| | LRK Home | | Bio Info | | Krash Khronicles | | LAROKE | |
| | BettyLou | | BillyBob's Garage | | Rat Patrol | | Deerslayer | | Elvira | |
| | Land of the Free and Home of the Brave | |
| | Keppylou's Art | | WWI Soldier's Diary | |
BillyBob Work-in-Progress Log
![]()
WHAT'S NEW is a chronological listing of updates to the BillyBob site.
![]()
TRUCK LINKS including vendor sites for old parts, custom parts, and tools as well as sites for classic car and truck organizations
STORE Operating in association with Amazon.com, books, recordings and tools can be purchased.
PLANNING for the restoration including project schedule and cost estimates.
![]()
TRAVELS WITH BILLYBOB With apologies to Steinbeck, this area of BillyBob's Garage will be used to log the trips BillyBob and I make together.
WORK-IN-PROGRESS is the restoration of parts of BillyBob that I can accomplish without a garage.
PRE-RESTORATION includes log entries of minor repairs and adventures between time of purchase and the time when I started restoration, a piece at a time.
JR'S KORNER JR's Korner is the history of BillyBob before I got him authored by my brother, Wm. C. Kephart.
![]()
BILLYBOB MAINTENANCE Ever changing detailing, oil change, lube, etc. maintenance routines specifically developed for BillyBob, including required tools, materials and procedures.
PARTS SHOP The Parts Shop is a repository of How-To articles. Things that I have done over and over enough times to have developed a procedure. This gives me a checklist and saves brain cells.
STEALTH SHOP Urban residence design with large integrated shop and separate living quarters for a relative or renter.
![]()
You will need the Adobe Acrobat browser plugin to view these wiring diagrams which are in the PDF file format. This format allows zooming and panning. If you don't have this plugin, it can be downloaded and installed (free) from the Adobe site. The button below will take you there.
![]()
BILLYBOB WIRING DIAGRAM Here's the wiring diagram updated with BillyBob's current state 'cepting the third-party strap-on turn-signal director.
STRAP-ON TURN-SIGNAL DIRECTOR/BRAKE LIGHT CIRCUIT This turn signal and brake light circuit diagram shows the current state of the third-party turn-signal director wiring, which will remain in place until I figure out the problems with the OEM turn-signal director. It also shows the OEM headlight switch.
58. Summer of My Discontent
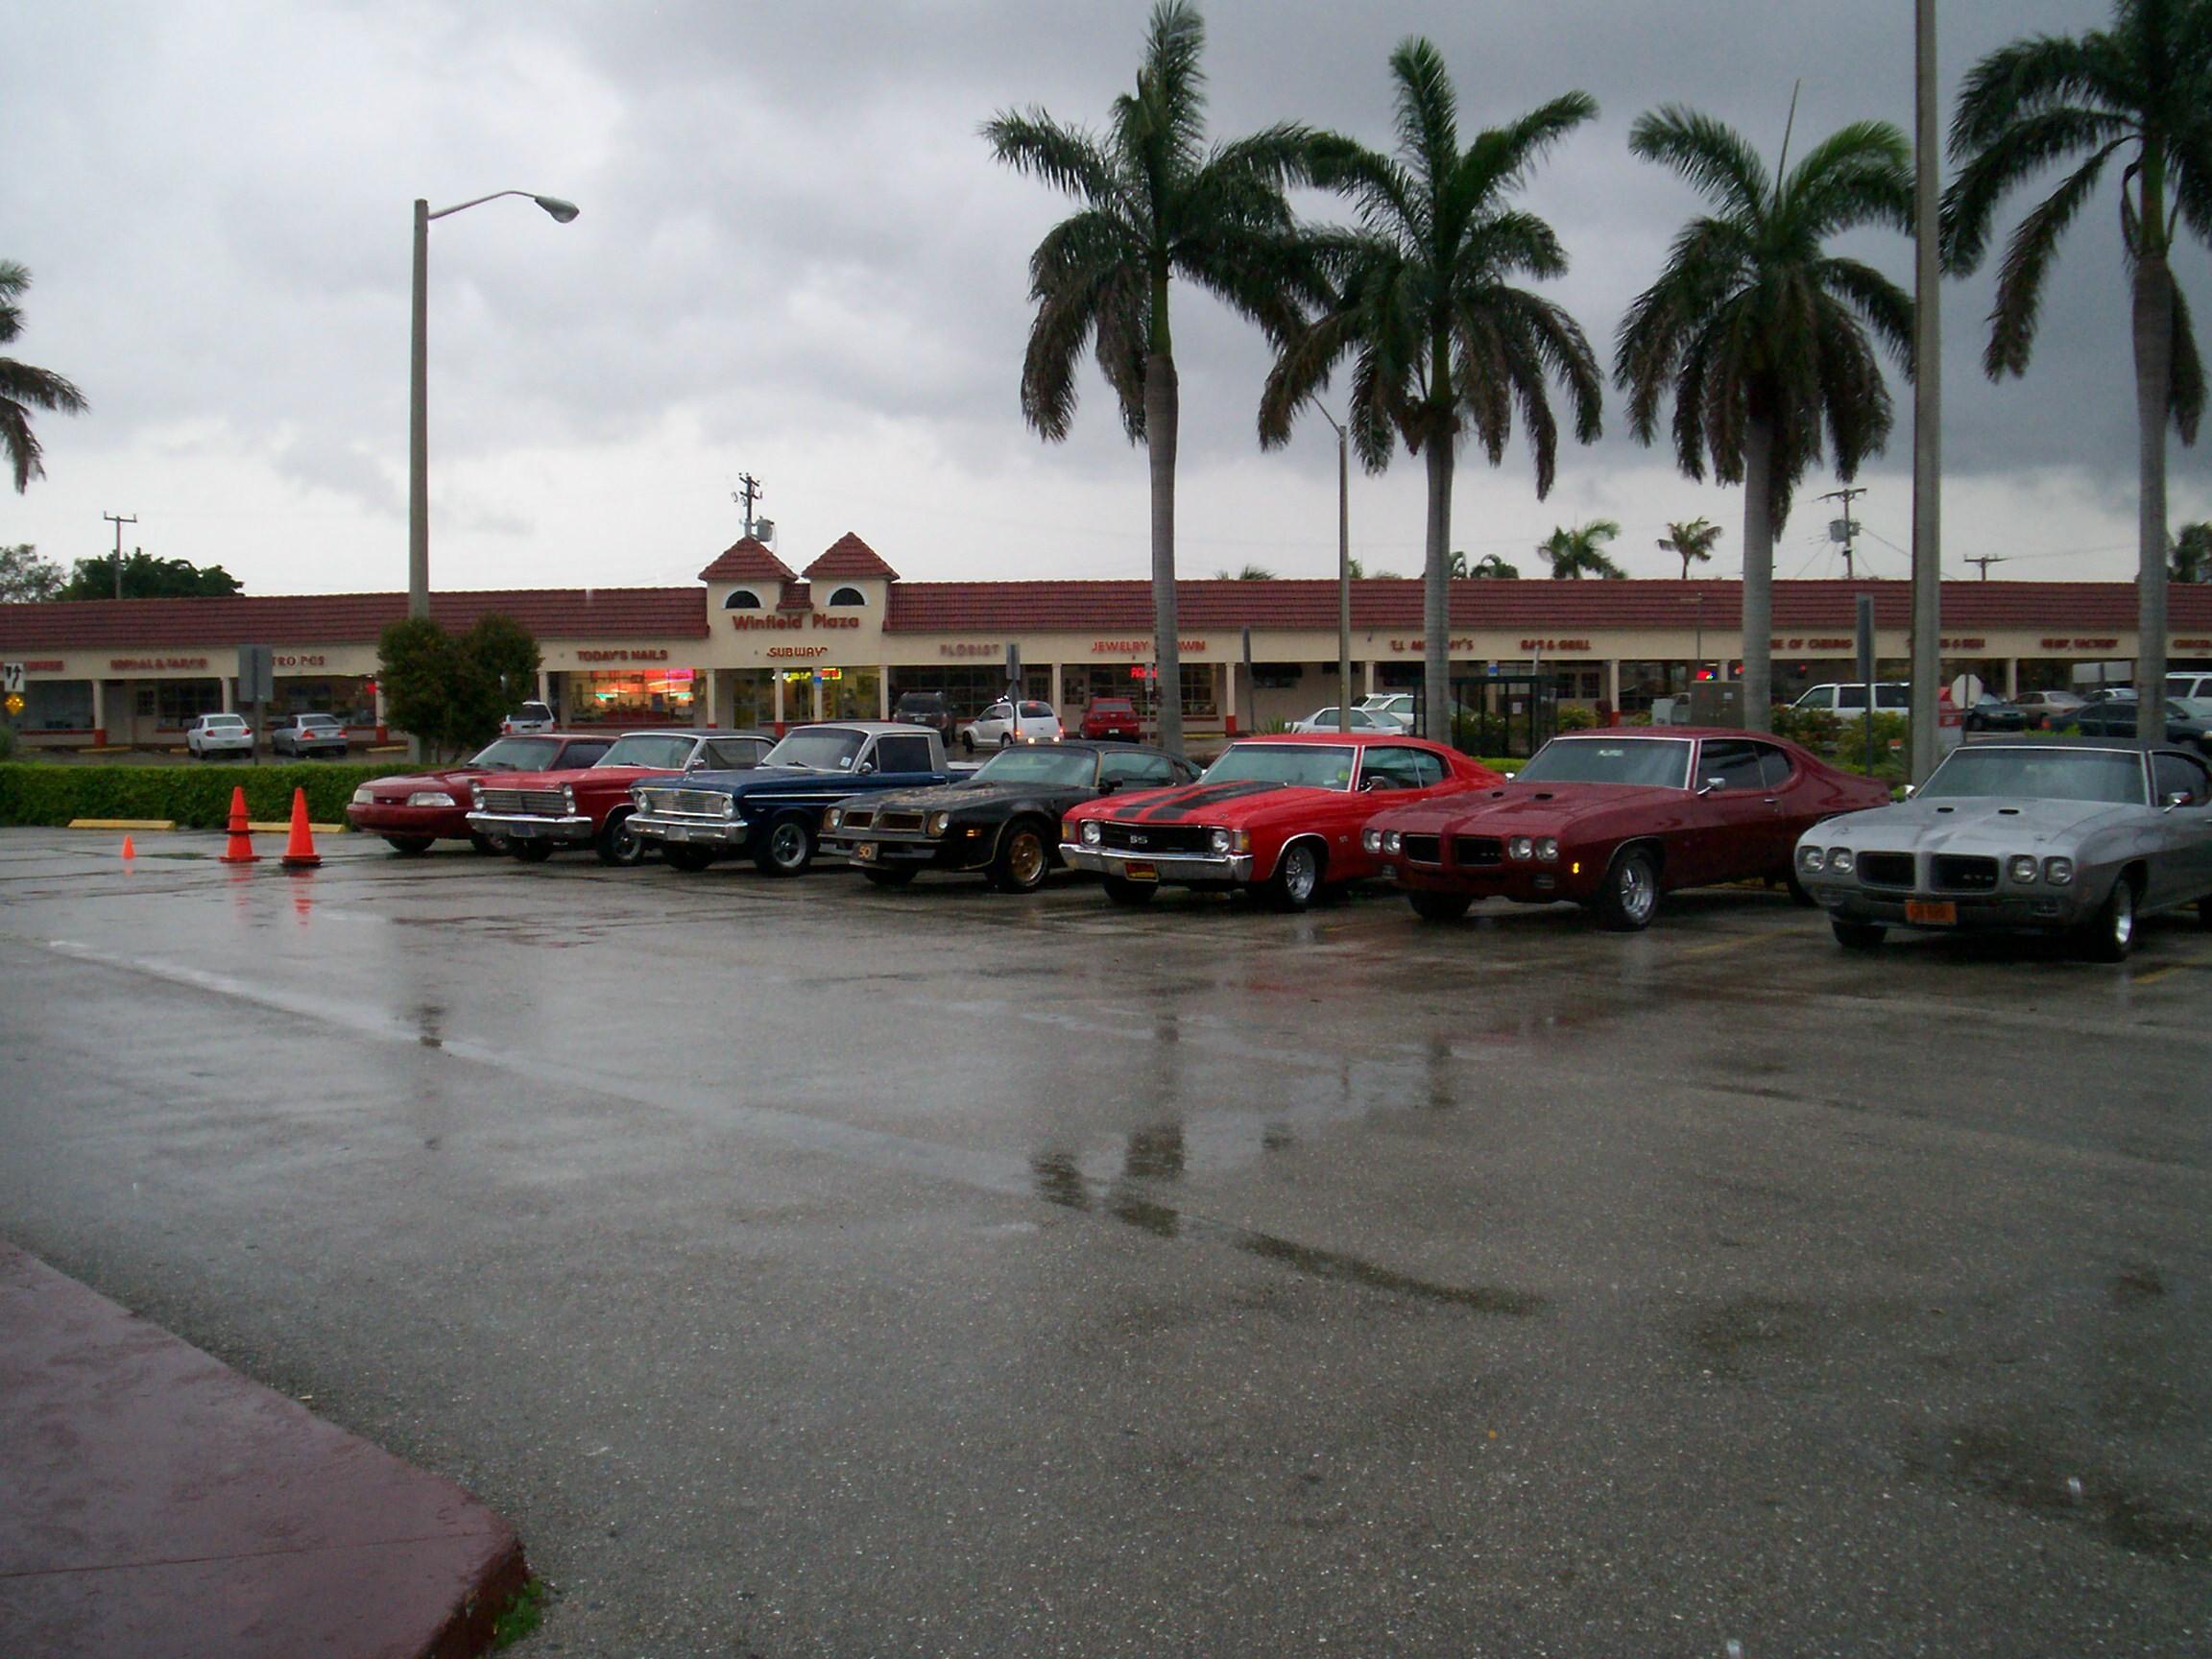
June 21st 2008 Didn't get much done this week due to rain and being plain lazy. more of the same today. There's a new cruise in tonite right here in Boca Raton. I spent the day spiffin' up BillyBob a bit, smokin' cigars and imbibing a few brews. Beer of the day is The Brooklyn Brewery's Pre-Prohibition Style Brooklyn Lager. I'll take their word for it since I wasn't around then.
 Left
the Krash lab for the cruise in at five in the afternoon. It was
raining lightly. This is put on by the same group that put on the north
Lauderdale sunday nite cruise in. We've been kicked out of there 'cause
we weren't buying enuf food to suit the restaurant hosting the thing.
The group is looking for a new venue. Despite the constant rain, it was
a good showing with about thirty cars. The boss brought out the '39
Caddy and his son Max brought his new Charger Hemi. He's had it eight
weeks and it needs tires already. I'm moved to recall my own mispent
youth.
Left
the Krash lab for the cruise in at five in the afternoon. It was
raining lightly. This is put on by the same group that put on the north
Lauderdale sunday nite cruise in. We've been kicked out of there 'cause
we weren't buying enuf food to suit the restaurant hosting the thing.
The group is looking for a new venue. Despite the constant rain, it was
a good showing with about thirty cars. The boss brought out the '39
Caddy and his son Max brought his new Charger Hemi. He's had it eight
weeks and it needs tires already. I'm moved to recall my own mispent
youth.
 July
7th 2008 I've been
goofin' off big time. Tryin' to get back in the saddle here with
weekend and week nite work on the three vehicles. It was time for monthly maintenance
again so that was performed on BillyBob and Renegade. BillyBob's oil
needed topping off. The rear main seal leak might be getting worse.
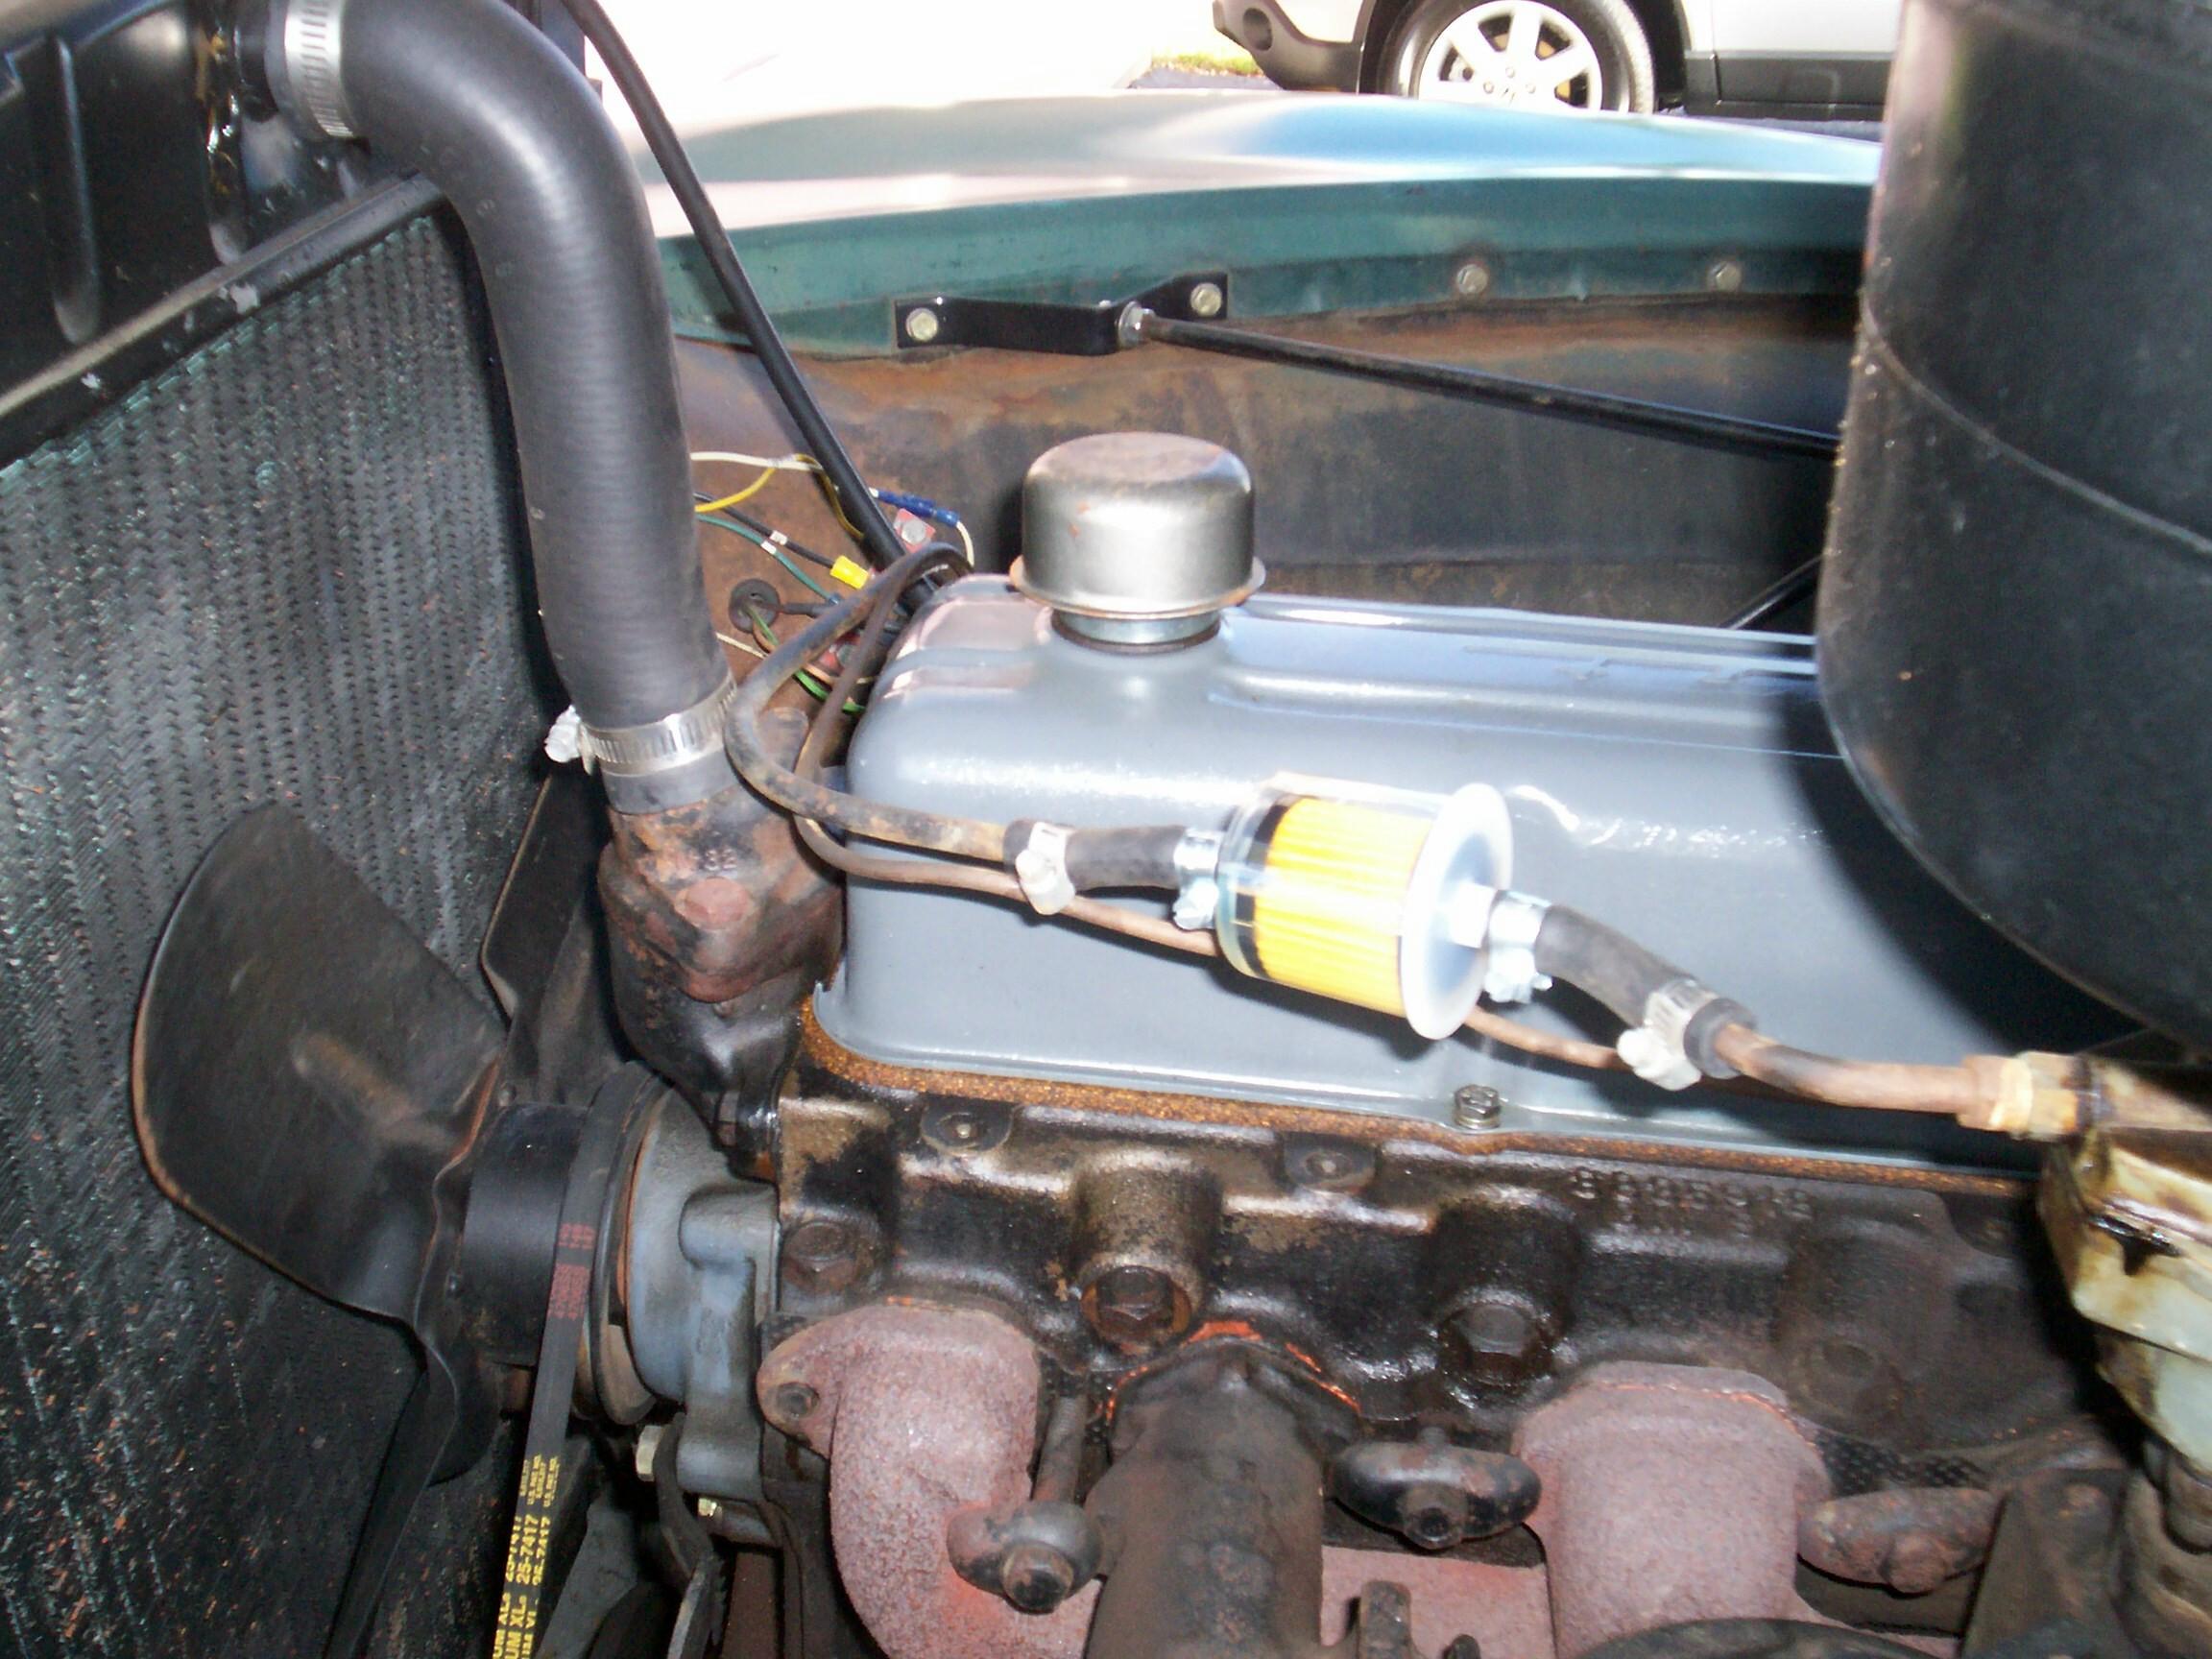
Afterwards, I replaced the aftermarket fuel filter on BillyBob. At a
cruise-in last saturday nite, a fella pointed out that the old one had
lots of hairline cracks in the now yellowed plastic and that it was
located above the exhaust manifold. I don't even know how old the
filter is. I've nebber changed it. My mechanic, Gary Morris, might have
changed it back in march of '96 but I don't know fer shure. I pulled
the one I had in the travel supplies out along with some fuel line hose
and replaced it. Ran the engine for a few minutes to check for leaks.
Didn't see or feel any.
July
7th 2008 I've been
goofin' off big time. Tryin' to get back in the saddle here with
weekend and week nite work on the three vehicles. It was time for monthly maintenance
again so that was performed on BillyBob and Renegade. BillyBob's oil
needed topping off. The rear main seal leak might be getting worse.
Afterwards, I replaced the aftermarket fuel filter on BillyBob. At a
cruise-in last saturday nite, a fella pointed out that the old one had
lots of hairline cracks in the now yellowed plastic and that it was
located above the exhaust manifold. I don't even know how old the
filter is. I've nebber changed it. My mechanic, Gary Morris, might have
changed it back in march of '96 but I don't know fer shure. I pulled
the one I had in the travel supplies out along with some fuel line hose
and replaced it. Ran the engine for a few minutes to check for leaks.
Didn't see or feel any.
August 16th 2008 Just puttering around today. Found out thursday nite, the hard way, that I have a kidney problem. I'm hoping for mild infection but it's probably a stone. It was a real character builder of a night. Almost fired up BillyBob for an emergency room run with a border patrol ball cap so I could get to the head of the line. 'bout three AM I blew chunks for the first time since the eighties when I wuz foolishly trading shots with some submarine sailors on Fort Lauderdale beach.
I love this country in particular and western civilization in general. In the morning I was able to set up an afternoon appointment with my doctor despite the fact I hadn't been to see him in twelve years. He did punish me for that tho'. During the exam, he asked me the last time I had a prostate check. I replied the the next time will be the first time. He snapped on the white glove and said to assume the position. Damnation!
Got a script for antibiotics to take care of the infection if that is what it is and a heavy duty painkiller for the upcoming episodes that leave me feeling as if I had just lost a bar fight. I was feeling some relief a half hour after I left the pharmacy. Had to take one of those a couple of hours ago. The downside of that is no beer and no powertools today. I'm feeling a little loopy. A few centuries ago, a monarch could trade half his kingdom and not get relief like this.
September 20th 2008 Finally back to work on BillyBob. Went up to New York at the beginning of the month and brought back DeerSlayer. He is now my daily driver. I'm addressing the rear main bearing seal leak on BillyBob today. Started off by getting the tools out of the shed and almost immediately knocked over a wide mouth gallon container of old oil water mixture ~!@#$%. Damnation! All the shed floor and bottom of the MIG welder stand is covered with gook. I do not know how this could have happened. I don't remember a lot, but I do remember putting the top on tight. Don't think it was a co-worker. They are great with Photoshop but an old school prank like this wouldn't cross their minds. Maybe there's a ghost of an old mechanic in the shed that I can blame my future mishaps on. Started draining the oil out of BillyBob and broke out the beer of the day which is Woodstock Inn Brewery's Red Rack Ale.
 September
27th 2008 Overcast
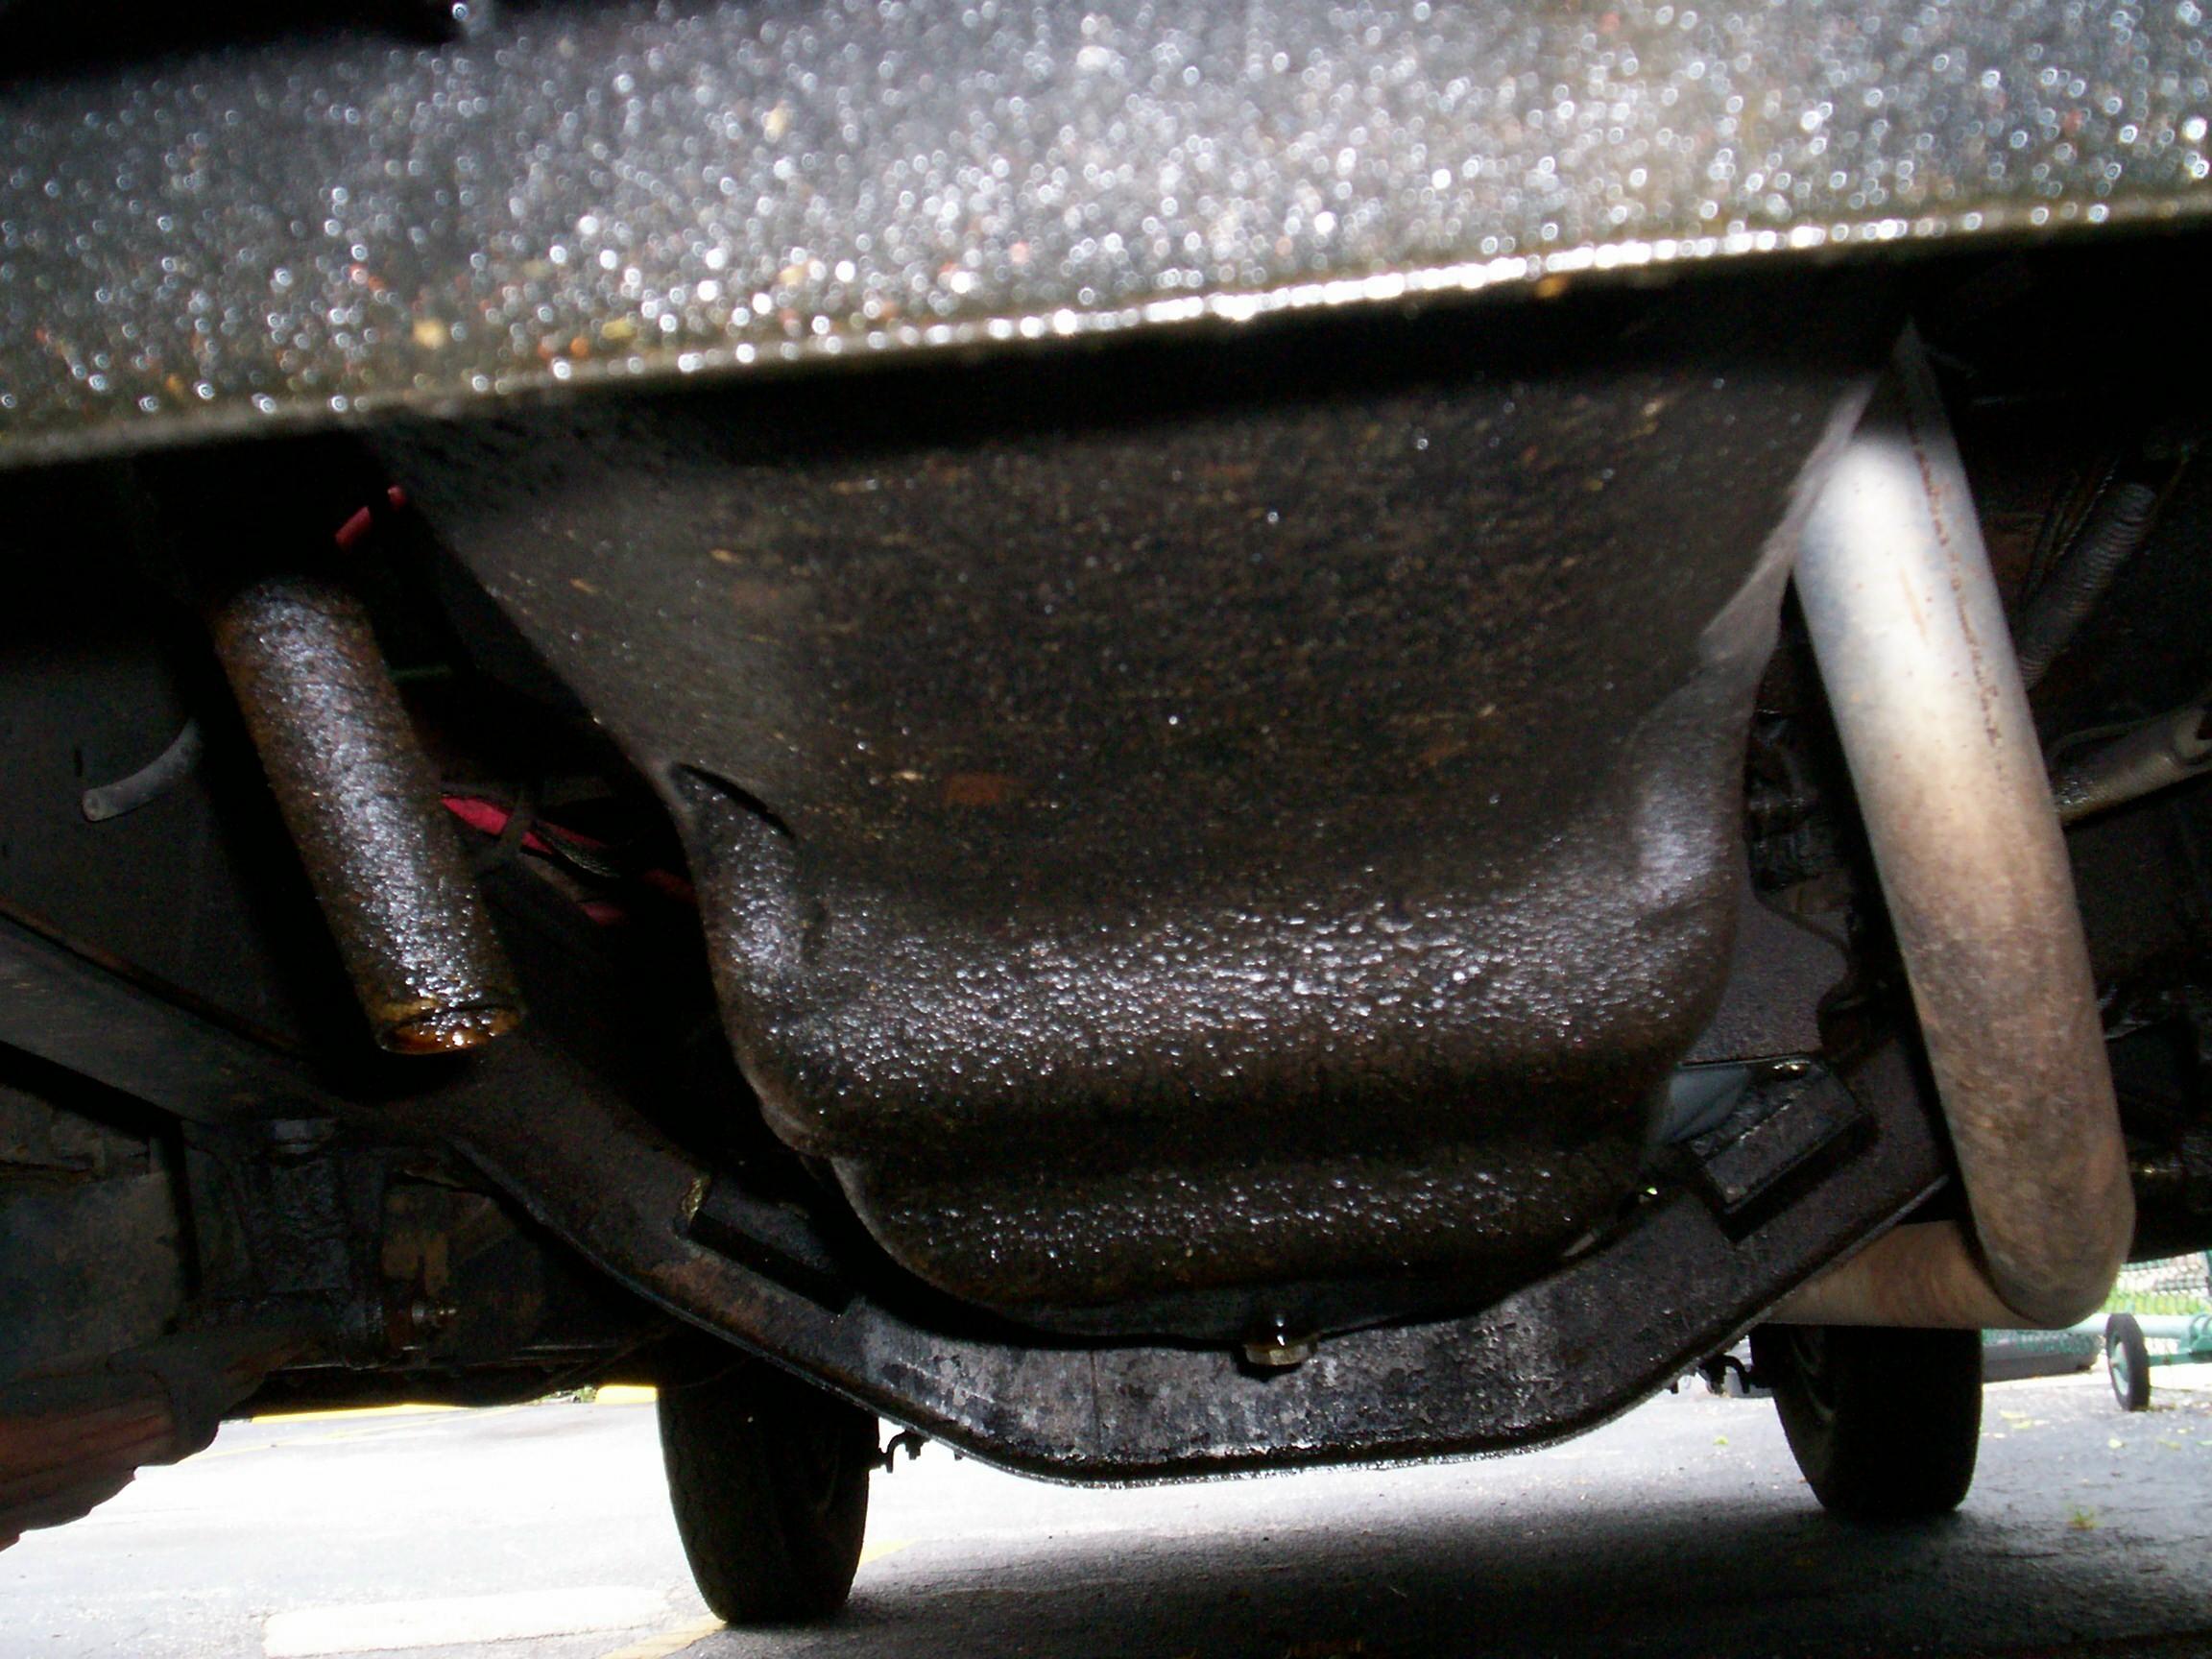
today, chance of rain sixty percent. I removed the oil pan capscrews
and spent the rest of the day trying to get the oil pan off. Damnation!
Someone glued this thing on with some kinda gorilla snot. Used pry
bars, gasket scrapers, putty knives and a rubber mallet without luck.
The flange was bending but the pan was not giving any sign of moving.
The only thing I accomplished was to get gunk all over myself. This is
gonna require more thought. Beer of the day is Woodstock Inn Brewery's
Pig's Ear Brown Ale.
September
27th 2008 Overcast
today, chance of rain sixty percent. I removed the oil pan capscrews
and spent the rest of the day trying to get the oil pan off. Damnation!
Someone glued this thing on with some kinda gorilla snot. Used pry
bars, gasket scrapers, putty knives and a rubber mallet without luck.
The flange was bending but the pan was not giving any sign of moving.
The only thing I accomplished was to get gunk all over myself. This is
gonna require more thought. Beer of the day is Woodstock Inn Brewery's
Pig's Ear Brown Ale.
October 11th 2008 Just damn! Last week I didn't get much past the beer of the day, Choc Beer Company's Miner Mishap Black Lager, and mishap it was. I ended up down at Crabby Jack's and that was a big misteak. This clearly calls for a course correction in my methods. A new rule for the BillyBob garage is that the beer is not consumed until the work is done for the day. I know this is a good rule I should have been following anyway but I have to thoroughly test things sometimes.
 I
have never taken a pan off before. Tony Pascarella told me that my
experience was nothing out of the ordinary and offered some putty knife
technique tips. An additional half hour of gruntin' and cussin' under
the truck this morning got the pan off. Good news is that I don't see
any evidence of metal particles.
I
have never taken a pan off before. Tony Pascarella told me that my
experience was nothing out of the ordinary and offered some putty knife
technique tips. An additional half hour of gruntin' and cussin' under
the truck this morning got the pan off. Good news is that I don't see
any evidence of metal particles.
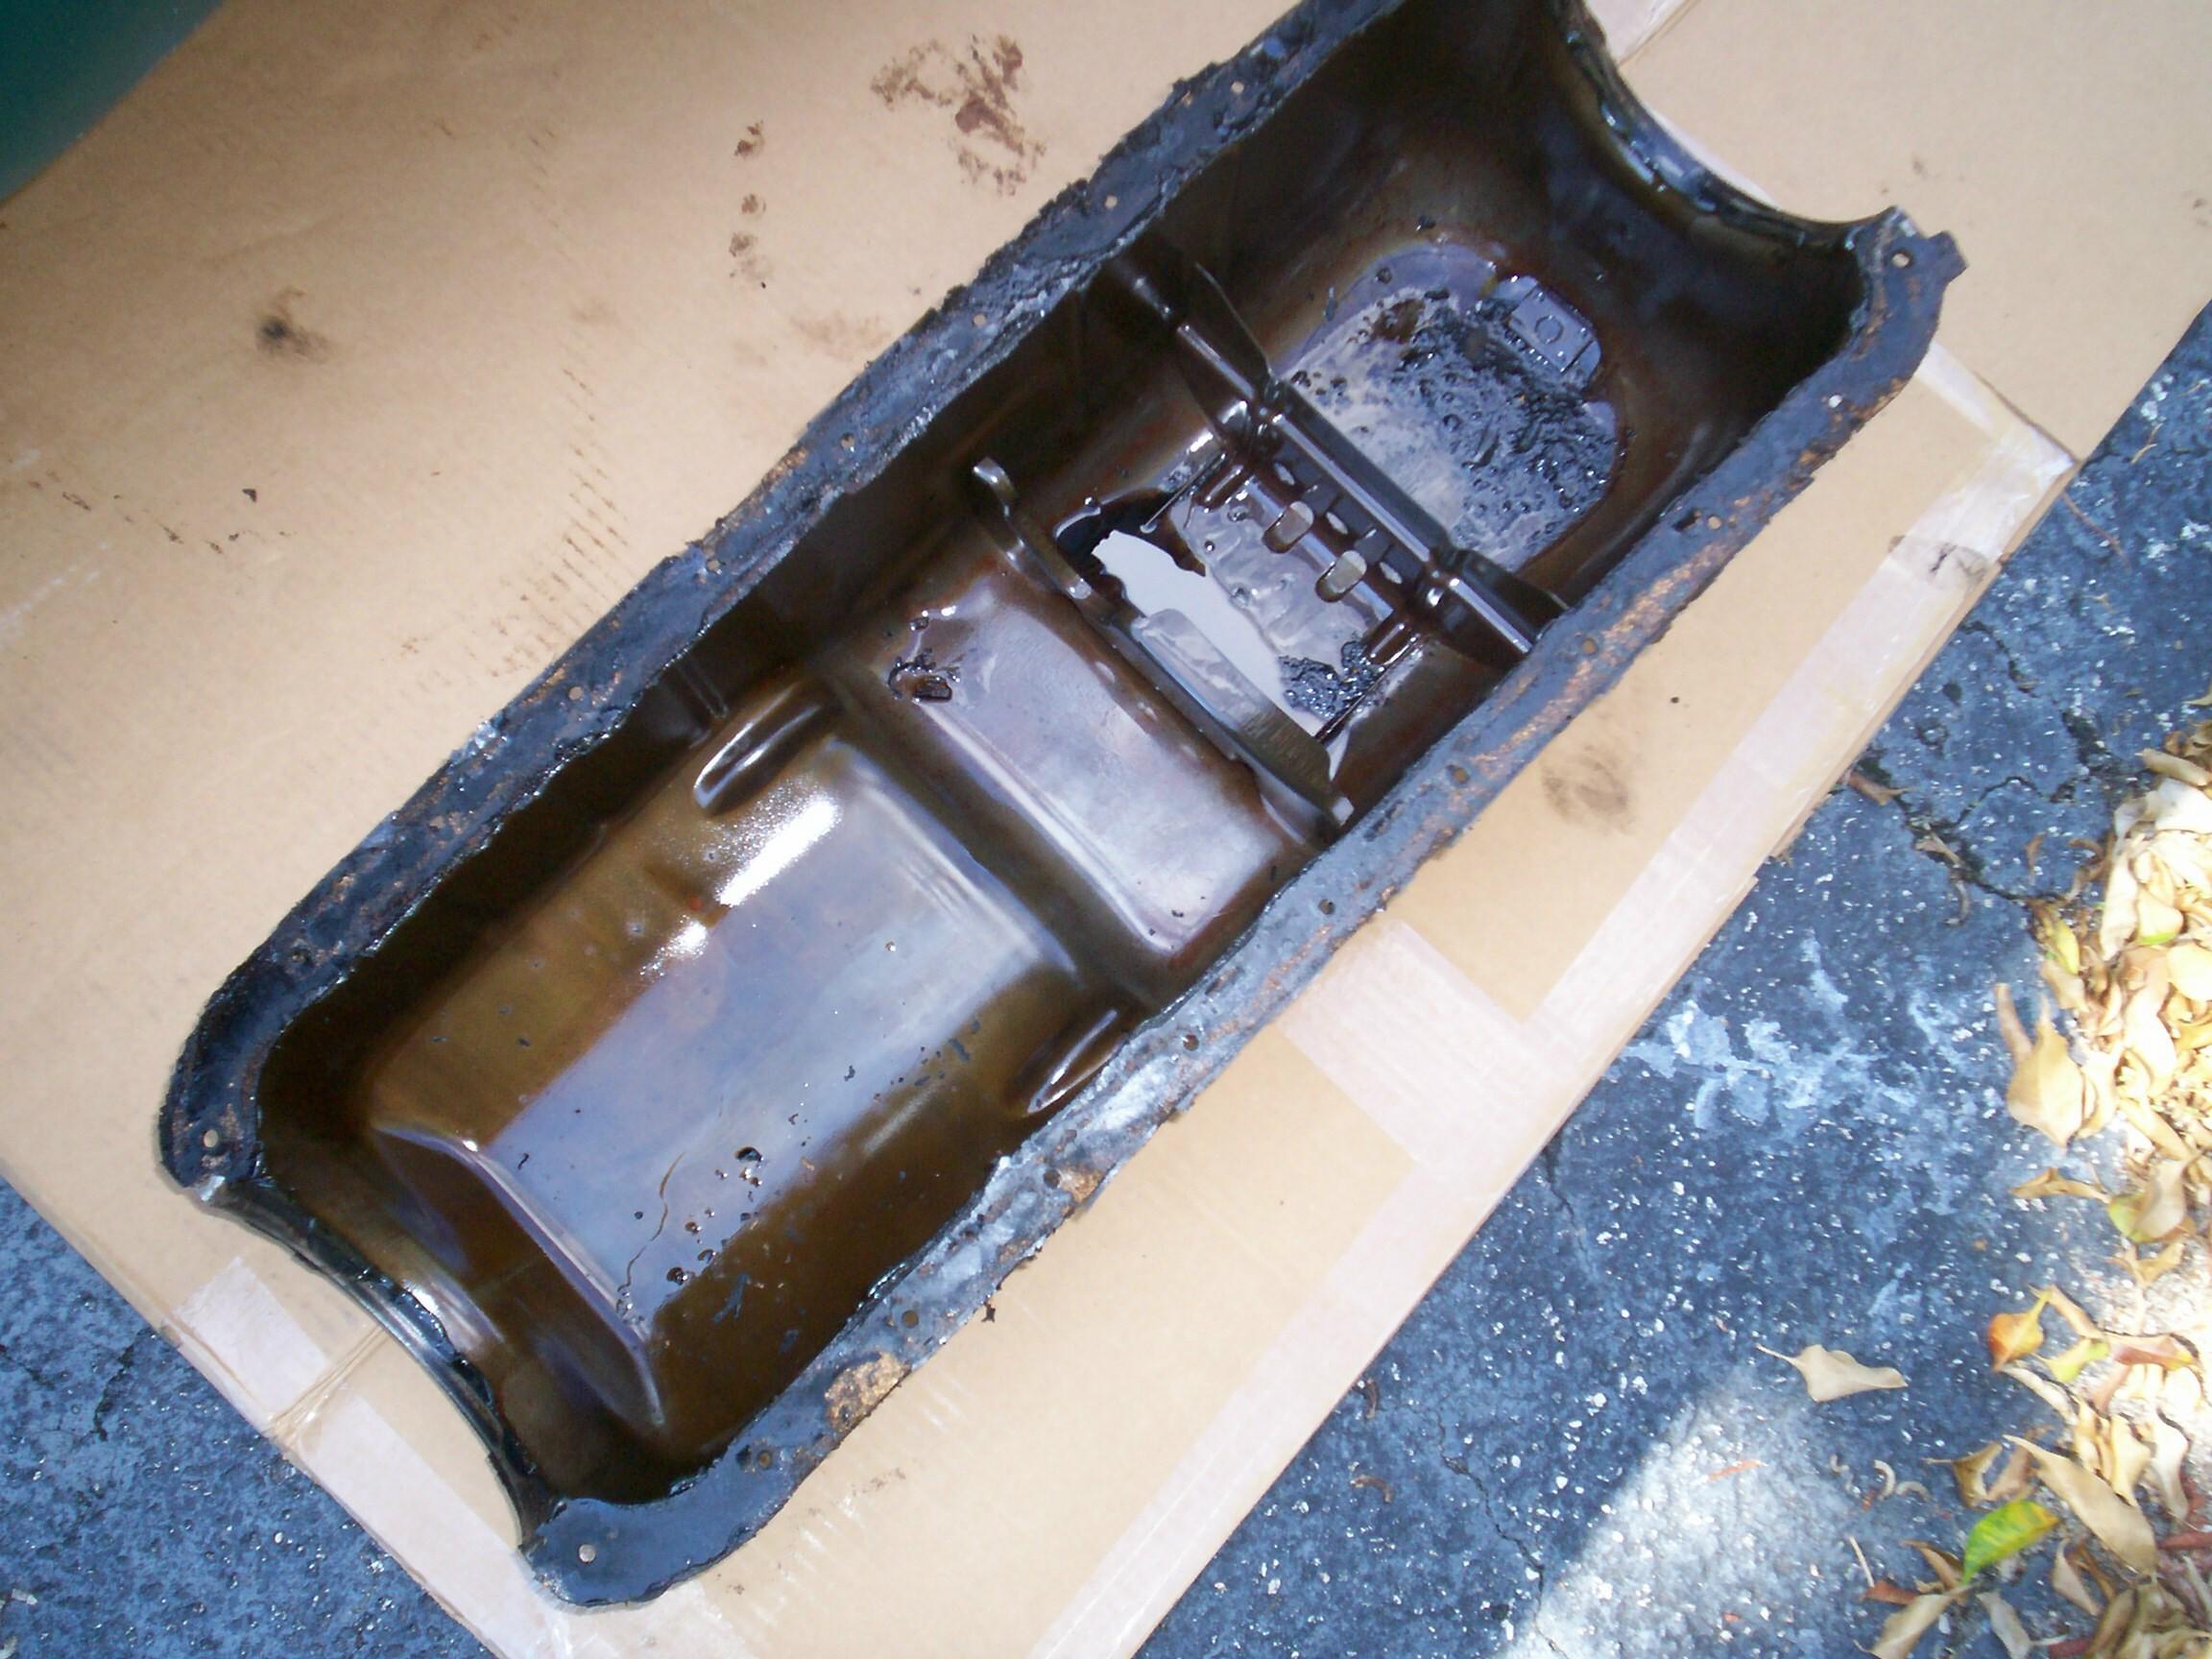
Spent the rest of the day cleaning the gasket mating surface on the pan, first with a gasket scraper, then with a wire cup in the angle grinder. Knocked it off at four thirty to go to the Krash Lab and clean up for a monthly Boca Raton cruise-in that I haven't been to before. Turned out to be a bust. Only three non-show vehicles and no warm bodies at the site when I got there. Some days are like that.
 October
18th 2008 Last sunday,
I continued cleaning the pan with a wire cup in the electric angle
grinder. It rained on the shadetree garage three times. A real pain in
the butt. On monday, I picked up some tin foil at the supermarket and,
monday night, I packed it around the crankcase and crankshaft in case
somebody comes by with a leaf blower before I get the pan back on.
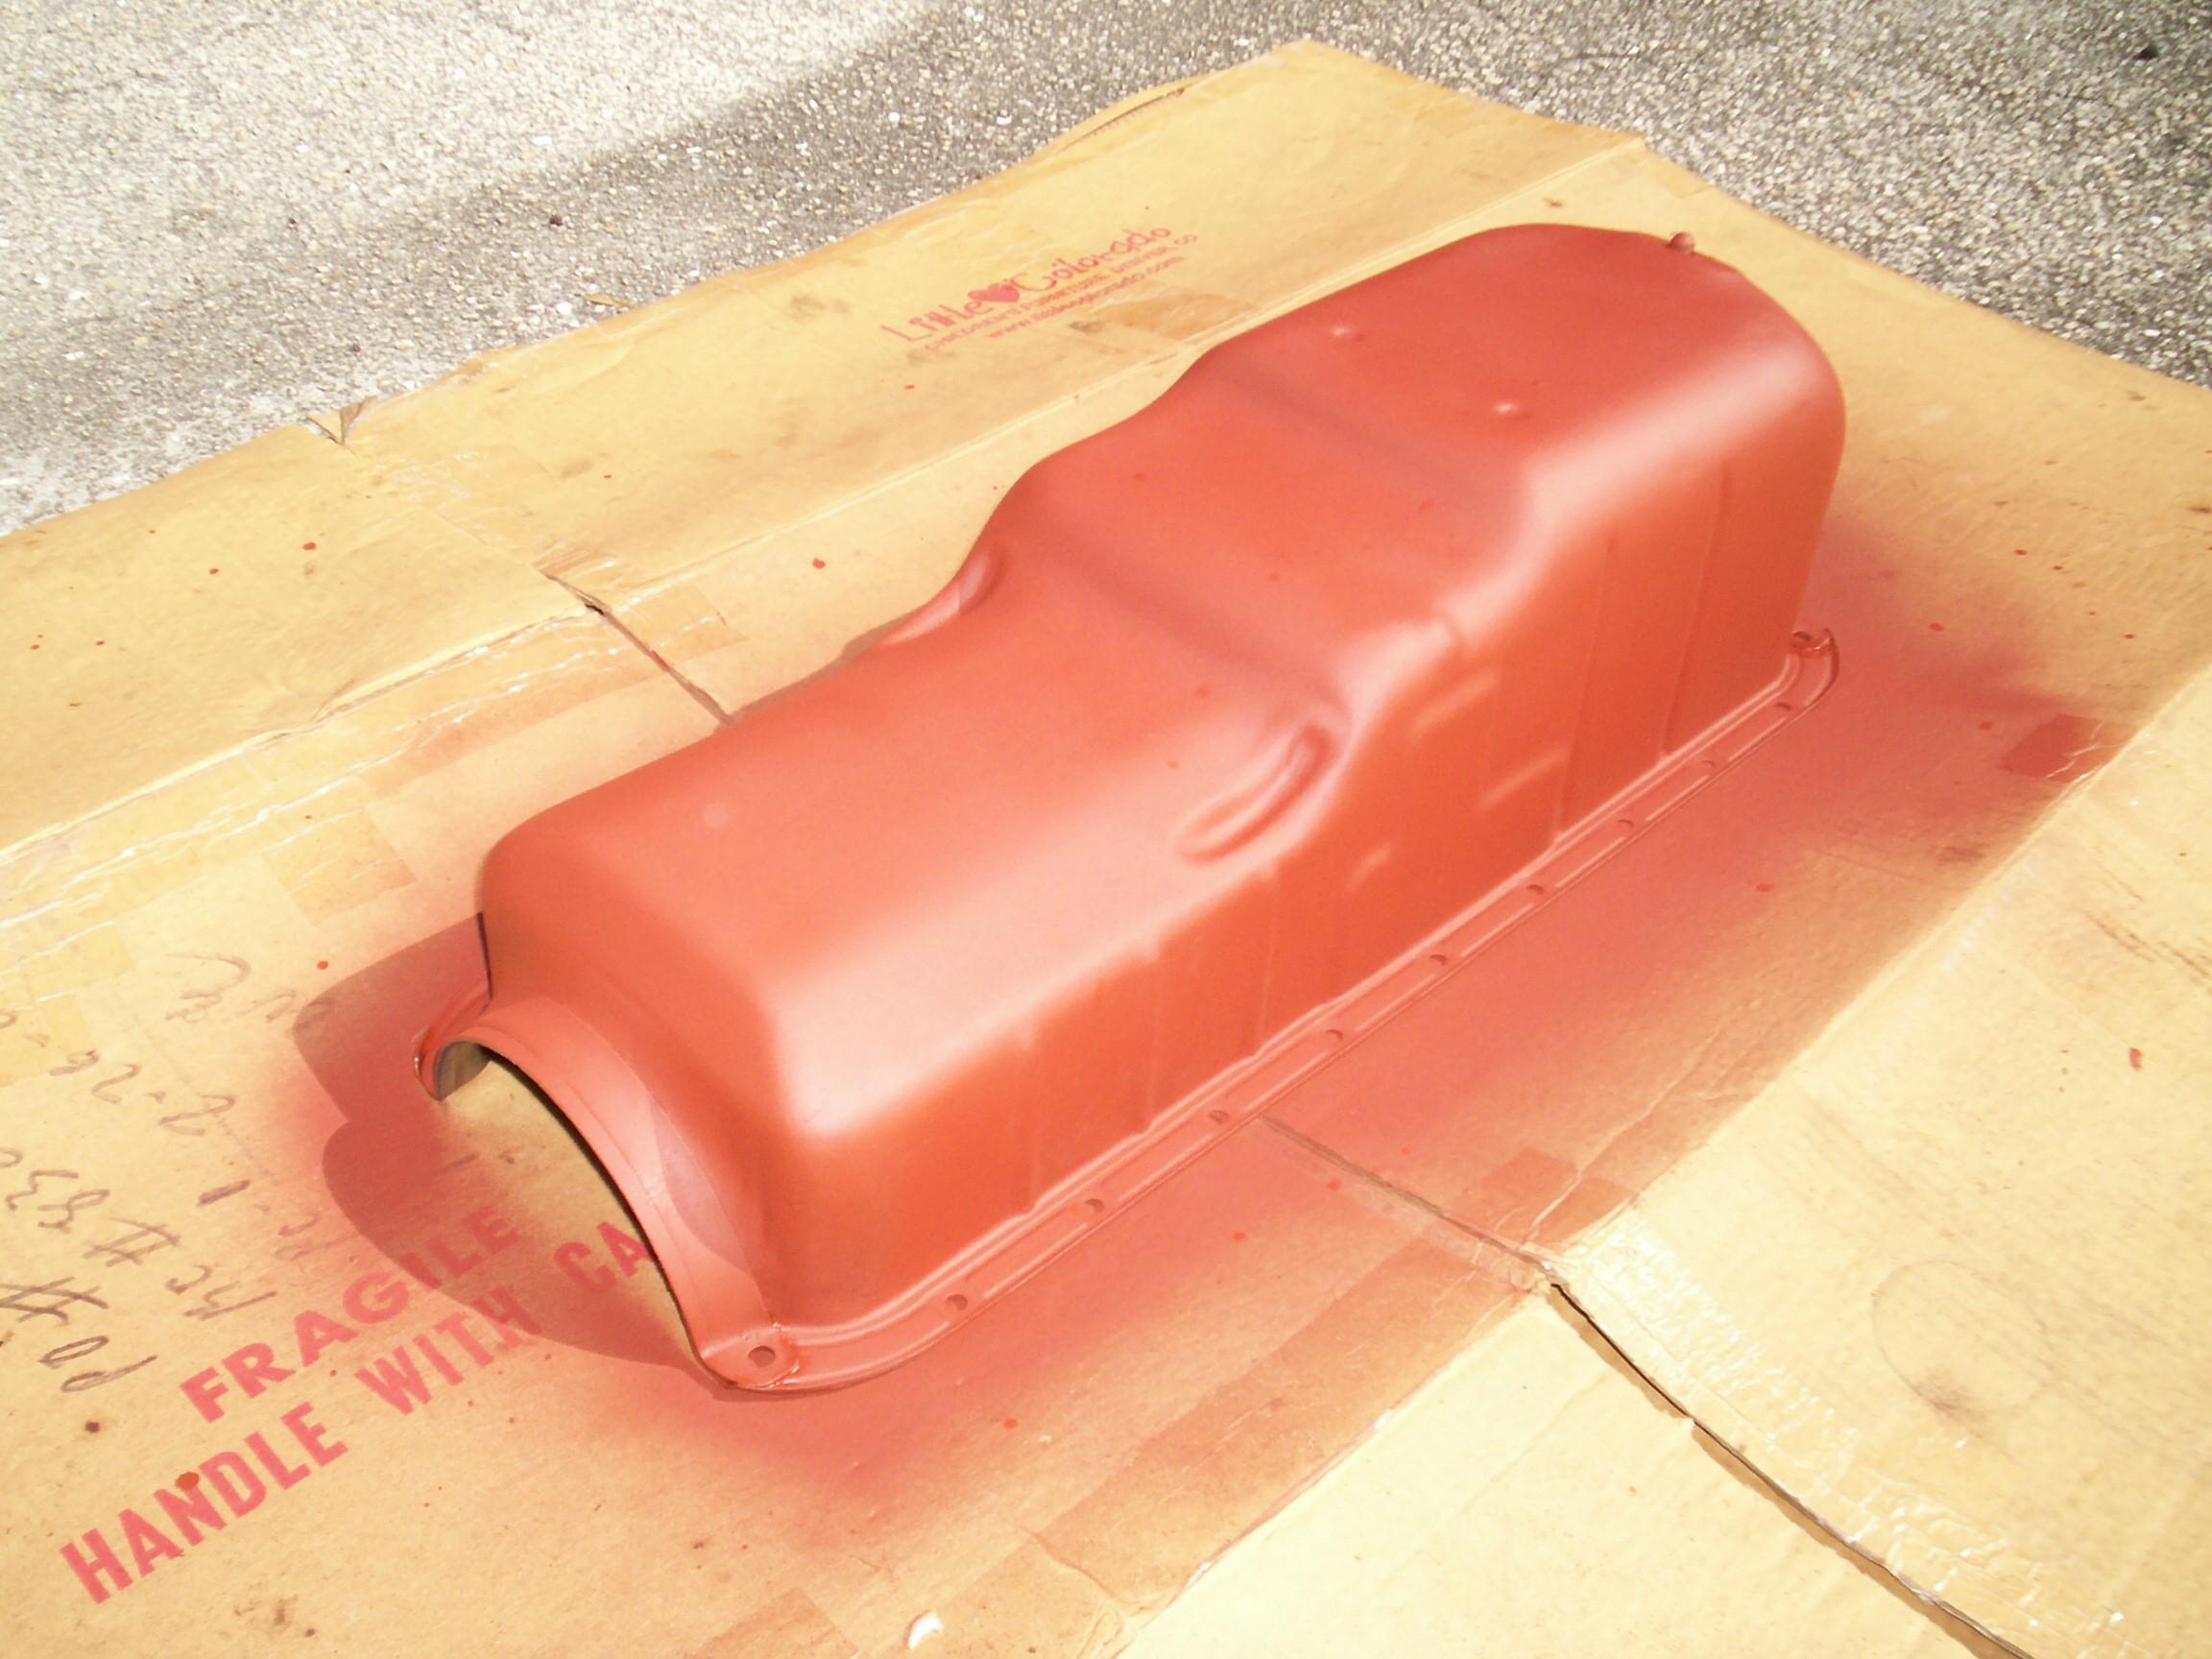
Today is a great day weatherwise and I started by straightening out the
pan flange with pliers. Then, a ball peen hammer was used to flatten
out the dimpled pan bolt holes. The pan was PRE paint prepped and given
a coat of Eastwood's Rust Encapsulator.
October
18th 2008 Last sunday,
I continued cleaning the pan with a wire cup in the electric angle
grinder. It rained on the shadetree garage three times. A real pain in
the butt. On monday, I picked up some tin foil at the supermarket and,
monday night, I packed it around the crankcase and crankshaft in case
somebody comes by with a leaf blower before I get the pan back on.
Today is a great day weatherwise and I started by straightening out the
pan flange with pliers. Then, a ball peen hammer was used to flatten
out the dimpled pan bolt holes. The pan was PRE paint prepped and given
a coat of Eastwood's Rust Encapsulator.
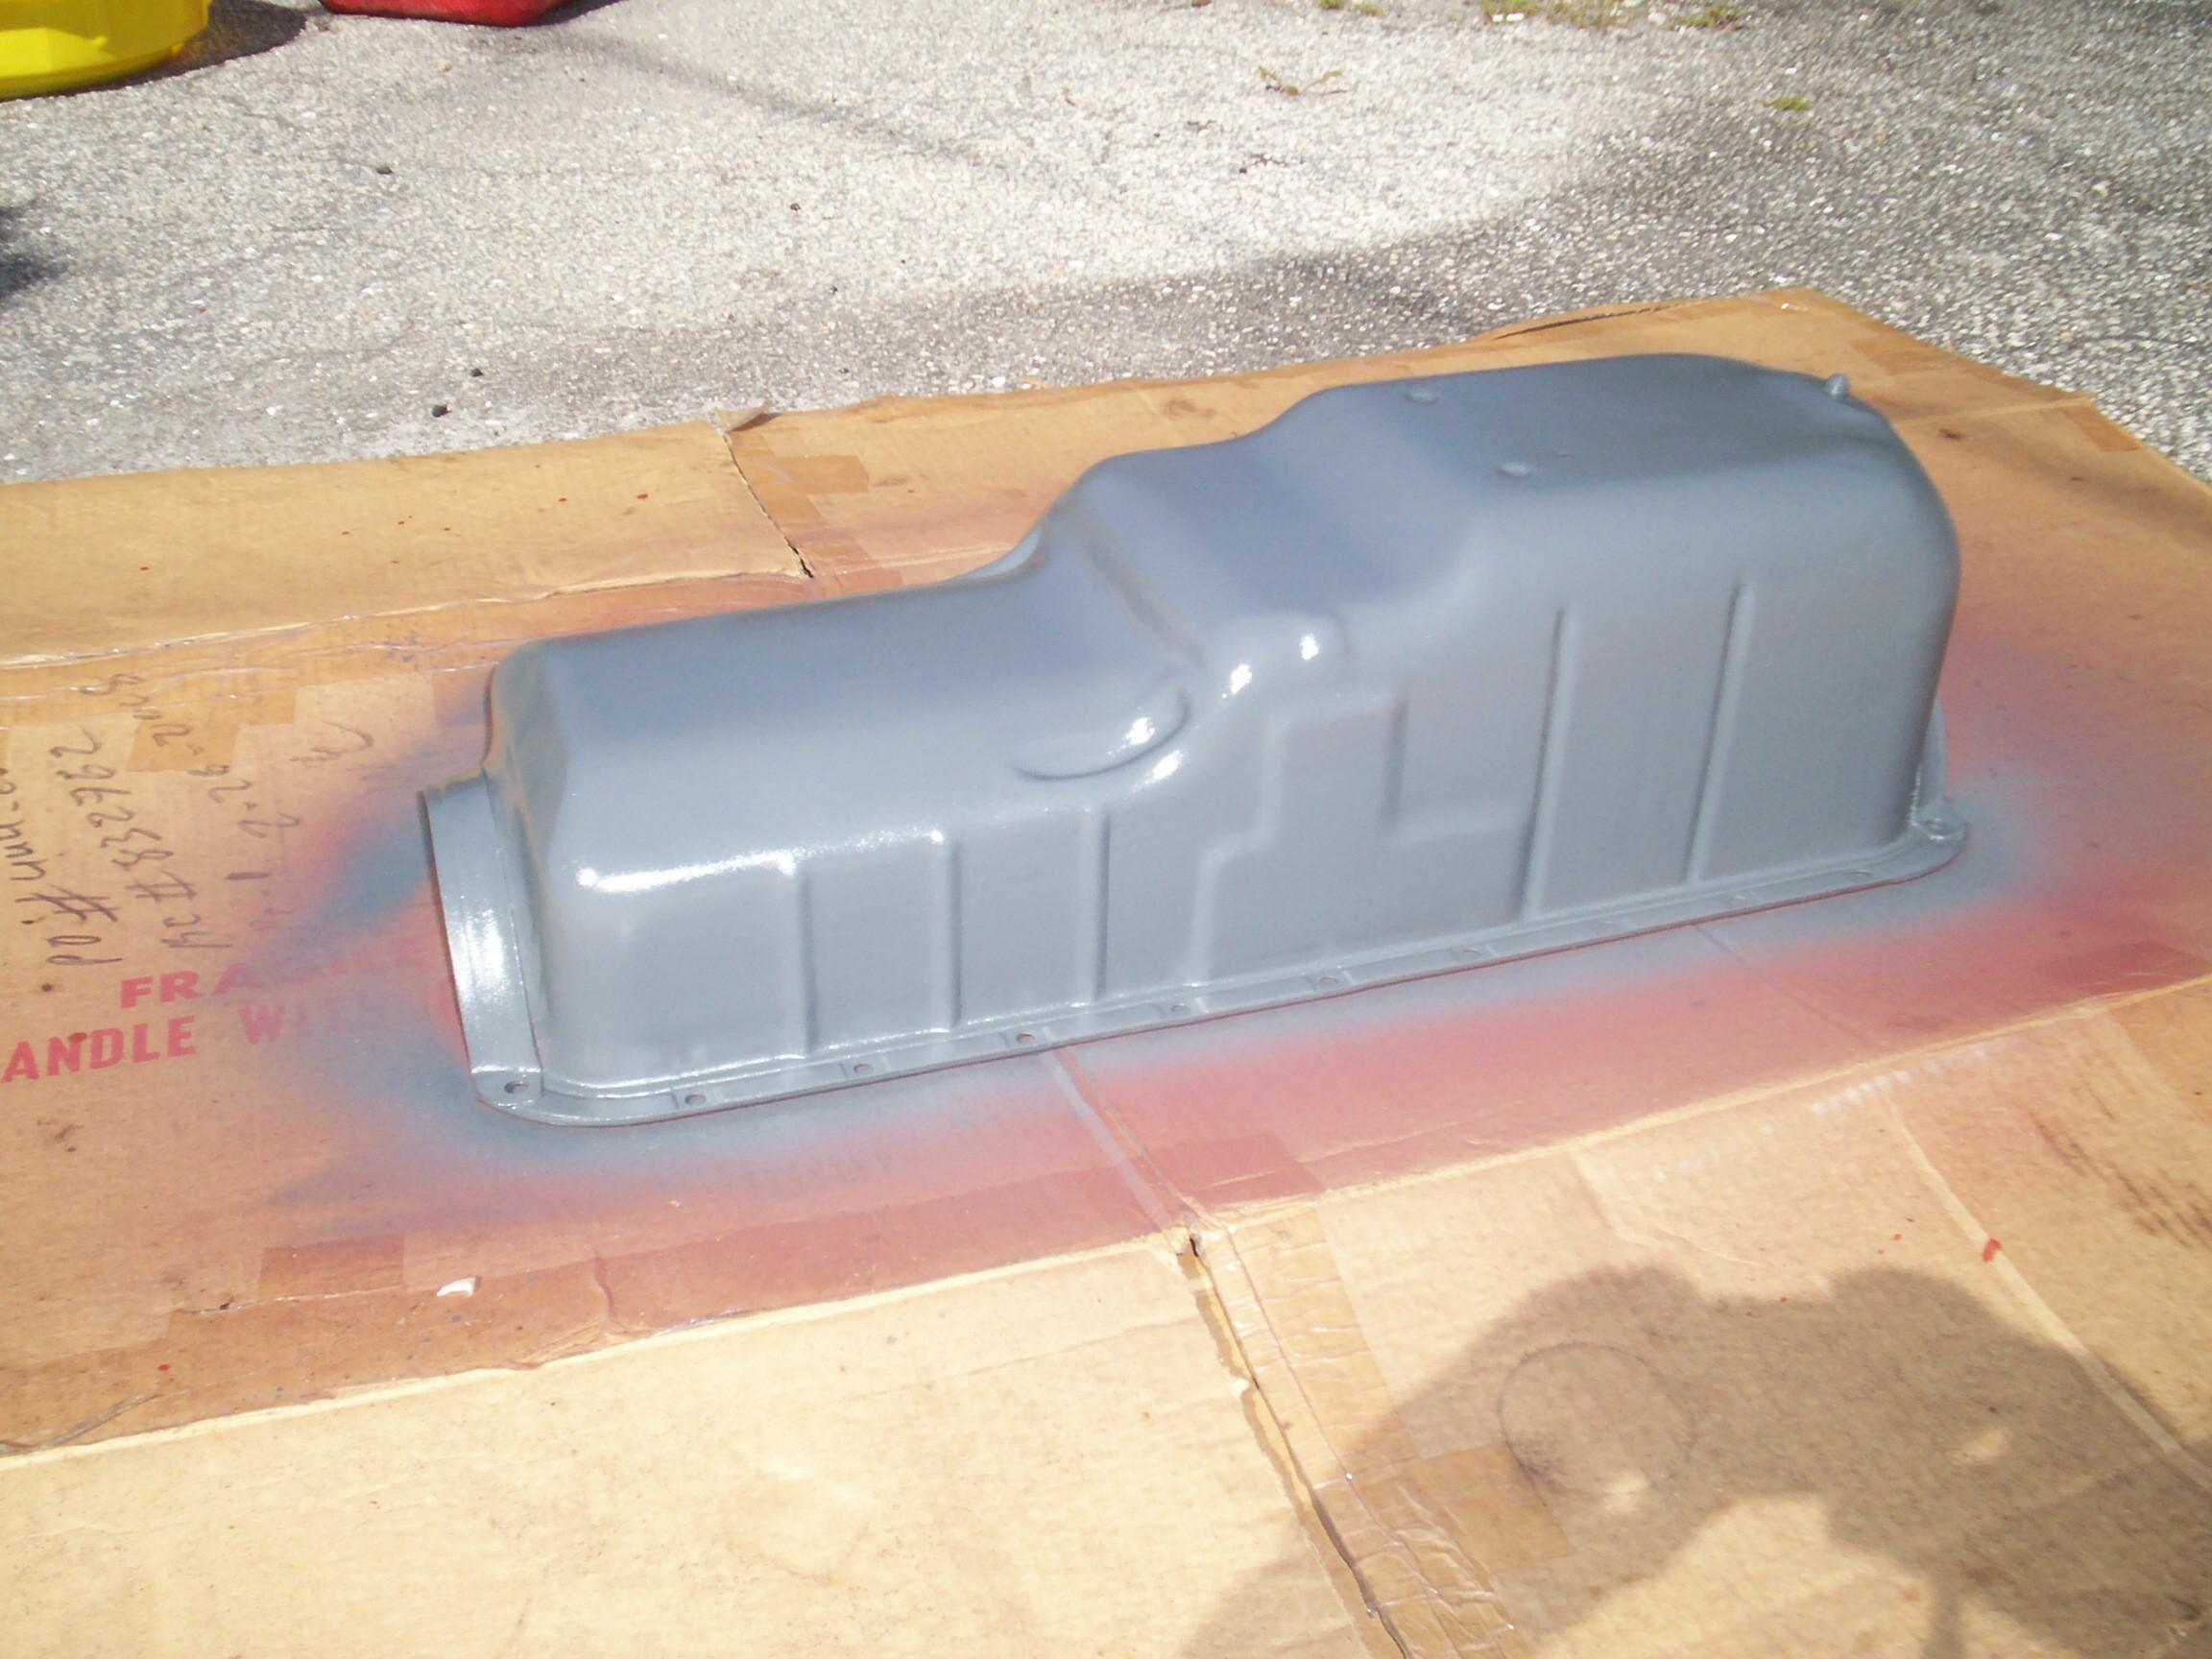 Waited
three hours and gave the pan a couple of coats of Bill Hirsch Chevrolet
Engine Gray which finished off my rattlecan. Finished out the day
detailing Deerslayer's engine compartment a bit for a cruise-in tonite.
Not a lot. I'm not much of a spit 'n polish guy. Had a cigar and
pondered a windshield crank problem I'm having with Deerslayer. The
beer of the day is Atlanta Brewing Company's Red Brick Peachtree Pale
Ale.
Waited
three hours and gave the pan a couple of coats of Bill Hirsch Chevrolet
Engine Gray which finished off my rattlecan. Finished out the day
detailing Deerslayer's engine compartment a bit for a cruise-in tonite.
Not a lot. I'm not much of a spit 'n polish guy. Had a cigar and
pondered a windshield crank problem I'm having with Deerslayer. The
beer of the day is Atlanta Brewing Company's Red Brick Peachtree Pale
Ale.
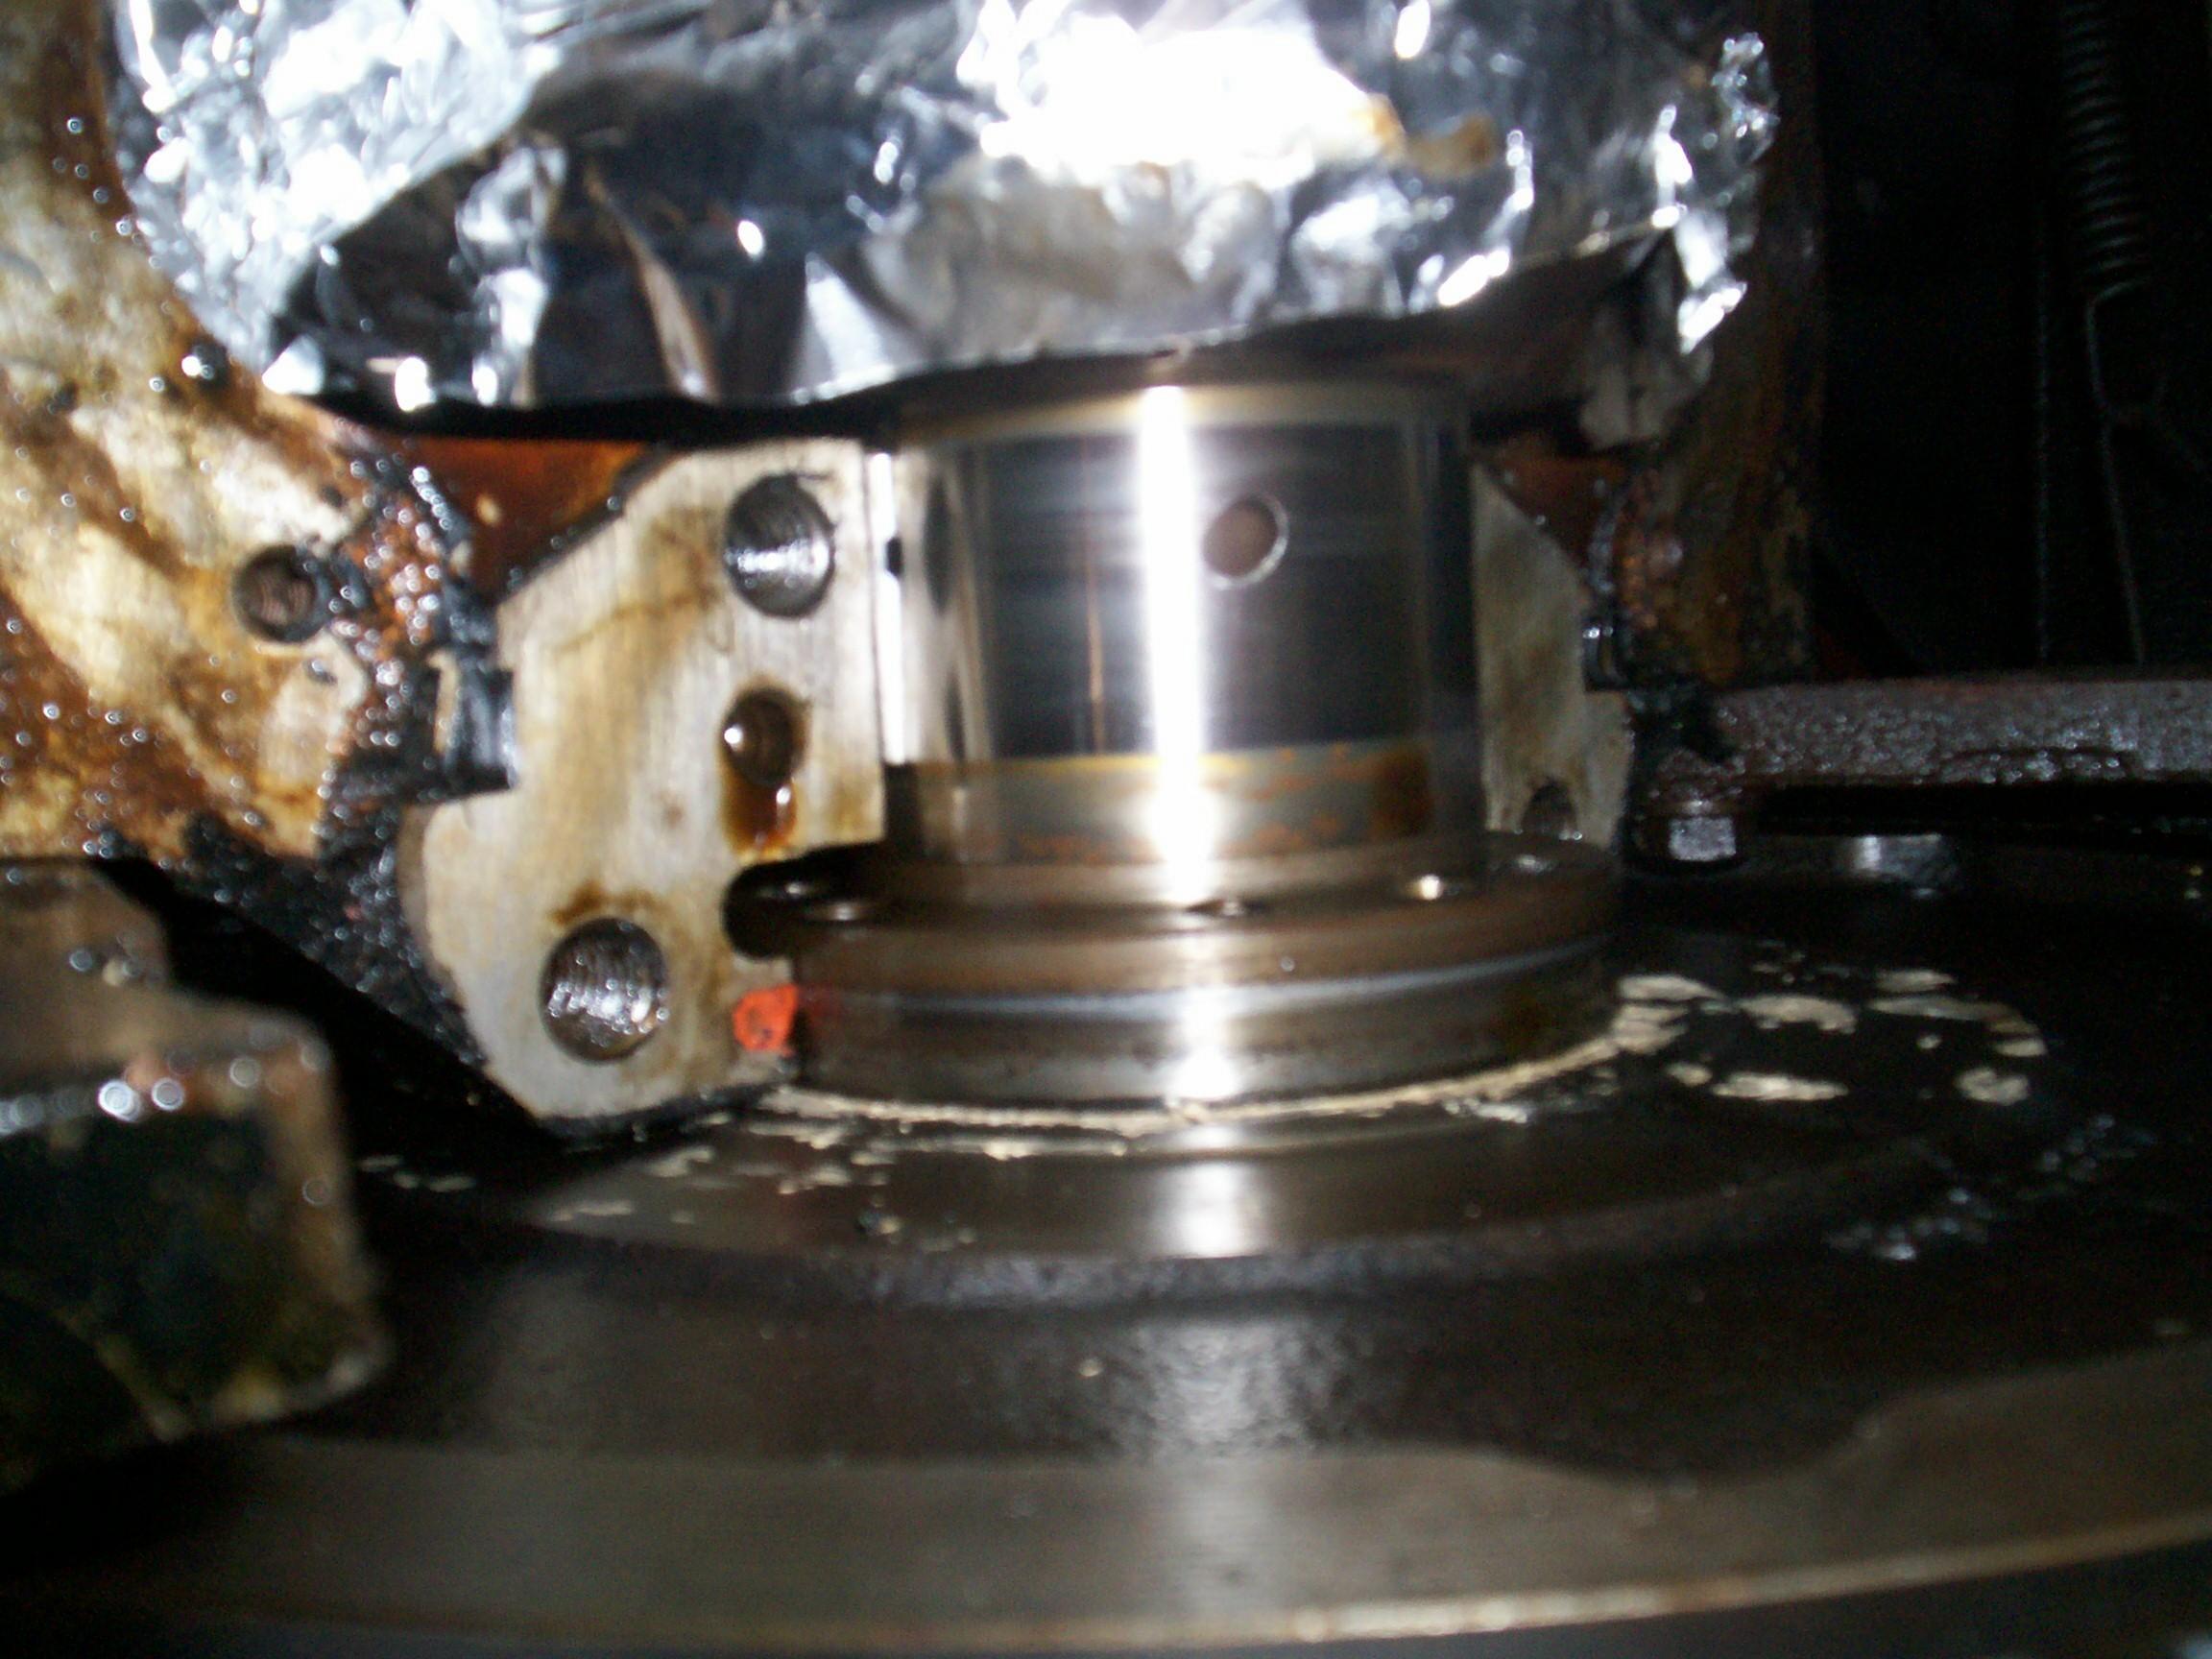 October
25th 2008 It's supposed
to be a soaker today but no sign of rain yet. Got out a breaker bar to
loosen up the rear main bearing bolts because I didn't want to wheel
out the air compressor and impact wrench if I don't have to. That
worked and I had the cap off in short order. Took note of which bolts
came out of which holes and tagged them. The crankshaft journal looks
good as far as I can tell for forty thousand miles of wear.
October
25th 2008 It's supposed
to be a soaker today but no sign of rain yet. Got out a breaker bar to
loosen up the rear main bearing bolts because I didn't want to wheel
out the air compressor and impact wrench if I don't have to. That
worked and I had the cap off in short order. Took note of which bolts
came out of which holes and tagged them. The crankshaft journal looks
good as far as I can tell for forty thousand miles of wear.
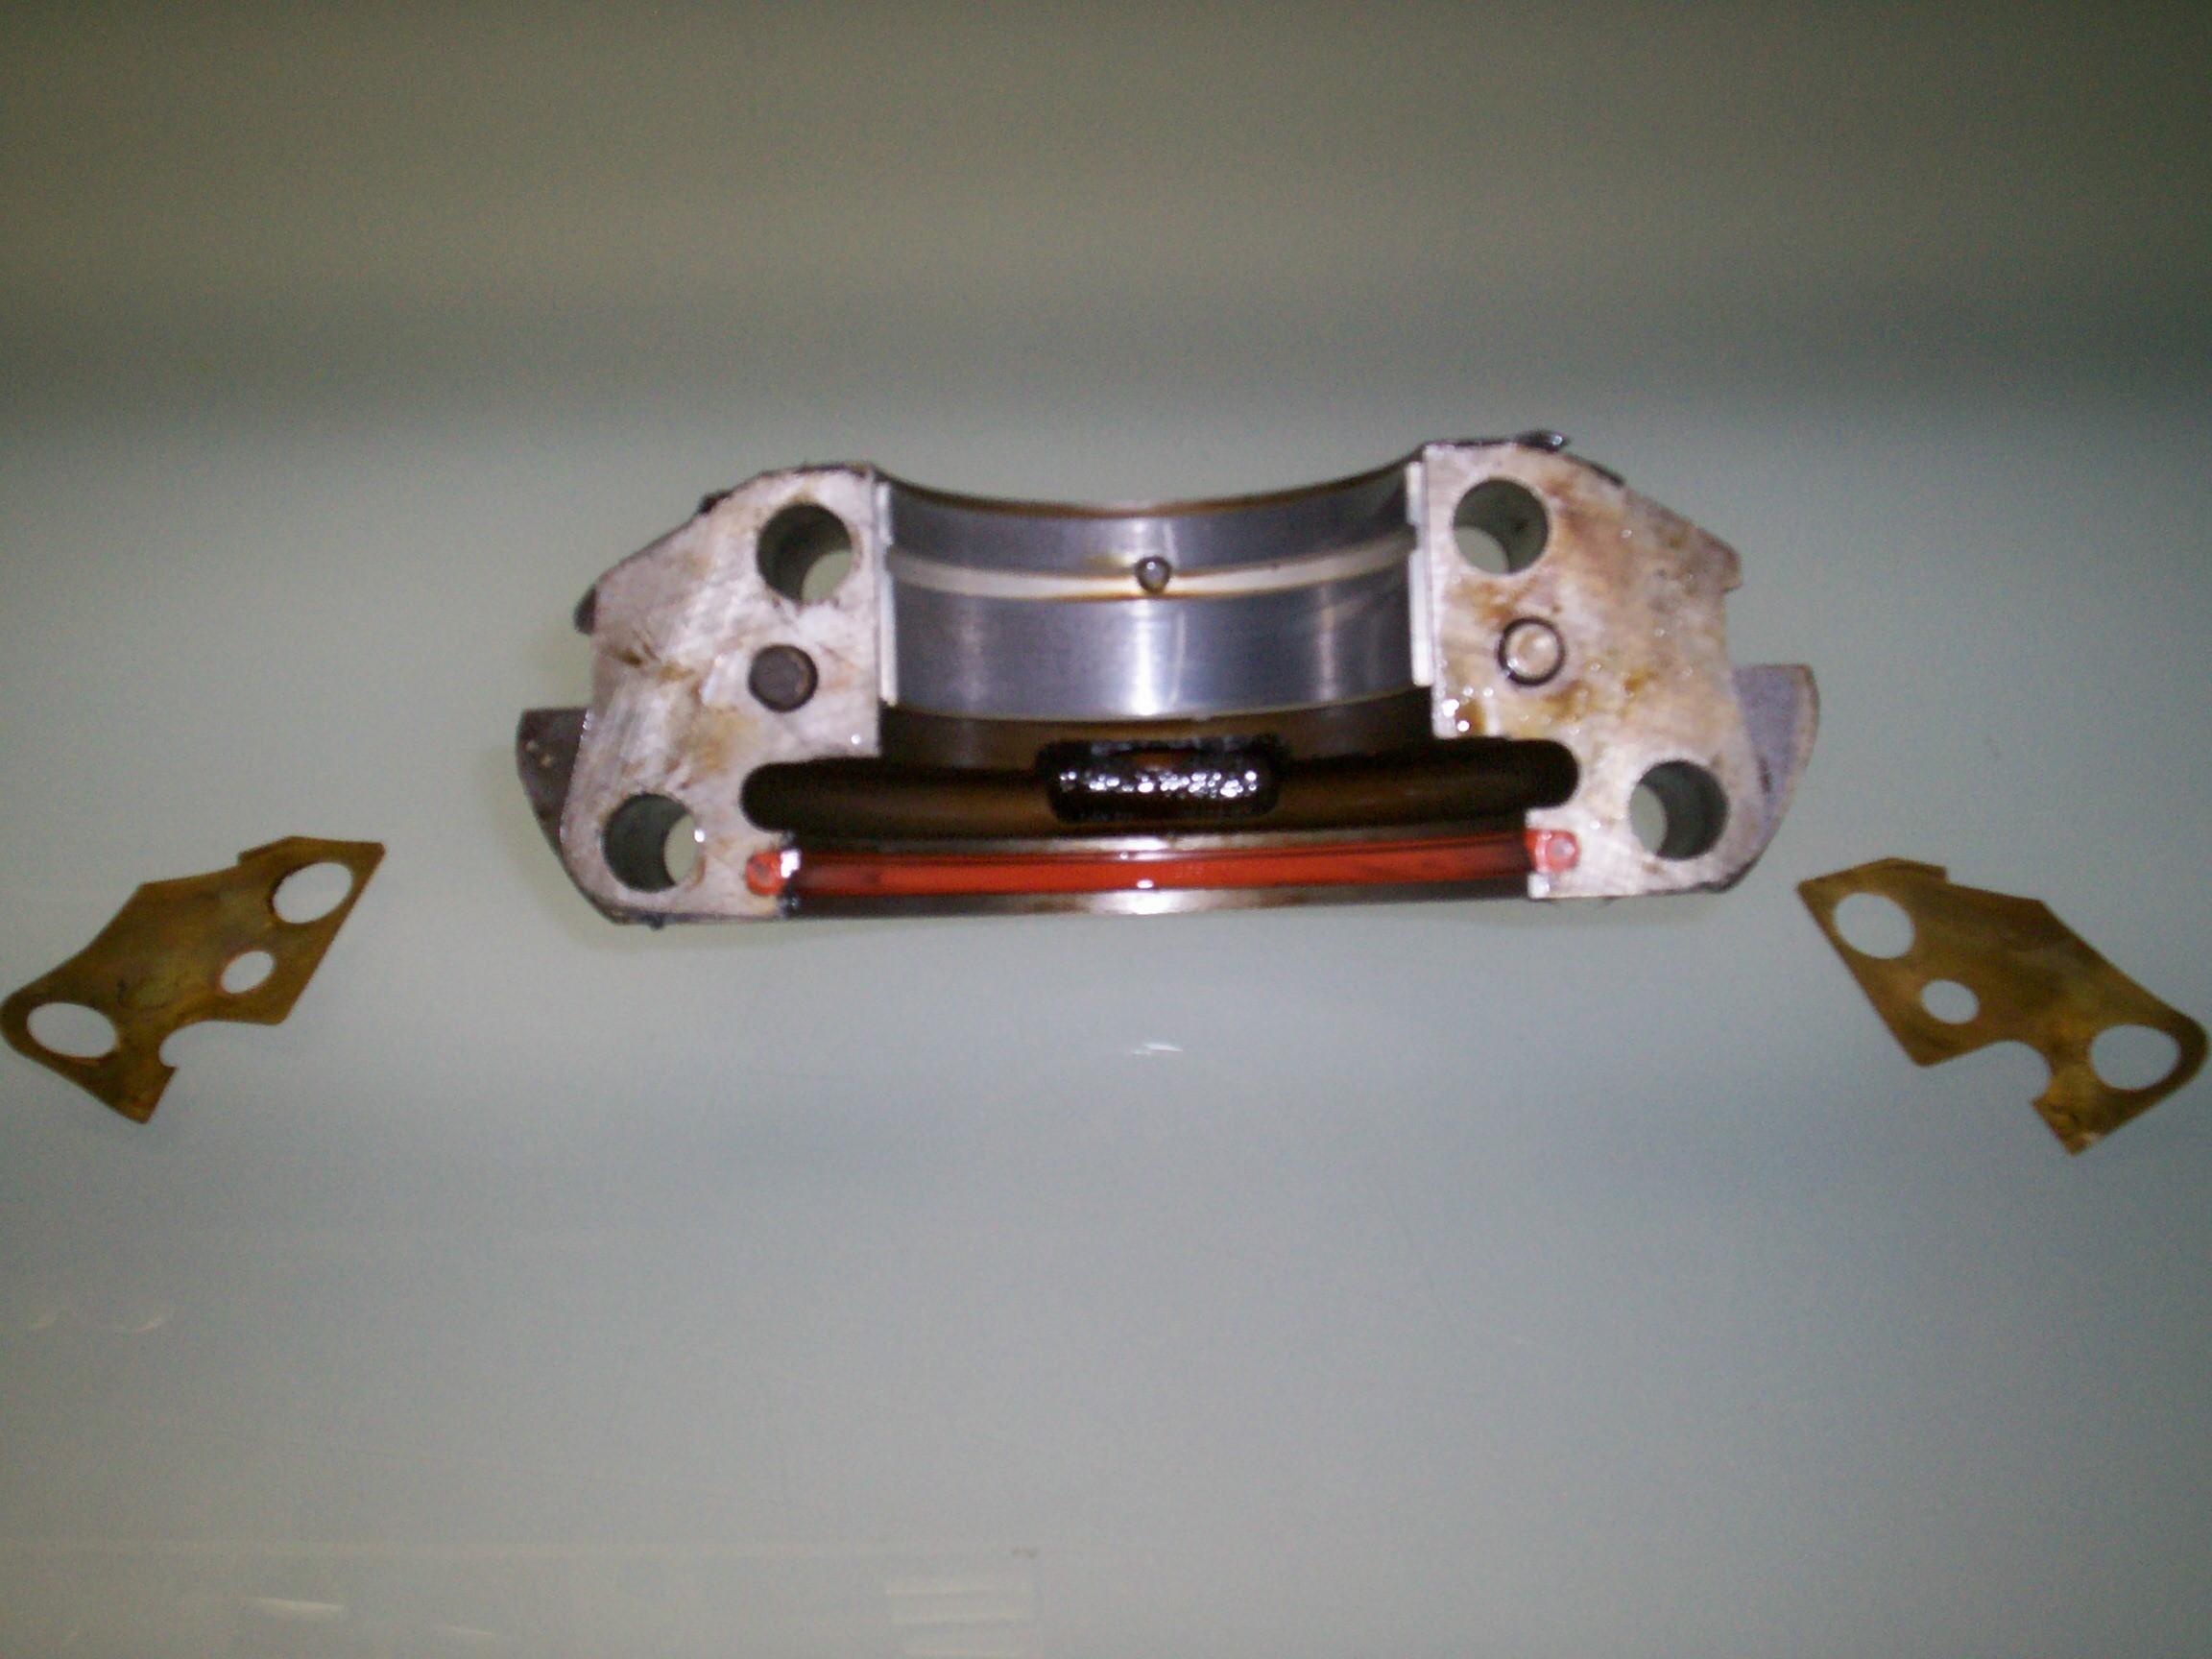 The
bearing half in the cap looks good too. I got a couple of surprises
'tho. I was not expecting the brass shims. I also thought BillyBob had
a rope seal but it has the neoprene seal. I have to ask JR if he was
using a rope seal when he had his seal adventure.
The
bearing half in the cap looks good too. I got a couple of surprises
'tho. I was not expecting the brass shims. I also thought BillyBob had
a rope seal but it has the neoprene seal. I have to ask JR if he was
using a rope seal when he had his seal adventure.
This development put me into decision tree pondering mode. Should I try to install the original type rope seal or should I order the neoprene seal? About this time the lawn service guy showed up. It wasn't Donnie. It was a guy he hired several months ago. The good news is that this guy does a really good job. The bad news is that he takes most of the day to do it. I put my tools away. Damnation! I can't even have a beer. I picked up some Florida skin fungus and the doc gave me some meds that cause liver damage in some people. Spirits are verboten since they increase the chance of liver damage. I'm dry fer a month or more.
November 8th 2008 Two more weeks gone by. Didn't get any work done last week. I ordered a rubber main bearing seal from Chev's of the Forties but it hadn't arrived yet. I had a computer meltdown in the Krash Lab that I had to fix for a co-worker anyway. His harddrive failed and I was struggling to get his computer back to where it was when the drive failed. Ended up having to install Windows XP five times. Not a pretty sight and I was suffering with a bad head cold the same fella had given me when we were first diagnosing his computer problems. Today is better.
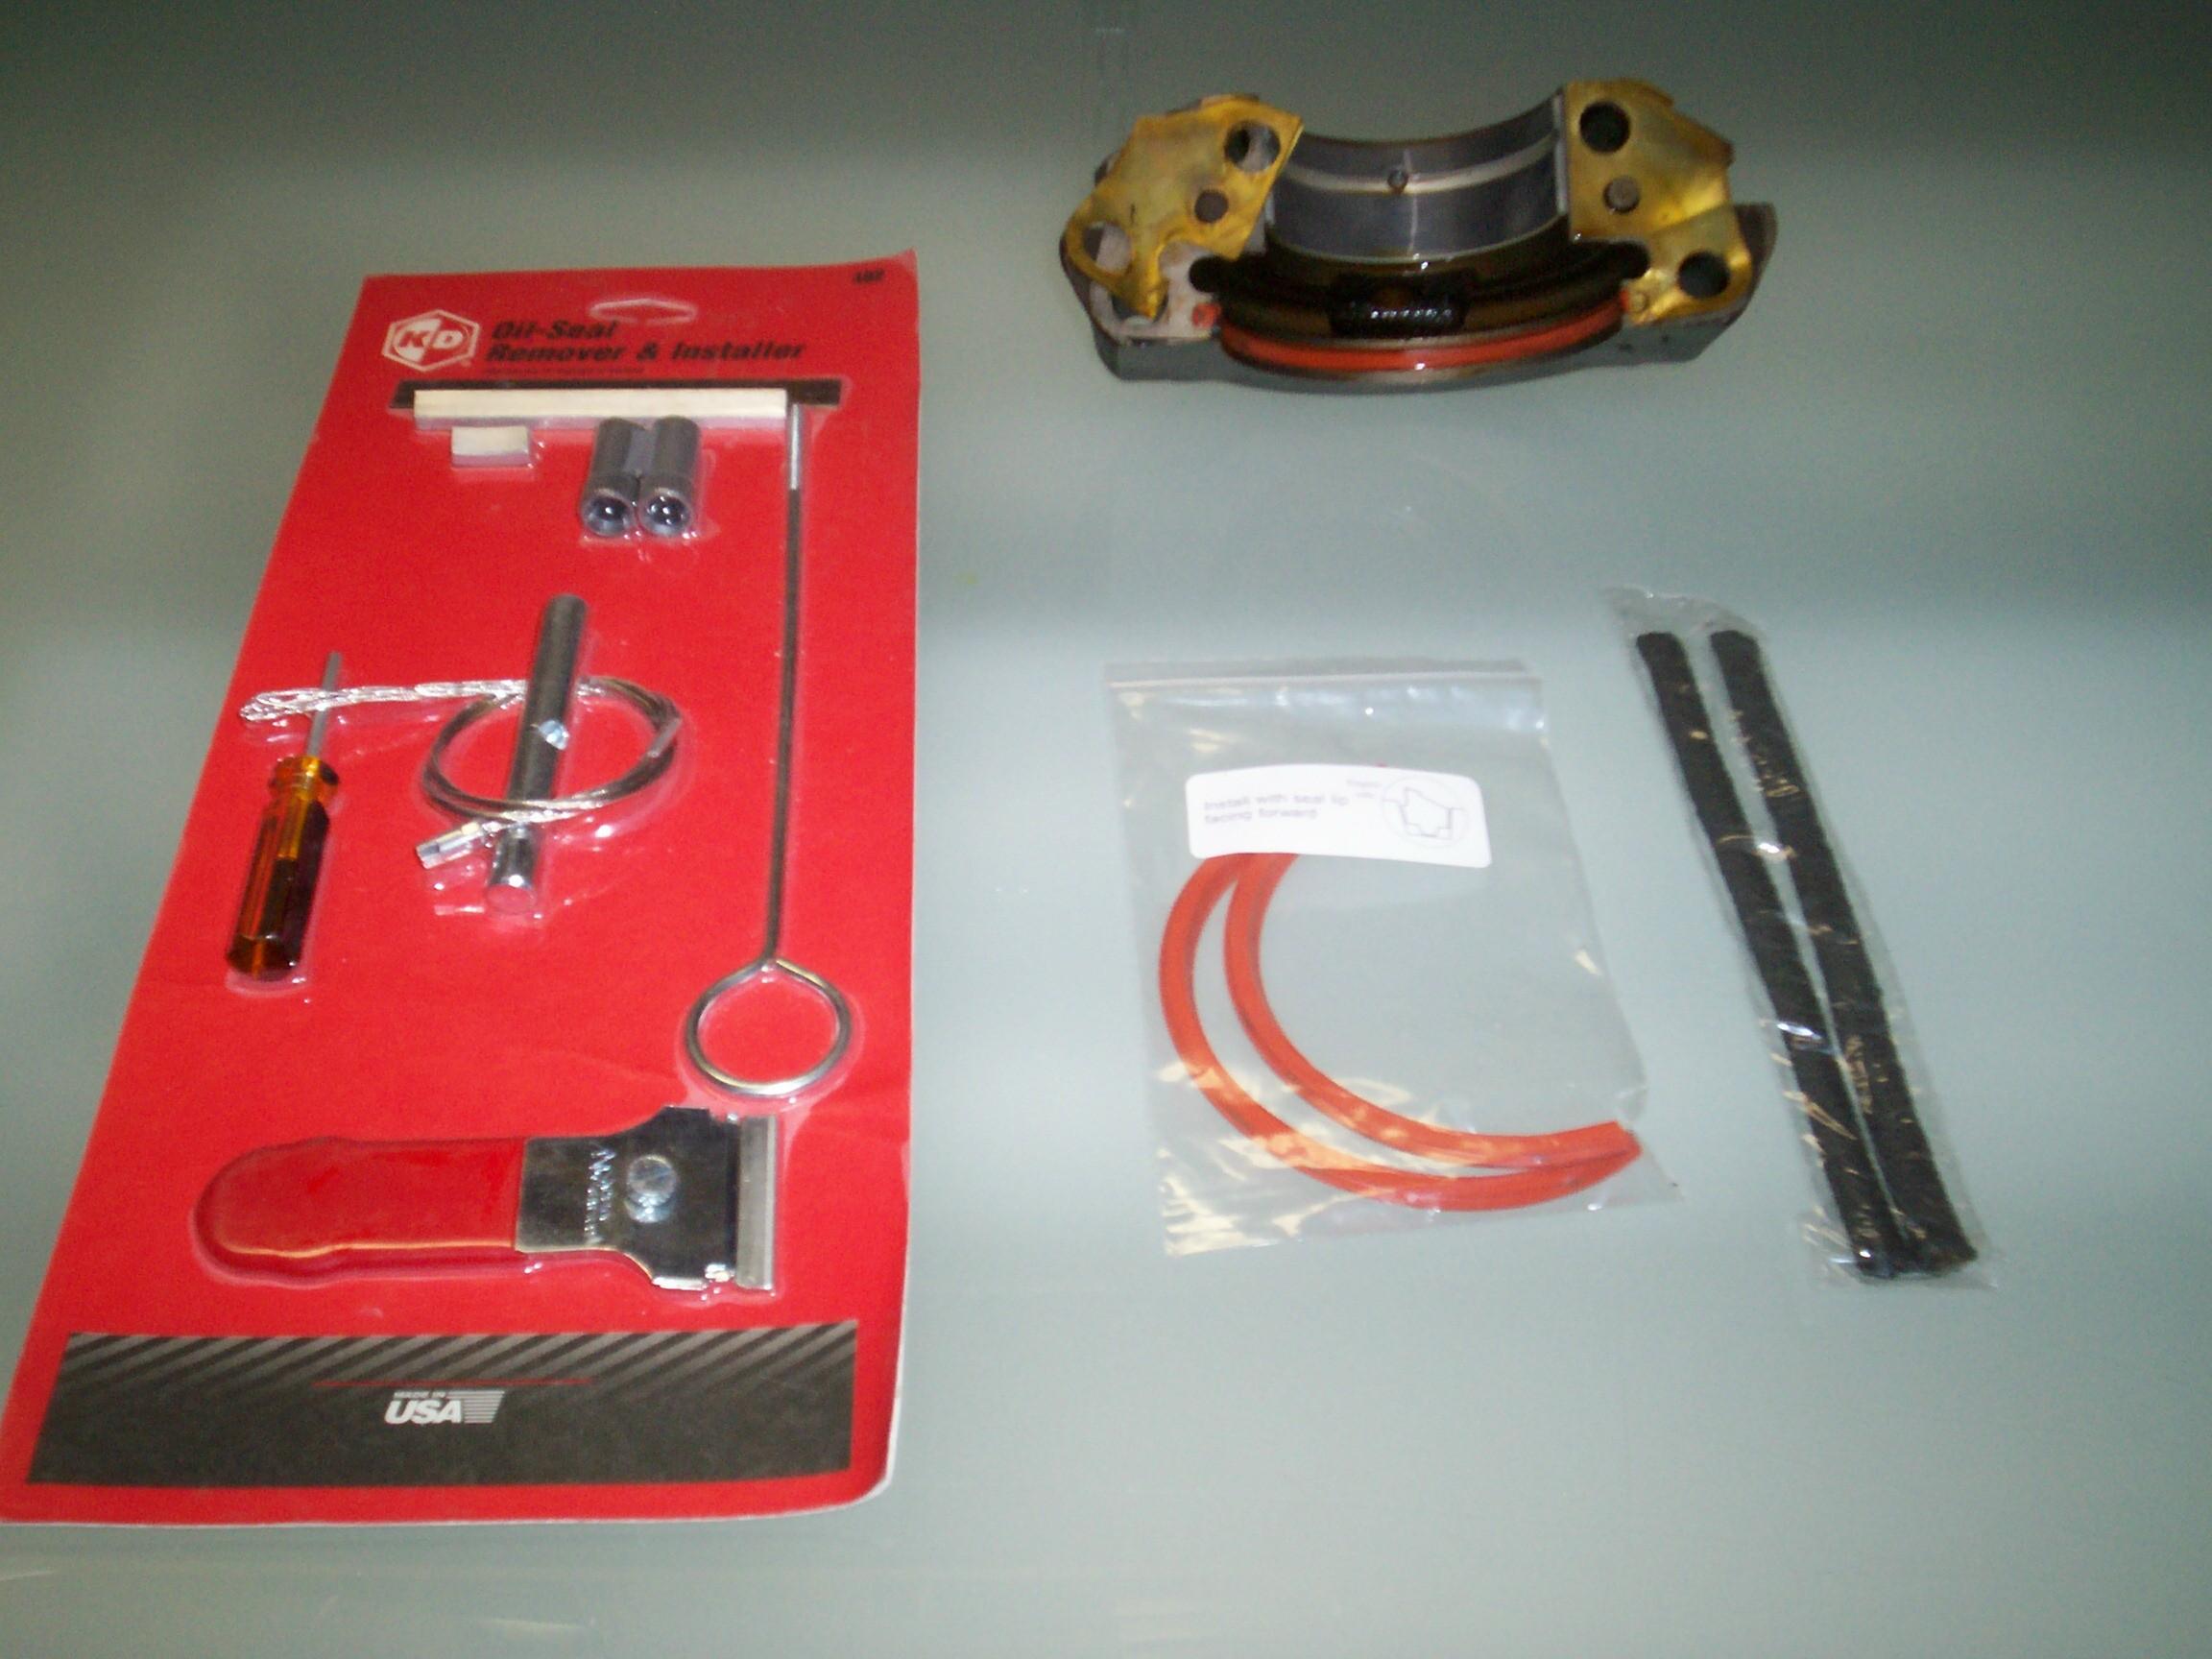 Some
time back, I got the KD Tools Oil-Seal Remover and Installer. This
comes with "wick seal remover, installer, guide funnels, pusher, offset
trimmer and neoprene seal punches". I don't know if I can correctly
match those names to the items in the kit, let alone figure out how to
use 'em.
Some
time back, I got the KD Tools Oil-Seal Remover and Installer. This
comes with "wick seal remover, installer, guide funnels, pusher, offset
trimmer and neoprene seal punches". I don't know if I can correctly
match those names to the items in the kit, let alone figure out how to
use 'em.
That went too easy! I had the old seals out and the new ones in in less than five minutes. The only tool used was the pusher to get enuf of the seal end out to grab it with my fingers and pull it the rest of the way. I soaked the new seals in oil for five minutes and slid them into place just as easily. The other main bearings were not loosened up for this exercise. I didn't try to trim these things or put any sealant on the ends. The brass shims went back in their original locations and the four bearing bolts went back in their original holes and were torqued, first to fifty footpounds in a criss-cross pattern, then to 100 footpounds. I didn't have enuf leverage, on my back under the truck, which wasn't jacked up, to get them any higher, even with a cussin' strength multiplier.
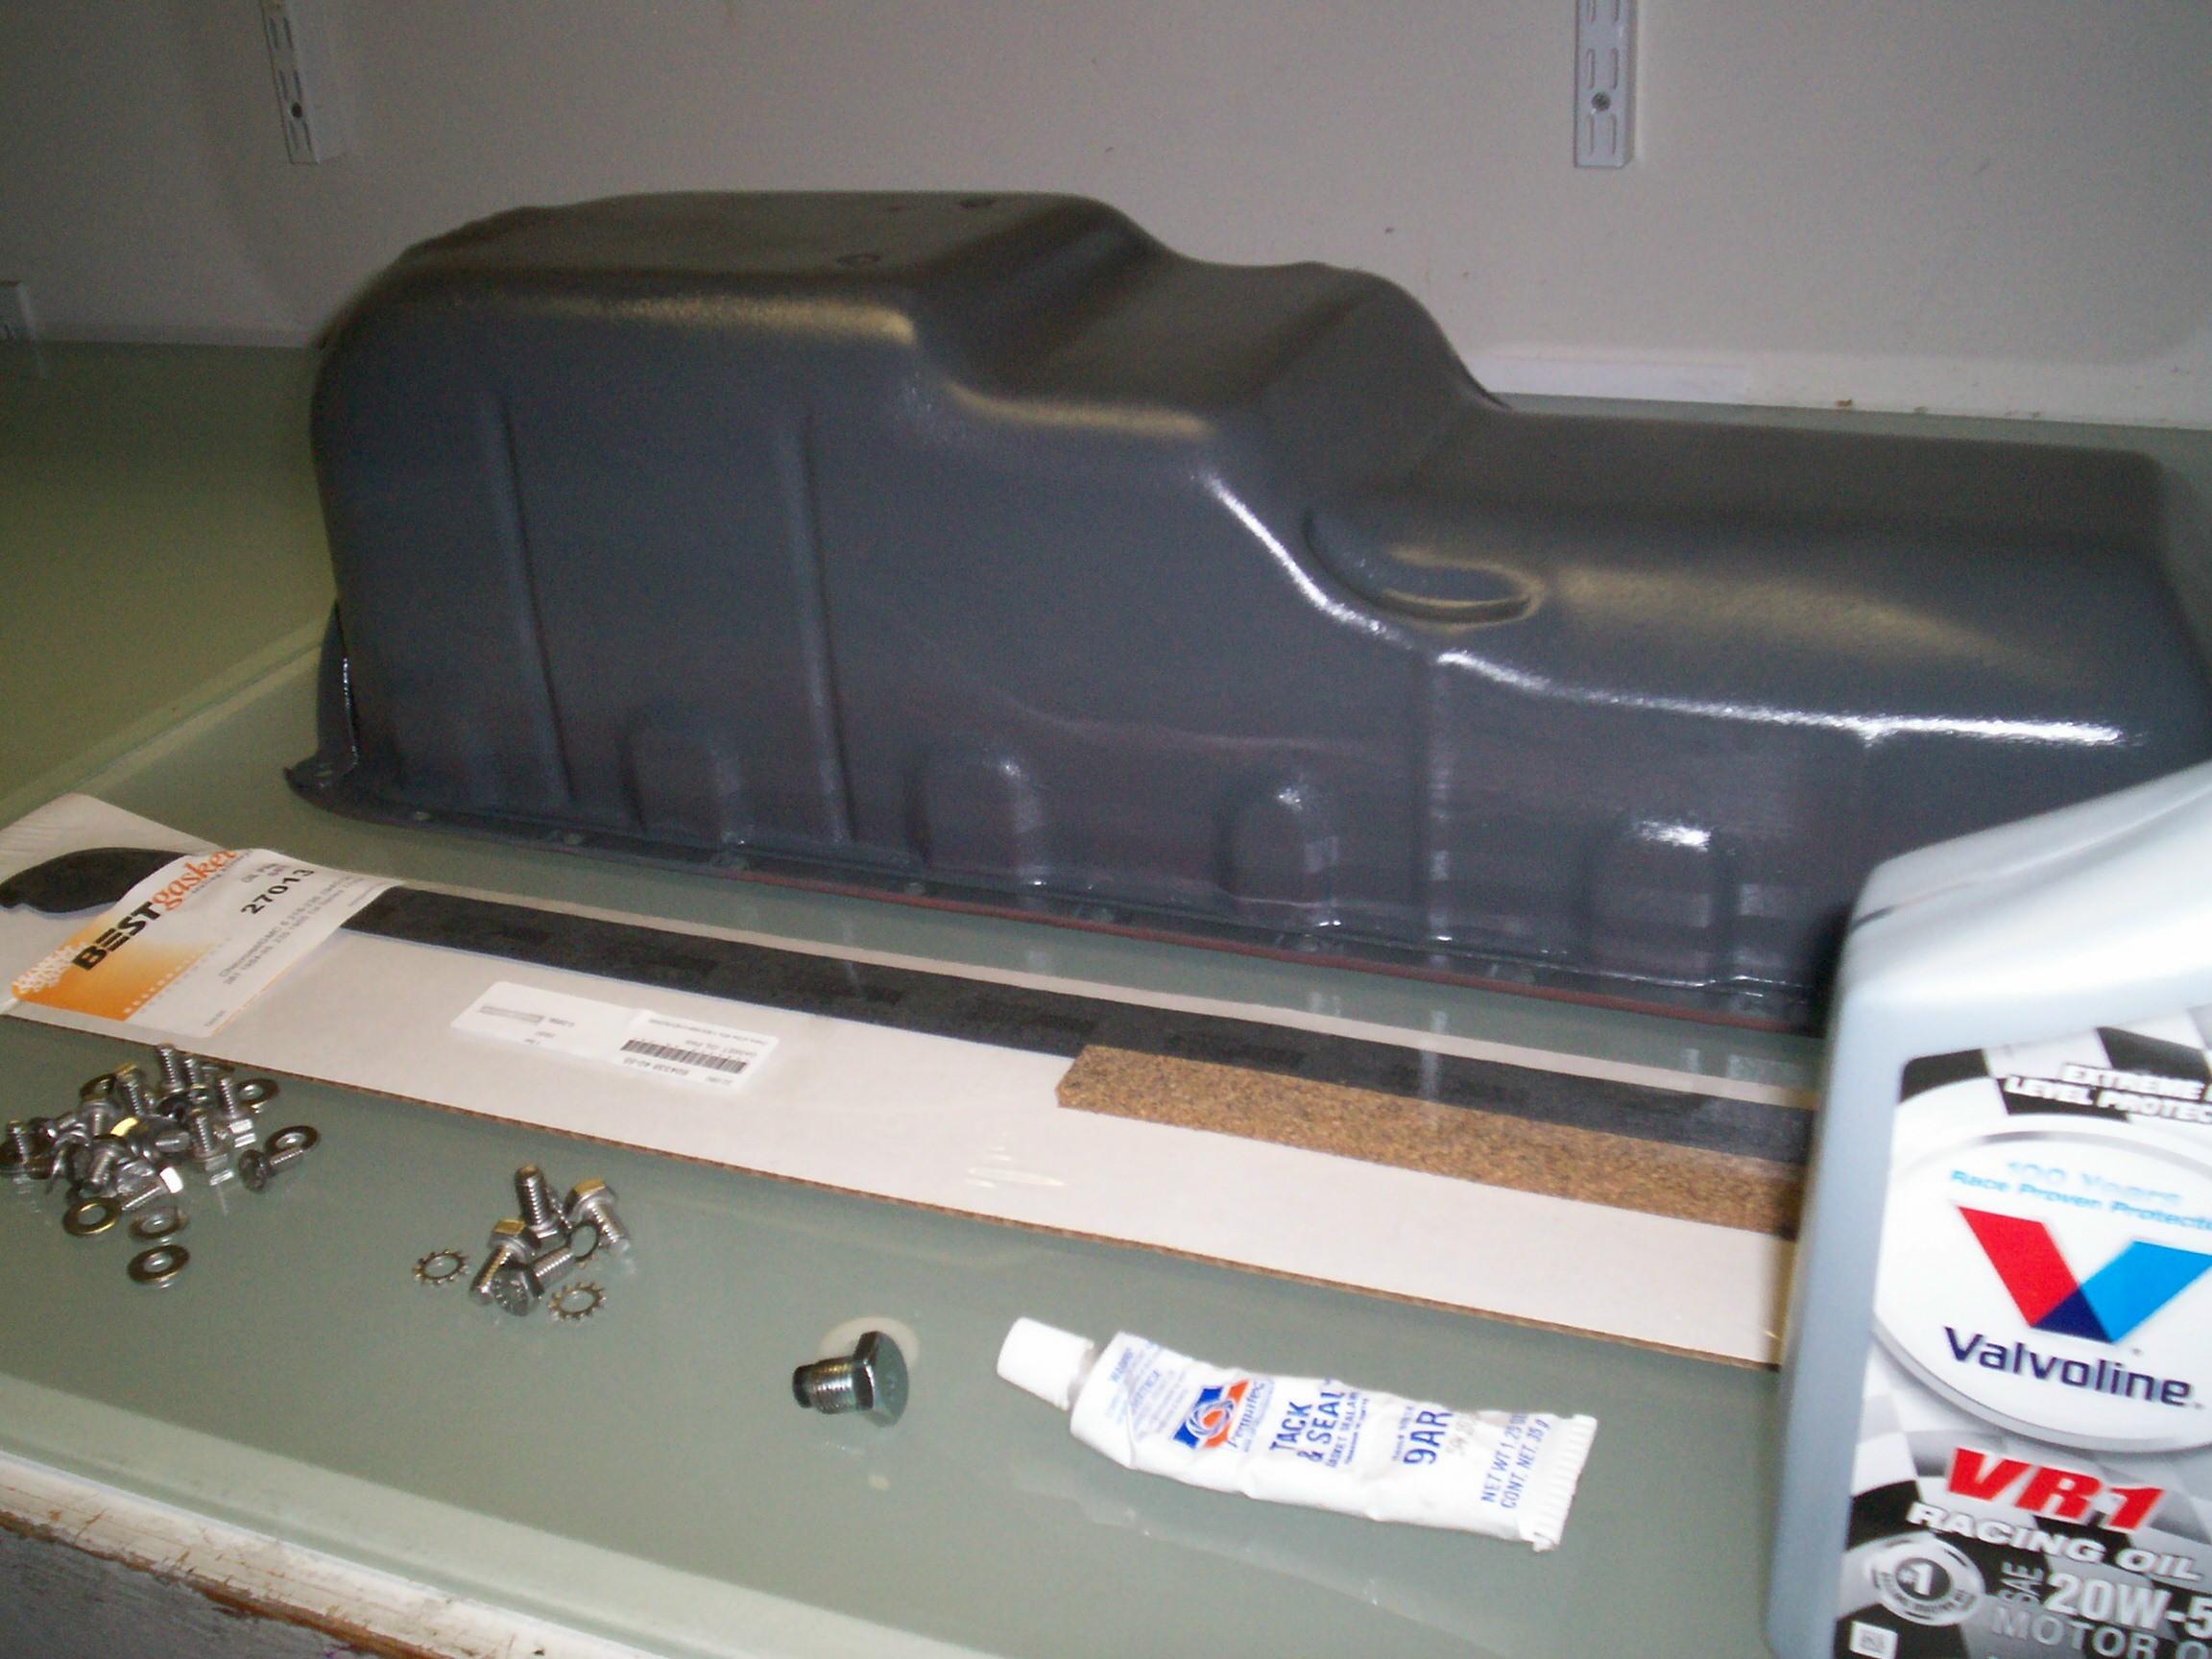 Now
comes the oil pan. Installed a new magnetic drain plug with
threadlocker blue. The pan gaskets from Best are cork. I used Permatex
Tack and Seal to attach them to the pan, starting with the two end
pieces. This stuff is old and messy. I have a special loathing for tube
dispensed products. I decided to let the ends set in place overnite.
Now
comes the oil pan. Installed a new magnetic drain plug with
threadlocker blue. The pan gaskets from Best are cork. I used Permatex
Tack and Seal to attach them to the pan, starting with the two end
pieces. This stuff is old and messy. I have a special loathing for tube
dispensed products. I decided to let the ends set in place overnite.
November 9th 2008 It's a good weather day. We're not being affected much by Hurricane Paloma. I put the two side gaskets on the pan and carried it out to BillyBob. Spread a thin coat of oil on the top side of the gaskets and prepared to put the pan back on. Damnation! Three of the gaskets came off just while manouvering the pan into position. I got them back into position with the pan resting on the front axle and took time out fer a ceegar. I don't think the Permatex set up right. Probably my fault.
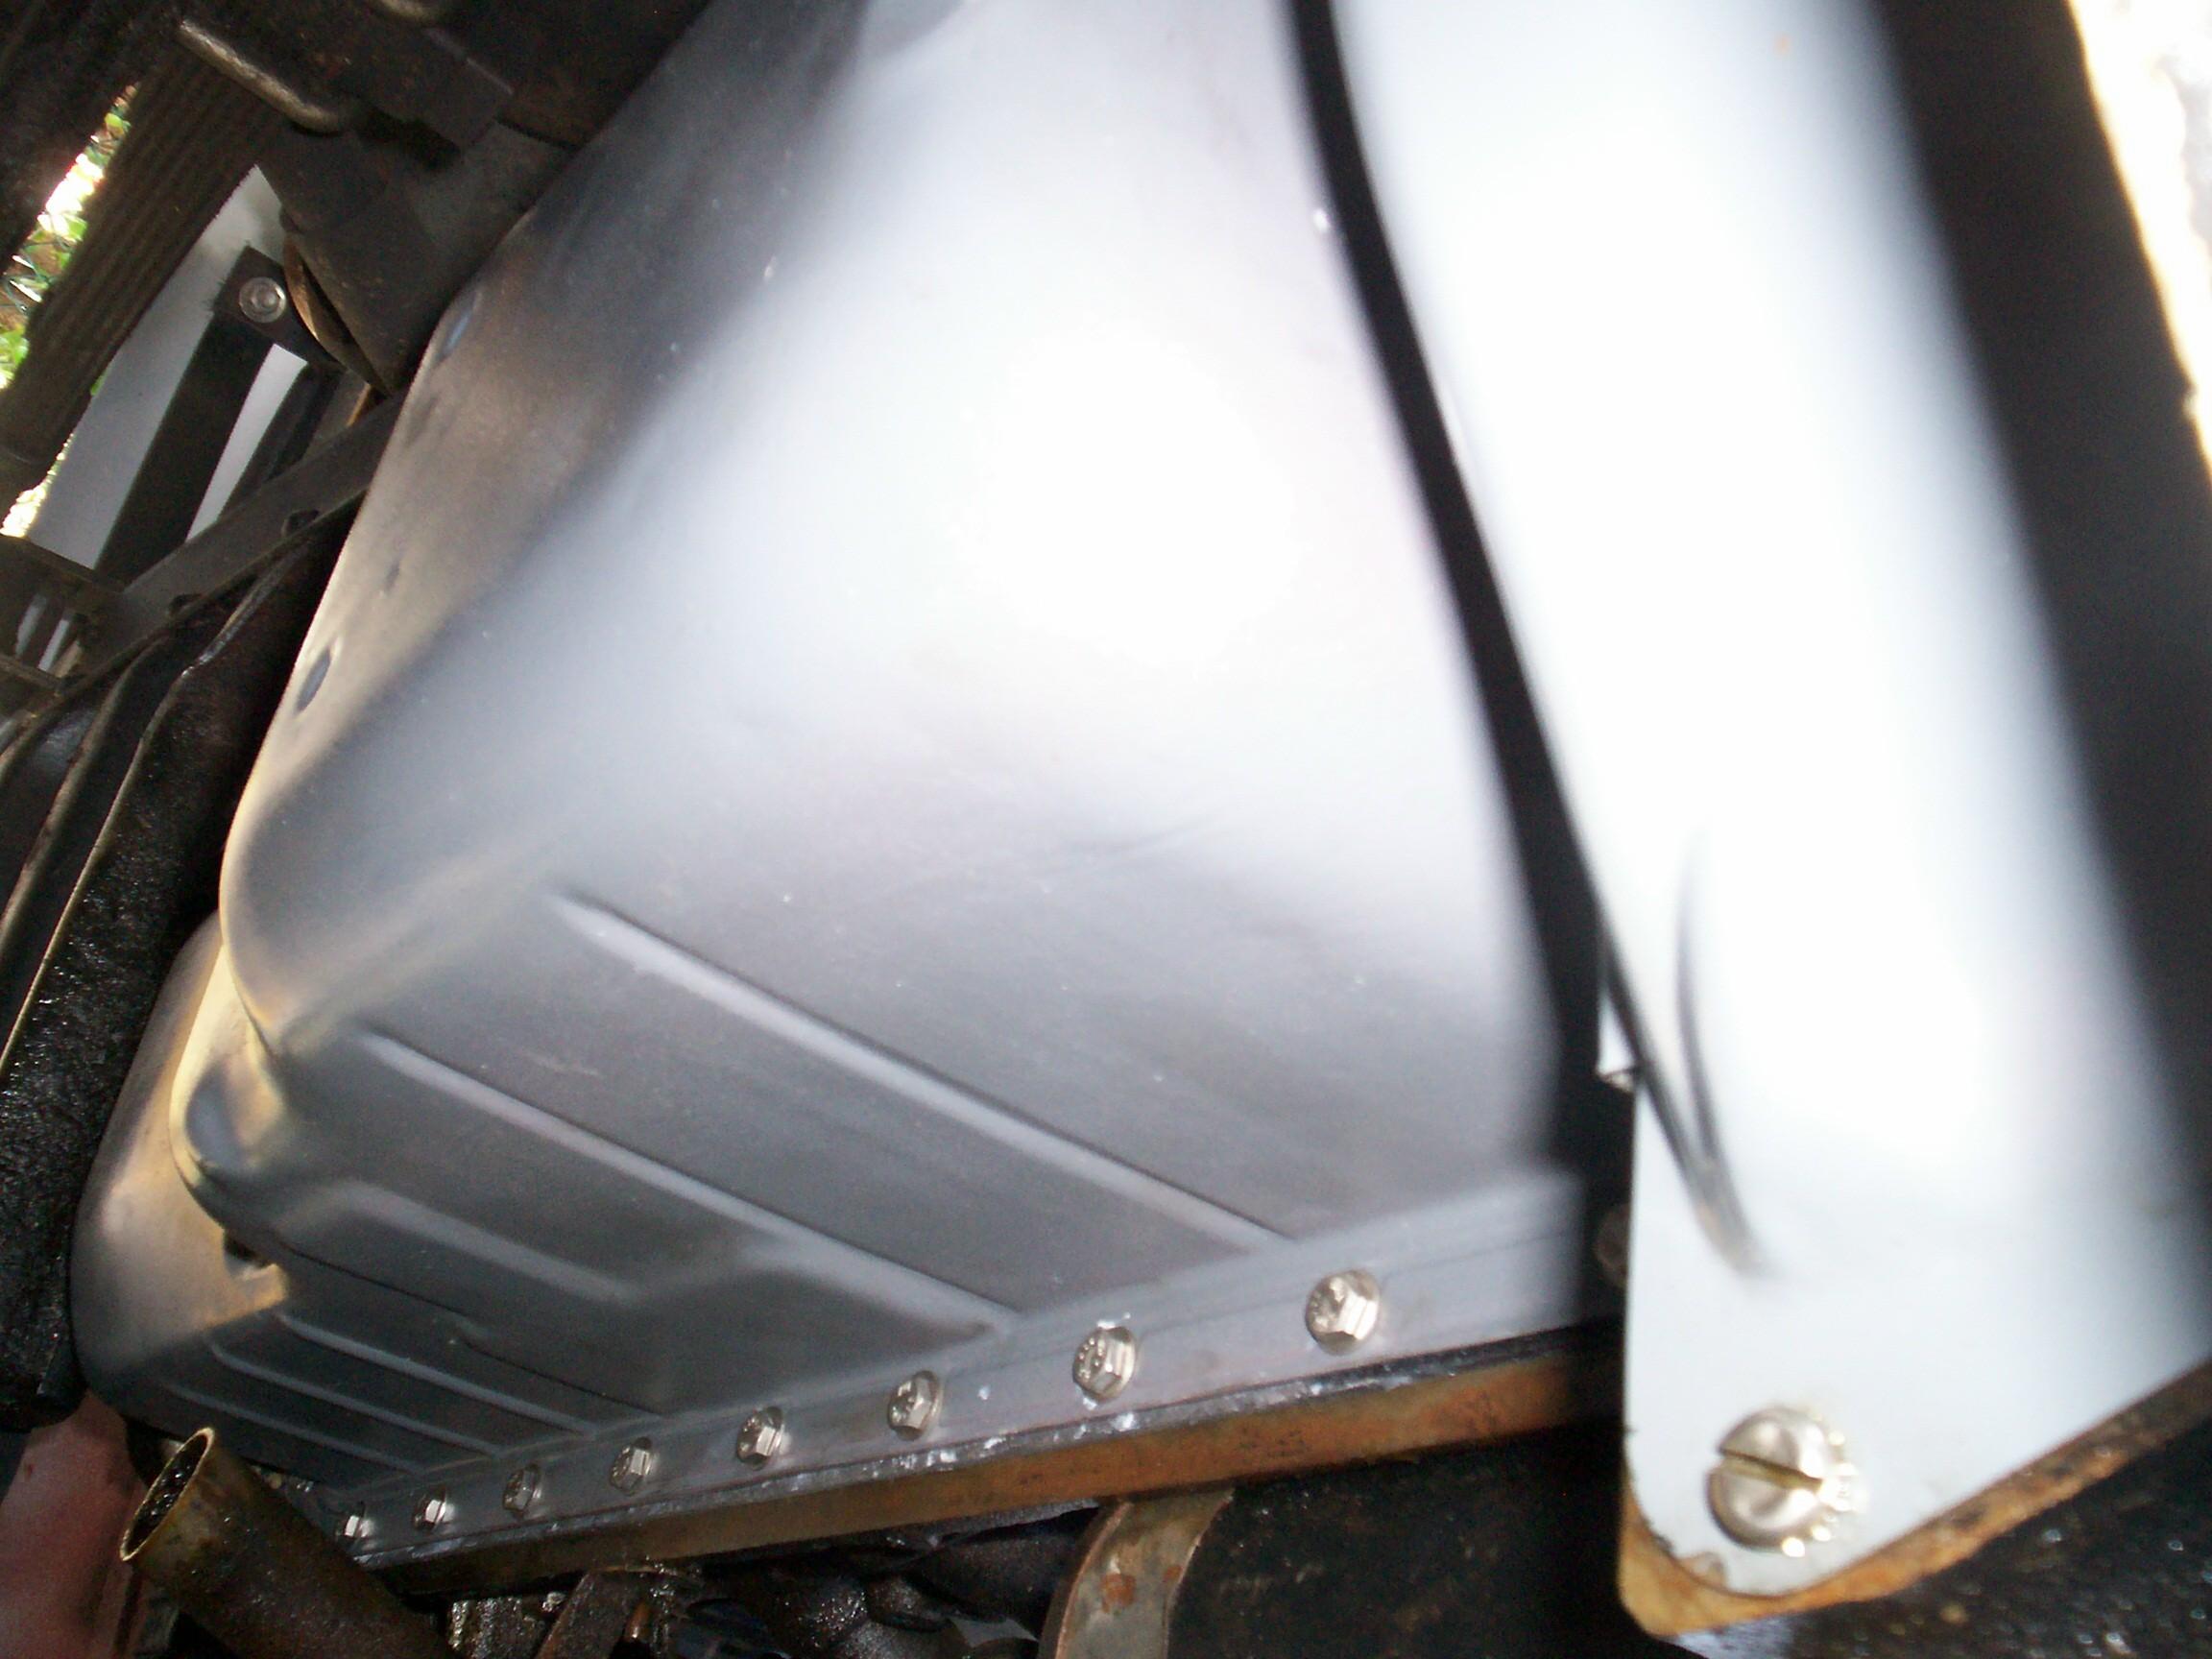
After the cigar, I got BillyBob's sissors jack out to support the pan while moving it into position. On the next attempt, the last gasket fell off too. Pulled the pan out of the way and examined things a bit closer. My major malfunction seemed to be with the front and rear gaskets. Took all the gaskets off the pan and concentrated on the front one first. The cork seemed a little too big for the slot it was 'sposed to go into on the engine. I stuffed it into the slot by hand and repositioned the rear gasket on the pan again. After a few curse laden tries, I got the pan on with the rear and front bolts started and the front and back gaskets in place. Now, I placed the side gaskets by taking the bolts out, one-by-one, placing the side gasket and, returning the bolt. Now, I got the rest of the bolts started. Ran the bolts home, not too tight, starting in the middle and working both directions to the pan ends. These bolts and washers are stainless steel replacements from Tom Langdon at the Stovebolt Engine Company and there are no spares. It was a perfect chance for Murphy to mess me up but I didn't lose any. All that effort to get the pan on took about three hours including the cigar break.
After I watched Powerblock on TV, I added oil (Valvoline 20-50wt VR1 Racing Oil) and started BillyBob. Everything was okay for about ten minutes then a leak developed at the back of the oil pan. Just a few drops from my battle with the gaskets where the side gasket meets the rear gasket most likely. Turned BillyBob off after about forty minutes and that's when the rear main leak started again. Curses! I was prepared for disappointment because even seasoned engine builders have problems with these seals sometimes. At least both leaks are close enuf to each other that I only need one drip pan to catch the leaks.
November 10th 2008 Checking today after the leaking stopped reveals that the engine isn't leaking as much as it was before I attempted this repair. Little victories. Damn little. I'll take my next run at this problem when it's time for the next oil change.
November 15th 2008 Looks like a good weather day. Gassed up BillyBob and stopped at a FLAPS on Wednesday to pickup some Threadlocker Blue and a can of Seafoam Motor Treatment. I put the Seafoam in BillyBob's tank and waited for the pavement below BillyBob to dry up (lawn sprinklers). Now that I'm using Deerslayer as a daily driver, the Seafoam is for fuel stabilization in BillyBob
 I
ran out of threadlocker last week when I installed the new magnetic
drain plug in the pan. The new stainless steel pan bolts need
threadlocker or anti-seize to keep the threads from spalling so today's
second task was removing the pan bolts, one at a time, and applying
threadlocker blue. These bolts aren't torqued down very tight and the
threadlocker also performs its main function to keep them in place.
I
ran out of threadlocker last week when I installed the new magnetic
drain plug in the pan. The new stainless steel pan bolts need
threadlocker or anti-seize to keep the threads from spalling so today's
second task was removing the pan bolts, one at a time, and applying
threadlocker blue. These bolts aren't torqued down very tight and the
threadlocker also performs its main function to keep them in place.
Performed monthly maintenance on BillyBob and inventoried the travel boxes in preparation to take him up to the warehouse bay tomorrow. I gotta do some work on BettyLou, Renegade and Deerslayer in the next couple of weeks. When BillyBob comes back down from the warehouse to the shadetree again, I plan on pulling off the road draft tube. I don't know what happens if the road draft tube is clogged up. If it puts a positive pressure in the crankcase, that might be part of my sealing problem. I don't know but I want to eliminate it as a possible cause.
| < Back
to Intro |
You can email me at ![]() webmaster@laroke.com
webmaster@laroke.com
Issued Saturday November 15, 2008
Updated Friday April 6, 2018
copyright © 1996-2018 Larry Robert Kephart all rights reserved
| | LRK Home | | Bio Info | | Krash Khronicles | | LAROKE | |
| | BettyLou | | BillyBob's Garage | | Rat Patrol | | Deerslayer | | Elvira | |
| | Land of the Free and Home of the Brave | |
| | Keppylou's Art | | WWI Soldier's Diary | |