| | LRK Home | | Bio Info | | Krash Khronicles | | LAROKE | |
| | BettyLou | | BillyBob's Garage | | Rat Patrol | | Deerslayer | | Elvira | |
| | Land of the Free and Home of the Brave | |
| | Keppylou's Art | | WWI Soldier's Diary | |
BillyBob Work-in-Progress Log
![]()
TRUCK LINKS including vendor sites for old parts, custom parts, and tools as well as sites for classic car and truck organizations
STORE Operating in association with Amazon.com, books, recordings and tools can be purchased.
PLANNING for the restoration including project schedule and cost estimates.
![]()
WORK-IN-PROGRESS is the restoration of parts of BillyBob that I can accomplish without a garage.
PRE-RESTORATION includes log entries of minor repairs and and adventures between time of purchase and the time when I started restoration, a piece at a time.
JR'S KORNER JR's Korner is the history of BillyBob before I got him authored by my brother, Wm. C. Kephart.
![]()
BILLYBOB MAINTENANCE Ever changing detailing, oil change, lube, etc. maintenance routines specifically developed for BillyBob, including required tools, materials and procedures.
STEALTH SHOP Urban residence design with large integrated shop and separate living quarters for a relative or renter.
![]()
You will need the Adobe Acrobat browser plugin to view these wiring diagrams which are in the PDF file format. This format allows zooming and panning. If you don't have this plugin, it can be downloaded and installed (free) from the Adobe site. The button below will take you there.
![]()
BILLYBOB WIRING DIAGRAM Here's the wiring diagram updated with the temporary light switch jumper, dome light circuit and lighter circuit.
UPDATED BILLYBOB WIRING DIAGRAM Here's the updated wiring diagram again, now with the new replacement headlight switch in place, new battery cables, and new turn signal re-wiring.
25. Nervous Breakdown Red Ducks
Wuz gonna call this log entry "Nervous Breakdown Redux" but I'm boycotting the French right now and even tho' "redux" is latin, it sounds suspiciously Frenchie to the unrepentant hillbilly in me. Now before my Cajun friend "Swampcat", and other Internet stovebolter readers of French descent get riled up, I am decended, in part, from a French great grandfather Ross on my Mother's side who came to Pennsylvania by way of Canada. I submit that many of these ancestors braved the new world frontier because they were fed up with the home country too! Swampcat called me "Herr Kephart" the last time I wrote against the French . . . I'm only glad my last name isn't Lipp.
At any rate, this log entry recovers some ground I've already gone over (headlight switch, parking lamps, battery cables and turn signals) and some new items I'm visiting for the first time (ballast resistor, ignition switch, dome light and cigarette lighter).
 October
24th 2002 Two spare
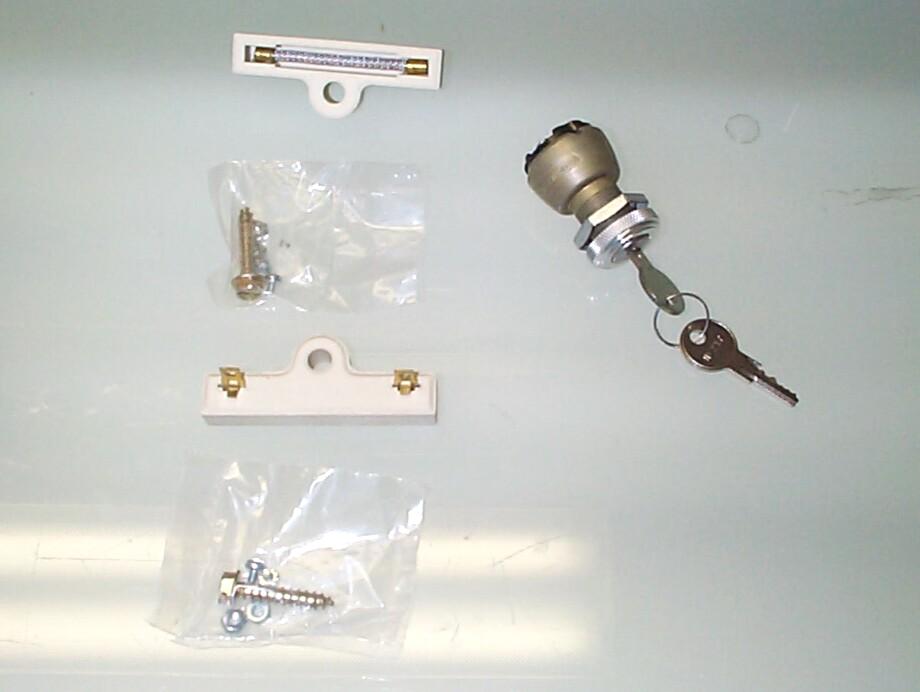
ballast resistors (#EL809) and a generic ignition switch with lock
cylinder and two keys (#IGS36) arrived from American
Classic Truck Parts today.
October
24th 2002 Two spare
ballast resistors (#EL809) and a generic ignition switch with lock
cylinder and two keys (#IGS36) arrived from American
Classic Truck Parts today.
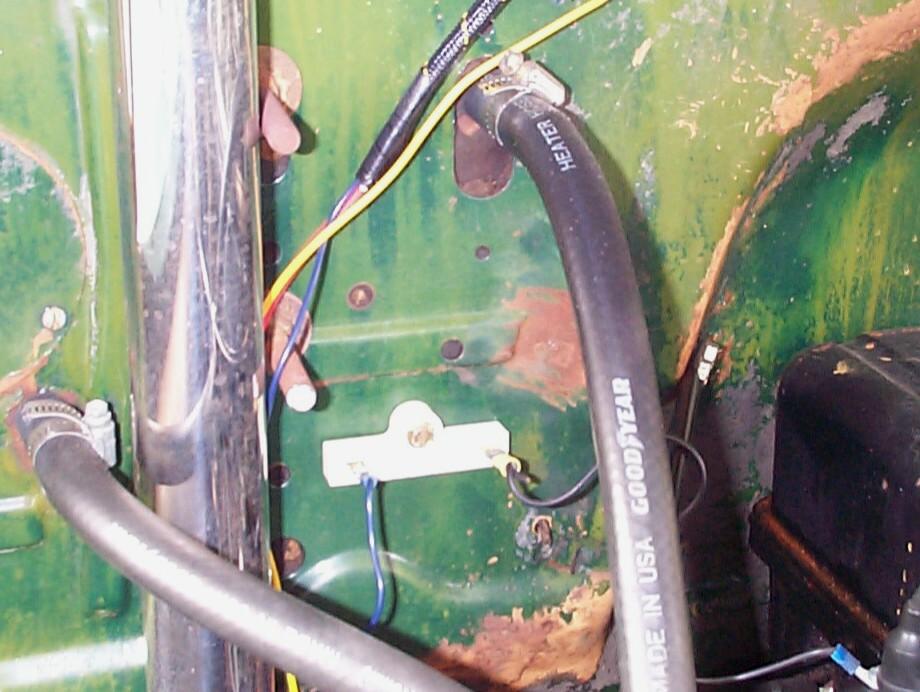 December
7th 2002 Pearl Harbor
Day. Good working weather. Took off the old ballast resistor and put it
in the glove compartment as a spare in case the new ballast resistor
turns out to be defective. Drilled a new 9/64" mounting hole lower and
to the left of the old mounting hole (flatter area of the firewall).
Installed the new ballast resistor with the supplied plated,
self-tapping cap screw. Attached the coil and wiring harness wires with
the existing blade type connectors.
December
7th 2002 Pearl Harbor
Day. Good working weather. Took off the old ballast resistor and put it
in the glove compartment as a spare in case the new ballast resistor
turns out to be defective. Drilled a new 9/64" mounting hole lower and
to the left of the old mounting hole (flatter area of the firewall).
Installed the new ballast resistor with the supplied plated,
self-tapping cap screw. Attached the coil and wiring harness wires with
the existing blade type connectors.
Wasn't supposed to rain but it started to by mid-morning. I'm also detailing the parking brake cable connections today (gettin' rid of the rust starting to creep back on things I've already fixed) so, I went inside to tin-zinc plate bolts and other hardware while I waited out the weather. After the rain stopped, the ignition switch was replaced with the new generic ignition switch. There is not much improvement here 'cept that the switch positions are solid "clicks" (I now know I am at accessory, off, or ignition settings) whereas the old generic switch was kinda loosey-goosey. I also now have a spare ignition key. The old switch and key goes into the spare parts inventory.
 February
8th 2003 Keepin' it
light today. The boss's wife decreed sometime back that the office
needed new carpet. The rest of us resisted as long as we could. The
carpet arrived this week and the Krash Lab will be in disarray for the
next three or four weekends. The installer needs BillyBob's shadetree
garage area to cut the carpet ~!@#$%
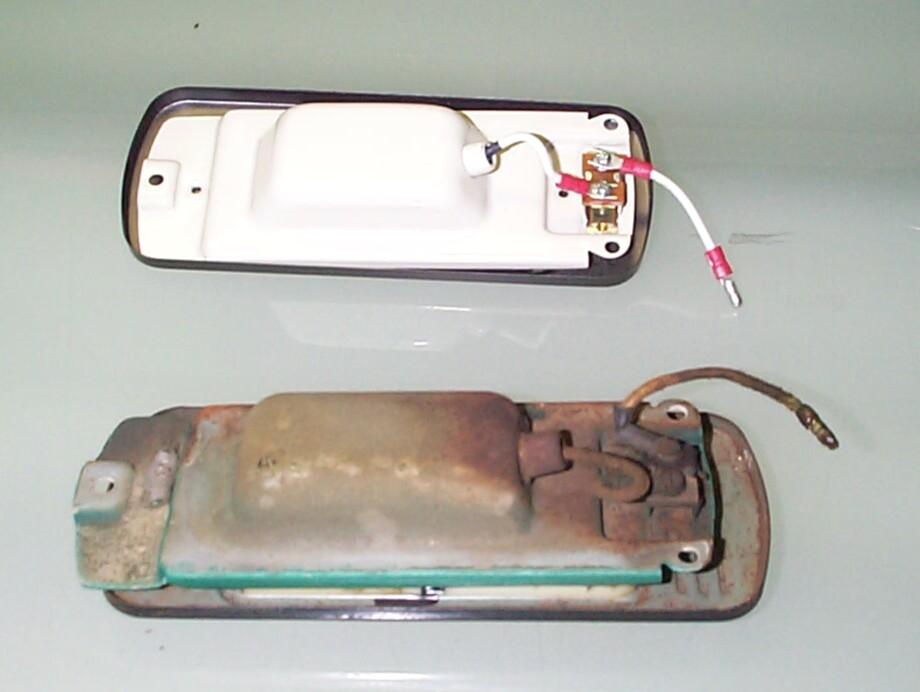
Decided to install a new dome lamp assembly I got from Chevy
Duty a couple of months ago.
February
8th 2003 Keepin' it
light today. The boss's wife decreed sometime back that the office
needed new carpet. The rest of us resisted as long as we could. The
carpet arrived this week and the Krash Lab will be in disarray for the
next three or four weekends. The installer needs BillyBob's shadetree
garage area to cut the carpet ~!@#$%
Decided to install a new dome lamp assembly I got from Chevy
Duty a couple of months ago.
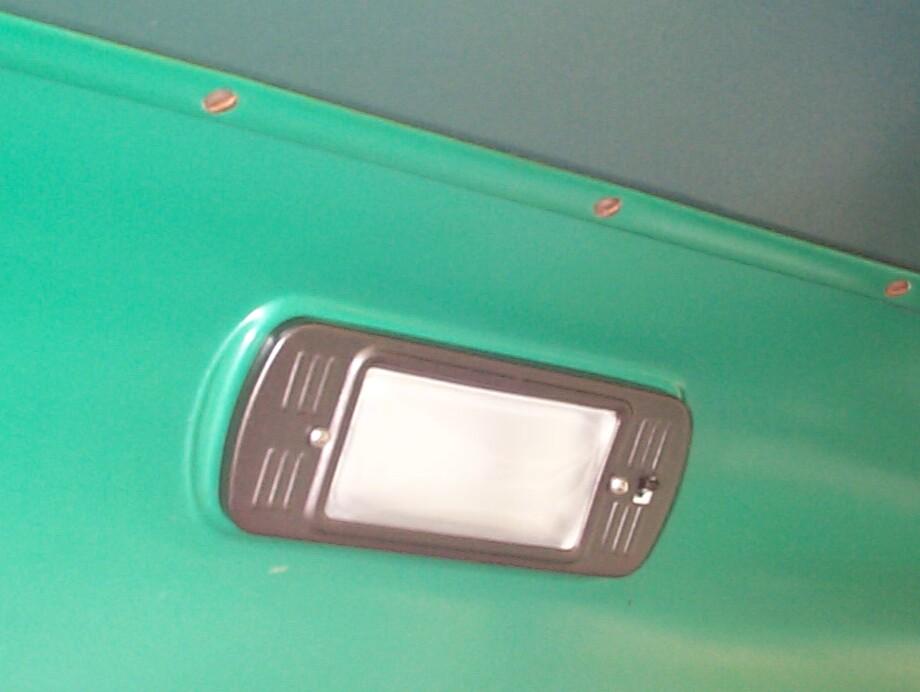 This
thing looks pretty close to the original and does not look as if it
will have to be "beaten into shape" as some other repro parts have to
be. It has a bullet connector and I was supprised to find that the old
wiring has a bullet receptacle when I removed the old assembly. Did not
feel like pulling new wire so it was connected to the old and tested.
Good! Now I can read a map at night (providing I have my reading
glasses with me).
This
thing looks pretty close to the original and does not look as if it
will have to be "beaten into shape" as some other repro parts have to
be. It has a bullet connector and I was supprised to find that the old
wiring has a bullet receptacle when I removed the old assembly. Did not
feel like pulling new wire so it was connected to the old and tested.
Good! Now I can read a map at night (providing I have my reading
glasses with me).
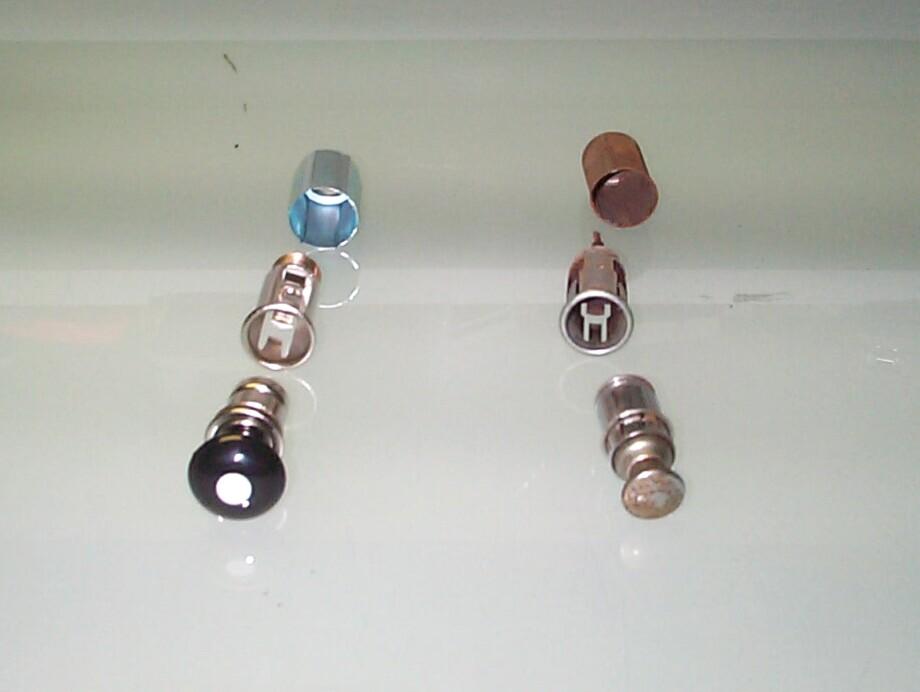 At
the same time I purchased the dome light, I got a new 54-55 1st
Series cigarette lighter (with the correct knob). This accessory was
connected to the battery terminal on the ignition switch with 14 gauge
wire. I had to take out the glove box cardboard to remove the old
corroded lighter. The glove box fell apart in my hands. Not gonna
replace the cardboard until I'm finished in this area of the dashboard
'cause the access is so nice with it out.
At
the same time I purchased the dome light, I got a new 54-55 1st
Series cigarette lighter (with the correct knob). This accessory was
connected to the battery terminal on the ignition switch with 14 gauge
wire. I had to take out the glove box cardboard to remove the old
corroded lighter. The glove box fell apart in my hands. Not gonna
replace the cardboard until I'm finished in this area of the dashboard
'cause the access is so nice with it out.
Been havin' a few problems with the lights . . . Sometimes the instrument lights and the parking lights won't work. Two times I thought I detected something burning too. Pulled out the light switch. No detectable burns but the ~!@#$%darn rheostat ceramic is crumbling! I moved the jumper from the second rheostat terminal to the first rheostat terminal to bypass it. Now I have instrument panel and parking lights again . . . At least today I have. Look's like the search for a good headlight switch is not over.
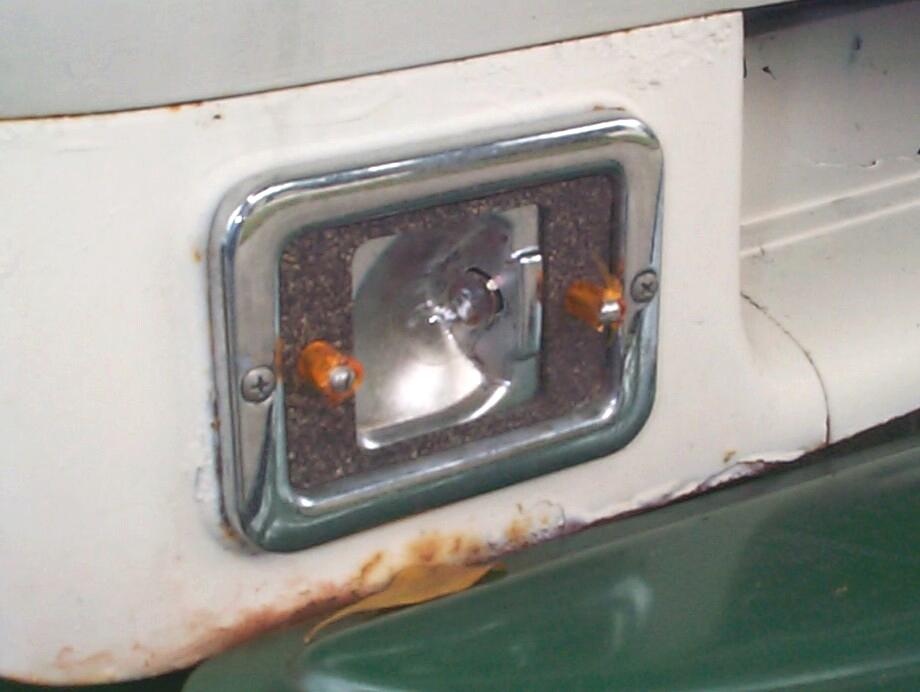 March
26th 2003 'Nother
parking lamp lense fell out on the way to work today. As before, the
area around the screw boss had fractured. The screws and bits of the
plastic around them remained in place. The last time this happened I
went up to the warehouse and dug the original parking lamps out of the
spare parts. I think I've discovered why the lenses keep breaking. The
gaskets behind the lenses are cork, not rubber. When they get wet they
swell up. If you snug up the screws that came with the new lamp units
enough to keep them from backing out, the lenses will fracture when the
cork gaskets get wet. The new screws are just machine screws threaded
their full length. When I looked at the old screws, the light bulb came
on behind my eyes. The old screws are threaded less than a quarter
inch, then there is a shoulder that continues up to the screw head. The
old screws can be tightened and still leave expansion room for the
lenses. Once again, the off-shore remanufacturers did not go the full
distance to provide a quality part ~!@#$%^
I hope this problem is solved now.
March
26th 2003 'Nother
parking lamp lense fell out on the way to work today. As before, the
area around the screw boss had fractured. The screws and bits of the
plastic around them remained in place. The last time this happened I
went up to the warehouse and dug the original parking lamps out of the
spare parts. I think I've discovered why the lenses keep breaking. The
gaskets behind the lenses are cork, not rubber. When they get wet they
swell up. If you snug up the screws that came with the new lamp units
enough to keep them from backing out, the lenses will fracture when the
cork gaskets get wet. The new screws are just machine screws threaded
their full length. When I looked at the old screws, the light bulb came
on behind my eyes. The old screws are threaded less than a quarter
inch, then there is a shoulder that continues up to the screw head. The
old screws can be tightened and still leave expansion room for the
lenses. Once again, the off-shore remanufacturers did not go the full
distance to provide a quality part ~!@#$%^
I hope this problem is solved now.
May 18th 2003 I've been trying to get the unknown 12v voltage regulator off the driver side inner fender for some time now but one of the mounting machine screw/hex nuts is hopelessly rusted. I had BillyBob's front wheels off today to work inside the wheelwell. I finally quit pussy-footin' around an' used the air-powered cut-off wheel to cut the hex nut off from below. I'm still out of luck tho' . . . The voltage regulator does not have any part numbers or brand names on it anywhere, inside, outside, top or bottom. This thing is as nondescript as they come.
 June
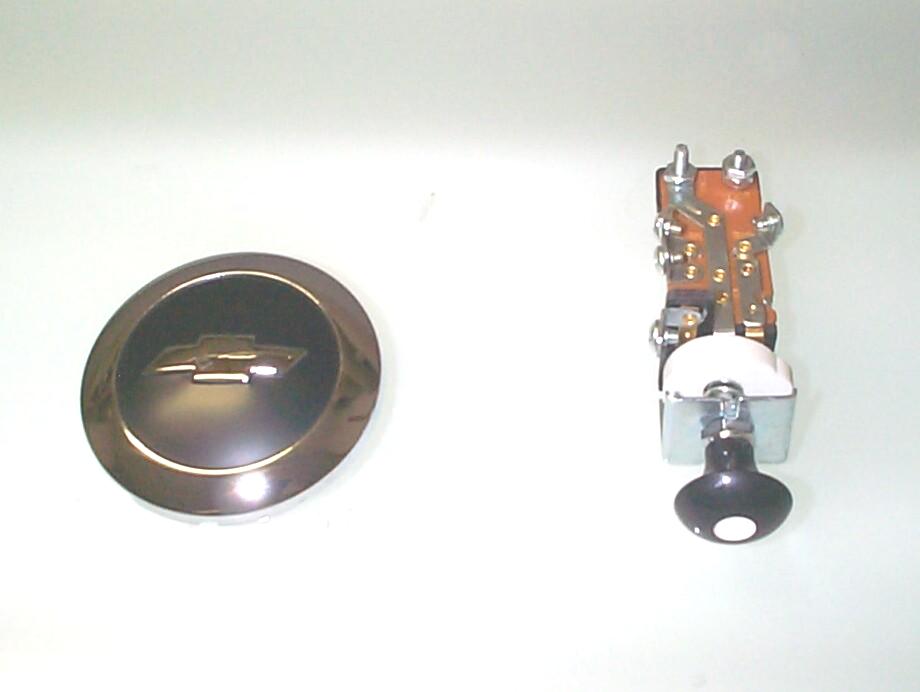
3rd 2003 Received an
order from Jeff McCoy at Bowtie Bits yesterday. Two items
that I haven't seen anywhere else yet: a repop 54-55 horn button and a
replacement headlight switch with the correct 54-55 1st series knob on
it. I messed up BillyBob's original horn button some when I was trying
to paint it. I will have another go at repairing it somewhere down the
line. I have a similar replacement headlight switch in inventory that I
got from Chevy Duty but it has this butt ugly little tan knob on it
that doesn't look like anything else on the dashboard so I designated
it for emergency use only.
June
3rd 2003 Received an
order from Jeff McCoy at Bowtie Bits yesterday. Two items
that I haven't seen anywhere else yet: a repop 54-55 horn button and a
replacement headlight switch with the correct 54-55 1st series knob on
it. I messed up BillyBob's original horn button some when I was trying
to paint it. I will have another go at repairing it somewhere down the
line. I have a similar replacement headlight switch in inventory that I
got from Chevy Duty but it has this butt ugly little tan knob on it
that doesn't look like anything else on the dashboard so I designated
it for emergency use only.
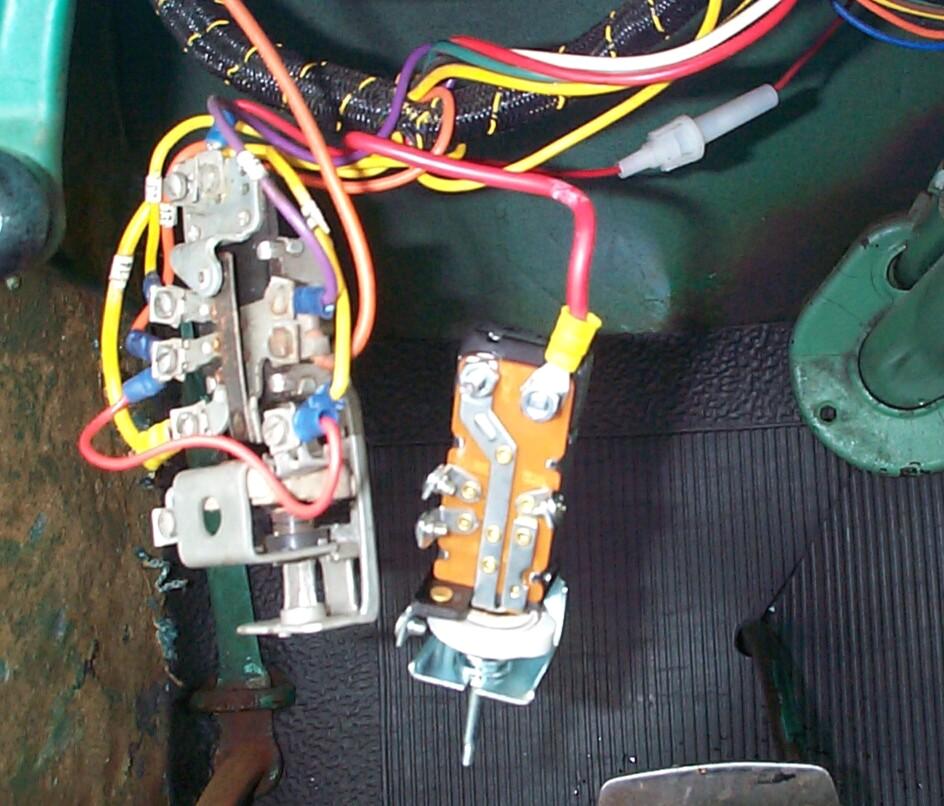 June
7th 2003 Wanted to
replace a water pump today but I've got to paint a pulley and fanblade
first and the rainy conditions aren't conducive to painting. While
waiting for it to dry up, I decided to install the replacement
headlight switch since it's slightly drier inside the truck. The new
replacement switch has fewer terminals than the original so some
brainstorming was required. With the help of BillyBob's wiring diagram
and the labels on the new switch I was able to get everything
connected. Basically, items that had a fuse and/or switch (turn
signals, brake light) was connected to the hot "BAT" terminal or the
hot "Aux" terminal (dome light). Rest of the wires had corresponding
terminals on the new switch to connect to. The new switch has the same
tang to locate it properly behind the dashboard, then the original
ferrule could be slipped over the knob shaft and screwed down tight.
Finally the new plastic 54-55 knob could be screwed on the end of the
shaft and tightened (by gripping the shaft with pliers to keep it from
twisting). Works good! Then BillyBob's wiring diagram was updated once
again.
June
7th 2003 Wanted to
replace a water pump today but I've got to paint a pulley and fanblade
first and the rainy conditions aren't conducive to painting. While
waiting for it to dry up, I decided to install the replacement
headlight switch since it's slightly drier inside the truck. The new
replacement switch has fewer terminals than the original so some
brainstorming was required. With the help of BillyBob's wiring diagram
and the labels on the new switch I was able to get everything
connected. Basically, items that had a fuse and/or switch (turn
signals, brake light) was connected to the hot "BAT" terminal or the
hot "Aux" terminal (dome light). Rest of the wires had corresponding
terminals on the new switch to connect to. The new switch has the same
tang to locate it properly behind the dashboard, then the original
ferrule could be slipped over the knob shaft and screwed down tight.
Finally the new plastic 54-55 knob could be screwed on the end of the
shaft and tightened (by gripping the shaft with pliers to keep it from
twisting). Works good! Then BillyBob's wiring diagram was updated once
again.
June 21st 2003 Florida's rainy season this year is, well, rainy. Today, so far, I'm getting an occasional misting rain but the forecast is for deluge. Started out with monthly maintenance. I am really butterfingered today . . . dropin' everything. Wrenches, bolts, radiator cap. The list is endless. I carefully drained the remaining drops of gear oil from one container into another half full container, then knocked them both over and lost more gear oil on the shed floor than I'd saved! Turned the air blue with foul language for a minute or two at that point.
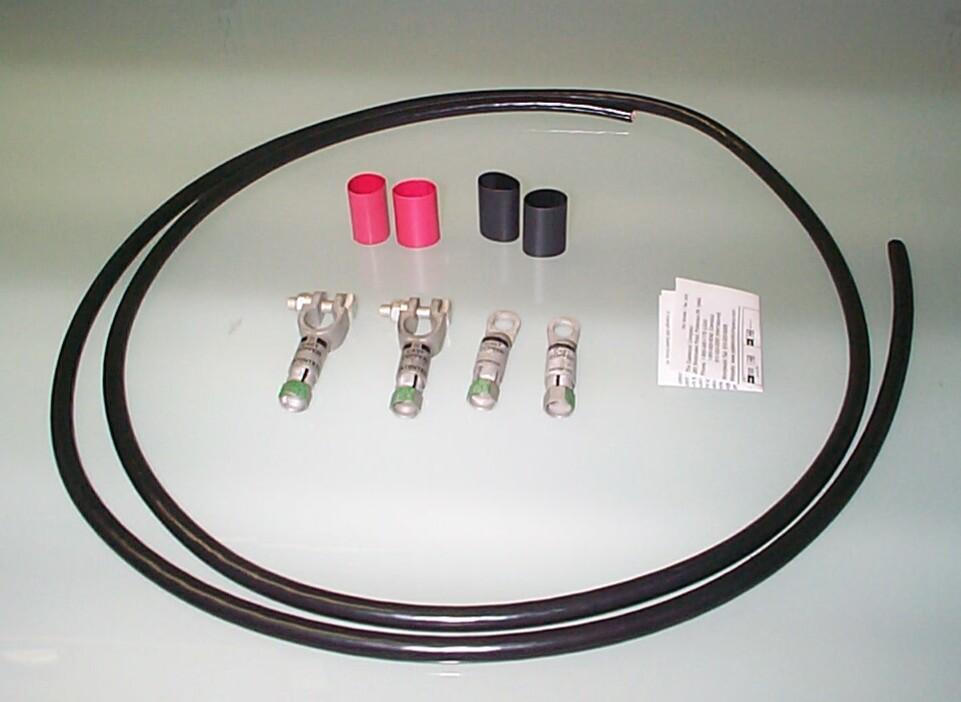 Back
when I first started addressing BillyBob's electrical system, I knew a
lot less about electrical issues and I still don't know much. At that
time I replaced the battery cables with a red #2 wire positive cable
and a black #6 ground cable. With the help of Randy Rundell's book and
fellow oletrucks maillist member Bill Hanlon, I decided to eventually
replace the #6 cable with a #2 cable to match the red positive cable.
To those ends, I recently purchased Eastwood's Battery Cable and
Connector Kit (#25080). This kit contains an eight foot length of #2
cable (just enuf if you're careful), two battery terminal compression
connectors and two ring compression connectors, and two black and two
red lengths of heat shrink insulation. Also got Eastwood's Cable Cutter
pliers (#25066) which aren't in the picture. The ring connectors are a
bit big for the starter terminal and ground bolt where these connectors
attach so I got a couple of smaller copper crimp connectors at a local
FLAPS.
Back
when I first started addressing BillyBob's electrical system, I knew a
lot less about electrical issues and I still don't know much. At that
time I replaced the battery cables with a red #2 wire positive cable
and a black #6 ground cable. With the help of Randy Rundell's book and
fellow oletrucks maillist member Bill Hanlon, I decided to eventually
replace the #6 cable with a #2 cable to match the red positive cable.
To those ends, I recently purchased Eastwood's Battery Cable and
Connector Kit (#25080). This kit contains an eight foot length of #2
cable (just enuf if you're careful), two battery terminal compression
connectors and two ring compression connectors, and two black and two
red lengths of heat shrink insulation. Also got Eastwood's Cable Cutter
pliers (#25066) which aren't in the picture. The ring connectors are a
bit big for the starter terminal and ground bolt where these connectors
attach so I got a couple of smaller copper crimp connectors at a local
FLAPS.
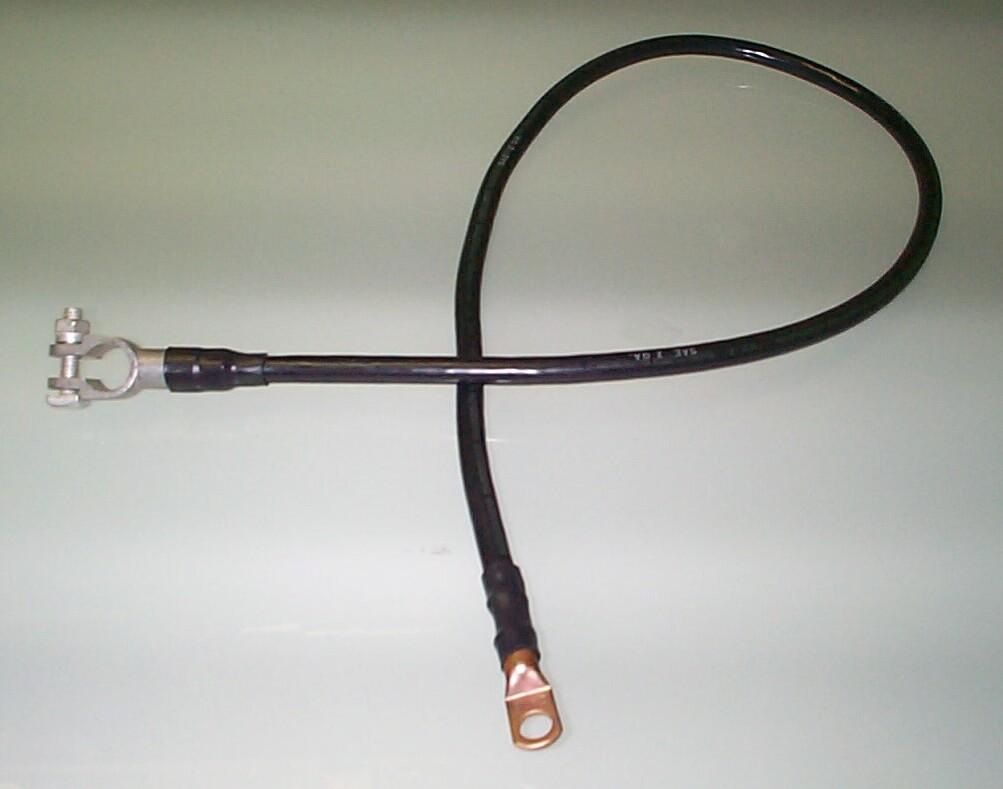 Used
some of the cable to reroute to a secondary cut-off switch, then
proceeded to make a new ground cable. Removed the old #6 ground cable
and used it to measure the length for the new #2 cable. Stripped an
inch of insulation off one end and crimped the FLAPS copper ring
connector on it. Then tried to solder the connection with my small
computer tool kit soldering iron. About the time I realized it was too
small for the job, the soldering iron cord got caught on something and
kept the soldering iron from going any further in the direction my hand
was going, and my fingers went down to the the hot end of the iron
causing some of my smoke to escape my body. ~!@#$%
Good news is that the the iron wasn't very hot from it's efforts to
heat up the cable and connector and that a callosed part of my hand
only made brief contact. A couple of my fingerprints look like the
sepia woodgrain in a kid's woodburning kit but that's about it. I don't
even think I'm gonna get a blister. Enuf of this. Pulled out the MAPP
torch which made the connector hot enough to sweat in the solder.
Installed the battery terminal compression connector on the other end.
Finished up with the black heat shrink insulation segments applied
using a hair dryer. Installed the cables, tested and cleaned up. Came
inside to update the BillyBob wiring diagram.
Used
some of the cable to reroute to a secondary cut-off switch, then
proceeded to make a new ground cable. Removed the old #6 ground cable
and used it to measure the length for the new #2 cable. Stripped an
inch of insulation off one end and crimped the FLAPS copper ring
connector on it. Then tried to solder the connection with my small
computer tool kit soldering iron. About the time I realized it was too
small for the job, the soldering iron cord got caught on something and
kept the soldering iron from going any further in the direction my hand
was going, and my fingers went down to the the hot end of the iron
causing some of my smoke to escape my body. ~!@#$%
Good news is that the the iron wasn't very hot from it's efforts to
heat up the cable and connector and that a callosed part of my hand
only made brief contact. A couple of my fingerprints look like the
sepia woodgrain in a kid's woodburning kit but that's about it. I don't
even think I'm gonna get a blister. Enuf of this. Pulled out the MAPP
torch which made the connector hot enough to sweat in the solder.
Installed the battery terminal compression connector on the other end.
Finished up with the black heat shrink insulation segments applied
using a hair dryer. Installed the cables, tested and cleaned up. Came
inside to update the BillyBob wiring diagram.
July 12th 2003 Wuz in Pennsylvania over Independence Day for a family reunion. On the drive up, I intersected with the "Great Race" group coming out of Chattanooga in the driving rain. Those folks are real troopers, 'specially the ones driving the old open cockpit racecars from the twenties and thirties. I passed seven of the 117 contestants, drenched and bookin' right along at about sixty mph (They only use the interstates to get in and out of the host cities each day).
Before I went North, I cleaned BillyBob's taillights and managed to make them stop working in the process. Gonna try to straighten out that problem today. hooked up a pair of alligator clip jumpers between the taillight mounting studs and the rear bumper . . . Eureka! I have lights. Looks like I screwed up my ground by waxing the taillight brackets. Disassembled the taillights and brackets and sanded the mounting hole areas to improve the ground contact. Re-assembled and everything is hunky-dory again.
July 25th 2003 Back in early June when I got my first order from Bowtie Bits, they sent along a catalog which has a lot more stuff than the website. One of the "new" items they were listing was a 1954-59 Chevy/GMC Turn Signal Kit (#TF-549-TSKRB). This is a rebuilt original factory accessory and they are as rare as hens' teeth. I called up and Jeff McCoy answered the phone. Ordered one from him and he asked if my info was on record and I said yes. Nothing happened during June and I thought that maybe the order slipped thru the cracks but yesterday the UPS man turned up with the turn signal kit.
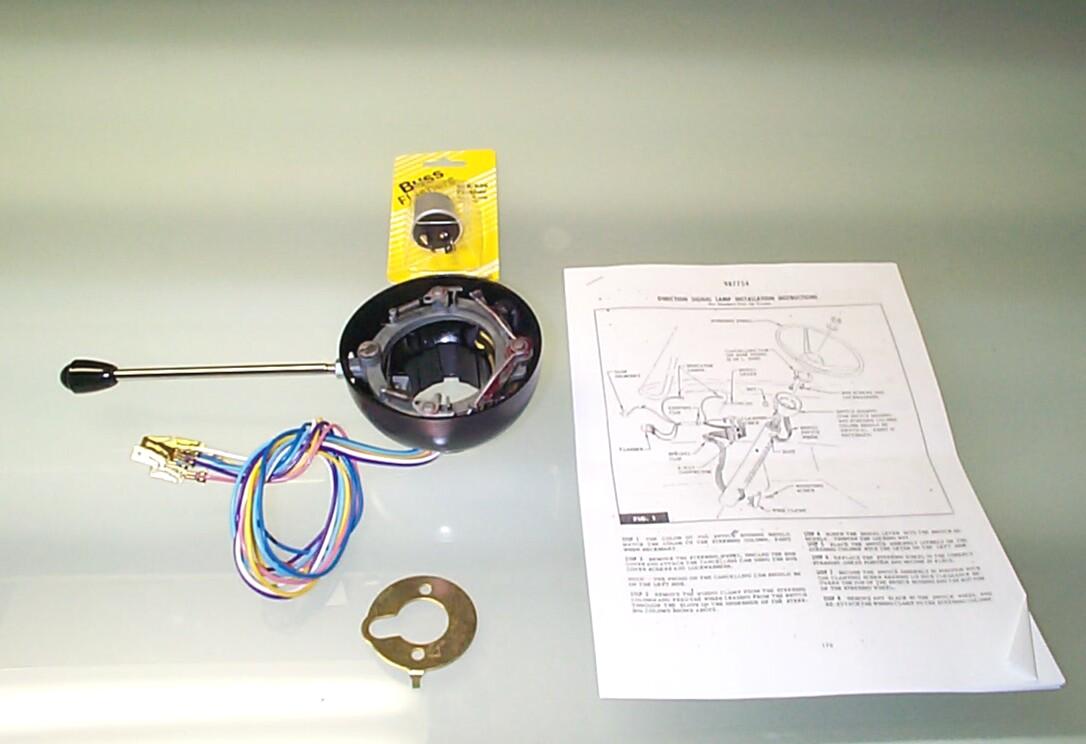 Now,
I can feel the spirit of my Dad again, looking over my shoulder and
giving me the dickens for buying this doo-hickey when the aftermarket
strap-on turn-signal director is working perfectly well and has the
additional functionality of four-way flashers which the original
doesn't have. "But the original has a self-canceling
feature, Dad" I offer silently and weakly. The kit
also includes a flasher (two-prong), the canceling cam, and
installation instructions for a Task Force truck (which aren't
completely applicable for BillyBob).
Now,
I can feel the spirit of my Dad again, looking over my shoulder and
giving me the dickens for buying this doo-hickey when the aftermarket
strap-on turn-signal director is working perfectly well and has the
additional functionality of four-way flashers which the original
doesn't have. "But the original has a self-canceling
feature, Dad" I offer silently and weakly. The kit
also includes a flasher (two-prong), the canceling cam, and
installation instructions for a Task Force truck (which aren't
completely applicable for BillyBob).
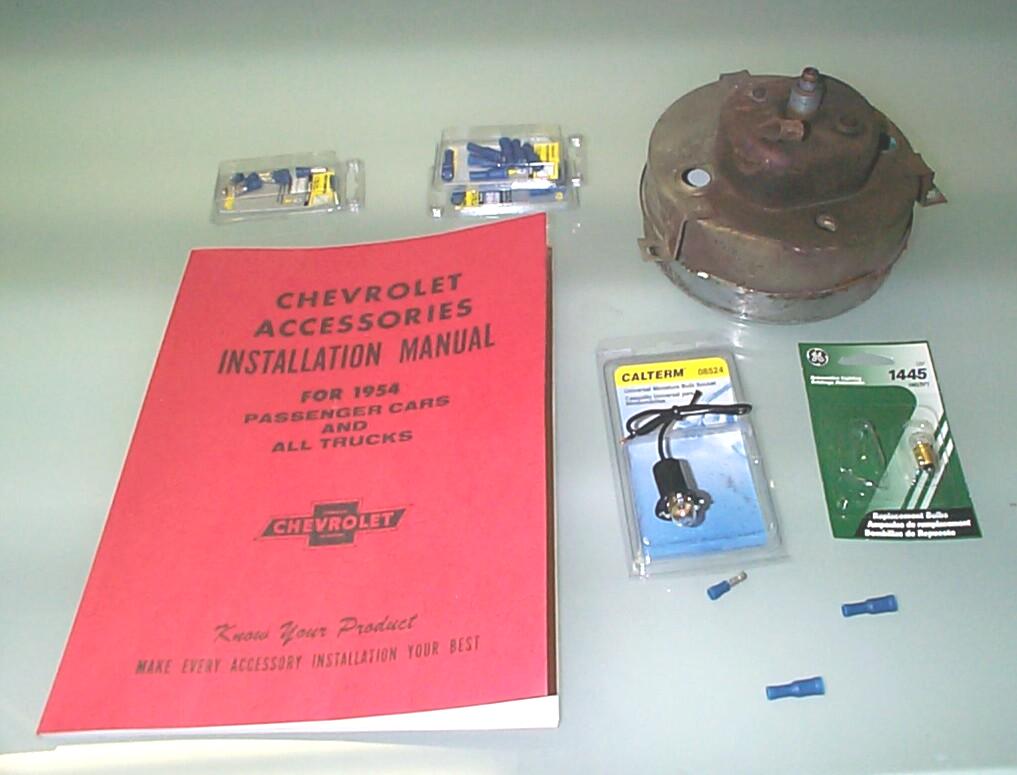 Last
year I got the "Chevrolet Accessories Installation Manual for 1954
Passenger Cars and All Trucks" from Chevy Duty and this book shows the
installation procedure for BillyBob. By reviewing these two manuals and
BillyBob's current wiring diagram I was able to figure out most of the
necessary connections. I want to try to make this work with my existing
three-prong flasher and include a working indicator light on the dash
so, it being a slow afternoon, I made an excursion to the Discount Auto
Parts store to pick up a Calterm #08524 Universal Miniature Bulb Socket
and a pack of GE #1445 instrument panel bulbs, hoping they are the
right size for the turn signal indicator light hole on the back of the
speedo gauge cluster. It "eyeballs" to be the same as the high beam
indicator which is what I'm trying to match here. I think I already
have a supply of bullet connectors so I should be set.
Last
year I got the "Chevrolet Accessories Installation Manual for 1954
Passenger Cars and All Trucks" from Chevy Duty and this book shows the
installation procedure for BillyBob. By reviewing these two manuals and
BillyBob's current wiring diagram I was able to figure out most of the
necessary connections. I want to try to make this work with my existing
three-prong flasher and include a working indicator light on the dash
so, it being a slow afternoon, I made an excursion to the Discount Auto
Parts store to pick up a Calterm #08524 Universal Miniature Bulb Socket
and a pack of GE #1445 instrument panel bulbs, hoping they are the
right size for the turn signal indicator light hole on the back of the
speedo gauge cluster. It "eyeballs" to be the same as the high beam
indicator which is what I'm trying to match here. I think I already
have a supply of bullet connectors so I should be set.
July 26th 2003 Stopped off at the warehouse on the way to the Krash Lab this morning to pick up BillyBob's old speedo cluster. Prelim fit experiments of the new bulb socket up under the dashboard yesterday resulted in some spirited cussing and little else. The socket is a little too big but I may be able to mitigate the problem with some creative pliers work. The old cluster will allow me to get the fit right at the workbench before crawling up under the dashboard again. The aftermarket director has seven wires and the original only has six. The one that is missing is the wire to the "P" terminal on the three-prong flasher. Since the aftermarket director has the turn indicator lights built-in and the original does not, I made the leap of logic that the "P" wire went to the indicator lamp. I pulled the "P" wire off the flasher and tested my theory . . . everything still worked but the indicator lamps. Good! I will run the "P" wire from the flasher to the indicator in the speedo cluster in the new setup. Maybe "P" stands for "Panel Light". Success! Got the new socket in and working. I mistakenly had the high beam indicator lamp in this hole before. It was relocated to the proper hole at the top of the speedo cluster.
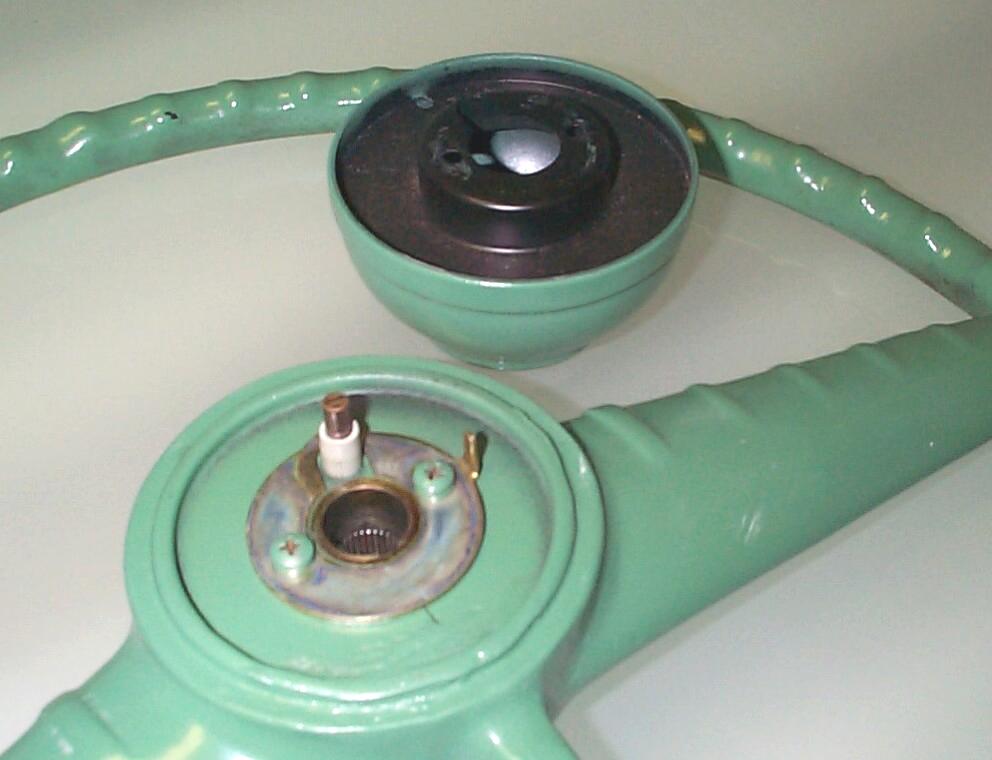 Cut
off the blade connectors on the "new" original director wires and
crimped on bullet connectors to match my existing setup. Dug up my
steering wheel puller and took the steering wheel and old aftermarket
director off. The sky started to rumble a bit in the distance at this
point. Removed the old hub off the back of the steering wheel and
replaced it with the canceling cam. Removed the wiring clamp (where the
horn wire enters) at the bottom of the steering column.
Cut
off the blade connectors on the "new" original director wires and
crimped on bullet connectors to match my existing setup. Dug up my
steering wheel puller and took the steering wheel and old aftermarket
director off. The sky started to rumble a bit in the distance at this
point. Removed the old hub off the back of the steering wheel and
replaced it with the canceling cam. Removed the wiring clamp (where the
horn wire enters) at the bottom of the steering column.
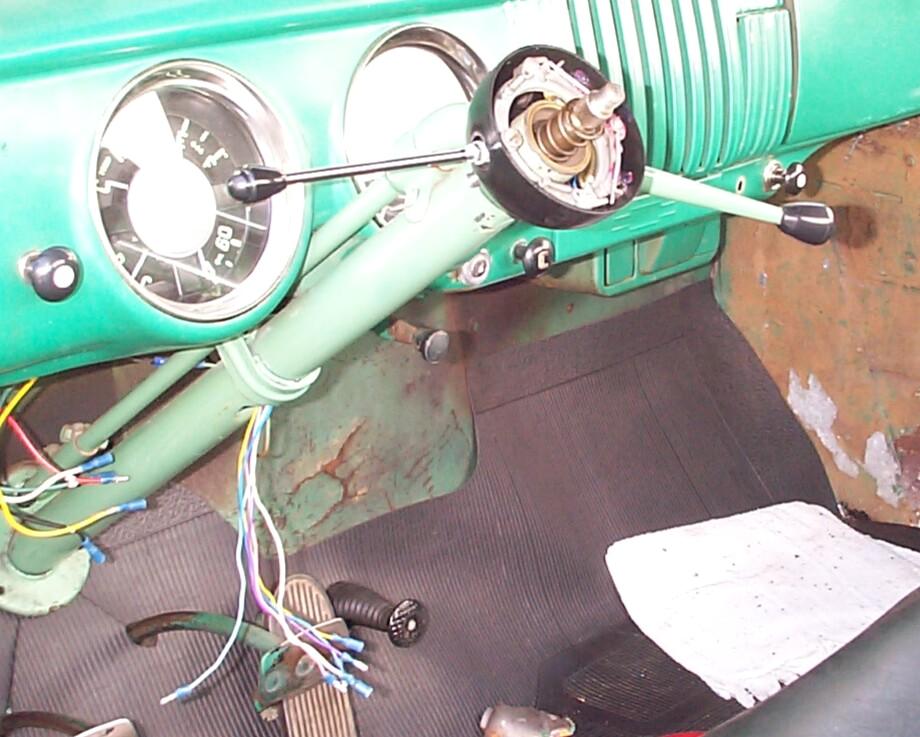 Spent
about a half hour snaking the six wires down inside the steering
column. It's a bit tight with the steering shaft to get all those
connectors thru and care had to be taken not to break the horn wire
connection. It would be real hell to fix that! Slipped the "new"
director on the steering wheel column with the clamping screw loose.
Reinstalled the steering wheel and adjusted the director so that there
was a 1/8" gap between it and the steering wheel, then tightened the
clamp screw. Replaced the wiring clamp at the bottom of the column.
Replaced the steering wheel, connected the wires and tested.
Spent
about a half hour snaking the six wires down inside the steering
column. It's a bit tight with the steering shaft to get all those
connectors thru and care had to be taken not to break the horn wire
connection. It would be real hell to fix that! Slipped the "new"
director on the steering wheel column with the clamping screw loose.
Reinstalled the steering wheel and adjusted the director so that there
was a 1/8" gap between it and the steering wheel, then tightened the
clamp screw. Replaced the wiring clamp at the bottom of the column.
Replaced the steering wheel, connected the wires and tested.
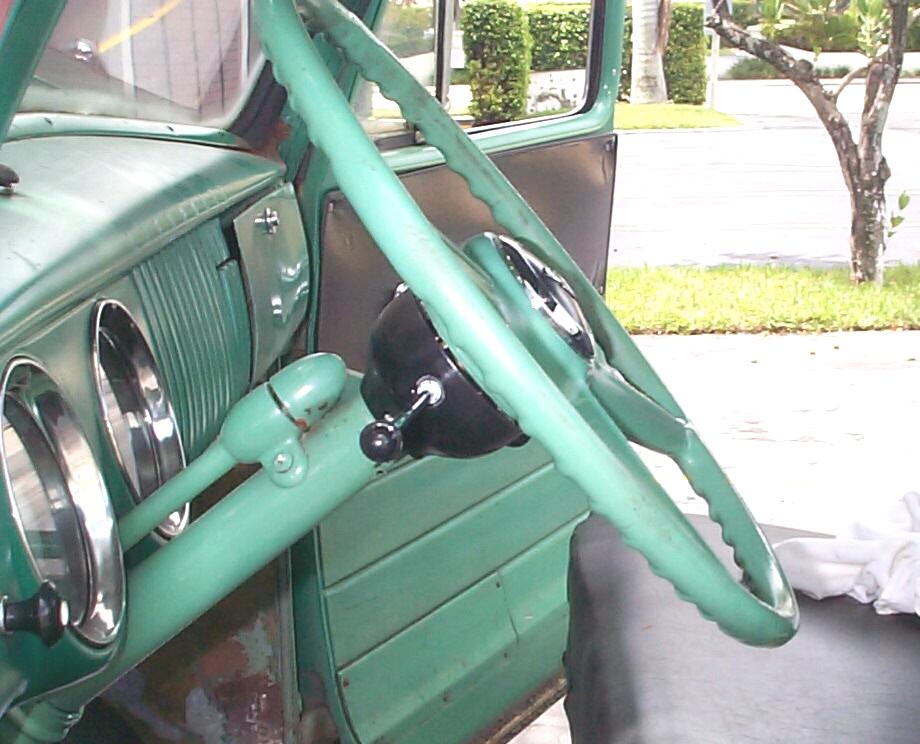 OOPS!
Turning the steering wheel ninety degrees or more to the left beeps the
horn. Pulled the wheel, checked clearances and reinstalled a couple of
times but couldn't find the problem. The third time I put it back
together the horn problem went away. There is more of a gap now between
the steering wheel and director - about 3/16" instead of the spec 1/8".
I'm wondering if I disturbed the horn wire inside the steering mast and
grounded it. I hope not. We'll play it by ear for now (sorry 'bout
that). Gotta paint the director to match the column and wheel but we'll
save that for another time. Went inside for awhile to post updates to
BillyBob's wiring diagram. Then I went for a test run around the block
. . . works good (at least for right hand turns - won't know about left
hand turns til later when I go home).
OOPS!
Turning the steering wheel ninety degrees or more to the left beeps the
horn. Pulled the wheel, checked clearances and reinstalled a couple of
times but couldn't find the problem. The third time I put it back
together the horn problem went away. There is more of a gap now between
the steering wheel and director - about 3/16" instead of the spec 1/8".
I'm wondering if I disturbed the horn wire inside the steering mast and
grounded it. I hope not. We'll play it by ear for now (sorry 'bout
that). Gotta paint the director to match the column and wheel but we'll
save that for another time. Went inside for awhile to post updates to
BillyBob's wiring diagram. Then I went for a test run around the block
. . . works good (at least for right hand turns - won't know about left
hand turns til later when I go home).
That's about enuf fun for this episode. Too late in the day to start anything big so I'll post this log entry before going home. Got lottsa other stuff to report on down the road in other upcoming log entries. Today, when I go home to the Krash Pad, I'll be able to reward myself with a fast food burger and a cigar. On bad days, I have a "consolation" burger and cigar.
| < Back
to Intro |
You can email me at ![]() webmaster@laroke.com
webmaster@laroke.com
Issued Saturday July 26, 2003
Updated Thursday February 15, 2018
copyright © 1996-2018 Larry Robert Kephart all rights reserved
| | LRK Home | | Bio Info | | Krash Khronicles | | LAROKE | |
| | BettyLou | | BillyBob's Garage | | Rat Patrol | | Deerslayer | | Elvira | |
| | Land of the Free and Home of the Brave | |
| | Keppylou's Art | | WWI Soldier's Diary | |