| | LRK Home | | Bio Info | | Krash Khronicles | | LAROKE | |
| | BettyLou | | BillyBob's Garage | | Rat Patrol | | Deerslayer | | Elvira | |
| | Land of the Free and Home of the Brave | |
| | Keppylou's Art | | WWI Soldier's Diary | |
BillyBob Work-in-Progress Log
![]()
WHAT'S NEW is a chronological listing of updates to the BillyBob site.
![]()
TRUCK LINKS including vendor sites for old parts, custom parts, and tools as well as sites for classic car and truck organizations
STORE Operating in association with Amazon.com, books, recordings and tools can be purchased.
PLANNING for the restoration including project schedule and cost estimates.
![]()
TRAVELS WITH BILLYBOB With apologies to Steinbeck, this area of BillyBob's Garage will be used to log the trips BillyBob and I make together.
WORK-IN-PROGRESS is the restoration of parts of BillyBob that I can accomplish without a garage.
PRE-RESTORATION includes log entries of minor repairs and adventures between time of purchase and the time when I started restoration, a piece at a time.
JR'S KORNER JR's Korner is the history of BillyBob before I got him authored by my brother, Wm. C. Kephart.
![]()
BILLYBOB MAINTENANCE Ever changing detailing, oil change, lube, etc. maintenance routines specifically developed for BillyBob, including required tools, materials and procedures.
PARTS SHOP The Parts Shop is a repository of How-To articles. Things that I have done over and over enough times to have developed a procedure. This gives me a checklist and saves brain cells.
STEALTH SHOP Urban residence design with large integrated shop and separate living quarters for a relative or renter.
![]()
You will need the Adobe Acrobat browser plugin to view these wiring diagrams which are in the PDF file format. This format allows zooming and panning. If you don't have this plugin, it can be downloaded and installed (free) from the Adobe site. The button below will take you there.
![]()
BILLYBOB WIRING DIAGRAM Here's the wiring diagram updated with BillyBob's current state 'cepting the third-party strap-on turn-signal director.
STRAP-ON TURN-SIGNAL DIRECTOR/BRAKE LIGHT CIRCUIT This turn signal and brake light circuit diagram shows the current state of the third-party turn-signal director wiring, which will remain in place until I figure out the problems with the OEM turn-signal director. It also shows the OEM headlight switch.
44. Paint and Wire
 January
7th 2006 Man! It's cold
fer South Florida today. Not quite "colder than a well digger's ass in
the Klondike", one of my Dad's favorite sayings, but cold enuf for us
thin-blooded, Floridians. Woke up to forty-five degrees with a forty
degree feel after the wind chill was factored in. I'm not going to be
doing much under the shadetree until it warms up a bit so I was glad I
had plans to meet my friend, John Ray (stovebolt.com moniker "Mowog54")
at Einstein's in Boca Raton for coffee at eight. While we were out in
the parking lot, shivering, and talking trucks, this guy pulled up in
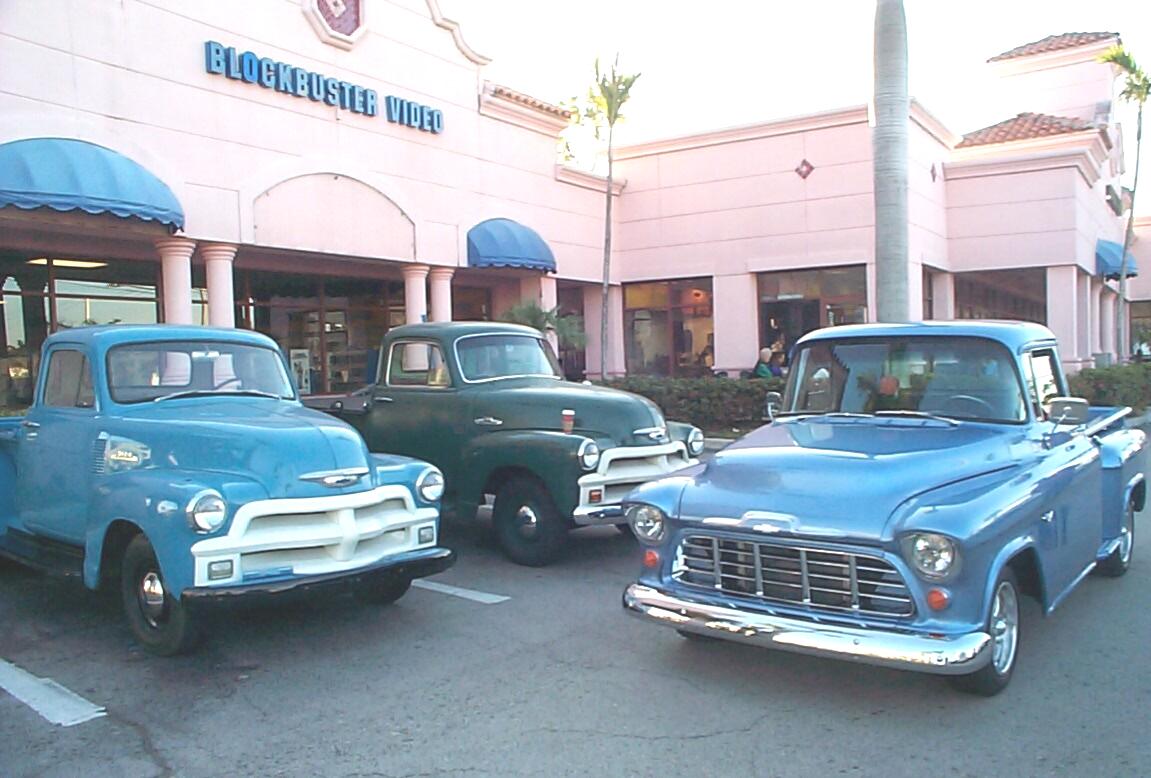
this clean '55 2nd Series. John hollered for him to come over and he
did after he got his coffee. This is a beautiful truck with a
performance 283 in it. I didn't get his name but we gave him the Stovebolt.com
web address and maybe we'll learn more from him there. Not often you
can get a '54, '55 1st and '55 2nd series chebby truck in the same pic.
January
7th 2006 Man! It's cold
fer South Florida today. Not quite "colder than a well digger's ass in
the Klondike", one of my Dad's favorite sayings, but cold enuf for us
thin-blooded, Floridians. Woke up to forty-five degrees with a forty
degree feel after the wind chill was factored in. I'm not going to be
doing much under the shadetree until it warms up a bit so I was glad I
had plans to meet my friend, John Ray (stovebolt.com moniker "Mowog54")
at Einstein's in Boca Raton for coffee at eight. While we were out in
the parking lot, shivering, and talking trucks, this guy pulled up in
this clean '55 2nd Series. John hollered for him to come over and he
did after he got his coffee. This is a beautiful truck with a
performance 283 in it. I didn't get his name but we gave him the Stovebolt.com
web address and maybe we'll learn more from him there. Not often you
can get a '54, '55 1st and '55 2nd series chebby truck in the same pic.
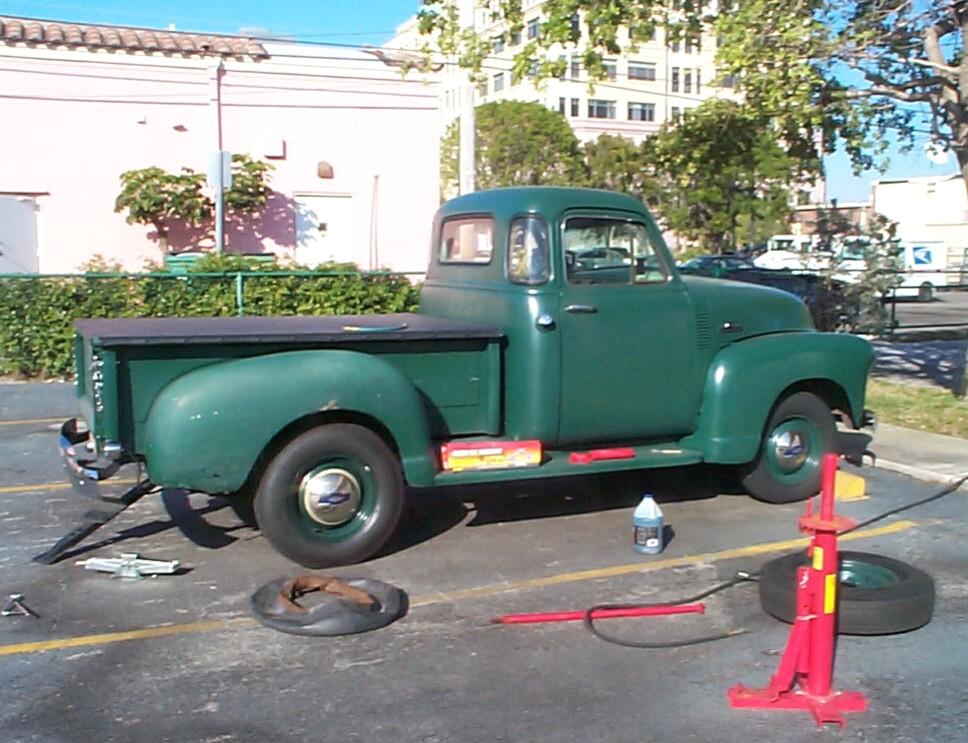 Got
the tools out and waited for the sun. At noon, I watched new PowerBlock
programs on Spike TV. "Trucks" was the only one that was a rerun. By
that time, it was comfortable to work outside but still cool. I decided
to replace the inner tube in the tire that had picked up a drywall
screw a few weeks back. Broke both beads, took the front bead off the
rim and pulled out the punctured tube and removed the drywall screw.
After checking the new tube for leaks, I deflated it and stuffed it
into the old tire. I inflated it slightly to make sure there were no
kinks. Remounted the front bead, spread tire lubricant on both beads
and inflated the tire to 45 psi to seat the beads. Then I rested fer
awhile.
Got
the tools out and waited for the sun. At noon, I watched new PowerBlock
programs on Spike TV. "Trucks" was the only one that was a rerun. By
that time, it was comfortable to work outside but still cool. I decided
to replace the inner tube in the tire that had picked up a drywall
screw a few weeks back. Broke both beads, took the front bead off the
rim and pulled out the punctured tube and removed the drywall screw.
After checking the new tube for leaks, I deflated it and stuffed it
into the old tire. I inflated it slightly to make sure there were no
kinks. Remounted the front bead, spread tire lubricant on both beads
and inflated the tire to 45 psi to seat the beads. Then I rested fer
awhile.
While all the tire foofarah was going on, I also had BillyBob's battery recharging. Tomorrow, gawd-willin' an' the creek don't rise, I plan to change BillyBob's oil. I always take this job as an excuse for an early morning Fort Lauderdale Beach run to warm up the engine and I want the battery fully charged for that.
January 8th 2006 Forty degrees outside when I woke this morning. Had a breakfast cigar and waited until eight before saddling up and heading for the Krash Lab. It was forty-five degrees by then. Started BillyBob and let him idle fer a few minutes while I brewed coffee. Yesterday and today were the first times I had to use the choke this year. Filled my USS Abner Read go-cup with joe and headed down A-1-A to warm BillyBob's engine up for the oil change. The beach run was beautiful and uneventful. Arrived back at the Krash Lab around ten-thirty and started draining the oil.
 January
14th 2006 Two cold
snaps this year, so far, and they are on back-to-back weekends! WTF!
It's warmer than last week but the wind is already above 20 mph this
morning and it feels colder. No painting or sandblasting this weekend.
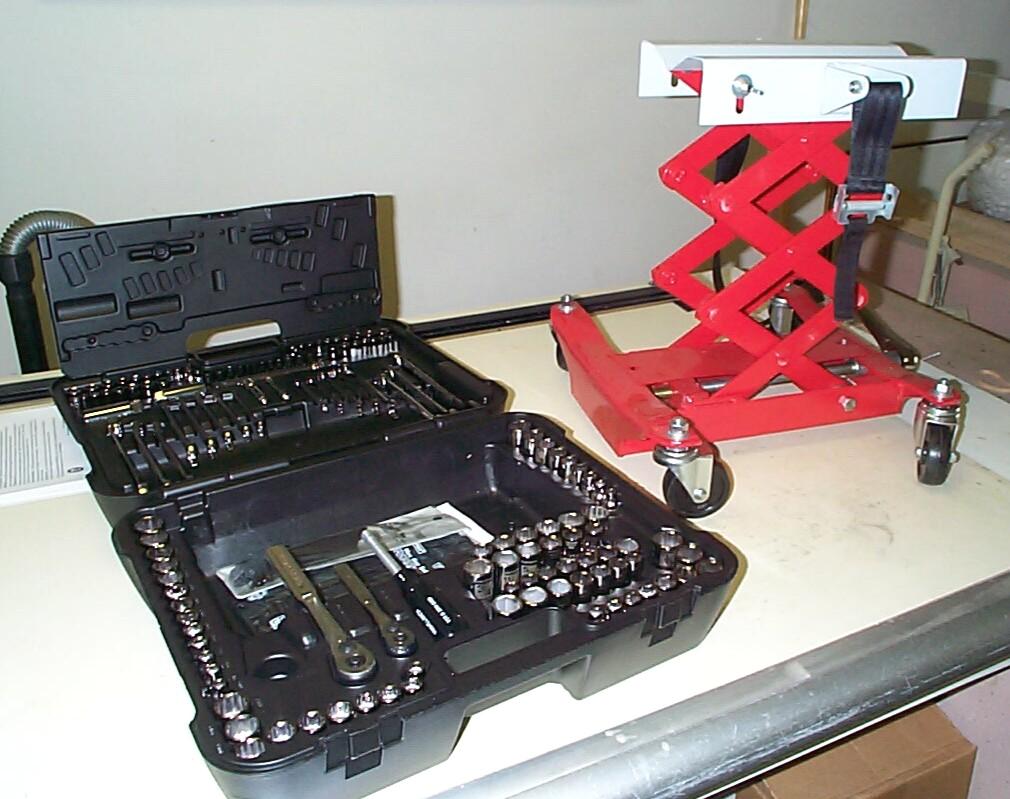
I don't even feel like dragging the tools out of the shed. Received a
transmission jack from Eastwood and a Craftsman 190 pc Mechanics Tool
Set from Sears during the past week. A major upcoming task on Renegade prompted
these purchases but they will be used for BillyBob and BettyLou as well.
The sockets and wrenches arrived in plastic bags and have to be
organized and placed in the molded plastic toolbox. I did this first
then used the socket wrench to put the caster wheels on the tranny
jack. By the time that was finished, it was even more miserable out
with wind gusts up to 35 mph. Curses!
January
14th 2006 Two cold
snaps this year, so far, and they are on back-to-back weekends! WTF!
It's warmer than last week but the wind is already above 20 mph this
morning and it feels colder. No painting or sandblasting this weekend.
I don't even feel like dragging the tools out of the shed. Received a
transmission jack from Eastwood and a Craftsman 190 pc Mechanics Tool
Set from Sears during the past week. A major upcoming task on Renegade prompted
these purchases but they will be used for BillyBob and BettyLou as well.
The sockets and wrenches arrived in plastic bags and have to be
organized and placed in the molded plastic toolbox. I did this first
then used the socket wrench to put the caster wheels on the tranny
jack. By the time that was finished, it was even more miserable out
with wind gusts up to 35 mph. Curses!
January 21st 2006 OK, where wuz I when global warming froze me out of the shadetree garage? Oh yeah, I was giving BillyBob a new coat of Rustoleum, among other things. And, I'm behind on monthly maintenance so, I tackled that first, on all three vehicles, after draggin' out the tools.
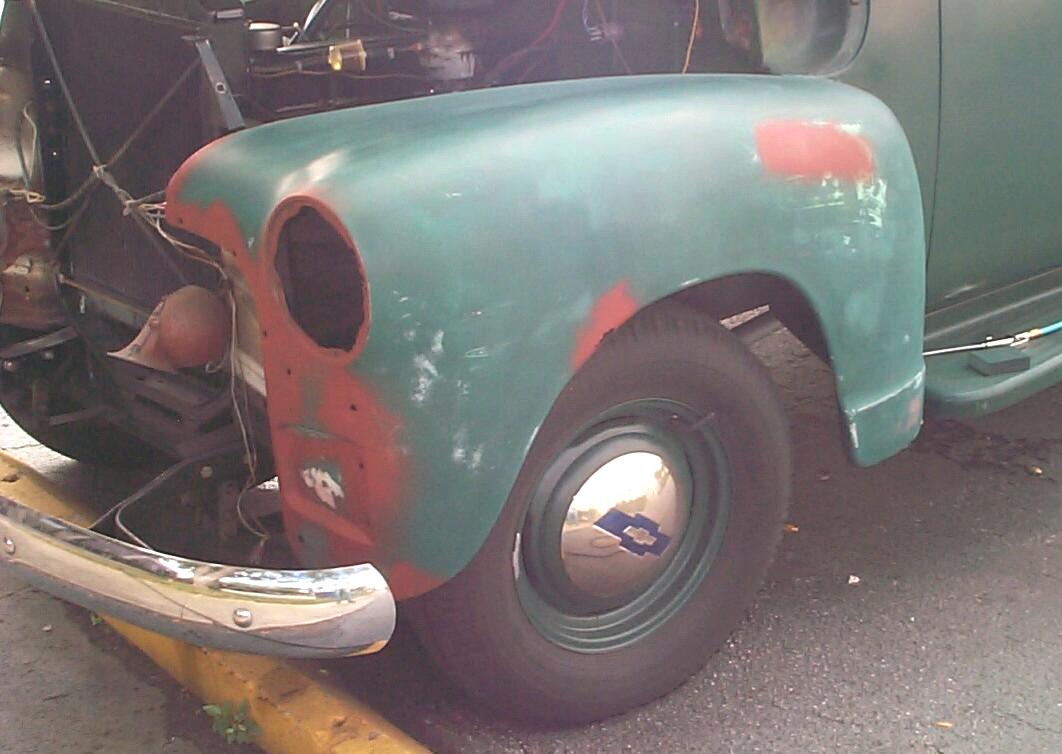
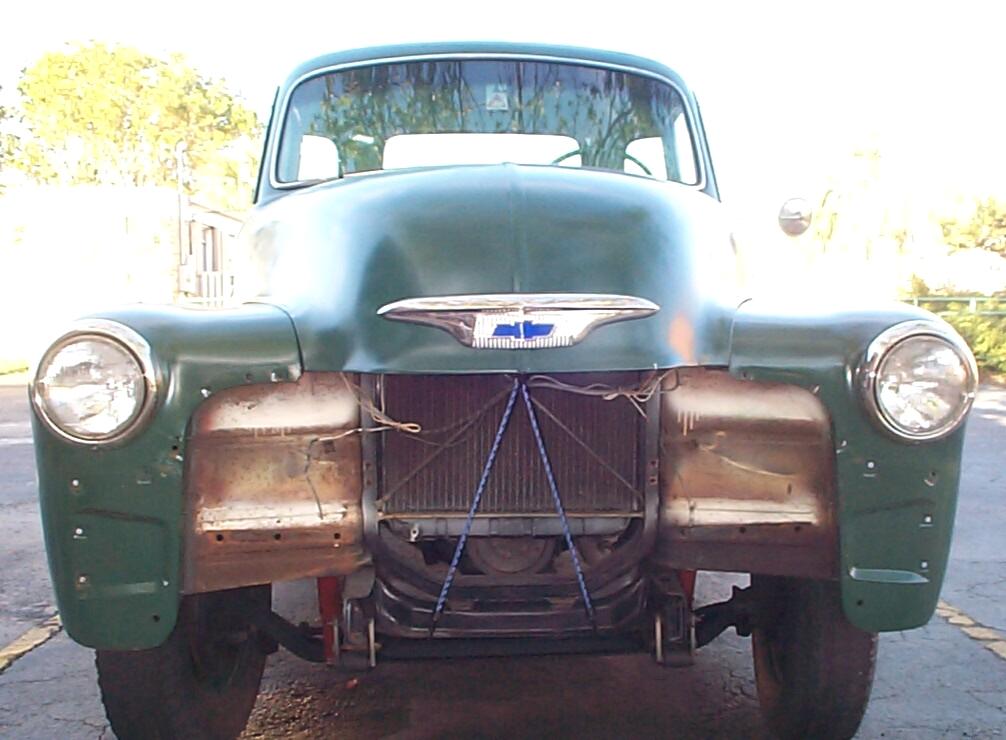
It's trying to rain on the shadetree garage but I started to get the driver side front fender ready for Rustoleum treatment anyway. Removed the parking lamp assemblies and grille. One of the sheetmetal screws in the wheelwell was missing - either I had forgot to put it in when I had the grille off last time or it fell out. Murphy mustuv' been asleep. It was an excellent opportunity to give me another flat tire. Removed the driver side headlight assembly next and went over the crusty areas with the wire cup in the electric angle grinder.
 Got
out the foam sanding block and started going over the rest of the front
fender. Was finshed sanding, PRE Paint Prepping and priming bare spots
with Rust Encapsulator by the time Powerblock was over on Spike TV. Not
long after that, I got nailed with a passing shower (first rain here
during the daytime in a week). I had some packages to open while it was
raining. I had ordered ten Rubbermaid Roughneck 18 gal tote boxes from
Home Improvements. Five cartons arrived last week from USPS. I thought
there might be two totes to the carton but when I opened the cartons,
there was only one per carton and a lot of plastic peanuts. There must
be another shipment yet to come. One of life's great mysteries to me is
why items that can take a beating are well cushioned and delicate items
often are not. These things did not need the styrofoam peanuts. I'll
see if I can save the peanuts in my leaky warehouse bay to pack company
computers when I return them at the end of the lease. Most of the totes
are for waterproof storage of BillyBob parts in that same leaky
warehouse while a couple are reserved for SHTF (Spit Hits The Fan)
emergency supplies at the Krash Pad.
Got
out the foam sanding block and started going over the rest of the front
fender. Was finshed sanding, PRE Paint Prepping and priming bare spots
with Rust Encapsulator by the time Powerblock was over on Spike TV. Not
long after that, I got nailed with a passing shower (first rain here
during the daytime in a week). I had some packages to open while it was
raining. I had ordered ten Rubbermaid Roughneck 18 gal tote boxes from
Home Improvements. Five cartons arrived last week from USPS. I thought
there might be two totes to the carton but when I opened the cartons,
there was only one per carton and a lot of plastic peanuts. There must
be another shipment yet to come. One of life's great mysteries to me is
why items that can take a beating are well cushioned and delicate items
often are not. These things did not need the styrofoam peanuts. I'll
see if I can save the peanuts in my leaky warehouse bay to pack company
computers when I return them at the end of the lease. Most of the totes
are for waterproof storage of BillyBob parts in that same leaky
warehouse while a couple are reserved for SHTF (Spit Hits The Fan)
emergency supplies at the Krash Pad.
January 22nd 2006 Too windy again today to sandblast. It had rained before I got here so I'm waiting fer things to dry out a little and masking off the driver side fender for its Rustoleum treatment. Left my glasses at the Krash Pad and I can't see very well but I'll muddle through.
 PRE
Paint Prepped the fender again and proceeded with the Rustoleum coat.
It was blue sky overhead when I started but a few minutes later, when I
was about two-thirds finished, I was stopped in my tracks by another
shower ~!@#$%^. Switched gears for the
time being and went about cleaning
up the headlight assembly and recharging BillyBob's battery
while I waited for the shadetree garage to dry out again. It continued
to sprinkle off and on but eventually dryed out enuf to finish the
paint coat. Where the rain hit wet paint, it blistered so I may have to
re-sand and paint some of the fender again next week . . . maybe . . .
weather permitting, heh, heh.
PRE
Paint Prepped the fender again and proceeded with the Rustoleum coat.
It was blue sky overhead when I started but a few minutes later, when I
was about two-thirds finished, I was stopped in my tracks by another
shower ~!@#$%^. Switched gears for the
time being and went about cleaning
up the headlight assembly and recharging BillyBob's battery
while I waited for the shadetree garage to dry out again. It continued
to sprinkle off and on but eventually dryed out enuf to finish the
paint coat. Where the rain hit wet paint, it blistered so I may have to
re-sand and paint some of the fender again next week . . . maybe . . .
weather permitting, heh, heh.
It was mid-afternoon by the time I got the headlight, grille and parking lamp assemblies re-installed. Too late to start any new project so, I packed the tools away and went home to the Krash Pad to watch the Steelers beat the Broncos on my new big screen. Being from western Pennslyvania, I was pleased with the outcome. My condolences to BillyBob's Denver fans.
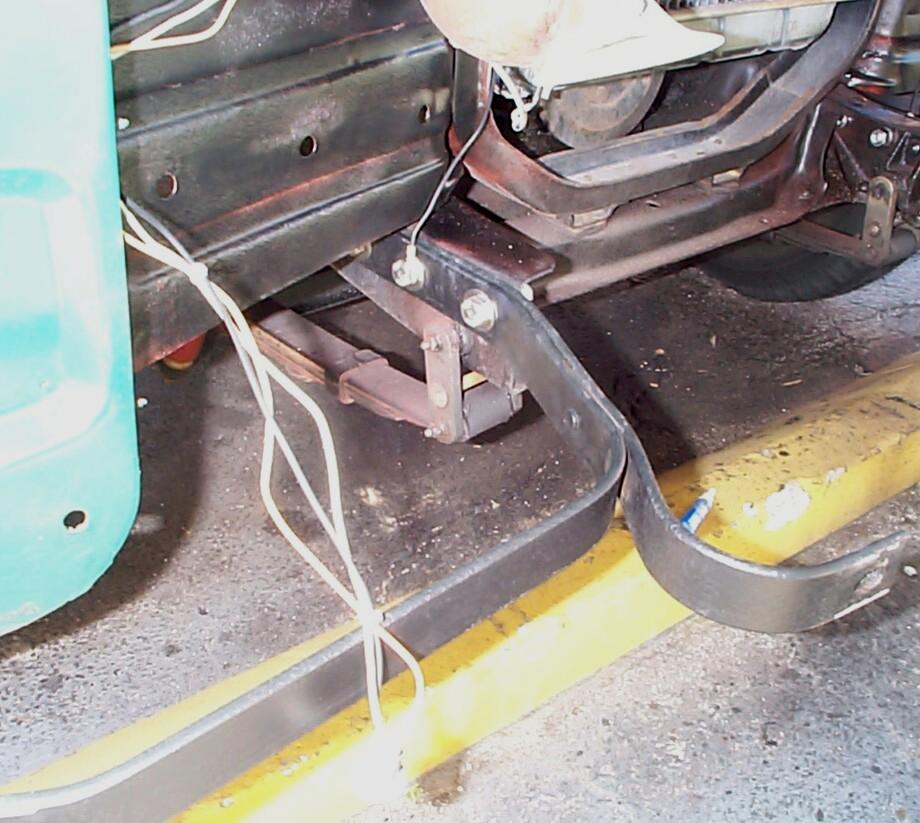
January 28th 2006 Overcast, breezy and cool again today. This whole month has been a slam dunk for miserable weather under BillyBob's shadetree. Dragged the tools out and removed BillyBob's battery for recharging. I hope it's the last time for awhile because, today, I gonna try to fix the charging system problem. First step is to reconfigure the battery cables so that the cut-off switch is on the ground wire instead of the hot wire between battery and starter motor. I think a voltage spike here might be burning out diodes in the Delcotron alternator.
 The
first part of the task is fairly easy. I just move the hot wire
terminal from the starter motor to the ground bolt on the bellhousing.
This is currently a black #2 battery cable with a 1" red heat shrink
collar. Then, the red cable from the other side of the cut-off switch
to the battery was removed. The cable was cut and I was able to remove
the cast copper compression ring terminal from it without damage to the
terminal. I like these cast copper compression terminals but I have not
been able to find replacements so, I will have to use this one on the
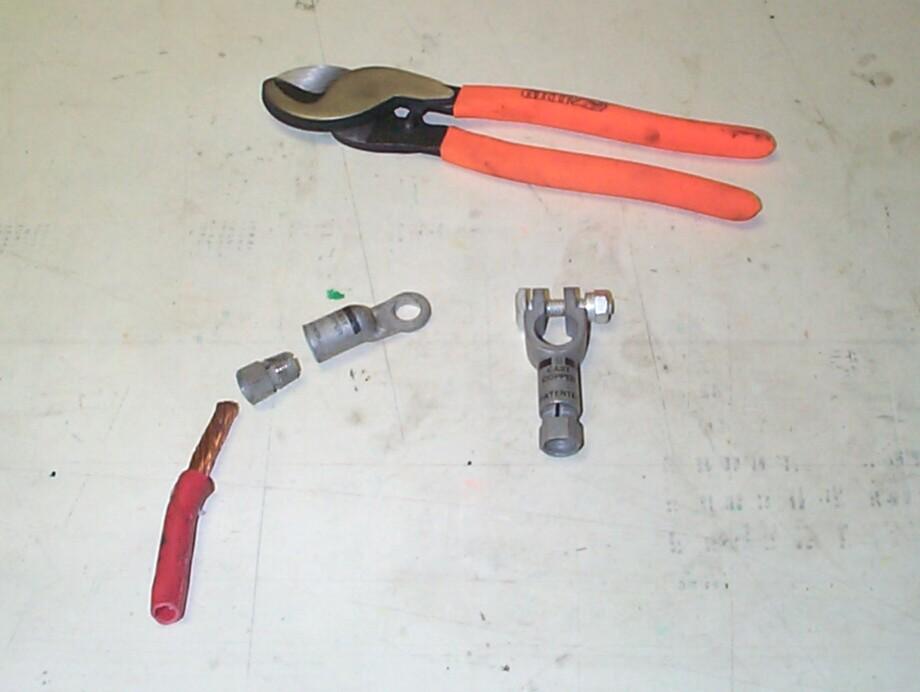
new ground cable. I'm glad I purchased cable cutters some time ago
(from Eastwood, I think).
The
first part of the task is fairly easy. I just move the hot wire
terminal from the starter motor to the ground bolt on the bellhousing.
This is currently a black #2 battery cable with a 1" red heat shrink
collar. Then, the red cable from the other side of the cut-off switch
to the battery was removed. The cable was cut and I was able to remove
the cast copper compression ring terminal from it without damage to the
terminal. I like these cast copper compression terminals but I have not
been able to find replacements so, I will have to use this one on the
new ground cable. I'm glad I purchased cable cutters some time ago
(from Eastwood, I think).
The soldered copper ring terminal from the dissconnected ground cable was cut off and the cable length was re-measured for connection to the cut-off switch. The cable was cut to length, a bit of heat shrink fitted over the end, and the cast copper ring terminal placed on it. It was finished off with the heat shrink and bolted onto the switch. I now have my new ground cable with cut-off switch done. On to the hot cable between starter and battery.
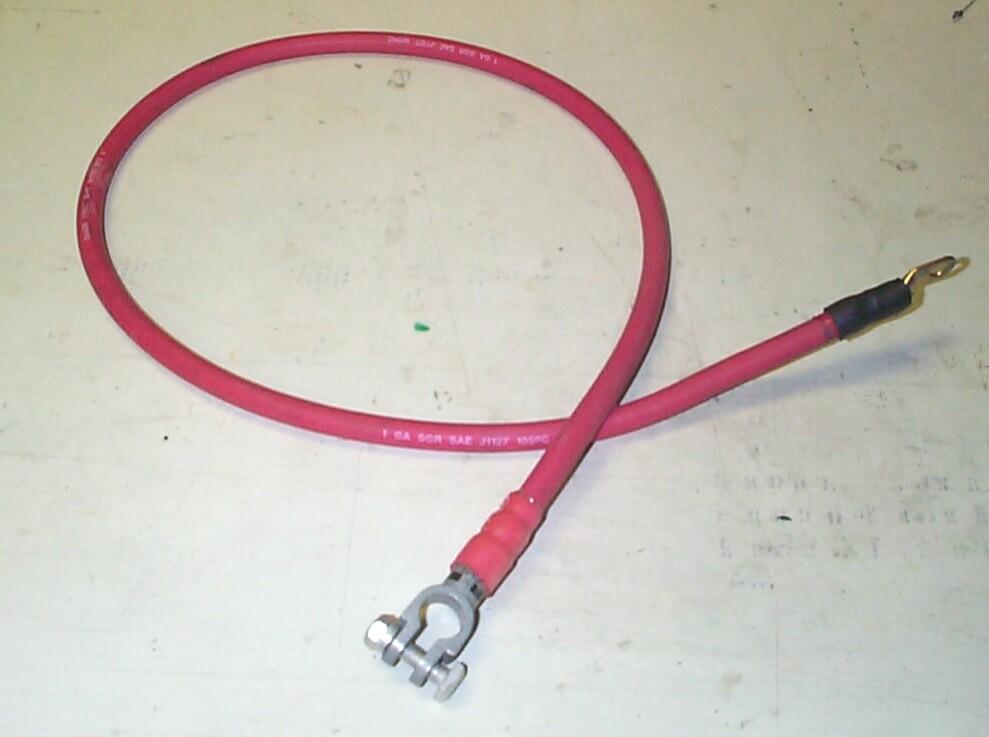 Took
the long #1 red cable I got from Eastwood a couple of months back and
sweated a copper ring terminal onto the end with a MAPP torch and
solder. Finished it with Heat shrink insulation from the Painless
Wiring kit. Connected the cable at the starter temporarily and snaked
it underneath BillyBob to the battery box. Measured the length needed
and removed the cable again. The cable was cut to length, a cast copper
compression battery terminal fitted to the end and another collar of
heat shrink insulation applied to complete the new hot cable. The cable
was then installed on BillyBob. OK, the new battery cable routing is
finished.
Took
the long #1 red cable I got from Eastwood a couple of months back and
sweated a copper ring terminal onto the end with a MAPP torch and
solder. Finished it with Heat shrink insulation from the Painless
Wiring kit. Connected the cable at the starter temporarily and snaked
it underneath BillyBob to the battery box. Measured the length needed
and removed the cable again. The cable was cut to length, a cast copper
compression battery terminal fitted to the end and another collar of
heat shrink insulation applied to complete the new hot cable. The cable
was then installed on BillyBob. OK, the new battery cable routing is
finished.
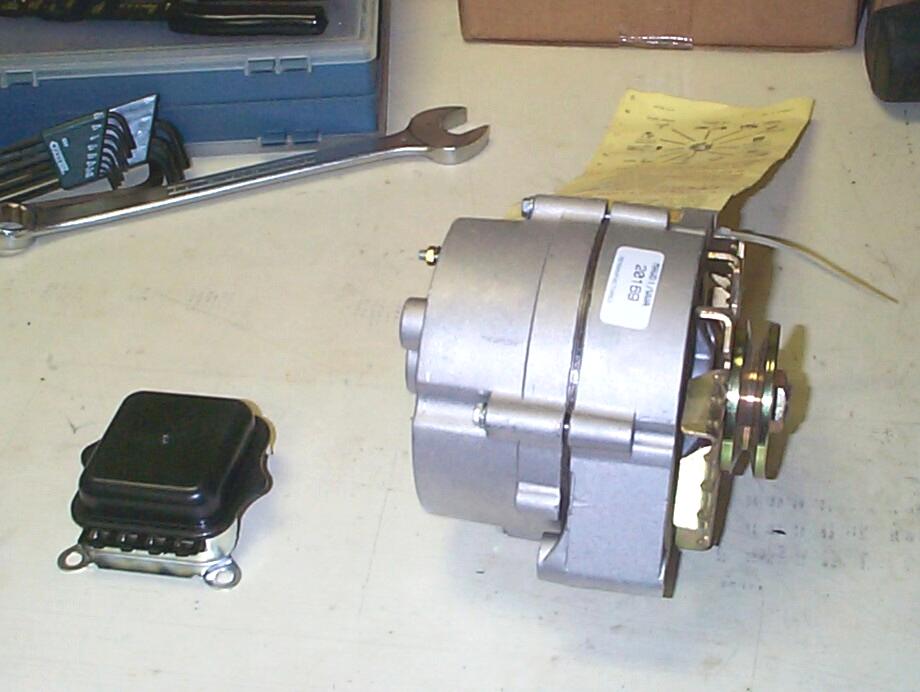 Step
two involves replacing the Delcotron alternator with a new rebuilt unit
I got from RockAuto.com. I
have the fixin's to fix my old alternator but not the time (and maybe
the skill) to do it yet, so I took the easy way out and got another
one. After taking the old alternator out of BillyBob, the pulley was
removed and put on the new replacement alternator. I usually use my
impact wrench to do this as it seems a lot easier than messin' with the
allen wrench/box wrench combo you have to use to do it manually. Took a
bit of fiddling to get the new alternator in. Too many parts in a
restricted space. The previous owner who originally converted to twelve
volt used the generator bracket to mount the alternator with two pipe
spacers and a threaded rod, nutted at both ends to tie it all together.
Works fine but isn't a whole lot of fun when you have to change
alternators.
Step
two involves replacing the Delcotron alternator with a new rebuilt unit
I got from RockAuto.com. I
have the fixin's to fix my old alternator but not the time (and maybe
the skill) to do it yet, so I took the easy way out and got another
one. After taking the old alternator out of BillyBob, the pulley was
removed and put on the new replacement alternator. I usually use my
impact wrench to do this as it seems a lot easier than messin' with the
allen wrench/box wrench combo you have to use to do it manually. Took a
bit of fiddling to get the new alternator in. Too many parts in a
restricted space. The previous owner who originally converted to twelve
volt used the generator bracket to mount the alternator with two pipe
spacers and a threaded rod, nutted at both ends to tie it all together.
Works fine but isn't a whole lot of fun when you have to change
alternators.
 Step
three was a new voltage regulator. I ordered a replacement thru
RockAuto.com and the item that arrived is a solid state device in lieu
of the orginal relay type. That's OK with me as long as I don't burn it
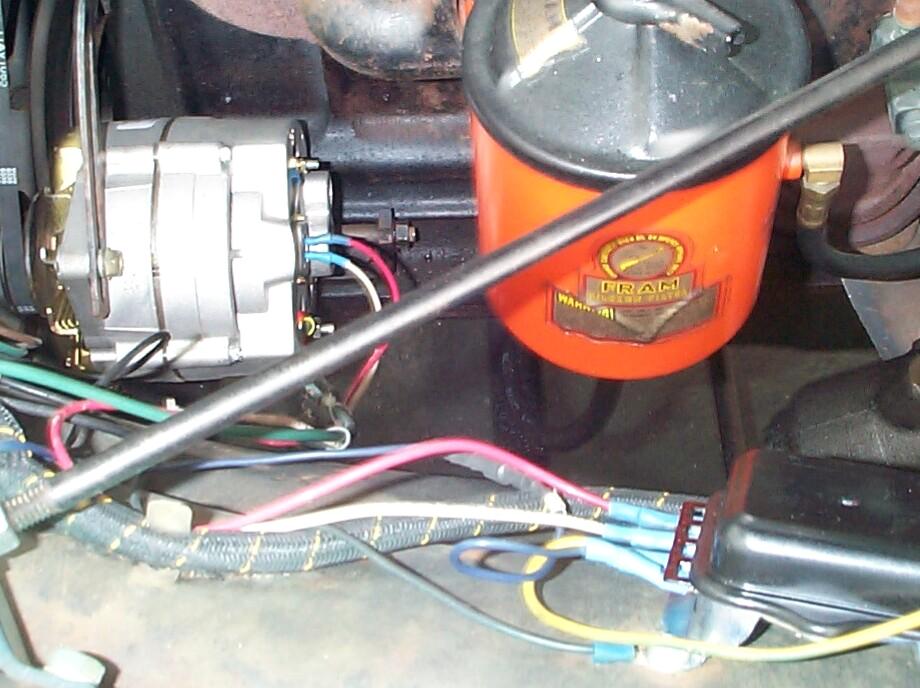
up during installation. Two of the alternator wiring terminals and four
of the regulator terminals are spade receptacle types. A tip suggested
to me some time back by Nate Hall was to finish terminals like this off
with heat shrink insulation to avoid shorts. A good idea which I
employed on all six terminals.
Step
three was a new voltage regulator. I ordered a replacement thru
RockAuto.com and the item that arrived is a solid state device in lieu
of the orginal relay type. That's OK with me as long as I don't burn it
up during installation. Two of the alternator wiring terminals and four
of the regulator terminals are spade receptacle types. A tip suggested
to me some time back by Nate Hall was to finish terminals like this off
with heat shrink insulation to avoid shorts. A good idea which I
employed on all six terminals.
Moment of truth came about two-thirty in the afternoon. Put the charged battery back in and fired BillyBob up. Ammeter shows heavy charging at first as I rev it a few times. It settles down to just slightly charging and when I shut it down ten minutes later, it is still slightly charging but the ammeter needle does not move any more when I blip the throttle. This behavior bodes good so far, and is what I was hoping for. We'll just have to wait and see now if everyting is normal in the next few weeks. I quit for the day as I'm been getting misting rain, off and on, all afternoon an' I've had a bellyfull of that.
January 29th 2006 Overcast again today. Started out by exercising the boss's Panzerwagon and warming up Renegade's engine, in-situ, for an oil change. Normally, a Fort Lauderdale beach run is in order for an oil change but until I get Renegade's clutch fixed, that is out of the question. I continued to work on the Jeep after the oil change by removing the battery for charging and cleaning and refinishing the battery box area. I didn't get any new work done on BillyBob.
February 4th 2006 It's the weekend and 'nother cold front is rollin' thru the shadetree garage. This wouldn't bug me so much if we weren't having nice weather during the workweeks - The bad weather streak is primarily on the weekends an' that's what is puttin' the burr under my saddle!
We've got an 80% rain chance, dropping as much as 1" on us forecast for today and BillyBob's garage was already wet from the first wave when I arrived. I'm in a quandry. Often, when I trust the forecasters, I feel snookered at the end of the day when it doesn't rain and I didn't get any BillyBob work done. Last week's charging system work appears successful and I'm feeling cocky as a result. Damn the tornados, full speed ahead!
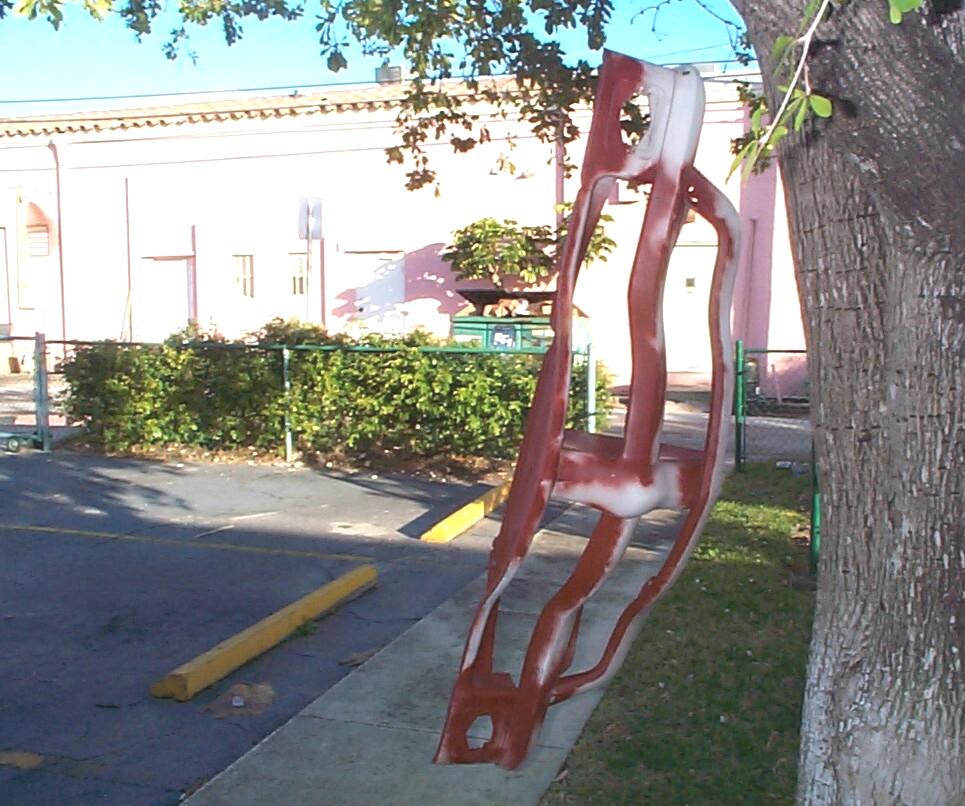
Dragged out the tools and took off the upper radiator baffle, parking lamp assemblies and grille again. Then, pried all the mounting screw clips off the grille and got the electric angle grinder and wire cup out for a session. Rough areas where the wire wheel couldn't get to were wire brushed by hand. This is a stage one job to preserve this grille a little longer while I build a new one. The back of this thing is solid rust and "bondo worms" where some previous owner had repaired a fender bender. I hung the grille up in the shadetree for PRE Paint Prepping and Rust Encapsulator treatment. Last sunday, a pair of doves built a nest above my usual painting spot and are expecting. I moved around to the other side of the tree and found a new spot for this session.
 Took
the horns, bumper and bumper brackets off BillyBob while the Rust
Encapsulator was setting up. It was noon and getting dark on the
western horizon. Wind had picked up to the point that paint was not
getting on the grille with the rattlecan nozzle only two inches away!
Murphy wins! I started cleaning up the tools when my Boss stuck his
head out the back door and asked for assistance in getting a document
printed from the laptop of one of his clients he was having a meeting
with. I haven't installed WiFi in the Krash Lab yet so it's a clunky
process of file transfer, etc. By the time that was accomplished, it
was raining cats and dogs and all the things I hadn't yet gotten
undercover were gettin' a soaking ~!@#$%^
Took
the horns, bumper and bumper brackets off BillyBob while the Rust
Encapsulator was setting up. It was noon and getting dark on the
western horizon. Wind had picked up to the point that paint was not
getting on the grille with the rattlecan nozzle only two inches away!
Murphy wins! I started cleaning up the tools when my Boss stuck his
head out the back door and asked for assistance in getting a document
printed from the laptop of one of his clients he was having a meeting
with. I haven't installed WiFi in the Krash Lab yet so it's a clunky
process of file transfer, etc. By the time that was accomplished, it
was raining cats and dogs and all the things I hadn't yet gotten
undercover were gettin' a soaking ~!@#$%^
 February
5th 2006 Fifty degrees
this morning in the shadetree garage but sunny and not too breezy. Got
the grille back out of the shed where I'd put it yesterday during the
gullywasher and hung it up in the tree again for another PRE Paint Prep
and a finish coat of Rustoleum "Satin Heirloom White" since I couldn't
find the "Shell White" I've used in the past. Dumped the whole can on
the grille. It was barely enuf, even for a stage I job.
February
5th 2006 Fifty degrees
this morning in the shadetree garage but sunny and not too breezy. Got
the grille back out of the shed where I'd put it yesterday during the
gullywasher and hung it up in the tree again for another PRE Paint Prep
and a finish coat of Rustoleum "Satin Heirloom White" since I couldn't
find the "Shell White" I've used in the past. Dumped the whole can on
the grille. It was barely enuf, even for a stage I job.
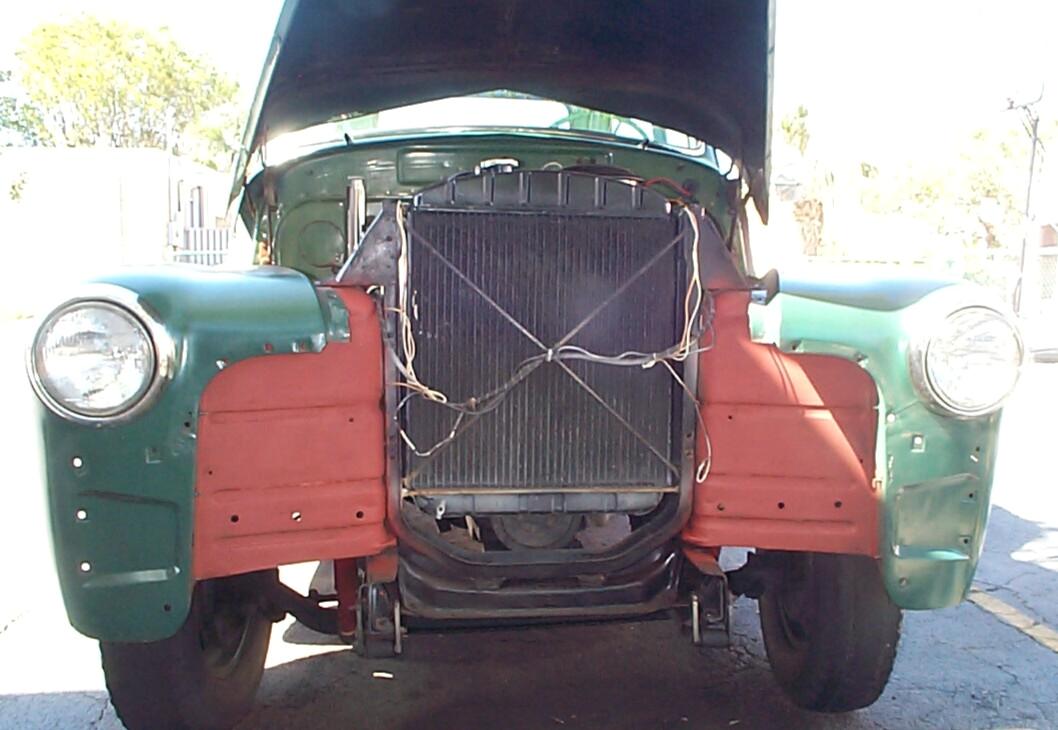
 Took
the bungie cord used to secure BillyBob's hood off and started to prep
the area behind the grille. This area is virgin BillyBob as far as
restoration efforts go. Nebber bin touched since I've owned him except
for the radiator support. Today I'm gonna give the inner fenders in
this area (between the radiator support and the fenders) a stage I
finish. I have a small lubricant leak, or three, on the driver's side
and this area of the engine compartment always loads up with oily dirt
between chassis degreasings. I think some of it is engine oil and some
of it is steering box lube. At any rate this side had to be degreased
with Simple Green, water, wire brushes and shop rags first.
Took
the bungie cord used to secure BillyBob's hood off and started to prep
the area behind the grille. This area is virgin BillyBob as far as
restoration efforts go. Nebber bin touched since I've owned him except
for the radiator support. Today I'm gonna give the inner fenders in
this area (between the radiator support and the fenders) a stage I
finish. I have a small lubricant leak, or three, on the driver's side
and this area of the engine compartment always loads up with oily dirt
between chassis degreasings. I think some of it is engine oil and some
of it is steering box lube. At any rate this side had to be degreased
with Simple Green, water, wire brushes and shop rags first.
 Went
over the affected areas next with wire cup in the electric angle
grinder then popped off the four rusted wiring clips for the parking
lamp wires. PRE Paint Prepped the areas and gave them a rattlecan Rust
Encapsulator treatment.
Went
over the affected areas next with wire cup in the electric angle
grinder then popped off the four rusted wiring clips for the parking
lamp wires. PRE Paint Prepped the areas and gave them a rattlecan Rust
Encapsulator treatment.
Turned to front bumper maintenance as I waited for paint to dry. The last time I tackled the problem of bumper corrosion, the back of the bumper was roughed up after removing the rust buildup, then coated with self-etching primer, finished with detail silver. That worked better than anything else I've tried so we're gonna stick with it. All I had to do was touchup the paint in a few places (clean, roughen, prep, primer, paint).
By two in the afternoon, both the Rust Encapsulator on the inner fenders and the self-etching primer on the back of the bumper had setup enough to topcoat with Eastwood's Underhood Black for the fenders and Detail Silver for the bumper. Both these paints are fast-drying acrylic lacquers.
Way back when I started working on the chassis wiring, I got a hand full each of chassis wiring clips and body wiring clips from one of the vendors. I wanted to route the parking lamp wiring correctly before I put the grille back on so, I went hunting for these clips to replace the rusty ones I pried off earlier. The miracle is that I found them within five minutes of when I started to look for them, not having seen them for years. Snapped them into place and routed the wiring thru them.
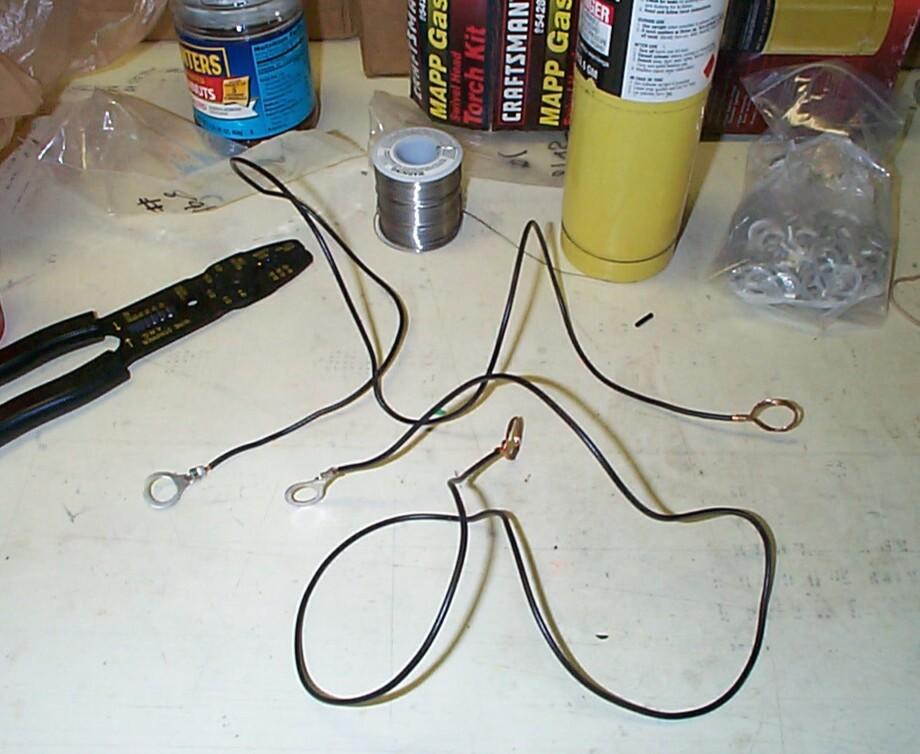 Next,
more permanent ground wires for the parking lamp assemblies were
fabbed. At Del City I found
ring terminals large enuf to fit the bumper bracket bolts. I also
ordered a spool of 14 ga black ground wire, solder and heat shrink from
them. A ring terminal was crimped on the end of the ground wire. The
ring was placed on the center bracket bolt and the wire was routed up
thru the clips and back down to the parking lamp socket where it was
cut off and three inches of insulation stripped. A loop was formed
around the socket at the little spring tabs where the socket fits into
the lamp housing. A second wire was made in this fashion for the other
side, then the ring terminals and "loops" were soldered for good
measure. The bumper brackets (with ring terminals) were re-installed at
that point with the new bolts I got from Doc's House of Bolts some
time back. A few wire ties were used on the parking lamp assembly wire
bundles to finish things off.
Next,
more permanent ground wires for the parking lamp assemblies were
fabbed. At Del City I found
ring terminals large enuf to fit the bumper bracket bolts. I also
ordered a spool of 14 ga black ground wire, solder and heat shrink from
them. A ring terminal was crimped on the end of the ground wire. The
ring was placed on the center bracket bolt and the wire was routed up
thru the clips and back down to the parking lamp socket where it was
cut off and three inches of insulation stripped. A loop was formed
around the socket at the little spring tabs where the socket fits into
the lamp housing. A second wire was made in this fashion for the other
side, then the ring terminals and "loops" were soldered for good
measure. The bumper brackets (with ring terminals) were re-installed at
that point with the new bolts I got from Doc's House of Bolts some
time back. A few wire ties were used on the parking lamp assembly wire
bundles to finish things off.
 Finished
cleaning the bumper and put it back on BillyBob next. The sun was
geting low in the west and I started hurrying a little to get home to
the Krash Pad for the Superbowl kickoff. Got the grille out of the tree
and put new sheetmetal screw clips on it. I was four short. Curses!
Carefully started re-installing the grille. Got all the sheetmetal
screws started first, then tightened them. Put the upper radiator
baffle on next and ran into a problem - the four capscrews that screw
into the top of the "bullnose" grille element were out of alignment
bigtime. I fooled around with it trying to get the capscrews started
with partial success. Got two of 'em in and got the third one started
wrong. When I tried to back it out, the captured nut broke loose from
the other side ~!@#$%^ I couldn't get the
last one started at all. Two is enuf fer the time being.
Finished
cleaning the bumper and put it back on BillyBob next. The sun was
geting low in the west and I started hurrying a little to get home to
the Krash Pad for the Superbowl kickoff. Got the grille out of the tree
and put new sheetmetal screw clips on it. I was four short. Curses!
Carefully started re-installing the grille. Got all the sheetmetal
screws started first, then tightened them. Put the upper radiator
baffle on next and ran into a problem - the four capscrews that screw
into the top of the "bullnose" grille element were out of alignment
bigtime. I fooled around with it trying to get the capscrews started
with partial success. Got two of 'em in and got the third one started
wrong. When I tried to back it out, the captured nut broke loose from
the other side ~!@#$%^ I couldn't get the
last one started at all. Two is enuf fer the time being.
 Well,
it looks like I'm not quite finished with the grille for this detailing
cycle afterall. It could use one more coat of paint, four more mounting
clips and two bolts. We'll revisit this when I get the clips. Got about
half the tools put away when I ran out of time. The boss and I locked
the place up and headed for our respective abodes for the game. I
missed the first play but the rest of the game was pure joy fer this
west Pennsylvania boy.
Well,
it looks like I'm not quite finished with the grille for this detailing
cycle afterall. It could use one more coat of paint, four more mounting
clips and two bolts. We'll revisit this when I get the clips. Got about
half the tools put away when I ran out of time. The boss and I locked
the place up and headed for our respective abodes for the game. I
missed the first play but the rest of the game was pure joy fer this
west Pennsylvania boy.
 February
11th 2006 Takin' it
easy today 'cause I won't be able to work tomorrow and can't start any
two-day jobs. Weather started out OK with Blue sky, low sixties, and no
wind. Tomorrow, the boss and I are planning to visit the Boca Raton
Collector Car Auction up at the polo grounds. After working on Renegade for a hour
or so, I moved on to BillyBob's passenger side rear fender. Not gonna
spend a lotta elbow grease here as it's fallin' apart and I have a
better replacement fender up at the warehouse that JR got at a swapmeet
when he owned the truck. Gave it the once over with the foam sanding
block and shot the bare spots with Rust Encapsulator.
February
11th 2006 Takin' it
easy today 'cause I won't be able to work tomorrow and can't start any
two-day jobs. Weather started out OK with Blue sky, low sixties, and no
wind. Tomorrow, the boss and I are planning to visit the Boca Raton
Collector Car Auction up at the polo grounds. After working on Renegade for a hour
or so, I moved on to BillyBob's passenger side rear fender. Not gonna
spend a lotta elbow grease here as it's fallin' apart and I have a
better replacement fender up at the warehouse that JR got at a swapmeet
when he owned the truck. Gave it the once over with the foam sanding
block and shot the bare spots with Rust Encapsulator.
 I
let the Rust Encapsulator set up for two hours, not the required four,
and hit the fender with the Rustoleum topcoat. I decided to risk the
consequences because the cold front is rolling in and the wind was
picking up. I didn't think I'd have time to do it in the morning before
the auto auction. If it messes up the paint, I may not even notice it.
I
let the Rust Encapsulator set up for two hours, not the required four,
and hit the fender with the Rustoleum topcoat. I decided to risk the
consequences because the cold front is rolling in and the wind was
picking up. I didn't think I'd have time to do it in the morning before
the auto auction. If it messes up the paint, I may not even notice it.
I'm not quite done with the Rustoleum paint job yet but there's enuf in this log entry to post for BillyBob's fans. The charging system is working good now and I don't have to worry 'bout that for a few years I hope. there's been a interesting discussion over at the Stovebolt forum about a $50 dollar paint job and I think I'm gonna give the technique a try with the front apron. If it goes well, I may do the whole truck that way. More on that next log entry.
| < Back
to Intro |
You can email me at ![]() webmaster@laroke.com
webmaster@laroke.com
Issued Tuesday February 14, 2006
Updated Friday March 16, 2018
copyright © 1996-2018 Larry Robert Kephart all rights reserved
| | LRK Home | | Bio Info | | Krash Khronicles | | LAROKE | |
| | BettyLou | | BillyBob's Garage | | Rat Patrol | | Deerslayer | | Elvira | |
| | Land of the Free and Home of the Brave | |
| | Keppylou's Art | | WWI Soldier's Diary | |