| | LRK Home | | Bio Info | | Krash Khronicles | | LAROKE | |
| | BettyLou | | BillyBob's Garage | | Rat Patrol | | Deerslayer | | Elvira | |
| | Land of the Free and Home of the Brave | |
| | Keppylou's Art | | WWI Soldier's Diary | |
BillyBob Work-in-Progress Log
![]()
WHAT'S NEW is a chronological listing of updates to the BillyBob site.
![]()
TRUCK LINKS including vendor sites for old parts, custom parts, and tools as well as sites for classic car and truck organizations
STORE Operating in association with Amazon.com, books, recordings and tools can be purchased.
PLANNING for the restoration including project schedule and cost estimates.
![]()
TRAVELS WITH BILLYBOB With apologies to Steinbeck, this area of BillyBob's Garage will be used to log the trips BillyBob and I make together.
WORK-IN-PROGRESS is the restoration of parts of BillyBob that I can accomplish without a garage.
PRE-RESTORATION includes log entries of minor repairs and adventures between time of purchase and the time when I started restoration, a piece at a time.
JR'S KORNER JR's Korner is the history of BillyBob before I got him authored by my brother, Wm. C. Kephart.
![]()
BILLYBOB MAINTENANCE Ever changing detailing, oil change, lube, etc. maintenance routines specifically developed for BillyBob, including required tools, materials and procedures.
PARTS SHOP The Parts Shop is a repository of How-To articles. Things that I have done over and over enough times to have developed a procedure. This gives me a checklist and saves brain cells.
STEALTH SHOP Urban residence design with large integrated shop and separate living quarters for a relative or renter.
![]()
You will need the Adobe Acrobat browser plugin to view these wiring diagrams which are in the PDF file format. This format allows zooming and panning. If you don't have this plugin, it can be downloaded and installed (free) from the Adobe site. The button below will take you there.
![]()
BILLYBOB WIRING DIAGRAM Here's the wiring diagram updated with BillyBob's current state 'cepting the third-party strap-on turn-signal director.
STRAP-ON TURN-SIGNAL DIRECTOR/BRAKE LIGHT CIRCUIT This turn signal and brake light circuit diagram shows the current state of the third-party turn-signal director wiring, which will remain in place until I figure out the problems with the OEM turn-signal director. It also shows the OEM headlight switch.
41. Wheels of Progress
August 6th 2005 Got up early and took BillyBob for a Fort Lauderdale Beach run. By the time I got to the Krash Lab, he was good and warm for a engine degreasing. I noticed as I was performing that task that one of the radiator straps had separated from the tank just like the old radiator had. Now that it's happened again to a new radiator, I had to stop and think on it. Way back in the fall of 2000 when I dealt with the radiator for the first time, I discovered the X-brace on the front of the radiator support had broken one of its four weld points. At the time I didn't have a welder and I tried to fix it with JB Weld. That didn't work for long. I'll bet that once I get that weld fixed properly, this radiator strap problem will go away.
 After
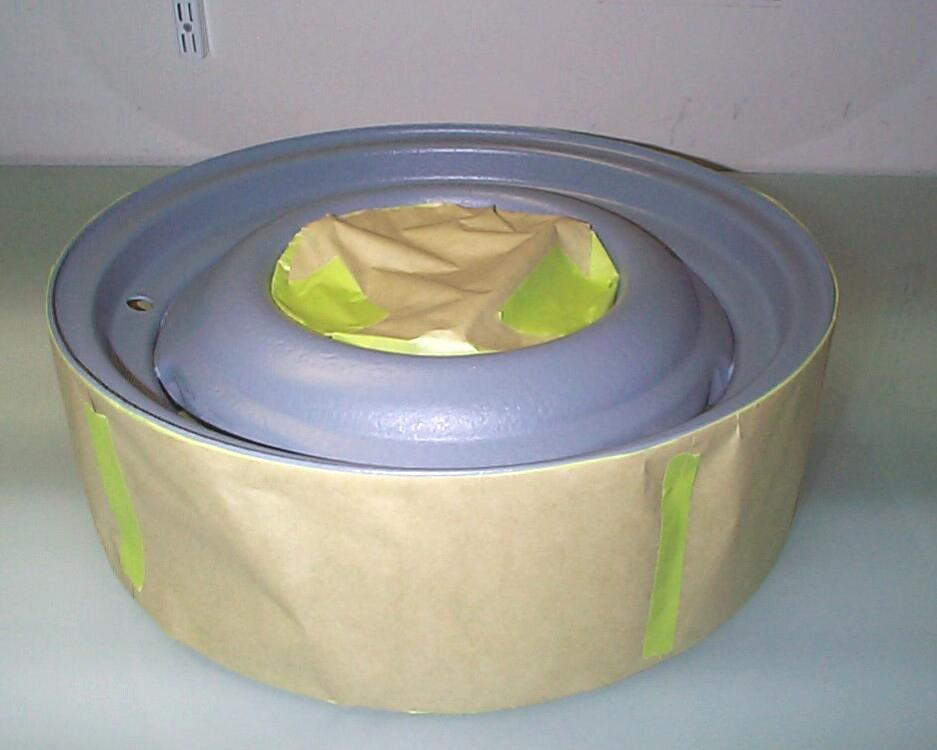
engine bay degreasing and drying, I started setting up for the next
wheel painting step tomorrow. Last week the wheel was given a heavy
coat of epoxy primer. Next up is surfacer coats to fill in the pits.
The reason I'm painting these wheels instead of powdercoating them is
because of the pits. You need smooth metal for powdercoat. It doesn't
work over filler. Bob Adler believes the key to chip-proofing wheels is
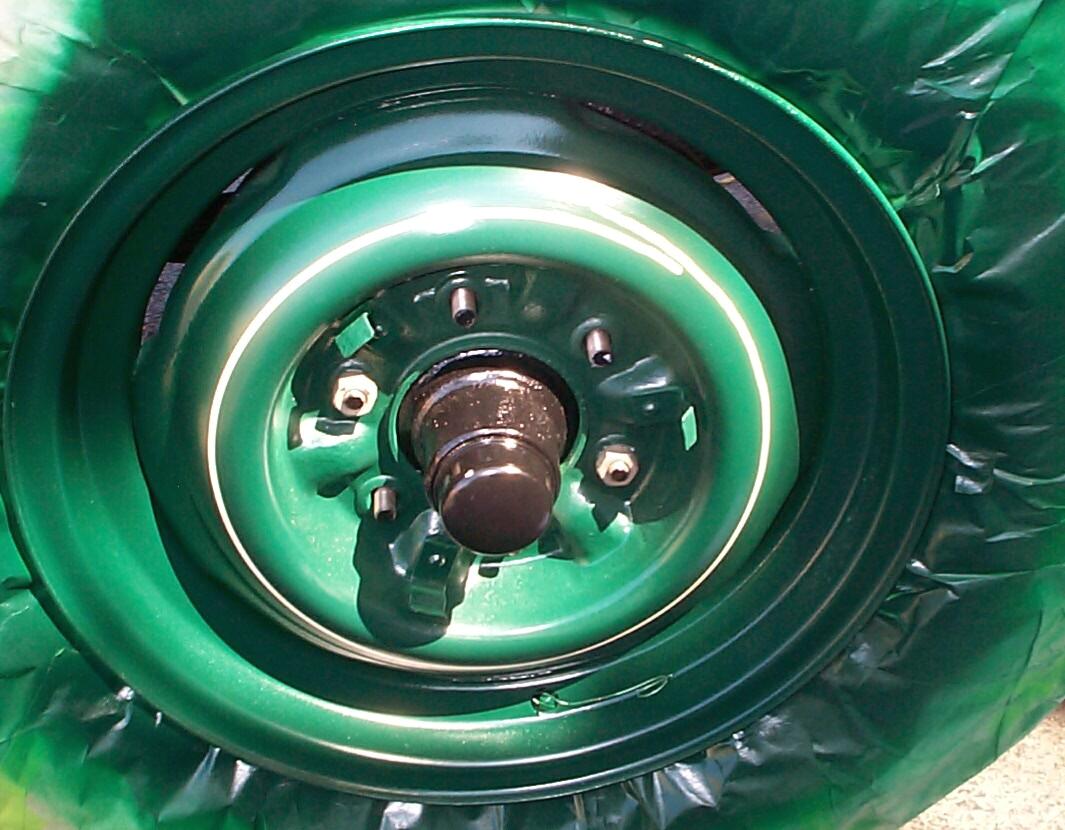
thin paint coats. I spent some time following his recommendation to
mask off areas that don't need surfacer - inner rim area and the area
that will be under the hub caps. I'm not filling in the pits on the
backside of the wheels either. BillyBob isn't a pedigreed. He doesn't
need that level of detail.
After
engine bay degreasing and drying, I started setting up for the next
wheel painting step tomorrow. Last week the wheel was given a heavy
coat of epoxy primer. Next up is surfacer coats to fill in the pits.
The reason I'm painting these wheels instead of powdercoating them is
because of the pits. You need smooth metal for powdercoat. It doesn't
work over filler. Bob Adler believes the key to chip-proofing wheels is
thin paint coats. I spent some time following his recommendation to
mask off areas that don't need surfacer - inner rim area and the area
that will be under the hub caps. I'm not filling in the pits on the
backside of the wheels either. BillyBob isn't a pedigreed. He doesn't
need that level of detail.
Regular as clockwork, the rains started around two in the afternoon and we had a short power interruption, the fourth in as many weeks ~!@#$%^ For some unknown reason, Florida Power and Light's worse infrastructure in the whole state is in downtown Boca Raton. Last year when Hurricane Frances hit Stuart sixty miles north of here, the Krash Lab's power was out for a whole week! That's tough on a small business. Gotta hand it to the guy I work for. We couldn't work but we all got paid while we were at home. There was never even any discussion about it. It was a given.
I waited on the rain this time and it stopped after it had turned the BillyBob garage into a wetland. I hurried to get some work done before the EPA agents showed up to tell me I was restricted to watching ducks land and takeoff. I wanted to restore the top half of the hood latch, the part that fits into the underside of the hood. This thing is secured with clutch head screws and I don't think they've moved since the truck left the assembly line. I used Kroil penetrating oil and MAPP torch technique to loosen them up. This had the effect of bubbling the hood paint some but it's Rustoleum and easily repaired at this point. I got two of 'em loose. The third one wouldn't budge and I quit before I completely buggered the clutch head "bowtie". All but two of these screws are 1/4" - 20 by 5/8" countersunk clutch head machine screws. I'm gonna see if I can get some new ones and some clutch head socket drive bits to go with my hand drivers. From my experience with Renegade's troublesome Torx fasteners, I know that you have a better shot with an impact wrench than a hand driver.
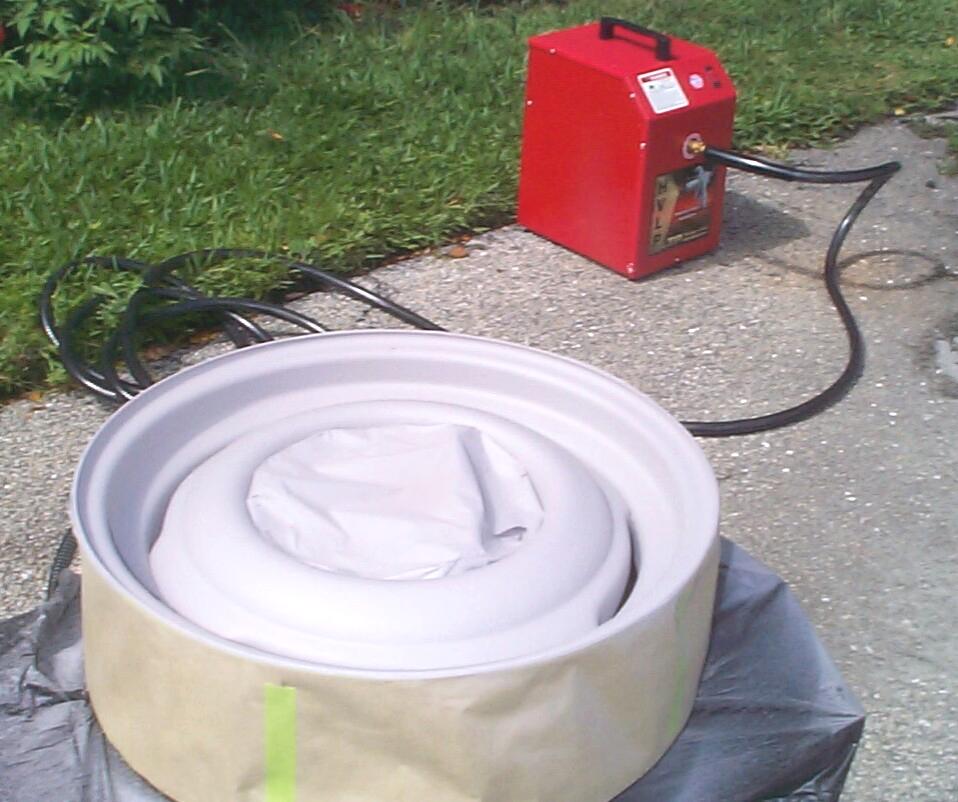
August 7th 2005 Starting out as a good weather day. I don't really need the super stand for todays painting operations so I rigged up the Decker Workmate with a plastic trash bag over it as a base to set the wheel on. Went over the wheel with a 3M scuff pad first, Then followed with an application of PRE Paint Prep. Got ready to mix the Omni MP182 surfacer primer and Omni MH166 slow hardener in a 5:1 ratio. I had some trouble last week pouring the epoxy primer and resealing the can. This stuff isn't really designed to be used in the small amounts I'm using. To improve my methods, I drilled two 9/64" holes in the top of the surfacer can lid and placed #12 round head sheet metal screws in the holes. This will give me small holes for pouring and venting. To seal the can back up again the screws are replaced and the can is turned uside down to seal it off from air entry. You still have to take the lid off to stir but you avoid getting paint all over the can lip and pouring is more precise.
 I
solved my spray gun drip problem from last time (by adjusting the fluid
regulating cap assembly) but today I have a new problem. The 1.4 nozzle
is too small for the surfacer. I'll have to get a 1.6 nozzle for future
ops. I soldiered on and applied four coats at fifteen minute intervals.
This mix has a pot life of an hour so you have to get-er-done. Time for
cleanup. We'll get to sanding next week. Went on to component detailing
in the engine bay.
I
solved my spray gun drip problem from last time (by adjusting the fluid
regulating cap assembly) but today I have a new problem. The 1.4 nozzle
is too small for the surfacer. I'll have to get a 1.6 nozzle for future
ops. I soldiered on and applied four coats at fifteen minute intervals.
This mix has a pot life of an hour so you have to get-er-done. Time for
cleanup. We'll get to sanding next week. Went on to component detailing
in the engine bay.
August 13th 2005 First order of business today is degreasing Renegade's engine bay so I put the top down and headed down the beach to warm him up. I didn't get rained on but I hit a lotta wet streets. Mustuv' threaded thru the storm cells just right. I hope it's a good omen for the rest of the day.
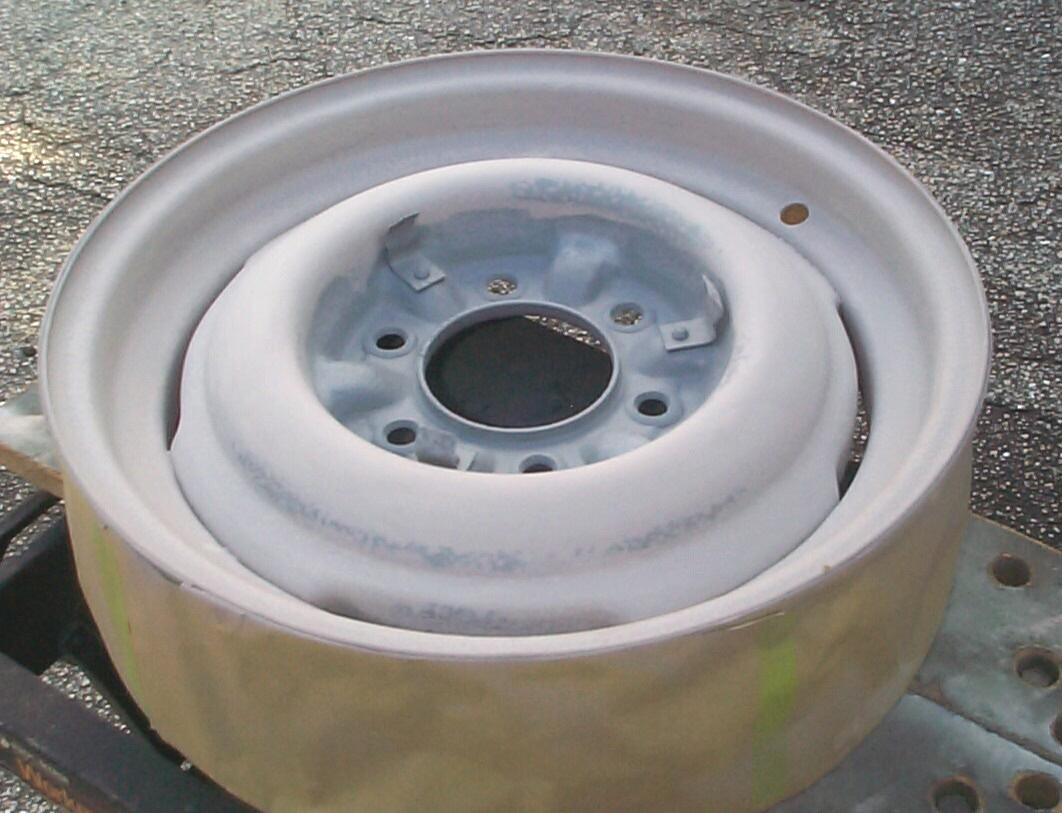 After
degreasing Renegade's engine bay, I set up the Decker Workmate in the
shade and began to work the wheel that had been sprayed with surfacer
last week. Used 320 grit sandpaper on a flexible foam block. I was
planning to epoxy primer this wheel again tomorrow but the sanding is
going slow. I'm not gonna do it half-assed this time . . . more like
eighty percent since this is a stage II effort. I may even need more
surfacer coats since the pitting was pretty severe. This paper is not
rated for wet sanding so I'm sanding dry and it loads up quick.
After
degreasing Renegade's engine bay, I set up the Decker Workmate in the
shade and began to work the wheel that had been sprayed with surfacer
last week. Used 320 grit sandpaper on a flexible foam block. I was
planning to epoxy primer this wheel again tomorrow but the sanding is
going slow. I'm not gonna do it half-assed this time . . . more like
eighty percent since this is a stage II effort. I may even need more
surfacer coats since the pitting was pretty severe. This paper is not
rated for wet sanding so I'm sanding dry and it loads up quick.
The boss showed up in the early afternoon and said there was some kinda car show up the street at the park (where the bums that like to sleep in BillyBob hang out). I knew something was going on up there but I thought it was a plant and garden show. I blew the paint dust off myself with the air compressor and sauntered up to the park with the boss. Along with the plant show, the Boca Raton Model A club had shown up to show about twenty of the vintage Henrys, including one '23 Model T touring car and a '31 Model A enclosed cab pickup truck. These were all restored and original vehicles, no rods. I was happy to see they were plagued with the same corrosion problems I have with BillyBob. Misery loves company.
August 14th 2005 Good weather start today. Before I go back to the tedius hand-sanding of the wheel, I want to do some more work in BillyBob's engine bay. Thanx to a tip from Bob (brjr51) in a forum thread over at stovebolt.com, I ordered a clutch head driver and bits from Chev's of the 40's. And thanx to Tim Lederman (tclederman) who answered my question in that same thread on where to get clutch head fasteners, I placed an order over the phone to Restoration Specialties in Windber, Pennsylvania. Windber is a stone's throw from Johnstown and during the 3-1/2 years I lived in Johnstown in the early seventies it was one of my haunts. There was a bar with lava lamps that played Pink Floyd music all the time. This was pre "Dark Side of the Moon" before they gained popularity in the US. It also had the only "art" theater in the area where you could see nekid wimmen if you were willing to run the guntlet of church group pickets outside. If I remember correctly, Windber was also where JR ordered his Gremlin to be shipped to. He was stationed in the Med at the time.
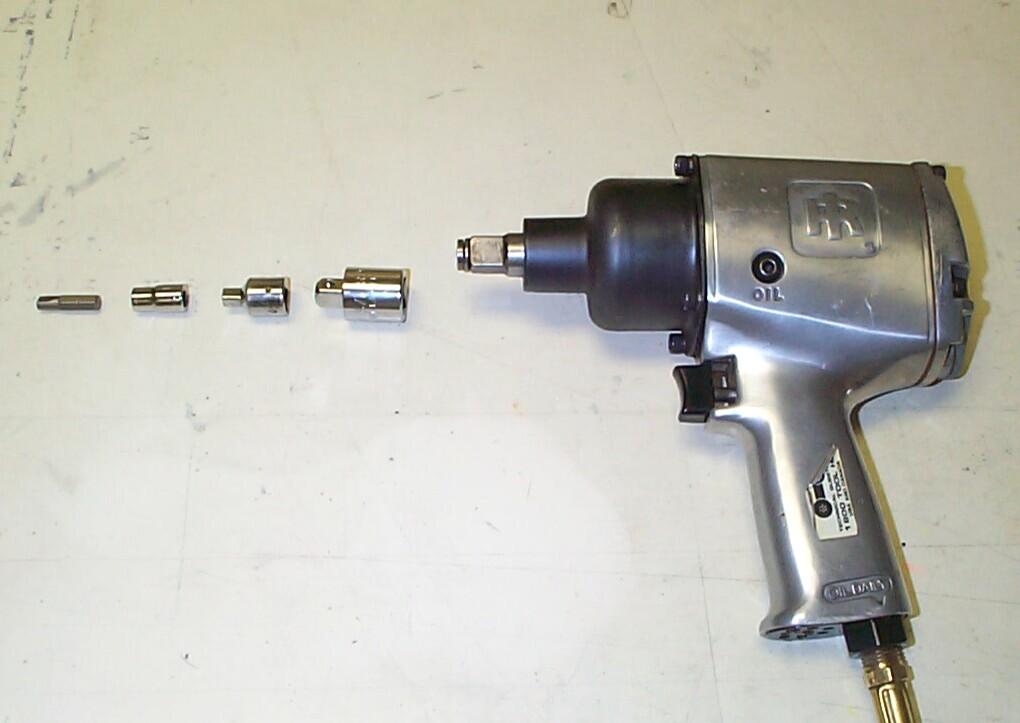 OK,
Enuf of that. To get the 1/4" clutch head bit to work with my impact
wrench, I had to jerry rig several adapters together - 1/2" impact
wrench to 1/2" to 3/8" socket adapter to 3/8" to 1/4" socket adapter to
1/4" socket to 1/4" clutch head bit. This contraption worked well 'cept
for one fastener which ended up with a buggered head (there's always
one, isn't there?)
OK,
Enuf of that. To get the 1/4" clutch head bit to work with my impact
wrench, I had to jerry rig several adapters together - 1/2" impact
wrench to 1/2" to 3/8" socket adapter to 3/8" to 1/4" socket adapter to
1/4" socket to 1/4" clutch head bit. This contraption worked well 'cept
for one fastener which ended up with a buggered head (there's always
one, isn't there?)
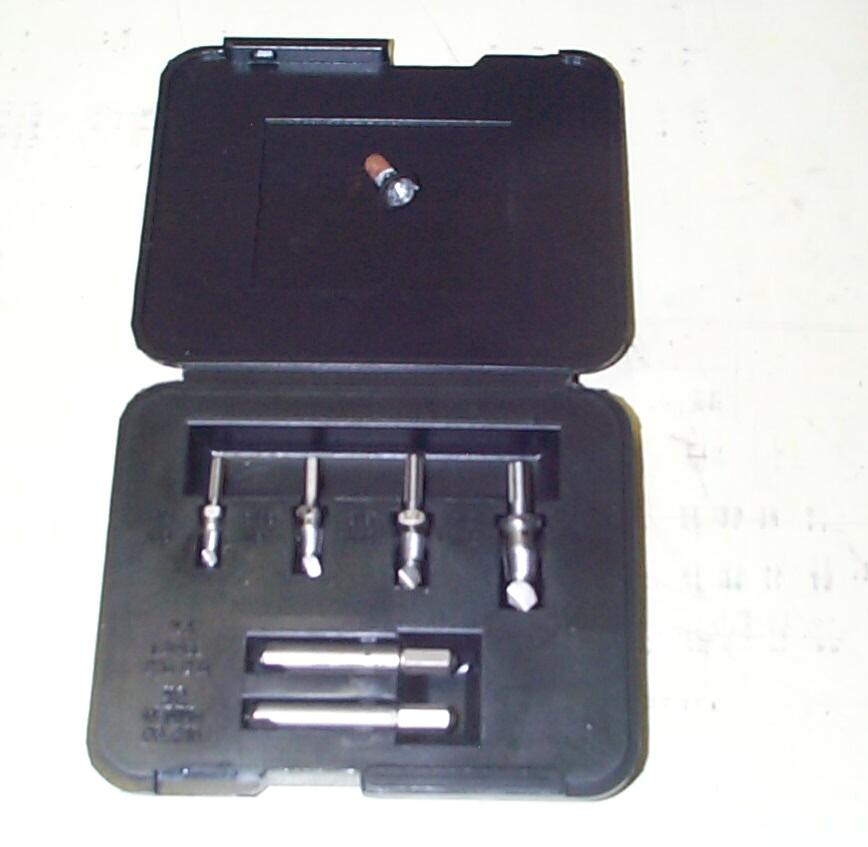 Rootin'
around in my toolbox reserved for speciality tools (where I also keep
the clutch head screwdrivers), I found my Craftsman #52156 "Drill-out"
extractor kit. Tried to loosen up the buggered clutch head screw with
MAPP torch treatment and penetrating oil one more time, then set after
it with the extractor kit. This thing is 'posed to work slow so you use
it in a 3/8" drive electric drill minimum. I tried the x2 medium bit
first which only succeeded in eating away more of the clutch head. The
good news was that this made enuf room to use the 1/4" m6 bolt
extractor bit which is a little more complicated to use requiring
several steps. No joy! Oh well. Cleaned the tool up and prepared to put
it away but decided at the last minute to use the x3 large extractor
bit to cut out the rest of the remaining clutch head so I could at
least get the lock assembly out. Woo Hoo!
The hole cut with the m6 bit was enuf to give the x3 a grip and back
the damaged screw out. I'll take that mulligan!
Rootin'
around in my toolbox reserved for speciality tools (where I also keep
the clutch head screwdrivers), I found my Craftsman #52156 "Drill-out"
extractor kit. Tried to loosen up the buggered clutch head screw with
MAPP torch treatment and penetrating oil one more time, then set after
it with the extractor kit. This thing is 'posed to work slow so you use
it in a 3/8" drive electric drill minimum. I tried the x2 medium bit
first which only succeeded in eating away more of the clutch head. The
good news was that this made enuf room to use the 1/4" m6 bolt
extractor bit which is a little more complicated to use requiring
several steps. No joy! Oh well. Cleaned the tool up and prepared to put
it away but decided at the last minute to use the x3 large extractor
bit to cut out the rest of the remaining clutch head so I could at
least get the lock assembly out. Woo Hoo!
The hole cut with the m6 bit was enuf to give the x3 a grip and back
the damaged screw out. I'll take that mulligan!
My order from Restoration Specialities was for #1265 Clutch Truss Head 1/4"-20 x 1/2" screws. These fit in two locations on the upper hood latch assembly. The other six are "flat" clutch head screws and I ordered #1267 Clutch Pan Head 1/4"-20 x 1/2". These are wrong for this application and I will have to re-order. Restoration Specialties compounded my mistake by sending me #2367 hex type ba washer head black oxide 5/16" x 1-1/8" sheet metal screws. These aren't chebby truck fasteners but I'm shure I can use 'em somewhere so I'm not sending them back. You can download Restoration Specialties catalog from their website in Adobe Arcobat PDF file format. The Clutch head fasteners are on pages 165, 170, 171 and 217.
Messed around fer a bit after that lining up new fasteners for the coil bracket, then went back to wheel sanding. When I quit yesterday, I wuz having some trouble sanding down the recessed area where the curve of the wheel section that the hub cap rests on meets the curve of the "spoke" section that meets the rim. I was sanding thru the epoxy to bare metal on the sides adjacent to this recess and not making much headway on the recess itself. Today I managed to solve that problem by adapting a office tool. In the architectural office here we use machine erasers for the few drawings that are still done by hand and they use flexible eraser inserts that are about six inches long and 1/4" in diameter. Wrapped in sandpaper, one of these inserts was perfect for the recessed area I was having trouble with. It works good in the slot areas between the spokes too.
Uhmmm . . . They make these inserts with embedded abrasive for ink on mylar media too. I wonder if we have any of those. I may just put one in an electric eraser and see what it can do . . . Well, that works better than I expected but requires too much finesse for me. An electric eraser is sorta like a low speed dremel tool, hollow down the shaft for the eraser insert to chuck into. Only 'bout 1/4" of eraser is exposed at a time and when that is worn down, you relax the chuck and pull out 'nother 1/4". The end of the insert is the working surface and you bear down on it lightly (so as not to burn a hole in the media). I was exposing an inch or more of insert and using the side of the cylinder as the working surface. The insert is not designed for this use and tends to shear off at the chuck if any but the very slightest pressure is applied sideways. Nice try but no cigar.
August 20th 2005 Starting out with good weather today. Made my third beach run, this time in BettyLou as it's her turn to get the engine bay degreased. Went back to sanding the wheel afterwards. I'm starting to get low on 320 grit paper but I think I might have enuf to get this wheel ready for the next step. Starting to formulate my stage II sanding routines like making the sandpaper last longer by blowing it off with compressed air when it loads up. The weather stayed sunny and by early evening the wheel sanding was getting close enuf fer govermint work. I hemmed and hawed around a bit and decided I wanted it just a little bit better and would put off the next painting session another week.
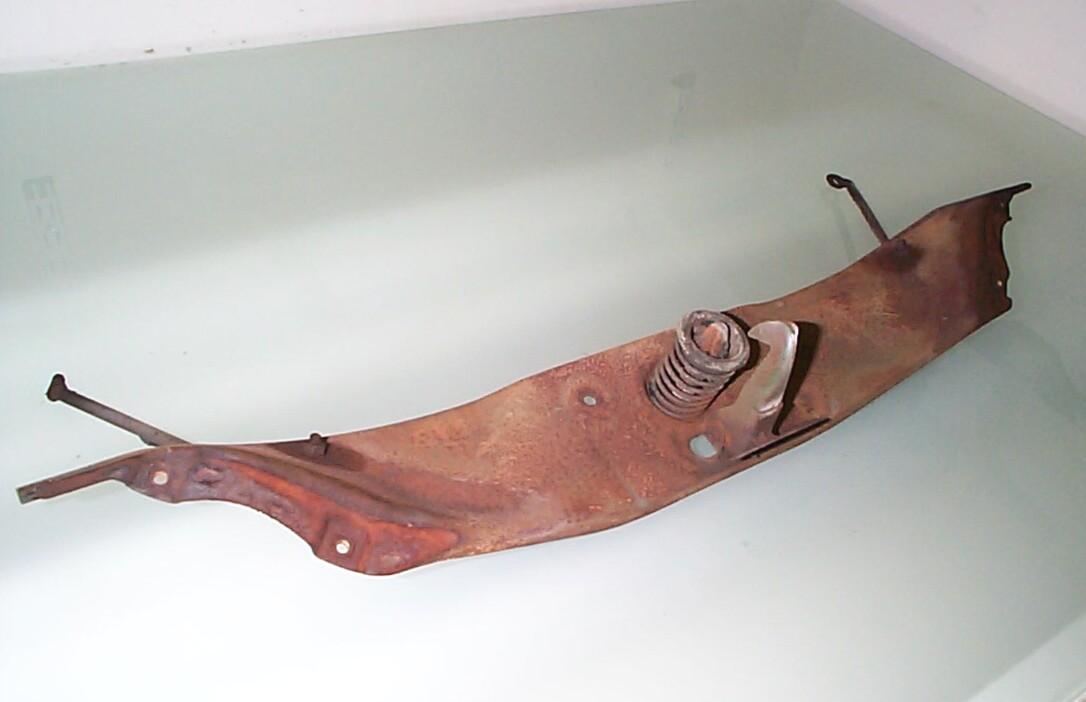 August
21st 2005 The day
started out sunny and with low wind. I removed the upper hood lock
assembly now that I had the clutch head fasteners loose. Dragged out
the pressure blaster and cleaned the hood lock assembly. Removed the
short hood braces from the assembly and the lock nut and washer off the
back of the latch shaft.
August
21st 2005 The day
started out sunny and with low wind. I removed the upper hood lock
assembly now that I had the clutch head fasteners loose. Dragged out
the pressure blaster and cleaned the hood lock assembly. Removed the
short hood braces from the assembly and the lock nut and washer off the
back of the latch shaft.
 The
latch shaft threads thru a captured nut also. This I could not get
loose so it will get a Kroil penetrating oil treatment before
re-assembly today. Blasted 'til I went thru two tanks of sand. I
cleaned up then before getting too dehydrated and the winds kick up or
the rains come. The assembly is not entirely clean so I decided not to
hit it with the self-etching primer. I'll be able to use the siphon
blaster or the spot blaster to finish it off when I get the latch out.
The
latch shaft threads thru a captured nut also. This I could not get
loose so it will get a Kroil penetrating oil treatment before
re-assembly today. Blasted 'til I went thru two tanks of sand. I
cleaned up then before getting too dehydrated and the winds kick up or
the rains come. The assembly is not entirely clean so I decided not to
hit it with the self-etching primer. I'll be able to use the siphon
blaster or the spot blaster to finish it off when I get the latch out.
 Put
the lock assembly back together and went on to monthly maintenance.
The hood gaps are off a little more now than they were before. I will
address that later on during doghouse bodywork. It's more art than
science and these things never did fit with the tolerances that today's
new vehicles have. The monthly maintenance took awhile because I took
care of Renegade and BettyLou as well. Finished up the day by applying
a small batch of JB Weld on the pitted area around the valve stem hole.
Put
the lock assembly back together and went on to monthly maintenance.
The hood gaps are off a little more now than they were before. I will
address that later on during doghouse bodywork. It's more art than
science and these things never did fit with the tolerances that today's
new vehicles have. The monthly maintenance took awhile because I took
care of Renegade and BettyLou as well. Finished up the day by applying
a small batch of JB Weld on the pitted area around the valve stem hole.
August 25th 2005
Well, it looks like tropical storm
Hurricane Katrina is going to disrupt plans for this weekend
in the shadetree garage. So much for the ~!@#$%^
Bermuda High theory holding the storms away from Florida this year. I
took BillyBob up to his warehouse bay early this morning. Renegade and
Bettylou are just going to have to ride out the storm exposed to the
elements.
August 27th 2005 Well, we dodged the Katrina bullet here in BillyBob's garage. Renegade and Bettylou survived without damage and BillyBob is still up at the warehouse. The aftermath weather is still not optimal but I can continue to work on the wheel and I have a few engine bay detailing procedures I can perform on Renegade and Bettylou.
After that, I turned my attention back to BillyBob's wheel sanding. Hand sanded the JB Weld that was applied last weekend around the valve stem opening with 80 grit paper on a foam sanding block. I finally got the wheel sanded good enuf to satisfy me. Spent the rest of the afternoon cutting up the big piece of sheetmetal that used to be BillyBob's bed into three segments that will fit into the dumpster with the three inch air-powered cut-off wheel. I've been putting this off, I've been tellin' myself, until I get a sawzall but havin' to drag it inside during hurricane prep last week to prevent it from flyin' around the parking lot finally goaded me into action. When that was done, it was time to go home to the Krash Pad.
August 28th 2005 Ran up to the warehouse first thing and exchanged Renegade for BillyBob. Started to set up to give the wheel its second coat of epoxy primer. Our weather is still being affected by Hurricane Katrina as she builds up in the gulf. Watchin' what that storm has in store for the Big Easy on the news is giving me a few twinges of survivor's guilt. I didn't mix the paint until I was certain I wouldn't be interrupted by rain. Primer went on OK but ended up a bit rough. I don't know why. I'll have to do some more sanding but not much.
 After
the paint session was cleaned up and tools put away, I went back to the
hood lock assembly. During the week, I had received a screwdriver bit
to help me loosen up the latch shaft that was frozen solid in the
captured nut of the hood lock assembly bar. The air hammer was
jerry-rigged with adapters again and . . . this time it didn't work. I
kept at it too long (willing it to work) until the bit broke and the
latch cone was buggered some. Darn! Discovered at that point that I
could depress the latch spring enuf to get a pair of vise-grips below
the latch cone to grip the latch shaft. Gave the frozen area a MAPP
torch and quench application and then tried the vise-grips. That got
'er loose. Put the thing back together again. It was too late in the
day for cleaning and painting this weekend.
After
the paint session was cleaned up and tools put away, I went back to the
hood lock assembly. During the week, I had received a screwdriver bit
to help me loosen up the latch shaft that was frozen solid in the
captured nut of the hood lock assembly bar. The air hammer was
jerry-rigged with adapters again and . . . this time it didn't work. I
kept at it too long (willing it to work) until the bit broke and the
latch cone was buggered some. Darn! Discovered at that point that I
could depress the latch spring enuf to get a pair of vise-grips below
the latch cone to grip the latch shaft. Gave the frozen area a MAPP
torch and quench application and then tried the vise-grips. That got
'er loose. Put the thing back together again. It was too late in the
day for cleaning and painting this weekend.
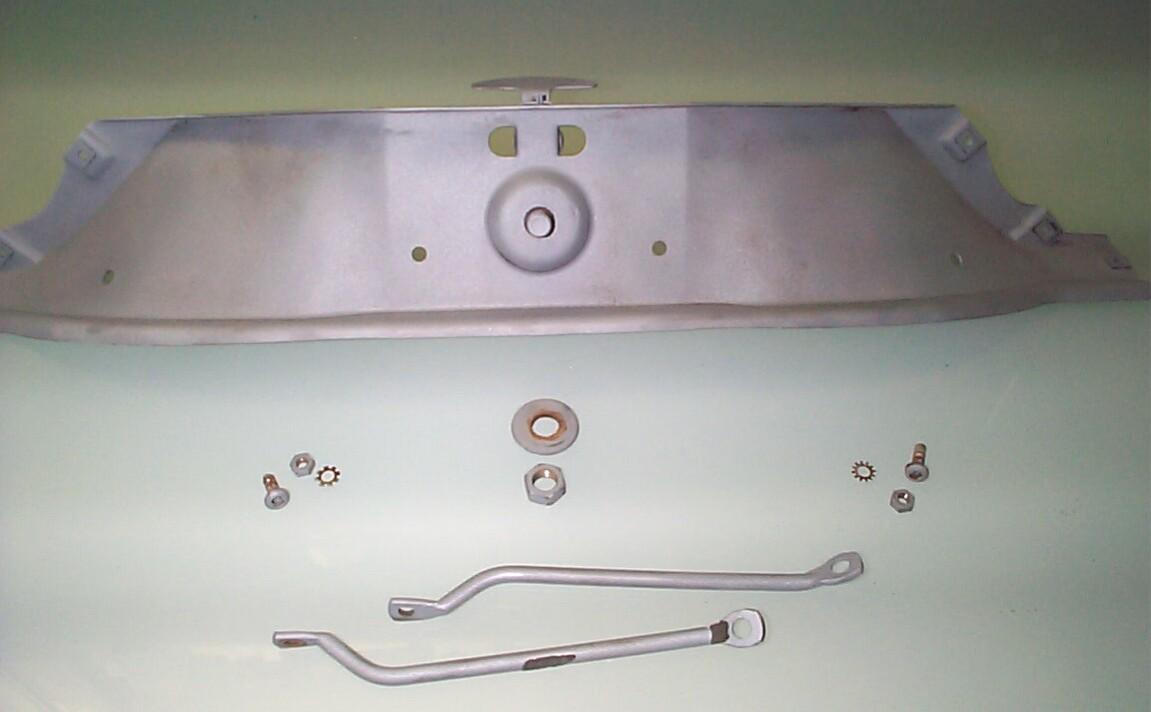
 September
3rd 2005 Typical
"scattered thunderstorms" day under the BillyBob shadetree. It's
September. We're half-way thru hurricane season with the most active
time yet to come. Began by removing the upper hood latch assembly
again. Took note of how far the latch shaft was screwed into the
captured nut before removal so I could get it back into the same
relative position during re-assembly. Then got it completely apart for
the first time. The latch shaft spring was warped a bit by last week's
torch and quench operation but it still works and the damage is not
noticable in its compressed state. Cleaned latch parts and used the
angle grinder to smooth down the latch cone tip that I damaged last
week. These parts will have to have the surface rust blasted off them
again before re-finishing and that will have to wait until it's dry
enuf to drag out the blaster so I put the assembly back together again.
September
3rd 2005 Typical
"scattered thunderstorms" day under the BillyBob shadetree. It's
September. We're half-way thru hurricane season with the most active
time yet to come. Began by removing the upper hood latch assembly
again. Took note of how far the latch shaft was screwed into the
captured nut before removal so I could get it back into the same
relative position during re-assembly. Then got it completely apart for
the first time. The latch shaft spring was warped a bit by last week's
torch and quench operation but it still works and the damage is not
noticable in its compressed state. Cleaned latch parts and used the
angle grinder to smooth down the latch cone tip that I damaged last
week. These parts will have to have the surface rust blasted off them
again before re-finishing and that will have to wait until it's dry
enuf to drag out the blaster so I put the assembly back together again.
Continued with engine compartment component detailing. Took the coil off to replace fasteners and clean it. Last time I did this, I ordered new fasteners for this time. Started to replace the rusted screw that holds the two sides of the bracket together around the coil. I'd ordered #10-32 x 1-1/2" stainless steel slotted screws for this. ~!@#$%^ The new screws are 'bout 1/16" shorter than the original. That's 1/16" too much! Back to the drawing board.
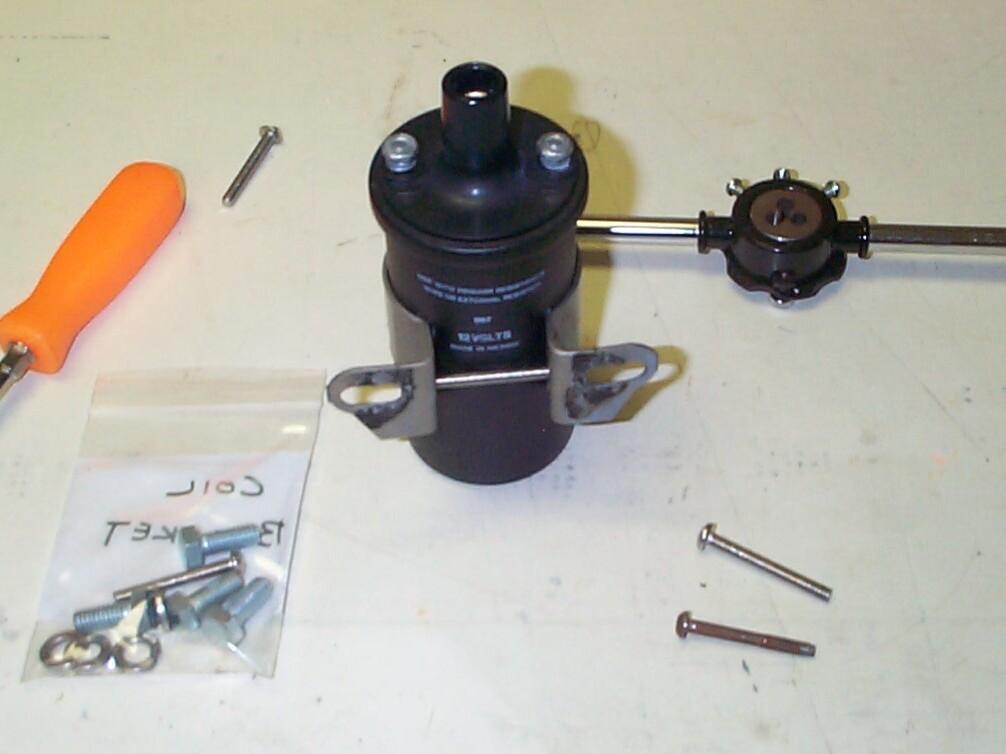 My
co-worker, Moe, was in the office and he thought he had some stainless
steel screws that would work. He ran home and came back with a couple
of #10-32 x 1-7/8" stainless steel phillips head screws. That saved me
for today. I was able to cut them off to the odd length and run a die
over the threads.
My
co-worker, Moe, was in the office and he thought he had some stainless
steel screws that would work. He ran home and came back with a couple
of #10-32 x 1-7/8" stainless steel phillips head screws. That saved me
for today. I was able to cut them off to the odd length and run a die
over the threads.
Finished up the day by lightly sanding last week's bumpy epoxy primer coat on the wheel job. Even so, I went thru to bare metal in a few spots. Gave these spots an application of self-etching primer.
September 5th 2005 Had big BillyBob plans for this three-day weekend but sunday was a rainout and Labor Day didn't start out much better. When I got to the Krash Lab on monday, I waited for things to dry up a bit. Drove BettyLou up to the warehouse to exchange with Renegade. I wanted BettyLou dry before putting her into the warehouse bay. While I was loading up Renegade with the tire changing equipment and one of BillyBob's new tires, it started raining hard. ~!@#$%^ BettyLou went into the bay wet. Why did I not want to put her away wet? The warehouse bay leaks and there are several drips off the concrete plank ceiling. I've gotten in the habit of pulling a sheet of visqueen over whatever vehicle is parked in there to avoid the white deposits the drips make on the paint and canvas. I don't care to trap water between the visqueen and the vehicle but it's the lessor of two evils. The rain never completely let up after that and I packed it in for the weekend.
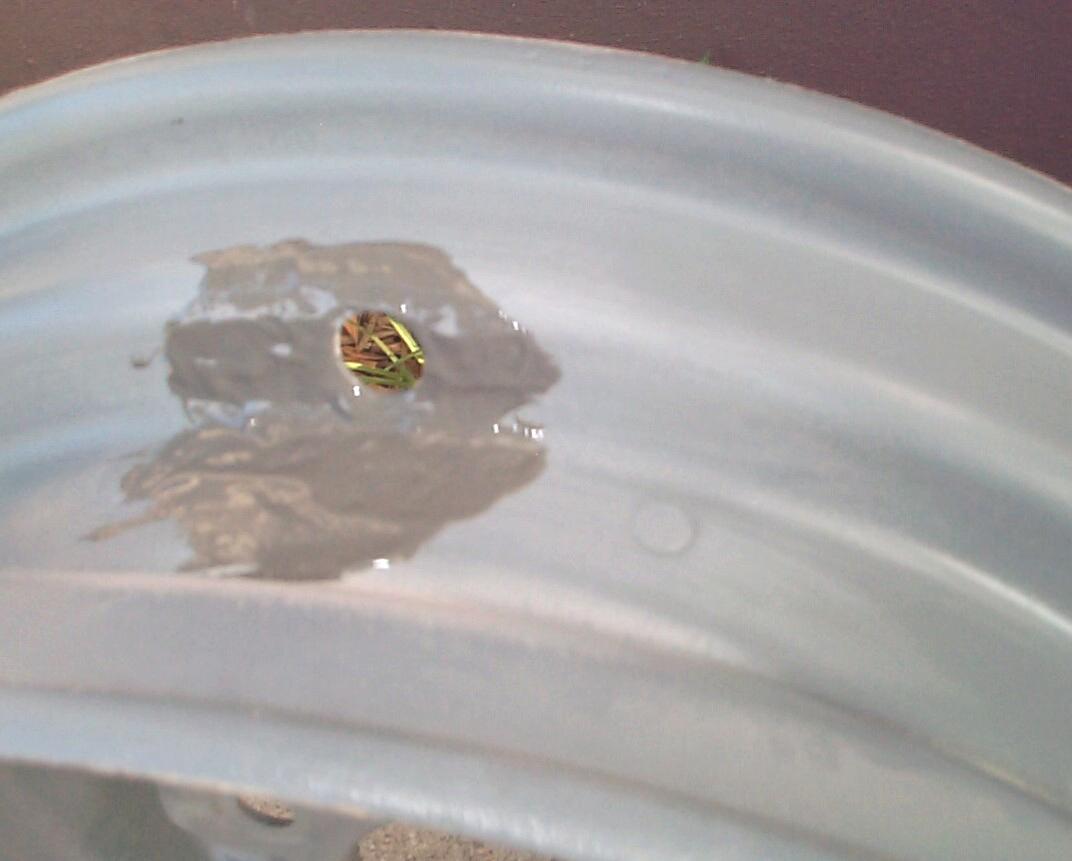
September 10th 2005 I've been in a wee bit of a snit all week because I'm still irritable over being rained out last weekend. Weather was good and I started out with mounting a new tire and inner tube on the primered rim. Less than twenty seconds into the task, I managed to ding the wheel in a highly visible area with the tire bar. ~!@#$%^ I decided to treat the incident as a sacrifice to Murphy in the hope he won't mess with me anymore today. I will have to fill this chip before final paint. This is the reason, by the way, to mount the tire before final painting operations and is an idea put forward by Brian Martin (martinsr) in the painting and bodywork forum at Stovebolt.com some time back.
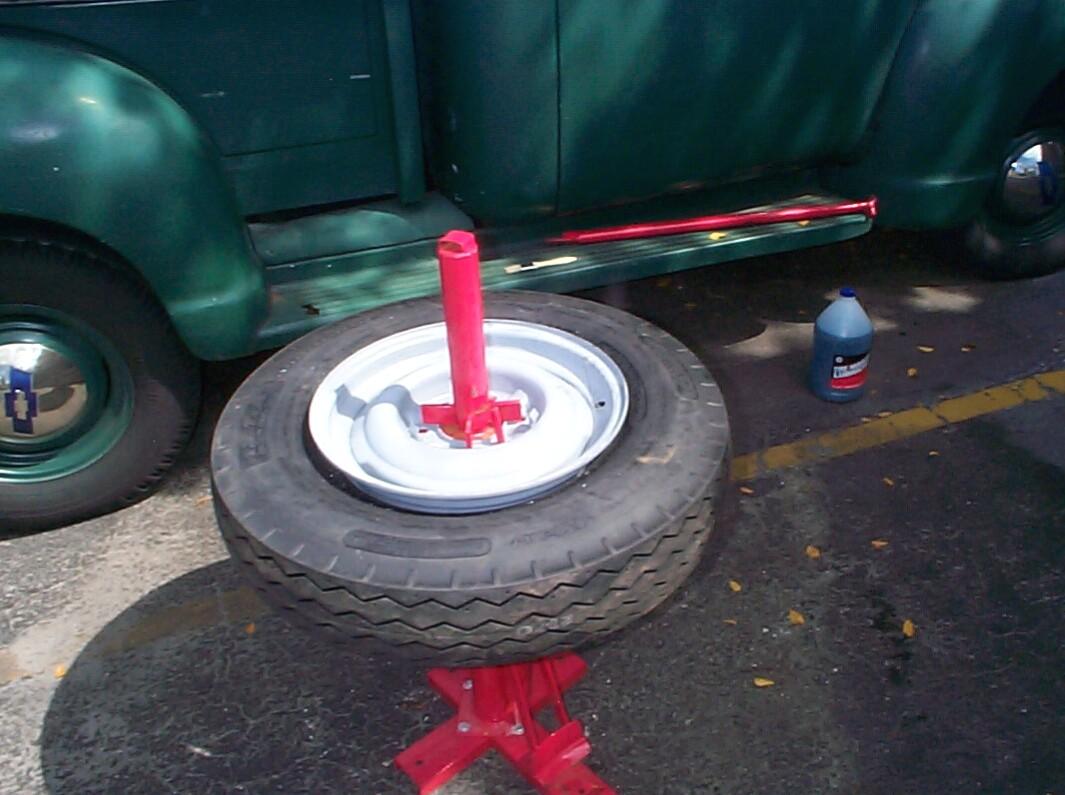 The
tire went on a lot easier than I expected it to which must be due to
the flexibility of the new rubber. My experience up to this point has
been putting new inner tubes in ancient tires an' that was only
slightly easier than taking old tires off. Either that or I'm becoming
a bit more skilled at it . . . Naahhh. Deflated the inner tube again
and wrapped a short piece of .041 stainless steel wire from my powder
coating supplies around the valve stem under the cap. Pushed the valve
stem down inside the rim for painting operations. The wire is to fish
it back out again.
The
tire went on a lot easier than I expected it to which must be due to
the flexibility of the new rubber. My experience up to this point has
been putting new inner tubes in ancient tires an' that was only
slightly easier than taking old tires off. Either that or I'm becoming
a bit more skilled at it . . . Naahhh. Deflated the inner tube again
and wrapped a short piece of .041 stainless steel wire from my powder
coating supplies around the valve stem under the cap. Pushed the valve
stem down inside the rim for painting operations. The wire is to fish
it back out again.
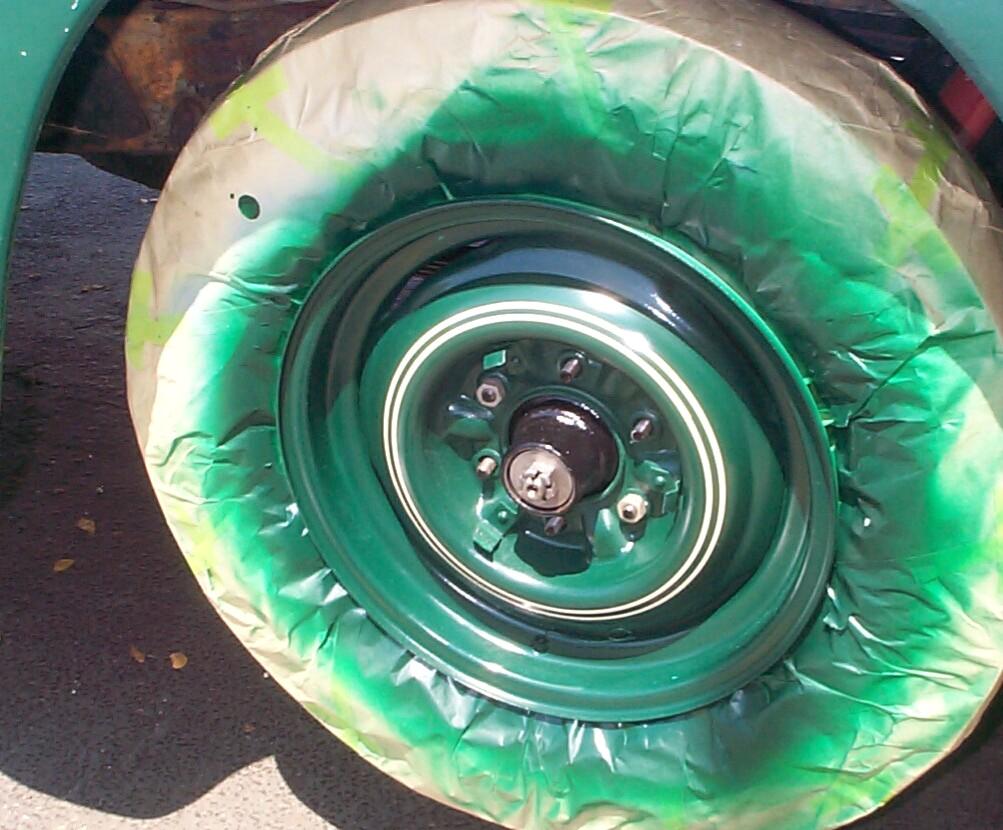
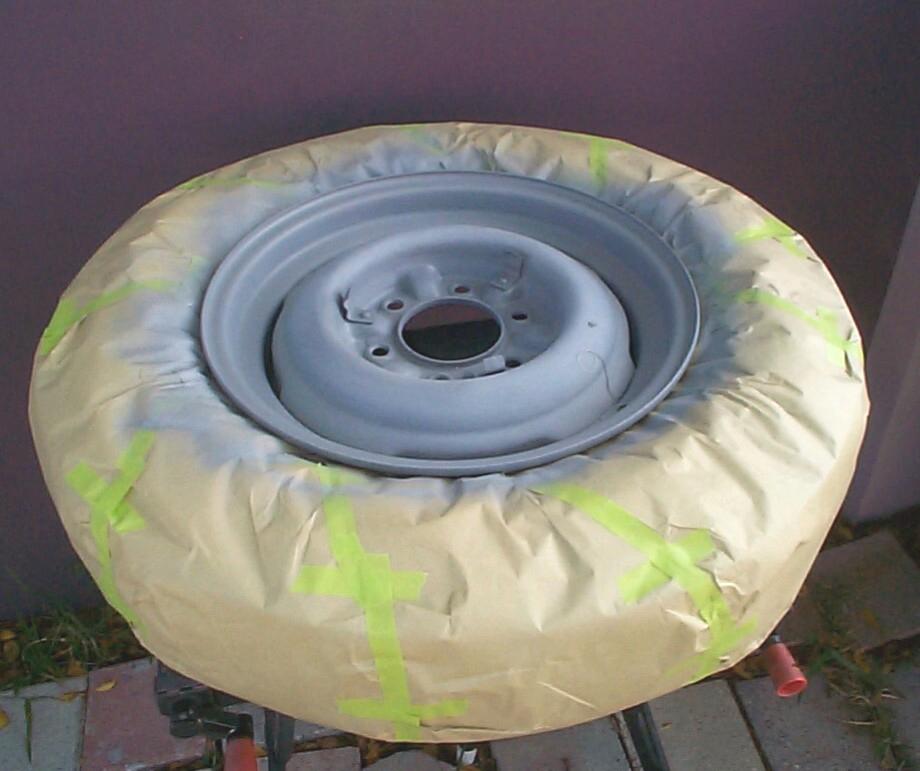 Got
out the masking paper and tape and masked the tire off from the wheel.
Then sanded down the rim damage caused by the tire mounting bar and
around the chip I made. Cleaned the wheel with PRE Paint Prep and gave
the bare rim spots a light blast of self-etching primer. Mixed up a
"dab" of JB Weld and filled the paint ding. Then I went back to engine
compartment detailing. I took the coil off again. Why? Cause dummy me
fergot to put threadlocker on the stainess steel screw last week an'
I'm afraid of spalling.
Got
out the masking paper and tape and masked the tire off from the wheel.
Then sanded down the rim damage caused by the tire mounting bar and
around the chip I made. Cleaned the wheel with PRE Paint Prep and gave
the bare rim spots a light blast of self-etching primer. Mixed up a
"dab" of JB Weld and filled the paint ding. Then I went back to engine
compartment detailing. I took the coil off again. Why? Cause dummy me
fergot to put threadlocker on the stainess steel screw last week an'
I'm afraid of spalling.
September 11th 2005 Four years into our active participation in WWIV. I recall watching people jumping out of the twin towers, making the horrible decision to die by impact rather than burning to death. Slightly more than half of the voting public appear to believe we are in a real war, myself included. I'm not sure what the others believe, especially those who designed the Flight 93 memorial in the form of a red cresent which seems to honor the hijackers, not the heros.
Took the tire tools up to the warehouse and exchanged Renegade for BettyLou first thing. The roll-up door went beyond its track guide and I spent twenty minutes standing on Rendgade's hood cussin' and sweatin' it back into place. Not a bad omen, I hope. When I got back to the Krash Lab, I started sanding down yesterday's application of JB Weld and prepping the wheel for finish paint.
After sanding, the whole wheel was gone over with a 3M Scuff Pad and set up in the Decker Workmate for painting. Got the nitrile gloves on and gave the wheel a couple of applications of PRE Paint Prep. Mixed up the "Juniper Green" paint I got from Paintsctatch.com with automotive lacquer thinner at a 1:1 ratio. I tried a round pattern first on the spray gun but the paint was too thin and caused runs at that setting so I went back to the vertical pattern. Sprayed two coats twenty minutes apart.
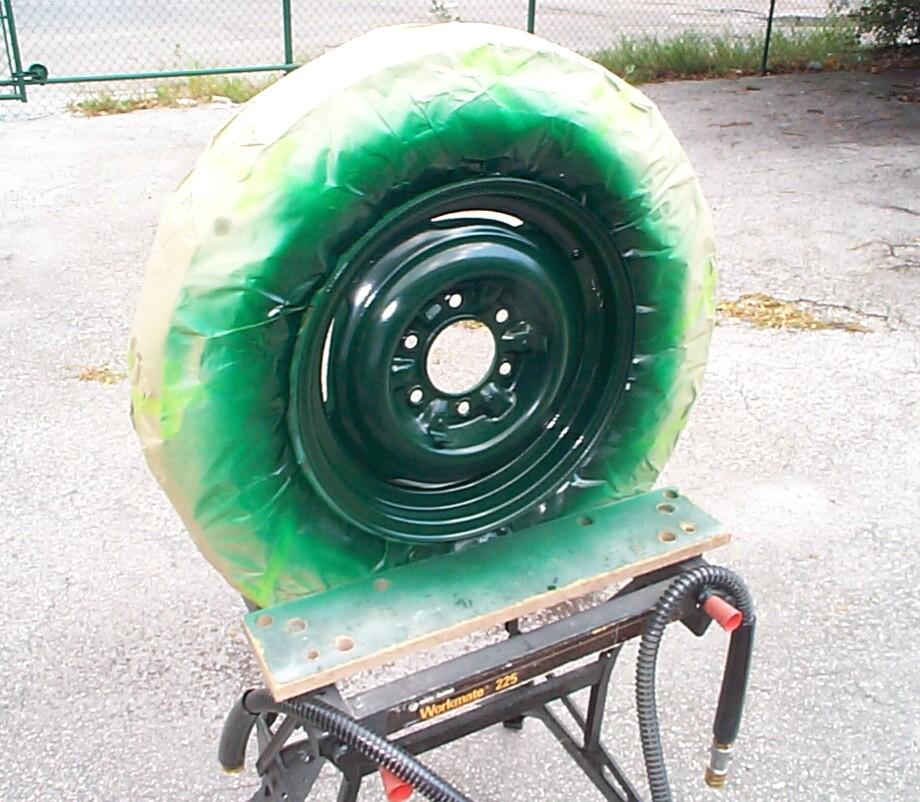 What
I ended up with is probably as good as what left the factory and I was
satisfied with it until I discovered spots I pretty much missed because
the wheel was vertical in the workmate and I missed some of the
"undersides". ~!@#$%^. As I was
comtemplating my next steps, Donny, the lawn guy showed up. Aye
Carumba! I've had enuf of this. Maybe I'll do better
next week . . . By the time Donny left a couple of hours later, I'd
simmered down and decided to give it one more college try. I didn't
want to setup and cleanup the paint gun one more time if I didn't have
to. Had paint gun problems and a couple of big drop spatters. Cleaned
that up as best I could and tried again. I'm going thru a lot of
expensive paint here and I don't want to throw any away. Got two more
wet coats laid down. Then the wind started picking up and blowing lawn
trimmin's around. Hustled the wheel back inside again. This paint job
is not good enuf for a judge but it is good enuf fer me.
What
I ended up with is probably as good as what left the factory and I was
satisfied with it until I discovered spots I pretty much missed because
the wheel was vertical in the workmate and I missed some of the
"undersides". ~!@#$%^. As I was
comtemplating my next steps, Donny, the lawn guy showed up. Aye
Carumba! I've had enuf of this. Maybe I'll do better
next week . . . By the time Donny left a couple of hours later, I'd
simmered down and decided to give it one more college try. I didn't
want to setup and cleanup the paint gun one more time if I didn't have
to. Had paint gun problems and a couple of big drop spatters. Cleaned
that up as best I could and tried again. I'm going thru a lot of
expensive paint here and I don't want to throw any away. Got two more
wet coats laid down. Then the wind started picking up and blowing lawn
trimmin's around. Hustled the wheel back inside again. This paint job
is not good enuf for a judge but it is good enuf fer me.
September 17th 2005 Constitution Day 218 years since the Constitution was signed. I'm in the "Enduring document" camp, not the "Living document" bunch. It's the finest governing document ever penned and if you want to change it, fine. Do it by amendment where we all get to radify by states. The founders never intended a black robe to change it by re-defining the words and phrases to allow a vocal minority to force their will upon the rest of us.
Back to BillyBob. First order of business today is pinstripping the wheel that was painted last week. Pulled out the floor jack and put BillyBob's rear end up on jackstands. I wanted to mount the new wheel so I could rotate the wheel with one hand while guiding the Beugler pinstripping tool with the other. The rear wheels were a little too tight against the brakes for me to turn the wheel smoothly with one hand so BillyBob's rear end was lowered and the front end was jacked up. The painted wheel was mounted on the passenger side with two lug nuts snugged up. Cleaned the stripping area with PRE Paint Prep and that was a mistake. It dulled the fresh paint. Repeated the cleaning with lacquer thinner and that restored the gloss. When I purchased the Beugler stripping tool from Eastwood, I also ordered a half-pint of #116-L Ivory Sign Painters' 1-shot Lettering Enamel. This color is pretty close to the tan that was originally used for pinstripes on the '55 1st Series Chevy trucks that were painted Juniper Green.
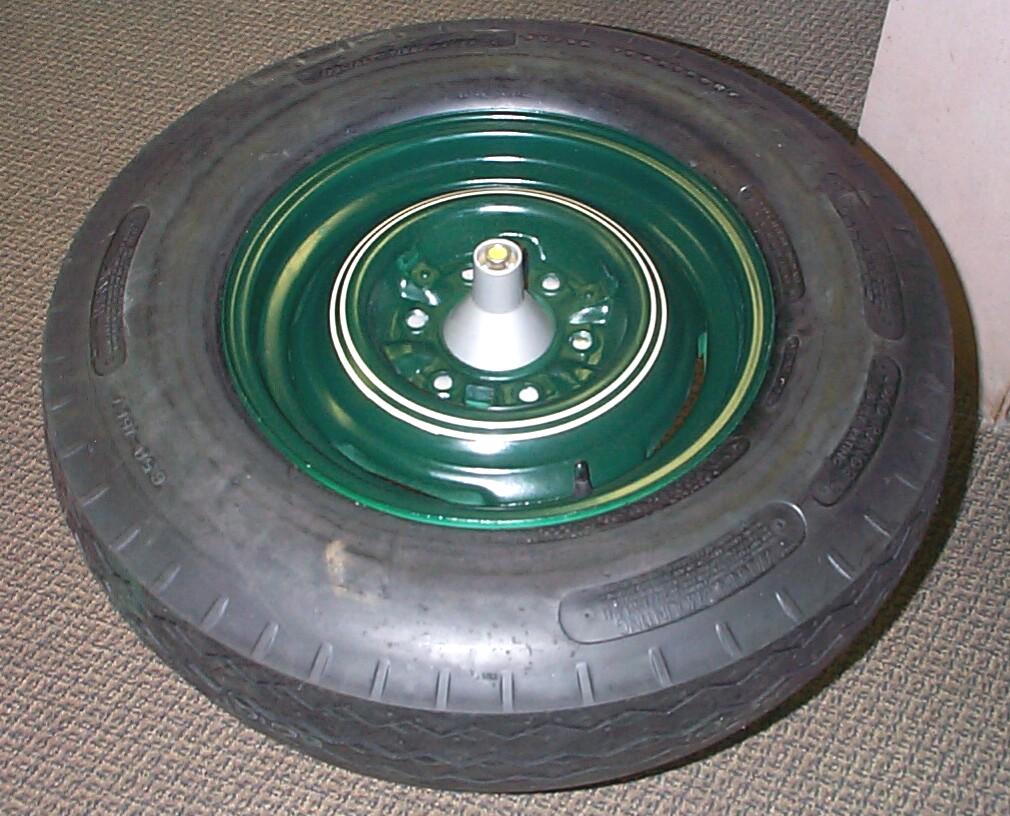
 Spent
a good portion of the day trying to lay down pinstripes on the wheel.
Kinda glad now that I put four coats of base color on the wheel last
sunday. Everytime I had to take pinstripe mistakes off with lacquer
thinner, I lost some basecoat too. After three disapointing tries with
the small guide arms that came with the Beugler tool, I decided it was
time to try a different approach. I bent up my own long guide arm from
coat hanger wire and secured it at the center of the wheel under the
spindle nut. The coat hanger wire was slightly smaller in diameter than
the factory guide arms so I had to wrap some electrical tape around the
end so the Beugler tool would clamp on to it. That worked. I ended up
with two pinstripes that were only slightly ragged at beginning/end
points. That's the good news. The bad news is that they aren't quite in
the right location and they feel a bit too wide. The hub cap will
probably cover the inner stripe when installed. I also gave up on
trying to put a third stripe on the outside edge of the rim (flat area
inside where the weights attach). I just couldn't get the tool
positioned in the tight space. This problem will require more thought.
Spent
a good portion of the day trying to lay down pinstripes on the wheel.
Kinda glad now that I put four coats of base color on the wheel last
sunday. Everytime I had to take pinstripe mistakes off with lacquer
thinner, I lost some basecoat too. After three disapointing tries with
the small guide arms that came with the Beugler tool, I decided it was
time to try a different approach. I bent up my own long guide arm from
coat hanger wire and secured it at the center of the wheel under the
spindle nut. The coat hanger wire was slightly smaller in diameter than
the factory guide arms so I had to wrap some electrical tape around the
end so the Beugler tool would clamp on to it. That worked. I ended up
with two pinstripes that were only slightly ragged at beginning/end
points. That's the good news. The bad news is that they aren't quite in
the right location and they feel a bit too wide. The hub cap will
probably cover the inner stripe when installed. I also gave up on
trying to put a third stripe on the outside edge of the rim (flat area
inside where the weights attach). I just couldn't get the tool
positioned in the tight space. This problem will require more thought.
 So,
I've ended up with stage I stripes on a stage II wheel refinishing
effort. This is the first of six wheels and I have plenty of time to
refine my skills and procedures. I'm gonna move on for now and come
back to this particular wheel down the line when I get better at this.
It's time for quarterly
maintenance again and I lubed all the zerk fittings before
putting BillyBob back on the ground again. Finished the rest of the
quarterly chores and started cleaning up the pinstripping tool.
So,
I've ended up with stage I stripes on a stage II wheel refinishing
effort. This is the first of six wheels and I have plenty of time to
refine my skills and procedures. I'm gonna move on for now and come
back to this particular wheel down the line when I get better at this.
It's time for quarterly
maintenance again and I lubed all the zerk fittings before
putting BillyBob back on the ground again. Finished the rest of the
quarterly chores and started cleaning up the pinstripping tool.
September 18th 2005 Starting out with good weather today. Went up to the warehouse bay to retrieve the static wheel balancer and a heavy duty sissors jack I'd gotten sometime back, from Northern Tool I think. Remembered not to open the roll-up door the whole way this time. Exchanged BettyLou for Renegade too. Back at the Krash Lab I got back to work on the wheel. Removed the masking and fished the inner tube valve stem thru the hole with aid from the wire I'd attached to it. Applied tire lubricant to the tire beads and prepared to seat them. Inflated the tire to 45 psi and waited a half hour for any leaks to show.
Took BillyBob's battery out and put it on the charger in the meantime. I haven't gotten back around to working on my charging problem and the battery was down to 11.91 volts. Days are shorter now and I'm using the lights more. I'm gonna have to get on the stick soon and fix this. I think it's a diode problem in the Decotron alternator and I've gotten new diodes from RockAuto along with other alternator rebuilding parts.
 Went
back to the new tire and completely deflated it again, removing the
valve core, to make sure the beads were seated. Then it was re-inflated
again to 36 psi. The wheel was next put on the static balancer. It was
in fair balance to begin with and only needed 1 oz so two half ounce
weights were put on the front and rear rims opposite each other.
Went
back to the new tire and completely deflated it again, removing the
valve core, to make sure the beads were seated. Then it was re-inflated
again to 36 psi. The wheel was next put on the static balancer. It was
in fair balance to begin with and only needed 1 oz so two half ounce
weights were put on the front and rear rims opposite each other.
Time to mount the new spare into the tire carrier. Some time back when I refinished the wheel carrier and adjusted it to Factory Assembly Manual specs, I discovered 'tho it might fit the standard 6.00 x 16 tire, it would not allow a 6.50 x 16 tire. Both the hinge side bolt and the hook bolt replacement I'd gotten from Chevy Duty were too short. I'd ordered new longer bolts from McMaster-Carr and now it's time to put them in. The hinge side bolt was replaced with a armorcoat 1/2" - 13 x 6-1/2" hex cap screw and the hook bolt was replaced with a stainless steel 1/2" -13 x 10" J-bolt.
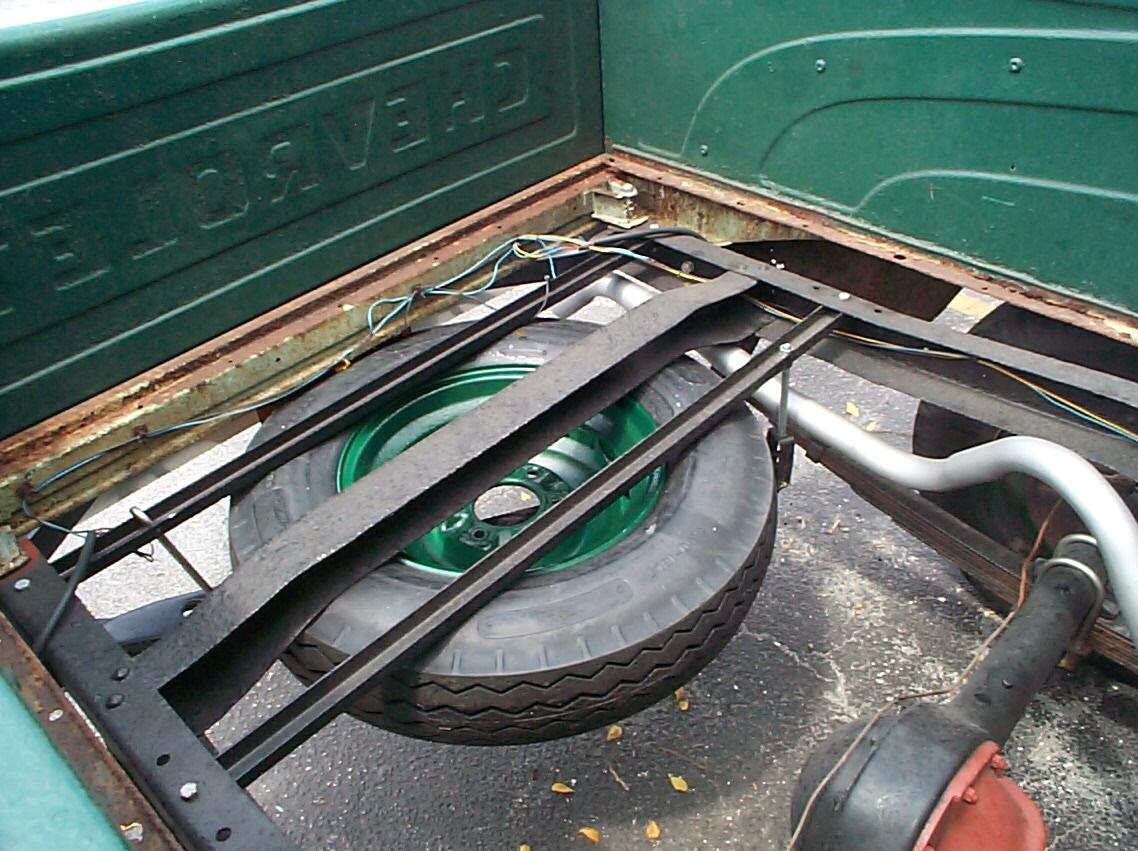 Time
to wrestle the wheel back into the carrier. Mein Gott!
Murphy rules. It teetered and tottered and fell on me several times.
The ~!@#$%^ spade portion of the carrier
was designed to gouge the wheel and it did in several places right down
to bare metal. The front of the wheel will have to be repaired and
re-finished again. You have to mount it face down so that the valve
will be accesible for checking and filling (Factory Assembly Manual sez
to position the tire so that the valve is at the back towards the rear
of the truck). If I was "in touch with my feminine side"
I'd cry but since I purged that gurly-boy stuff a long time ago, I'll
just grind my teeth instead. The good news is that I'm glad I didn't
spend any more time yesterday trying to get perfect pinstripes since
that work has been canceled out and will have to be done over (more
better next time). I'm gonna attach some non-stock padding to the wheel
carrier so this doesn't happen again. Then . . . It started to rain.
Got the battery back up to 12.95 volts and, after the rain stopped, put
it back in BillyBob. Wasn't in the mood to start anything else so I put
the tools away.
Time
to wrestle the wheel back into the carrier. Mein Gott!
Murphy rules. It teetered and tottered and fell on me several times.
The ~!@#$%^ spade portion of the carrier
was designed to gouge the wheel and it did in several places right down
to bare metal. The front of the wheel will have to be repaired and
re-finished again. You have to mount it face down so that the valve
will be accesible for checking and filling (Factory Assembly Manual sez
to position the tire so that the valve is at the back towards the rear
of the truck). If I was "in touch with my feminine side"
I'd cry but since I purged that gurly-boy stuff a long time ago, I'll
just grind my teeth instead. The good news is that I'm glad I didn't
spend any more time yesterday trying to get perfect pinstripes since
that work has been canceled out and will have to be done over (more
better next time). I'm gonna attach some non-stock padding to the wheel
carrier so this doesn't happen again. Then . . . It started to rain.
Got the battery back up to 12.95 volts and, after the rain stopped, put
it back in BillyBob. Wasn't in the mood to start anything else so I put
the tools away.
That's a wrap! Got the first wheel done even tho' I turned around and destroyed it again during installation. Two steps forward and one step back. Next time, I'll be starting on the second spare wheel I got from American Classic Truck Parts. I'll be reporting less on the wheel work and more on the other things I'll be doing' with BillyBob like the alternator and other under the hood work. I'll mention it if I'm doing wheel work and make reference to a parts shop procedure I've worked up for the wheel re-finishing process. I'll only go into detail if I'm doing something different than last time.
| < Back
to Intro |
You can email me at ![]() webmaster@laroke.com
webmaster@laroke.com
Issued Monday September 19, 2005
Updated Friday March 9, 2018
copyright © 1996-2018 Larry Robert Kephart all rights reserved
| | LRK Home | | Bio Info | | Krash Khronicles | | LAROKE | |
| | BettyLou | | BillyBob's Garage | | Rat Patrol | | Deerslayer | | Elvira | |
| | Land of the Free and Home of the Brave | |
| | Keppylou's Art | | WWI Soldier's Diary | |