| | LRK Home | | Bio Info | | Krash Khronicles | | LAROKE | |
| | BettyLou | | BillyBob's Garage | | Rat Patrol | | Deerslayer | | Elvira | |
| | Land of the Free and Home of the Brave | |
| | Keppylou's Art | | WWI Soldier's Diary | |
BillyBob Work-in-Progress Log
![]()
WHAT'S NEW is a chronological listing of updates to the BillyBob site.
![]()
TRUCK LINKS including vendor sites for old parts, custom parts, and tools as well as sites for classic car and truck organizations
STORE Operating in association with Amazon.com, books, recordings and tools can be purchased.
PLANNING for the restoration including project schedule and cost estimates.
![]()
TRAVELS WITH BILLYBOB With apologies to Steinbeck, this area of BillyBob's Garage will be used to log the trips BillyBob and I make together.
WORK-IN-PROGRESS is the restoration of parts of BillyBob that I can accomplish without a garage.
PRE-RESTORATION includes log entries of minor repairs and adventures between time of purchase and the time when I started restoration, a piece at a time.
JR'S KORNER JR's Korner is the history of BillyBob before I got him authored by my brother, Wm. C. Kephart.
![]()
BILLYBOB MAINTENANCE Ever changing detailing, oil change, lube, etc. maintenance routines specifically developed for BillyBob, including required tools, materials and procedures.
PARTS SHOP The Parts Shop is a repository of How-To articles. Things that I have done over and over enough times to have developed a procedure. This gives me a checklist and saves brain cells.
STEALTH SHOP Urban residence design with large integrated shop and separate living quarters for a relative or renter.
![]()
You will need the Adobe Acrobat browser plugin to view these wiring diagrams which are in the PDF file format. This format allows zooming and panning. If you don't have this plugin, it can be downloaded and installed (free) from the Adobe site. The button below will take you there.
![]()
BILLYBOB WIRING DIAGRAM Here's the wiring diagram updated with BillyBob's current state 'cepting the third-party strap-on turn-signal director.
STRAP-ON TURN-SIGNAL DIRECTOR/BRAKE LIGHT CIRCUIT This turn signal and brake light circuit diagram shows the current state of the third-party turn-signal director wiring, which will remain in place until I figure out the problems with the OEM turn-signal director. It also shows the OEM headlight switch.
39. Cab Doodads an' other things
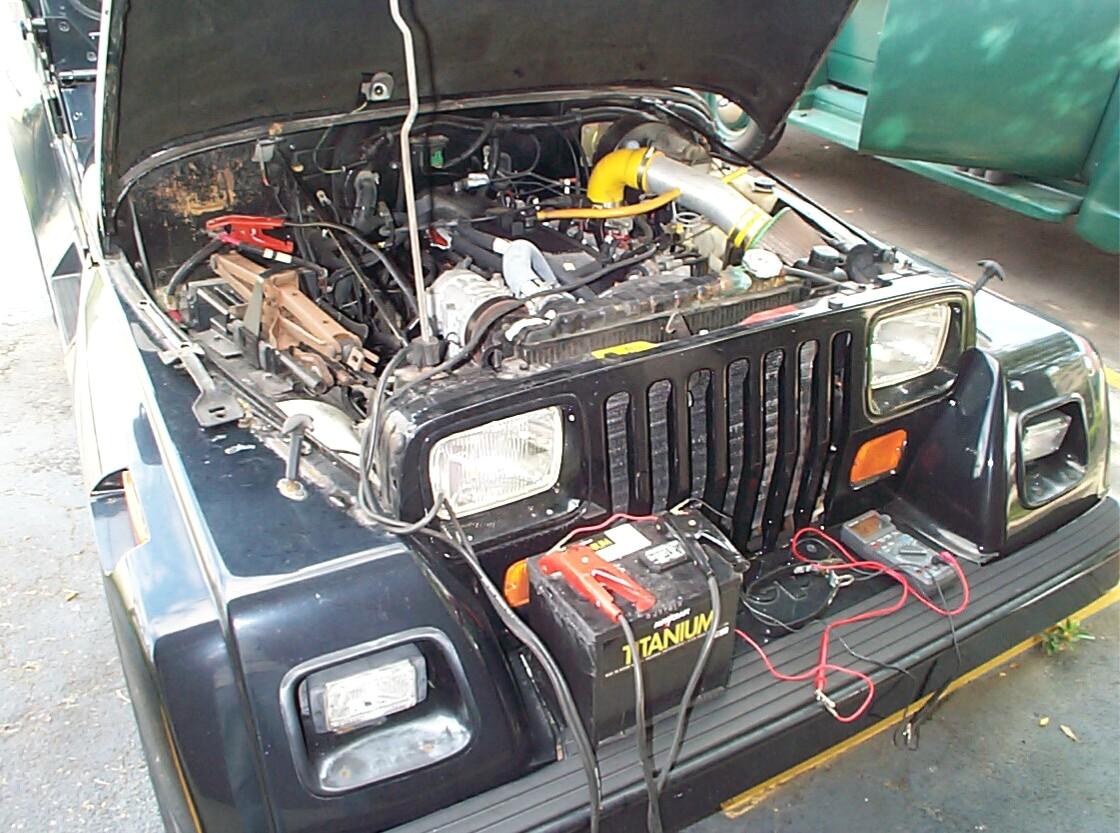
May 14th 2005 Overcast today. It may rain in the shadetree garage. This is an "odds-n-ends" day. Gonna try to get a bunch of small tasks out of the way. First up: charging system troubleshooting. I still have the ammeter fluctuation with the battery slowly losing charge. Problem is my very limited electrical knowledge and a system that has been converted to 12v from 6v. I can't follow the shop manual directions exactly because BillyBob has a 12v alternator, not the original 6v generator. Also, the alternator is an old sixties Delcotron unit with an external voltage regulator so modern troubleshooting guides aren't an exact fit either. Lucky for me, when I was a young man, I bought a lot of Peterson publications including 1974's "Basic Automotive Troubleshooting For All Cars". This book has nice big drawings and typeface and helps compensate for my lack of thoretical knowledge and old eyes.
Both the Shop Manual and Peterson's Troubleshooter call for stress testing the battery early in the troubleshooting procedures to eliminate it as a source of trouble. You pull the coil wire from the distributor and crank the starter for fifteen seconds, checking voltage before and during the cranking. This test works fine for a 6v starter and battery or a 12v starter and battery. In a 6v starter with 12v battery situation like BillyBob's, however, I don't know what readings would be relevant and I'm pretty shure it's damn hard on the starter.
My first solution to this problem was to switch batteries between BillyBob and Renegade for a week and see how the batteries perform. That's what I do to fix computers when I can't make hardware tests - Switch out parts. I ran into a problem right off with battery size differences. The Jeep battery was a half-inch too long to fit in BillyBob. OK, fall-back position time. I decided to put BillyBob's battery in the Jeep and leave BillyBob sit overnite while I drove Renegade . . . Murphy strikes again! BillyBob's battery has its terminals reversed and the battery is taller than the Jeep battery. Not a problem 'cept that Chrysler was stingy with the terminal wires and they are too short to reach BillyBob's posts ~!@#$%
 I'm
not gonna let Murphy beat me on this issue. It's too early in the
morning to give up. I set up BillyBob's battery on Renegades's front
bumper and ran jumper cables - positive terminal post to positive
terminal wire and negative ground on engine to negative terminal post.
Renegade's alarm goes off and my remote key fob is dead so I gotta jump
in the jeep, turn the ignition on and toggle the valet switch to get it
to shutup. I gotta go thru this dance every time Renegades's battery is
re-connected. OK, next alligator clip jumpers are run from the battery
terminals to my multi-meter probes. The coil wire is removed, the
voltage is checked to be 12.45v, and the multi-meter's "minimum reading
hold" function is toggled on. Jump in Renegade, set parking brake,
transmission in neutral and crank the starter for a calm 30 count
(should be close to 15 seconds). BillyBob's battery lowest reading is
10.93v during cranking. Current reading is back up to 12.33v and it
came up to 12.41v by the time I took the multi-meter off a few minutes
later. The battery is OK.
I'm
not gonna let Murphy beat me on this issue. It's too early in the
morning to give up. I set up BillyBob's battery on Renegades's front
bumper and ran jumper cables - positive terminal post to positive
terminal wire and negative ground on engine to negative terminal post.
Renegade's alarm goes off and my remote key fob is dead so I gotta jump
in the jeep, turn the ignition on and toggle the valet switch to get it
to shutup. I gotta go thru this dance every time Renegades's battery is
re-connected. OK, next alligator clip jumpers are run from the battery
terminals to my multi-meter probes. The coil wire is removed, the
voltage is checked to be 12.45v, and the multi-meter's "minimum reading
hold" function is toggled on. Jump in Renegade, set parking brake,
transmission in neutral and crank the starter for a calm 30 count
(should be close to 15 seconds). BillyBob's battery lowest reading is
10.93v during cranking. Current reading is back up to 12.33v and it
came up to 12.41v by the time I took the multi-meter off a few minutes
later. The battery is OK.
I went back and started some of the preliminary checks I should have performed before checking the battery starting with the fan belt tension. It seemed a hair loose so I adjusted the tension. Checked all the the wire connectors between alternator, regulator and battery next. All solid 'cept fer the slightly wobbly "F" blade on the back of the alternator. I can't hear the alternator bearings unless I use the automotive stethoscope so I think they're OK. When I switched the battery cut-off off, the engine died. I think this is an important clue. In the past, the engine could keep on running on the alternator juice alone.
Finally, I checked the alternator voltage. For the Delcotron, you disconnect the battery, then disconnect and tape off the "field" and "relay" wire terminals (now I find out that grounding these terminals can damage the diodes in the alternator and I have no doubt that I may have done that some time in the past). Run a jumper from the "field" terminal on the alternator to the "out" or "Bat" terminal. I was lucky to find a wiring diagram for this test on a Delcotron in another one of my Peterson publications, "Basic Ignition and Electrical Systems" from 1971. Connect the battery and start the engine (don't rev it up as the alternater is running unregulated. Check voltage at idle or slightly above by placing the multimeter probes between the "Bat" and "Grd" terminals on the alternator. It should be 15 volts. Oh, Oh! The alternator is only putting out 13.33v at idle. I pulled the choke out a bit to raise engine speed but it only came up to 14.47v. I think I have a good alternator up at BillyBob's warehouse.
Went on to pickup where I'd left off months ago with tune-up routines. The last thing I did with regard to that was install new points and condenser. The points had been set at 0.019" with the feeler gauge since they were new. I pulled the distributor cap and reset them at 0.016" today. The next tune-up step in the Shop Manual is to clean the fuel pump filter bowl and screen but BillyBob's fuel pump appears to be a newer type that doesn't come apart easily so I skipped the fuel pump step.
I set the ignition timing next in accord with the Shop Manual. As far as I could tell, the "octane selector" was already set at "0" so I moved on to setting up my Sears induction timing light. The induction clamp was set on number one spark plug wire a few inches from the plug. Since the battery is too far away, the positive alligator clip was connected to the starter motor "hot" lug and the negative clip was connected to the thermostat housing bolt head at the front of the engine for ground. Started the engine and let it warm up a bit. It's hard for these old eyes to see the pointer in the bellhousing hole above the starter motor and I couldn't see the steel ball in the flywheel at all at idle. Unloosened the distributor hold-down bolt and moved it counter-clockwise as far as I could (the vacuum advance housing and tubing limited movement). This got the steel ball almost lined up with the pointer 'an good enuf fer me. The hold-down was tightened back up. The engine felt better but we'll get a better indication when I drive home to the Krash Pad tonite.
May 15th 2005 Woke up and left the Krash Pad by 6:30 AM (like every other day) and headed down A-1-A for a Fort Lauderdale Port Everglades sunrise beach run. I wanted to warm up BillyBob's engine for valve adjustment. Also wanted to see how the troublesome charging system would fare on a longer run than my daily runs between the Krash Pad and the Krash Lab. It was a good ride. Ammeter needle behaviour was the same as on the short runs. Front end vibration problem seems to have been solved by the static wheel balancing. The engine idles and starts better since yesterday's ignition timing exercise. BillyBob starts on the first engine revolution without the choke if the starter can catch a tooth on the worn ring gear.
When I got to the Krash Lab, I found that the longer run had charged the battery a bit - up to 12.73v from 12.45v when I checked yesterday before going home. Disconnected the battery, set tranny in neutral and set the parking brake. Removed the spark plugs and distributor cap. Removed the valve cover. Tightened the fan belt so I could use the fan to turn the engine. I used Nate Hall's write-up on Deve Krehbiel's site to adjust the intake valves to 0.008" and the exhaust valves to 0.020" (Severe Service recommendations).
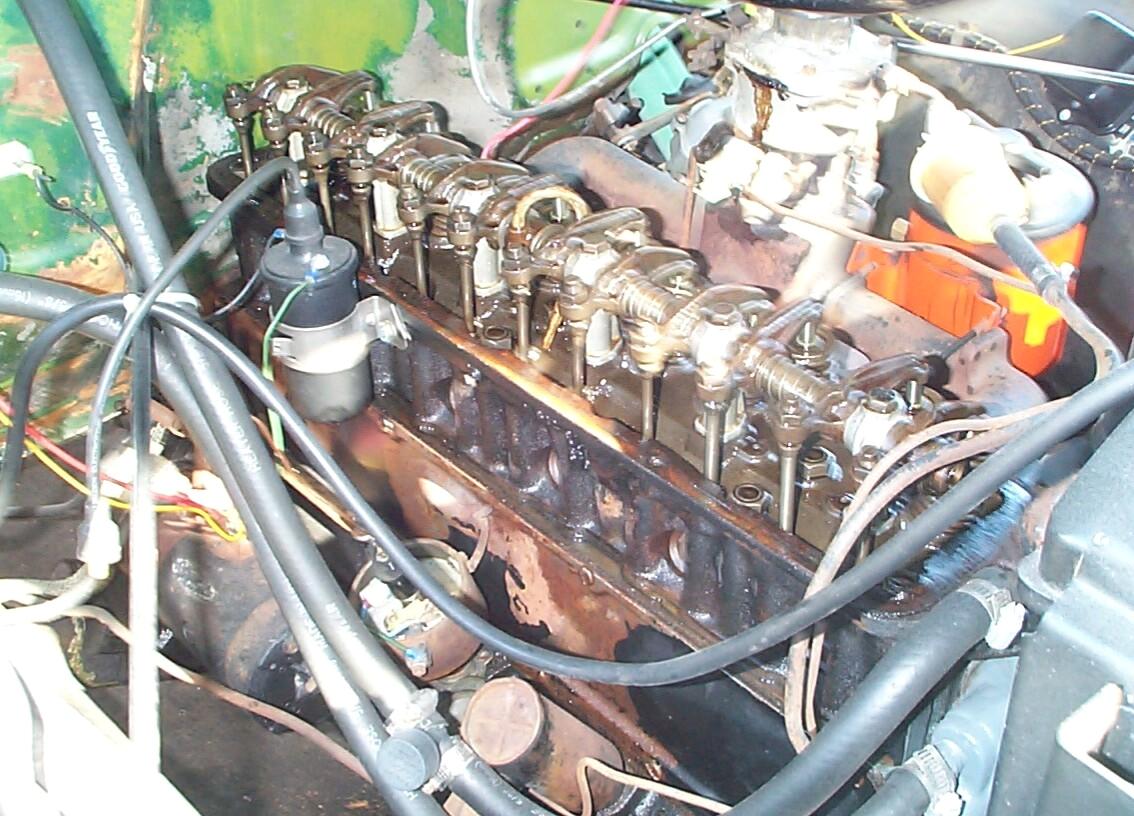 The
fan was used to turn the engine to TDC for number #1 cylinder and
valves 1,2,3,5,7 and 9 were set. The engine was turned one revolution
by hand again to put #6 cylinder at TDC and valves 12,11,10,8,6 and 4
were set. I have one of those Gunson "Click-adjust" tappet adjusters
but I left it in the box. This is the first time I've adjusted valves
since I was a teenager and I've forgotten everything (probably a good
thing since I was even more prone to mistakes then than now). Learning
the "Click-adjust" in addition to everthing else was too much for one
session.
The
fan was used to turn the engine to TDC for number #1 cylinder and
valves 1,2,3,5,7 and 9 were set. The engine was turned one revolution
by hand again to put #6 cylinder at TDC and valves 12,11,10,8,6 and 4
were set. I have one of those Gunson "Click-adjust" tappet adjusters
but I left it in the box. This is the first time I've adjusted valves
since I was a teenager and I've forgotten everything (probably a good
thing since I was even more prone to mistakes then than now). Learning
the "Click-adjust" in addition to everthing else was too much for one
session.
After the valves were adjusted, the fan belt was loosened and re-tensioned correctly and the spark plugs were re-installed. They look good by the way, all a nice even light gray. I was slowed down for a few minutes to re-crimp spark plug wire number 6 terminal which had pulled off when I removed it from the spark plug. Probably time for new wires as these are about ten years old. Put the plug wires and distributor cap back on and fired up the engine (started on first revolution). Left it at idle and observed the rocker arm operation fer awhile. I daydreamed about the engine room scene in Das Boot and those clacking rocker arm assemblies during the hard charge past Gibralter. BillyBob's valve train area is still clean and oil is reaching all the rocker arms. Good!
May 21st 2005 The good weekend weather continues. Dragged out the tools and started in on the interior cleaning and detailing. After floor vaccuum and cleaning, I went on to floor repair. The previous repair from November of 2002 is holding pretty well 'cept for a small crack that has developed in the reinforcing right where my feet rest when they aren't operating the numerous pedals in front of them. Brought what was left of the POR-15 Floorpan and Trunk Restoration Kit down from the warehouse. It was in pretty ratty condition having been subjected to a roof leak in the warehouse for a long period of time. There appeared to be enuf useable materials to reinforce the area where the crack had developed. Cut a peice of the fiberglass mat, painted the area with the silver POR-15 and embedded the mat in it, then painted the mat. This time I got the correct color first because of the paint drippings on the outsides of the nearly identical cans.
 While
the POR-15 set up, I went on to replace the foot starter boot which had
gone the way of all repop rubber. It started breaking apart several
weeks ago. Treated the new boot and the master brake cylinder access
cover with protectant. Got a four-hole firewall grommet a couple of
weeks ago from Chevy-Duty
along with some other stuff. Decided it was time to install the
throttle cable. Took out the choke cable and lubed both it and the
throttle cable with white lithium grease from an aerosol can. Installed
the four-hole grommet in a hole that had previously held a two-hole
grommet. I know I'll find a use for the other holes when I install the
overdrive tranny down the road.
While
the POR-15 set up, I went on to replace the foot starter boot which had
gone the way of all repop rubber. It started breaking apart several
weeks ago. Treated the new boot and the master brake cylinder access
cover with protectant. Got a four-hole firewall grommet a couple of
weeks ago from Chevy-Duty
along with some other stuff. Decided it was time to install the
throttle cable. Took out the choke cable and lubed both it and the
throttle cable with white lithium grease from an aerosol can. Installed
the four-hole grommet in a hole that had previously held a two-hole
grommet. I know I'll find a use for the other holes when I install the
overdrive tranny down the road.
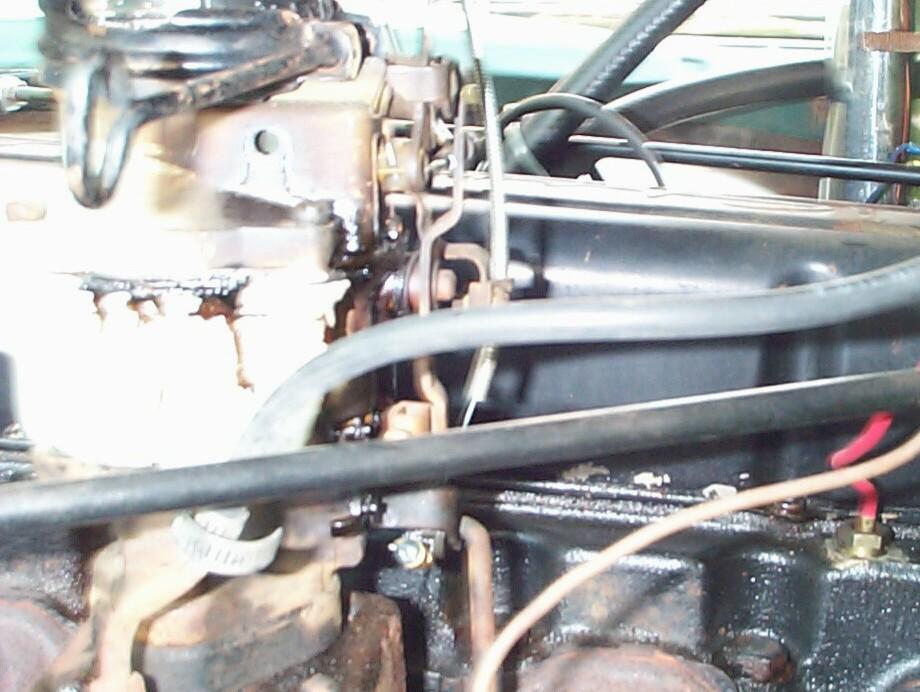 Threaded
the choke and throttle cables thru the grommet and connected them.
Choke first, then the throttle cable with the new wire stop I got from
Chevy-Duty some time back. BillyBob didn't have his throttle cable when
I got him so I thumbed thru Factory Assembly Manual 'til I found the Choke
and Throttle Controls Instruction page. It looks cleaner and
more straightforward in the drawing than it does on BillyBob. I wuz
ponderin' on making the cables shorter when I had a minor reality
check. I may need a bit more cable under the dash once the radio,
defroster hoses and wiper motor are installed so better wait 'til then
to shorten these up. In the meantime, I'll ride with these the way they
are and see if they need any minor adjustments in the coming week.
Threaded
the choke and throttle cables thru the grommet and connected them.
Choke first, then the throttle cable with the new wire stop I got from
Chevy-Duty some time back. BillyBob didn't have his throttle cable when
I got him so I thumbed thru Factory Assembly Manual 'til I found the Choke
and Throttle Controls Instruction page. It looks cleaner and
more straightforward in the drawing than it does on BillyBob. I wuz
ponderin' on making the cables shorter when I had a minor reality
check. I may need a bit more cable under the dash once the radio,
defroster hoses and wiper motor are installed so better wait 'til then
to shorten these up. In the meantime, I'll ride with these the way they
are and see if they need any minor adjustments in the coming week.
By four-thirty in the afternoon, I was ready for the POR-15 black coat. In my haste, I fergot to put my nitrile gloves back on and, off course, I got POR-15 on my fingers. I'm gonna have black dog paws fer awhile now an' I got a wedding to attend in Raleigh next weekend. Curses!
May 22nd 2005
Brought my replacement alternator down from the warehouse during the
week. Installed it this morning - pulled the old one out, exchanged
pulleys and installed the new one. During this process, I read in the
installation instructions that came with the remanufactured unit that
you should nebber disconnect the battery while the engine is running
since it could cause a voltage spike that could damage the alternator.
Confound it! Hoisted on my own petard
retard again! Another bad habit to unlearn. A few more alternators an'
I may be expert enuf not to keep being the possible cause of my own
charging system troubles.
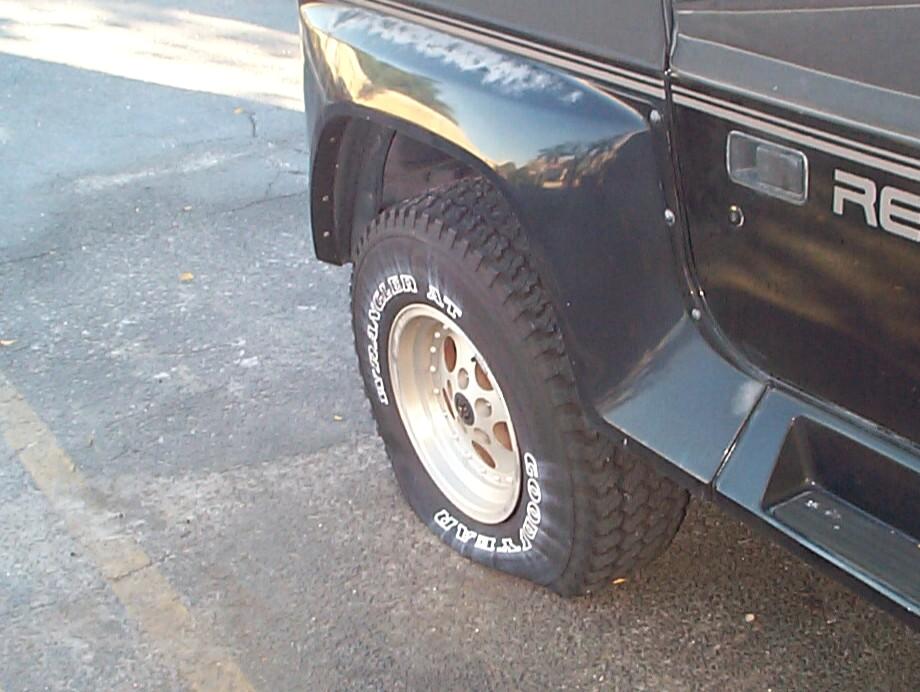
June 4th 2005 Made my drive up to Raleigh and back in a rental Buick last weekend without incident. One of my cousins was getting married and another was graduating from high school. I had a good time celebrating these milestones with my relations. When I got back to the Krash Lab on Memorial Day evening, I jumped in BillyBob and drove home to the Krash Pad. We limped into the parking lot with a flat left rear tire. Curses! These old tires are not going to wait for me to re-finish the wheels, it appears. On tuesday morning, I called up M.E. Miller Tire Company in Ohio and ordered six new 6.50x16 tires, inner tubes and a qt of tire black paint. Hopefully, the tires will arrive this coming week so I can have BillyBob back on the road for a car show next sunday.
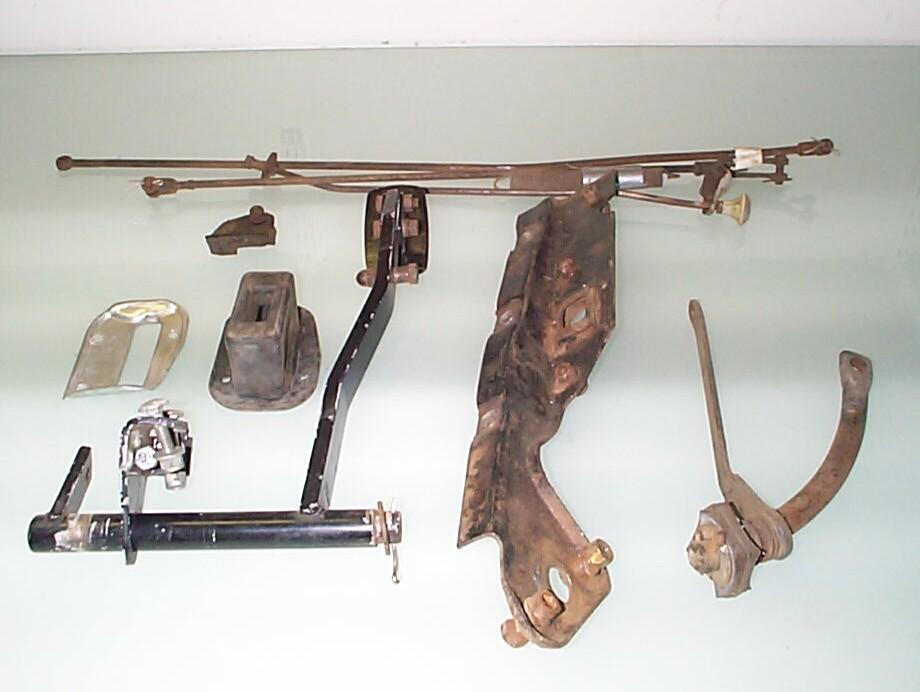 After
the last log entry, chassis Chazzmeteria,
was posted, I got an e-mail from fellow ole trucker Robert French.
Robert, who hails from Perryville, Arkansas, had taken note of my
description of the sad state of BillyBob's parking brake assembly in
the driver side wheelwell. He had a bucketfull of these parts
(everything back to the cross-shaft) left over from the work on his
truck "ol blue". Robert said the parts were "in very good shape" and he
offered to send them to me for a pittance. I jumped at the offer and
they arrived a week or so later. Very good shape, my butt! They're
beautiful! These will be the best looking original parts on BillyBob
when I get around to putting them on. Thank you, Robert.
After
the last log entry, chassis Chazzmeteria,
was posted, I got an e-mail from fellow ole trucker Robert French.
Robert, who hails from Perryville, Arkansas, had taken note of my
description of the sad state of BillyBob's parking brake assembly in
the driver side wheelwell. He had a bucketfull of these parts
(everything back to the cross-shaft) left over from the work on his
truck "ol blue". Robert said the parts were "in very good shape" and he
offered to send them to me for a pittance. I jumped at the offer and
they arrived a week or so later. Very good shape, my butt! They're
beautiful! These will be the best looking original parts on BillyBob
when I get around to putting them on. Thank you, Robert.
I've also about finished collecting the parts I need to install the overdrive transmission in BillyBob sometime down the line. After reading the documentation posted on Deve Krehbiel's site and my Motors and Chilton manuals, I also got a lot of help from a timely discussion going on over at Stovebolt.com with Truckedup (Tony), Cosmo, Hotrod Lincoln (Jerry) and others about how to wire these things up. There are several different ways to skin this cat and even tho' the overdrive wasn't offered until the 2nd Series half-ton trucks, I wanted to configure it as if it had been. I bought the new "Radio Shack" solution parts and wiring diagrams as a fallback solution then went in search of the harder-to-locate "period correct" parts.
 In
the Stovebolt.com message thread, Red58 (Bill) mentioned that Jim Carter sold a
overdrive wiring sub-harness. I found it and ordered it. A bonus for me
when it arrived was the realization that it would match BillyBob's main
wiring harness which I had also gotten from Jim Carter a few years ago.
Found a "NOS Dodge Plymouth Overdrive 1946-47-48-49-50-56 MoPar
Kickdown Switch" next thru an ebay auction. This looks too new and
shiny to be NOS and I'll bet somebody is manufacturing these. Got a
"1964 Chevy Belair Overdrive Cable Handle & Mount" thru another
ebay auction. This is mangled a bit an' I'm not sure at this point if
I'm going to be able to make it work or not. Last, but not least, a "12
Volt Overdrive Solenoid and Relay Ford, Chevy" came thru a third
auction. It was a package deal but the scarce kickdown relay was what I
was after. If the relay doesn't work reliably, I can use it to conceal
the "Radio Shack" relay similar to what Dave Carter did in this
article over at Studebaker.com. It's also good to have the
spare solenoid in case the one on the tranny turns out to be bad when I
start restoring it.
In
the Stovebolt.com message thread, Red58 (Bill) mentioned that Jim Carter sold a
overdrive wiring sub-harness. I found it and ordered it. A bonus for me
when it arrived was the realization that it would match BillyBob's main
wiring harness which I had also gotten from Jim Carter a few years ago.
Found a "NOS Dodge Plymouth Overdrive 1946-47-48-49-50-56 MoPar
Kickdown Switch" next thru an ebay auction. This looks too new and
shiny to be NOS and I'll bet somebody is manufacturing these. Got a
"1964 Chevy Belair Overdrive Cable Handle & Mount" thru another
ebay auction. This is mangled a bit an' I'm not sure at this point if
I'm going to be able to make it work or not. Last, but not least, a "12
Volt Overdrive Solenoid and Relay Ford, Chevy" came thru a third
auction. It was a package deal but the scarce kickdown relay was what I
was after. If the relay doesn't work reliably, I can use it to conceal
the "Radio Shack" relay similar to what Dave Carter did in this
article over at Studebaker.com. It's also good to have the
spare solenoid in case the one on the tranny turns out to be bad when I
start restoring it.
June 11th 2005 The streak of good weather weekends in Boca Raton came to an end last weekend. BillyBob was laid up with a flat tire at the Krash Pad but there was still sandblasting and painting tasks I could have performed. Unfortunately, I awoke to a downpour on Sunday morning and it didn't let up any until close to noon. By that time, I wasn't in the mood to jeep up to the Krash Lab. On Monday morning, I awoke to see one of the buildings that our firm designed in Boca . . . on a three-second shot on the Weather Channel. Sunday's deluge was enuf to make the national weather news. It's raining everyday now and we're being buffeted by tropical storm Arlene as she makes her way thru the Gulf but I still have hopes to attend a car show with BillyBob tomorrow.
This weekend started out with more of the same. Dark skies and flooded streets. The new tires and inner tubes arrived at the Krash Lab on tuesday afternoon. They look good. My plan is to replace the inner tube in the flat tire for the time being, that being the course of least resistance. With that in mind, I jeeped up to the Krash Lab first thing to drag out the tools and get a jackstand and other implements necessary to take the wheel off BillyBob back at the Krash Pad. Had to stop for many cloudbursts. I may go over my cigar quota today while I wait out rain.
 It
rained hard for most of the morning. I didn't get the needed tools back
to the Krash Pad 'til almost noon. Put BillyBob up on a jackstand with
Renegade's sissors jack and removed the wheel with the flat. Went into
the Krash Pad to let the weather improve a bit more and watch Powerblock on Spike
TV. Things had dried out by two and I headed back up to the Krash Lab
with a stop along the way at the warehouse to pick up the tire changing
machine and static wheel balancer.
It
rained hard for most of the morning. I didn't get the needed tools back
to the Krash Pad 'til almost noon. Put BillyBob up on a jackstand with
Renegade's sissors jack and removed the wheel with the flat. Went into
the Krash Pad to let the weather improve a bit more and watch Powerblock on Spike
TV. Things had dried out by two and I headed back up to the Krash Lab
with a stop along the way at the warehouse to pick up the tire changing
machine and static wheel balancer.
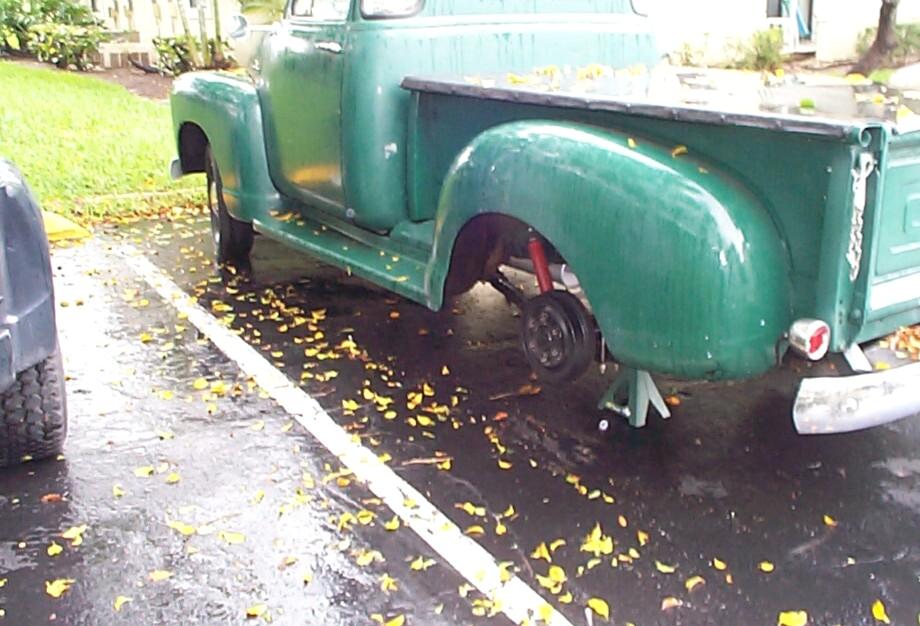
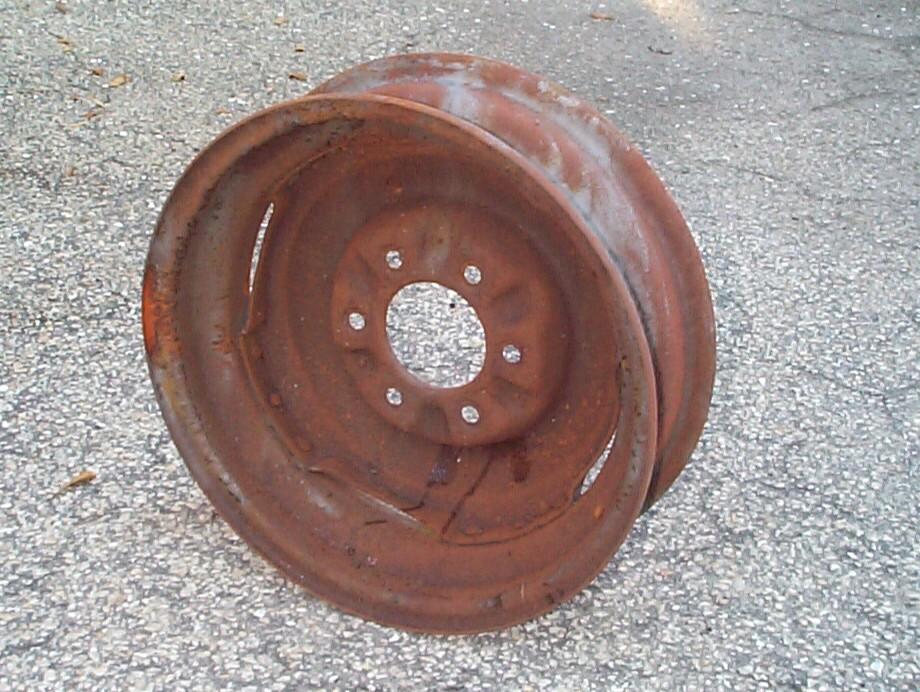
Struggled for the next 2-1/2 hours to get the tire off, clean the rim up, re-mount the tire with a new inner tube and balance the wheel. The cost was one bleeding blister and a quart of sweat. The old tire did not have any signs of puncture or cuts so I think the old inner tube just gave out. This wheel has some heavy rust damage on the inner rim in the valve stem area and will require work when I get to it in the wheel restoration project. Called my frend, John Ray, to make tenative arrangements for the car show, then loaded up the wheel and went back to the Krash Pad for the night.
June 12th 2005 Got up at first light to better weather. The tire had not lost any air pressure overnite so I re-installed it on BillyBob and fired him up for the first time in almost two weeks. Motored up to the Krash Lab for monthly maintenance and to prepare for the car show. The show itself is another story which is recorded here. Suffice it to say we made it there and back again without incident.
 June
18th 2005 Today was
scheduled for quarterly
maintenance so the tools were dragged out and that was
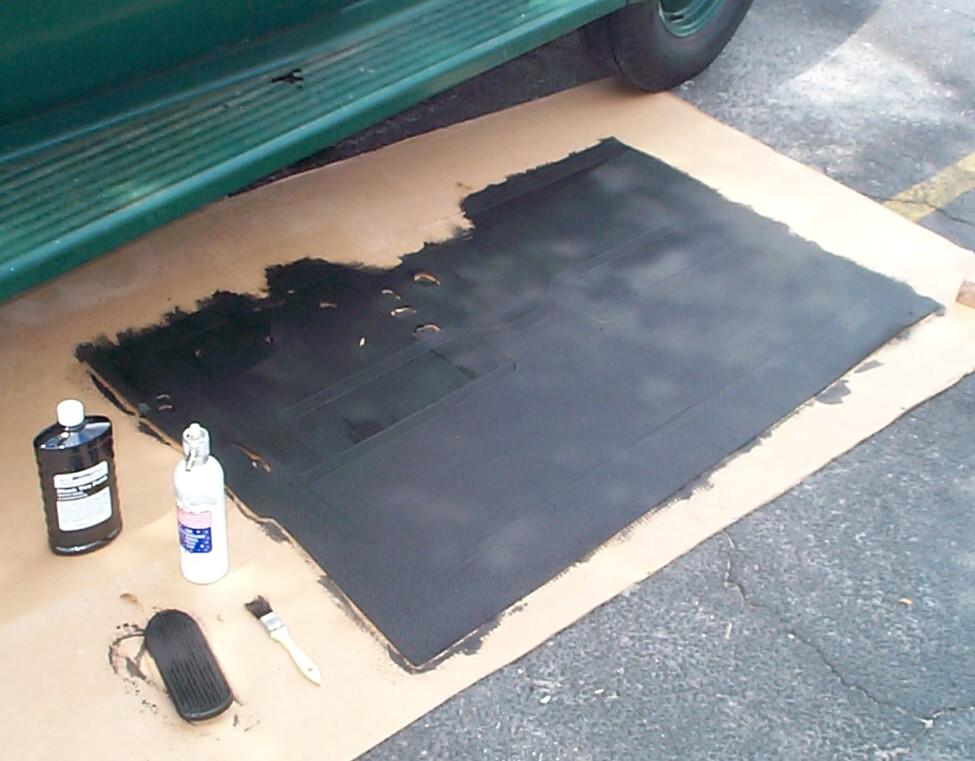
performed first. OK then. Back to interior detailing. When I did the
windshield job, despite my masking efforts, the floor mat accumulated a
collection of rust encapsulator red and dashboard green paint speckles.
Also, the OxiSolve treatments left a whitish residue where the stuff
managed to contact the floor mat. Cleaning the mat with simple green
did not get this stuff off. When I purchased the new tires and inner
tubes from M.E. Tire Company, I also got a quart of their Black Tire
Paint. This stuff is a fast-drying water-based concentrate mixed with
water in a 1:1 ratio. I poured the mix into my Rechargable Aerosol
Spray Can I got a few years ago from Harbor Freight. This
is the first time I've used the thing. Pressurized it to 50 PSI from
the air compressor and put the medium spray nozzle on . . . Mustuv'
done sometin' wrong. All it would do is dribble and spit! Whipped out a
1" disposable brush in a hurry and used that to spread out the results
from the dribble spray. Painted the gas pedal while I was at it. Gonna
have to get the kinks out before I try to use this thing with an
expensive paint.
June
18th 2005 Today was
scheduled for quarterly
maintenance so the tools were dragged out and that was
performed first. OK then. Back to interior detailing. When I did the
windshield job, despite my masking efforts, the floor mat accumulated a
collection of rust encapsulator red and dashboard green paint speckles.
Also, the OxiSolve treatments left a whitish residue where the stuff
managed to contact the floor mat. Cleaning the mat with simple green
did not get this stuff off. When I purchased the new tires and inner
tubes from M.E. Tire Company, I also got a quart of their Black Tire
Paint. This stuff is a fast-drying water-based concentrate mixed with
water in a 1:1 ratio. I poured the mix into my Rechargable Aerosol
Spray Can I got a few years ago from Harbor Freight. This
is the first time I've used the thing. Pressurized it to 50 PSI from
the air compressor and put the medium spray nozzle on . . . Mustuv'
done sometin' wrong. All it would do is dribble and spit! Whipped out a
1" disposable brush in a hurry and used that to spread out the results
from the dribble spray. Painted the gas pedal while I was at it. Gonna
have to get the kinks out before I try to use this thing with an
expensive paint.
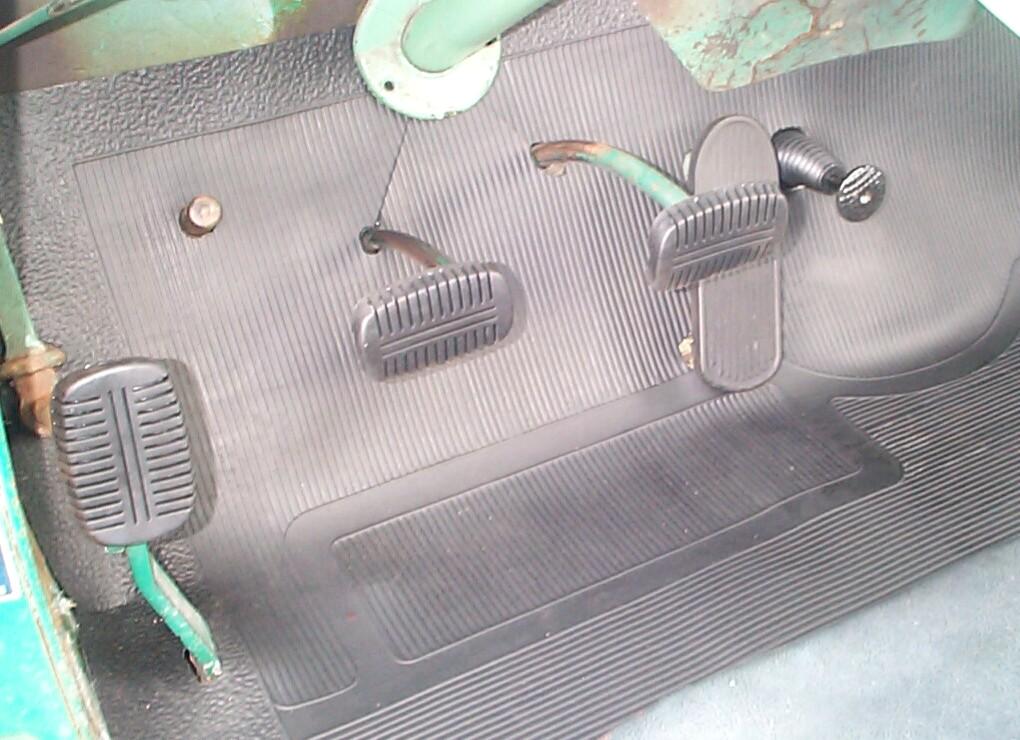 A
couple of weeks ago, three replacement rubber pedal pads were purchased
from American
Classic Truck Parts along with some other things. BillyBob
hasn't had rubber on the pedals for a long time. It's an easy
improvement. One pedal size fits the brake, clutch and parking brake
pedals. It's a stretch fit and I hope they stay on that way. I don't
want to glue them on if I don't have too. By mid-afternoon, it started
to get dark in the southwest and I could hear thunder grumblings from
that direction. I decided to pack in the tools and head for the Krash
Pad . . . Fifteen seconds after that a cell formed right over the Krash
Lab and the sky opened up on me
A
couple of weeks ago, three replacement rubber pedal pads were purchased
from American
Classic Truck Parts along with some other things. BillyBob
hasn't had rubber on the pedals for a long time. It's an easy
improvement. One pedal size fits the brake, clutch and parking brake
pedals. It's a stretch fit and I hope they stay on that way. I don't
want to glue them on if I don't have too. By mid-afternoon, it started
to get dark in the southwest and I could hear thunder grumblings from
that direction. I decided to pack in the tools and head for the Krash
Pad . . . Fifteen seconds after that a cell formed right over the Krash
Lab and the sky opened up on me
~!@#$%^
 June
19th 2005 Got up to the
Krash Lab by 7 AM and set up fer sandblasting by 7:30. Rain is forecast
again today, but right now we have clear blue skys and five mph wind.
My metal wash treatment of the spare wheel after sandblasting a few
weeks ago didn't turn out so well. Surface rust started to show the
next day and it went downhill from there. I may have had my mixture
wrong 'cause I mixed the solution with the Mark I eyeball, by gosh and
by golly. I also let it drip dry instead of using air gun and hair
dryer. That's allowed but I don't think it works with heavily pitted
metal where liquid can collect in the pits. At any rate, the wheel had
to be blasted again. I got it done by 9:30 AM with about 75 lbs of
sand. BY then, the wind had picked up slightly and the first big white
"fluffy" clouds started to appear.
June
19th 2005 Got up to the
Krash Lab by 7 AM and set up fer sandblasting by 7:30. Rain is forecast
again today, but right now we have clear blue skys and five mph wind.
My metal wash treatment of the spare wheel after sandblasting a few
weeks ago didn't turn out so well. Surface rust started to show the
next day and it went downhill from there. I may have had my mixture
wrong 'cause I mixed the solution with the Mark I eyeball, by gosh and
by golly. I also let it drip dry instead of using air gun and hair
dryer. That's allowed but I don't think it works with heavily pitted
metal where liquid can collect in the pits. At any rate, the wheel had
to be blasted again. I got it done by 9:30 AM with about 75 lbs of
sand. BY then, the wind had picked up slightly and the first big white
"fluffy" clouds started to appear.
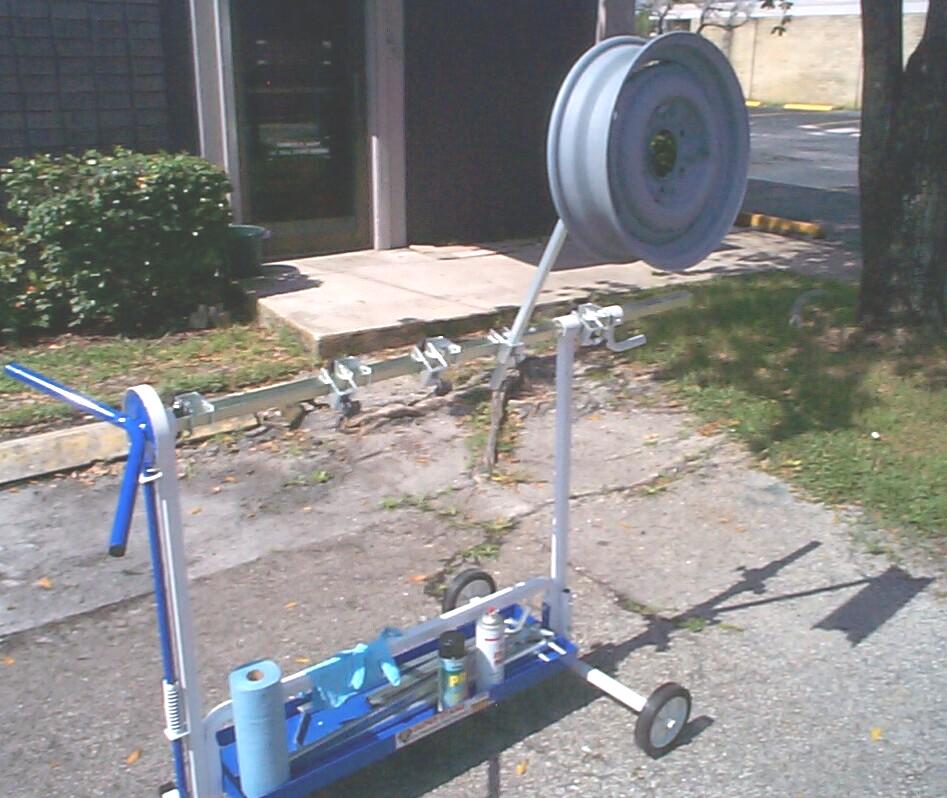 The
wheel is too big to hang up in the shadetree so I pulled out my "Super
Stand" I picked up last year. Since my Boss was letting me store it
inside the Krash Lab, it was buried under a lot of stuff the interior
design department was storing in the same location. Ten minutes and a
little grunting freed it. The wheel was suspended off a hook, PRE Paint
Prepped and given a coat of Eastwood's
Self-Etching Primer. Hard to tell if I got good coverage since the
primer is the same color as the blasted metal. I may order darker
primer next time. I hope this holds back corrosion until I'm ready for
the next step with this wheel which will be automotive grade primers
and surfacers applied with the HVLP turbine.
The
wheel is too big to hang up in the shadetree so I pulled out my "Super
Stand" I picked up last year. Since my Boss was letting me store it
inside the Krash Lab, it was buried under a lot of stuff the interior
design department was storing in the same location. Ten minutes and a
little grunting freed it. The wheel was suspended off a hook, PRE Paint
Prepped and given a coat of Eastwood's
Self-Etching Primer. Hard to tell if I got good coverage since the
primer is the same color as the blasted metal. I may order darker
primer next time. I hope this holds back corrosion until I'm ready for
the next step with this wheel which will be automotive grade primers
and surfacers applied with the HVLP turbine.
 June
25th 2005 I didn't see
it on the calendar but this must be my month for flat tires. Went to
Discount Auto Parts yesterday at lunchtime in Renegade to pick up a
case of motor oil. I wuz back and inside the Krash Lab, not five
minutes, when a co-worker, George, told me a rear jeep tire was going
flat in a hurry! ~!@#$%^ Yup! Flat as can
be an' no visible sign as to why.
June
25th 2005 I didn't see
it on the calendar but this must be my month for flat tires. Went to
Discount Auto Parts yesterday at lunchtime in Renegade to pick up a
case of motor oil. I wuz back and inside the Krash Lab, not five
minutes, when a co-worker, George, told me a rear jeep tire was going
flat in a hurry! ~!@#$%^ Yup! Flat as can
be an' no visible sign as to why.
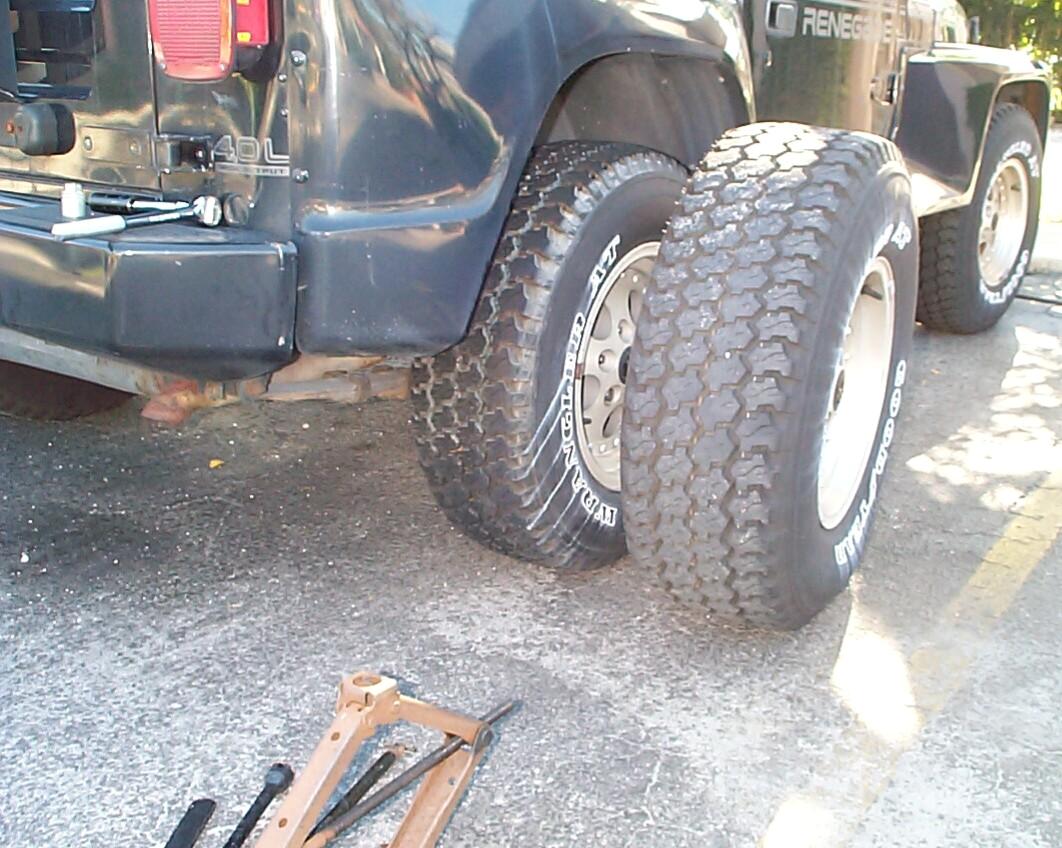 So,
first thing this morning, jacked up Renegade's rear corner with its
sissors jack and started draggin' out tools 'til I got to the
compressor. Set up the compressor and filled the tire until I started
hearing escaping air. Yup, got a puncture in the tread area. I couldn't
see it before because the way the jeep was parked it was on the bottom.
Put the original, smaller, spare tire on. I'll give the Goodyear Tire
Dealer a shot at fixing the tire next week. For now, Renegade will be
moved to another area of the lot an' I'll get back to BillyBob.
So,
first thing this morning, jacked up Renegade's rear corner with its
sissors jack and started draggin' out tools 'til I got to the
compressor. Set up the compressor and filled the tire until I started
hearing escaping air. Yup, got a puncture in the tread area. I couldn't
see it before because the way the jeep was parked it was on the bottom.
Put the original, smaller, spare tire on. I'll give the Goodyear Tire
Dealer a shot at fixing the tire next week. For now, Renegade will be
moved to another area of the lot an' I'll get back to BillyBob.
Time to finish up interior detailing. Lubricated the cowl vent pivots with a drop of motor oil on each. That's when I discovered my improvised binding screw pivot was missing! AAARRRUUGH!! Reminder to self - Nebber ebber put fasteners together without threadlocker again! Well, there's another McMaster-Carr order in my future. I went on to polish interior handles, gauge surrounds, aftermarket strap-on turn signal director and horn button.
Well, that takes care of interior detailing for this cycle. Now it's on to the glass and trim detailing. I'll be plodding along on the wheel restoration, charging system headscratcher and other little jobs as well. There will be a car show a couple of miles from the Krash Pad on July 3rd that I will try to attend if the South Florida monsoons let up long enuf.
| < Back
to Intro |
You can email me at ![]() webmaster@laroke.com
webmaster@laroke.com
Issued Saturday June 25, 2005
Updated Wednesday March 7, 2018
copyright © 1996-2018 Larry Robert Kephart all rights reserved
| | LRK Home | | Bio Info | | Krash Khronicles | | LAROKE | |
| | BettyLou | | BillyBob's Garage | | Rat Patrol | | Deerslayer | | Elvira | |
| | Land of the Free and Home of the Brave | |
| | Keppylou's Art | | WWI Soldier's Diary | |