| | LRK Home | | Bio Info | | Krash Khronicles | | LAROKE | |
| | BettyLou | | BillyBob's Garage | | Rat Patrol | | Deerslayer | | Elvira | |
| | Land of the Free and Home of the Brave | |
| | Keppylou's Art | | WWI Soldier's Diary | |
BillyBob Work-in-Progress Log
![]()
WHAT'S NEW is a chronological listing of updates to the BillyBob site.
![]()
TRUCK LINKS including vendor sites for old parts, custom parts, and tools as well as sites for classic car and truck organizations
STORE Operating in association with Amazon.com, books, recordings and tools can be purchased.
PLANNING for the restoration including project schedule and cost estimates.
![]()
TRAVELS WITH BILLYBOB With apologies to Steinbeck, this area of BillyBob's Garage will be used to log the trips BillyBob and I make together.
WORK-IN-PROGRESS is the restoration of parts of BillyBob that I can accomplish without a garage.
PRE-RESTORATION includes log entries of minor repairs and adventures between time of purchase and the time when I started restoration, a piece at a time.
JR'S KORNER JR's Korner is the history of BillyBob before I got him authored by my brother, Wm. C. Kephart.
![]()
BILLYBOB MAINTENANCE Ever changing detailing, oil change, lube, etc. maintenance routines specifically developed for BillyBob, including required tools, materials and procedures.
PARTS SHOP The Parts Shop is a repository of How-To articles. Things that I have done over and over enough times to have developed a procedure. This gives me a checklist and saves brain cells.
STEALTH SHOP Urban residence design with large integrated shop and separate living quarters for a relative or renter.
![]()
You will need the Adobe Acrobat browser plugin to view these wiring diagrams which are in the PDF file format. This format allows zooming and panning. If you don't have this plugin, it can be downloaded and installed (free) from the Adobe site. The button below will take you there.
![]()
BILLYBOB WIRING DIAGRAM Here's the wiring diagram updated with BillyBob's current state 'cepting the third-party strap-on turn-signal director.
STRAP-ON TURN-SIGNAL DIRECTOR/BRAKE LIGHT CIRCUIT This turn signal and brake light circuit diagram shows the current state of the third-party turn-signal director wiring, which will remain in place until I figure out the problems with the OEM turn-signal director. It also shows the OEM headlight switch.
34. Windshield Epic - The Good (Fini)
 October
9th 2004 Wonderful
weather in the shadetree garage today, what they call "indian summer"
up north. First task was to put the gasket back on the windshield
again. I didn't have the "Mah Jong team" here to help me but I've been
giving it some thought since my last battle with it alone a couple of
months ago. I brought a couple of ratty old pillows with me from the
Krash Pad this morning. After getting the gasket positioned and
partially mounted on the top and bottom edges of the windshield with
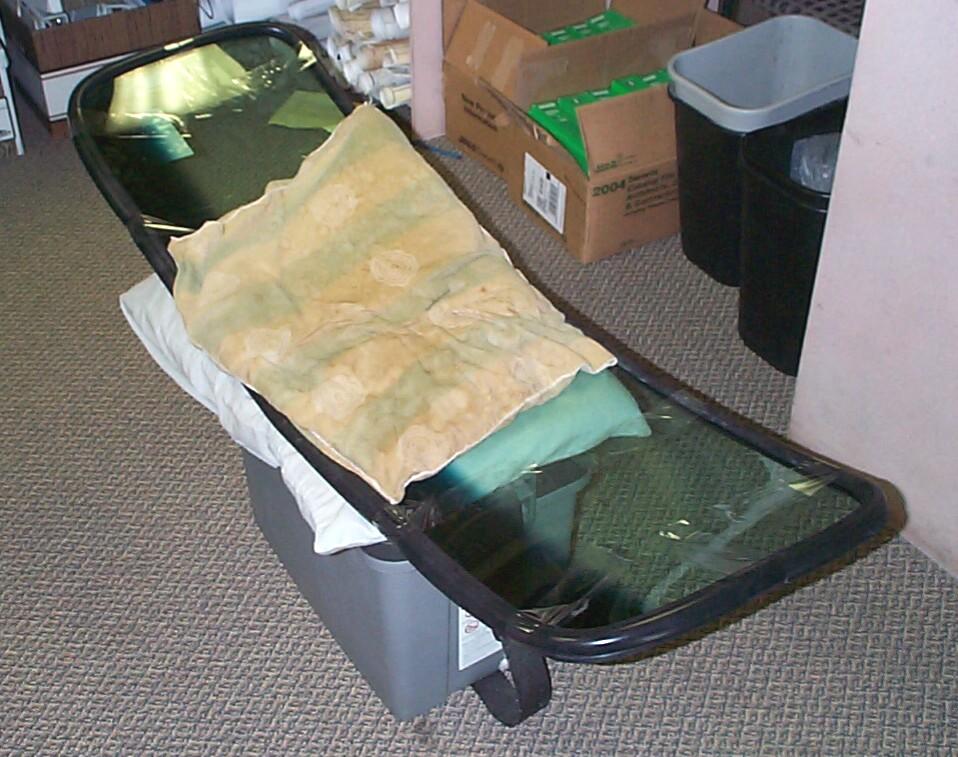
soapy water, I secured it with strapping tape. The windshield was
sandwiched between the two pillows and placed on top of my Sears tote
box with the curved edges up. I was able to sit on this assembly and
work the gasket onto the ends of the windshield. My body weight pinned
the windshield and made up for the extra hands I didn't have. The
gasket was on and secured with more strapping tape in about ten minutes.
October
9th 2004 Wonderful
weather in the shadetree garage today, what they call "indian summer"
up north. First task was to put the gasket back on the windshield
again. I didn't have the "Mah Jong team" here to help me but I've been
giving it some thought since my last battle with it alone a couple of
months ago. I brought a couple of ratty old pillows with me from the
Krash Pad this morning. After getting the gasket positioned and
partially mounted on the top and bottom edges of the windshield with
soapy water, I secured it with strapping tape. The windshield was
sandwiched between the two pillows and placed on top of my Sears tote
box with the curved edges up. I was able to sit on this assembly and
work the gasket onto the ends of the windshield. My body weight pinned
the windshield and made up for the extra hands I didn't have. The
gasket was on and secured with more strapping tape in about ten minutes.
Installed the trim next. The Steele Rubber Products instruction sheet sez to insert the top and bottom pieces first followed by the left and right end pieces and that is what I did the last time. It's difficult to judge the placement of the top and bottom pieces and, if you're off, one or two of the gaps that the clips cover can be too big. This time I installed the ends first so that I would be in a better position to judge the gaps. I did better this time but I'm still not happy with how the trim fits overall. Finally, I spent some time placing mason's cord in the pinchweld slot the whole way around the windshield with the ends crossed beyond bottom center a couple of feet each way and taped to the glass to secure them. Well, my fingers are sore an' I'm calling it quits for the day.
 October
10th 2004 Another good
weather day. I'm back to the point I wuz last sunday when the situation
went south. I'm being more cautious this time. The way it's sitting
now, it just doesn't look like it will fit and in the back of my noggin
is the unthinkable fear that I got the pinchweld metalwork off enuf
that it won't fit. I know that everyone who's done this job have their
own special curses reserved for it. Tim Bleeker, who's rebuilding a '58
Apache called Rusty calls the windshield gasket the "black
loop of evil".
October
10th 2004 Another good
weather day. I'm back to the point I wuz last sunday when the situation
went south. I'm being more cautious this time. The way it's sitting
now, it just doesn't look like it will fit and in the back of my noggin
is the unthinkable fear that I got the pinchweld metalwork off enuf
that it won't fit. I know that everyone who's done this job have their
own special curses reserved for it. Tim Bleeker, who's rebuilding a '58
Apache called Rusty calls the windshield gasket the "black
loop of evil".
I made more progress in a shorter time before the trim started popping out and the gasket came off the passenger side upper corner ~!@#$%^ At this point, I removed the trim and managed to get the gasket back on the glass. Another twenty minutes of struggle, however, and the gasket was off the glass in several places. Time to regroup.
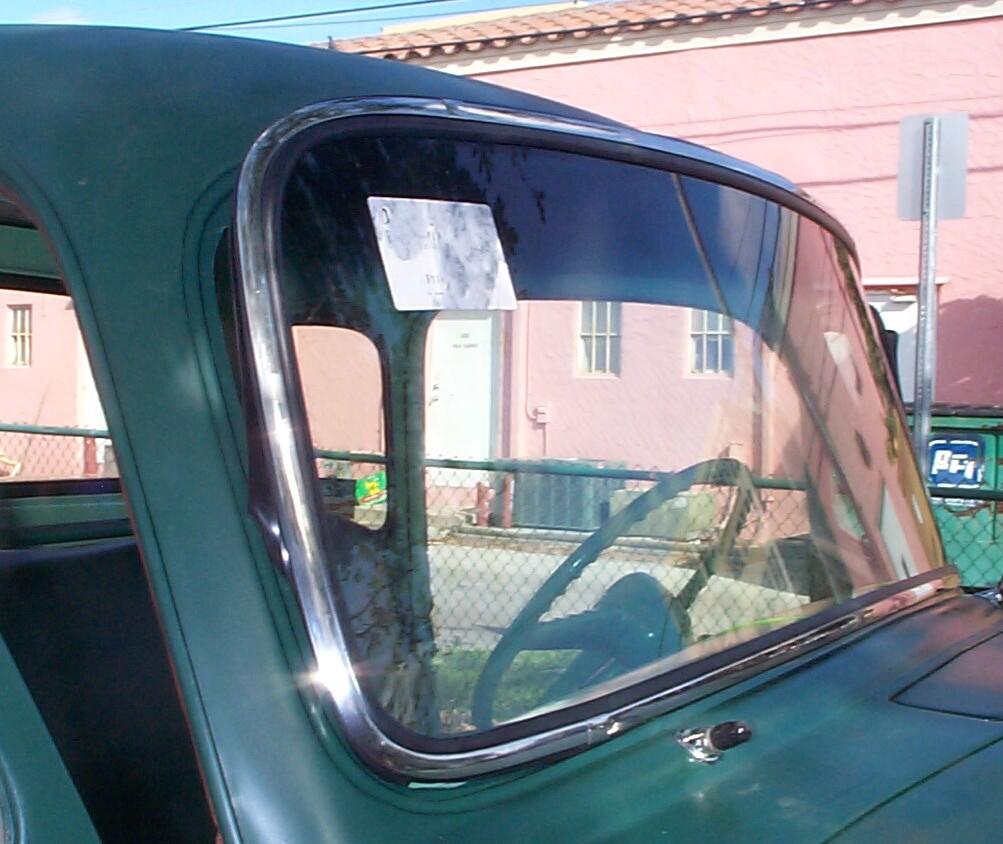
October 16th 2004 'Nother beautific day here on the gold coast. Goin' for the third round with the windshield today. I've been defeated twice. I'm bloodied but unbowed by the experiences. Started out this morning by putting the gasket back on the windshield and the trim in the gasket. Again, I ignored the instructions on this issue and put the end pieces in first. The fit of the trim was better this time but still not perfect. After that, the cord was stuffed into the gasket pinchweld channel again with the ends crossing at the bottom middle.
Back out to the truck with the windshield assembly. This time, I also ignored the instructions about starting the windshield at the bottom with the lip of the gasket over the pinchweld. The gasket has an extra 1" flap of rubber on the inside at the top and sides. The bottom doesn't have this flap in order for the defroster vents to be clear. The fly in the buttermilk is that this ~!@#$%^ flap is gawdawful hard to get over the pinchweld once the bottom of the windshield gasket is in place. The action of trying to get the flap over the pinchweld on the sides is what caused the trim to pop and the gasket to roll off the glass edge in my last two failed attempts.
 So,
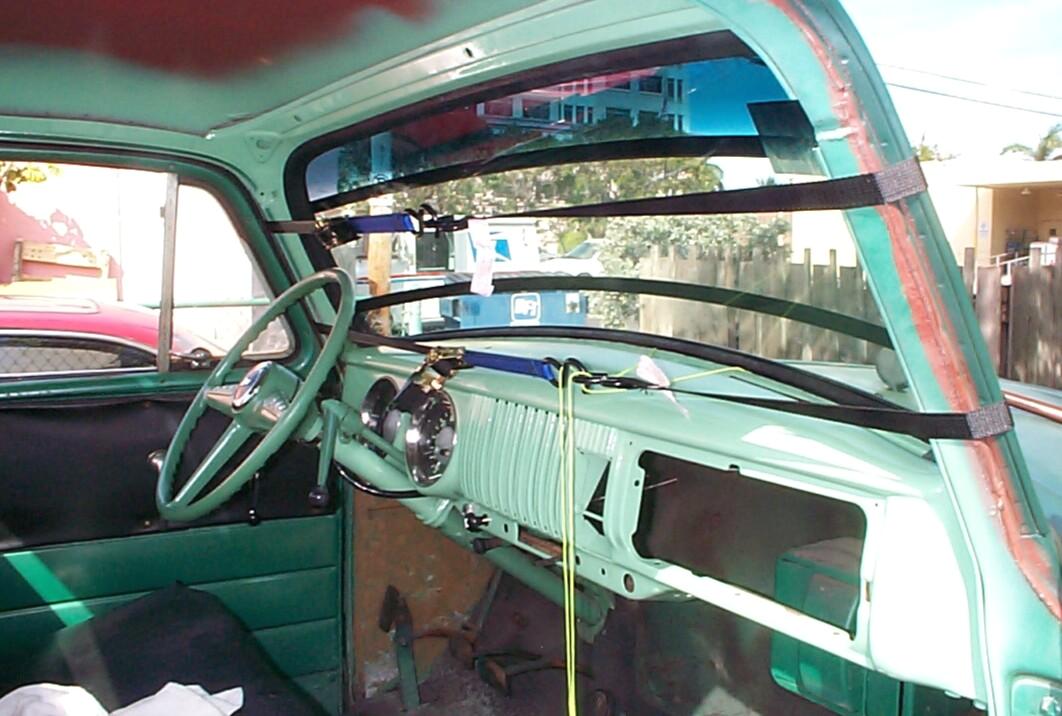
this time, I centered the windshield in its opening with the bottom
resting on the windshield wiper shaft bezels and worked the flap over
the pinchweld at the top and sides. So far, so good. Next, I positioned
a pair of ratcheting tie-down straps around the windshield assembly and
A-pillers to apply some even, gentle pressure to the outside of the
windshield and to try to pin the trim and gasket against the glass.
Next, I applied a lot of WD-40 to the gasket and pinchweld. This helped
me to work the assembly deeper into the opening. By three in the
afternoon, I had the gasket bottom almost close enuf to pull the lip
over the pinchweld. When I first started pulling on the cord, however,
it dug into the lip of the gasket like a knife. I came inside fer
awhile to ponder on how to back the cord off before it does any real
damage.
So,
this time, I centered the windshield in its opening with the bottom
resting on the windshield wiper shaft bezels and worked the flap over
the pinchweld at the top and sides. So far, so good. Next, I positioned
a pair of ratcheting tie-down straps around the windshield assembly and
A-pillers to apply some even, gentle pressure to the outside of the
windshield and to try to pin the trim and gasket against the glass.
Next, I applied a lot of WD-40 to the gasket and pinchweld. This helped
me to work the assembly deeper into the opening. By three in the
afternoon, I had the gasket bottom almost close enuf to pull the lip
over the pinchweld. When I first started pulling on the cord, however,
it dug into the lip of the gasket like a knife. I came inside fer
awhile to ponder on how to back the cord off before it does any real
damage.
I abandoned the cord at the bottom, managed to grab it at the top and work it to get the top and side lips over the pinchweld. Used other tools (described below) to get the gasket lip over the pinchweld at the bottom. It was time for the victory dance and a good thing noone else was around. Referring to my spasmodic jerking around as dancing is a stretch. Observers have to suppress the urge to rush up and stick something in my mouth to keep me from biting off my tongue during what they suspect is a seizure. In the seventies, I wasted over $300 on ballroom dancing lessons before everyone concerned would admit I had no talent in this area. My instructor gave up the profession, found herself a guy to marry and moved out of town.
 October
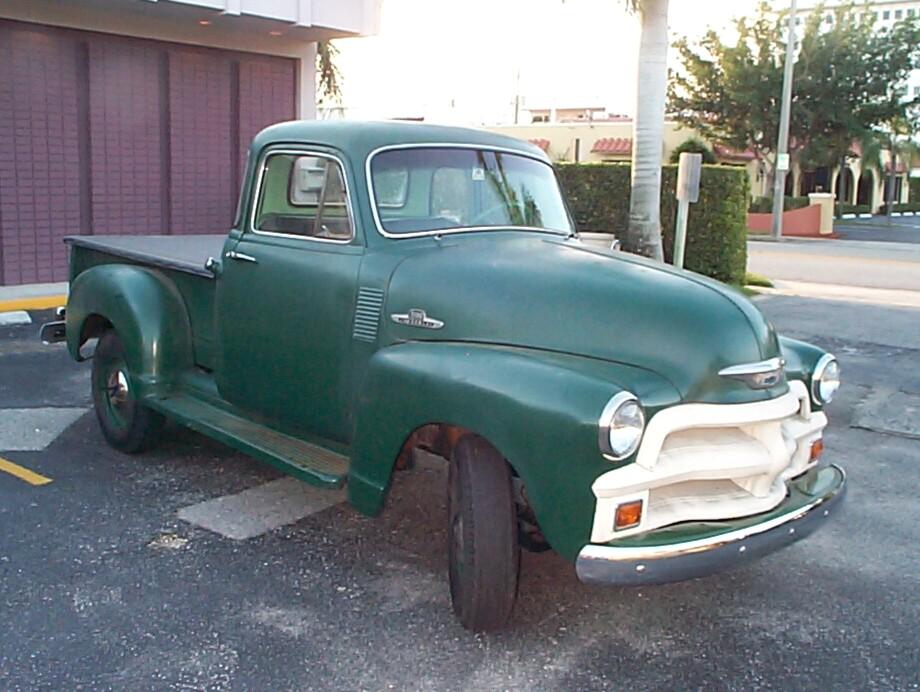
17th 2004 BillyBob is
back on the road again as a daily driver! What I had originally
scheduled as a four-day job is finally done after ten and a half
months. I'm glad I learned how to replace the windshield but if I ever
have to do it again, it will be too soon! There are some loose ends to
finish up. After the WD-40 dries up, flowable silicone glass sealer
will be forced in under the gasket. Hopefully, we don't get too much
rain between now and then.
October
17th 2004 BillyBob is
back on the road again as a daily driver! What I had originally
scheduled as a four-day job is finally done after ten and a half
months. I'm glad I learned how to replace the windshield but if I ever
have to do it again, it will be too soon! There are some loose ends to
finish up. After the WD-40 dries up, flowable silicone glass sealer
will be forced in under the gasket. Hopefully, we don't get too much
rain between now and then.
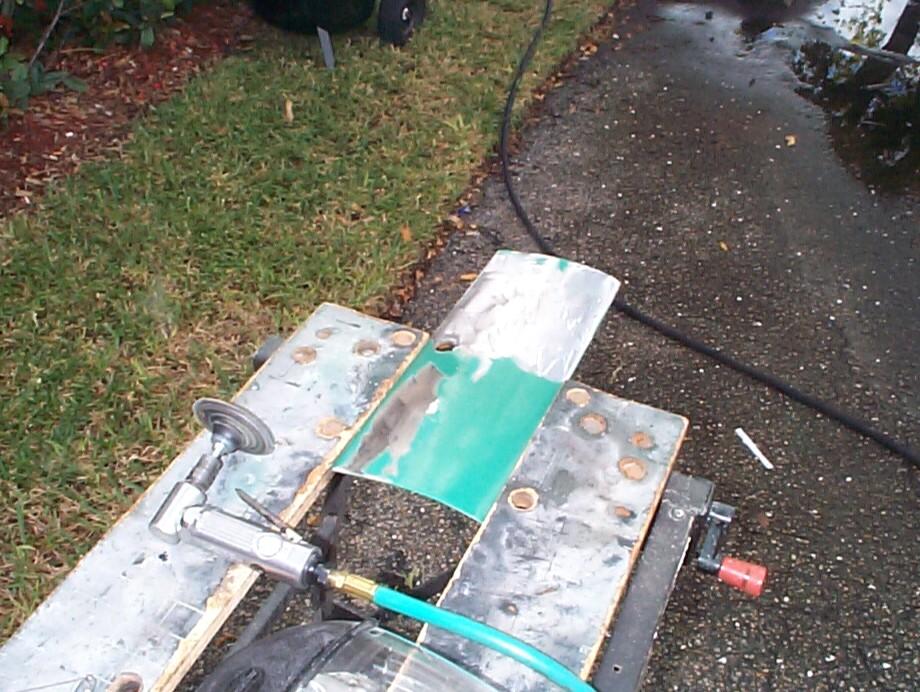
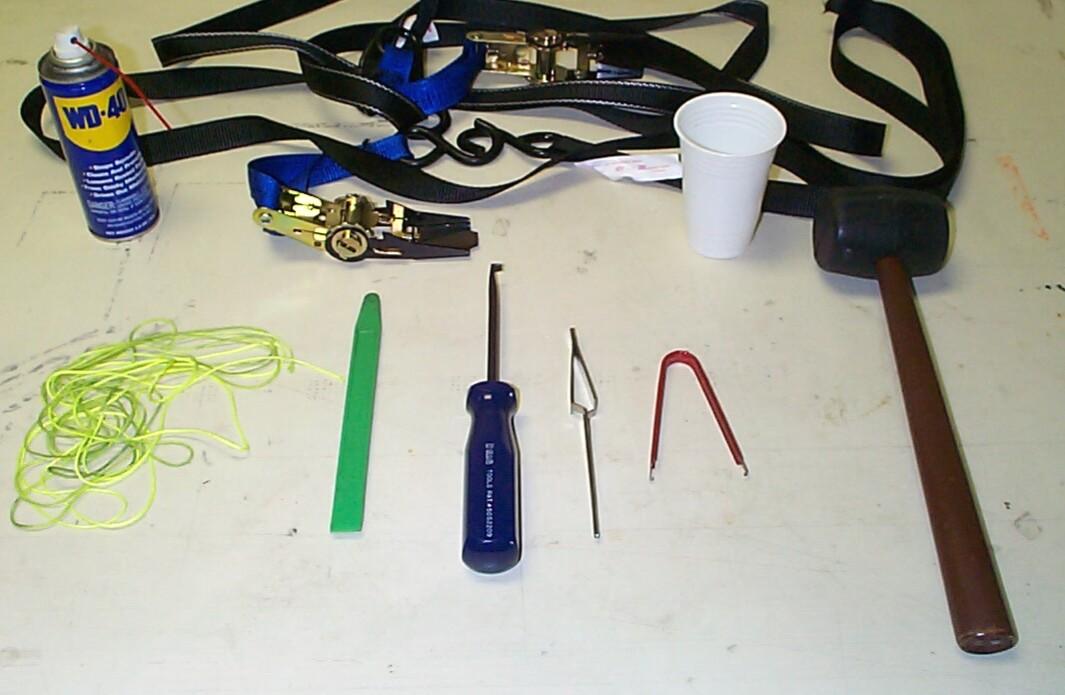 Here
are some of the tools used to get the windshield into place. In the
back are the ratcheting tie-downs. I had to cut the straps as they were
too long. The woven masonry cord may have been too small in diameter
since it cut thru the rubber at the bottom of the gasket. WD-40 and
soapy water were used as lubricants at different times. The green
plastic glass installation "slip-stick" was obtained from LMC
Truck Parts. Following a tip from Bob
Adler in the latest Vintage Truck magazine, I'm now gonna use
it to take hub caps off and keep paint damage to a minimum. The
screw-driver type tool is a door skin removing tool that I used to coax
the gasket lip over the pinchweld where the cord wasn't working. It's
an expensive tool and if I didn't already have one, I would have made
one out of a cheap screwdriver. The "U" shaped tool is a computer chip
puller and was used for the same purpose of helping the gasket over the
pinchweld along with the long computer tool tweezers. The rubber mallet
helped a little to seat the gasket and trim. I'm hoping that day-to-day
vibration will help in this process too as the windshield is in solid
but there was no satisfying pop or snap to tell me I was finished and
the trim is still not fully seated.
Here
are some of the tools used to get the windshield into place. In the
back are the ratcheting tie-downs. I had to cut the straps as they were
too long. The woven masonry cord may have been too small in diameter
since it cut thru the rubber at the bottom of the gasket. WD-40 and
soapy water were used as lubricants at different times. The green
plastic glass installation "slip-stick" was obtained from LMC
Truck Parts. Following a tip from Bob
Adler in the latest Vintage Truck magazine, I'm now gonna use
it to take hub caps off and keep paint damage to a minimum. The
screw-driver type tool is a door skin removing tool that I used to coax
the gasket lip over the pinchweld where the cord wasn't working. It's
an expensive tool and if I didn't already have one, I would have made
one out of a cheap screwdriver. The "U" shaped tool is a computer chip
puller and was used for the same purpose of helping the gasket over the
pinchweld along with the long computer tool tweezers. The rubber mallet
helped a little to seat the gasket and trim. I'm hoping that day-to-day
vibration will help in this process too as the windshield is in solid
but there was no satisfying pop or snap to tell me I was finished and
the trim is still not fully seated.
Update: After reading this episode, a few regular readers of BillyBob's Logs had some comments that I thought would be useful for others comtemplating a windshield replacement. Nathan Hall (VWNATE) had several tips that I will keep in mind if I have to do something like this again.
I read your windshiled install with interest , this is normally a two man job , not much skill requierd for the 2nd. person , I think the ratchet tie downs were a good idea . You should never , _EVER_ lube the gasket when installing it onto the glass , this is why it gave you so much trouble slipping off and difficult to install , it takes a special method to quickly load a winshield , I hate to say I have the feel for it as I wind up getting suckered into way too many windshield installations . it is neceesary to lube the string and it's channel but _not_ the glass nor it's channel , nor the trim and it's channel as the friction is what keeps those items in place whilst you're drawing the string out . WD-40 isn't a good idea either as it attakes the rubber , I use silicone and rinse the excess of with hot water , that seems to float it away pretty well . I don't use string , I use nylon cord as it's very slippery and pulls out whilst flipping the rubber's lip over the pinchweld without damage , I have also used plastic clothesline with a wire center to very good effect on those tougher jobs .
Rob English (OldCarKook) made me feel better about the trouble I was having with the trim fitting by letting me know that my problems with the 54-55 replacement windshield are not an isolated incident (misery loves company).
Your windshield saga only served to cement any thoughts I have had about replacing the windshield in my '54 myself. I have the gasket, glass, and trim, and have heard from others that the repopped windshields don't fit as well as the originals and have seen a few instances where they dumped the stainless trim and got a regular gasket because of endless frustrations trying to install the glass with trim in and fit problems. The glass shop that I've used has a special tool that tucks under the gasket and allows them to inject sealant in. They finish with a bead along the glass edge at the gasket (even though water can't really get "around" the glass) and they refer to that as "wet sealing" the glass. All I know is that I have NEVER seen a windshield that didn't leak before it was wet-sealed.
The rest of today is cleanup, nursing my aching fingers and arms, and getting BillyBob back on his maintenance routines. The disintegrating car cover went into the dumpster. I was putting duct tape over new rips every time I touched it. After monthly maintenance, I started looking for my battery hold-down frame. One of my reasons for getting the battery from Antique Auto Battery was to get one with the correct dimensions so the hold-down would fit. I couldn't find it so, as I often do when I can't find something, I started cleaning up and organizing my tools and inventory in the hope of finding it with a deeper search. By mid-afternoon, I was pretty certain, the battery hold-down was not at the Krash Lab. I'll have to go up to the warehouse and root around next week. Finished up the day by pulling the steering wheel and re-positioning it. It was off by about ninety degrees.
October 19th 2004 I'm uneasy about BillyBob's charging system. The new twelve-volt battery cranking of the six-volt starter motor doesn't seem as robust as it did with the old battery (or even a couple of weeks ago with the new battery), and the ammeter is always charging slightly. This may be perfectly fine and I'm just uncomfortable because it's "different" than what I'm used to. The battery also appears to be too full as there is always some electrolyte on top of the case after a run. This is baffling to me since the electrolyte levels in the cells are are correct. The battery appears to be "sweating". I took the battery out when I got to the Krash Lab and put it on the charger. I'll leave it on auto 'til noon and put it back in.
Put the battery back in BillyBob at lunchtime. Voltmeter reading is 12.77 volts. It's still "sweating" and three of the cells are down a bit. The electrolyte appears to be getting up on top to the battery by some sort of capillary action . . . Looks like it is weeping out of a place where the side plastic laps over the battery top on the edges. Curses!
October 21st 2004 Rained the past two late afternoons and I let BillyBob sit at the Krash Lab. He hasn't been started and the battery is holding at 12.58 volts. It is still weeping some. The new windshield is leaking at the bottom corners but I expected that. As far as I can see, that is the only place it is leaking in the cab. There are no drips that I can detect at either the wiper bezels, outside mirror mount, or the cowl vent or other under dash areas. Hope that remains the case when BillyBob is at speed. I'm trying not to drive BillyBob in the rain until after the windshield sealant is in place. I also don't want to apply Rain-X until after the sealant is applied.
October 23rd 2004 Starting out with fairly good weather today. First order of business is sealing the windshield after getting the tools out of the shed. Permatex Flowable Silicone Windshield and Glass Sealer was used. This is messy stuff. I sealed the exterior perimeter where the gasket meets the body first. Made a bit of a mess trying to clean up excess so I decided to wait until tomorrow, after curing, to remove the excess snot balls.
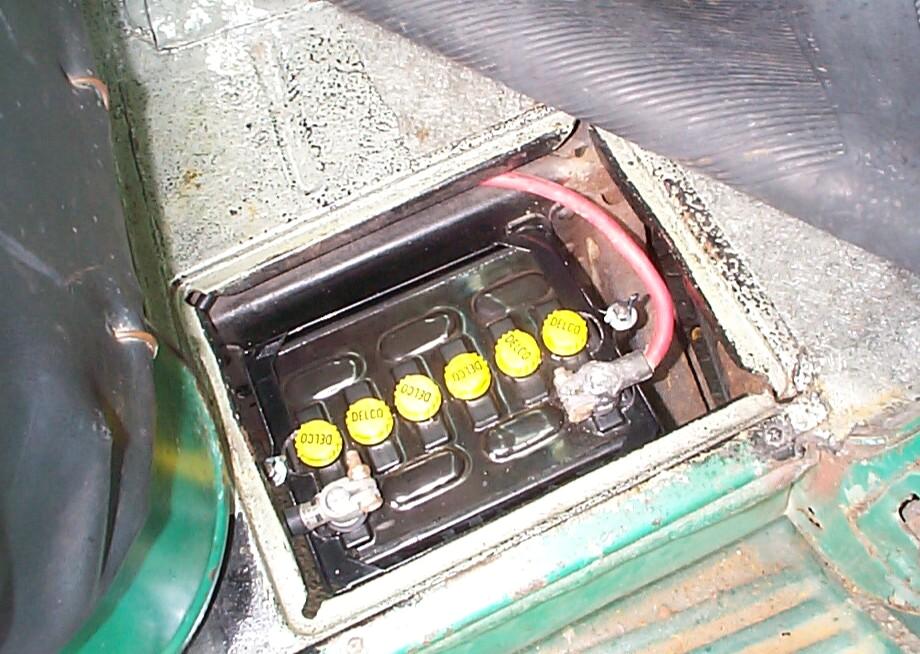 Went
on to the battery hold-down. I finally managed to find it up at
BillyBob's barn. At that point, the tool and inventory reorganization
came to a standstill. This hold-down is made for a six-volt battery so
some modifications have to be made for it to work with the twelve-volt
battery. Namely, notches have to be cut so it will clear the filler
caps and battery terminals. I located a flat washer the same size as
the terminal and filler cap bases. It was vise-gripped to the hold-down
top and a prick punch was scribed around it to mark the material to be
removed. This procedure was repeated for the other three required
locations. Clamped the hold-down in the Black & Decker Workmate
and used my 4" angle grinder to burn away most of the material that had
to be removed. Dressed the rough openings with a half-round file to
finish them out. The hold-down was secured with 5/16"-18 wingnuts and
flat washers. Then the ~!@#$%^ rain
started and I had to scramble my tools undercover.
Went
on to the battery hold-down. I finally managed to find it up at
BillyBob's barn. At that point, the tool and inventory reorganization
came to a standstill. This hold-down is made for a six-volt battery so
some modifications have to be made for it to work with the twelve-volt
battery. Namely, notches have to be cut so it will clear the filler
caps and battery terminals. I located a flat washer the same size as
the terminal and filler cap bases. It was vise-gripped to the hold-down
top and a prick punch was scribed around it to mark the material to be
removed. This procedure was repeated for the other three required
locations. Clamped the hold-down in the Black & Decker Workmate
and used my 4" angle grinder to burn away most of the material that had
to be removed. Dressed the rough openings with a half-round file to
finish them out. The hold-down was secured with 5/16"-18 wingnuts and
flat washers. Then the ~!@#$%^ rain
started and I had to scramble my tools undercover.
October 24th 2004 Once again, a good weather start this morning. I wanted to degrease/clean the engine compartment as part of routine maintenance, so I took BillyBob on a twenty-five mile, hour-long engine warm-up run down to north Fort Lauderdale and back. It was a pleasant ride and BillyBob ran well. It rained last nite at the Krash Pad. I don't know how hard as I usually nod off with the TV surround sound blasting away and am blissfully unaware the minor events of nature. The only evidence of water inside the cab was at the windshield corners in the defroster trench. Regarding BillyBob's other current headscratcher, the battery has quit sweating for the most part but the electrolyte level in all the cells is low. I suppose when I top it off, it will start sweating again.
The silicone glass sealer I applied yesterday looks terrible. I really screwed the pooch with my first attempt. The stuff is uneven and picks up more highlights in the sun than the stainless steel trim. I know I'll do better next time 'cause I don't think I could do worse. Now I just have to figure out how to get this stuff off for my next try. I'll ponder it awhile and work on something else.
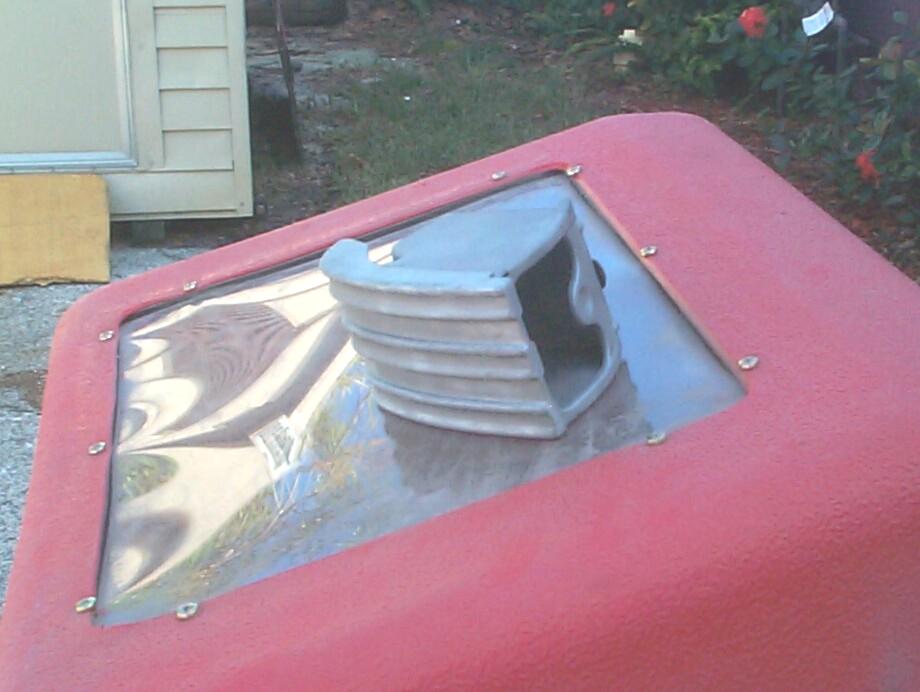 After
BillyBob and the Boss's Panzerwagon maintenance. I pulled out my new
portable blast cabinet and cleaned up BillyBob's ashtray with
aluminum-oxide media. It still has a few spots I couldn't reach or see,
so I will soak it in OxiSolve next week to convert the remaining traces
of rust before primering.
After
BillyBob and the Boss's Panzerwagon maintenance. I pulled out my new
portable blast cabinet and cleaned up BillyBob's ashtray with
aluminum-oxide media. It still has a few spots I couldn't reach or see,
so I will soak it in OxiSolve next week to convert the remaining traces
of rust before primering.
October 30th 2004 Received foil-backed "hot rod" insulation earlier this week from California Car Cover. I wuz gonna install it this weekend inside the cab on the roof but when I opened the box this morning, I found the contact adhesive had been backordered an' I was gonna hafta wait.
Continued with engine compartment detailing instead. Pulled the hood lock plate, upper radiator baffle and fender braces. I cleaned them and put all the fasteners in the tumbler for a cleaning session. I've been getting into the habit of gathering an inventory of fasteners so that when I perform this periodical detailing, I can just replace the fasteners and save time. The old fasteners can then be recycled at leisure (rainy days). Toward that end, an inventory spreadsheet was started to keep track of this enterprise.
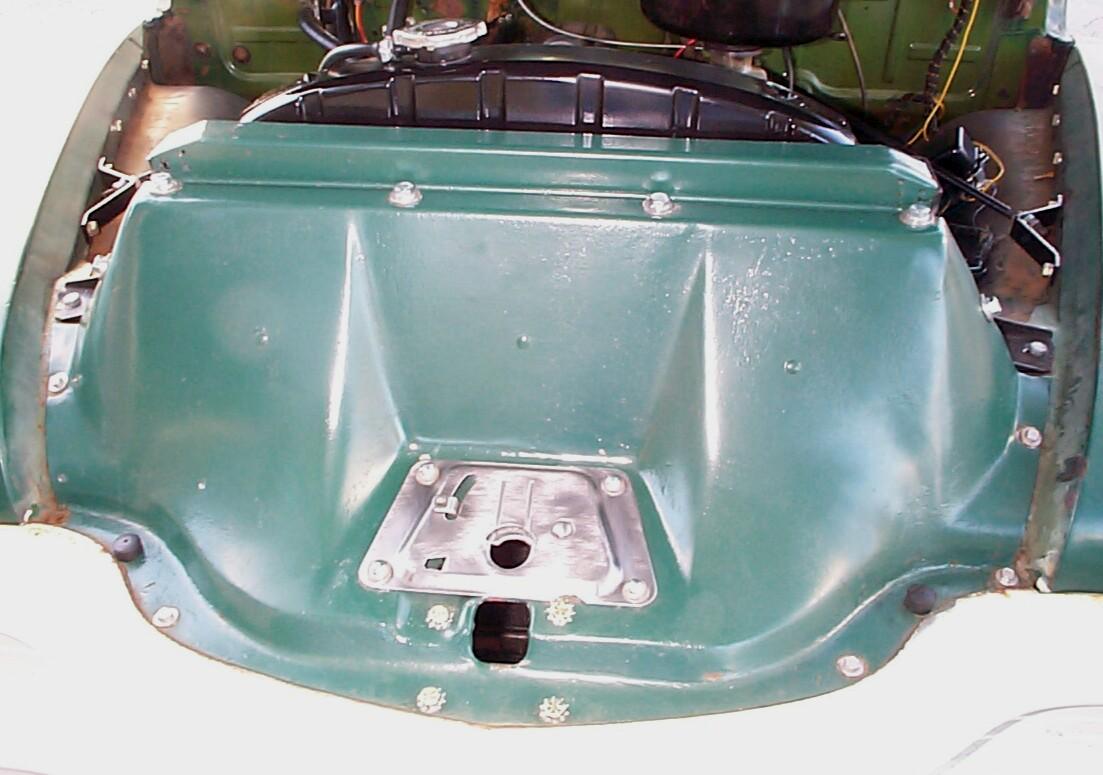 I
didn't bother with the upper radiator baffle today 'cepting to clean
it. It's Rustoleum Dark Hunter Green but I think the proper finish for
these things is a gloss or semi-gloss black and I aim to redo it in the
near future. Touched up the radiator with Eastwood's Radiator Black
rattlecan, hit the hoses with protectant and finished up today by
shining up the Hood Lock Plate with a 3M Cleaning Wheel in my electric
drill and finishing it off with three light coats of Eastwood's Diamond
Clear.
I
didn't bother with the upper radiator baffle today 'cepting to clean
it. It's Rustoleum Dark Hunter Green but I think the proper finish for
these things is a gloss or semi-gloss black and I aim to redo it in the
near future. Touched up the radiator with Eastwood's Radiator Black
rattlecan, hit the hoses with protectant and finished up today by
shining up the Hood Lock Plate with a 3M Cleaning Wheel in my electric
drill and finishing it off with three light coats of Eastwood's Diamond
Clear.
October 31st 2004 Continued with the engine bay detailing today by cleaning up the coil and touching up the coil bracket paint (Detail Gray). Messed around with the battery some more. Hydrometer readings have one cell each at 12.75 and 12.25 and four cells at 12.50. Whether I add distilled water or electrolyte, it's not long before it sweats out the top of the case. BillyBob starts up in the first few seconds of cranking but I've got a bad gut feeling that I'll be stranded if I have to crank very long on this battery. The bare metal from where I cut the notches for the hold-down is corroding. I cleaned up the hold-down and covered the bare metal edges with "Liquid Electrical Tape". This stuff is just as messy as when I used it making the taillight wiring a few years back. My skills with it haven't improved.
 Then
what the weather experts forecast as "a slight chance of a shower"
dumped a hard rain on the shadetree garage for ten minutes. After the
rain stopped, I did a little work on the glove box door, just so I
could say I'm making some forward progress. Dragged the air compressor
out in the mud and went after the front of the glove box door with
Norton Speedlock 24 grit disks in the air angle grinder. Halfway
finished grinding the paint off and the sky clouds up and it begins to
sprinkle on me. I take the work inside and it stops. I go outside and
resume grinding away. The rain comes back ~!@#$%^
I get the face of the glove box door finished but that's it. Murphy is
playing his sadistic games with me today an' I've had a bellyfull!
Then
what the weather experts forecast as "a slight chance of a shower"
dumped a hard rain on the shadetree garage for ten minutes. After the
rain stopped, I did a little work on the glove box door, just so I
could say I'm making some forward progress. Dragged the air compressor
out in the mud and went after the front of the glove box door with
Norton Speedlock 24 grit disks in the air angle grinder. Halfway
finished grinding the paint off and the sky clouds up and it begins to
sprinkle on me. I take the work inside and it stops. I go outside and
resume grinding away. The rain comes back ~!@#$%^
I get the face of the glove box door finished but that's it. Murphy is
playing his sadistic games with me today an' I've had a bellyfull!
November 17th 2004 Got back from a family emergency in Pennsylvania yesterday. First thing I did wuz check BillyBob's battery . . . ~!@#$%^ The plates were exposed in one cell. I don't know how long it's been sulfating since it's been a little over two weeks since the last time the battery was checked and it has been disconnected all that time. I am definitely beginning to believe I have a defective battery and I don't have the time to drain it, pack it, and send it back for another one just like it. Rats!
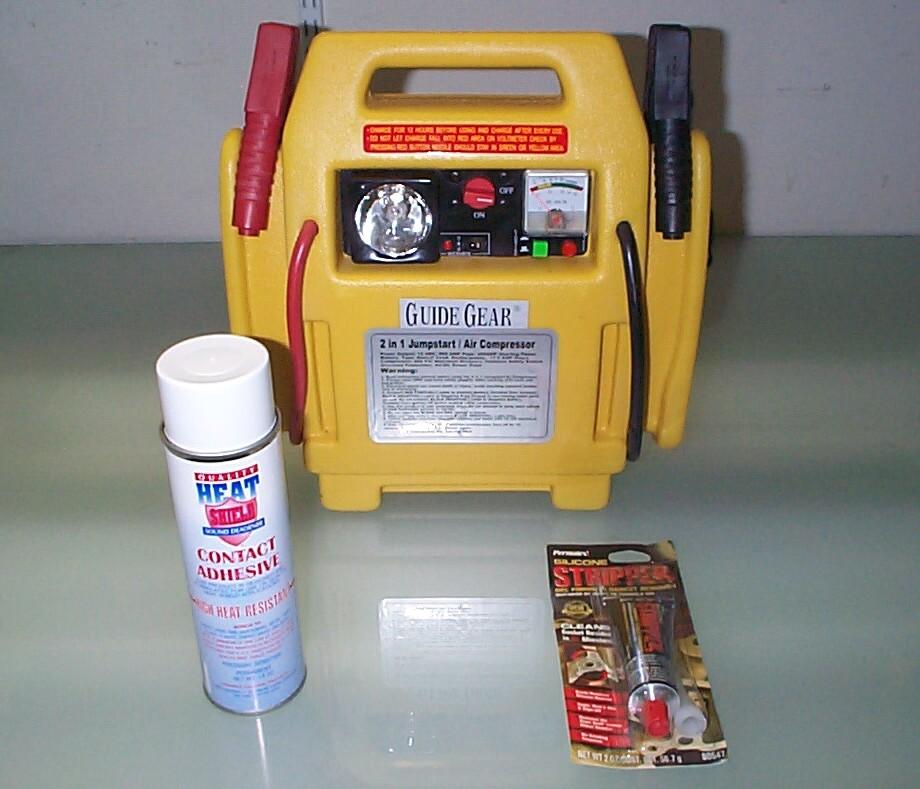 November
20th 2004 While I was
away, several packages arrived at the Krash Lab. The back-ordered
Contact Adhesive from California Car Cover, Permatex Silicone Stripper
(gel formula gasket remover) from USA Hardware, and a Portable
Jumpstarter / Air Compressor that was on sale at Sportsman's Guide were
among the goodies. The contact adhesive is for the headliner
insulation. The Permatex Stripper is to clean up my windshield gasket
mess (if it doesn't damage rubber). The Jumpstarter is insurance
against BillyBob's questionable new battery leaving me stranded
somewhere. It has a sealed, rechargeable 17.5 amp-hour battery capable
of 12vdc, 900 amp peak, 400 amp starting power. Also has a built-in 260
psi air compressor, light, lighter accessory socket, voltmeter,
pressure meter and two recharging adapters (120v/12v AC transformer and
cigarette lighter). A pretty good deal for forty-five bucks.
November
20th 2004 While I was
away, several packages arrived at the Krash Lab. The back-ordered
Contact Adhesive from California Car Cover, Permatex Silicone Stripper
(gel formula gasket remover) from USA Hardware, and a Portable
Jumpstarter / Air Compressor that was on sale at Sportsman's Guide were
among the goodies. The contact adhesive is for the headliner
insulation. The Permatex Stripper is to clean up my windshield gasket
mess (if it doesn't damage rubber). The Jumpstarter is insurance
against BillyBob's questionable new battery leaving me stranded
somewhere. It has a sealed, rechargeable 17.5 amp-hour battery capable
of 12vdc, 900 amp peak, 400 amp starting power. Also has a built-in 260
psi air compressor, light, lighter accessory socket, voltmeter,
pressure meter and two recharging adapters (120v/12v AC transformer and
cigarette lighter). A pretty good deal for forty-five bucks.
The reason I was in Pennsylvania was because my mother was in the hospital. She passed away the day after I got there. JR and I lost our biggest cheerleader that day. Both parents are gone now. Here's a pic of them from happier times in the mid-seventies when Dad was ER of Johnstown B.P.O.E. Lodge 175
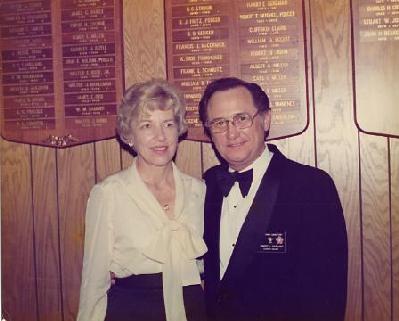
During my life to this point, no appreciation of my accomplishments has been more important to me than that of my parents. They were my heros. If they were proud of me, I had met my goal. Praise from others was extra gravy. Any future achievements will have a lot of the shine taken off because they will no longer be here to help me celebrate.
Godspeed, Mom. Go find Dad.
| < Back
to Intro |
You can email me at ![]() webmaster@laroke.com
webmaster@laroke.com
Issued Saturday November 20, 2004
Updated Wednesday February 28, 2018
copyright © 1996-2018 Larry Robert Kephart all rights reserved
| | LRK Home | | Bio Info | | Krash Khronicles | | LAROKE | |
| | BettyLou | | BillyBob's Garage | | Rat Patrol | | Deerslayer | | Elvira | |
| | Land of the Free and Home of the Brave | |
| | Keppylou's Art | | WWI Soldier's Diary | |