| | LRK Home | | Bio Info | | Krash Khronicles | | LAROKE | |
| | BettyLou | | BillyBob's Garage | | Rat Patrol | | Deerslayer | | Elvira | |
| | Land of the Free and Home of the Brave | |
| | Keppylou's Art | | WWI Soldier's Diary | |
BillyBob Work-in-Progress Log
![]()
TRUCK LINKS including vendor sites for old parts, custom parts, and tools as well as sites for classic car and truck organizations
STORE Operating in association with Amazon.com, books, recordings and tools can be purchased.
PLANNING for the restoration including project schedule and cost estimates.
![]()
TRAVELS WITH BILLYBOB With apologies to Steinbeck, this area of BillyBob's Garage will be used to log the trips BillyBob and I make together.
WORK-IN-PROGRESS is the restoration of parts of BillyBob that I can accomplish without a garage.
PRE-RESTORATION includes log entries of minor repairs and and adventures between time of purchase and the time when I started restoration, a piece at a time.
JR'S KORNER JR's Korner is the history of BillyBob before I got him authored by my brother, Wm. C. Kephart.
![]()
BILLYBOB MAINTENANCE Ever changing detailing, oil change, lube, etc. maintenance routines specifically developed for BillyBob, including required tools, materials and procedures.
STEALTH SHOP Urban residence design with large integrated shop and separate living quarters for a relative or renter.
32. Windshield Epic - Almost Good
April 17th 2004 Breezy and cloudy but a good weather day otherwise. Got the tax return trama over with . . . on time, got my anger management squared away over a system that punishes the productive, then rubs salt in the wounds with an impossibly complex system of forms that no one truly understands. I rewarded myself on the return of my sunny disposition by adding a Smith & Wesson Magnum 500 to my firearms collection. I named this hand cannon "Burt" after the Michael Gross character in Tremors, Burt Gummer.
Dragged the tools out. As long as I was changing the wire on the MIG welder from .025 to .023, I decided this was as good a time as any to clean the welder and re-organize my welding accessories. Cleaned the welder and cart with Simple Green and a shop rag. Dug thru my tool documentation for the welder manual, then installed the .023 wire, a new .023 contact tip and a new gas nozzle.
 April
24th 2004 Good weather
day but not much shade under BillyBob's tree. Deciduous trees behave
differently in the semi-tropics than they do in the temperate zones. I
don't even know what species BillyBob's tree is but it's a dirty tree
during flowering and for the last three weeks it's been losing all it's
leaves. New growth is beginning to bud but it will be a few weeks
before it gets it's canopy back. In the meantime, BillyBob and I will
be in the Florida sun all day long.
April
24th 2004 Good weather
day but not much shade under BillyBob's tree. Deciduous trees behave
differently in the semi-tropics than they do in the temperate zones. I
don't even know what species BillyBob's tree is but it's a dirty tree
during flowering and for the last three weeks it's been losing all it's
leaves. New growth is beginning to bud but it will be a few weeks
before it gets it's canopy back. In the meantime, BillyBob and I will
be in the Florida sun all day long.
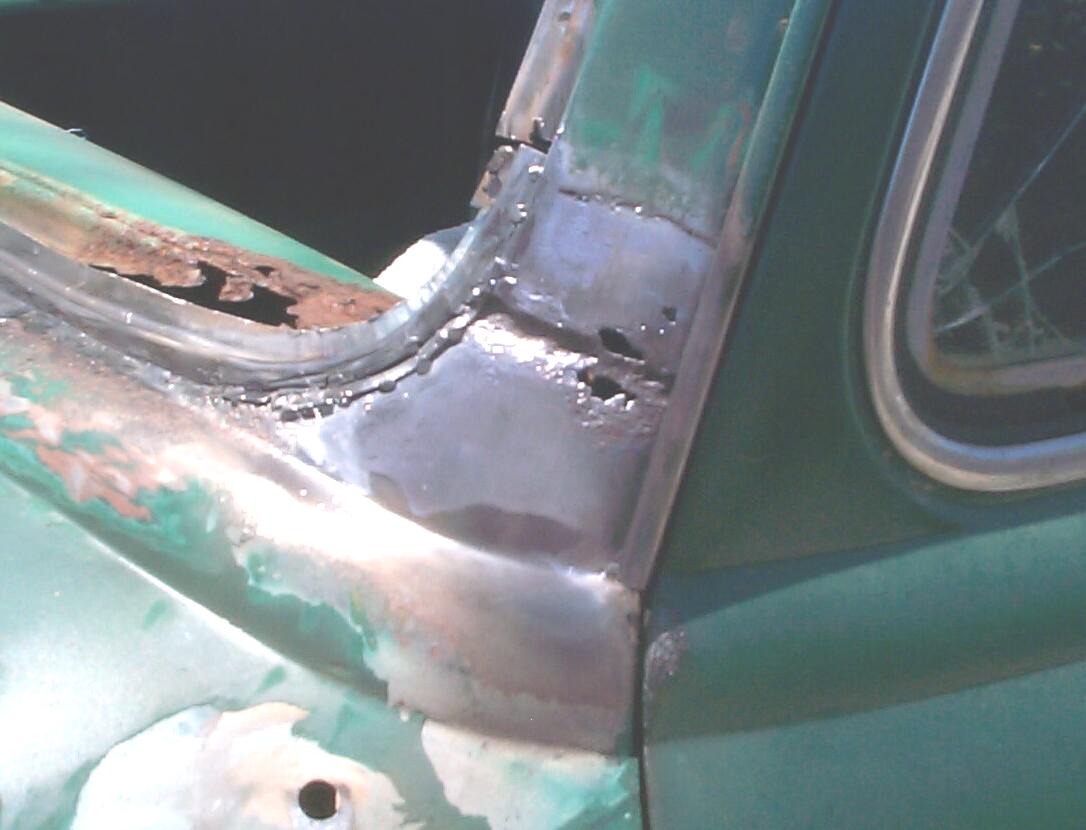
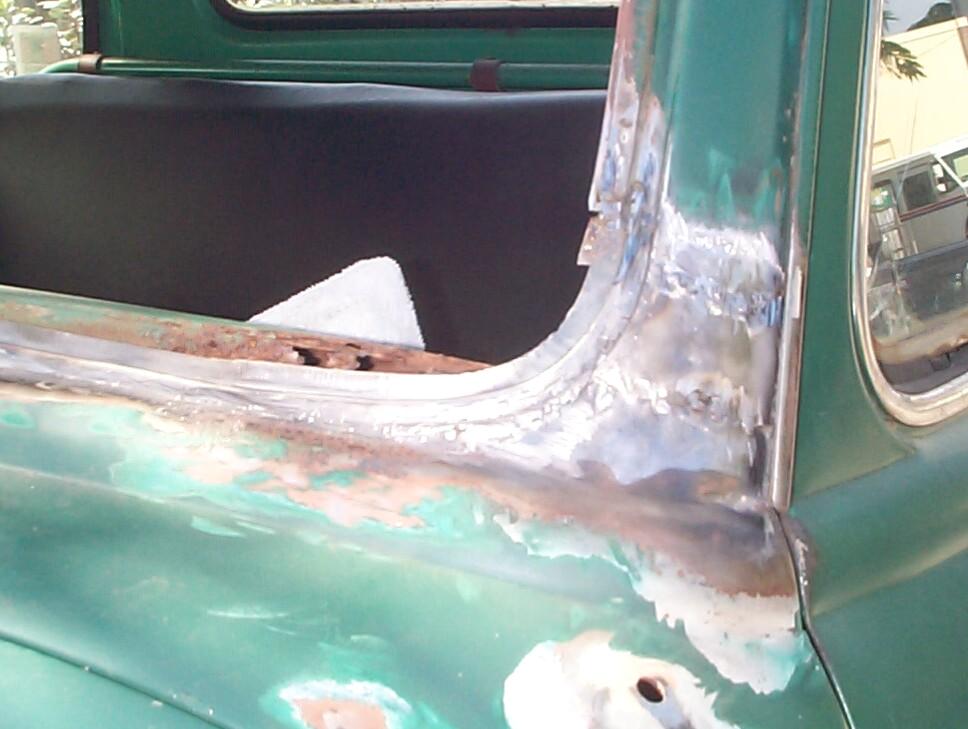
 After
setting up the tools, I began to shape and weld the first patch panel
piece to the driver side. I'm right-handed and the fender and hood are
in my way on this side. I didn't realize until now what a pain in the
keester this situation is. Going slow and messing around with wire
speed and voltage settings for the new .023 wire. Summer is finally
coming and I have to stop and take water breaks often. Finally settled
on a wire speed a bit over 3 and an arc voltage setting of D. The piece
on this side doesn't fit as well as I'd like and I did a little shaping
with MAPP torch and pick hammer after it was tacked in place. This
activity began to melt out the body seam lead. Eastwood
has leading kits and I have a video on the subject but, right now, it's
one more thing I don't have time to learn.
After
setting up the tools, I began to shape and weld the first patch panel
piece to the driver side. I'm right-handed and the fender and hood are
in my way on this side. I didn't realize until now what a pain in the
keester this situation is. Going slow and messing around with wire
speed and voltage settings for the new .023 wire. Summer is finally
coming and I have to stop and take water breaks often. Finally settled
on a wire speed a bit over 3 and an arc voltage setting of D. The piece
on this side doesn't fit as well as I'd like and I did a little shaping
with MAPP torch and pick hammer after it was tacked in place. This
activity began to melt out the body seam lead. Eastwood
has leading kits and I have a video on the subject but, right now, it's
one more thing I don't have time to learn.
May 1st 2004 It was a tuff week. Jerry Powell, a retired big rigger a few years older than me and well known among the old truck community as "Bullfoot" passed away on Tuesday morning. Many of us got to know Jerry and his family at Stovebolt.com. Altho' Jerry could write clear prose when he wanted to, most of his postings were in a Bullfoot personalized "fun with phonics" format. His style could soften hard points of debate. By the time you ciphered his message, you were too tired to stomp off angry if you disagreed. I am much distressed at the loss of a friend I will now never get the chance to meet. Maybe someday, we'll meet up at the Celestial Truckstop. That would be . . . "Coolamundo!"
Dragged the tools out, then waited for the morning storm clouds to pass . . .
May 2nd 2004 OK. I got lazy again yesterday and ended up watching TRUCK reruns on Spike TV all day while waitin' for "perfect" weather. The spirit of my Dad is pacing on my shoulder and shouting in my ear "Quit pussyfootin' around!!"
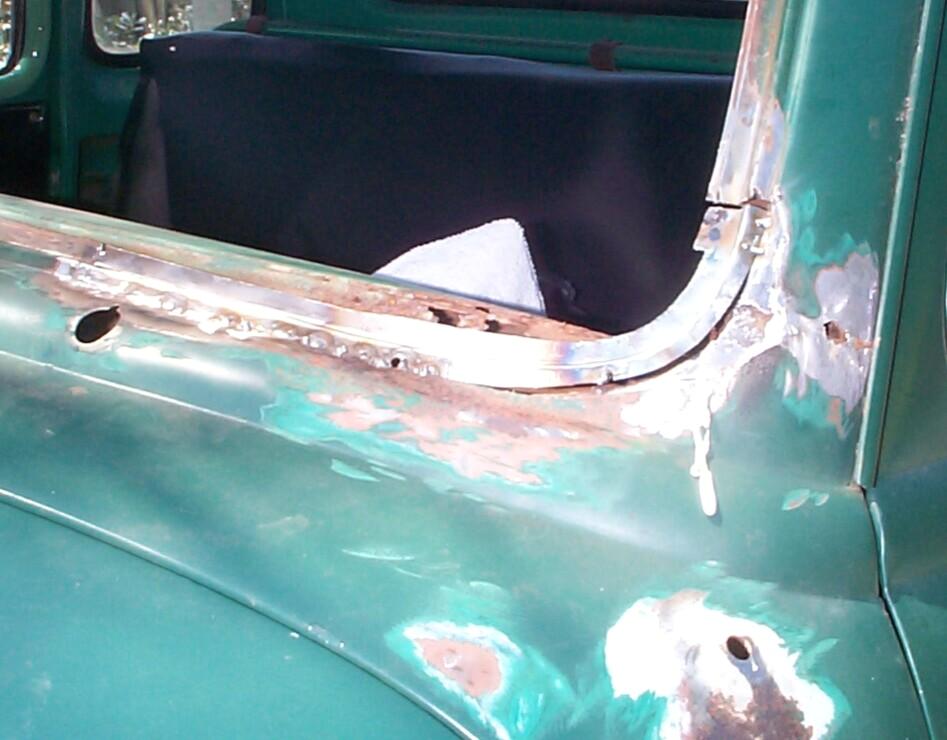
 After
Jeep maintenance this morning, I went back at the pinchweld curve patch
panel with welder and grinder and I welded in another small filler
sliver where the gaps between pieces were too big. Also melted out more
body lead from the A-post where there is rust damage underneath. The
lead here was over 1/8" thick so there is plenty of room for me to lap
weld a small patch panel over this area for reinforcement.
After
Jeep maintenance this morning, I went back at the pinchweld curve patch
panel with welder and grinder and I welded in another small filler
sliver where the gaps between pieces were too big. Also melted out more
body lead from the A-post where there is rust damage underneath. The
lead here was over 1/8" thick so there is plenty of room for me to lap
weld a small patch panel over this area for reinforcement.
I formed a little patch to cover the rust-thru holes, trimed and contoured it to fit snug, then got the nitrile gloves on and PRE paint prepped the patch area and the patch. Mixed a small batch of JB Weld epoxy and applied it to the patch area and the back of the patch, then slapped the patch into position and took off the gloves . . . Then, I screwed up! I placed a C-clamp type vise-grip to clamp the patch to the A-piller for setting. Problem wuz, I had the clamp a little too tight and I placed the pressure point smack-dab in the middle of the patch. This was like putting your thumb down hard on a peanutbutter and jelly sandwich - the corners fly up and the jelly squirts out! Curses! I cut my thumb removing the clamp in haste, then got JB Weld on my hands as I tried to get the patch back to its convex shape ~!@#$%^ The patch was re-applied, this time with two clamps on the edges. Then hands and patch area were purged of excess JB Weld with lacquer thinner. All's well that ends well.
May 8th 2004 Great weather day. My alarm didn't function and I got to the Krash Lab 'bout an hour late. Started back in on the weld and grind operations. Ran out of MIG shielding gas by noon. Curses!
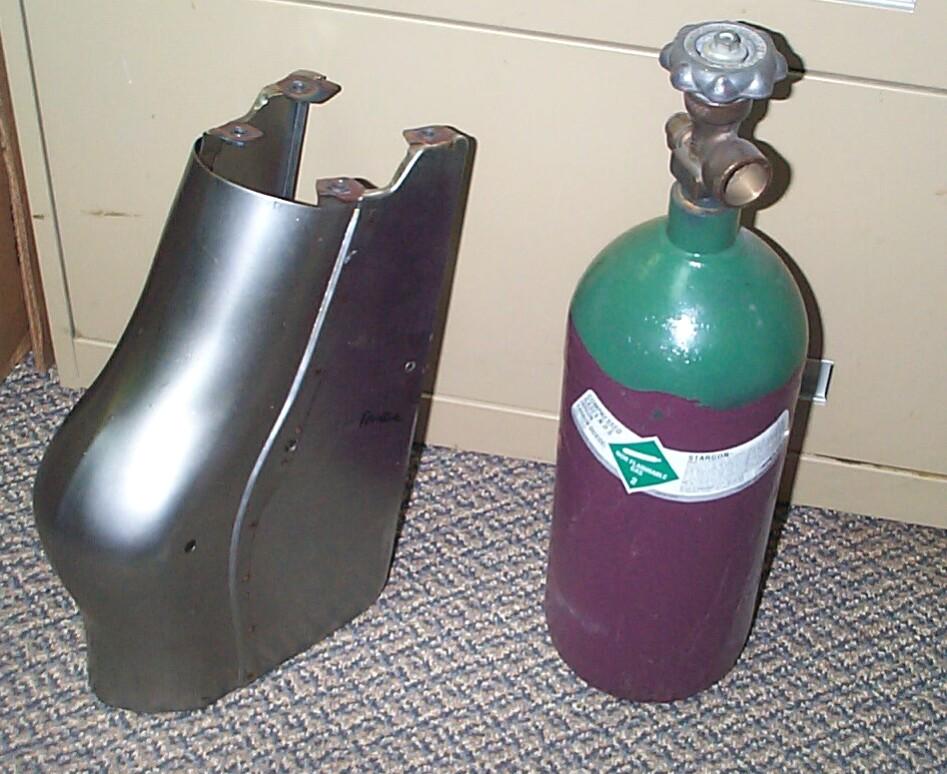 May
14th 2004 Went to
American Welding Supply in Renegade to trade in my empty tank for a
replacement bottle of shielding gas. Walking across the parking lot in
the fenced in compound, a fella told me that American went out of
business in October. Darn! He told me about another place nearby called
Prax Air. I went looking for it but his directions were sketchy and I
didn't ask him for more detailed directions (it's a man thing, ya
know). Came back to the Krash Lab and found a "Praxair Distribution
Southeast" address and a map to the place on the Internet. Back in the
jeep and this time I got my replacement tank of Argon (75%), CO2 (25%)
shielding gas. The tank looked a bit small and when I got back to the
Krash Lab and looked at the receipt, it said 15 cf. I'm pretty sure the
tank I turned in was a 20 cf bottle. Rats, but I've wasted enuf time on
this today. I owe my boss some work time. The good news this week is
that a replacement grille nose came from Chevy
Duty. I'd ordered this a year ago. Scuttlebutt had it that
the guy who made these things had passed on. All the vendors were out
but there was a chance somebody else would take over the business and
they would become available again. I let the back order ride since
Chevy Duty doesn't charge your credit card until they ship. I'm glad I
did. It's a quality piece welded up from three smaller stampings and
with four captured nuts welded in place.
May
14th 2004 Went to
American Welding Supply in Renegade to trade in my empty tank for a
replacement bottle of shielding gas. Walking across the parking lot in
the fenced in compound, a fella told me that American went out of
business in October. Darn! He told me about another place nearby called
Prax Air. I went looking for it but his directions were sketchy and I
didn't ask him for more detailed directions (it's a man thing, ya
know). Came back to the Krash Lab and found a "Praxair Distribution
Southeast" address and a map to the place on the Internet. Back in the
jeep and this time I got my replacement tank of Argon (75%), CO2 (25%)
shielding gas. The tank looked a bit small and when I got back to the
Krash Lab and looked at the receipt, it said 15 cf. I'm pretty sure the
tank I turned in was a 20 cf bottle. Rats, but I've wasted enuf time on
this today. I owe my boss some work time. The good news this week is
that a replacement grille nose came from Chevy
Duty. I'd ordered this a year ago. Scuttlebutt had it that
the guy who made these things had passed on. All the vendors were out
but there was a chance somebody else would take over the business and
they would become available again. I let the back order ride since
Chevy Duty doesn't charge your credit card until they ship. I'm glad I
did. It's a quality piece welded up from three smaller stampings and
with four captured nuts welded in place.
 May
15th 2004 Good weather
day. I spent most of it welding and grinding with the obligatory
burning holes and filling holes, etc. By four in the afternoon, I was
finally satisfied enuf with the first pinch weld patch piece to move on
to the second piece (the inside pinch weld curve).
May
15th 2004 Good weather
day. I spent most of it welding and grinding with the obligatory
burning holes and filling holes, etc. By four in the afternoon, I was
finally satisfied enuf with the first pinch weld patch piece to move on
to the second piece (the inside pinch weld curve).
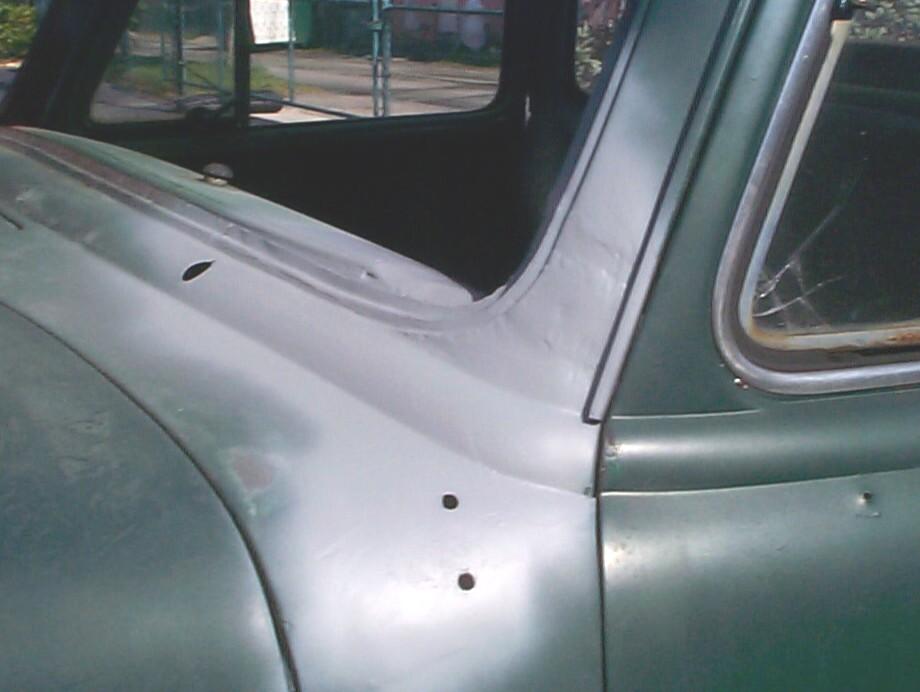
 May
22nd 2004 Good weather
day again and time to start on the inner pinch weld / defroster trench
patch panel. Measured, scribed and cut a 1-1/2" by 18" piece of sheet
steel with the mini nibbler. Made the piece into a 1/2" by 1" by 18"
"L" shape with the Mini Bending Brake next. Finished the bend with
anvil and body hammer. Got out the metal shrinker and formed the curve
to the card stock template I made when I first started this job back in
November. Donnie, the lawn guy showed up and I went inside and watched
the car shows on Spike TV until he was finished in the shadetree
garage. After I got BillyBob's garage back to myself, I trimmed and
shaped the new patch panel and cut out old rusted metal until I had a
rough fit by late afternoon.
May
22nd 2004 Good weather
day again and time to start on the inner pinch weld / defroster trench
patch panel. Measured, scribed and cut a 1-1/2" by 18" piece of sheet
steel with the mini nibbler. Made the piece into a 1/2" by 1" by 18"
"L" shape with the Mini Bending Brake next. Finished the bend with
anvil and body hammer. Got out the metal shrinker and formed the curve
to the card stock template I made when I first started this job back in
November. Donnie, the lawn guy showed up and I went inside and watched
the car shows on Spike TV until he was finished in the shadetree
garage. After I got BillyBob's garage back to myself, I trimmed and
shaped the new patch panel and cut out old rusted metal until I had a
rough fit by late afternoon.
 May
23rd 2004 When the lawn
guy was here yesterday, he asked me to relocate BillyBob a couple of
feet so he could get his mower past on the side and the front. Billybob
hasn't been started in almost two months and since Donnie hasn't
plagued me with his clueless helper since the powdercoating incident, I
decided to accommodate him today. Reinstalled the instrument pod,
ignition switch, headlight switch and steering wheel. Checked to make
shure I didn't have any open ground short circuits with all the other
dangling wires. BillyBob started with about ninety seconds of
intermittant cranking and the battery was still strong when he
sputtered to life. After thirty minutes, I moved him over a few feet
and shut down again. After panzerwagon and Renegade
maintenance, instruments and switches were disconnected again and
replaced with the welding blanket. Then, the inner pinch weld piece was
welded in place. Fit is good. I luv it when a plan comes together.
May
23rd 2004 When the lawn
guy was here yesterday, he asked me to relocate BillyBob a couple of
feet so he could get his mower past on the side and the front. Billybob
hasn't been started in almost two months and since Donnie hasn't
plagued me with his clueless helper since the powdercoating incident, I
decided to accommodate him today. Reinstalled the instrument pod,
ignition switch, headlight switch and steering wheel. Checked to make
shure I didn't have any open ground short circuits with all the other
dangling wires. BillyBob started with about ninety seconds of
intermittant cranking and the battery was still strong when he
sputtered to life. After thirty minutes, I moved him over a few feet
and shut down again. After panzerwagon and Renegade
maintenance, instruments and switches were disconnected again and
replaced with the welding blanket. Then, the inner pinch weld piece was
welded in place. Fit is good. I luv it when a plan comes together.
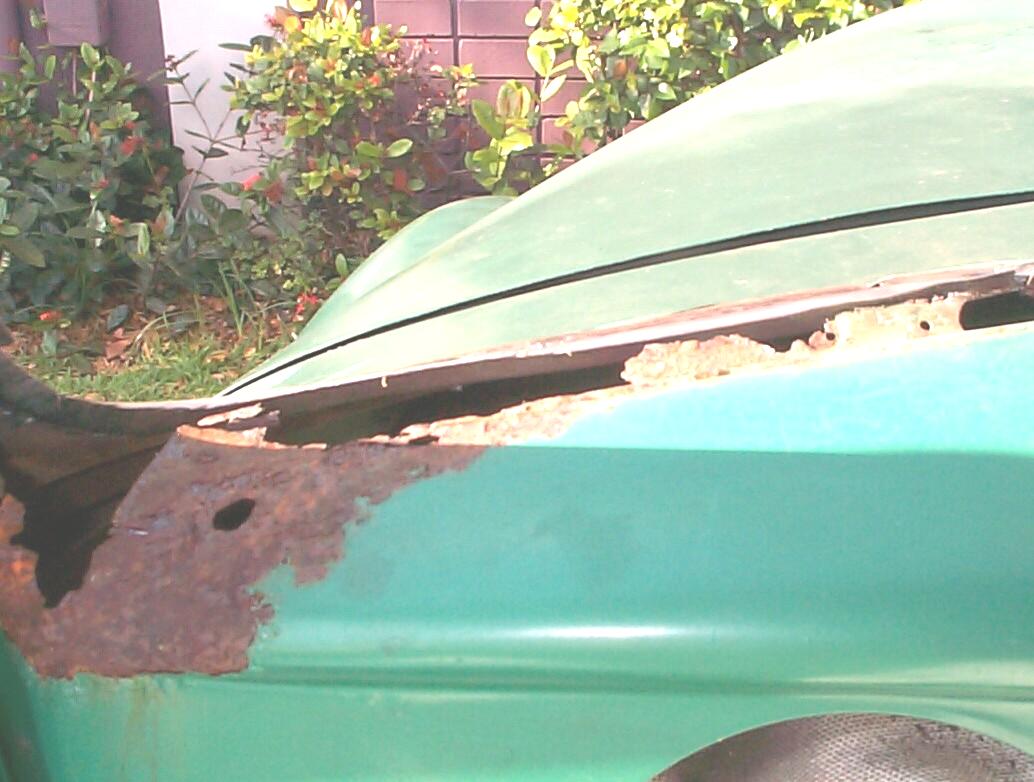
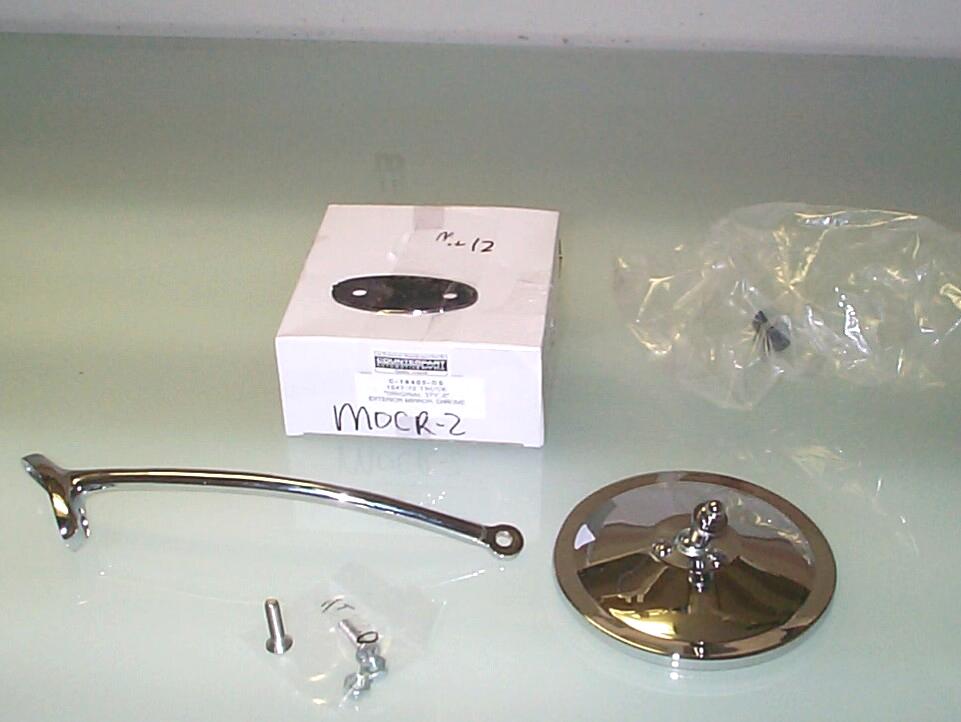 May
29th 2004 Three days of
good weather are forecast. I hope to make good progress. Back when I
started stripping paint from the driver side cowl, two perfect holes
filled with bondo and backed by tin foil were uncovered. I assumed
these to be the original mirror mounting holes so I ordered a chrome
reproduction in the original style from American
Classic Truck Parts. Got the gasket and stainless steel
fasteners too. They arrived earlier this week. I fitted the mirror arm
first thing this morning. It matches the holes perfectly. Continued to
form the inner pinch weld patch panel with MAPP torch and pick hammer.
May
29th 2004 Three days of
good weather are forecast. I hope to make good progress. Back when I
started stripping paint from the driver side cowl, two perfect holes
filled with bondo and backed by tin foil were uncovered. I assumed
these to be the original mirror mounting holes so I ordered a chrome
reproduction in the original style from American
Classic Truck Parts. Got the gasket and stainless steel
fasteners too. They arrived earlier this week. I fitted the mirror arm
first thing this morning. It matches the holes perfectly. Continued to
form the inner pinch weld patch panel with MAPP torch and pick hammer.
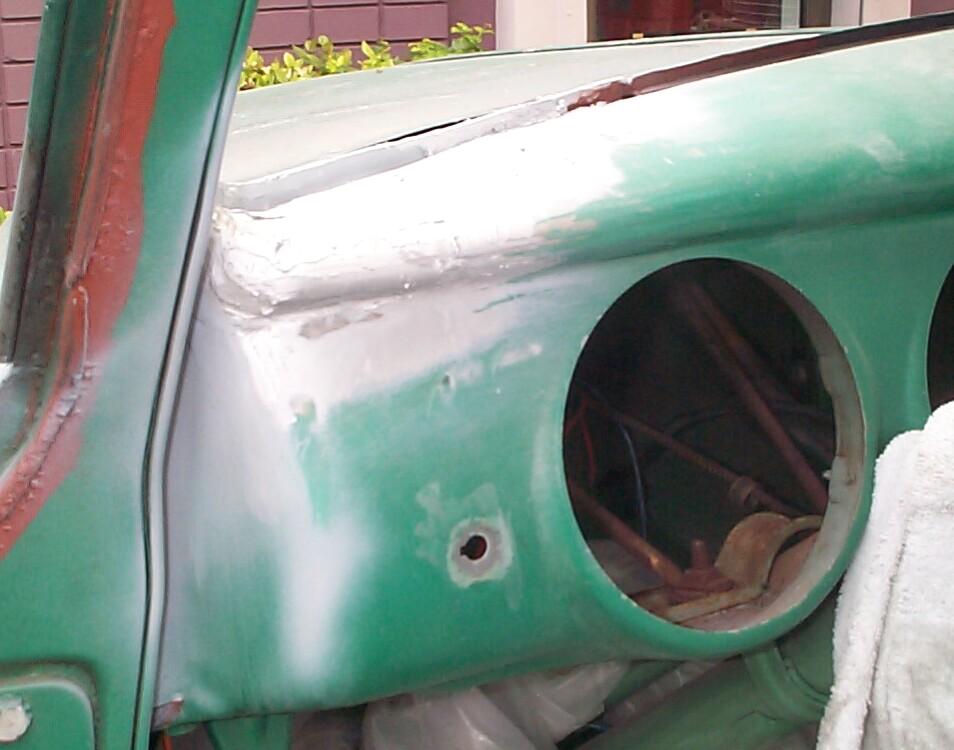
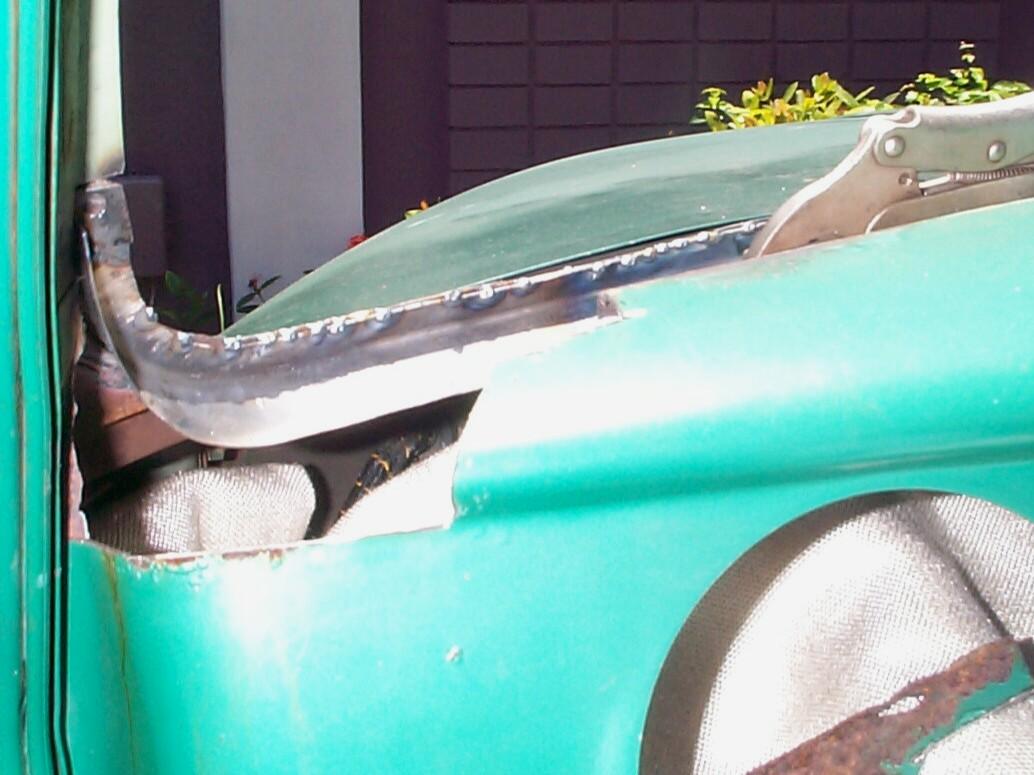 Went
on to cut out rotted dashboard area for the next patch panel with the
air powered cut-off wheel and air powered saber saw. Then, I went about
forming a card stock template to be the guide for the shape of the next
piece. Stopped for awhile to watch the WWII War Memorial dedication
live on the History Channel. Cut a piece of sheet metal with mini
nibbler and aviation snips and began to form it into the dash curve
using the old cut out pieces as forming templates. Continued to trim
the piece with snips until they were causing more harm than good
(awkward cuts and jagged edges). Clamped my angle grinder into my shop
vise to turn it into a mini bench grinder and finished trimming via
grinding. Got a good fit but it's too late in the day to drag the
welder out so I'll leave that for tomorrow.
Went
on to cut out rotted dashboard area for the next patch panel with the
air powered cut-off wheel and air powered saber saw. Then, I went about
forming a card stock template to be the guide for the shape of the next
piece. Stopped for awhile to watch the WWII War Memorial dedication
live on the History Channel. Cut a piece of sheet metal with mini
nibbler and aviation snips and began to form it into the dash curve
using the old cut out pieces as forming templates. Continued to trim
the piece with snips until they were causing more harm than good
(awkward cuts and jagged edges). Clamped my angle grinder into my shop
vise to turn it into a mini bench grinder and finished trimming via
grinding. Got a good fit but it's too late in the day to drag the
welder out so I'll leave that for tomorrow.
 May
30th 2004 Performed
routine maintenance on Renegade and the Panzerwagon, then started
dragging the air compressor and welder out of the shed. My particle
board ramp broke again. Now it's in three pieces and it will require
more heavy lifting to get the wheeled equipment in and out. Spot welded
the new piece in place, then went about bumping both the new dash piece
and the inner pinch weld piece with MAPP torch and pick hammer.
May
30th 2004 Performed
routine maintenance on Renegade and the Panzerwagon, then started
dragging the air compressor and welder out of the shed. My particle
board ramp broke again. Now it's in three pieces and it will require
more heavy lifting to get the wheeled equipment in and out. Spot welded
the new piece in place, then went about bumping both the new dash piece
and the inner pinch weld piece with MAPP torch and pick hammer.
May 31st 2004 Memorial Day and I'm reminded of my Uncle Dutch again. He's the one in the middle in the pic below. Dutch was killed in the battle of Leyte Gulf shooting the wing off the Japanese Kamikaze plane that sunk his ship. My Dad is on the right. He was a Army Air Corps ground crew Staff Sgt. in a Combat Cargo outfit in the CBI theatre. On the left is Walt Shipley, a life long family friend who served as a B-17 ball turret gunner based in England. This photo was taken before they went to war in the early forties. Dad and Walt survived to start families after the war. All are gone now.
This is a good place to repeat a story about Walt Shipley that I told over at Stovebolt.com sometime back. About 1970, I was making a Sunday night run from my hometown of Clearfield, PA to Johnstown, PA where our family lived at that time, a distance of 80 miles. Gassed up my Javelin SST and got two miles down the road before water in the gas stopped me cold. It was February and the temp was in the twenties. I called Dad in Johnstown. He called Walt Shipley who drove twenty-five miles to help me. I could see that he had the flu and a high fever (which he failed to tell dad about). I asked him to drop me off at my grandmother's house and I would worry about the car the next day. Walt wouldn't hear of it. We worked on that car getting the water out for two hours until it ran good enough for me to coax it to my grandmother's house. Never have forgotten the distance Walt Shipley went to get his friend's kid out of trouble.
 June
5th 2004 The weather
forcast is 60% rain. When I got to the Krash Lab about eight am, I
called up the local doppler radar over the Internet. No cells in sight
yet and outside the sky is blue with a squadron of hot air balloons on
the western horizon. Time to start dragging out the tools. Memorial day
was a hot and humid day in the shadetree garage. Grinding and welding,
filling holes an' cursin' 'em. I had to take more and longer water
breaks. I don't have the skill to make pretty welds but I'm persistant
and making slow progress. By ten-thirty, dark clouds had formed. When
the first thunderclap sounded, I pulled the compressor and welder under
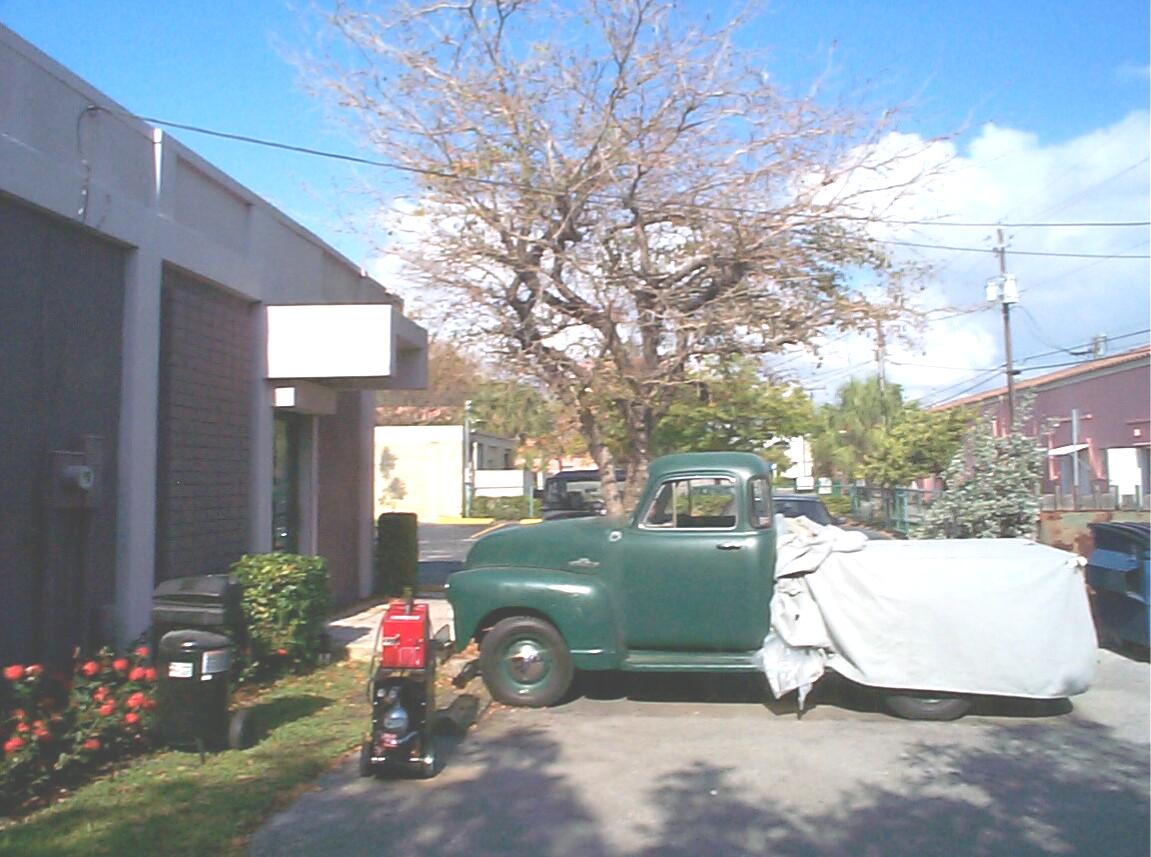
cover and pulled the plastic and car cover over BillyBob. I am not
happy with my "Evolution 4" car cover. The material has fatigued to the
point that you can pinch a hole in it with your thumb and forefinger! I
don't think it will last until the windshield project is finished.
June
5th 2004 The weather
forcast is 60% rain. When I got to the Krash Lab about eight am, I
called up the local doppler radar over the Internet. No cells in sight
yet and outside the sky is blue with a squadron of hot air balloons on
the western horizon. Time to start dragging out the tools. Memorial day
was a hot and humid day in the shadetree garage. Grinding and welding,
filling holes an' cursin' 'em. I had to take more and longer water
breaks. I don't have the skill to make pretty welds but I'm persistant
and making slow progress. By ten-thirty, dark clouds had formed. When
the first thunderclap sounded, I pulled the compressor and welder under
cover and pulled the plastic and car cover over BillyBob. I am not
happy with my "Evolution 4" car cover. The material has fatigued to the
point that you can pinch a hole in it with your thumb and forefinger! I
don't think it will last until the windshield project is finished.
I contented myself to organize my tools in the Krash Lab including a craftsman toolbox full of electrical stuff someone had thrown into the dumpster enclosure at the Krash Pad sometime back. I'm gonna keep the usable stuff and re-finish the toolbox which has a rusted bottom. I also watched powerblock on Spike TV.
June 12th 2004 Last sunday was more of the same. Only got a couple of hours of welding and grinding done before thunderstorms chased me inside again. And . . . I'm gettin' a late start this morning. Last night was a bachelor party for a co-worker, George. We saddled up and went south to a strip club, Tootsies Cabaret, in north Miami (Aventura). My boss and I sat in the back and he kept supplying crisp currency and drinks to "his guys" and proceeded to get toasted himself. I wasn't drinking and the drivers were taking it easy too. These places have changed somewhat since I dated a dancer, Dash, in the eighties and was a regular. There's not much dancing anymore. It's gymnastics and no mystery. One of the guys got too close and went blind with a pap smear on his glasses. This being Miami, there were about fifty beautiful girls from all over the Western Hemisphere. Lots of tattoos, piercings and friction dances. I'm a little old-fashioned, I guess, and like the old clubs better. The Frengi's are right 'tho. You can never have enuf nekid wimmin.
The late start and neverending length of this project made me decide that the welding portion of this job is done. The new metal/old metal integration is structurally sound so I'm moving on to the JB Weld stage. Kevin Tetz of Paintucation would assign a "high cheese factor" to my work I think, but I'm anxious to get BillyBob back on the road before I lose any more momentum. Wire-brushed the exposed metal one more time with the wire wheel in the air-powered angle grinder. Covered the welding blanket under the dash with a plastic trash bag to catch any drippings and then applied Eastwood's OxiSolve rust converter with a spray bottle. Applied paper towels on top of that and saturated them with OxiSolve in turn. Covered the whole wet mess with plastic food wrap to slow down evaporation. Kept applying more OxiSolve on fifteen minute intervals. Repeated this process for two hours before cleanup.
 June
13th 2004 I let the
OxiSolve treatment cure overnite. First task this morning is another
wire wheel brushing to remove any excess OxiSolve residue before JB
Weld application. Next, gaps and holes were taped from the back with
duct tape to keep the JB Weld from dripping thru. PRE Paint prepped the
area and began to apply JB Weld. Mixed and applied several batches
until I ran out of JB. It was enuf.
June
13th 2004 I let the
OxiSolve treatment cure overnite. First task this morning is another
wire wheel brushing to remove any excess OxiSolve residue before JB
Weld application. Next, gaps and holes were taped from the back with
duct tape to keep the JB Weld from dripping thru. PRE Paint prepped the
area and began to apply JB Weld. Mixed and applied several batches
until I ran out of JB. It was enuf.
 June
19th 2004 Muggy in the
shadetree garage. During the week, I picked up some more JB Weld and
1/4" x 1-1/4" flat washers at Discount Auto Parts (more about the
washers later). Removed the duct tape backing the JB Weld gaps from the
back of the dashboard and began to setup for sanding. OK, the washer is
for the ignition switch opening. I haven't located a good original
switch and am using a generic replacement. Problem is that the
replacement is a good deal smaller than the dashboard hole it fits into.
June
19th 2004 Muggy in the
shadetree garage. During the week, I picked up some more JB Weld and
1/4" x 1-1/4" flat washers at Discount Auto Parts (more about the
washers later). Removed the duct tape backing the JB Weld gaps from the
back of the dashboard and began to setup for sanding. OK, the washer is
for the ignition switch opening. I haven't located a good original
switch and am using a generic replacement. Problem is that the
replacement is a good deal smaller than the dashboard hole it fits into.
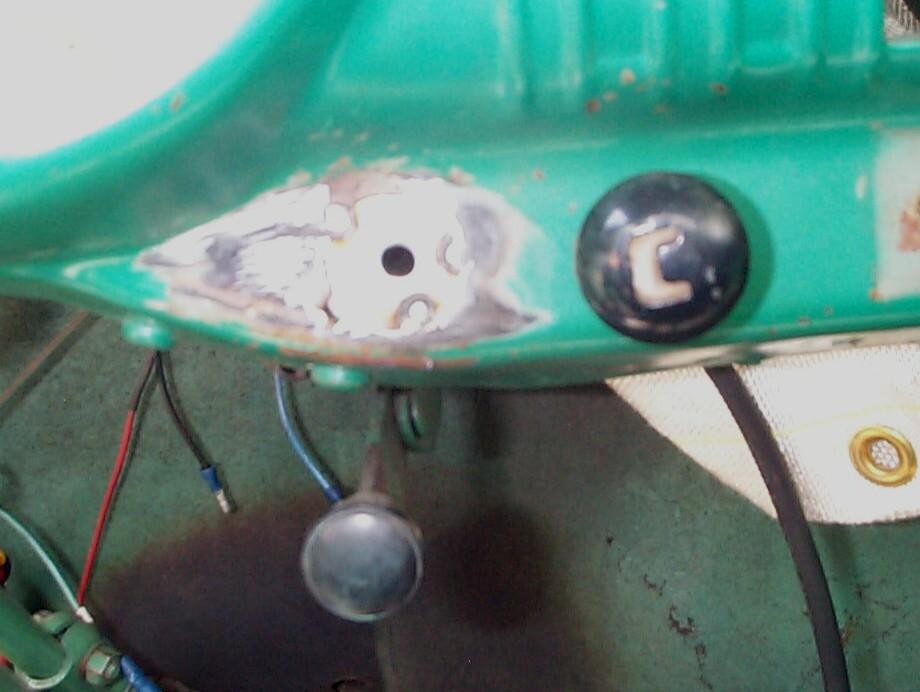 Sanded
around the ignition switch hole to bare metal and touched it up with
hammer and dolly where it was deformed a little. Used the grinder to
grind a flat on one side of the washer to make it fit better, then
dragged out the MIG welder. Placed the washer behind the ignition
switch opening, then fixed it in place with three spot welds. Sanded
the welds down flush. Then . . . the wheels fell off. When I started to
drill the 5/8" hole, the torque from the big drill bit in a slow
electric drill broke the spot welds loose. Then when I put the washer
in a vice to finish the job, the drill bit bent the washer all out of
shape when it started to break thru ~!@#$%^.
The general idea is sound but the execution is lacking. I'll take a
different run at this next week.
Sanded
around the ignition switch hole to bare metal and touched it up with
hammer and dolly where it was deformed a little. Used the grinder to
grind a flat on one side of the washer to make it fit better, then
dragged out the MIG welder. Placed the washer behind the ignition
switch opening, then fixed it in place with three spot welds. Sanded
the welds down flush. Then . . . the wheels fell off. When I started to
drill the 5/8" hole, the torque from the big drill bit in a slow
electric drill broke the spot welds loose. Then when I put the washer
in a vice to finish the job, the drill bit bent the washer all out of
shape when it started to break thru ~!@#$%^.
The general idea is sound but the execution is lacking. I'll take a
different run at this next week.
Moved on to sanding down the JB Weld from last week's operation so I can make some progress before I go home to the Krash Pad today. I used the Norton Speedlock system and tight spot sanding cones in the air powered angle grinder again. Afterwards, the area was PRE Paint Prepped and given three coats of Eastwood's Self-Etching Primer. It was mid-afternoon by this time and the northwestern sky was getting dark and starting to rumble. I decided to put the tools away and call it a day.
 June
20th 2004 The primer
cured overnite. Now is the time for the first batch of the Evercoat
Metal-to-Metal Filler. The primed area was roughed up with a scotch pad
then PRE Paint Prepped. Mixed up a small batch of filler and managed to
get most of it on BillyBob before it started to set up.
June
20th 2004 The primer
cured overnite. Now is the time for the first batch of the Evercoat
Metal-to-Metal Filler. The primed area was roughed up with a scotch pad
then PRE Paint Prepped. Mixed up a small batch of filler and managed to
get most of it on BillyBob before it started to set up.
June 26th 2004 Good weather but hot and humid so I'm taking it slow with many breaks. Started out with some under the dashboard work. Got the shop vac out to clean the cab, then took the welding blanket out from behind the dash. Removed the vacuum wiper motor and control next.
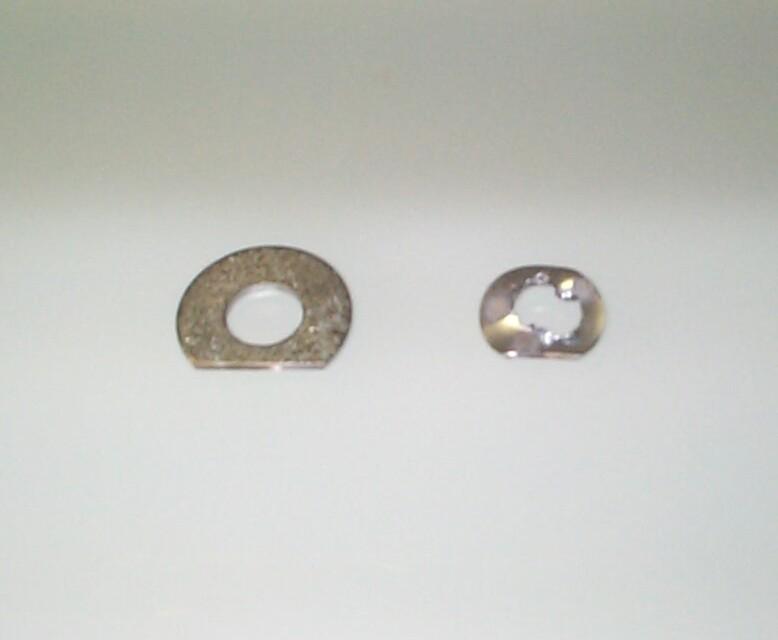 During
the past week, I picked up a big 5/8" flat washer at Home Depot along
with a spool of mason's twine to help with the installation of the
windshield gasket down the road. The 5/8" washer hole is just a bit too
small for the ignition switch so I went after it with a rat tail file
until the switch would fit. One side of the washer was ground down flat
to fit behind the dash like last week's failed first attempt. I found
out that I could position and tighten up the switch mounting nuts now
without welding the modified washer in place so I'm done with this. If
I find an original switch, it won't be too difficult to install.
During
the past week, I picked up a big 5/8" flat washer at Home Depot along
with a spool of mason's twine to help with the installation of the
windshield gasket down the road. The 5/8" washer hole is just a bit too
small for the ignition switch so I went after it with a rat tail file
until the switch would fit. One side of the washer was ground down flat
to fit behind the dash like last week's failed first attempt. I found
out that I could position and tighten up the switch mounting nuts now
without welding the modified washer in place so I'm done with this. If
I find an original switch, it won't be too difficult to install.
Then I applied more of Eastwood's Rust Encapsulator behind the dash at the new metalwork. It's kinda checkerboard right now but I'll eventually fill in the gaps and get the whole area covered under there before I put the dashboard back together. Murphy made an appearance at this point to punish me for not wearing goggles. Got a big drop of Rust Encapsulator in my left eye. The eyelid closed just before it hit and minimized the damage. I rinsed the eye with cold water in the Krash Lab washroom for about ten minutes before I could see again without discomfort. Then . . . I hunted up my goggles and went back at it.
Sanded down the first batch of filler with the Norton Speedlock system and block sanding with 80 grit paper by hand. The Boss arrived with the family dog, Toby, in tow (the real boss, SWMBO, is out of town and he is in charge of the dog). Then our janitorial service, Patrick and his son, arrived to clean the place . . . Too much traffic in my work area and critters underfoot to get anything done for awhile. I wonder where Donnie, the lawn guy is?
After Patrick and son left, the animals calmed down (neither Toby or Wingnut like vacuum cleaners), and I went back to work on BillyBob. There was just enuf time, before calling it a day, to PRE Paint Prep the driver's side repair area and apply the second coat of Metal-to-Metal filler.
 June
27th 2004 OK. The end
of this task is in sight. I've still got some fill and primer work on
the repair areas ahead of me, but I'm close to the actual windshield
installation. Got to prep and paint the upper half of the interior and
dashboard, clean and polish the stainless steel windshield trim and
decide what I'm gonna do about the windshield wipers and, lastly,
install the windshield. All that stuff will be covered in the last log
entry of this epic. When I post the next log entry, BillyBob will be
back on the road! That's the plan an' I'm stickin' to it!
June
27th 2004 OK. The end
of this task is in sight. I've still got some fill and primer work on
the repair areas ahead of me, but I'm close to the actual windshield
installation. Got to prep and paint the upper half of the interior and
dashboard, clean and polish the stainless steel windshield trim and
decide what I'm gonna do about the windshield wipers and, lastly,
install the windshield. All that stuff will be covered in the last log
entry of this epic. When I post the next log entry, BillyBob will be
back on the road! That's the plan an' I'm stickin' to it!
| < Back
to Intro |
You can email me at ![]() webmaster@laroke.com
webmaster@laroke.com
Issued Sunday June 27, 2004
Updated Monday February 26, 2018
copyright © 1996-2018 Larry Robert Kephart all rights reserved
| | LRK Home | | Bio Info | | Krash Khronicles | | LAROKE | |
| | BettyLou | | BillyBob's Garage | | Rat Patrol | | Deerslayer | | Elvira | |
| | Land of the Free and Home of the Brave | |
| | Keppylou's Art | | WWI Soldier's Diary | |