| | LRK Home | | Bio Info | | Krash Khronicles | | LAROKE | |
| | BettyLou | | BillyBob's Garage | | Rat Patrol | | Deerslayer | | Elvira | |
| | Land of the Free and Home of the Brave | |
| | Keppylou's Art | | WWI Soldier's Diary | |
BillyBob Work-in-Progress Log
![]()
TRUCK LINKS including vendor sites for old parts, custom parts, and tools as well as sites for classic car and truck organizations
STORE Operating in association with Amazon.com, books, recordings and tools can be purchased.
PLANNING for the restoration including project schedule and cost estimates.
![]()
TRAVELS WITH BILLYBOB With apologies to Steinbeck, this area of BillyBob's Garage will be used to log the trips BillyBob and I make together.
WORK-IN-PROGRESS is the restoration of parts of BillyBob that I can accomplish without a garage.
PRE-RESTORATION includes log entries of minor repairs and and adventures between time of purchase and the time when I started restoration, a piece at a time.
JR'S KORNER JR's Korner is the history of BillyBob before I got him authored by my brother, Wm. C. Kephart.
![]()
BILLYBOB MAINTENANCE Ever changing detailing, oil change, lube, etc. maintenance routines specifically developed for BillyBob, including required tools, materials and procedures.
STEALTH SHOP Urban residence design with large integrated shop and separate living quarters for a relative or renter.
27. Framework - Halfway Home
December 14th 2002 Good workin' weather today in the shadetree garage. With the springs in place, I think I'm over the hump on the frame work. Gotta attend to spring shackle and U-bolt details yet but the rear half of the frame is almost done. The front part of the frame is 'bout twenty percent and under the cab is practically untouched but I'm creepin' up on it.
 Put
BillyBob's front end up on jackstands, removed the front wheels,
bumper, bumper brackets and splash apron. It's good to see that I'm
consistant . . . the bumper brackets I powdercoated are rusting in
several places. I'll get the powdercoating process down sooner or
later. In the mean time, I'll try another tact with the bumper
brackets. Removed the front spring shackles and began to prep the
driver side frame horn with the scraping, wire brush, and degreasing
treatment, then applied Eastwood's PRE Paint Prep
(#10041Z) and a rattlecan coat of Eastwood's Rust Encapsulator
(#16040Z). I'm low on Eastwood's Undergone Degreaser and I'm not sure
they carry it anymore. One disadvantage I've found is that it eats new
paint as well as grease. It's a windy day so I was a bit more careful
and masked off parts I didn't want painted.
Put
BillyBob's front end up on jackstands, removed the front wheels,
bumper, bumper brackets and splash apron. It's good to see that I'm
consistant . . . the bumper brackets I powdercoated are rusting in
several places. I'll get the powdercoating process down sooner or
later. In the mean time, I'll try another tact with the bumper
brackets. Removed the front spring shackles and began to prep the
driver side frame horn with the scraping, wire brush, and degreasing
treatment, then applied Eastwood's PRE Paint Prep
(#10041Z) and a rattlecan coat of Eastwood's Rust Encapsulator
(#16040Z). I'm low on Eastwood's Undergone Degreaser and I'm not sure
they carry it anymore. One disadvantage I've found is that it eats new
paint as well as grease. It's a windy day so I was a bit more careful
and masked off parts I didn't want painted.
 The
shackle I installed several months ago was showing some corrosion (not
much). I had finished it with Eastwood's Diamond Clear paint for bare
metal parts (#10200Z). Gonna try somethin' different today. Gonna
replace that shackle with the new one I have left over from the new
spring installation. The other front shackle is new enough that it
isn't showing signs of rust yet. Cleaned the four shackle sides with
Simple Green, then hung them up in the tree and applied Eastwood's PRE
Paint Prep. After that a coat of Eastwood's Self Etching Primer
(#16014Z) was applied. The primer should cure for 'bout two hours. Went
back to the frame. Removed masking on the springs and prepped both
sides of frame and springs with PRE 'til I ran out of PRE. finished up
with lacquer thinner and painted with Eastwood's rattlecan Chassis
Black (#10025Z). Went back in the Krash Lab to tin-zinc plate the
shackle bolts and locknuts with Eastwood's Kit (#10049Z). Afterwards,
the bolts and nuts were polished in the tumbler (#43204). At this
point, the shackle sides were given a couple of coats of Eastwood's
Detail Gray acrylic lacquer(#10036Z). Let the shackle sides dry for
awhile, then started putting things back together, Lubed the shackles
and closed up shop. The bumper brackets and bolts will have to wait
'til tomorrow.
The
shackle I installed several months ago was showing some corrosion (not
much). I had finished it with Eastwood's Diamond Clear paint for bare
metal parts (#10200Z). Gonna try somethin' different today. Gonna
replace that shackle with the new one I have left over from the new
spring installation. The other front shackle is new enough that it
isn't showing signs of rust yet. Cleaned the four shackle sides with
Simple Green, then hung them up in the tree and applied Eastwood's PRE
Paint Prep. After that a coat of Eastwood's Self Etching Primer
(#16014Z) was applied. The primer should cure for 'bout two hours. Went
back to the frame. Removed masking on the springs and prepped both
sides of frame and springs with PRE 'til I ran out of PRE. finished up
with lacquer thinner and painted with Eastwood's rattlecan Chassis
Black (#10025Z). Went back in the Krash Lab to tin-zinc plate the
shackle bolts and locknuts with Eastwood's Kit (#10049Z). Afterwards,
the bolts and nuts were polished in the tumbler (#43204). At this
point, the shackle sides were given a couple of coats of Eastwood's
Detail Gray acrylic lacquer(#10036Z). Let the shackle sides dry for
awhile, then started putting things back together, Lubed the shackles
and closed up shop. The bumper brackets and bolts will have to wait
'til tomorrow.
 December
15th 2002 A chilly but
dry start this morning. Put the bumper bolts and bumper bracket bolts,
washers and nuts in the tumbler for a cleaning session. The bumper
brackets were my second powdercoating experience and my second failure.
What went wrong? I don't know but I have my suspicions. My third and
fourth tries are doing better but it's too early to tell for shure. on
the third and fourth attempts, I used a different powder (from Columbia
coatings) and I heated up the parts between prepping and
powdercoating to outgas the cleaning chemicals which is probably more
important.
December
15th 2002 A chilly but
dry start this morning. Put the bumper bolts and bumper bracket bolts,
washers and nuts in the tumbler for a cleaning session. The bumper
brackets were my second powdercoating experience and my second failure.
What went wrong? I don't know but I have my suspicions. My third and
fourth tries are doing better but it's too early to tell for shure. on
the third and fourth attempts, I used a different powder (from Columbia
coatings) and I heated up the parts between prepping and
powdercoating to outgas the cleaning chemicals which is probably more
important.
Cleaned and wire-brushed the bumper brackets. Hung them up in the shadetree and gave the rusty areas a rattlecan coat of Rust Encapsulator after prepping with lacquer thinner. Later the brackets were finished off with three coats of Eastwood's black SEM Trim Paint (#10023Z), then hung up in the shed to be installed next week.
 December
21st 2002 Chilly again
this morning so, I decided to stay in the Krash Lab and tin-zinc plate
the bumper and bumper bracket bolts, nuts and washers while it warms up
outside. The bumper brackets are finished (for the second time) and
ready for installation. After all the hardware was plated, it was
thrown into the tumbler for a polishing session. BillyBob is up at the
warehouse. I'm workin' on Renegade
today. The Jeep gets jealous if I lavish too much attention on the ole
stovebolt.
December
21st 2002 Chilly again
this morning so, I decided to stay in the Krash Lab and tin-zinc plate
the bumper and bumper bracket bolts, nuts and washers while it warms up
outside. The bumper brackets are finished (for the second time) and
ready for installation. After all the hardware was plated, it was
thrown into the tumbler for a polishing session. BillyBob is up at the
warehouse. I'm workin' on Renegade
today. The Jeep gets jealous if I lavish too much attention on the ole
stovebolt.
 March
22nd 2003 Fourth day of
the second Iraq war and a forty percent chance of rain here in the
shadetree garage. I got the TV on inside the Krash Lab and I got a
roofing crew for company because the building next door caught on fire
earlier in the week and they are here to "dry-in" the building. Today's
task, if I don't get rained out, is to work on the front axle and front
U-bolts. Dragged the tools out of the shed and got Billybob's front end
up on jackstands and the front wheels removed. Started scraping
forty-eight years of grease and mud off the front axle. Decided to take
care of one side at a time, passenger side first.
March
22nd 2003 Fourth day of
the second Iraq war and a forty percent chance of rain here in the
shadetree garage. I got the TV on inside the Krash Lab and I got a
roofing crew for company because the building next door caught on fire
earlier in the week and they are here to "dry-in" the building. Today's
task, if I don't get rained out, is to work on the front axle and front
U-bolts. Dragged the tools out of the shed and got Billybob's front end
up on jackstands and the front wheels removed. Started scraping
forty-eight years of grease and mud off the front axle. Decided to take
care of one side at a time, passenger side first.
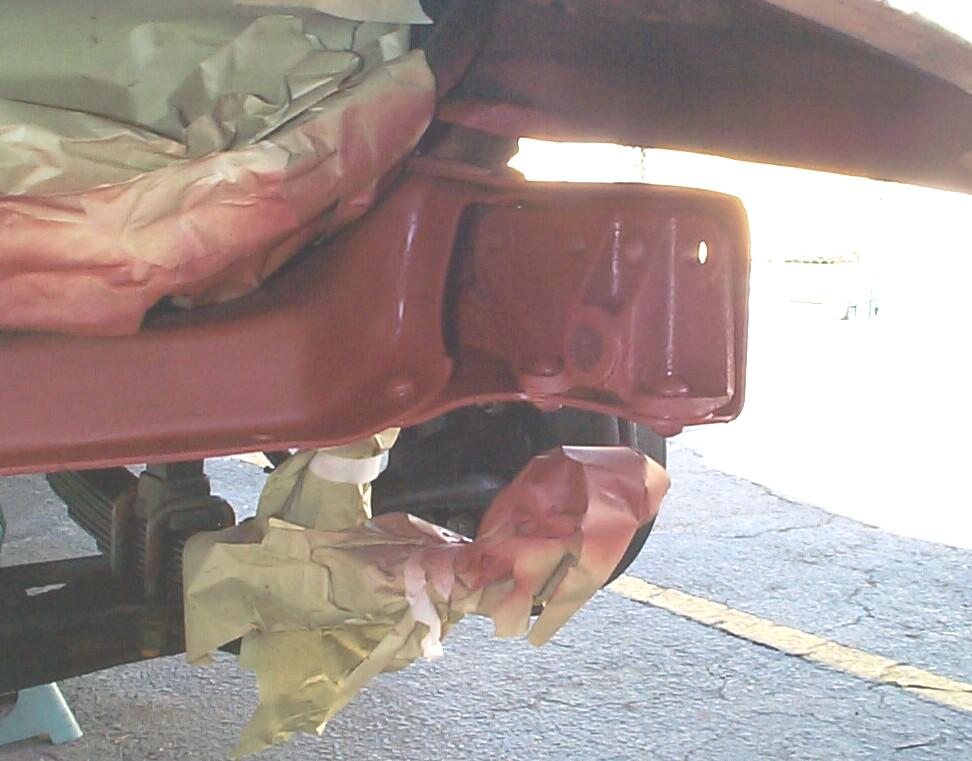
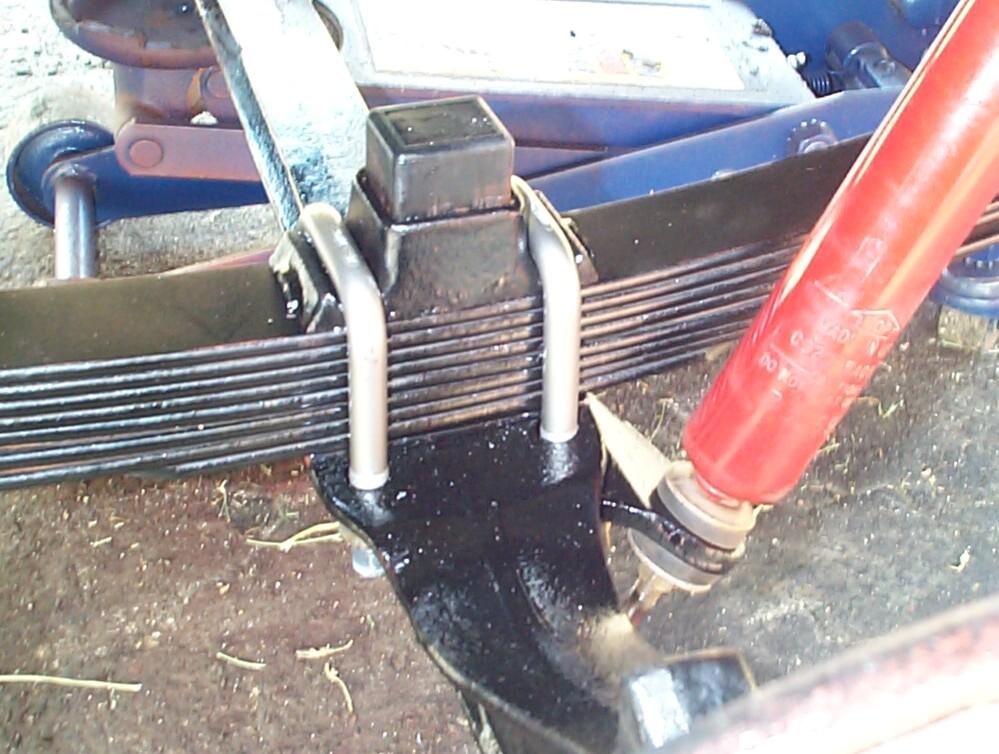
Removed the shock, U-bolts, shock bracket and bumper saddle. Followed up with several iterations of putty knife, wire brush and degreaser. Then an application of PRE Paint Prep and a coat of Rust Encapsulator. While that was setting up, I went on to the axle bumper saddle. The bumper fits tightly into a hole in the saddle. When these new bumpers were installed in November, they would not insert the full distance into the hole and this left a little sandwich of rubber between the springs and the saddles. Today I cut the excess rubber off with a hacksaw so the saddle will seat on the spring when re-assembled. The bumper was then punched out of the saddle and the saddle, shock bracket and one of the caster shims left over from the spring installation were wire brushed, PRE Paint Prepped, and given a rattlecan Rust Encapsulator coat. BillyBob wanders more than he did before the new springs were installed. I think there is more than one reason for this, but caster angle is one of them so, I am putting the caster shims back between the springs and axle (thick edge to the back).
 U-Bolts,
Nuts and shock bracket spacer washers were cleaned with Simple Green
and water, then submerged in Eastwood's OxiSolve (#16027) for thirty
minutes. Gave the passenger side of the axle, the caster shim, the
shock bracket and the bumper saddle a rattlecan coat of Chassis Black.
The U-bolts, spacer washers and hex nuts were given a treatment of PRE
Paint Prep and a coat of Plasticoat Anti-Rust Primer. Then a
thunderhead rolled in from the north and I scrambled to get the tools
and parts under cover to wait out the storm . . . the dark clouds
rumbled and passed over without dumpin' on the shadetree garage. I have
no doubt that if I hadn't moved everything inside, I would'uv been
soaked.
U-Bolts,
Nuts and shock bracket spacer washers were cleaned with Simple Green
and water, then submerged in Eastwood's OxiSolve (#16027) for thirty
minutes. Gave the passenger side of the axle, the caster shim, the
shock bracket and the bumper saddle a rattlecan coat of Chassis Black.
The U-bolts, spacer washers and hex nuts were given a treatment of PRE
Paint Prep and a coat of Plasticoat Anti-Rust Primer. Then a
thunderhead rolled in from the north and I scrambled to get the tools
and parts under cover to wait out the storm . . . the dark clouds
rumbled and passed over without dumpin' on the shadetree garage. I have
no doubt that if I hadn't moved everything inside, I would'uv been
soaked.
 Started
dragging the tools out again and gave the U-Bolts, spacer washers and
hex nuts a couple of coats of Eastwood's Detail Gray lacquer. Watched
the war coverage for an hour and then started putting things back
together again. Something I didn't notice before is that the caster
shim has a location nipple that matches a hole on top of the axle to
help get it positioned correctly. Applied Threadlocker Blue to hex nuts
on both the U-bolts and shock absorber and tightened everything up.
That's it. It's four-thirty and, weather permitting, I'll do the other
side tomorrow.
Started
dragging the tools out again and gave the U-Bolts, spacer washers and
hex nuts a couple of coats of Eastwood's Detail Gray lacquer. Watched
the war coverage for an hour and then started putting things back
together again. Something I didn't notice before is that the caster
shim has a location nipple that matches a hole on top of the axle to
help get it positioned correctly. Applied Threadlocker Blue to hex nuts
on both the U-bolts and shock absorber and tightened everything up.
That's it. It's four-thirty and, weather permitting, I'll do the other
side tomorrow.
March 24th 2003 Got the driver's side done yesterday. The storm clouds hung over me all day but only released a few big drops on the shadetree garage. Pretty much went the same way as the passenger side 'cept faster cause I've been thru the routine once already. The ride improvement surprised me. Adding the caster shims and removing the excess axle bumper rubber "sandwiches" made a big difference.
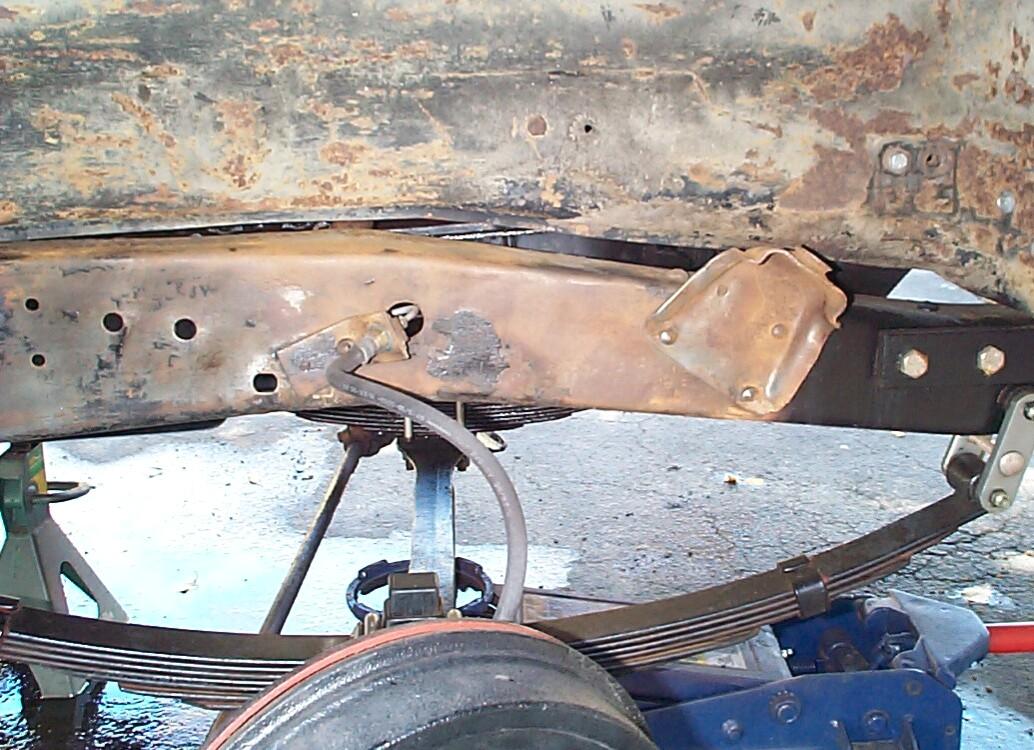
 August
10th 2003 Found some
time to get back to the frame this weekend. As long as the weather
holds anyway. Replacing rear spring shackle frame bushings is next on
the list. There's a slight problem in that the exhaust tail pipe is in
the way on the driver's side. When the friendly guys at Mineke put a
new exhaust system on BillyBob back in May
of '96, they welded everything. Not very pretty, but it
works. As long as I have to mess with it, I'm gonna make it more
original in the process. With this in mind, I ordered a tail pipe
bracket (#94-853) from Chevy Duty. I still gotta get a muffler clamp
before I try to take the tail pipe off, but I got started today by
breaking off the rusted tail pipe bracket frame bolt with a nut
splitter and chisel. Replaced it with a temporary capscrew, washer and
hex nut until I get a proper size connector. Started prepping the new
tail pipe hanger bracket, first with PRE Paint Prep, then with
Eastwood's Self-Etching Primer and finally with a few coats of
Eastwood's Detail Gray.
August
10th 2003 Found some
time to get back to the frame this weekend. As long as the weather
holds anyway. Replacing rear spring shackle frame bushings is next on
the list. There's a slight problem in that the exhaust tail pipe is in
the way on the driver's side. When the friendly guys at Mineke put a
new exhaust system on BillyBob back in May
of '96, they welded everything. Not very pretty, but it
works. As long as I have to mess with it, I'm gonna make it more
original in the process. With this in mind, I ordered a tail pipe
bracket (#94-853) from Chevy Duty. I still gotta get a muffler clamp
before I try to take the tail pipe off, but I got started today by
breaking off the rusted tail pipe bracket frame bolt with a nut
splitter and chisel. Replaced it with a temporary capscrew, washer and
hex nut until I get a proper size connector. Started prepping the new
tail pipe hanger bracket, first with PRE Paint Prep, then with
Eastwood's Self-Etching Primer and finally with a few coats of
Eastwood's Detail Gray.
 August
16th 2003 Had the front
end up in the air and wheels off today for wheelwell cleaning
maintenance so I took the opportunity to clean and paint a bit more of
the frame - the front shock brackets and a couple of feet of frame on
both sides. Power washed with degreaser then used a wire cup in the air
powered angle grinder on the frame and shock brackets. Had to continue
with several iterations of Eastwoods Undergone Heavy Residue Remover
(#31130Z) and putty knife scraping to get it clean enuf to paint.
Finally got to the point where I could mask it off and PRE Paint Prep
it. Then came a coat of rattlecan Rust Encapsulator.
August
16th 2003 Had the front
end up in the air and wheels off today for wheelwell cleaning
maintenance so I took the opportunity to clean and paint a bit more of
the frame - the front shock brackets and a couple of feet of frame on
both sides. Power washed with degreaser then used a wire cup in the air
powered angle grinder on the frame and shock brackets. Had to continue
with several iterations of Eastwoods Undergone Heavy Residue Remover
(#31130Z) and putty knife scraping to get it clean enuf to paint.
Finally got to the point where I could mask it off and PRE Paint Prep
it. Then came a coat of rattlecan Rust Encapsulator.
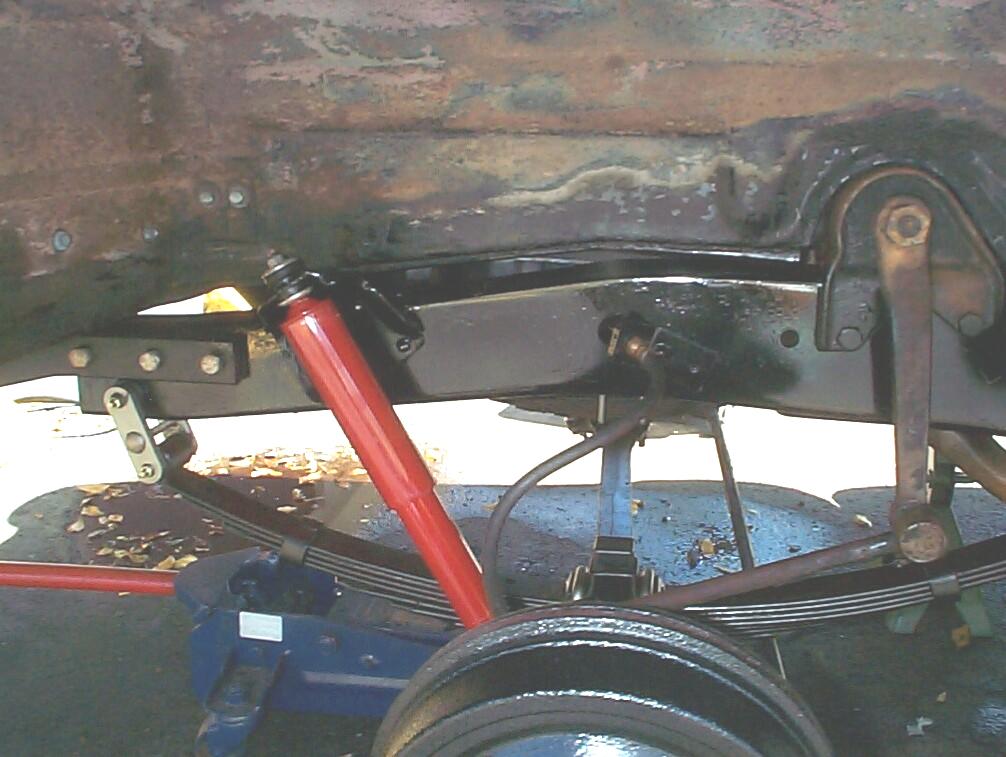 After
an hour, a coat of Chassis Black was applied. Waited a minimum time and
began to reassemble shocks. I noticed that both brake flex lines to the
front wheels had some "bubbles" in the sheathing that felt that there
might be fluid in them. There is no leaking, but this development, I
think, is not good. I'll order replacements soon. Installed a new
voltage regulator while I had good access to both sides of the inner
fender, then replaced the wheels and put BillyBob back on the ground.
After
an hour, a coat of Chassis Black was applied. Waited a minimum time and
began to reassemble shocks. I noticed that both brake flex lines to the
front wheels had some "bubbles" in the sheathing that felt that there
might be fluid in them. There is no leaking, but this development, I
think, is not good. I'll order replacements soon. Installed a new
voltage regulator while I had good access to both sides of the inner
fender, then replaced the wheels and put BillyBob back on the ground.
October 11th 2003 Good working weather today, so far. We were bug-bombing the Krash Lab last night so I had to take my parrot, Wingnut, home for the weekend. It was his first ride in BillyBob and he wore himself out trying to keep his balance on the perch. Wingnut was panting pretty good by the time we got to the Krash Pad. He's 27 which is middle-aged for his species. He was pretty subdued for the rest of the evening. Some people did doubletakes at the sight of an old Chevy truck with a rough Willie Nelson lookalike and a green parrot chuggin' down the road. Not exactly a Big Bird and Waylon Jennings roadtrip, but you get my drift.
Performed some routine chassis degreasing maintenance first today. Noticed a bit of play in the front end a few weeks back and eventually discovered that the hex nuts on the driver side front U-bolt had loosened up to the point that some of the spring leaves were skewed out of place. I tightened them up and today I'm gonna take the U-bolts off and put the leaves back into alignment. Loosened the U-bolts and tapped the leaves back into place with a small sledge hammer. Tightened the U-bolt hex nuts back up again to lowest impact wrench setting. Took U-bolt hex nuts off one-by-one, applied threadlocker blue, then tightened up again to highest impact wrench setting.
 After
that, I went back to the exhaust system. Unbolted the tailpipe bracket,
then proceeded to remove the tailpipe from the muffler. Used the three
inch cutoff wheel to remove the rusted U-bolt type muffler clamp. Setup
the "E-Z Pull" pipe separater tool (#43401) I got from Eastwood to help
remove the tailpipe. Even with this tool, it took a little persuasion
from the MAPP torch to finally get the muffler and tailpipe separated.
After
that, I went back to the exhaust system. Unbolted the tailpipe bracket,
then proceeded to remove the tailpipe from the muffler. Used the three
inch cutoff wheel to remove the rusted U-bolt type muffler clamp. Setup
the "E-Z Pull" pipe separater tool (#43401) I got from Eastwood to help
remove the tailpipe. Even with this tool, it took a little persuasion
from the MAPP torch to finally get the muffler and tailpipe separated.
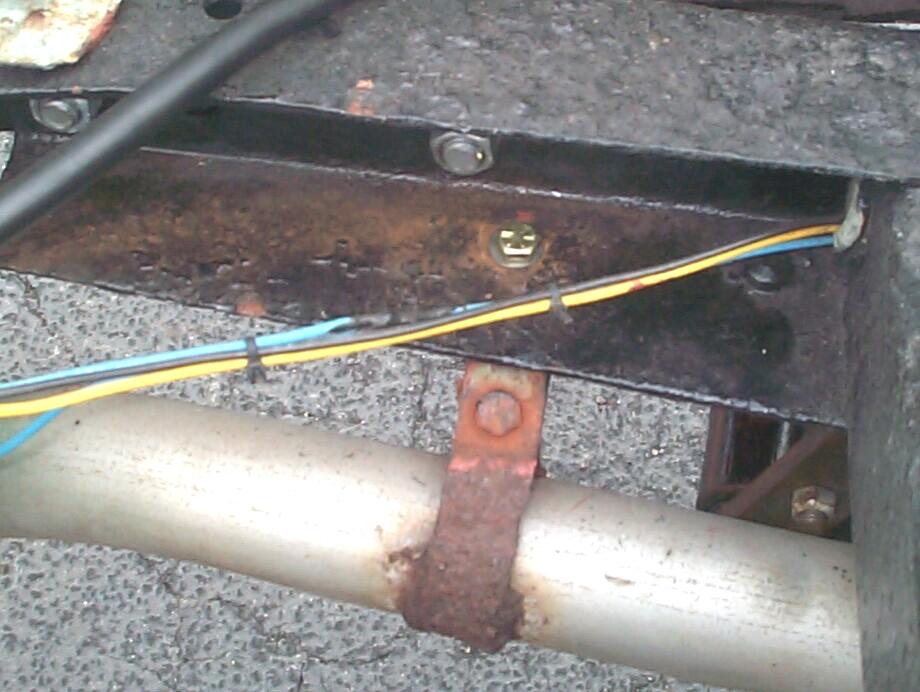
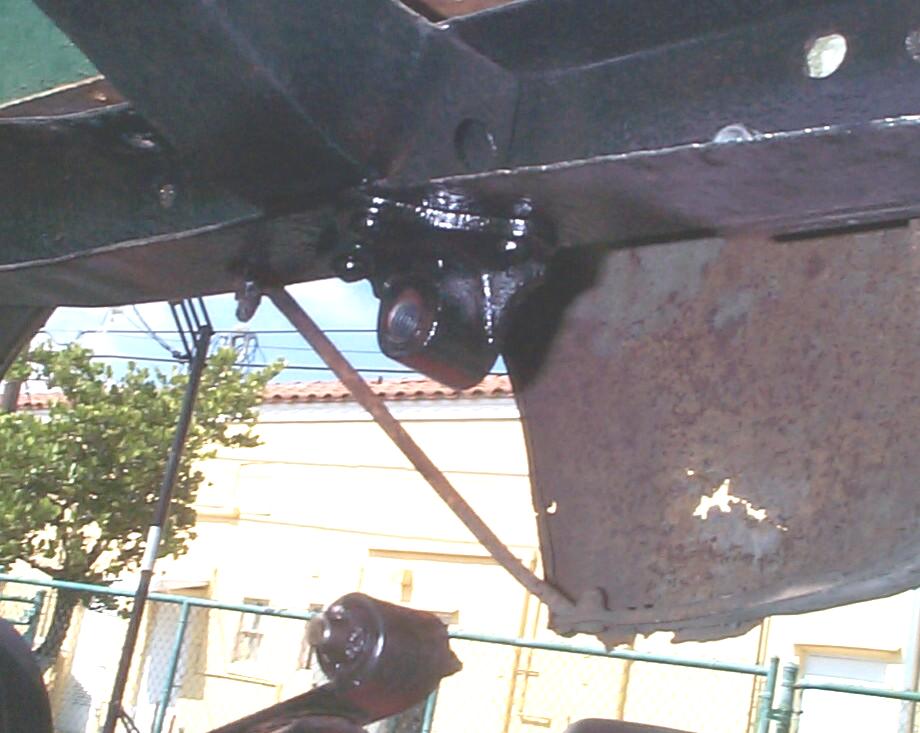
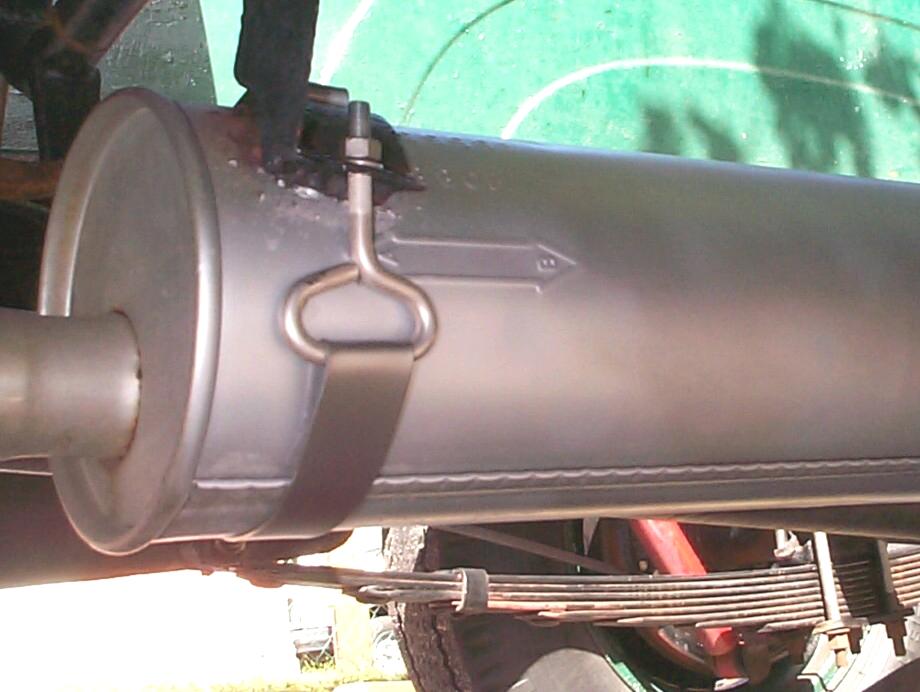
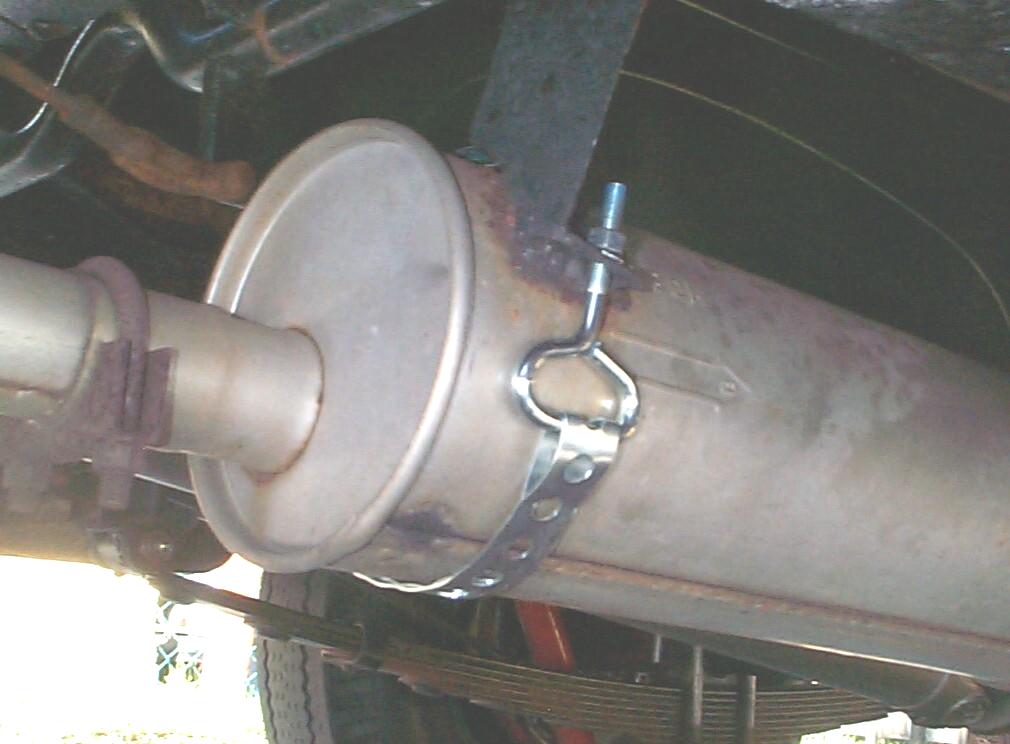 The
tailpipe is going to be off for a few weeks while I change the rear
spring shackle frame bushing. To guard against the muffler weld
breaking and dropping the rest of the system on the ground, a universal
hold down strap that I got at Discount Auto Parts was installed. This
is very close to the original muffler strap indicated in the Factory
Assembly Manual. I'm still looking for a solid strap so it
will be more like the original when I'm finished.
The
tailpipe is going to be off for a few weeks while I change the rear
spring shackle frame bushing. To guard against the muffler weld
breaking and dropping the rest of the system on the ground, a universal
hold down strap that I got at Discount Auto Parts was installed. This
is very close to the original muffler strap indicated in the Factory
Assembly Manual. I'm still looking for a solid strap so it
will be more like the original when I'm finished.
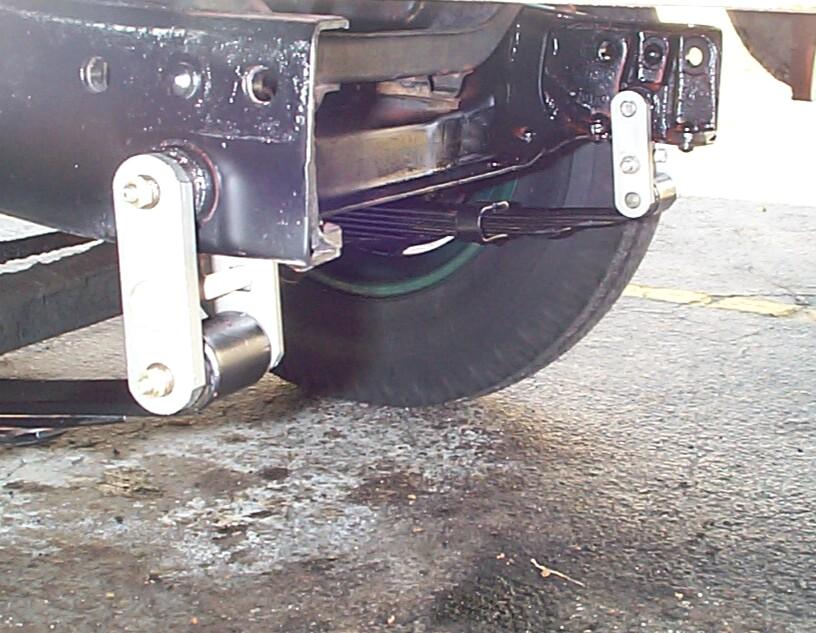
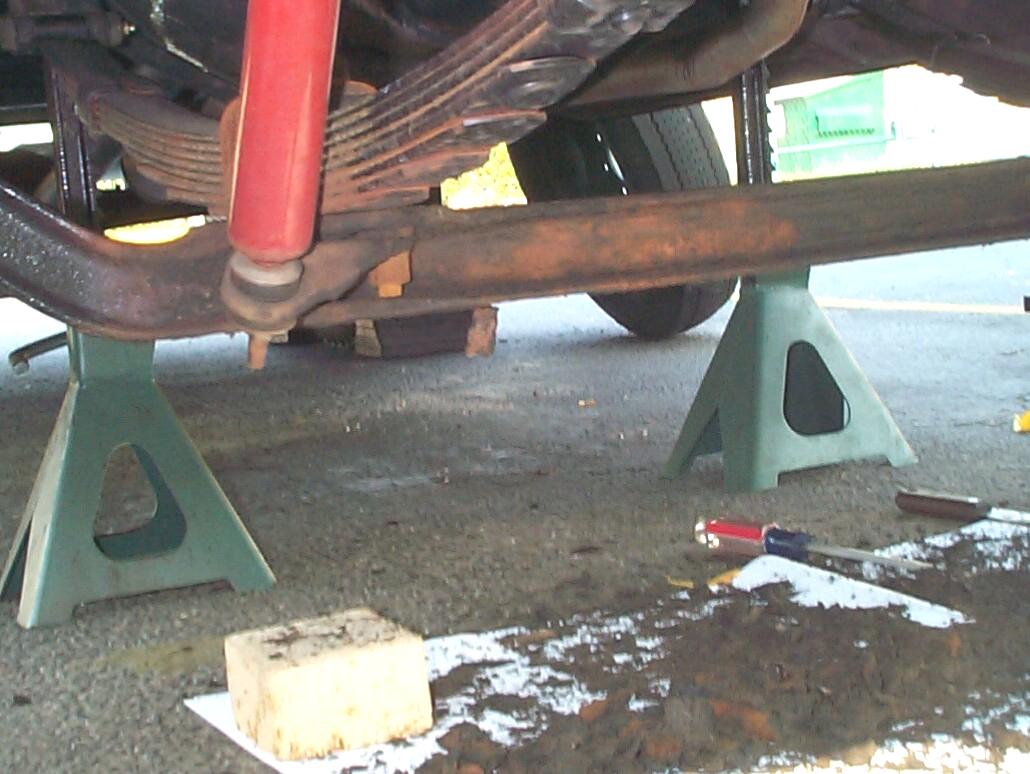
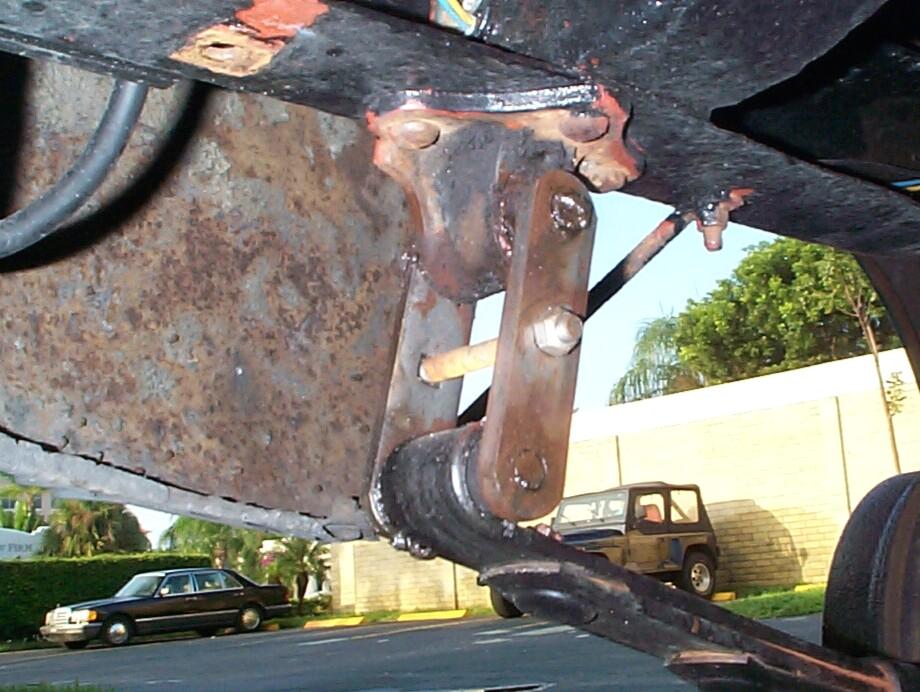 October
18th 2003 Nice weather
today. Breezy and not too hot. Gonna attend to the rear spring
shackles. Started out by jacking up the back of BillyBob and placing
the jackstands under the frame just in front of the rear springs so I
could use the floor jack to move the rear axle assembly up and down.
Took off the rear wheels. Last Thanksgiving, the shackles were
installed "raw" without paint when the springs were installed.
October
18th 2003 Nice weather
today. Breezy and not too hot. Gonna attend to the rear spring
shackles. Started out by jacking up the back of BillyBob and placing
the jackstands under the frame just in front of the rear springs so I
could use the floor jack to move the rear axle assembly up and down.
Took off the rear wheels. Last Thanksgiving, the shackles were
installed "raw" without paint when the springs were installed.
The shackles disassembled without problems and the old shackle pins screwed out of the worn frame bushings easily. These things were so worn that I couldn't get new pins to fit in the old bushings last year when the new springs were installed so I continued to use the old pins until I could press in new bushings. Today's the day. The shackle parts were put in a bucket of Simple Green and water to soak. I put the new bushings in a cup of ice in the freezer this morning first thing to shrink them down a bit if possible.
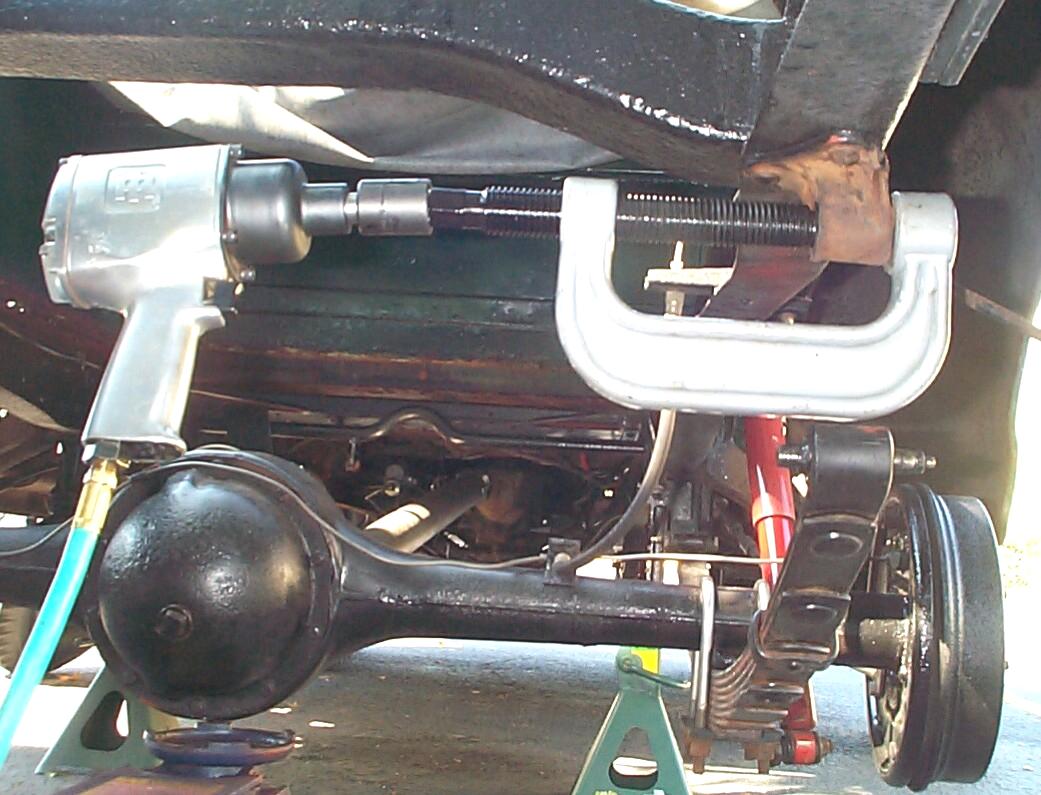 The
frame brackets were given the degreasing and putty knife treatment.
Then they were heated up with the MAPP torch and quenched with a spray
bottle of water to try to loosen up any unnatural grip they might have
on the old bushings. Then the old bushings were removed. I used Harbor
Freight's "3-in-1 Service Kit" (#38335-0VGA) in combination
with my impact wrench for this task and it turned an all-day job,
peppered with cursing, into a half hour job. Drove each bushing half
way out, then stopped long enuf to insert a 5/8" short socket between
the tool and bushing as a spacer since the tool's screw was to big to
fit in the bushing hole. Then, one at a time, each frame bracket was
heated up again with the MAPP torch, the new bushing was removed from
the ice cup and dipped into chassis grease, then started by tapping
lightly into place with a hammer and finally pressed home with the
3-in-1 tool and impact wrench. I didn't even burn myself!
The
frame brackets were given the degreasing and putty knife treatment.
Then they were heated up with the MAPP torch and quenched with a spray
bottle of water to try to loosen up any unnatural grip they might have
on the old bushings. Then the old bushings were removed. I used Harbor
Freight's "3-in-1 Service Kit" (#38335-0VGA) in combination
with my impact wrench for this task and it turned an all-day job,
peppered with cursing, into a half hour job. Drove each bushing half
way out, then stopped long enuf to insert a 5/8" short socket between
the tool and bushing as a spacer since the tool's screw was to big to
fit in the bushing hole. Then, one at a time, each frame bracket was
heated up again with the MAPP torch, the new bushing was removed from
the ice cup and dipped into chassis grease, then started by tapping
lightly into place with a hammer and finally pressed home with the
3-in-1 tool and impact wrench. I didn't even burn myself!
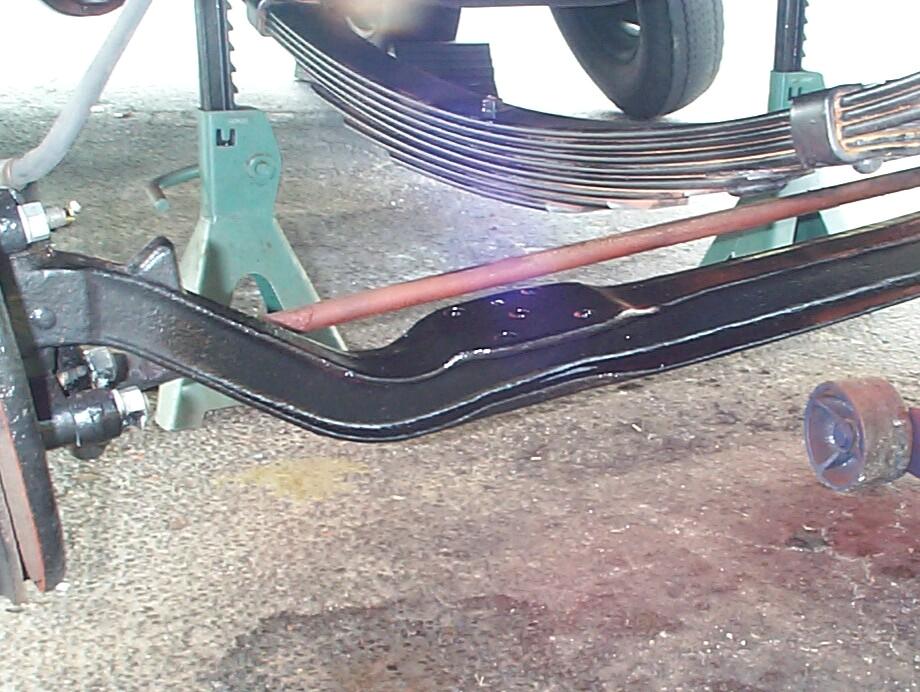
 The
hard part is done. The brackets were masked, wire brushed, PRE Paint
Prepped and given a coat of rattlecan Rust Encapsulator. After an hour,
they got a coat of Chassis Black. Baby steps . . . another small part
of the frame is painted now. It's mid-afternoon and too late to prime
and paint the shackles so that will wait 'til another day. New shackle
pins were threaded into the bushings after being dipped in chassis
grease and the shackles were put back together. Used Threadlocker Blue
on the shackle bolts and snugged them up (8 ftlbs is the spec). Got out
the grease gun and freshened all the rear shackle zerk fittings.
The
hard part is done. The brackets were masked, wire brushed, PRE Paint
Prepped and given a coat of rattlecan Rust Encapsulator. After an hour,
they got a coat of Chassis Black. Baby steps . . . another small part
of the frame is painted now. It's mid-afternoon and too late to prime
and paint the shackles so that will wait 'til another day. New shackle
pins were threaded into the bushings after being dipped in chassis
grease and the shackles were put back together. Used Threadlocker Blue
on the shackle bolts and snugged them up (8 ftlbs is the spec). Got out
the grease gun and freshened all the rear shackle zerk fittings.
October 19th 2003 I don't know if it was a psychosomatic reaction or not, but the ride home yesterday seemed noticably improved. BillyBob's road wander has all but disappeared (on good roads) with the new spring shackle bushings in place. I was not expecting this much difference in the ride but I'm not complaining.
 October
26th 2003 Gained an
hour today (spring ahead, fall back) due to daylight savings time.
Jacked up BillyBob and removed the rear spring shackle sides, bolts and
nuts for finishing. Cleaned the shackle sides with simple green and
water again. Dried them with a clean rag and took the surface rust off
with a wire wheel in the angle grinder. like the front shackles, the
rear shackle sides were hung up in the tree and given a treatment with
Eastwood's PRE Paint Prep. After that a coat of Eastwood's Self Etching
Primer was applied. Today also happened to be the scheduled day for
parking brake maintenance, so the clevis, jamb nuts, and lever bolts
were removed from each side and thrown into the tumbler with the
shackle bolts for a cleaning session. After the cleaning session the
shackle bolts and hex nuts were given the tin-zinc plating treatment
while the shackle sides were given a couple of coats of Eastwood's
Detail Gray Lacquer. After tin-zinc plating, the small parts were
placed in the tumbler again for a polishing session with the walnut
shell media. Getting late by the time the polishing session was over.
Time to re-assemble the parking brakes and shackles and start dragging
the tools back into the shed for another week.
October
26th 2003 Gained an
hour today (spring ahead, fall back) due to daylight savings time.
Jacked up BillyBob and removed the rear spring shackle sides, bolts and
nuts for finishing. Cleaned the shackle sides with simple green and
water again. Dried them with a clean rag and took the surface rust off
with a wire wheel in the angle grinder. like the front shackles, the
rear shackle sides were hung up in the tree and given a treatment with
Eastwood's PRE Paint Prep. After that a coat of Eastwood's Self Etching
Primer was applied. Today also happened to be the scheduled day for
parking brake maintenance, so the clevis, jamb nuts, and lever bolts
were removed from each side and thrown into the tumbler with the
shackle bolts for a cleaning session. After the cleaning session the
shackle bolts and hex nuts were given the tin-zinc plating treatment
while the shackle sides were given a couple of coats of Eastwood's
Detail Gray Lacquer. After tin-zinc plating, the small parts were
placed in the tumbler again for a polishing session with the walnut
shell media. Getting late by the time the polishing session was over.
Time to re-assemble the parking brakes and shackles and start dragging
the tools back into the shed for another week.
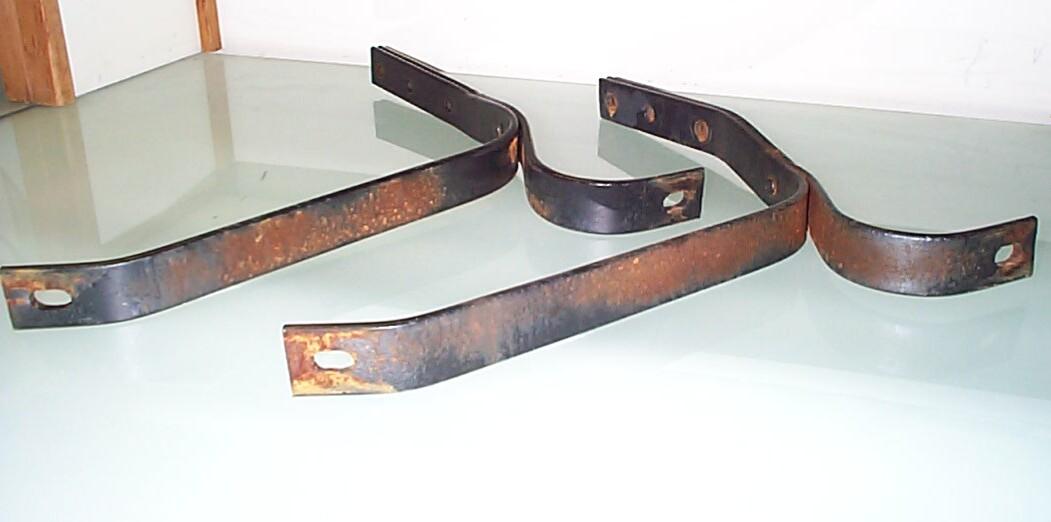
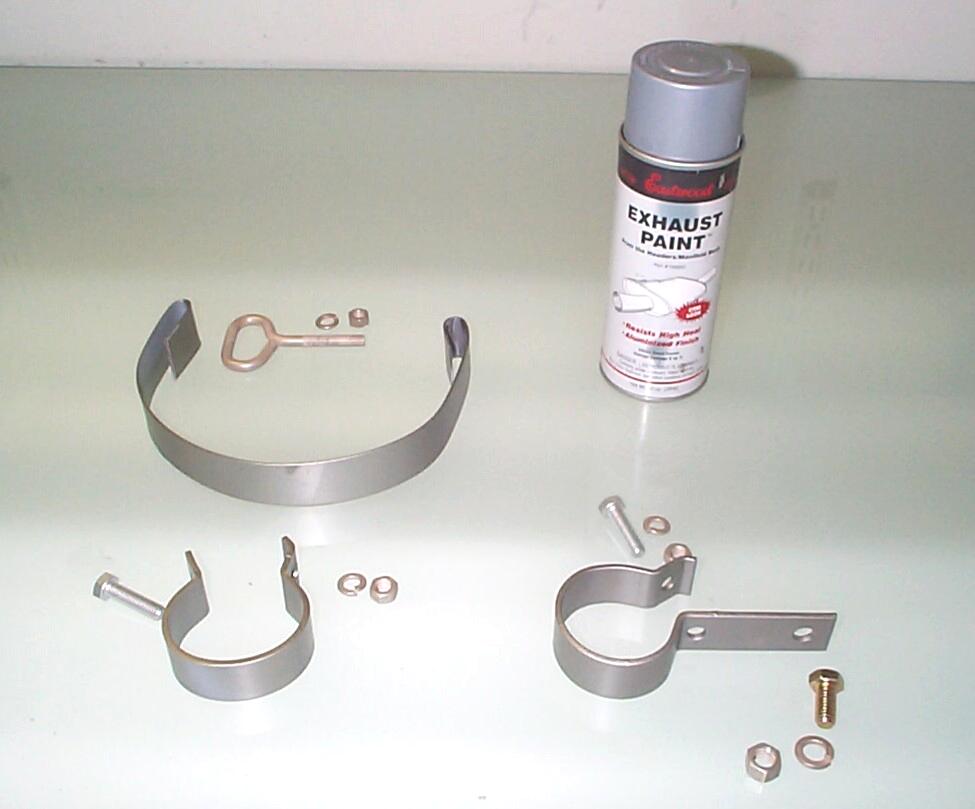
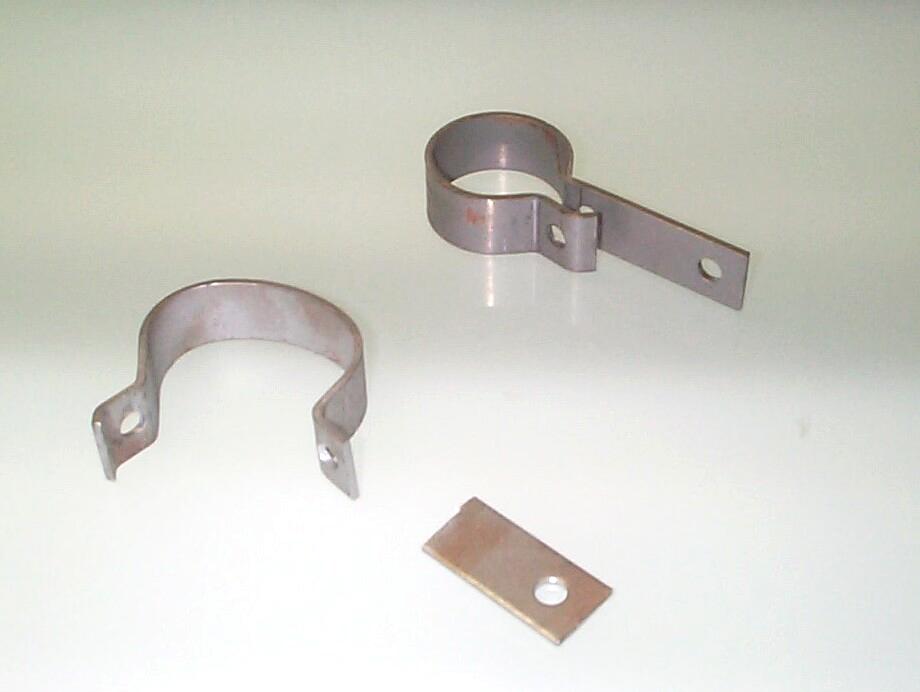 November
1st 2003 Windy, but no
rain so far today. Started out with some monthly maintenance and
chassis washing. Then turned my attention to the exhaust system. I'd
been looking for original type strap muffler clamps for a few weeks
without success . . . decided to make my own. Lucky for me that I let
this thought incubate awhile 'cause it eventually dawned on me that the
muffler clamps were just like the tailpipe hanger strap 'cept that its
leg was a little longer to bolt to the frame. Ordered two more tailpipe
clamps from Chevy Duty and today I cut back the long legs with a
hacksaw, then cleaned up the cut ends with my electric grinder.
November
1st 2003 Windy, but no
rain so far today. Started out with some monthly maintenance and
chassis washing. Then turned my attention to the exhaust system. I'd
been looking for original type strap muffler clamps for a few weeks
without success . . . decided to make my own. Lucky for me that I let
this thought incubate awhile 'cause it eventually dawned on me that the
muffler clamps were just like the tailpipe hanger strap 'cept that its
leg was a little longer to bolt to the frame. Ordered two more tailpipe
clamps from Chevy Duty and today I cut back the long legs with a
hacksaw, then cleaned up the cut ends with my electric grinder.
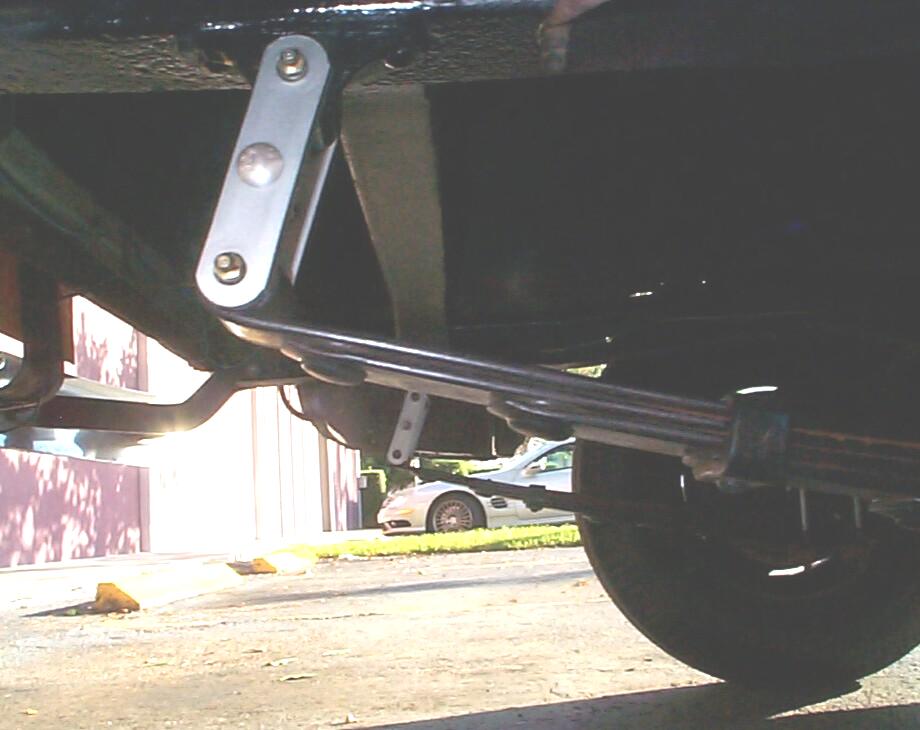
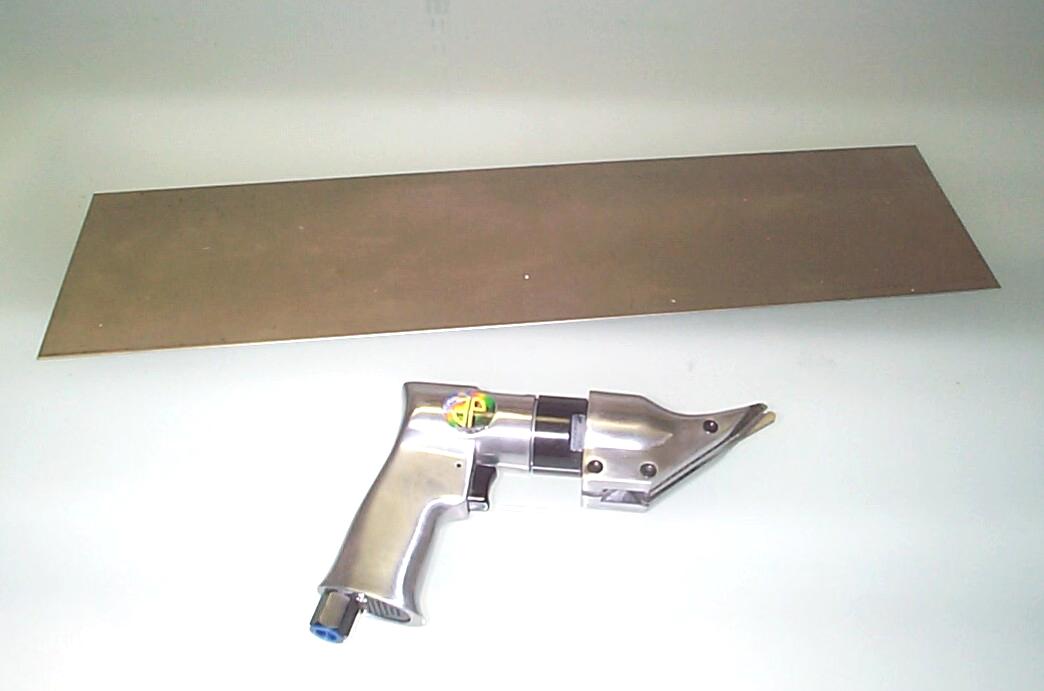 I
also had trouble finding a solid strap to support the muffler so I
ordered a 6" by 24" by 1/16" piece of steel from McMaster-Carr.
Also got an air powered shear (#28118) from Eastwood this week that
will handle steel up to 1/16" thick. Measured and C-clamped the steel
to the Decker Workmate with a strip of wood to act as a guide. The air
shear worked well but I did get away from the guide a bit in one place
as I tried to learn how to use the tool. Good enuf for govment work
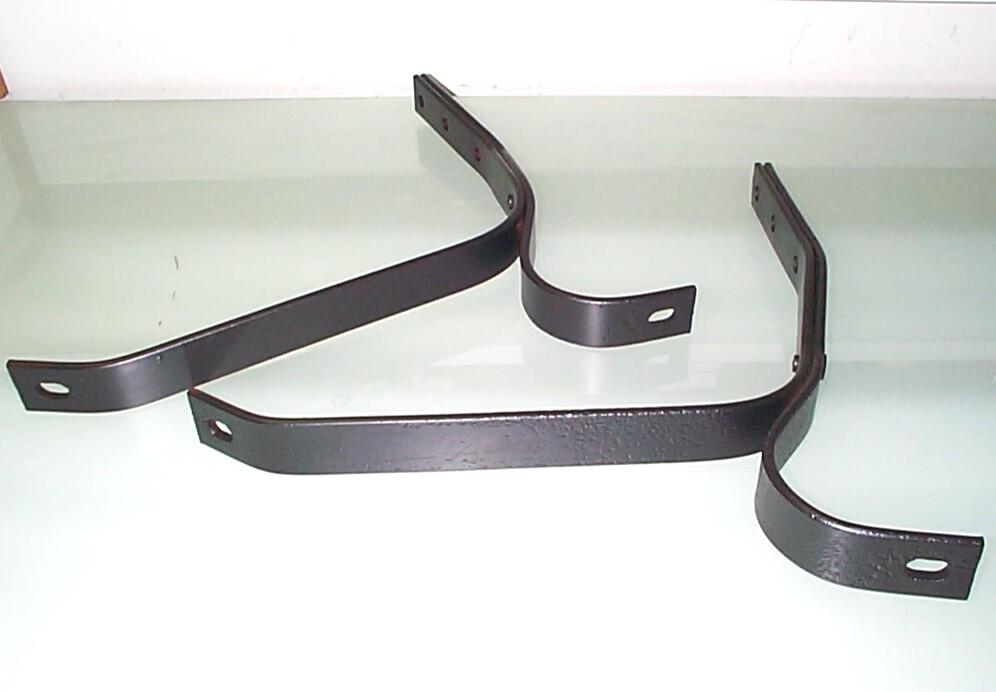
tho' and I'm not starting over. Took the perforated strap off the
muffler and used it as a template to bend the new strap. Hung the new
strap and pipe clamps up in the tree for a PRE Paint Prep treatment and
a coat of Eastwoods Self-etching Primer.
I
also had trouble finding a solid strap to support the muffler so I
ordered a 6" by 24" by 1/16" piece of steel from McMaster-Carr.
Also got an air powered shear (#28118) from Eastwood this week that
will handle steel up to 1/16" thick. Measured and C-clamped the steel
to the Decker Workmate with a strip of wood to act as a guide. The air
shear worked well but I did get away from the guide a bit in one place
as I tried to learn how to use the tool. Good enuf for govment work
tho' and I'm not starting over. Took the perforated strap off the
muffler and used it as a template to bend the new strap. Hung the new
strap and pipe clamps up in the tree for a PRE Paint Prep treatment and
a coat of Eastwoods Self-etching Primer.
While waiting for the primer to set up, the tailpipe was freed from it's old, welded on, rusted bracket with my electric grinder. Then the whole tailpipe was cleaned up with a wire wheel in the air powered angle grinder. The clamps were then finished off with a couple of coats of Eastwood's Detail Gray. Startin' to get dark - time to wrap it up for the day.
 November
2nd 2003 Another windy
day. Started out by trying to straighten the muffler outlet pipe a bit
with a body hammer and using a big socket as a dolly. There was a
crease in it from the old u-bolt type muffler clamp and I didn't want
to have as much trouble getting the tailpipe back in as I had getting
it out. After the tailpipe was in, the frame muffler bracket was masked
off and the muffler was gone over with a 3M Scuff Pad. Painted the
muffler and tailpipe with Eastwood's Exhaust Paint (#10020Z). This was
a bit problematic due to the wind, the close quarters, and a sputtering
rattlecan. Hard to get an even coat and I spent a few minutes
afterwards with the lacquer thinner removing spatters from other
painted surfaces.
November
2nd 2003 Another windy
day. Started out by trying to straighten the muffler outlet pipe a bit
with a body hammer and using a big socket as a dolly. There was a
crease in it from the old u-bolt type muffler clamp and I didn't want
to have as much trouble getting the tailpipe back in as I had getting
it out. After the tailpipe was in, the frame muffler bracket was masked
off and the muffler was gone over with a 3M Scuff Pad. Painted the
muffler and tailpipe with Eastwood's Exhaust Paint (#10020Z). This was
a bit problematic due to the wind, the close quarters, and a sputtering
rattlecan. Hard to get an even coat and I spent a few minutes
afterwards with the lacquer thinner removing spatters from other
painted surfaces.
 Setup
the Tin-Zinc Plating Kit and plated the muffler clamp hardware next.
Put the plated parts in the tumbler for a polishing session and did
some frame touch-ups with Eastwood's Chassis Black and a 1" brush. When
assembly commenced, everything went smoothly with my home-built muffler
strap. The clamps were another story. In the Factory Assembly Manual,
the clamps are shown with the clamp ends coming together fairly tight.
With BillyBob's tailpipe and the repop clamps, there is still about a
3/4" gap between the clamp ears when the clamp is tight against the
pipe. This means I mis-calculated the length of the clamp bolts I
ordered from McMaster-Carr (5/16" - 18 x 1-1/4"). Gonna have to get 2"
long bolts this week coming up before I can finish this job.
Setup
the Tin-Zinc Plating Kit and plated the muffler clamp hardware next.
Put the plated parts in the tumbler for a polishing session and did
some frame touch-ups with Eastwood's Chassis Black and a 1" brush. When
assembly commenced, everything went smoothly with my home-built muffler
strap. The clamps were another story. In the Factory Assembly Manual,
the clamps are shown with the clamp ends coming together fairly tight.
With BillyBob's tailpipe and the repop clamps, there is still about a
3/4" gap between the clamp ears when the clamp is tight against the
pipe. This means I mis-calculated the length of the clamp bolts I
ordered from McMaster-Carr (5/16" - 18 x 1-1/4"). Gonna have to get 2"
long bolts this week coming up before I can finish this job.
 November
8th 2003 We had a rain
of bibical proportions earlier in the week but the weather is pretty
good so far today under the shadetree. Longer 2" capscrews arrived from
McMaster-Carr earlier in the week and they were installed first on the
rear muffler clamp and the tailpipe clamp. Took off the old u-bolt type
front muffler clamp with the 3" air cut-off wheel next. about thirty
inches of exhaust pipe forward of the muffler was prepped first with a
3M Scuff Pad followed by PRE Paint Prep and finally by a coat of
Exhaust Paint. Tin-zinc plated another muffler clamp nut and lock
washer, then polished them in the tumbler, then assembled the forward
muffler pipe clamp.
November
8th 2003 We had a rain
of bibical proportions earlier in the week but the weather is pretty
good so far today under the shadetree. Longer 2" capscrews arrived from
McMaster-Carr earlier in the week and they were installed first on the
rear muffler clamp and the tailpipe clamp. Took off the old u-bolt type
front muffler clamp with the 3" air cut-off wheel next. about thirty
inches of exhaust pipe forward of the muffler was prepped first with a
3M Scuff Pad followed by PRE Paint Prep and finally by a coat of
Exhaust Paint. Tin-zinc plated another muffler clamp nut and lock
washer, then polished them in the tumbler, then assembled the forward
muffler pipe clamp.
 Another
thing I wanted to take care of today is the spring U-bolt ends. The
Detail Gray paint on both the front and rear U-bolts is holding up well
and I don't think they will have to come apart again anytime soon. The
bolt ends and hex nuts are rusted tho' and I want to paint them Detail
Gray also. Found a small plastic measuring cup with a flat tab handle
flush with the top of the cup. Filled the measuring cup with Eastwood's
OxiSolve, placed it over one of the U-bolt ends and clamped the handle
to the shock mounting plate to keep the bolt end submerged for thirty
minutes. This routine was then repeated for the other seven bolt ends
on the rear U-bolts.
Another
thing I wanted to take care of today is the spring U-bolt ends. The
Detail Gray paint on both the front and rear U-bolts is holding up well
and I don't think they will have to come apart again anytime soon. The
bolt ends and hex nuts are rusted tho' and I want to paint them Detail
Gray also. Found a small plastic measuring cup with a flat tab handle
flush with the top of the cup. Filled the measuring cup with Eastwood's
OxiSolve, placed it over one of the U-bolt ends and clamped the handle
to the shock mounting plate to keep the bolt end submerged for thirty
minutes. This routine was then repeated for the other seven bolt ends
on the rear U-bolts.
 November
9th 2003 I was making
painting masks for the U-bolt ends yesterday when the rains hit (Miami
got almost 4 inches in six hours). I secured the Krash Lab and went
home in the Renegade. We're expecting more of the same today but, so
far, it's clear skys. I finished my cardboard mask and taped it in
place on the passenger side shock mount. Gave the bolt ends a coat of
Plasti-kote Anti-Rust Primer, then two coats of Detail Gray. Afterwards
the mask was flipped and moved to the driver side shock mount for the
same process.
November
9th 2003 I was making
painting masks for the U-bolt ends yesterday when the rains hit (Miami
got almost 4 inches in six hours). I secured the Krash Lab and went
home in the Renegade. We're expecting more of the same today but, so
far, it's clear skys. I finished my cardboard mask and taped it in
place on the passenger side shock mount. Gave the bolt ends a coat of
Plasti-kote Anti-Rust Primer, then two coats of Detail Gray. Afterwards
the mask was flipped and moved to the driver side shock mount for the
same process.
Well, that's enuf for one log entry. Will continue with front u-bolt ends, exhaust pipe and spare tire carrier in the next frame work episode. More cowl vent work, windshield replacement and other cab leak repairs are coming up soon. Bodywork, continuing brake and electrical adventures are ahead too. Tuesday is Veterans Day. Remember them.
| < Back
to Intro |
You can email me at ![]() webmaster@laroke.com
webmaster@laroke.com
Issued Sunday November 9, 2003
Updated Monday February 19, 2018
copyright © 1996-2018 Larry Robert Kephart all rights reserved
| | LRK Home | | Bio Info | | Krash Khronicles | | LAROKE | |
| | BettyLou | | BillyBob's Garage | | Rat Patrol | | Deerslayer | | Elvira | |
| | Land of the Free and Home of the Brave | |
| | Keppylou's Art | | WWI Soldier's Diary | |