| | LRK Home | | Bio Info | | Krash Khronicles | | LAROKE | |
| | BettyLou | | BillyBob's Garage | | Rat Patrol | | Deerslayer | | Elvira | |
| | Land of the Free and Home of the Brave | |
| | Keppylou's Art | | WWI Soldier's Diary | |
BillyBob Work-in-Progress Log
![]()
TRUCK LINKS including vendor sites for old parts, custom parts, and tools as well as sites for classic car and truck organizations
STORE Operating in association with Amazon.com, books, recordings and tools can be purchased.
PLANNING for the restoration including project schedule and cost estimates.
![]()
WORK-IN-PROGRESS is the restoration of parts of BillyBob that I can accomplish without a garage.
PRE-RESTORATION includes log entries of minor repairs and and adventures between time of purchase and the time when I started restoration, a piece at a time.
JR'S KORNER JR's Korner is the history of BillyBob before I got him authored by my brother, Wm. C. Kephart.
![]()
BILLYBOB MAINTENANCE Ever changing detailing, oil change, lube, etc. maintenance routines specifically developed for BillyBob, including required tools, materials and procedures.
16. Frame Job: The beat goes on
February 10th 2002 Rain and another downtown festival slowed me down this weekend somewhat. In Jim Richardson's book "Engine and Chassis Detailing", he lists the color schemes for tri-five chevs ('55, '56 and '57 model years). I don't have the Chevrolet Restoration Kit from General Motors, but BillyBob will never be invited to Pebble Beach so this list will be close enuf for me for most items. The list indicates the driveshaft and universal joints to be unpainted. I ordered a rattlecan of "Detail Gray" (Part #1246Z) and Corroless which has been reformulated and now goes by the moniker "Rust Encapsulator" (#16040Z) from Eastwood. The Detail Gray is a fast drying acrylic lacquer. It is supposed to restore the "original color of machined steel and rough cast aluminum". It looks like silver paint to me.
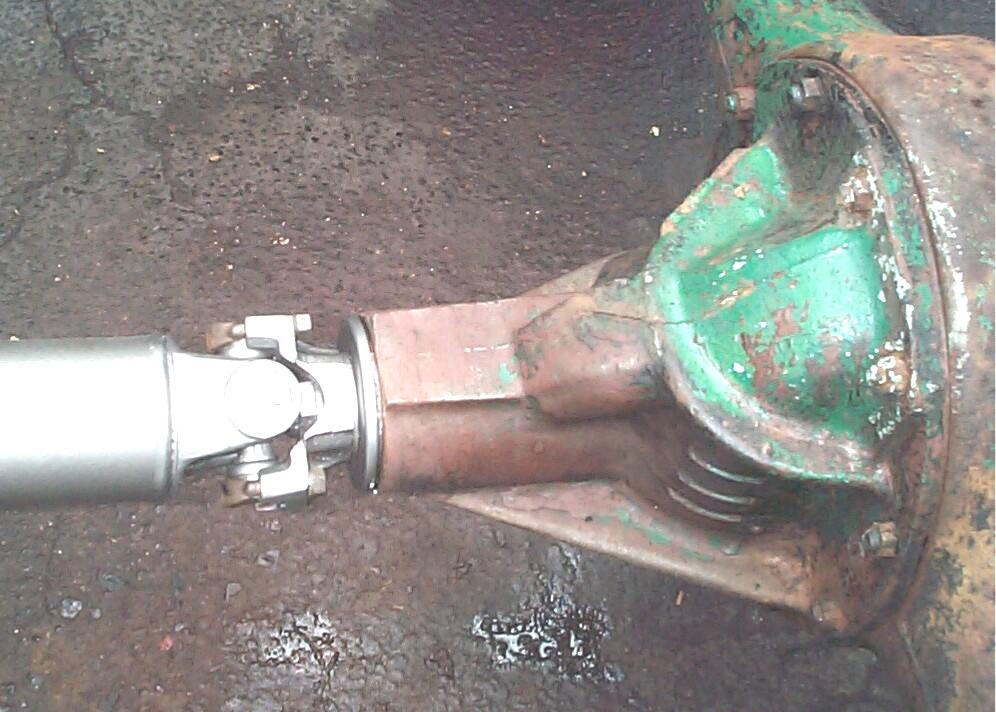 I
painted over the chassis black I applied to the driveshaft a few weeks
ago with the detail gray. The differential pinion trunion was also
cleaned and painted, first with "Rust Encapsulator", then with "Detail
Gray". I've been debating with myself over replacing the pinon seal for
sometime because the last time I put gear oil in the differential, it
seemed to drip out in short order. A week ago, I topped off the gear
oil again, but there is no longer any sign of leaking. I'm a bit
confused, but one of the "Shop Sharks" on the Stovebolt.com
forums mentioned that a clogged vent on the axle housing could allow
pressure to build up and force oil out. I think possibly one of my
degreasing operations may have cleared the vent and that's why I'm not
losing gear oil anymore. Changing the pinon seal is a bit tricky for
first timers like myself so I'm going to leave it alone for now.
I
painted over the chassis black I applied to the driveshaft a few weeks
ago with the detail gray. The differential pinion trunion was also
cleaned and painted, first with "Rust Encapsulator", then with "Detail
Gray". I've been debating with myself over replacing the pinon seal for
sometime because the last time I put gear oil in the differential, it
seemed to drip out in short order. A week ago, I topped off the gear
oil again, but there is no longer any sign of leaking. I'm a bit
confused, but one of the "Shop Sharks" on the Stovebolt.com
forums mentioned that a clogged vent on the axle housing could allow
pressure to build up and force oil out. I think possibly one of my
degreasing operations may have cleared the vent and that's why I'm not
losing gear oil anymore. Changing the pinon seal is a bit tricky for
first timers like myself so I'm going to leave it alone for now.
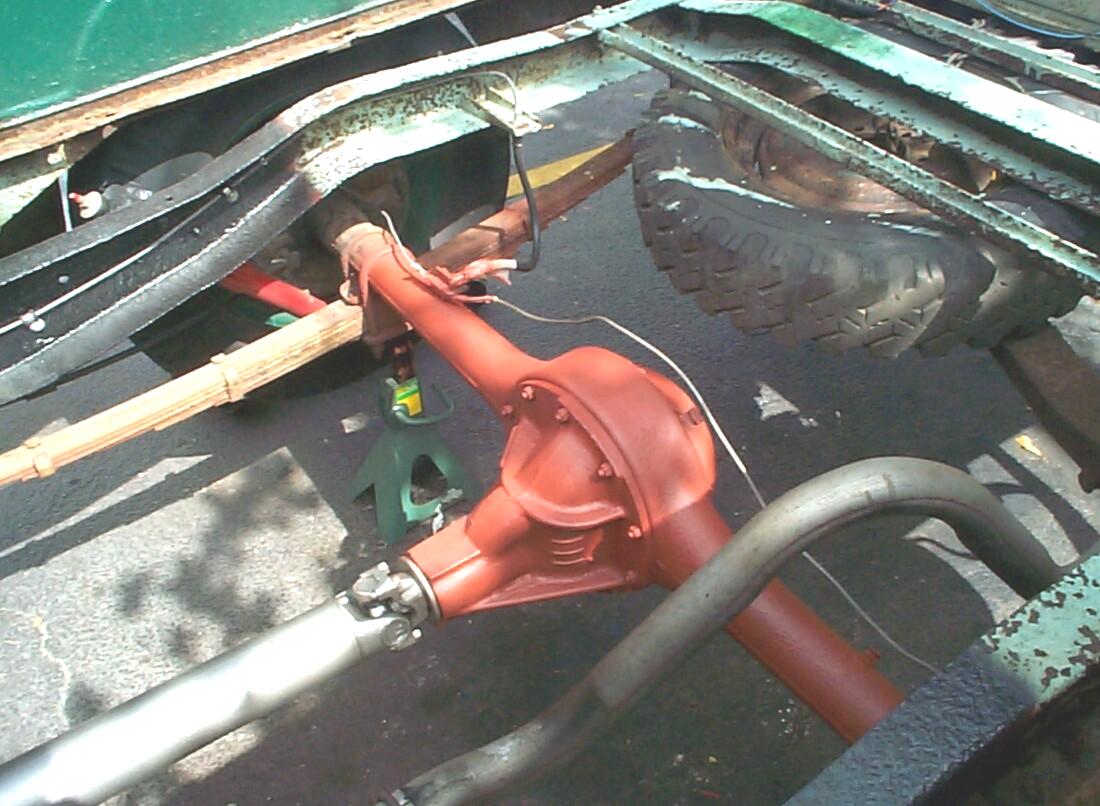 March
2nd 2002 After two
weekends of bad weather, today is perfect, if a little breezy. I
decided to paint the rear axle between the spring mounts. Jacked up the
rear end and went thru a few iterations of degreasing, scraping and
wire brushing. Finished up with PRE paint prep and masking off the
brake line fittings on top of the rear axle. Gave the rear axle a
rattlecan coat of Eastwood's Rust Encapsulator (Corroless) trying to
avoid the brake lines as much as possible. Afterwards, I cleaned the
overspray off the brake lines with lacquer thinner.
March
2nd 2002 After two
weekends of bad weather, today is perfect, if a little breezy. I
decided to paint the rear axle between the spring mounts. Jacked up the
rear end and went thru a few iterations of degreasing, scraping and
wire brushing. Finished up with PRE paint prep and masking off the
brake line fittings on top of the rear axle. Gave the rear axle a
rattlecan coat of Eastwood's Rust Encapsulator (Corroless) trying to
avoid the brake lines as much as possible. Afterwards, I cleaned the
overspray off the brake lines with lacquer thinner.
 Let
the Rust Encapsulator cure for ninety minutes. The differential carrier
on the tri-five chevies was either unfinished or "red lead" and the
axle housing was black. Rust Encapsulator looks enuf like red lead to
me, so the gear carrier was masked off and the rest was rattlecan
sprayed with Eastwood's chassis Black. This time it was the Chassis
Black rattlecan that clogged up before the ~!@#$%^
can was empty. After the Chassis Black setup a bit, the masking was
removed and the lacquer thinner treatment given to the brake lines
again.
Let
the Rust Encapsulator cure for ninety minutes. The differential carrier
on the tri-five chevies was either unfinished or "red lead" and the
axle housing was black. Rust Encapsulator looks enuf like red lead to
me, so the gear carrier was masked off and the rest was rattlecan
sprayed with Eastwood's chassis Black. This time it was the Chassis
Black rattlecan that clogged up before the ~!@#$%^
can was empty. After the Chassis Black setup a bit, the masking was
removed and the lacquer thinner treatment given to the brake lines
again.
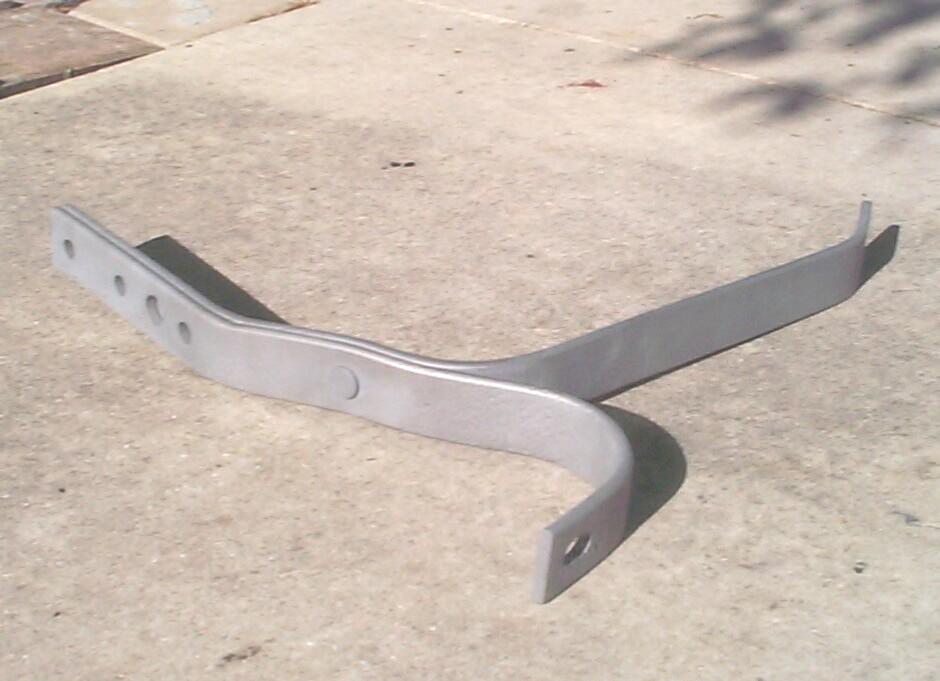
March 3rd 2002 While I had BillyBob's front end up in the air today to lube all the chassis zerk fittings, I decided to take a shot at removing one of the front bumper bracket bolts so I could measure it and order some new ones. I selected the center one on the driver side (there are three on each side) because it had been covered with grease and had the best chance of not being frozen with rust. It was also accessible to the impact wrench (a rare occasion). The impact wrench made short work of it. The bolt turns out to be 2" long (excluding hex head), has 1/2" x 20 threads on 1-3/8" of the shaft and fits a 3/4" socket.
 March
9th 2002 It's
mid-morning an' I'm half way thru replacing the front passenger side
spring shackle and bushings. Right now I'm winded and writing this
while I catch my breath. Back when I first mentioned the dubious
condition of this shackle I got an e-mail from Randy Park:
March
9th 2002 It's
mid-morning an' I'm half way thru replacing the front passenger side
spring shackle and bushings. Right now I'm winded and writing this
while I catch my breath. Back when I first mentioned the dubious
condition of this shackle I got an e-mail from Randy Park:
Sir Don't take a chance. Just replace the bolts on the shackle. You sure don't wont it to come apart on you. I KNOW! It hurts like hell. Only miner body damage. And a bent front axle. Regards Randy Park
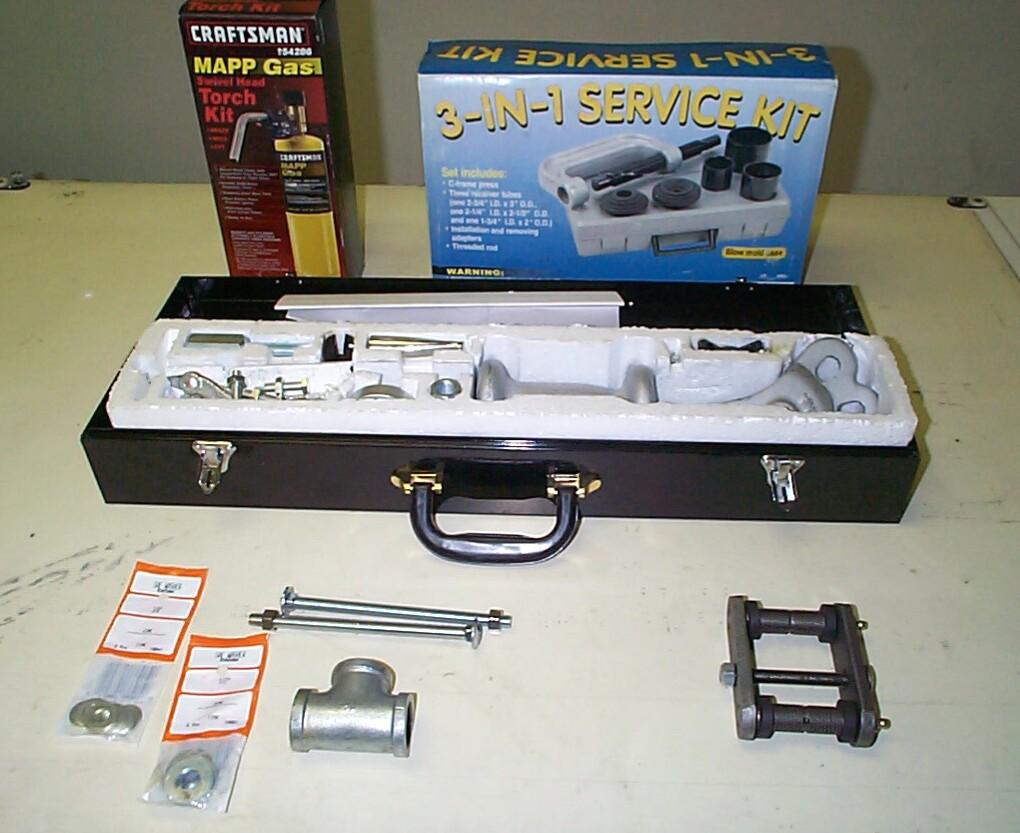
I took Randy seriously and ordered the shackle. I've been a bit afraid of this job so, I've been gathering every chassis tool I can think of to make it go as smoothly as possible. Whatever tools I don't use, I plan to spread out around BillyBob as talismans to ward off Murphy. I got Harbor Freight's "3-in-1 Service Kit" and "17 pc Slide Hammer Kit" when they were on sale. I got a big hammer from Home Depot along with the parts needed to construct Boyo's homemade bushing puller. I already had my MAPP torch from Sears. The replacement shackle came from Chevy Duty.
Luck was with me or the talismans worked . . . I don't care which. It was a great day under the shadetree except for some big blackbirds who kept dropping ballast on BillyBob's hood then set up a ruckus to let me know of their fowl deeds. The old shackle came apart easily and the spring did not move out of alignment. That's GOOD. Both shackle pins moved freely and screwed out of the bushings without effort. That's real GOOD. I tried Boyo's puller on the upper bushing next. It worked until the old bushing was about an eighth of an inch out. Then the bolt started turning with the nut and I couldn't figure an easy way to stabilize it.
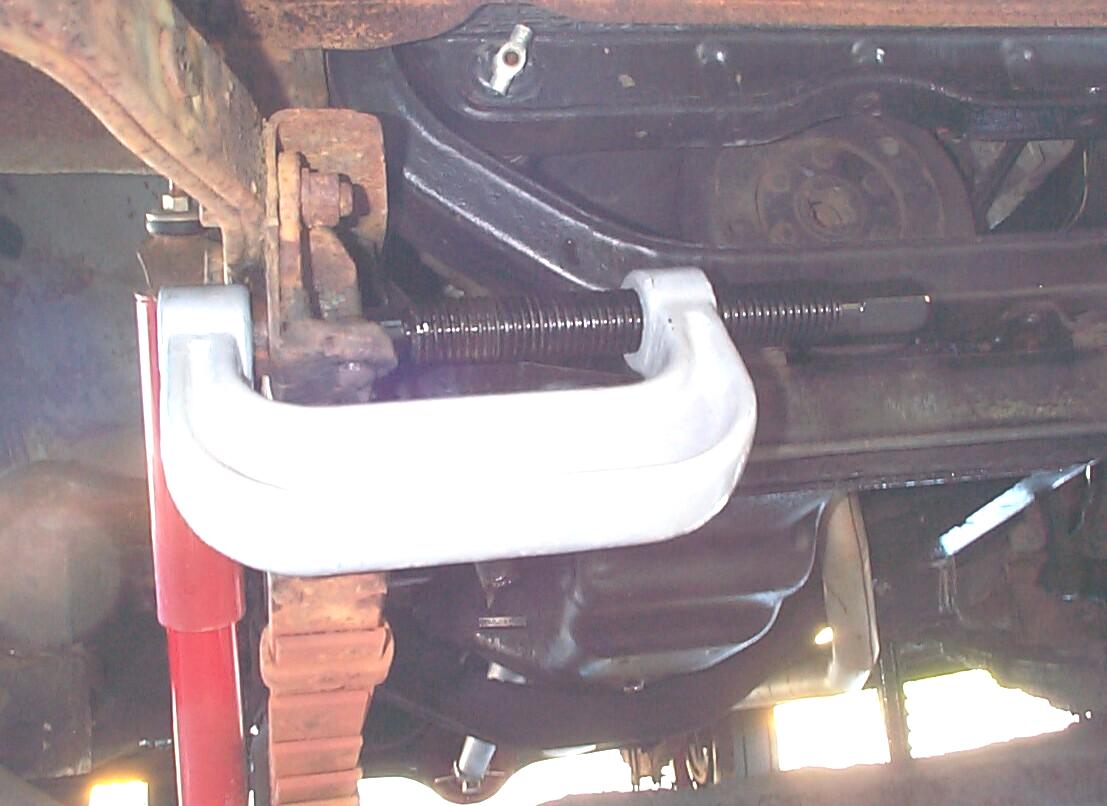 I
tried the "3-in-1 Service Kit" next. This tool turned out to be perfect
for the job. The end of the "forcing screw" turned out to be a smigeon
smaller than the outside diameter of the bushing. I positioned the
C-housing and snugged the screw up. Then I used the impact wrench to
rotate the forcing screw down 'til the bushing was about half way out.
I couldn't go any farther 'cause the forcing screw helix was bigger in
diameter than the bushing hole. I backed the gadget off and put a 5/8"
socket between it and the bushing. This was enuf to get the job done.
The lower bushing in the spring eye was done the same way in a few
minutes. Then the area was degreased.
I
tried the "3-in-1 Service Kit" next. This tool turned out to be perfect
for the job. The end of the "forcing screw" turned out to be a smigeon
smaller than the outside diameter of the bushing. I positioned the
C-housing and snugged the screw up. Then I used the impact wrench to
rotate the forcing screw down 'til the bushing was about half way out.
I couldn't go any farther 'cause the forcing screw helix was bigger in
diameter than the bushing hole. I backed the gadget off and put a 5/8"
socket between it and the bushing. This was enuf to get the job done.
The lower bushing in the spring eye was done the same way in a few
minutes. Then the area was degreased.
 So
far, so good. I had put the new bushings in the Krash Lab freezer
before going home last nite to shrink them down a bit. Now, I heated
the upper bushing bracket with the MAPP torch to expand it some. Took
the first bushing from the freezer and slathered it with some chassis
grease. Well . . . It didn't go in very far. I didn't want to bang on
it with the sledge for fear of deforming it. Positioned the "3-in-1
Service tool" to press the bushing in. OOPS!
Not enuf room for the impact wrench. This is no fun with a eighteen
inch breaker bar and that's what winded me. Next time we'll press the
bushing in from the other side where there's plenty of room for the
impact wrench. Performed the same procedure with the spring eye bushing
and this time there was room for the impact wrench. It only took a
couple of minutes.
So
far, so good. I had put the new bushings in the Krash Lab freezer
before going home last nite to shrink them down a bit. Now, I heated
the upper bushing bracket with the MAPP torch to expand it some. Took
the first bushing from the freezer and slathered it with some chassis
grease. Well . . . It didn't go in very far. I didn't want to bang on
it with the sledge for fear of deforming it. Positioned the "3-in-1
Service tool" to press the bushing in. OOPS!
Not enuf room for the impact wrench. This is no fun with a eighteen
inch breaker bar and that's what winded me. Next time we'll press the
bushing in from the other side where there's plenty of room for the
impact wrench. Performed the same procedure with the spring eye bushing
and this time there was room for the impact wrench. It only took a
couple of minutes.
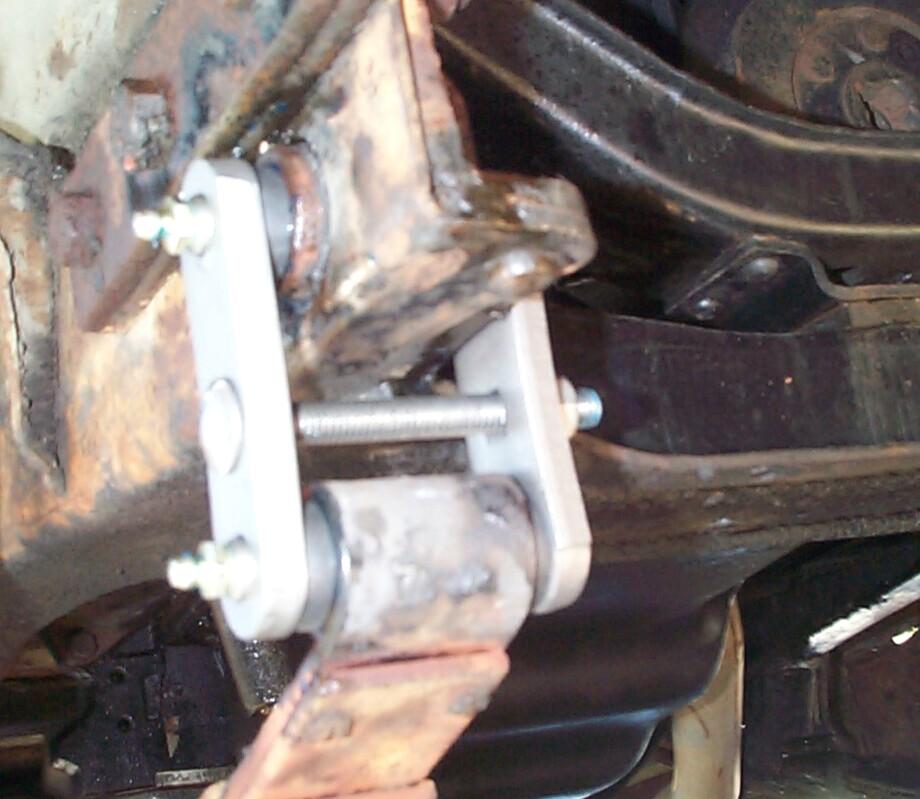 The
rest was anti-climatic. The zerk fittings on the shackle pins were
unscrewed and given a drop of threadlocker blue and screwed back in.
The shackle pin threads were greased up with chassis grease and screwed
in place. The rubber washers were placed on the shackle pins and the
front axle was jacked up and down 'til positioned correctly to assemble
the new shackle. The shackle didn't come with a lock washer but I put
one on anyway. Theadlocker blue was put on the shackle hex nut and the
new shackle was tightened up. I got the grease gun out and lubed the
shackle pins for good measure. Finished up by cleaning the new shackle
with PRE paint prep and spraying on a couple coats of Eastwood's
Diamond Clear paint for bare metal parts.
The
rest was anti-climatic. The zerk fittings on the shackle pins were
unscrewed and given a drop of threadlocker blue and screwed back in.
The shackle pin threads were greased up with chassis grease and screwed
in place. The rubber washers were placed on the shackle pins and the
front axle was jacked up and down 'til positioned correctly to assemble
the new shackle. The shackle didn't come with a lock washer but I put
one on anyway. Theadlocker blue was put on the shackle hex nut and the
new shackle was tightened up. I got the grease gun out and lubed the
shackle pins for good measure. Finished up by cleaning the new shackle
with PRE paint prep and spraying on a couple coats of Eastwood's
Diamond Clear paint for bare metal parts.
This operation went better than expected and was a good training exercise for me since I'll have to replace all the shackles and the spring pins when I replace the springs down the road. I think I'm going to the Wendy's drive-thru and reward myself with a burger.
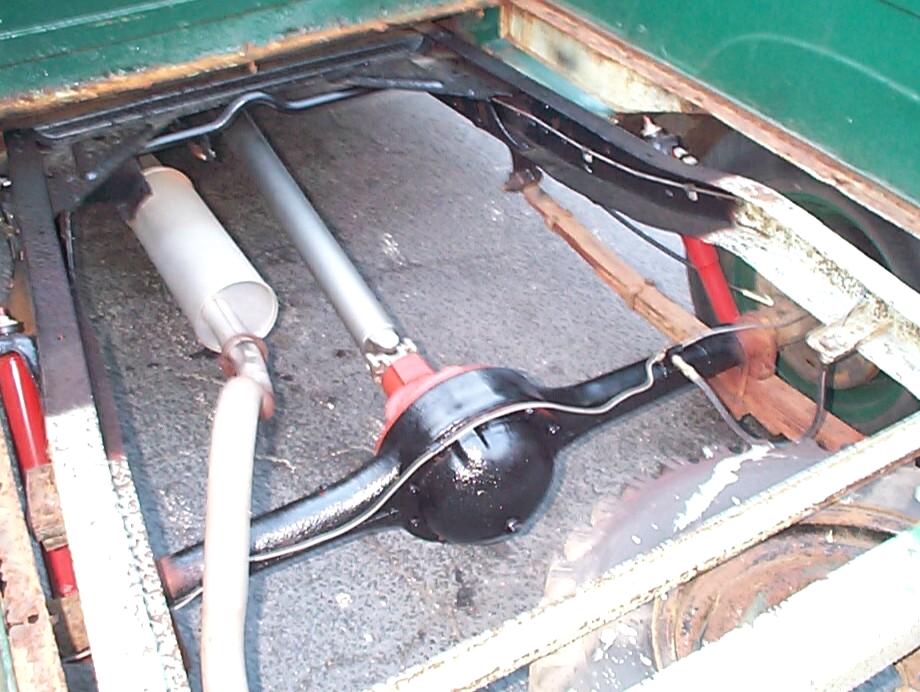
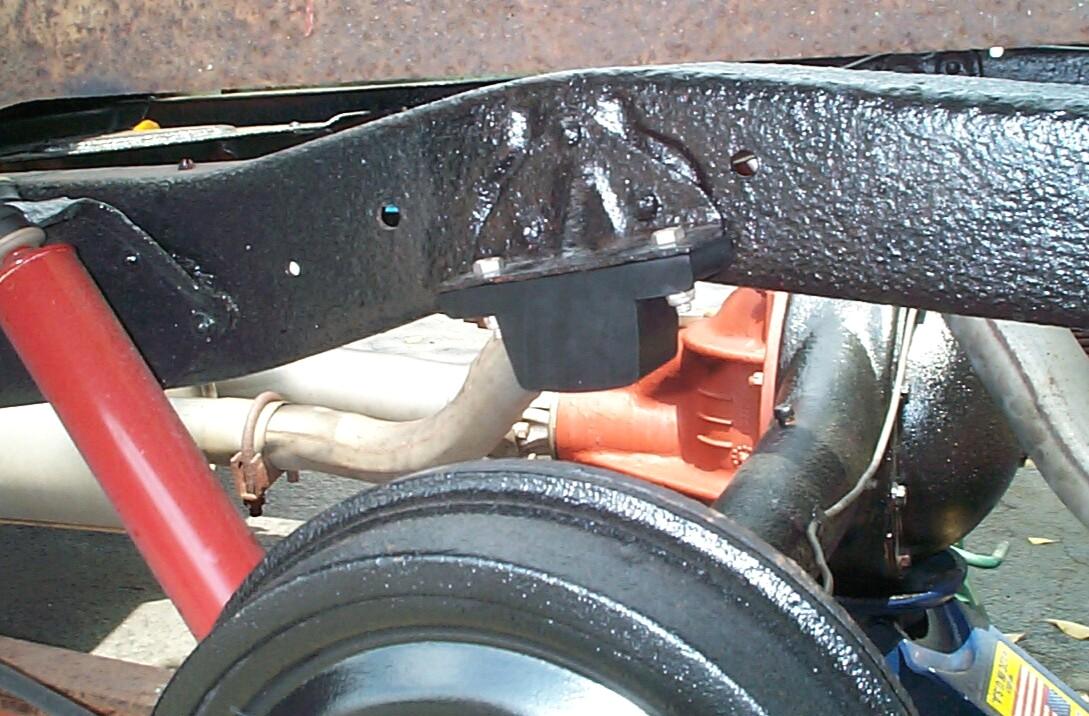
March 16th 2002 Jacked up the rear end, placed jackstands under the frame, removed the rear wheels and lowered the pumpkin to get the best access to the frame area above the rear axle. Started to take the rear axle bumpers off. They were held in place by two very rusted cap screws and hex nuts each (1/2" hex head). Kroil penetrating oil was applied. There was room enuf for the impact wrench here so, I put vice-grips on the head of the first cap screw and used the impact wrench on the hex nut . . . WRONG! The hex head was rounded off in short order. An open-end wrench was used on the head of the remaining three cap screws and the impact wrench made quick work of getting the hex nuts off. These turned out to be 5/16" x 18 cap screws 1-1/4" long (excluding head, 1/2" socket). Now, I went back at the rounded cap screw with cut-off wheel, air chisel and angle grinder. After awhile, I had both bumpers off. New ones are on a UPS truck somewhere between here and Chevy duty.
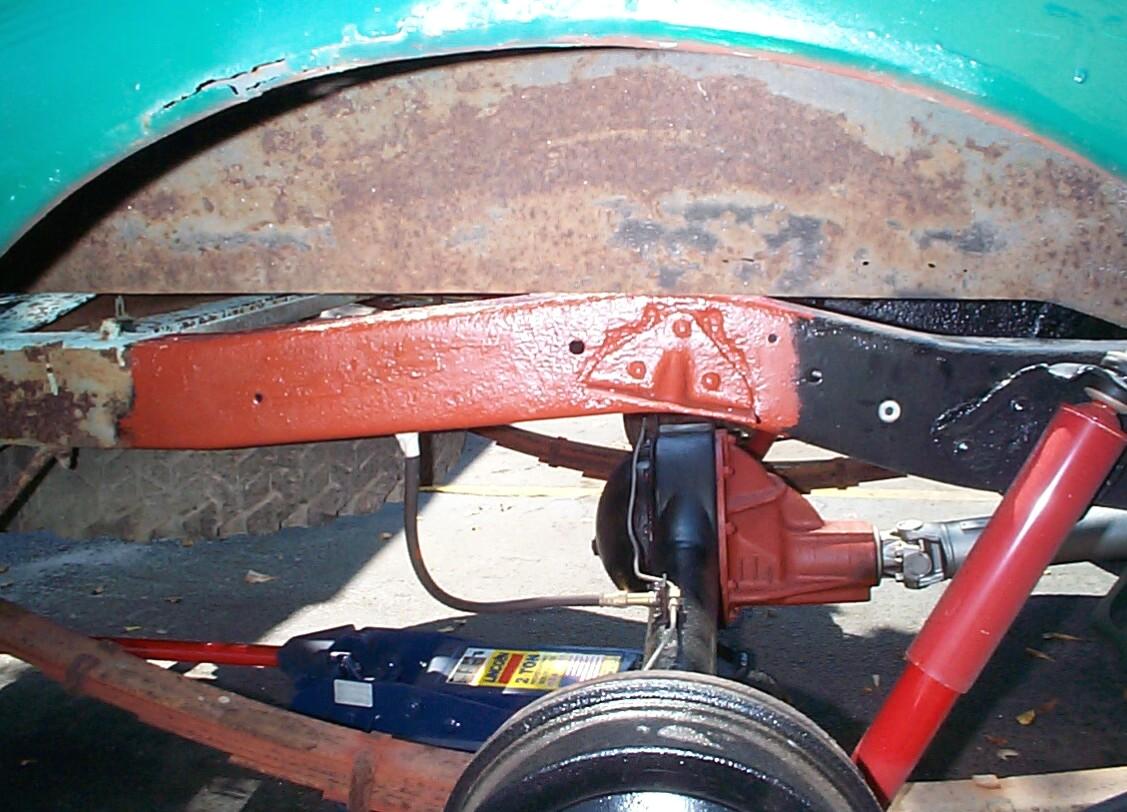 Wire
brushed and PRE paint prepped the next eighteen inches of frame on both
sides, including the axle bumper brackets. Gave the prepped area a
brush coat of Corroless rust stabilizer. Waited a hour and brush
painted a coat of Chassis Black over the Corroless. It was too soon and
the Corroless bled thru a bit. Have to apply another coat of Chassis
Black later.
Wire
brushed and PRE paint prepped the next eighteen inches of frame on both
sides, including the axle bumper brackets. Gave the prepped area a
brush coat of Corroless rust stabilizer. Waited a hour and brush
painted a coat of Chassis Black over the Corroless. It was too soon and
the Corroless bled thru a bit. Have to apply another coat of Chassis
Black later.
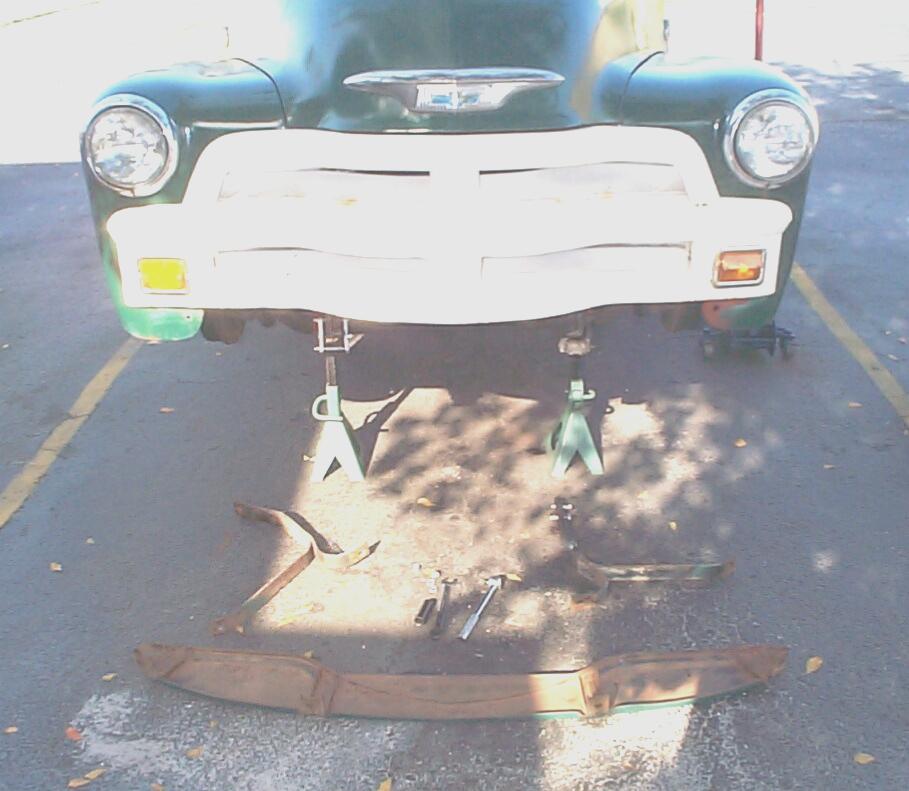 March
23rd 2002 Couldn't be a
nicer day under the shadetree. I got started early. Put Billybob's
front end up on jack stands and removed the front wheels. Took off the
front bumper. I had been putting Kroil penetrating oil on the front
bumper bracket bolts for weeks. I had gotten new bolts and hex nuts
from McMaster-Carr
a couple of weeks back. I was lucky an' got all the old bolts off in a
few minutes with the help of the impact wrench. With the bumper
brackets loose, I could now remove the front splash apron.
March
23rd 2002 Couldn't be a
nicer day under the shadetree. I got started early. Put Billybob's
front end up on jack stands and removed the front wheels. Took off the
front bumper. I had been putting Kroil penetrating oil on the front
bumper bracket bolts for weeks. I had gotten new bolts and hex nuts
from McMaster-Carr
a couple of weeks back. I was lucky an' got all the old bolts off in a
few minutes with the help of the impact wrench. With the bumper
brackets loose, I could now remove the front splash apron.
Wire-brushed, sanded and PRE prepped the splash apron and hung it up in the tree to treat the bottom with rattlecan Rust Encapsulator. After that cured, the whole thing was spray can painted with Rustoleum Hunter Green. Did some scrapin' and wire-brushin' the frame ends and bumper brackets. I'm gettin' pretty good at spraping and painting but I'm too old to start a new career in the Navy. Put the bumper brackets back on BillyBob with new fasteners and replaced the bumper. The splash apron was hung in the shed overnite to dry . . . Doggone it! Looks like Rustoleum pulled a fast one on me. They now have "Hunter Green Dark" as well as a new "Hunter Green" which is lighter than last year's Hunter Green. Neither of these new hunter greens match what is on BillyBob. Now, the Tammy Faye Baker paint job has liver spots!
 March
24th 2002 Today, I
tried media blasting for the first time. I am completely new to this.
Several months back I bought a cheap Harbor Freight blast cabinet when
it was on sale. I knew this wasn't quality equipment but might be ok
for a learner. I set it up today outside with an inline disposable air
filter from Eastwood and ten pounds of aluminium oxide media from
McMaster-Carr. First thing I learned was it was too small for the
bumper brackets, so I settled for cleaning up a used brake master
cylinder push rod clevis I received earlier in the week from American
Classic Truck Parts. The cabinet leaks a lot. Even outside,
this is the first and last time I use it without respirator and
goggles. I taped the worst leaking off with masking tape for now. The
bottom of the cabinet is shallow so the pickup hose runs out of media
often. Vison was impaired even with the built-in light due to sunlight
reflection . . . I might set this up in the shed next time so I can see
better. All-in-all, it was an ok session. I expected problems 'an I got
'em but, they aren't insurmountable.
March
24th 2002 Today, I
tried media blasting for the first time. I am completely new to this.
Several months back I bought a cheap Harbor Freight blast cabinet when
it was on sale. I knew this wasn't quality equipment but might be ok
for a learner. I set it up today outside with an inline disposable air
filter from Eastwood and ten pounds of aluminium oxide media from
McMaster-Carr. First thing I learned was it was too small for the
bumper brackets, so I settled for cleaning up a used brake master
cylinder push rod clevis I received earlier in the week from American
Classic Truck Parts. The cabinet leaks a lot. Even outside,
this is the first and last time I use it without respirator and
goggles. I taped the worst leaking off with masking tape for now. The
bottom of the cabinet is shallow so the pickup hose runs out of media
often. Vison was impaired even with the built-in light due to sunlight
reflection . . . I might set this up in the shed next time so I can see
better. All-in-all, it was an ok session. I expected problems 'an I got
'em but, they aren't insurmountable.
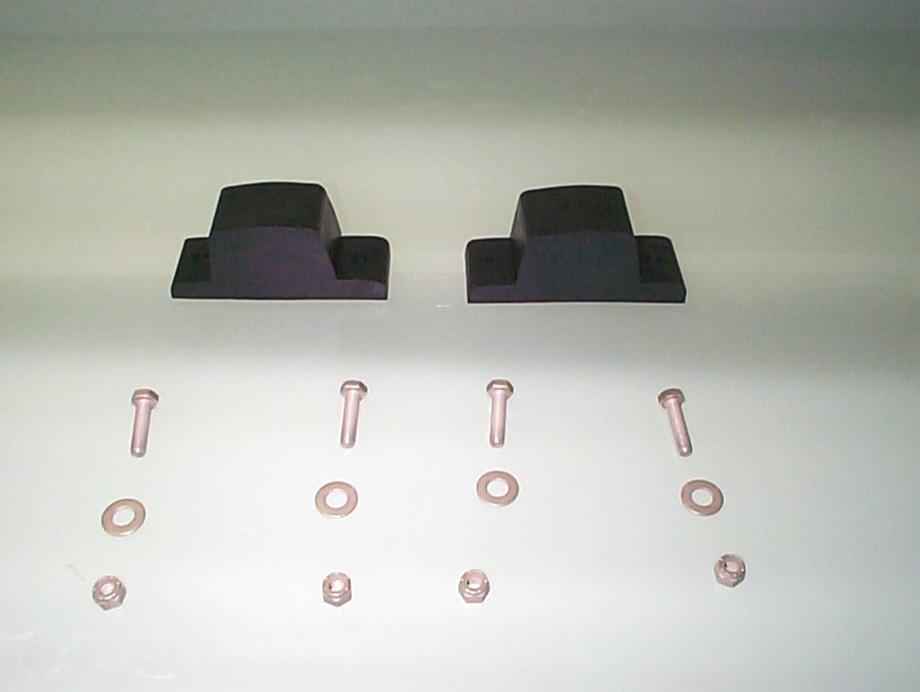 April
6th 2002 A little of
this, a little of that today. Washed and treated the new rear axle
bumpers with protectant. Tin-zinc plated the new 5/16" - 18 x 1-1/4"
bolts, hex nuts and flat washers for fastening the bumpers to the frame
brackets. Polished same in tumbler.
April
6th 2002 A little of
this, a little of that today. Washed and treated the new rear axle
bumpers with protectant. Tin-zinc plated the new 5/16" - 18 x 1-1/4"
bolts, hex nuts and flat washers for fastening the bumpers to the frame
brackets. Polished same in tumbler.
 While
the hardware was being polished, I worked on the radiator. Last week
when installing a remanufactured alternator, I noticed that the
passenger side support "strap" had separated from the upper radiator
tank. Today, I peeled the strap back and cleaned between it and the
tank with wire brush and PRE paint prep. Stirred up a batch of J-B Weld
epoxy and pasted the stuff between the strap and the tank. Held the
strap in place for curing with a jerry-rigged C-clamp and wedge. Also
did some minor work on the brake re-build project. Finally, the new
axle bumpers were installed on BillyBob.
While
the hardware was being polished, I worked on the radiator. Last week
when installing a remanufactured alternator, I noticed that the
passenger side support "strap" had separated from the upper radiator
tank. Today, I peeled the strap back and cleaned between it and the
tank with wire brush and PRE paint prep. Stirred up a batch of J-B Weld
epoxy and pasted the stuff between the strap and the tank. Held the
strap in place for curing with a jerry-rigged C-clamp and wedge. Also
did some minor work on the brake re-build project. Finally, the new
axle bumpers were installed on BillyBob.
April 13th 2002 Decided to work on the front passenger side frame horn today. Not much of a task but I'm also working on the brake master cylinder (which was reported on in the last log entry) and trying to track down a new nasty noise on the passenger side front. It's creaking and groaning much like the noise made by the timbers and ropes of an old sailing ship . . . makes me a bit uneasy. Last nite when I got home, I tried to manhandle the front wheel by rocking it back and forth an' I got a little squeak for my efforts. First thing this morning when I got BillyBob up on jack stands, I removed the wheel. The lug nuts were tight. I had been afraid they wouldn't be. Next, I pulled the grease cap. The castle nut was intact as was the cotter pin. Pulled the cotter pin and tightened the castle nut a notch . . . Too tight, back to it's original position. This side seems to have just a smigeon more play than the other side and it appears to be in the kingpin. I'm gonna lube the zerk fittings on this side before I finish up today and keep scratchin' my head over this one.
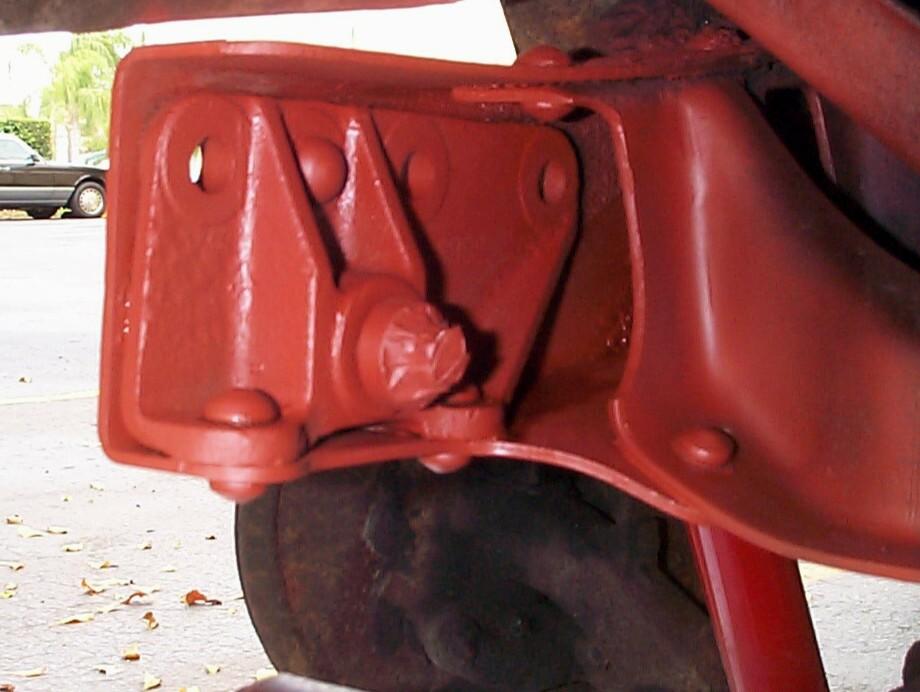 Removed
the bumper, splash apron and passenger side bumper bracket. I knew
leaving the driver side bracket in place was an accident just beggin'
to happen and, shure nuff, I bashed my head into it at one point. But,
it was early in the day so I didn't have to worry about it anymore. You
tend to get an automatic radar effect about the location of an object
once you've injured yourself on it. Disconnected the spring shackle and
gave the frame horn one more scraping, wire brush, degreasing
treatment, then applied PRE Paint Prep and a rattlecan coat of Rust
Encapsulator.
Removed
the bumper, splash apron and passenger side bumper bracket. I knew
leaving the driver side bracket in place was an accident just beggin'
to happen and, shure nuff, I bashed my head into it at one point. But,
it was early in the day so I didn't have to worry about it anymore. You
tend to get an automatic radar effect about the location of an object
once you've injured yourself on it. Disconnected the spring shackle and
gave the frame horn one more scraping, wire brush, degreasing
treatment, then applied PRE Paint Prep and a rattlecan coat of Rust
Encapsulator.
April 14th 2002 Finished up yesterday with a coat of rattlecan Chassis Black. When putting the shackle back together, I didn't screw the hex nut down as tight as during the initial installation. I read in the manual that this was to be torqued to 8 footpounds. Lubed the shackle and kingpin zerk fittings and headed for home . . . The creaking and groaning has disappeared. I suspect the shackle was the cause of my auditory discomfort.
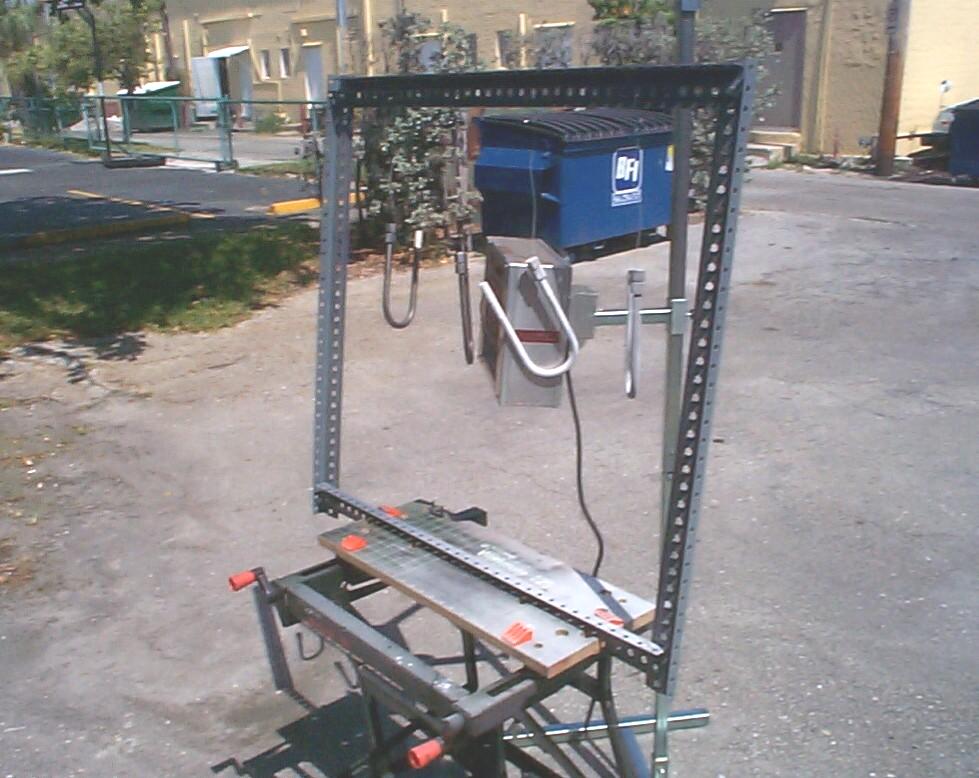 May
5th 2002 A month or so
ago, I splurged and got Eastwood's Deluxe Hot Coat System and Infared
Curing System. The Hotcoat System was on sale and I justified the
purchase to myself based on the big savings ($15.00 heh, heh). Today,
is a good day to see if I can get decent results using these new
gadgets outside. It's sunny and winds are about as low as they get in
this neck of the woods. Built a support rack out of old shelving angles
and clamped it into the Workmate. Prepped the '55 1st
Series Rear Axle U-Bolts I received from LMC
Truck a week or so back, first with lacquer thinner, then
with PRE Paint Prep, and hung them on the rack. Coated the U-Bolts with
"Satin Clear". Had beginner's troubles and used a lot of powder.
Finished by baking with the Infared System . . . Had a hard time
maintaining an even temperature, but I think I did OK. The proof will
be whether these things rust or not when I get them installed. I will
be pretty limited by the weather, but I think I can powdercoat
successfully outside when the conditions are right.
May
5th 2002 A month or so
ago, I splurged and got Eastwood's Deluxe Hot Coat System and Infared
Curing System. The Hotcoat System was on sale and I justified the
purchase to myself based on the big savings ($15.00 heh, heh). Today,
is a good day to see if I can get decent results using these new
gadgets outside. It's sunny and winds are about as low as they get in
this neck of the woods. Built a support rack out of old shelving angles
and clamped it into the Workmate. Prepped the '55 1st
Series Rear Axle U-Bolts I received from LMC
Truck a week or so back, first with lacquer thinner, then
with PRE Paint Prep, and hung them on the rack. Coated the U-Bolts with
"Satin Clear". Had beginner's troubles and used a lot of powder.
Finished by baking with the Infared System . . . Had a hard time
maintaining an even temperature, but I think I did OK. The proof will
be whether these things rust or not when I get them installed. I will
be pretty limited by the weather, but I think I can powdercoat
successfully outside when the conditions are right.
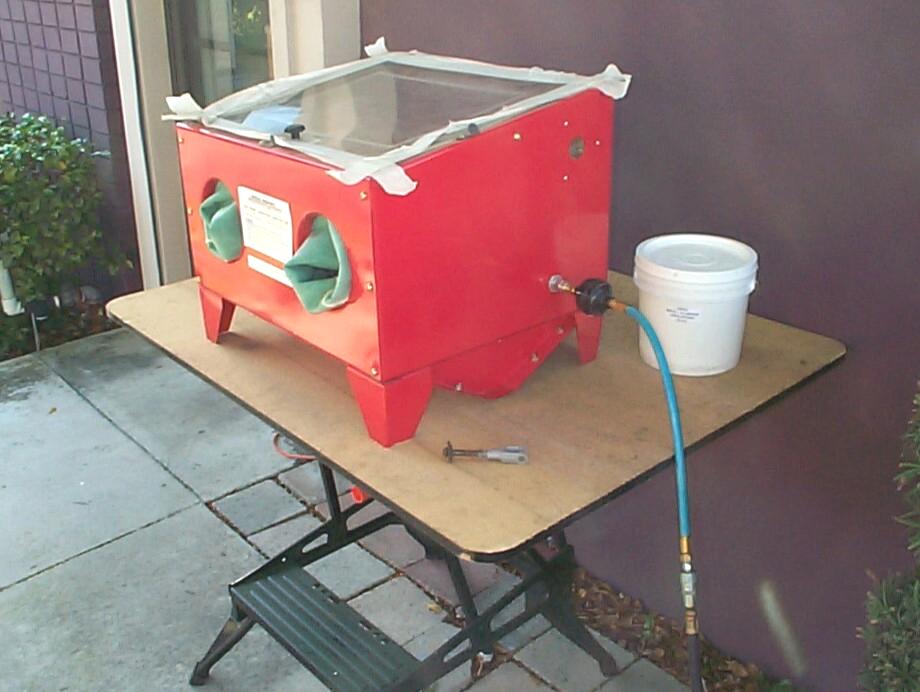
May 27th 2002 Decoration Day. That's what my grandparents called Memorial Day 'cause originally, it was a day to put up decorations to honor the civil war dead. It's a day when I think about my uncle "Dutch" who was killed in the Battle of Leyte Gulf. My aunt "Jane" (Kathy Kephart Lucore) sent me a recent newspaper story about him a few weeks ago. It's a quiet day here at the Krash Lab where I'm goin' slow and cleaning up the aftermath of Saturday and Sunday BillyBob work. On Saturday the wheels and wheelwells were detailed as part of BillyBob's scheduled maintenance. On Sunday, I tried out the Eastwood Siphon Blaster I purchased over a year ago.
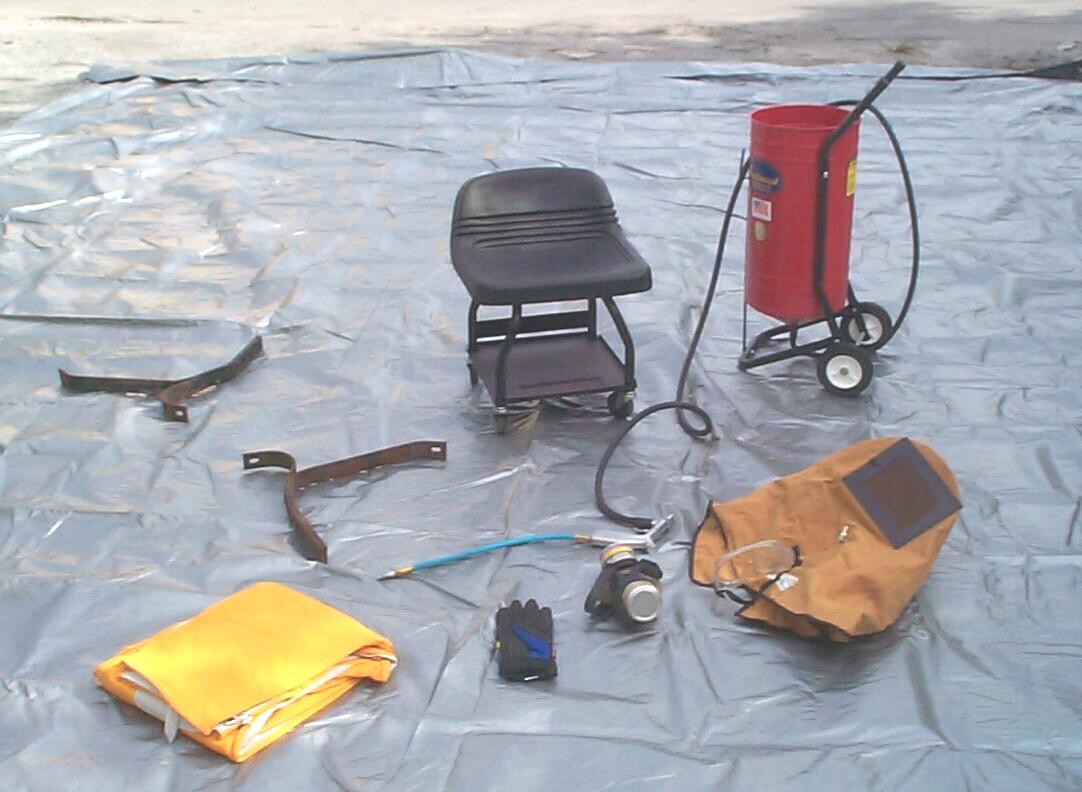 My
plans were to sandblast and powdercoat BillyBob's front bumper
brackets. Started out by removing the front bumper, splash apron and
bumper brackets again. Weather was not optimum but my plan was to do it
all in one day . . . Boy! was I in for a surprise. I've been gathering
all the other stuff I thought I'd need for blasting over the last year.
This included inline dosposable filters for the air compressor, a big
rubberized tarp to localize the sand for recycling, mechanix gloves, a
blasting hood and coveralls. I already had goggles and a respirator.
Also picked up 200 lbs of blasting sand at Home Depot.
My
plans were to sandblast and powdercoat BillyBob's front bumper
brackets. Started out by removing the front bumper, splash apron and
bumper brackets again. Weather was not optimum but my plan was to do it
all in one day . . . Boy! was I in for a surprise. I've been gathering
all the other stuff I thought I'd need for blasting over the last year.
This included inline dosposable filters for the air compressor, a big
rubberized tarp to localize the sand for recycling, mechanix gloves, a
blasting hood and coveralls. I already had goggles and a respirator.
Also picked up 200 lbs of blasting sand at Home Depot.
 Spread
out the tarp (20' x 30') and pinned down the edges with concrete
pavers. I was a little worried at this point about folding this thing
up again. Ran into a problem with the inline filter . . . needed a
male-to-male fitting I didn't have so I had to abandon the filter for
this session. Loaded up fifty pounds of sand and set the air compressor
to 90 PSI. Put on work boots, the coveralls, respirator, googles,
gloves and hood and got started. I knew the limitations of my air
compressor for this kind of work so I was prepared for a lot of waiting
time while the air compressor caught up to me. I didn't really time it
but this felt like about seven minutes of waiting for every three
minutes of blasting. I started out with the most rusted and badly
pitted bumper bracket. That one bracket took over four hours and 100
lbs of sand. That was as much fun as I could stand for one day.
Spread
out the tarp (20' x 30') and pinned down the edges with concrete
pavers. I was a little worried at this point about folding this thing
up again. Ran into a problem with the inline filter . . . needed a
male-to-male fitting I didn't have so I had to abandon the filter for
this session. Loaded up fifty pounds of sand and set the air compressor
to 90 PSI. Put on work boots, the coveralls, respirator, googles,
gloves and hood and got started. I knew the limitations of my air
compressor for this kind of work so I was prepared for a lot of waiting
time while the air compressor caught up to me. I didn't really time it
but this felt like about seven minutes of waiting for every three
minutes of blasting. I started out with the most rusted and badly
pitted bumper bracket. That one bracket took over four hours and 100
lbs of sand. That was as much fun as I could stand for one day.
Cleaning up was a big problem. We have a broom in the Krash Lab but I couldn't find it. I assumed somebody took it home to use. I was stuck with sand on the tarp. The tarp was folded up as well as could be and dragged into the shed with the sand in it. It was heavy. As luck would have it, I spied the misplaced broom about thirty seconds after I locked up the shed for the day.
Lessons learned for next time. Blasting on Sunday is a good idea. The Krash Lab is in a downtown business area and there are too many people around to inconvenience on Saturday. My tarp technique needs improvement. The wind grabbed it once and it almost rolled me up and flew me down the alley. It takes much effort to deploy, keep in place, and put away again. The goggles aren't needed with the hood but the respirator is. The coveralls and hood were a good idea. Enuf air passes thru so I'm not parboiled and they actually protect me from the hot Florida sun as well as the sand. The inline air filter wasn't necessary this time. And finally, I have to schedule more time for this work considering the limitations of the air compressor.
 Decided
to leave the bumper, apron and brackets off 'til this op is finished.
Put the blasted bracket back on and it will be rusted up again by next
week. It's time to post this log entry and keep movin'. Continuing
frame work to be posted later will include the remaining portion of the
rear frame behind the pumpkin, spare tire and carrier assembly, more
front frame work (including bumper brackets) and, once I get the frame
ends done, work on the frame under the cab. I'm also thinking of
replacing the springs over the four day Thanksgiving weekend this year.
Decided
to leave the bumper, apron and brackets off 'til this op is finished.
Put the blasted bracket back on and it will be rusted up again by next
week. It's time to post this log entry and keep movin'. Continuing
frame work to be posted later will include the remaining portion of the
rear frame behind the pumpkin, spare tire and carrier assembly, more
front frame work (including bumper brackets) and, once I get the frame
ends done, work on the frame under the cab. I'm also thinking of
replacing the springs over the four day Thanksgiving weekend this year.
| < Back
to Intro |
You can email me at ![]() webmaster@laroke.com
webmaster@laroke.com
Issued Saturday June 1, 2002
Updated Friday May 26, 2017
copyright © 1996-2017 Larry Robert Kephart all rights reserved
| | LRK Home | | Bio Info | | Krash Khronicles | | LAROKE | |
| | BettyLou | | BillyBob's Garage | | Rat Patrol | | Deerslayer | | Elvira | |
| | Land of the Free and Home of the Brave | |
| | Keppylou's Art | | WWI Soldier's Diary | |