| | LRK Home | | Bio Info | | Krash Khronicles | | LAROKE | |
| | BettyLou | | BillyBob's Garage | | Rat Patrol | | Deerslayer | | Elvira | |
| | Land of the Free and Home of the Brave | |
| | Keppylou's Art | | WWI Soldier's Diary | |
BillyBob Work-in-Progress Log
![]()
TRUCK LINKS including vendor sites for old parts, custom parts, and tools as well as sites for classic car and truck organizations
STORE Operating in association with Amazon.com, books, recordings and tools can be purchased.
PLANNING for the restoration including project schedule and cost estimates.
![]()
WORK-IN-PROGRESS is the restoration of parts of BillyBob that I can accomplish without a garage.
PRE-RESTORATION includes log entries of minor repairs and and adventures between time of purchase and the time when I started restoration, a piece at a time.
JR'S KORNER JR's Korner is the history of BillyBob before I got him authored by my brother, Wm. C. Kephart.
![]()
BILLYBOB MAINTENANCE Ever changing detailing, oil change, lube, etc. maintenance routines specifically developed for BillyBob, including required tools, materials and procedures.
17. Odds n Ends
August 13th 2001 Some of the work I do on BillyBob doesn't warrant a full log entry. Lest these items fall thru BillyBob's numerous cracks, I'll record them here.
 November
12th 2001 Can't work on
BillyBob until the local Goodyear tire store finishes fixin' the
leaking tire/wheel I delivered to them 2-1/2 weeks ago, so I'll work on
some catch-up documentation here. Before I went on vacation in
September, I obtained a 1955 Florida license plate in good condition
thru an EBay auction. Now, all I have to do is finish the paperwork and
send the plate (with a check) to Tallahassee for authenication. Once
the authorities do that and send the plate back to me, I can mount it
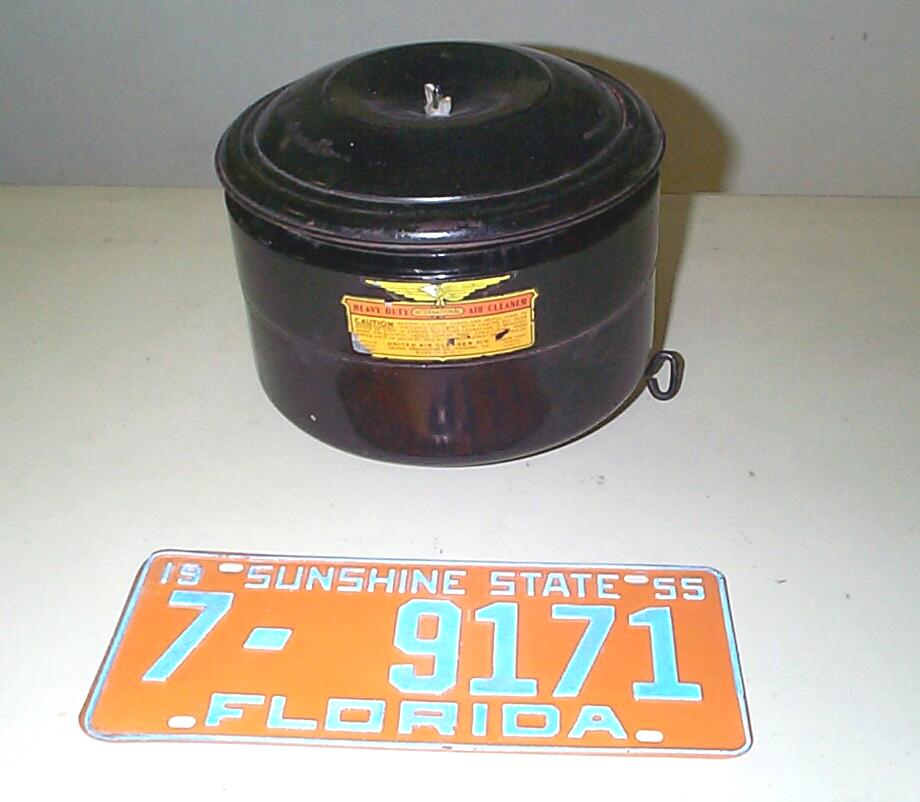
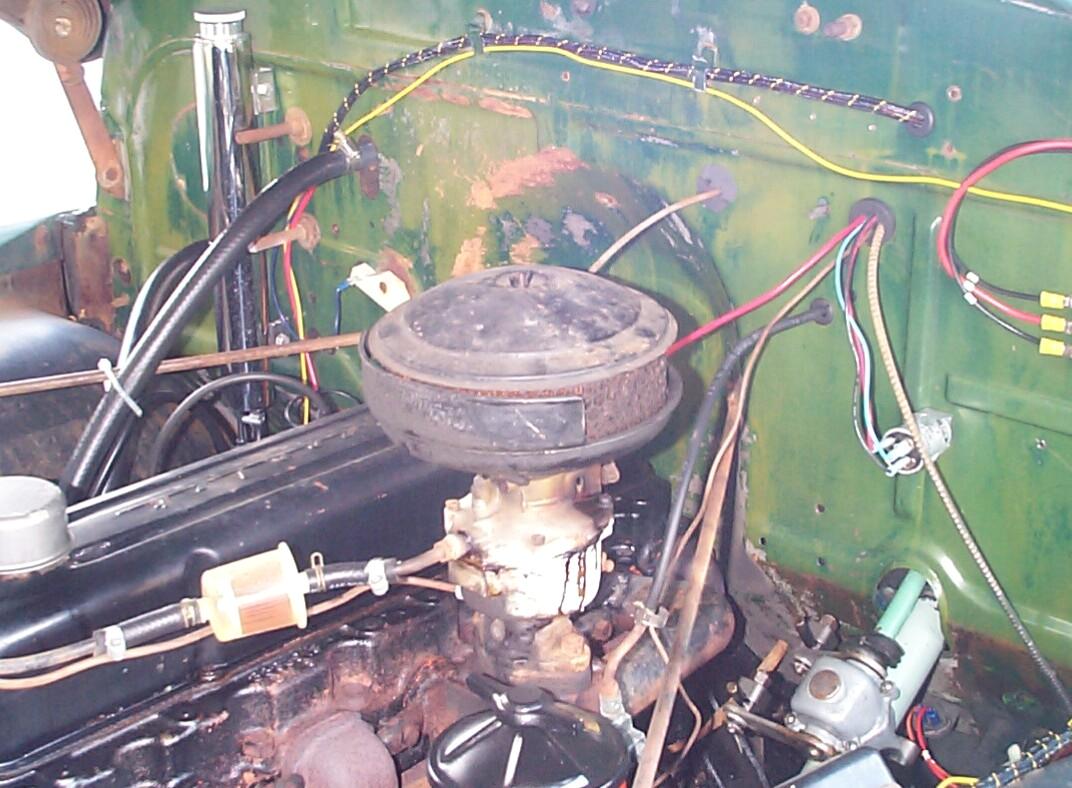
on BillyBob. I bought a "NOS Oil Bath Air Cleaner" from Vintage
Auto Parts, Inc. The air cleaner arrived about a week after I
ordered it. The other item I ordered, a shiftbox rebuild kit, did not
arrive and I see it's been removed from their website so I'm guessin' I
won't get it. The air cleaner was 'posed to ship with an adapter to fit
2-1/4" carbs - It didn't and I do need the adapter. The air cleaner
looks brand new on the inside but the outside has several dents and the
paint and decal are "scuffed up" . . . Not exactly my definition of NOS
(New Old Stock). I'm a bit disappointed but Vintage Auto Parts carries
a lot of stuff I haven't seen anywhere else so I will risk ordering
from them again, if needs require it.
November
12th 2001 Can't work on
BillyBob until the local Goodyear tire store finishes fixin' the
leaking tire/wheel I delivered to them 2-1/2 weeks ago, so I'll work on
some catch-up documentation here. Before I went on vacation in
September, I obtained a 1955 Florida license plate in good condition
thru an EBay auction. Now, all I have to do is finish the paperwork and
send the plate (with a check) to Tallahassee for authenication. Once
the authorities do that and send the plate back to me, I can mount it
on BillyBob. I bought a "NOS Oil Bath Air Cleaner" from Vintage
Auto Parts, Inc. The air cleaner arrived about a week after I
ordered it. The other item I ordered, a shiftbox rebuild kit, did not
arrive and I see it's been removed from their website so I'm guessin' I
won't get it. The air cleaner was 'posed to ship with an adapter to fit
2-1/4" carbs - It didn't and I do need the adapter. The air cleaner
looks brand new on the inside but the outside has several dents and the
paint and decal are "scuffed up" . . . Not exactly my definition of NOS
(New Old Stock). I'm a bit disappointed but Vintage Auto Parts carries
a lot of stuff I haven't seen anywhere else so I will risk ordering
from them again, if needs require it.
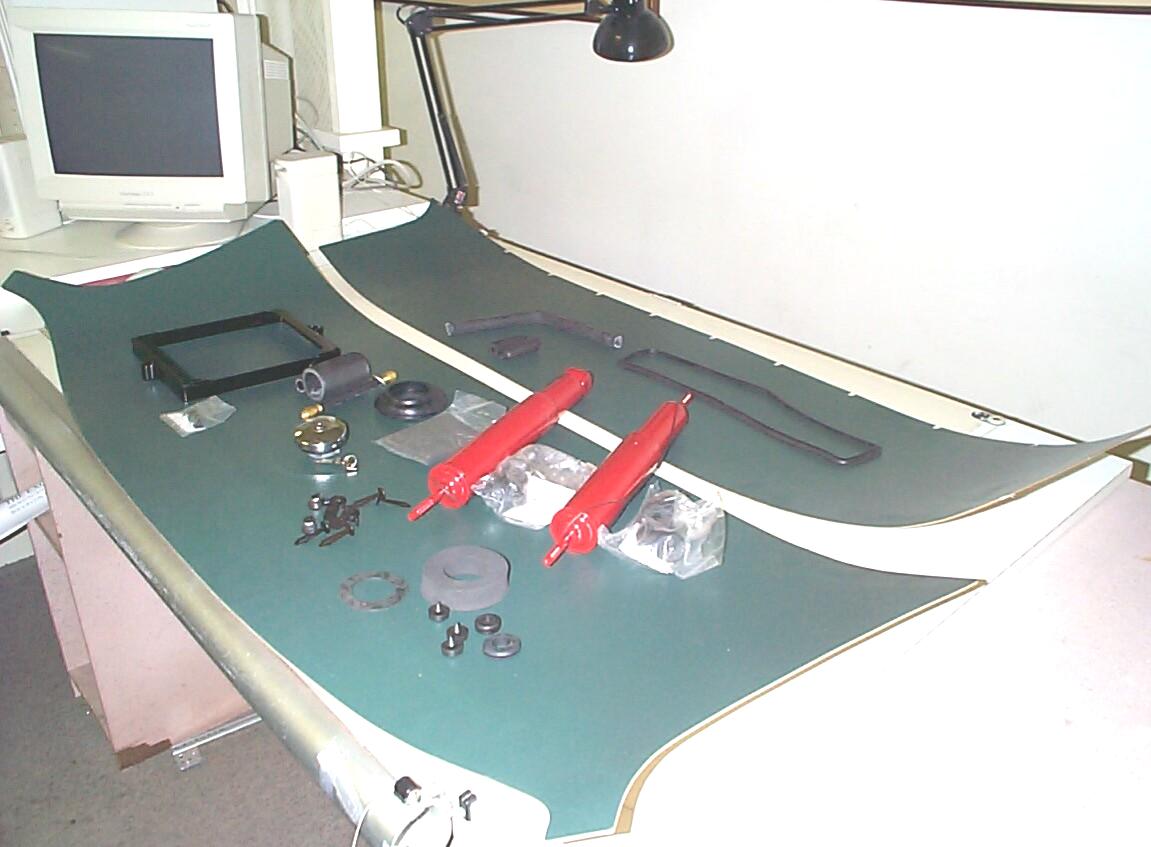 More
recently, I ordered a bunch of stuff from Chevy
Duty Online for future work on BillyBob. Interior items
include a green headliner (Part #21-456), glove box lock striker
(#22-611) and eleven firewall cover retainers (#42-085). Gas tank items
include a gas tank filler neck grommet (#23-013), locking gas cap orig
type A (#23-155), gas tank filler and vent hose (#23-212), gas tank
floor seal donut (#23-305), gas tank mounting pads (#23-325), gas tank
to cab bumpers (#23-355), gas tank sender wire grommet (#23-415), fuel
line grommet (#23-425), flexible fuel line (#23-458) and gas tank
sender unit gasket (#23-593). For the cowl vent I ordered a top cowl
vent gasket molded (#34-014) and top cowl vent drain hose (#34-205).
Also got another battery top retainer (#43-015) and parking brake cable
boots (#71-883) to replace the ones I've ruined. Finally, a pair of
front shock absorbers (#74-621) and three rear shock absorbers
(#74-622) arrived. That's one too many due to a backorder glitch. Chevy
Duty has a good return policy but I've decided to keep the extra shock
as a spare 'cause I'm too lazy to go thru the return process.
More
recently, I ordered a bunch of stuff from Chevy
Duty Online for future work on BillyBob. Interior items
include a green headliner (Part #21-456), glove box lock striker
(#22-611) and eleven firewall cover retainers (#42-085). Gas tank items
include a gas tank filler neck grommet (#23-013), locking gas cap orig
type A (#23-155), gas tank filler and vent hose (#23-212), gas tank
floor seal donut (#23-305), gas tank mounting pads (#23-325), gas tank
to cab bumpers (#23-355), gas tank sender wire grommet (#23-415), fuel
line grommet (#23-425), flexible fuel line (#23-458) and gas tank
sender unit gasket (#23-593). For the cowl vent I ordered a top cowl
vent gasket molded (#34-014) and top cowl vent drain hose (#34-205).
Also got another battery top retainer (#43-015) and parking brake cable
boots (#71-883) to replace the ones I've ruined. Finally, a pair of
front shock absorbers (#74-621) and three rear shock absorbers
(#74-622) arrived. That's one too many due to a backorder glitch. Chevy
Duty has a good return policy but I've decided to keep the extra shock
as a spare 'cause I'm too lazy to go thru the return process.
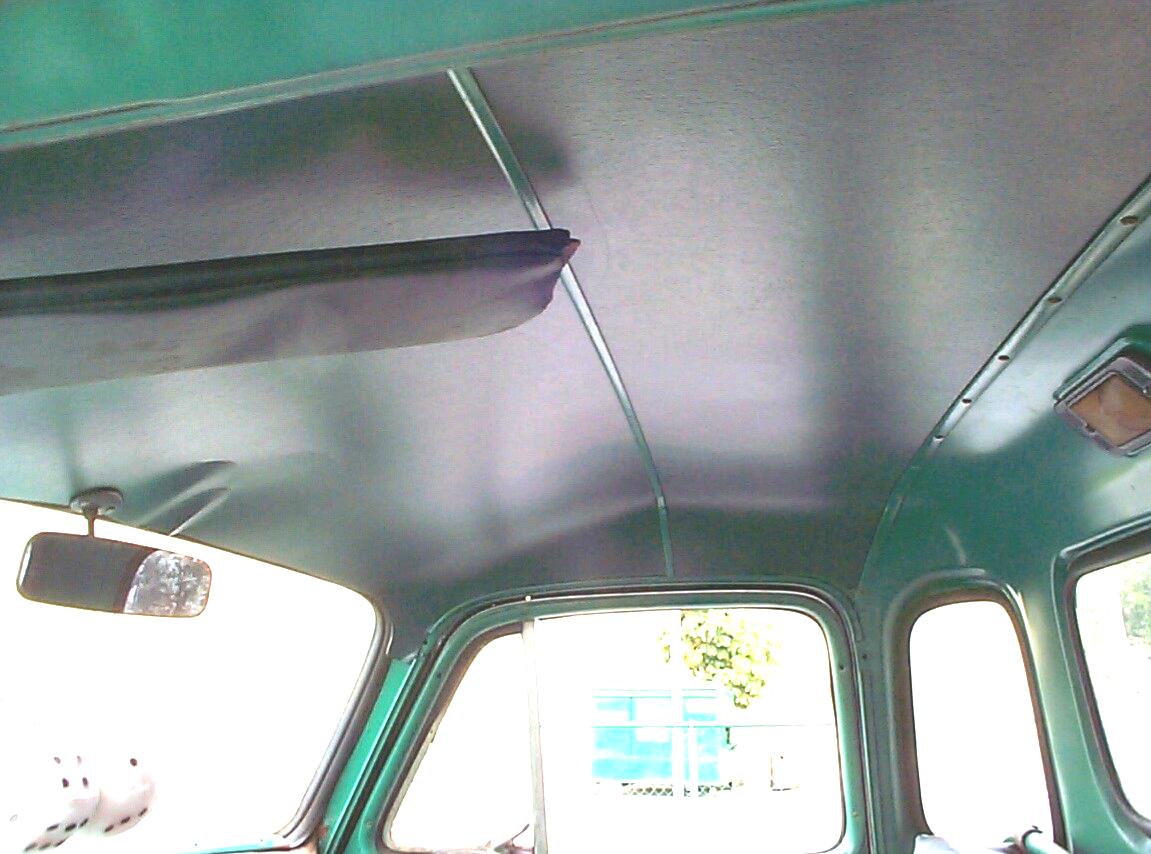
December 1st 2001 Good news and bad news today. The good news is that the new gas sender installation went without a hitch and now I have gas gauge readings for the first time since I've owned BillyBob (that story will be told in a future log entry). The bad news is that I botched the installation of the new headliner and herein lies that sad tale.
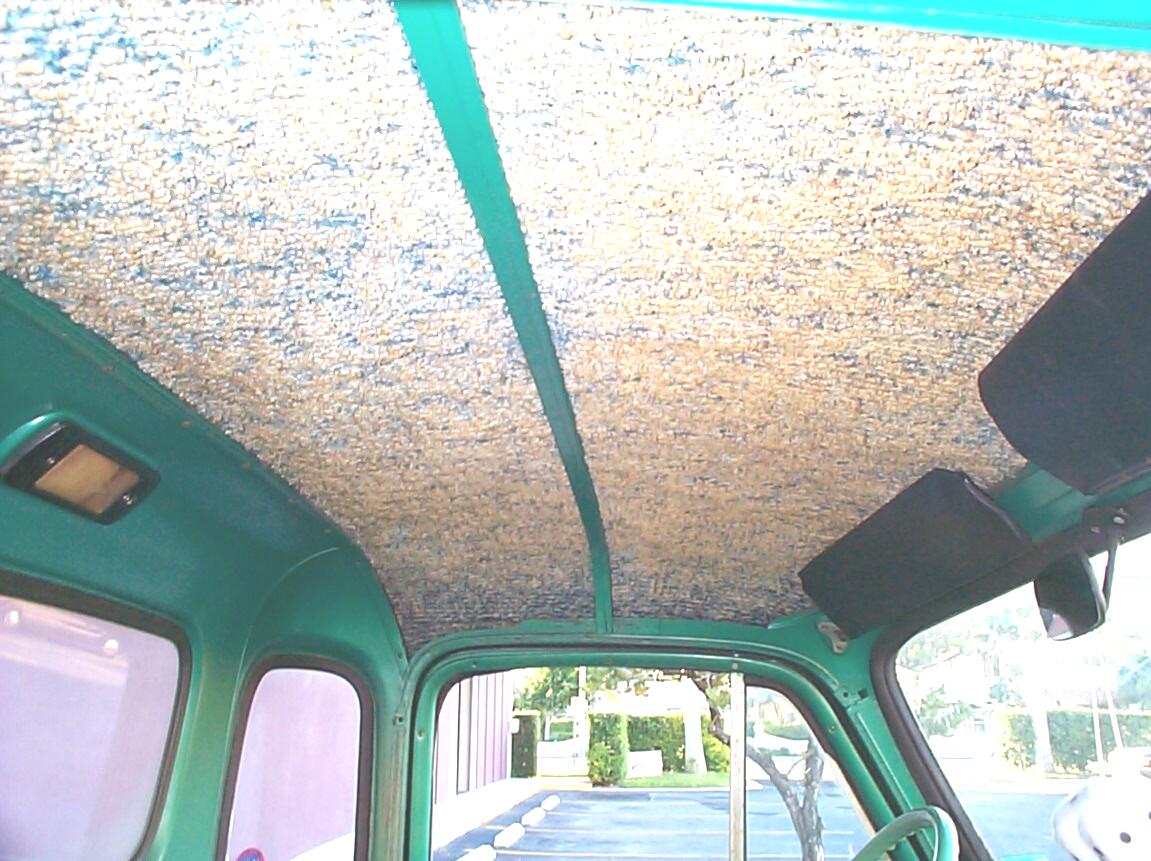 I'd
be more disappointed in my efforts if I didn't know from the ole truck
maillists and stovebolt forums what a pain-in-the-butt job a headliner
installation is. Billybob didn't have a headliner when I got him, just
some horrible blue-green shag carpeting glued to the roof and the
headliner bow. An additional handicap is that I didn't know what the
finished product was supposed to look like.
I'd
be more disappointed in my efforts if I didn't know from the ole truck
maillists and stovebolt forums what a pain-in-the-butt job a headliner
installation is. Billybob didn't have a headliner when I got him, just
some horrible blue-green shag carpeting glued to the roof and the
headliner bow. An additional handicap is that I didn't know what the
finished product was supposed to look like.
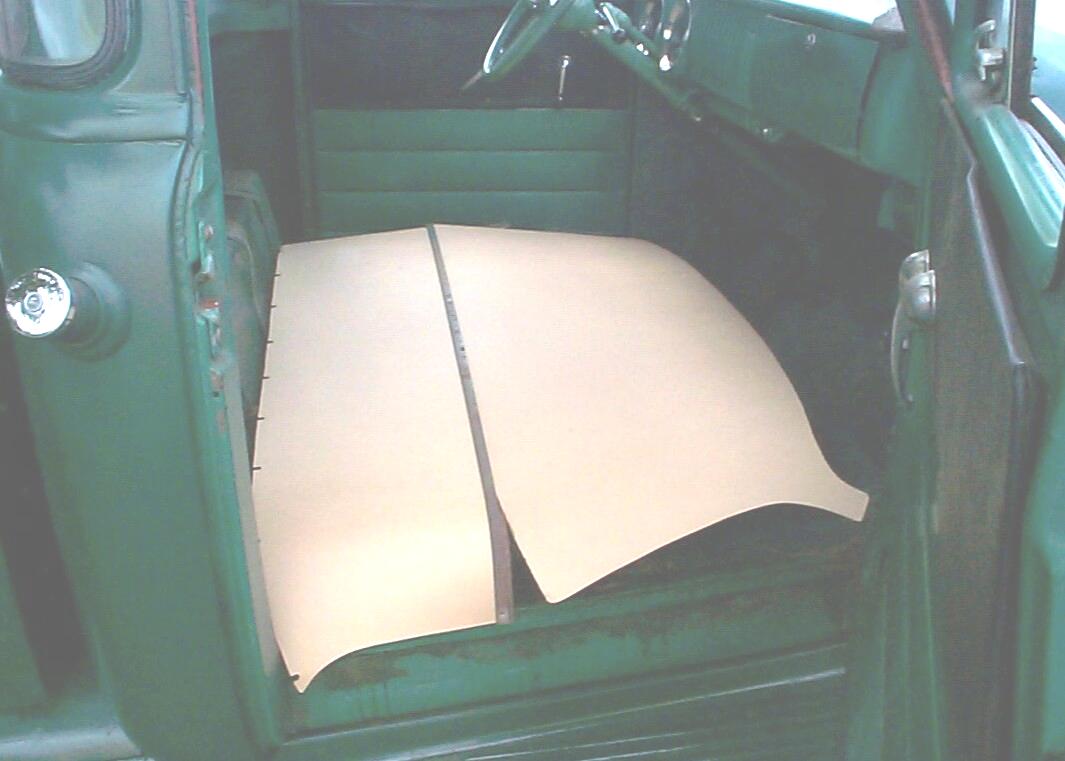 When
I first got the cardboard headliner panels, I unrolled them and put
books on them to flatten them out. Today, a flat workarea in the Krash
Lab was cleared and I started to work on the headliner bow which just
"snaps" in place. The bow is "S" shaped in cross-section. The top
recess of the S seats the back edge of the front headliner panel. The
bottom recess receives the leading edge of the back panel. First, the
grooves in the bow were cleaned out 'cause they still had some remnants
of the original headliner in them. Then, I tried to fit the new
headliner panels in the bow grooves . . . with limited success. The
trailing edge of the rear headliner panel fits underneath a trim strip
at the back of the cab roof. This strip was loosened but not completely
removed. The seat was already out for the gas sender work. Then the new
headliner "assembly" was carried out to BillyBob. The back side of the
headliner panels were "misted" with a 50/50 solution of household
ammonia and water to make them temporarily more flexible.
When
I first got the cardboard headliner panels, I unrolled them and put
books on them to flatten them out. Today, a flat workarea in the Krash
Lab was cleared and I started to work on the headliner bow which just
"snaps" in place. The bow is "S" shaped in cross-section. The top
recess of the S seats the back edge of the front headliner panel. The
bottom recess receives the leading edge of the back panel. First, the
grooves in the bow were cleaned out 'cause they still had some remnants
of the original headliner in them. Then, I tried to fit the new
headliner panels in the bow grooves . . . with limited success. The
trailing edge of the rear headliner panel fits underneath a trim strip
at the back of the cab roof. This strip was loosened but not completely
removed. The seat was already out for the gas sender work. Then the new
headliner "assembly" was carried out to BillyBob. The back side of the
headliner panels were "misted" with a 50/50 solution of household
ammonia and water to make them temporarily more flexible.
I got the back panel underneath the trim strip and struggled with the whole assembly until I started to lose feeling in my legs (I was on my haunches). I also realized that the visors and rear view mirror would have to be removed so I did that. The rear panel was left in place and the front panel and bow were taken back into the Krash Lab. The front headliner was more effectively inserted into the bow groove and fixed in place this time with good ole duct tape on the back. This new assembly was carried back out to the truck and, with a mighty effort, pressed into place. Despite my efforts to the contrary, I did end up with a couple of substantial bulges and folds at the leading edge which I hoped would be minimized when I reinstalled the visors and mirror.
 No
such luck! I had a heck of a time finding the proper location for the
visor screws and hinge and I really made a mess in is area installing
the driver side visor . . . So much so, in fact, that I abandoned
re-installing the passenger side visor. By the time I got the mirror
re-installed, I was crestfallen. This will have to be done over with
new materials sometime down the road, but I need some time to lick my
emotional wounds before I come back to this. In the meantime, I'll
decide whether I want to tackle an original headliner again or try one
of the one-piece fiberglass replacement headliners.
No
such luck! I had a heck of a time finding the proper location for the
visor screws and hinge and I really made a mess in is area installing
the driver side visor . . . So much so, in fact, that I abandoned
re-installing the passenger side visor. By the time I got the mirror
re-installed, I was crestfallen. This will have to be done over with
new materials sometime down the road, but I need some time to lick my
emotional wounds before I come back to this. In the meantime, I'll
decide whether I want to tackle an original headliner again or try one
of the one-piece fiberglass replacement headliners.
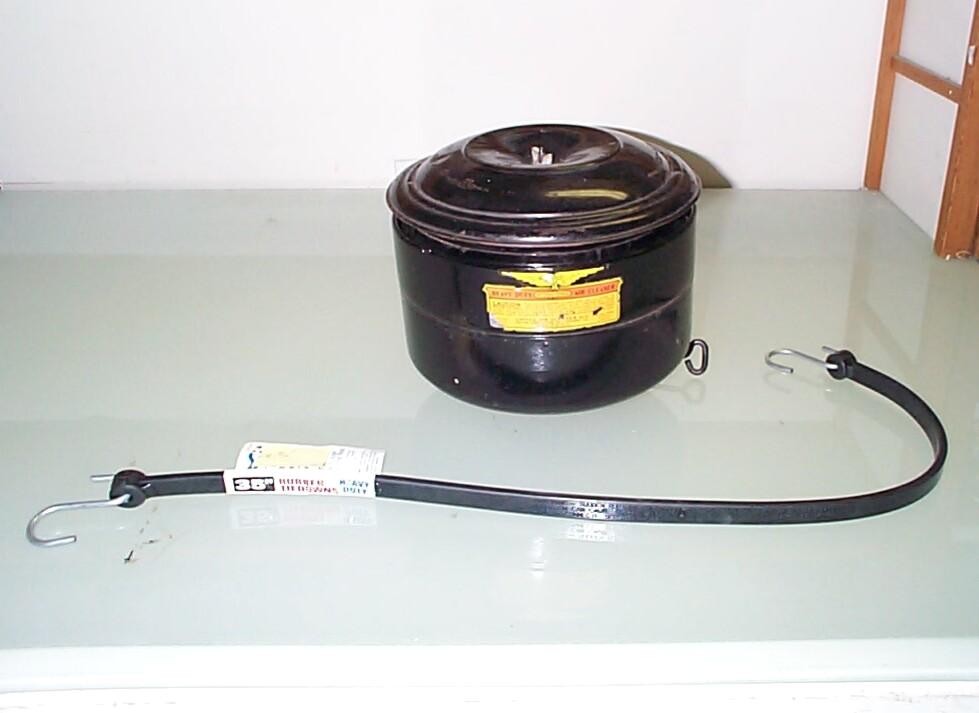 December
15th 2001 During the
week I went to Home Depot and found something I thought I could adapt
as a spacer to make the 2-5/8" Base of the oil bath air cleaner fit on
the 2-1/4" Rochester carb. It was a rubber tiedown strap for a couple
of bucks that looked to be about the right thickness of 3/16". Today, I
cut a length, lined the inside of the air cleaner and tried it . . .
even with liguid soap, it was just too thick to work. Back to the
drawing board on this one.
December
15th 2001 During the
week I went to Home Depot and found something I thought I could adapt
as a spacer to make the 2-5/8" Base of the oil bath air cleaner fit on
the 2-1/4" Rochester carb. It was a rubber tiedown strap for a couple
of bucks that looked to be about the right thickness of 3/16". Today, I
cut a length, lined the inside of the air cleaner and tried it . . .
even with liguid soap, it was just too thick to work. Back to the
drawing board on this one.
January 26th 2002 Messed around with the butchered headliner a little bit today. I've learned since my first fight with this thing that the front half should be installed first (the opposite of what I did) and that the front lip goes behind the windshield rubber. I took the whole thing out and tried again. I left the seat in and found it much more comfortable in a sitting position. I used more ammonia/water solution and got the whole thing back in without nearly the trouble I had last time. Also found out that the mirror is easier to install if you separate the mirror from the bracket, screw in the bracket, then re-assemble the mirror.
February 23rd 2002 Raining today. Last Saturday was an all day soaker too. While waiting for a clear sky, I decided to work on the YOM (year of manufacture) license plate authenication paperwork. In Florida, you have to send the plate you want to use to Tallahassee for authenication. If the condition of the plate meets their approval and the number is not already in use, the DMV will authenicate it and return it. you also have to send it certified, return receipt and include a letter of request, registration copy, proof of insurance and money. I've been putting this off 'cause I'm saturated with paperwork and a born procrastinator (I was born 'bout a month late 'an been that way ever since). For you Florida boys 'an gals who are interested in doing the same thing, here is an Adobe Acrobat PDF file template of my letter: Florida License Plate Letter. I put everything in an 11 x 14 photo mailer (do not bend) for a trip to the Post Office on Monday.
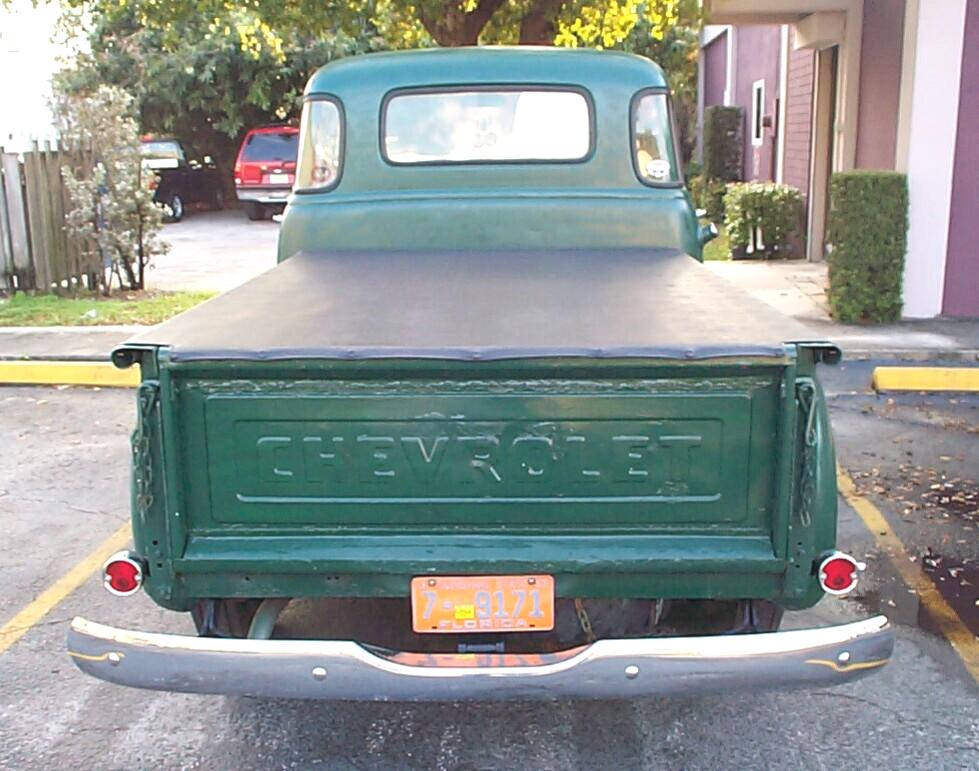 March
13th 2002 The
authenicated 1955 Florida license plate and new registration reflecting
the change arrived this week and I mounted it on BillyBob the other
day. I read somewhere that you were 'sposed to keep the normal plate in
the truck with the stickers on it but, if that was once true, they've
changed their policy. Now, they just put the registration sticker on
the old tag. Not as purty with that modern sticker on there but it's a
small thing to have to live with. The blue lettering is actually darker
than it shows in these photos. A few weeks later, I received a
communication from the State of Florida. When I get anything from any
government that I am not expecting, I tend to cringe. I never suspect
good news. This time, however, it was. They had pro-rated the YOM
license plate fee and it was a refund check.
March
13th 2002 The
authenicated 1955 Florida license plate and new registration reflecting
the change arrived this week and I mounted it on BillyBob the other
day. I read somewhere that you were 'sposed to keep the normal plate in
the truck with the stickers on it but, if that was once true, they've
changed their policy. Now, they just put the registration sticker on
the old tag. Not as purty with that modern sticker on there but it's a
small thing to have to live with. The blue lettering is actually darker
than it shows in these photos. A few weeks later, I received a
communication from the State of Florida. When I get anything from any
government that I am not expecting, I tend to cringe. I never suspect
good news. This time, however, it was. They had pro-rated the YOM
license plate fee and it was a refund check.
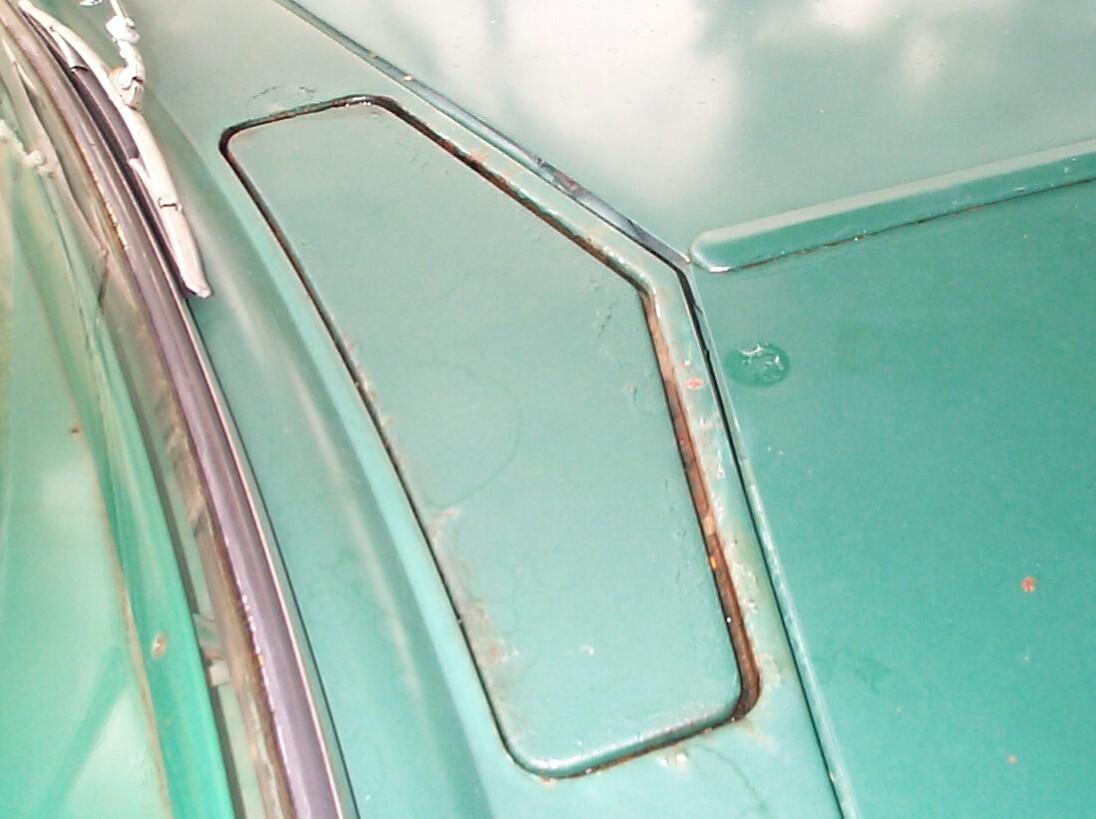
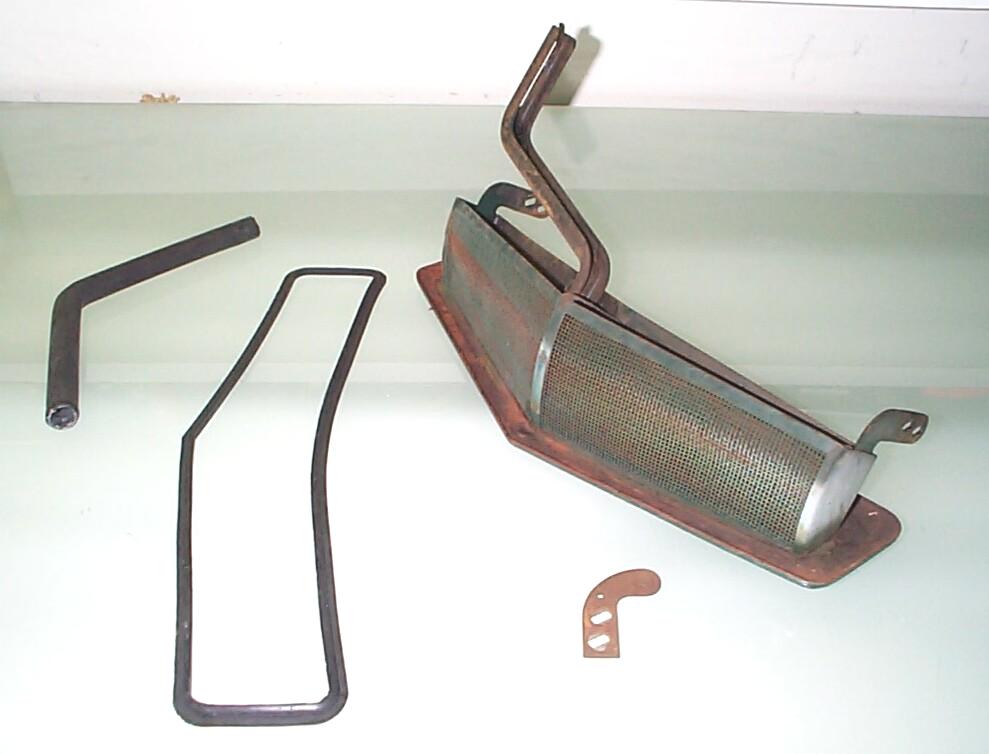 April
20th 2002 Degreased
Renegade's engine compartment today before going up to the warehouse to
get BillyBob, so I didn't have time to start a big project. Started
work on the cowl vent. Got a new rubber cowl vent gasket and drain
rubber some time back from Chevy Duty. Not too long ago one of the cowl
vent hinge rivets sheared off, making it inoperable for the time being.
There are two bolts on each side holding the vent to the hinges and one
bolt connecting it to the lever assembly Every other connection in the
assembly is riveted. After removing these bolts with a 3/8" socket
driver and wrench, I was able to get the vent out. The vent gutters
were wire-brushed, dremeled, sanded and vacuumed. The gasket was laid
in the channel to check the fit and the fit is perfect. The pivot
points were oiled and the vent was replaced for the day (still
inoperable at this point).
April
20th 2002 Degreased
Renegade's engine compartment today before going up to the warehouse to
get BillyBob, so I didn't have time to start a big project. Started
work on the cowl vent. Got a new rubber cowl vent gasket and drain
rubber some time back from Chevy Duty. Not too long ago one of the cowl
vent hinge rivets sheared off, making it inoperable for the time being.
There are two bolts on each side holding the vent to the hinges and one
bolt connecting it to the lever assembly Every other connection in the
assembly is riveted. After removing these bolts with a 3/8" socket
driver and wrench, I was able to get the vent out. The vent gutters
were wire-brushed, dremeled, sanded and vacuumed. The gasket was laid
in the channel to check the fit and the fit is perfect. The pivot
points were oiled and the vent was replaced for the day (still
inoperable at this point).
May 12th 2002 Mother's Day. Makes me remember when JR and I were in the DeMolay Masonic-affiliated youth organization. We had a Rose ceremony for mothers that was pretty moving for all family members. Good memories and balmy weather here in the shade tree garage today.
 Haven't
been having any luck trying to make my own adapter for the oil bath air
cleaner so, a couple of weeks ago when I had the need to order
something else from Vintage Auto Parts, Inc., I asked them for the
adapter and they threw it into the new order at no charge. It arrived
this week and it looks a bit like a slice of PCV pipe with a small
section cutout for contraction. I can take the old standard air cleaner
off now and inventory it for refurbishing at a later date.
Haven't
been having any luck trying to make my own adapter for the oil bath air
cleaner so, a couple of weeks ago when I had the need to order
something else from Vintage Auto Parts, Inc., I asked them for the
adapter and they threw it into the new order at no charge. It arrived
this week and it looks a bit like a slice of PCV pipe with a small
section cutout for contraction. I can take the old standard air cleaner
off now and inventory it for refurbishing at a later date.
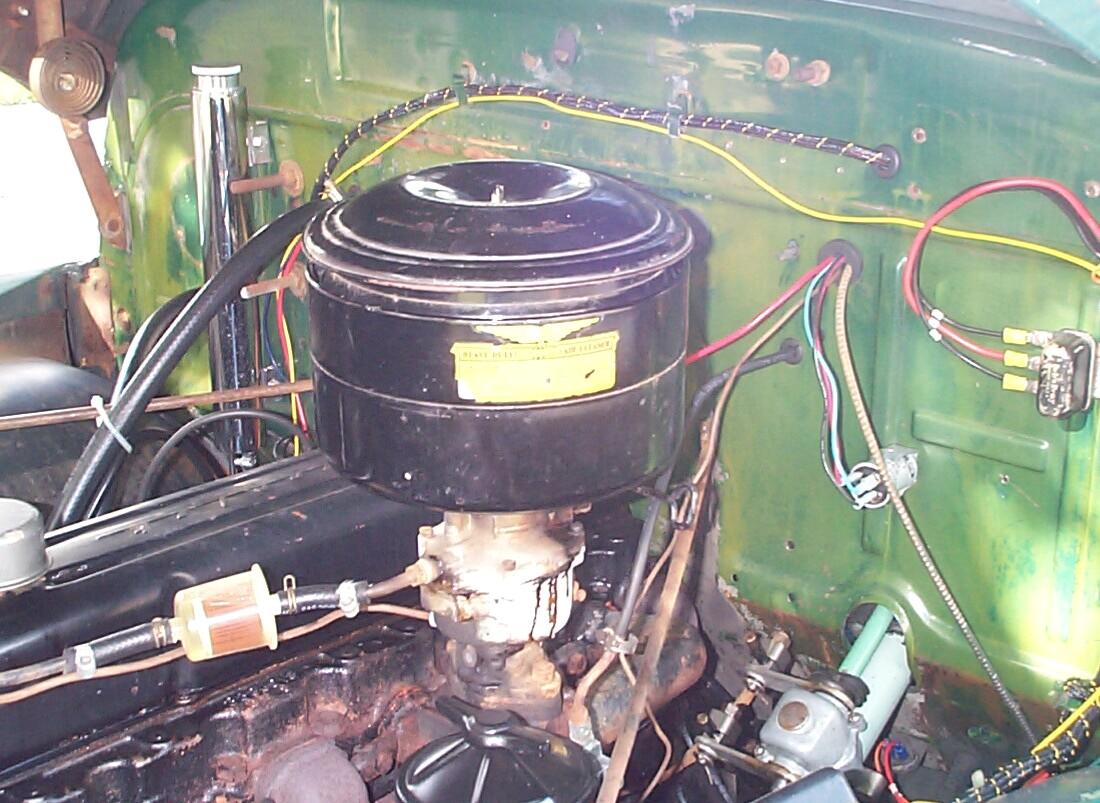 The
oil bath air cleaner I got from Vintage is not the original oil bath
air cleaner for 1955 Chevy trucks, but an aftermarket "Heavy Duty
International Air Cleaner" manufactured in the same era by United Air
Cleaner Div. of United Specialities Company of Chicago. It's made to
fit 1932-1954 Chevrolet cars and trucks (providing you have the hood
clearance). A nice touch is that it has an inlet for a PCV valve line.
I might do that someday if I can locate the original parts.
The
oil bath air cleaner I got from Vintage is not the original oil bath
air cleaner for 1955 Chevy trucks, but an aftermarket "Heavy Duty
International Air Cleaner" manufactured in the same era by United Air
Cleaner Div. of United Specialities Company of Chicago. It's made to
fit 1932-1954 Chevrolet cars and trucks (providing you have the hood
clearance). A nice touch is that it has an inlet for a PCV valve line.
I might do that someday if I can locate the original parts.
 June
23rd 2002 Didn't do
much yesterday when the weather wasn't too bad and I'm being punished
for it today. Yesterday, all I did was a tumbler session and when my
boss arrived, he said he caught me cleaning my rusty nuts again. Today,
I'm dodging rain cells trying to put BillyBob's newly powdercoated
front bumper brackets back on along with the splash apron and bumper.
Wanted to work some more on the cowl vent today but, so far, it's a
rainout. The sun would shine long enough to give me the confidence to
pull the tools out of the shed, then it would start pouring on me for
fifteen minutes or so. I went thru this cycle three times while trying
to clean out the cowl vent gutter. Little things were going wrong too.
Electrical cords and air hoses were fouling more than usual. By noon,
I'd had enuf. It's Murphy's day an' he can have it!
June
23rd 2002 Didn't do
much yesterday when the weather wasn't too bad and I'm being punished
for it today. Yesterday, all I did was a tumbler session and when my
boss arrived, he said he caught me cleaning my rusty nuts again. Today,
I'm dodging rain cells trying to put BillyBob's newly powdercoated
front bumper brackets back on along with the splash apron and bumper.
Wanted to work some more on the cowl vent today but, so far, it's a
rainout. The sun would shine long enough to give me the confidence to
pull the tools out of the shed, then it would start pouring on me for
fifteen minutes or so. I went thru this cycle three times while trying
to clean out the cowl vent gutter. Little things were going wrong too.
Electrical cords and air hoses were fouling more than usual. By noon,
I'd had enuf. It's Murphy's day an' he can have it!
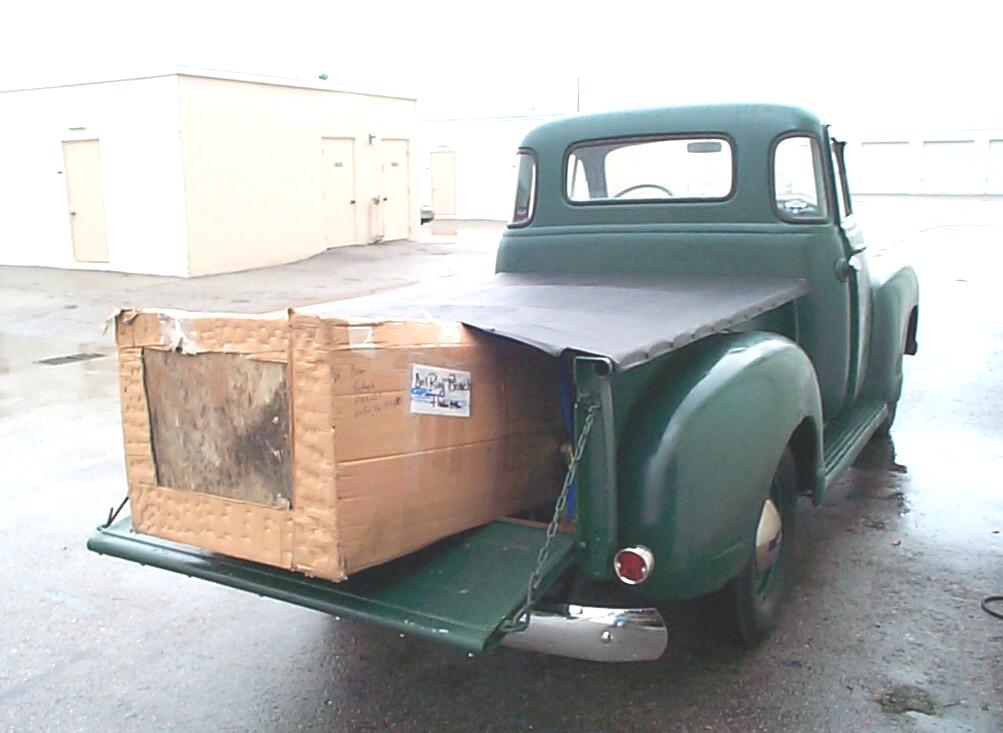 June
25th 2002 Won an EBay
auction last week for a 54-55 right front fender. It arrived yesterday
at the Delray Beach Greyhound bus terminal. I went to pick it up before
the daily rains got rough. Stopped at a FLAPS and picked up a couple of
14 foot ratchet tie-down straps. Good thing I got two of 'em. Took a
couple of times around the block to find the bus terminal. It is a gray
concrete block building that resembles a family-owned auto repair
facility. I never did see a Greyhound sign and it also serves as a
Ryder Truck rental and Taxi stop. There was a cabbie snoring away on
the only piece of furniture in the "waiting room". I could hear him but
I couldn't see him behind my fender and all the other freight waiting
to be picked up or loaded. BillyBob still has no bed but I was able to
strap the fender down to the rear frame crossmembers and hang it out
over the tailgate (Redneck Loveseat). I buggered up
the first tie-down by running too much strap thru the ratchet
mechanism. After a few minutes, it was abandoned to be fixed later and
I went on to the second strap which I wrapped twice around the fender
before securing with the ratchet.
June
25th 2002 Won an EBay
auction last week for a 54-55 right front fender. It arrived yesterday
at the Delray Beach Greyhound bus terminal. I went to pick it up before
the daily rains got rough. Stopped at a FLAPS and picked up a couple of
14 foot ratchet tie-down straps. Good thing I got two of 'em. Took a
couple of times around the block to find the bus terminal. It is a gray
concrete block building that resembles a family-owned auto repair
facility. I never did see a Greyhound sign and it also serves as a
Ryder Truck rental and Taxi stop. There was a cabbie snoring away on
the only piece of furniture in the "waiting room". I could hear him but
I couldn't see him behind my fender and all the other freight waiting
to be picked up or loaded. BillyBob still has no bed but I was able to
strap the fender down to the rear frame crossmembers and hang it out
over the tailgate (Redneck Loveseat). I buggered up
the first tie-down by running too much strap thru the ratchet
mechanism. After a few minutes, it was abandoned to be fixed later and
I went on to the second strap which I wrapped twice around the fender
before securing with the ratchet.
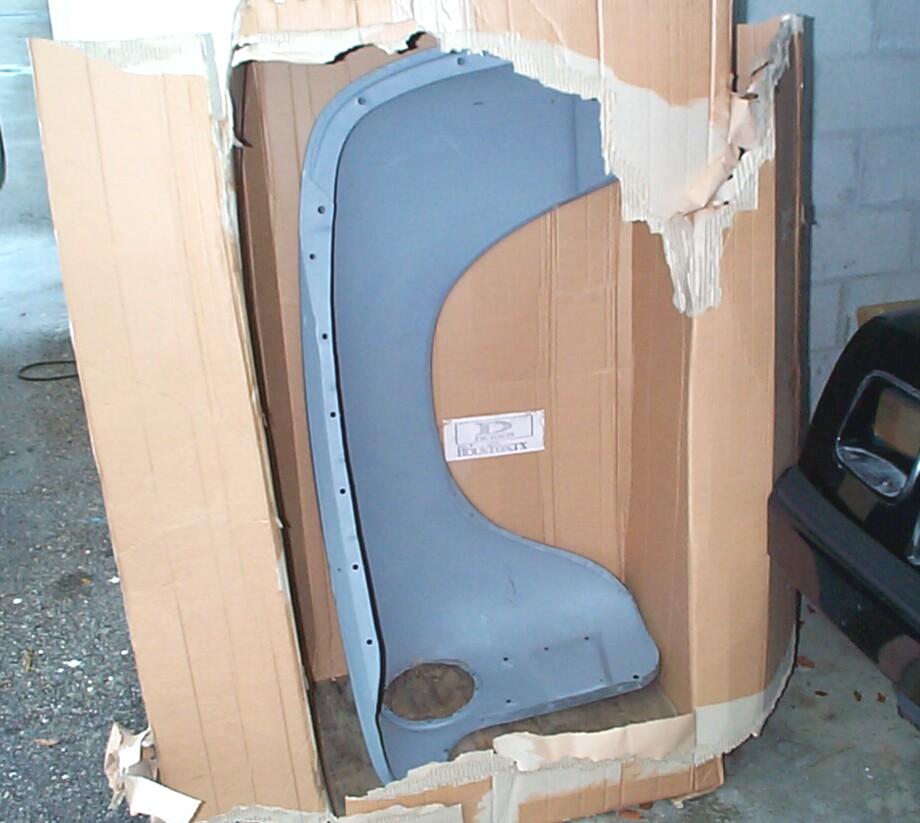 Was
still able to button down the bed cover which protected the fender from
a little of the rain that hit me between the bus station and BillyBob's
warehouse. Oh, the joys of rain driving in an old truck . . . Brake
fade after washouts, twin dashboard waterfalls at the leaking
windshield corners and thru the cowl vent, fog buildup on the
windshield inside and only rain-x on the outside. Cut open the packing
when I got the fender into the warehouse. It's a beauty, as advertised
by the Seller, and was not damaged by the carrier in any way. You ole
truckers from the Southwest don't know the emotional impact of a clean
piece of metal on us in the tropics and the rustbelt. It can bring
tears to your eyes. It's a good day despite the overcast skys.
Was
still able to button down the bed cover which protected the fender from
a little of the rain that hit me between the bus station and BillyBob's
warehouse. Oh, the joys of rain driving in an old truck . . . Brake
fade after washouts, twin dashboard waterfalls at the leaking
windshield corners and thru the cowl vent, fog buildup on the
windshield inside and only rain-x on the outside. Cut open the packing
when I got the fender into the warehouse. It's a beauty, as advertised
by the Seller, and was not damaged by the carrier in any way. You ole
truckers from the Southwest don't know the emotional impact of a clean
piece of metal on us in the tropics and the rustbelt. It can bring
tears to your eyes. It's a good day despite the overcast skys.
Well, that's almost a year's worth of minor setbacks and little victories. I'll be continuing with the headliner and cowl vent in 'nother log entry down the road. Also got some other small tasks to report on in an electrical system log entry coming up in the next month or so plus the continuing frame and brake work. Startin' on the doors soon too.
| < Back
to Intro |
You can email me at ![]() webmaster@laroke.com
webmaster@laroke.com
Issued Monday July 1, 2002
Updated Tuesday May 30, 2017
copyright © 1996-2017 Larry Robert Kephart all rights reserved
| | LRK Home | | Bio Info | | Krash Khronicles | | LAROKE | |
| | BettyLou | | BillyBob's Garage | | Rat Patrol | | Deerslayer | | Elvira | |
| | Land of the Free and Home of the Brave | |
| | Keppylou's Art | | WWI Soldier's Diary | |