| | LRK Home | | Bio Info | | Krash Khronicles | | LAROKE | |
| | BettyLou | | BillyBob's Garage | | Rat Patrol | | Deerslayer | | Elvira | |
| | Land of the Free and Home of the Brave | |
| | Keppylou's Art | | WWI Soldier's Diary | |
BillyBob Work-in-Progress Log
![]()
TRUCK LINKS including vendor sites for old parts, custom parts, and tools as well as sites for classic car and truck organizations
STORE Operating in association with Amazon.com, books, recordings and tools can be purchased.
PLANNING for the restoration including project schedule and cost estimates.
![]()
WORK-IN-PROGRESS is the restoration of parts of BillyBob that I can accomplish without a garage.
PRE-RESTORATION includes log entries of minor repairs and and adventures between time of purchase and the time when I started restoration, a piece at a time.
JR'S KORNER JR's Korner is the history of BillyBob before I got him authored by my brother, Wm. C. Kephart.
3. Shifty Behavior Page 2
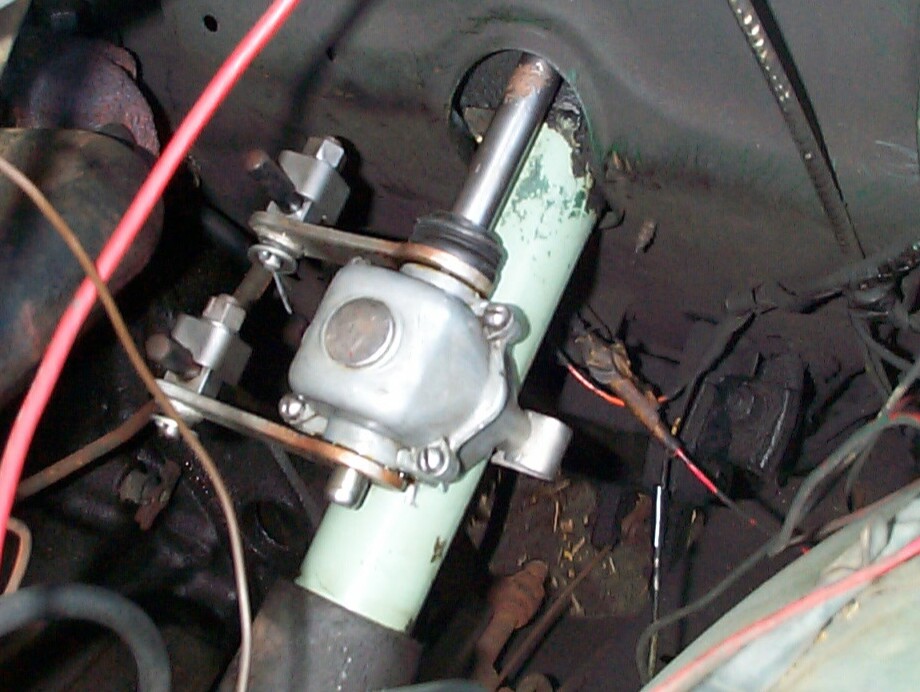
May 2nd 2000 My co-worker and friend, Rick Steffan, pointed out after comparing the photographs and Factory Assembly Drawing that the 1st and Reverse lever assembly appeared to be on the shaft backwards! By Golly! I have to agree with him 'tho I was unsuccessful at putting it on the shaft any other way than indicated in the photos last session. It is slightly bent inwards, maybe the result of a previous "force-fit".
 May
13th 2000 Whew! Summer
is here in South Florida. S'posed to hit ninety 'fore noon. I'm moving
slow like a gecko in the sun. I was at a family wedding in Morehead
City, North Carolina, last weekend and didn't work on BillyBob.
Morehead is a nice place that reminds me a lot of Key West. I felt
right at home. First thing I did today was to remove the 1st
and Reverse lever assembly and turn it around to the proper
orientation. The shift rod now clears the other shift lever in all
positions by at least 3/32 of an inch, 'tho the shift lever is still
bent somewhat by the previous force fit.
May
13th 2000 Whew! Summer
is here in South Florida. S'posed to hit ninety 'fore noon. I'm moving
slow like a gecko in the sun. I was at a family wedding in Morehead
City, North Carolina, last weekend and didn't work on BillyBob.
Morehead is a nice place that reminds me a lot of Key West. I felt
right at home. First thing I did today was to remove the 1st
and Reverse lever assembly and turn it around to the proper
orientation. The shift rod now clears the other shift lever in all
positions by at least 3/32 of an inch, 'tho the shift lever is still
bent somewhat by the previous force fit.
Now I'm not gonna blame JR for this, 'cause it was probably messed up before he got the truck, and I'm hungry for more tales from him about when he owned BillyBob. It's been a while since he's penned any and I want to be ready when he finds his muse again. Currently, he's using his communications skills to hold seminars for IEEE and other frivolous stuff (Jus' kiddin' JR).
I ordered a new product, "Diamond Clear Gloss Finish for Bare Metal" aerosol (#10200Z), from Eastwood to finish the shift levers and shift box. The shift rods will be finished with "Chassis Black". Cotter Pin Removal Pliers (#49006) were also ordered. I plan to pick up a bench vise in the coming week to help me straighten out the 1st and Reverse lever before applying the finish.
When I got BillyBob back on the ground, I decided to replace the bushings on the swivel assembly that connect the shift rods to the shift box levers since these were pretty "loosie-goosie". I had figured out by this time that this was where the ME102 Shift Lever Bushings really belonged. I was thrown off before by the fact that there are six in the package and only two are required. I am thankful for the four extras. I got the rear lever assembly (1st and Reverse) apart, back together, and adjusted OK. The nut on the front lever assembly was frozen, however. That accursed Murphy again!
I tried WD-40, then two applications of Liquid Wrench Penetrating Oil without luck. I decided to quit before I got farther behind. What I had done so far today seemed to make the shifting easier, at least in a static test in the parking lot. The "proof is in the pudding" and I'll find out for sure when I take BillyBob back to the warehouse in a few hours. It's time to get in out of the sun anyway. With my fair-skinned, red-haired, complexion I can actually blister on an overcast day. Coal miners used to keep canaries in cages down below. When the birds stopped singing and dropped over dead, it indicated dangerous levels of methane and time to book. My boating friends use me as their canary. When I turn red and start to bubble, they put on sunscreen.
I went inside and ordered a can of Kroil/AeroKroil Penetrating Oil from the Kano Laboratories Website. Some of the ole truckers on the mailing list swear this stuff is a miracle product and I'm hoping it'll help me out here.
May 20th 2000 I got a Craftsman 6-1/2" Bench Vise at Sears during the week. The cotter pin pliers and Diamond Clear coating aerosol arrived from Eastwood by mid-week and the Kroil/AeroKroil Penetrating Oil got here from Kano yesterday. Since the rear of BillyBob was jacked up this week instead of the front (to paint the rear wheels), there wasn't much space under the truck to work on the transmission linkage. I'm sure the cotter pin pliers will work great just as soon as I can find a way to get at the cotter pins I need to remove!
The bent 1st and Reverse lever was removed again and pounded on a bit with the assistance of the vise, but I wasn't making much progress, so I quit before I screwed things up. I did have some difficulty getting it back on the transmission after the straightening session.
May 27th 2000 Not much progress this week. I've been up to the warehouse everyday giving BillyBob a dose of the Kroil/AeroKroil Penetrating Oil on the frozen shift box front lever assembly and it's still frozen. I've also been looking for replacements for the little 7/16" x 7/16" compression springs that go on the end of each shift rod assembly without luck so far.
 June
3rd 2000 Better luck
today! Last week, my friend Rick Steffan offered help again in the form
of another type of penetrating oil, "PB Blaster". Dutifully, I visited
BillyBob at his warehouse bay everyday to apply some PB Blaster and try
to losen the bolt again. This treatment appeared to be having the same
effect as the previous treatments . . . no progress, that is. On
thursday, I visited Sears again and purchased their Craftsman MAPP Gas
Swivel Head Torch Kit.
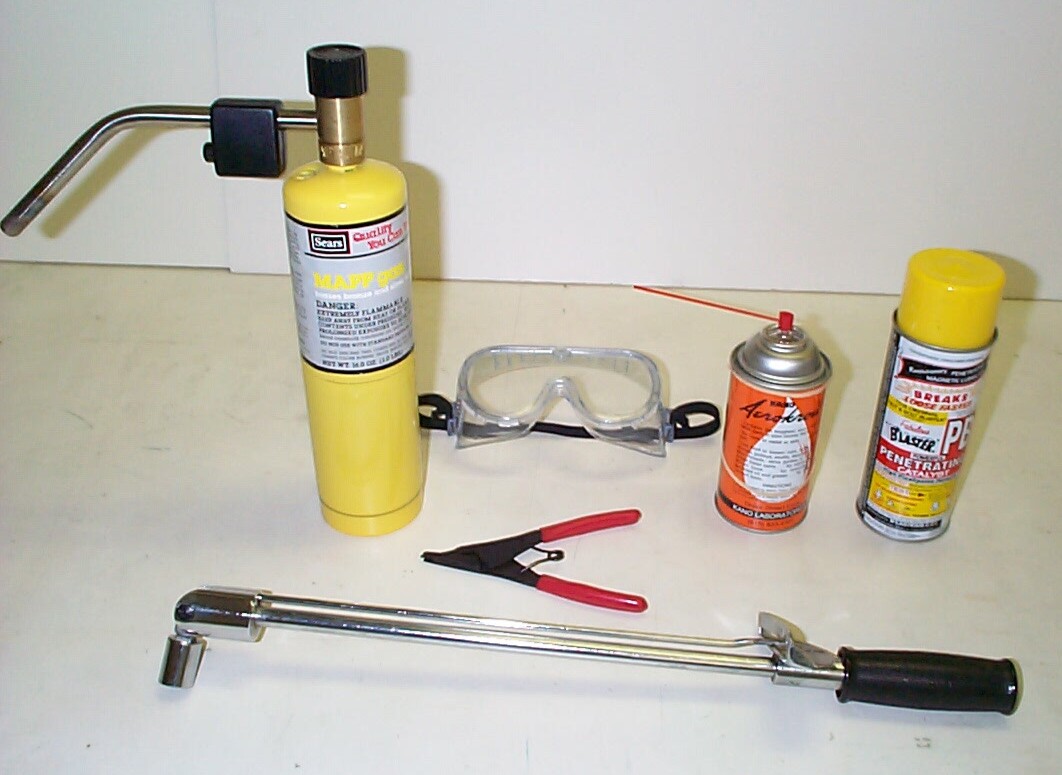
June
3rd 2000 Better luck
today! Last week, my friend Rick Steffan offered help again in the form
of another type of penetrating oil, "PB Blaster". Dutifully, I visited
BillyBob at his warehouse bay everyday to apply some PB Blaster and try
to losen the bolt again. This treatment appeared to be having the same
effect as the previous treatments . . . no progress, that is. On
thursday, I visited Sears again and purchased their Craftsman MAPP Gas
Swivel Head Torch Kit.
I managed to maneuver the torch into a position where I could apply heat to the frozen nut without burning anything else and keep the torch upright per instructions . . . no easy feat. The bolt was heated 'til there was just a hint of red at the edges. I applied the box end 9/16" wrench again . . . no joy. Next, another dose of Kroil/AeroKroil after the nut cooled down some. I found a 1/4" drive adapter for my old torque wrench and went after the nasty nut with a 9/16" socket on the torque wrench . . . the additional leverage was enuf to do the trick. It finally broke free without damage.
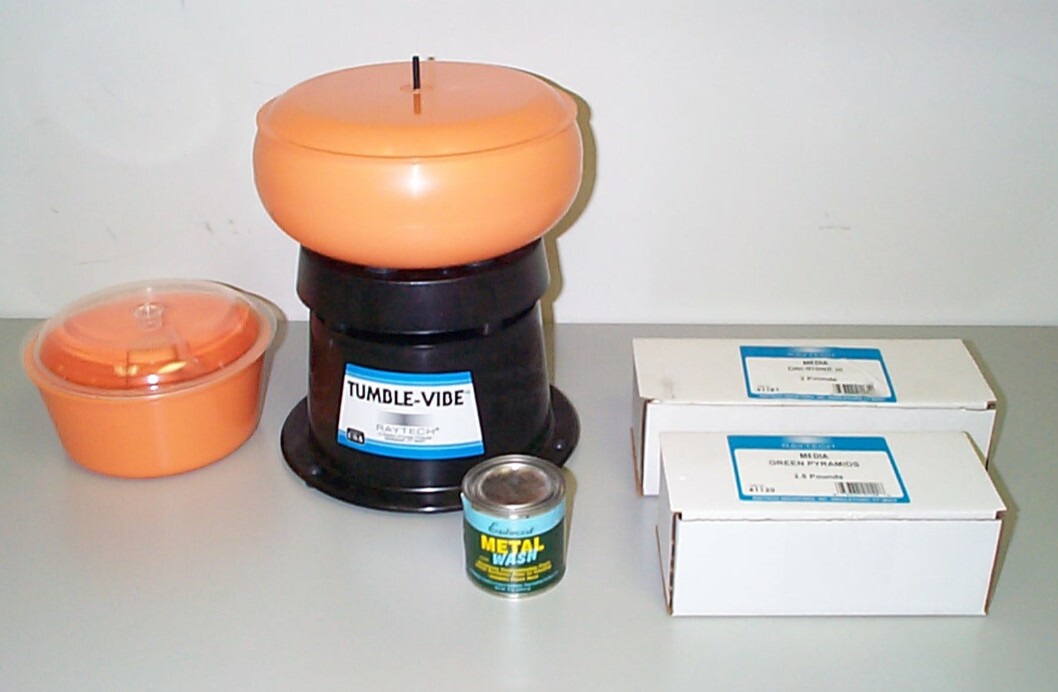 I
got to use my new cotter pin pliers too and they work great in
situations where you have about 6" clearance around the cotter pin in
which to work since they have to be applied perpendicular to the eye of
the cotter pin. Both swivel assemblies were disassembled and put in
Eastwood's "Vibratory Tumbler System" (catalog #43204) with some lug
nuts I already had bouncing around in there.
I
got to use my new cotter pin pliers too and they work great in
situations where you have about 6" clearance around the cotter pin in
which to work since they have to be applied perpendicular to the eye of
the cotter pin. Both swivel assemblies were disassembled and put in
Eastwood's "Vibratory Tumbler System" (catalog #43204) with some lug
nuts I already had bouncing around in there.
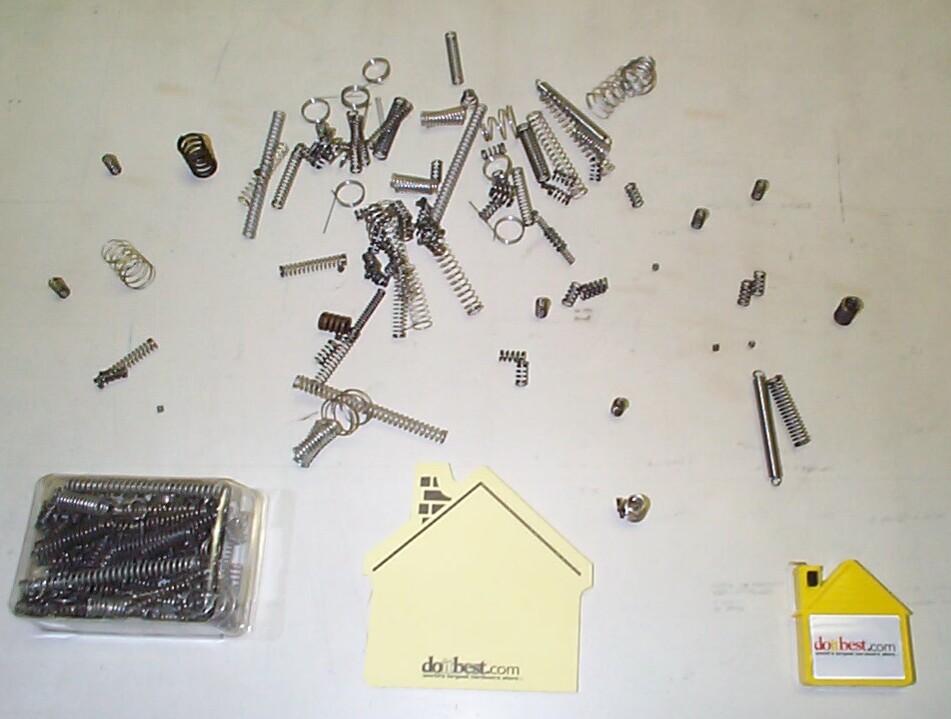 I
still haven't been able to locate a local source for the 7/16" x 7/16"
compression springs I need. In mild desperation I ordered a couple of
"Spring Asortment #1" paks from the doitbest.com
hardware Website. The tab was only a little more than a ten-spot,
including shipping. Worth the gamble. Here's wot I got back. The only
spring close to what I need measured 1" long by 1/2" dia., and cutting
it in half might work in a pinch, but it is much stiffer than the
originals I'm trying to replace. It was an acceptable gamble but no
cigar this time. All these springs go into the misc. parts bin for now.
The little promotional yellow house tape measure and stick-it notepad
is nice too.
I
still haven't been able to locate a local source for the 7/16" x 7/16"
compression springs I need. In mild desperation I ordered a couple of
"Spring Asortment #1" paks from the doitbest.com
hardware Website. The tab was only a little more than a ten-spot,
including shipping. Worth the gamble. Here's wot I got back. The only
spring close to what I need measured 1" long by 1/2" dia., and cutting
it in half might work in a pinch, but it is much stiffer than the
originals I'm trying to replace. It was an acceptable gamble but no
cigar this time. All these springs go into the misc. parts bin for now.
The little promotional yellow house tape measure and stick-it notepad
is nice too.
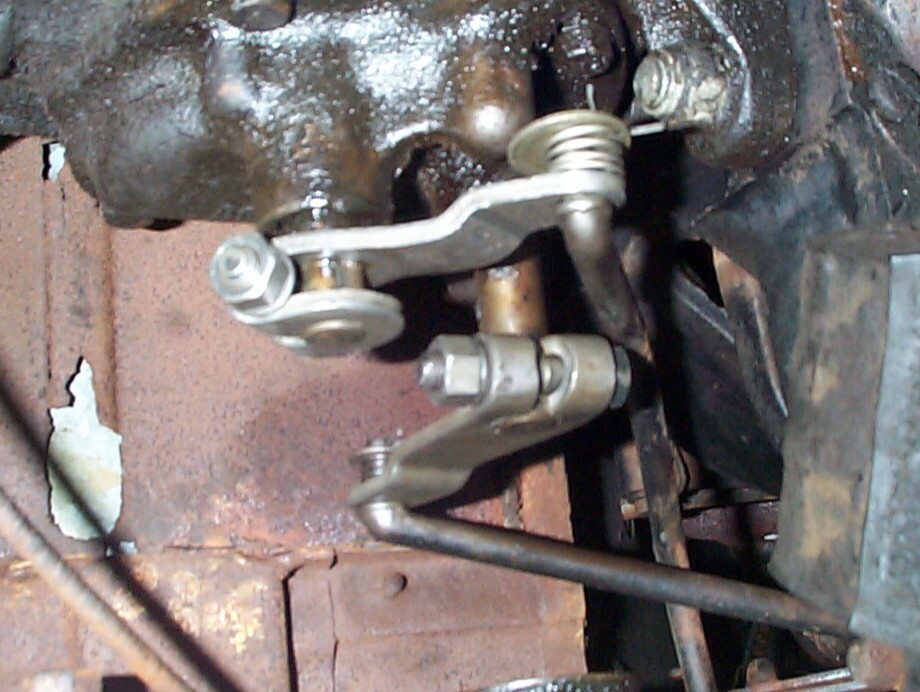
 After
the tumbler was finished, the swivel parts were rinsed with water and
dried with a hair-dryer. The pic shows the parts lined up for
re-assembly including bushings and cotter pins. OK, now that I've
finally tripped over the frozen nut hurdle, next week I plan on
installing the re-built shift box.
After
the tumbler was finished, the swivel parts were rinsed with water and
dried with a hair-dryer. The pic shows the parts lined up for
re-assembly including bushings and cotter pins. OK, now that I've
finally tripped over the frozen nut hurdle, next week I plan on
installing the re-built shift box.
I've made some progress. I feel the spirit of my Dad sitting on my shoulder today instead of Murphy. Not that Dad didn't have his bad days too. One that comes to mind is when we were rebuiding the 223 CI inline six of my 1st car, a '59 Ford sedan. We were rebuilding it because I had run it several miles without water. We were finishing the head work at my paternal grandfather's shop. It was mid-winter, temperature in the twenties, and the only heat was within five feet of the shop's potbellied stove. I was cleaning parts and Dad was finishing the valve seats. He was trying to finish in time to pick up my mother at work, a half-hour drive in the family car, a '67 Plymouth Fury III. I was to drive the old Ford back with its non-working heater. The exhaust system needed replacement too, so you had to ride with the windows down to avoid asphyxiation. He cursed more as the deadline approached. Finally he said "You go pick up your mother. I'll be home with your !@#$%^ Ford when I ~!@#$% finish." Someone else might have said the heck with it and abandoned the job for another week. I'm just now realizing some of the things my father did for me, and I think I still have a few discoveries ahead. He wandered in a few hours later, dirty, exhausted and frozen. I never ran an engine without water again.
 June
17th 2000 Replaced
Billybob's shift box with the rebuilt unit from Jim
Carter's today. Improvement is difficult to judge.
Thankfully, the bolts thru the clamp securing the shift box to the
steering column were not frozen because I couldn't see them, only feel
them and there wasn't much room to work in. I received an unpleasant
surprise when I got the shift box off. The shift box has an alignment
"peg" on the bottom where it mates with the steering column. I was
expecting a corresponding hole in the steering column . . . what I saw
was a 3/4" or so longitudinal slot. This is good for adjustment (and
necessary, now that I think about it), but to my addled brain's way of
thinking, there's already too many adjustment points between
transmission and gear shift lever in the cab.
June
17th 2000 Replaced
Billybob's shift box with the rebuilt unit from Jim
Carter's today. Improvement is difficult to judge.
Thankfully, the bolts thru the clamp securing the shift box to the
steering column were not frozen because I couldn't see them, only feel
them and there wasn't much room to work in. I received an unpleasant
surprise when I got the shift box off. The shift box has an alignment
"peg" on the bottom where it mates with the steering column. I was
expecting a corresponding hole in the steering column . . . what I saw
was a 3/4" or so longitudinal slot. This is good for adjustment (and
necessary, now that I think about it), but to my addled brain's way of
thinking, there's already too many adjustment points between
transmission and gear shift lever in the cab.
The shift box clamp and bolts were cleaned in the tumbler and the steering column between steering gear box and firewall was cleaned with "goo-off" and rags. Sure nuff, when I got the thing back together, I couldn't get clean shifts between all three gears and reverse all the time. 1st/reverse shifts would bind as often as not after coming back thru the gate from 2nd/3rd gear shifts. The situation was improved a bit by messing with the swivel adjustments again. Still, the neutral gate did not seem to have enough play.
I got out the shop manual at this juncture. It states the clearance between the "gearshift lever and gearshift control upper support" should be between 3/32" and 1/8". I had about 1/16" clearance. To adjust the clearance you have to "remove upper bolt from upper and lower control shaft clamp and remove two screws holding upper support to steering gear housing and remove upper control shaft assembly." This is darn near impossible to accomplish with the steering wheel in place, but I managed to move things enough to turn the support around the shaft once, which gave me clearance in the proper range. With a little profanity I got things hooked up again. There seems to be a small improvement.
Our mail carrier arrived about this time and he had the August issue of "Classic Trucks" magazine as well as a Chevy Duty catalog for me. My mood improved.
| < Back to Intro |
You can email me at ![]() webmaster@laroke.com
webmaster@laroke.com
Issued Saturday September 23, 2000
Updated Thursday April 20, 2017
copyright © 1996-2017 Larry Robert Kephart all rights reserved
| | LRK Home | | Bio Info | | Krash Khronicles | | LAROKE | |
| | BettyLou | | BillyBob's Garage | | Rat Patrol | | Deerslayer | | Elvira | |
| | Land of the Free and Home of the Brave | |
| | Keppylou's Art | | WWI Soldier's Diary | |