| | LRK Home | | Bio Info | | Krash Khronicles | | LAROKE | |
| | BettyLou | | BillyBob's Garage | | Rat Patrol | | Deerslayer | | Elvira | |
| | Land of the Free and Home of the Brave | |
| | Keppylou's Art | | WWI Soldier's Diary | |
BillyBob Work-in-Progress Log
![]()
TRUCK LINKS including vendor sites for old parts, custom parts, and tools as well as sites for classic car and truck organizations
STORE Operating in association with Amazon.com, books, recordings and tools can be purchased.
PLANNING for the restoration including project schedule and cost estimates.
![]()
WORK-IN-PROGRESS is the restoration of parts of BillyBob that I can accomplish without a garage.
PRE-RESTORATION includes log entries of minor repairs and and adventures between time of purchase and the time when I started restoration, a piece at a time.
JR'S KORNER JR's Korner is the history of BillyBob before I got him authored by my brother, Wm. C. Kephart.
3. Shifty Behavior Page 3
June 24th 2000 The trip back to the barn last week was not entirely satisfactory. I did not have any problems on the 1st to 2nd to 3rd gear shifts, but getting the gearshift back thru the gate into 1st or reverse positions at stoplights was still problematic. First thing this morning I moved the shift box about 3/32" up the steering column in its alignment slot to see if that would improve the shifting. When I removed the old shift box I could tell from the dirt patterns on the bottom that it had been on the column as far up as it would go. When the new shift box was installed last week, its alignment pin was located at the other end of the slot. BillyBob was test driven around the block . . . If there is any improvement it's too hard to tell.
 I
think I'll work on the shift lever adjustment at the steering wheel
again. When I started getting ready for the re-wiring job last week, I
anticipated pulling the steering wheel to get at the horn button
wiring. That would make this job easier too. Eastwood
has a steering wheel restoration kit with puller (catalog #52061), and
since that job has to be done too someday, I ordered the kit and it
arrived a few days ago. I took off the steering wheel and, for a change
of pace, didn't have any problems with the procedure. Had to stop for a
moment to deal with a wasp that had taken a liking to BillyBob's cab.
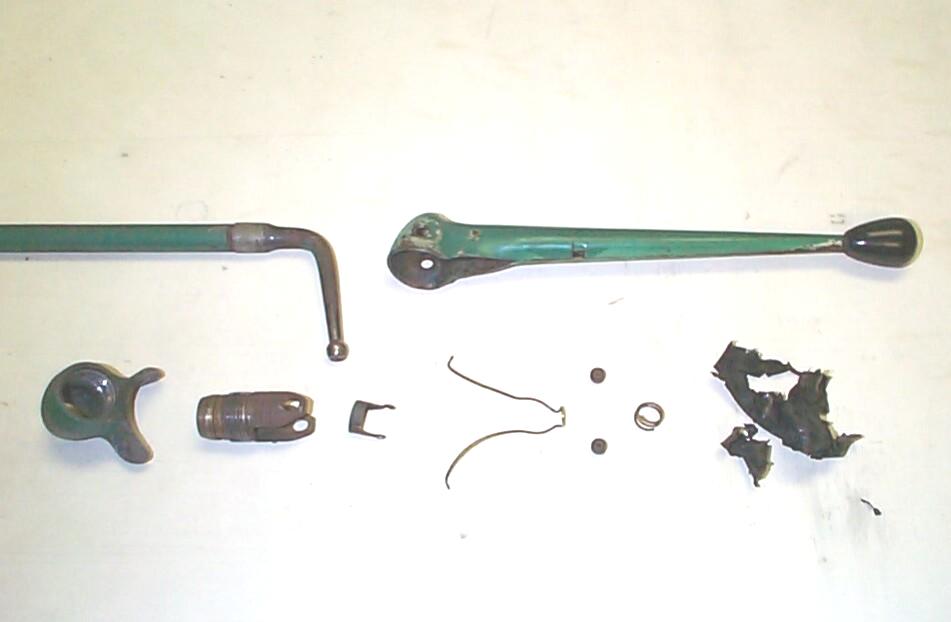
That done, I removed the gearshift assembly. After a little
headscratchin' I got it disassembled. A small coil spring was held in
place around the "ball joint" end of the "Upper Control Shaft" and
wishbone-shaped "Shift Lever Spring" with electrical tape. I can't be
sure, but I don't think BillyBob came out of the Los Angeles factory
this way.
I
think I'll work on the shift lever adjustment at the steering wheel
again. When I started getting ready for the re-wiring job last week, I
anticipated pulling the steering wheel to get at the horn button
wiring. That would make this job easier too. Eastwood
has a steering wheel restoration kit with puller (catalog #52061), and
since that job has to be done too someday, I ordered the kit and it
arrived a few days ago. I took off the steering wheel and, for a change
of pace, didn't have any problems with the procedure. Had to stop for a
moment to deal with a wasp that had taken a liking to BillyBob's cab.
That done, I removed the gearshift assembly. After a little
headscratchin' I got it disassembled. A small coil spring was held in
place around the "ball joint" end of the "Upper Control Shaft" and
wishbone-shaped "Shift Lever Spring" with electrical tape. I can't be
sure, but I don't think BillyBob came out of the Los Angeles factory
this way.
The small parts from the steering wheel and shift lever assemblies were thrown in the tumbler for cleaning and the other shift lever parts and the steering column were given an initial treatment with Goo-Off to get some of the acumulated crud off. I also moved the shift box in the engine compartment up the steering column a "smidgeon' more. After the parts were clean, I proceded to put the gearshift assembly back together with the new Shift Lever Spring and pins I purchased from Jim Carter months ago. After a few aborted attempts and mini panic attacks, I found the trick to the process and got the darn thing re-assembled. There's always a trick, isn't there?
During replacement of the gearshift assembly on the steering column, I found it didn't like where I'd put the shift box, so that earlier "smidgeon" adjustment was reversed. Got the steering wheel back on without trouble and the shifts thru the gears seem marginally better but that may just be wishful thinkin'. The test will be on the way back to the warehouse again. Good thing I have a pickup box to carry my tools with me!
June 26th 2000 In my eternal quest for the elusive 7/16" O.D. by 7/16" long compression springs for the six shift rod/shift lever connection assemblies, I've ordered another spring assortment , this time from Harbor Freight. This cost about $22 with shipping and consists of 20 different compression and extension springs that can be cut to size. Unfortunately, the 7/16" compression spring in this assortment is too stiff for my purposes. More springs for the parts box!
 I
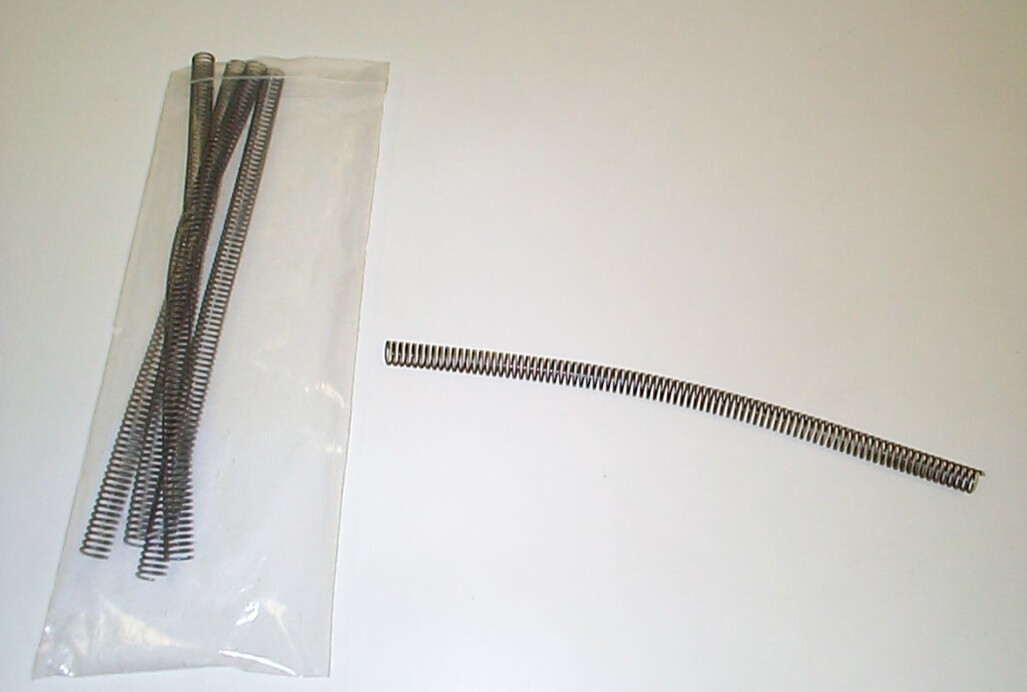
tried one more time with an order to McMaster-Carr
Supply Company. In their online catalog I located a "continuous-length
compression spring, hard-drawn steel, 11" long, 0.48" O.D., 0.041"
wire, 5 to a package" for less than ten dollars. These
springs arrived today, and tho' I'll have to cut them to length
(without the finished ends of the originals), they aren't too stiff and
they'll be close enuf for "Stage I" work. I've gathered just about all
I need to complete this job, if I can only figure out how to get at the
intermediate
I
tried one more time with an order to McMaster-Carr
Supply Company. In their online catalog I located a "continuous-length
compression spring, hard-drawn steel, 11" long, 0.48" O.D., 0.041"
wire, 5 to a package" for less than ten dollars. These
springs arrived today, and tho' I'll have to cut them to length
(without the finished ends of the originals), they aren't too stiff and
they'll be close enuf for "Stage I" work. I've gathered just about all
I need to complete this job, if I can only figure out how to get at the
intermediate
"bellcrank" assembly on the side of the bellhousing - It
is nearly inaccessible without taking the truck apart.
July 15th 2000 A short break in the monsoon season saturdays we've been having here. I have enuf confidence of clear weather for a few hours that I've rolled out the jack and stands to work on the shift rods today. Can't get the mutilated cotter pin off the "LEVER 3698273" to "ROD 3713866" connection (Factory Assembly Manual designations). I just can't get any of the tools at my disposal in there with the exception of the long bent needle-nose pliers, and I can't get leverage with that tool. ~!@#$%^**. Wish I could time-warp forward a few years and pickup a batch of Craftsman Mil-Spec Nano-tech at Sears, then program those little buggers to go in there and eat that ~!@#$ cotter pin! Enuf daydreams, the wind is kickin' up a bit. Time to get BillyBob back on all four wheels and write today off as far as the shift linkage is concerned. I'll move on to the steering wheel restoration where I think I can effect a little progress.
July 29th 2000 We had construction work going on here at the Krash Lab last week so I passed up working underneath BillyBob and concentrated on the steering wheel. Today, I jacked BillyBob up again for 'nother go at my nemesis, the cotter pin. The 2nd/3rd shift lever assembly was partially disassembled this time to get the "ROD 3713866" past it for a little more clearance and jockeying room. With the additional movement and use of the trouble light, I realized that I had been pulling at the cotter pin ninety degrees to the hole it was in instead of inline with it. New knowledge of the situation in mind, the cotter pin was out with a few more choice curses.
The shift rods were immersed in carb cleaner for a couple of hours to get most of the built up grease and paint off. That left the rust to contend with. I don't have a blast cabinet yet or the air compressor to run it so I'm left with methods that require more manual labor. 60 grit sandpaper by hand, then my new Dremel motor tool at 10,000 RPM with the coarse sanding drum cleaned up everything but the deep pitting. Close enuf for gov'ment work. The rods were finished up with Eastwood's PRE Paint Prep (catalog #10041Z).
 I
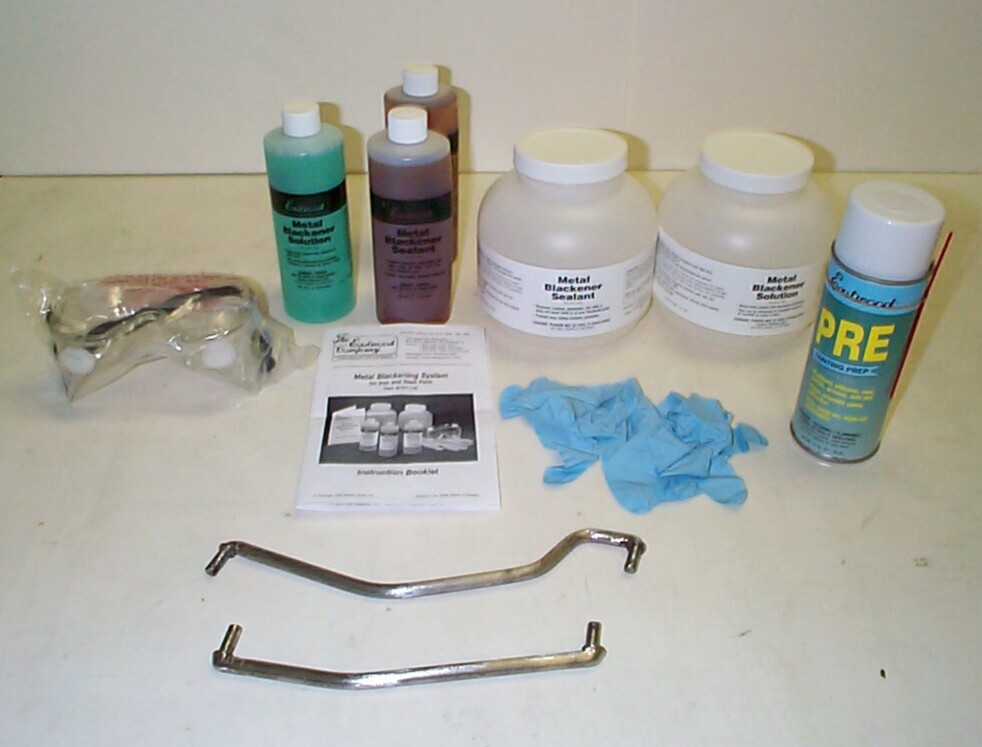
want to finish the shift rods black and, if this were a "Stage II"
operation, powdercoat would be the preferred method. For Stage I, I'm
settling for a combo platter. The high wear ends of the shift rods will
be finished with Eastwood's new "Metal Blackening System" (#10113Z) and
the rest of the rods will be painted with Eastwood's "Chassis Black"
(#10025Z). I got the ends of the rods treated with the Blackening
solution and sealant and hung them up to dry for a couple of hours.
This system demands clean metal. Don't let any contaminants touch the
bare metal before treatment, including skin oils (wear the rubber
gloves supplied with the kit). This kit is made for small parts that
can be fully submerged in the solution, not parts as large as these
shift rods. That's why I intend to mask off the ends and paint the rods
with chassis black next week.
I
want to finish the shift rods black and, if this were a "Stage II"
operation, powdercoat would be the preferred method. For Stage I, I'm
settling for a combo platter. The high wear ends of the shift rods will
be finished with Eastwood's new "Metal Blackening System" (#10113Z) and
the rest of the rods will be painted with Eastwood's "Chassis Black"
(#10025Z). I got the ends of the rods treated with the Blackening
solution and sealant and hung them up to dry for a couple of hours.
This system demands clean metal. Don't let any contaminants touch the
bare metal before treatment, including skin oils (wear the rubber
gloves supplied with the kit). This kit is made for small parts that
can be fully submerged in the solution, not parts as large as these
shift rods. That's why I intend to mask off the ends and paint the rods
with chassis black next week.
Managed to get things back together for the ride back to BillyBob's warehouse. I'm using 1/16" x 1" cotter pins just to hold things in place until "final assembly" which will use 3/32" x 1-1/2" cotter pins. These small cotter pins are "finger-bendable". Even so, I have to hold and compress the spring and washer while inserting the cotter pin. This is not that hard except for the one location that I've been having the problems getting access to. Here, I have to do everything with one hand and I managed that, much to my own surprise. I hope I can repeat the performance in the future weeks. Remarkable design the "Great Mechanic in the Sky" came up with in the human hand.
August 5th 2000 Jacked BillyBob up and removed the transmission to bellcrank assembly shift rods again. I cleaned the shift rods with Eastwood's PRE Paint Prep (catalog #10041Z) again and a good bit of the "Blackening" came off, so I must of really screwed up the application of that stuff last week . . . live an' learn. Masked off the ends of the rods and sprayed them with Eastwood's "Chassis Black" (#10025Z).
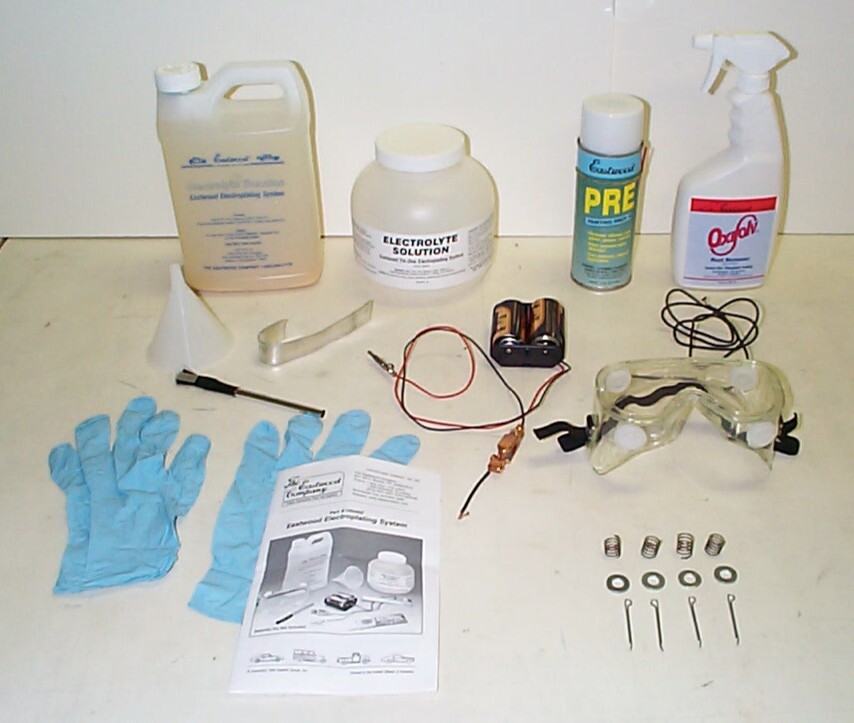 I
cut off four lengths of the compression spring I purchased from McMaster-Carr
Supply Company with my Dremel motor tool to match the
existing 7/16" O.D. by 7/16" long compression springs I haven't been
able to find replacements for. Weeks back, I had picked up new 5/16"
flat washers and 3/32" x 1-1/2" cotter pins. Four flat washers, four
cotter pins and the four spring lengths were now surmerged in
Eastwood's OxiSolv rust remover/cleaner (#16026) for ten minutes, then
dumped in a plastic cup of clean water. The parts were picked out of
the cup, one at a time, and electroplated with Eastwood's Tin-Zinc
Electroplating System (#10049Z) for three minutes each. After each part
came out of the electroplating solution, it was dumped in a second cup
of cold water. When all the springs, washers and cotter pins were
electroplated, they were removed from the water and dried with a hair
dryer. The dried parts were treated to a session in Eastwood's
"Vibratory Tumbler System" (catalog #43204) to shine them up a little.
I
cut off four lengths of the compression spring I purchased from McMaster-Carr
Supply Company with my Dremel motor tool to match the
existing 7/16" O.D. by 7/16" long compression springs I haven't been
able to find replacements for. Weeks back, I had picked up new 5/16"
flat washers and 3/32" x 1-1/2" cotter pins. Four flat washers, four
cotter pins and the four spring lengths were now surmerged in
Eastwood's OxiSolv rust remover/cleaner (#16026) for ten minutes, then
dumped in a plastic cup of clean water. The parts were picked out of
the cup, one at a time, and electroplated with Eastwood's Tin-Zinc
Electroplating System (#10049Z) for three minutes each. After each part
came out of the electroplating solution, it was dumped in a second cup
of cold water. When all the springs, washers and cotter pins were
electroplated, they were removed from the water and dried with a hair
dryer. The dried parts were treated to a session in Eastwood's
"Vibratory Tumbler System" (catalog #43204) to shine them up a little.
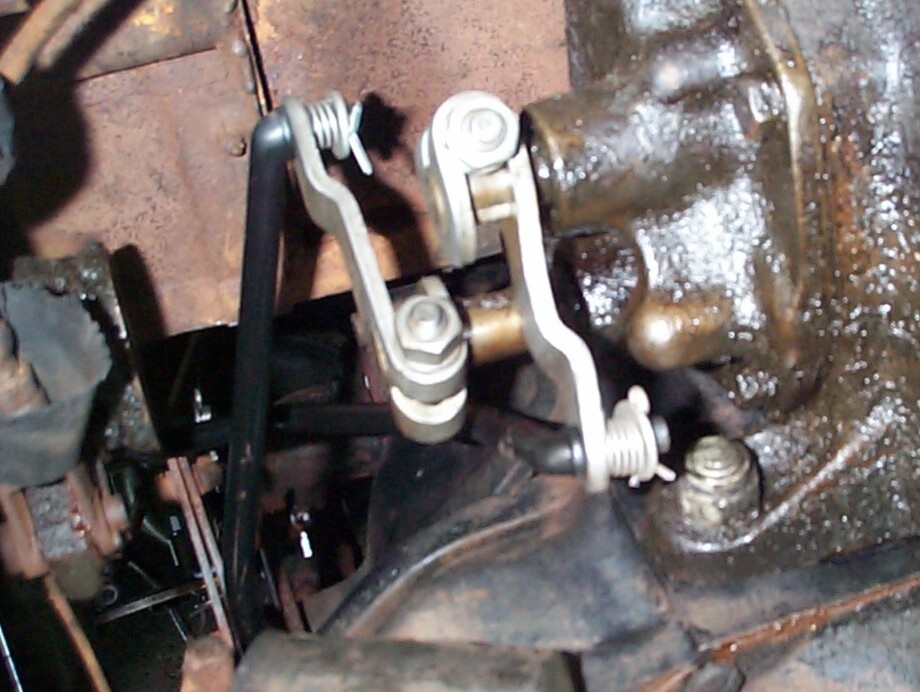 The
tumbler did a good job of putting a satin sheen on the plated parts.
During final assembly (of this part of the Stage I restoration), I
found the disadvantage of the un-finished compression spring ends were
that they kept getting stuck in the washer holes, in turn preventing
the washer from fitting on the shift rod end. I eventually got past
that minor irritation and this is the result. Next, is final
re-finishing of the shift rods and fittings between the bellcrank
assembly and the shift box on the steering column. I've given up doing
anything to the bellcrank assembly this go round. I haven't figured out
how to get it apart and I fear it is a press fit assembly that I can't
get to without taking the bellhousing out of the truck. I left messages
on the truck lists I belong to and at the StoveBolt
Bulletin Board, but nobody who knows how to do this was able
to respond to my messages. I'm sure I'll have a solution by the time I
get to the off-the-frame Stage II restoration.
The
tumbler did a good job of putting a satin sheen on the plated parts.
During final assembly (of this part of the Stage I restoration), I
found the disadvantage of the un-finished compression spring ends were
that they kept getting stuck in the washer holes, in turn preventing
the washer from fitting on the shift rod end. I eventually got past
that minor irritation and this is the result. Next, is final
re-finishing of the shift rods and fittings between the bellcrank
assembly and the shift box on the steering column. I've given up doing
anything to the bellcrank assembly this go round. I haven't figured out
how to get it apart and I fear it is a press fit assembly that I can't
get to without taking the bellhousing out of the truck. I left messages
on the truck lists I belong to and at the StoveBolt
Bulletin Board, but nobody who knows how to do this was able
to respond to my messages. I'm sure I'll have a solution by the time I
get to the off-the-frame Stage II restoration.
| < Back to Intro |
You can email me at ![]() webmaster@laroke.com
webmaster@laroke.com
Issued Saturday September 23, 2000
Updated Friday April 21, 2017
copyright © 1996-2017 Larry Robert Kephart all rights reserved
| | LRK Home | | Bio Info | | Krash Khronicles | | LAROKE | |
| | BettyLou | | BillyBob's Garage | | Rat Patrol | | Deerslayer | | Elvira | |
| | Land of the Free and Home of the Brave | |
| | Keppylou's Art | | WWI Soldier's Diary | |