| | LRK Home | | Bio Info | | Krash Khronicles | | LAROKE | |
| | BettyLou | | BillyBob's Garage | | Rat Patrol | | Deerslayer | | Elvira | |
| | Land of the Free and Home of the Brave | |
| | Keppylou's Art | | WWI Soldier's Diary | |
Tinkering with Deerslayer
![]()
DEERSLAYER LINKS including vendor sites for parts and tools as well as sites for old truck and hot rod organizations
![]()
TINKERING WITH DEERSLAYER chronicles the day-by-day maintenance and improvements episodes for Deerslayer, a '37 Chevy farm truck hot rod.
CRUISIN' WITH DEERSLAYER Roadtrips, cruise-in's and truck show stories and tall tales.
TONY'S DUNGEON Tony Pascarella's forum entries at OldGMCtrucks.com regarding Deerslayer, particularly the 302 GMC engine build in his farmhouse basement.
![]()
DEERSLAYER MAINTENANCE Ever changing detailing, oil change, lube, etc. maintenance routines specifically developed for Deerslayer, including required tools, materials and procedures.
PROJECT NAILHEAD Chronicles the rebuild of a 1954 Buick Roadmaster 322 nailhead engine as a future replacement for Deerslayer's Jimmy 302.
48. Dystopian Summer
 June
17th 2020
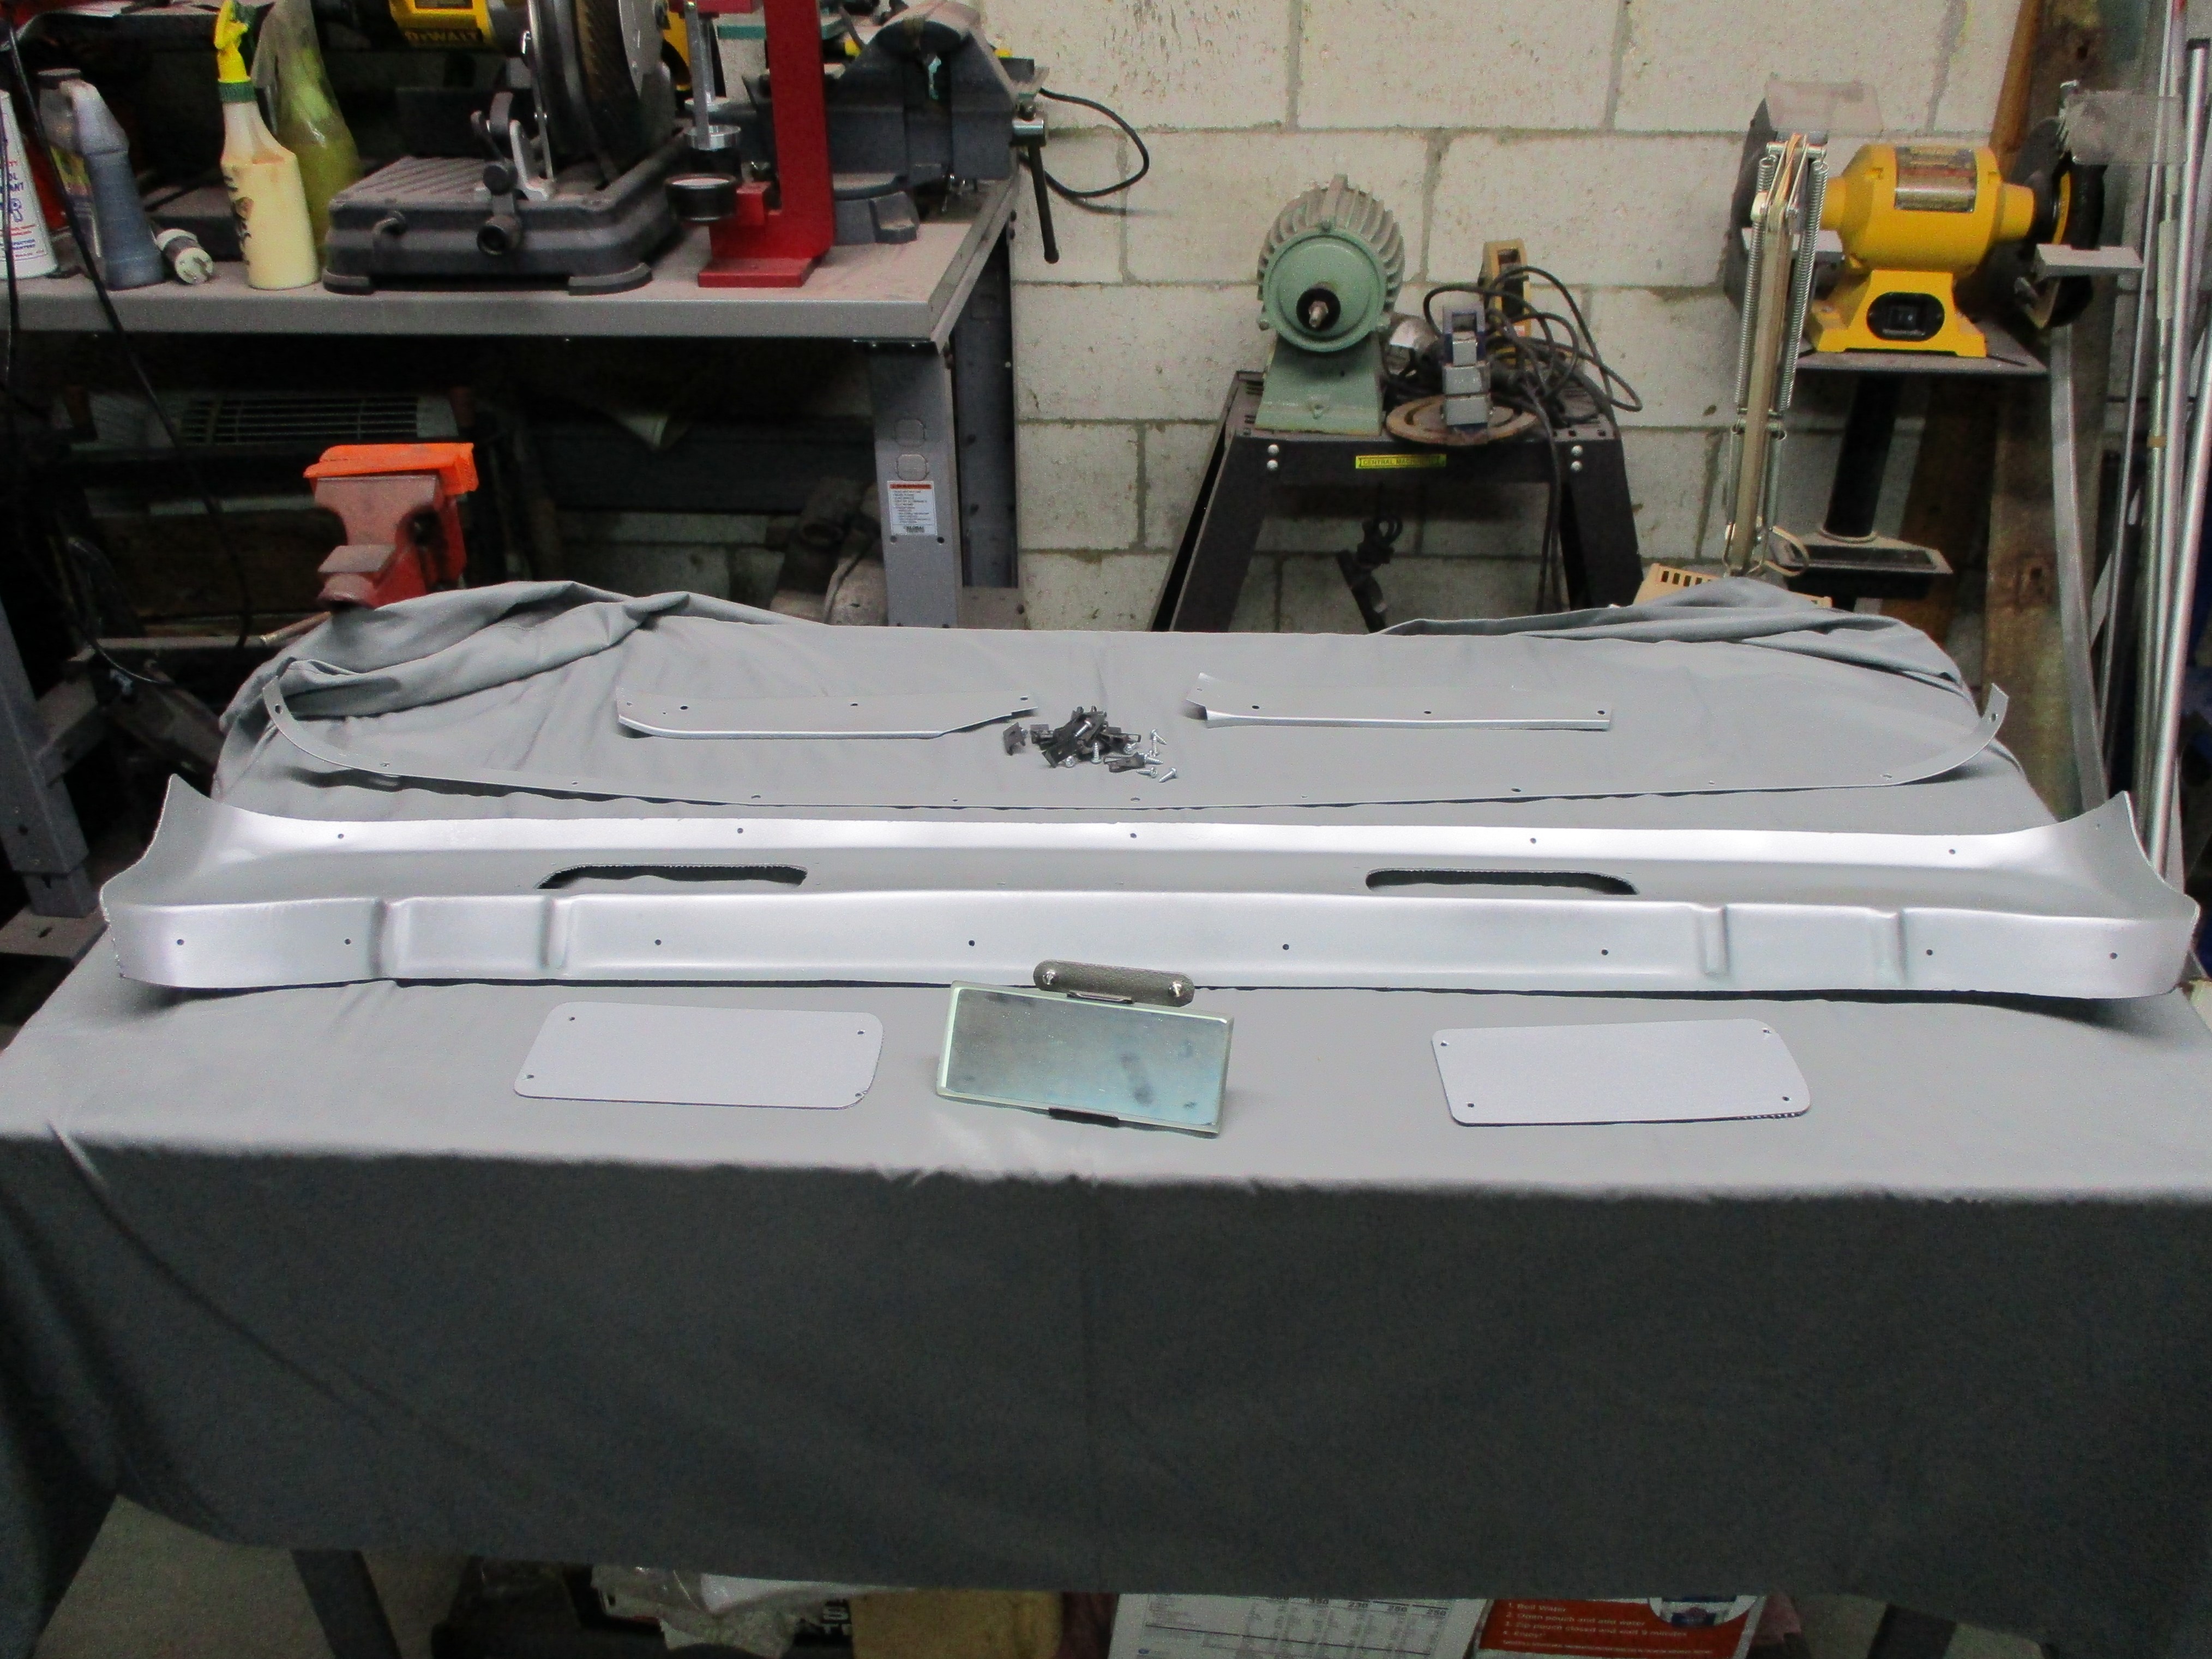
Back to the windshield hinge cover. Once the new wiper motor was
installed and it was clear the switch would be on the dash, I wanted
both wiper access covers to look the same so another flat cover was
ordered.
June
17th 2020
Back to the windshield hinge cover. Once the new wiper motor was
installed and it was clear the switch would be on the dash, I wanted
both wiper access covers to look the same so another flat cover was
ordered.
When it arrived, both covers were tidied up with a belt sander, taped on to the hinge cover and mounting holes drilled. Mounting holes were also drilled for the rear view mirror and stainless steel screws and hex nuts found in inventory to mount it.
The hinge cover and trim parts were roughed up with a
scotchbrite pad, PRE Paint prepped and sprayed with a coat of
Eastwood's Silver CAD detail paint. Beer of the day was Payette Brewing
Company's Pistolero Porter.
 June
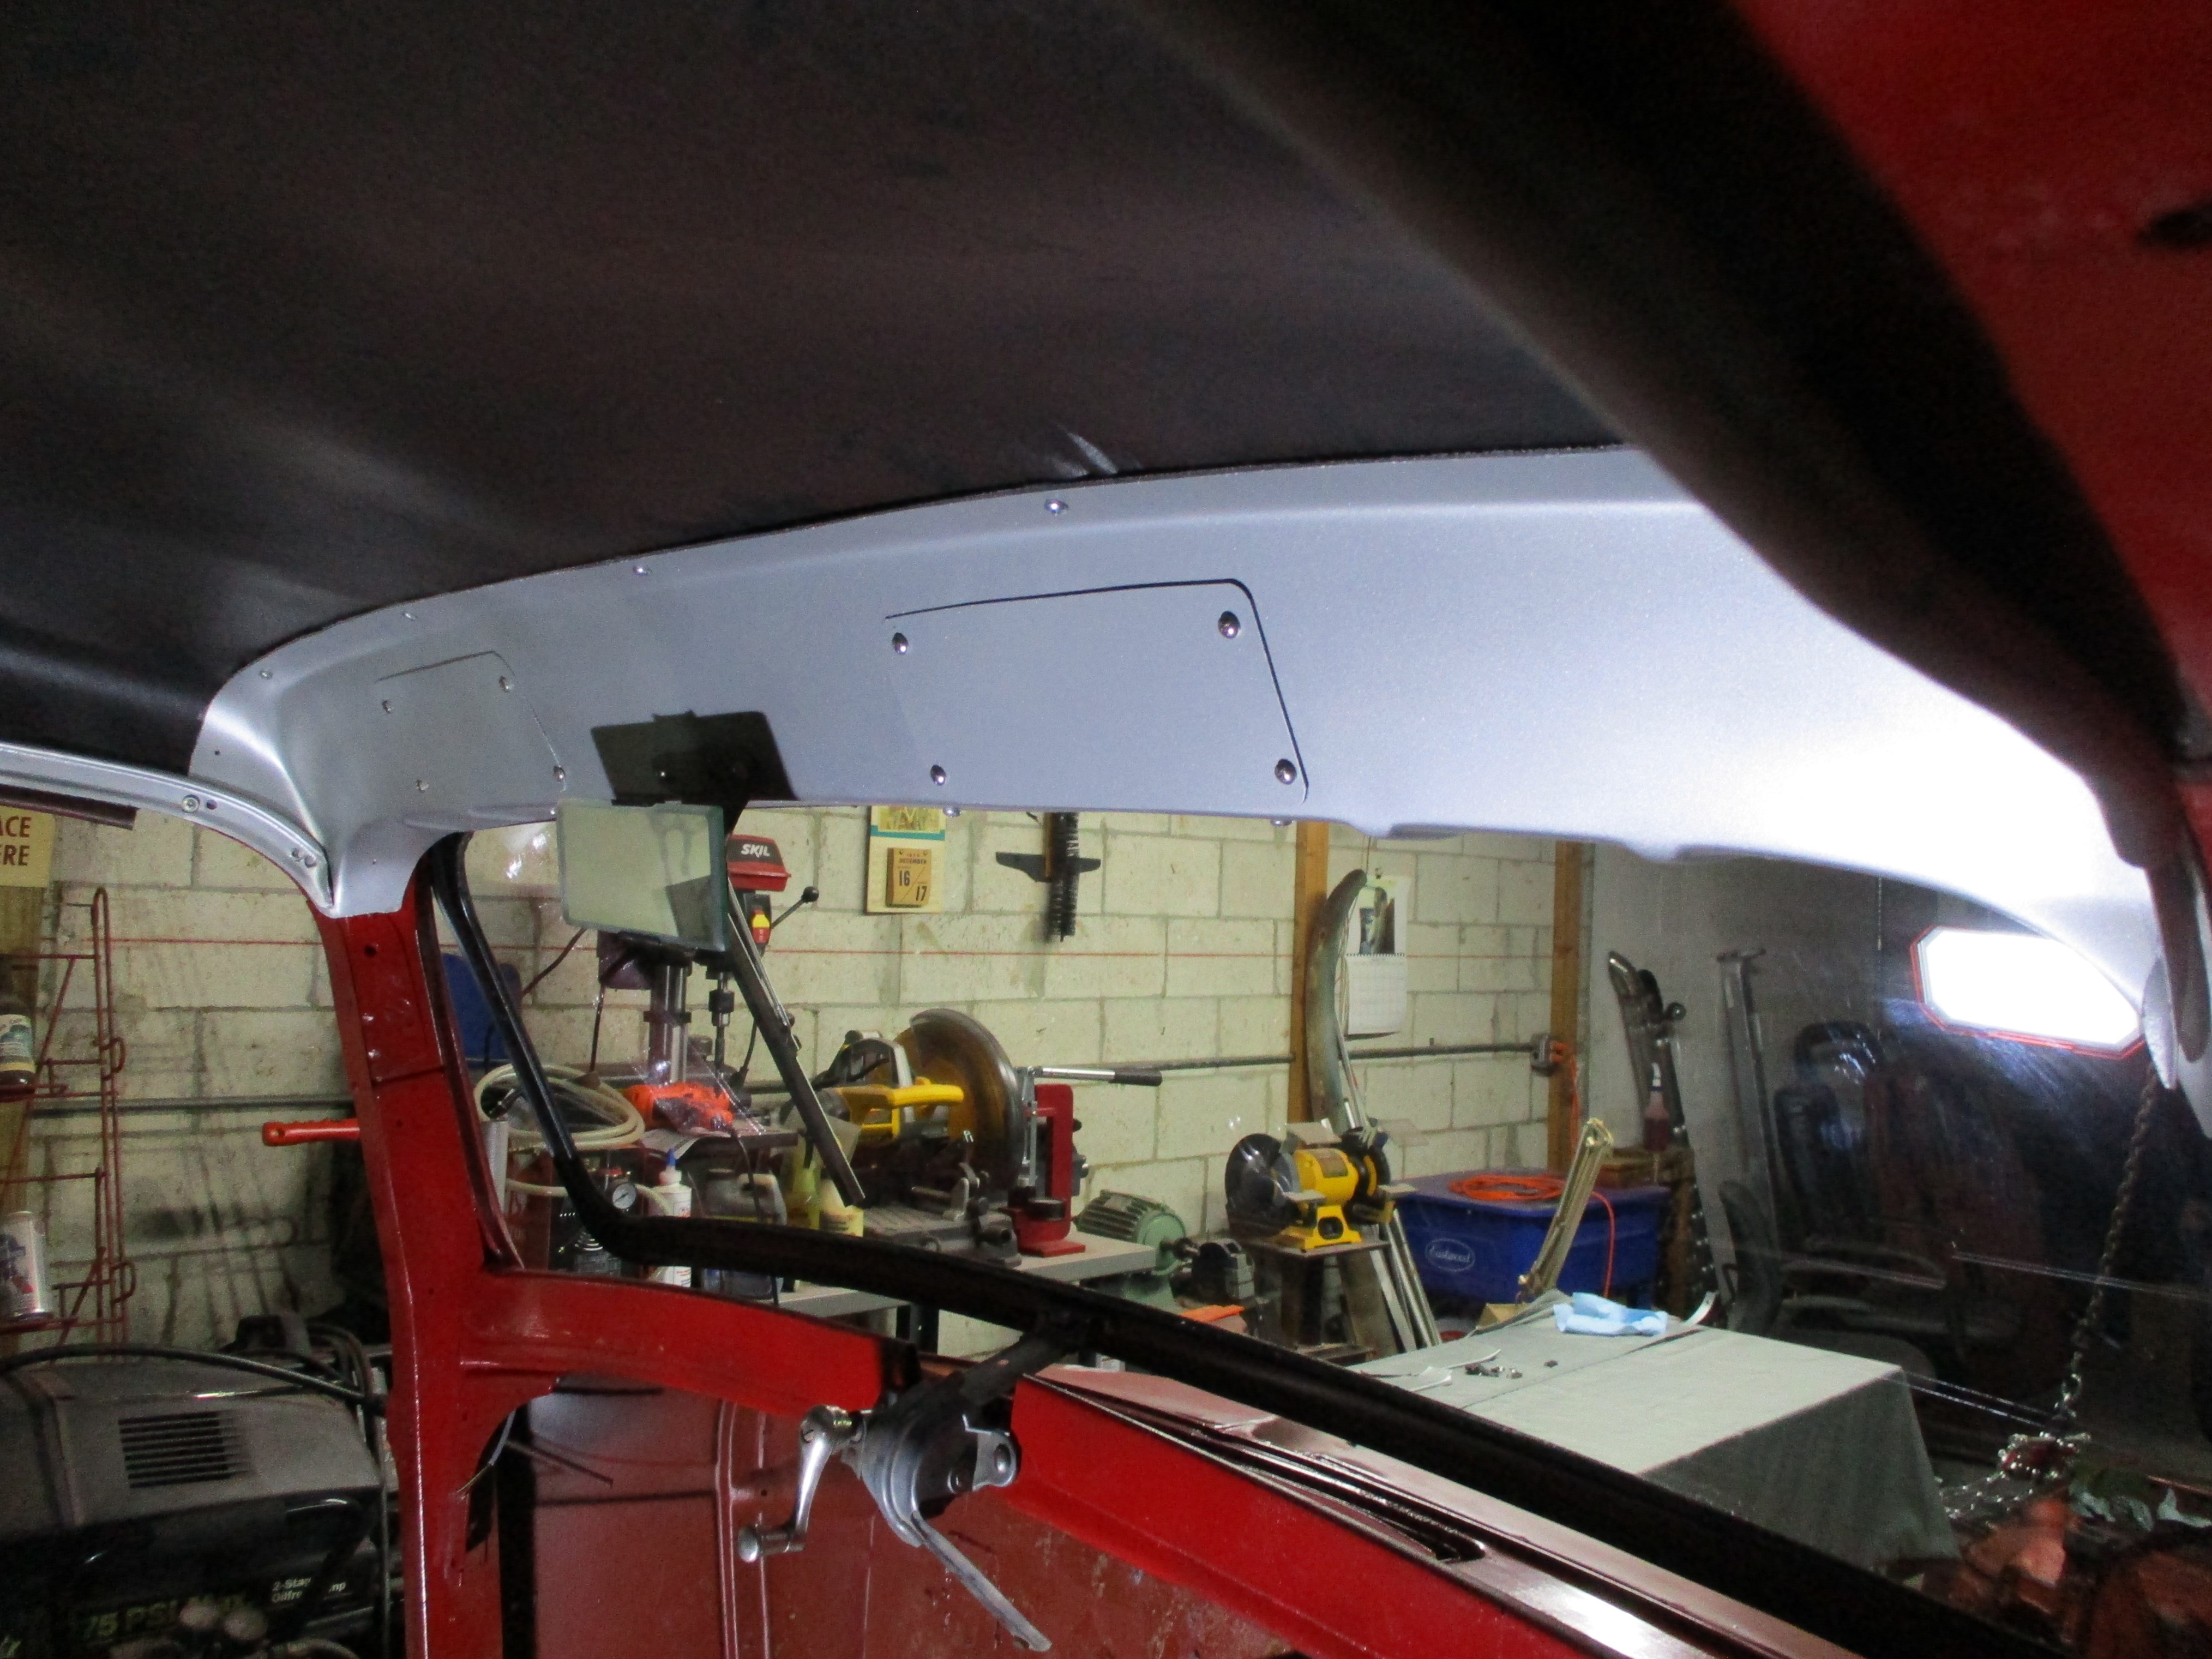
19th 2020
Attached the wiper access covers with stainless steel self-tapping
screws from a McMaster-Carr assortment I had in inventory and attached
the rear view mirror screws and hex nuts with threadlocker blue. The
hinge cover came with clips to attach it to the headliner cardboard. I
wrestled the clips into place. That's not a bad thing. They are tight
and I won't have to worry about them falling off while I have my hands
full with the hinge cover.
June
19th 2020
Attached the wiper access covers with stainless steel self-tapping
screws from a McMaster-Carr assortment I had in inventory and attached
the rear view mirror screws and hex nuts with threadlocker blue. The
hinge cover came with clips to attach it to the headliner cardboard. I
wrestled the clips into place. That's not a bad thing. They are tight
and I won't have to worry about them falling off while I have my hands
full with the hinge cover.
Secured the hinge cover in the cab with the philips head sheet
metal screws that came with it. The ends have an alignment issue where
they meet the A-pillar trim and door trim that requires some deep
ponder mode thinking to finish this task. Background music was The Best
of Eddie Cochran.
 June
25th 2020
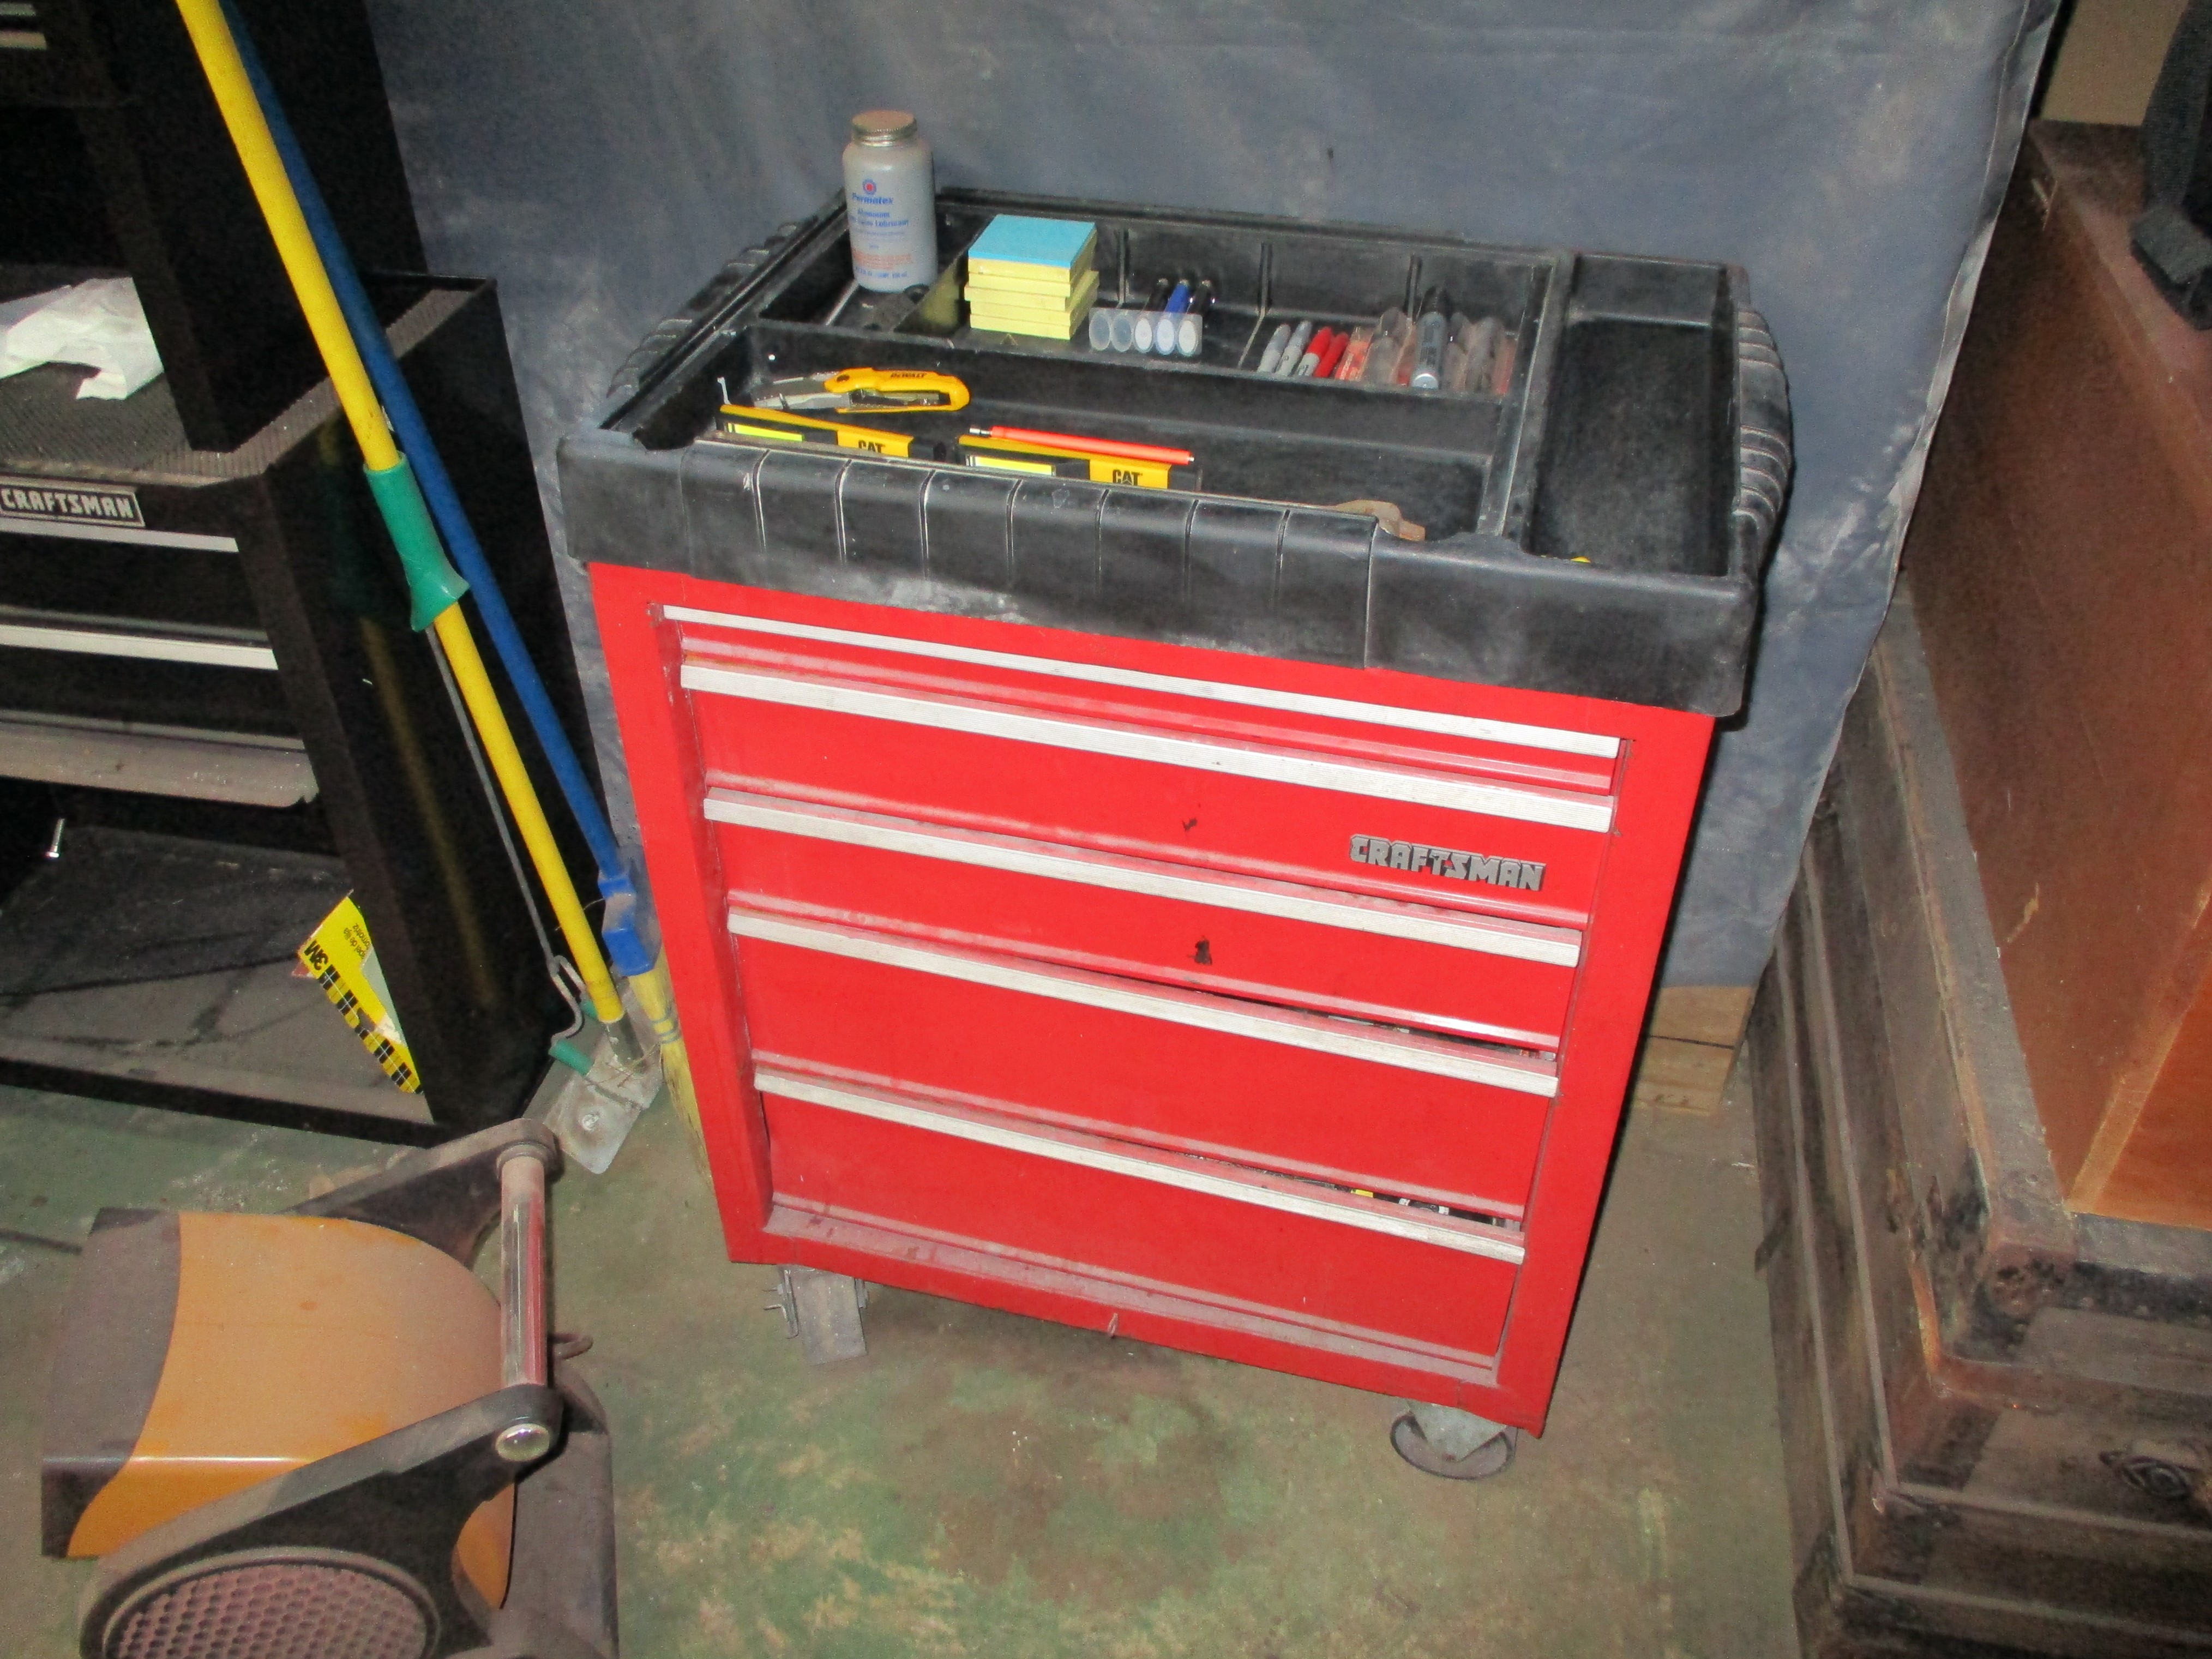
On with the inventory / reorganization operations. Next, along the
South wall under the loft, is the tool cart my friend Gato gave me. I'm
pretty certain the die grinder burrs are here even tho' two light
searches have not revealed them.
June
25th 2020
On with the inventory / reorganization operations. Next, along the
South wall under the loft, is the tool cart my friend Gato gave me. I'm
pretty certain the die grinder burrs are here even tho' two light
searches have not revealed them.
Top tray - (2) 18" breaker bars, Permatex Anti-Seize, ratchet screwdriver, scribe, burnishing tool, X-Acto knife, (2) silver sharpies, (2) LED flashlights, utility knife, (4) black sharpies, (2) red sharpies, miniature tape measure, (6) 3x3 Post-it note pads, (3) BIC lighters, pocket magnetic telescope probe, church key, (2) cigar snips.
Top drawer - sealants - Marine Goop sealant, Gorilla Super glue, (2) flowable silicone windshield and glass sealer tubes, Permatex muffler and tailpipe sealer, (3) JB Weld paks, (3) Permatex Threadlocker blue tubes.
2nd drawer - torque wrench, mechanic's square.
3rd drawer - (2) Dremel motor tools, Lang 11 pc gasket punch set, (3) Dremel accessories paks, SE leather punch set, (2) brake cylinder hones, Fel-Pro gasket materials pak.
4th drawer - air tools - 1/2" impact wrench, (2) stub hoses, composite body 5" sander, air tool wrenches, arbors and chucks. Long reach angle grinder, long reach die grinder, pencil die grinder, sheet metal nibbler, saber saw, air hammer, angle grinder.
5th drawer - consumables - 40 pc medium wire wheels and cups, cigar box of sandpaper porting cones and rolls, cigar box of Dremal wire wheels and cups, cigar box of Dremel buffs, one each 8" grinding wheel and wire wheel, air hammer chisels, assorted 3" to 5" cutoff wheels, assorted sanding disks and bands, assorted paint stripping and flapper wheels, Dremel brass and steel wire wheel and cup set, Scotchbrite 2" cookies supply.
And . . .
four, count 'em, four die grinder burr and bit sets!
Beer of the day was Nebraska Brewing Co's IPA.
 July
20th 2020
We've been having a few weeks of heat wave here in South Florida and
it's sapped my ambition as well as a gum infection flareup that took
out my pilot light. My gum infection finally subsided this past
weekend. Heat wave is still on but not as intense and it's time to
re-light
that pilot light.
July
20th 2020
We've been having a few weeks of heat wave here in South Florida and
it's sapped my ambition as well as a gum infection flareup that took
out my pilot light. My gum infection finally subsided this past
weekend. Heat wave is still on but not as intense and it's time to
re-light
that pilot light.
I'm ramping up again. In the meantime, I'm still obtaining
parts here and there. I've been thinking about gas filler options to
replace Deerslayer's hinged aluminum door in the bed. My friend, Johan
Amy posted a picture of an aircraft wing flush filler cap that caught
my fancy. A quick search revealed that Summit offers an automotive
substitute that will serve nicely. I ordered one and it arrived today.
It goes on the shelf now with the other parts to go back on Deerslayer
down the road.
 September
17th 2020
Had a false start on getting my ambition back. It's a process. My deep
ponder mode ruminations tell me that one day of work in the shop
is an anomaly, three continuous days, a pattern, six days a trend,
twelve days a habit and twenty-four days a discipline.
September
17th 2020
Had a false start on getting my ambition back. It's a process. My deep
ponder mode ruminations tell me that one day of work in the shop
is an anomaly, three continuous days, a pattern, six days a trend,
twelve days a habit and twenty-four days a discipline.
On Labor Day, the daily heat wave temperature dropped a couple of degrees, just enuf to jump start garage activity again.
Found a vertex magneto for the nailhead build and bought it as
a birthday present to myself. I've been
looking for one of these for a few years now. I was beginning to fear
Tommy Ivo had used them all up. This thing was new in the box. A couple
of bronze gears were included as well.
 September
23rd 2020
Getting back in the saddle. Baby steps. The magneto spurred me to
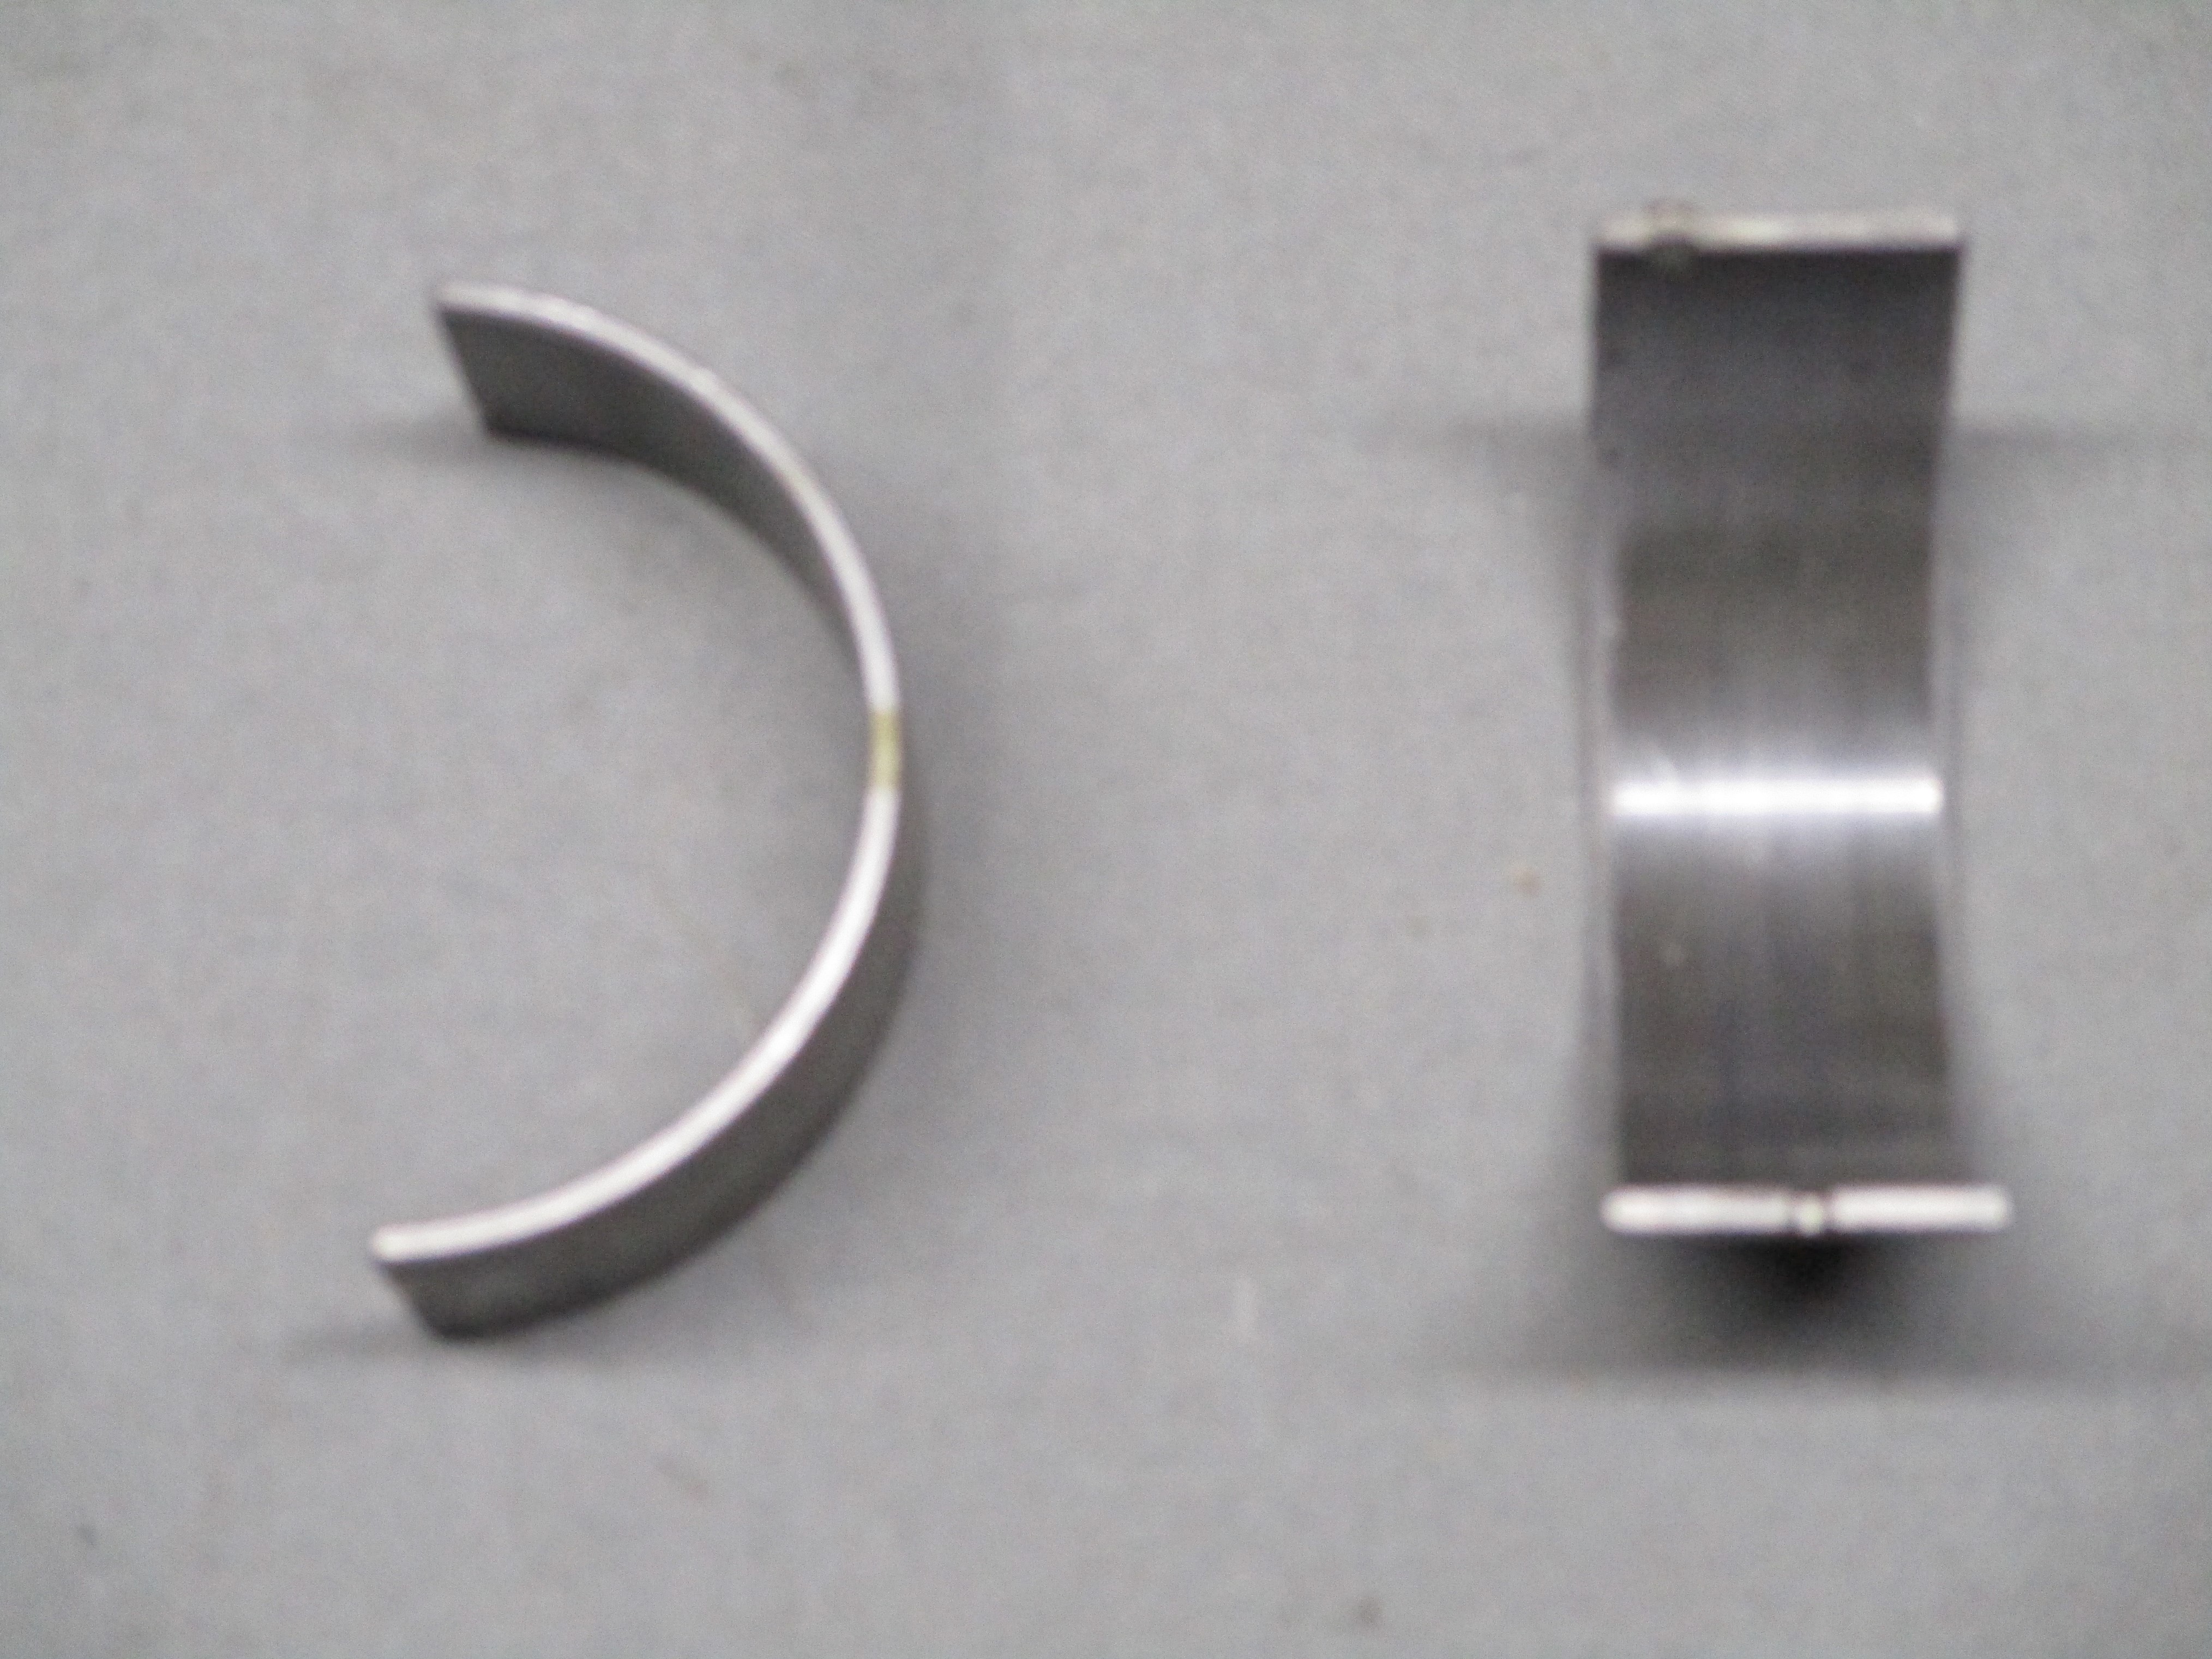
fiddle with the nailhead a bit. I pulled number one piston. no ridge at
the top of the cylinder so it tapped out easily with the help of brass
hammer and drift and wooden block. The rod bearings look like they were
installed yesterday. Put the piston assembly in the parts washer
oileater soup for initial cleaning. The wrist pin is semi-floating with
a pinch clamp at the top of the rod. Still have to figure out how the
pin retainers work.
September
23rd 2020
Getting back in the saddle. Baby steps. The magneto spurred me to
fiddle with the nailhead a bit. I pulled number one piston. no ridge at
the top of the cylinder so it tapped out easily with the help of brass
hammer and drift and wooden block. The rod bearings look like they were
installed yesterday. Put the piston assembly in the parts washer
oileater soup for initial cleaning. The wrist pin is semi-floating with
a pinch clamp at the top of the rod. Still have to figure out how the
pin retainers work.
Also picked up a set of solid lifters for the Isky
Street/Strip cam from Northwestern Auto Supply Inc. They arrived today
and I took a cursory look at them.
 September
29th 2020
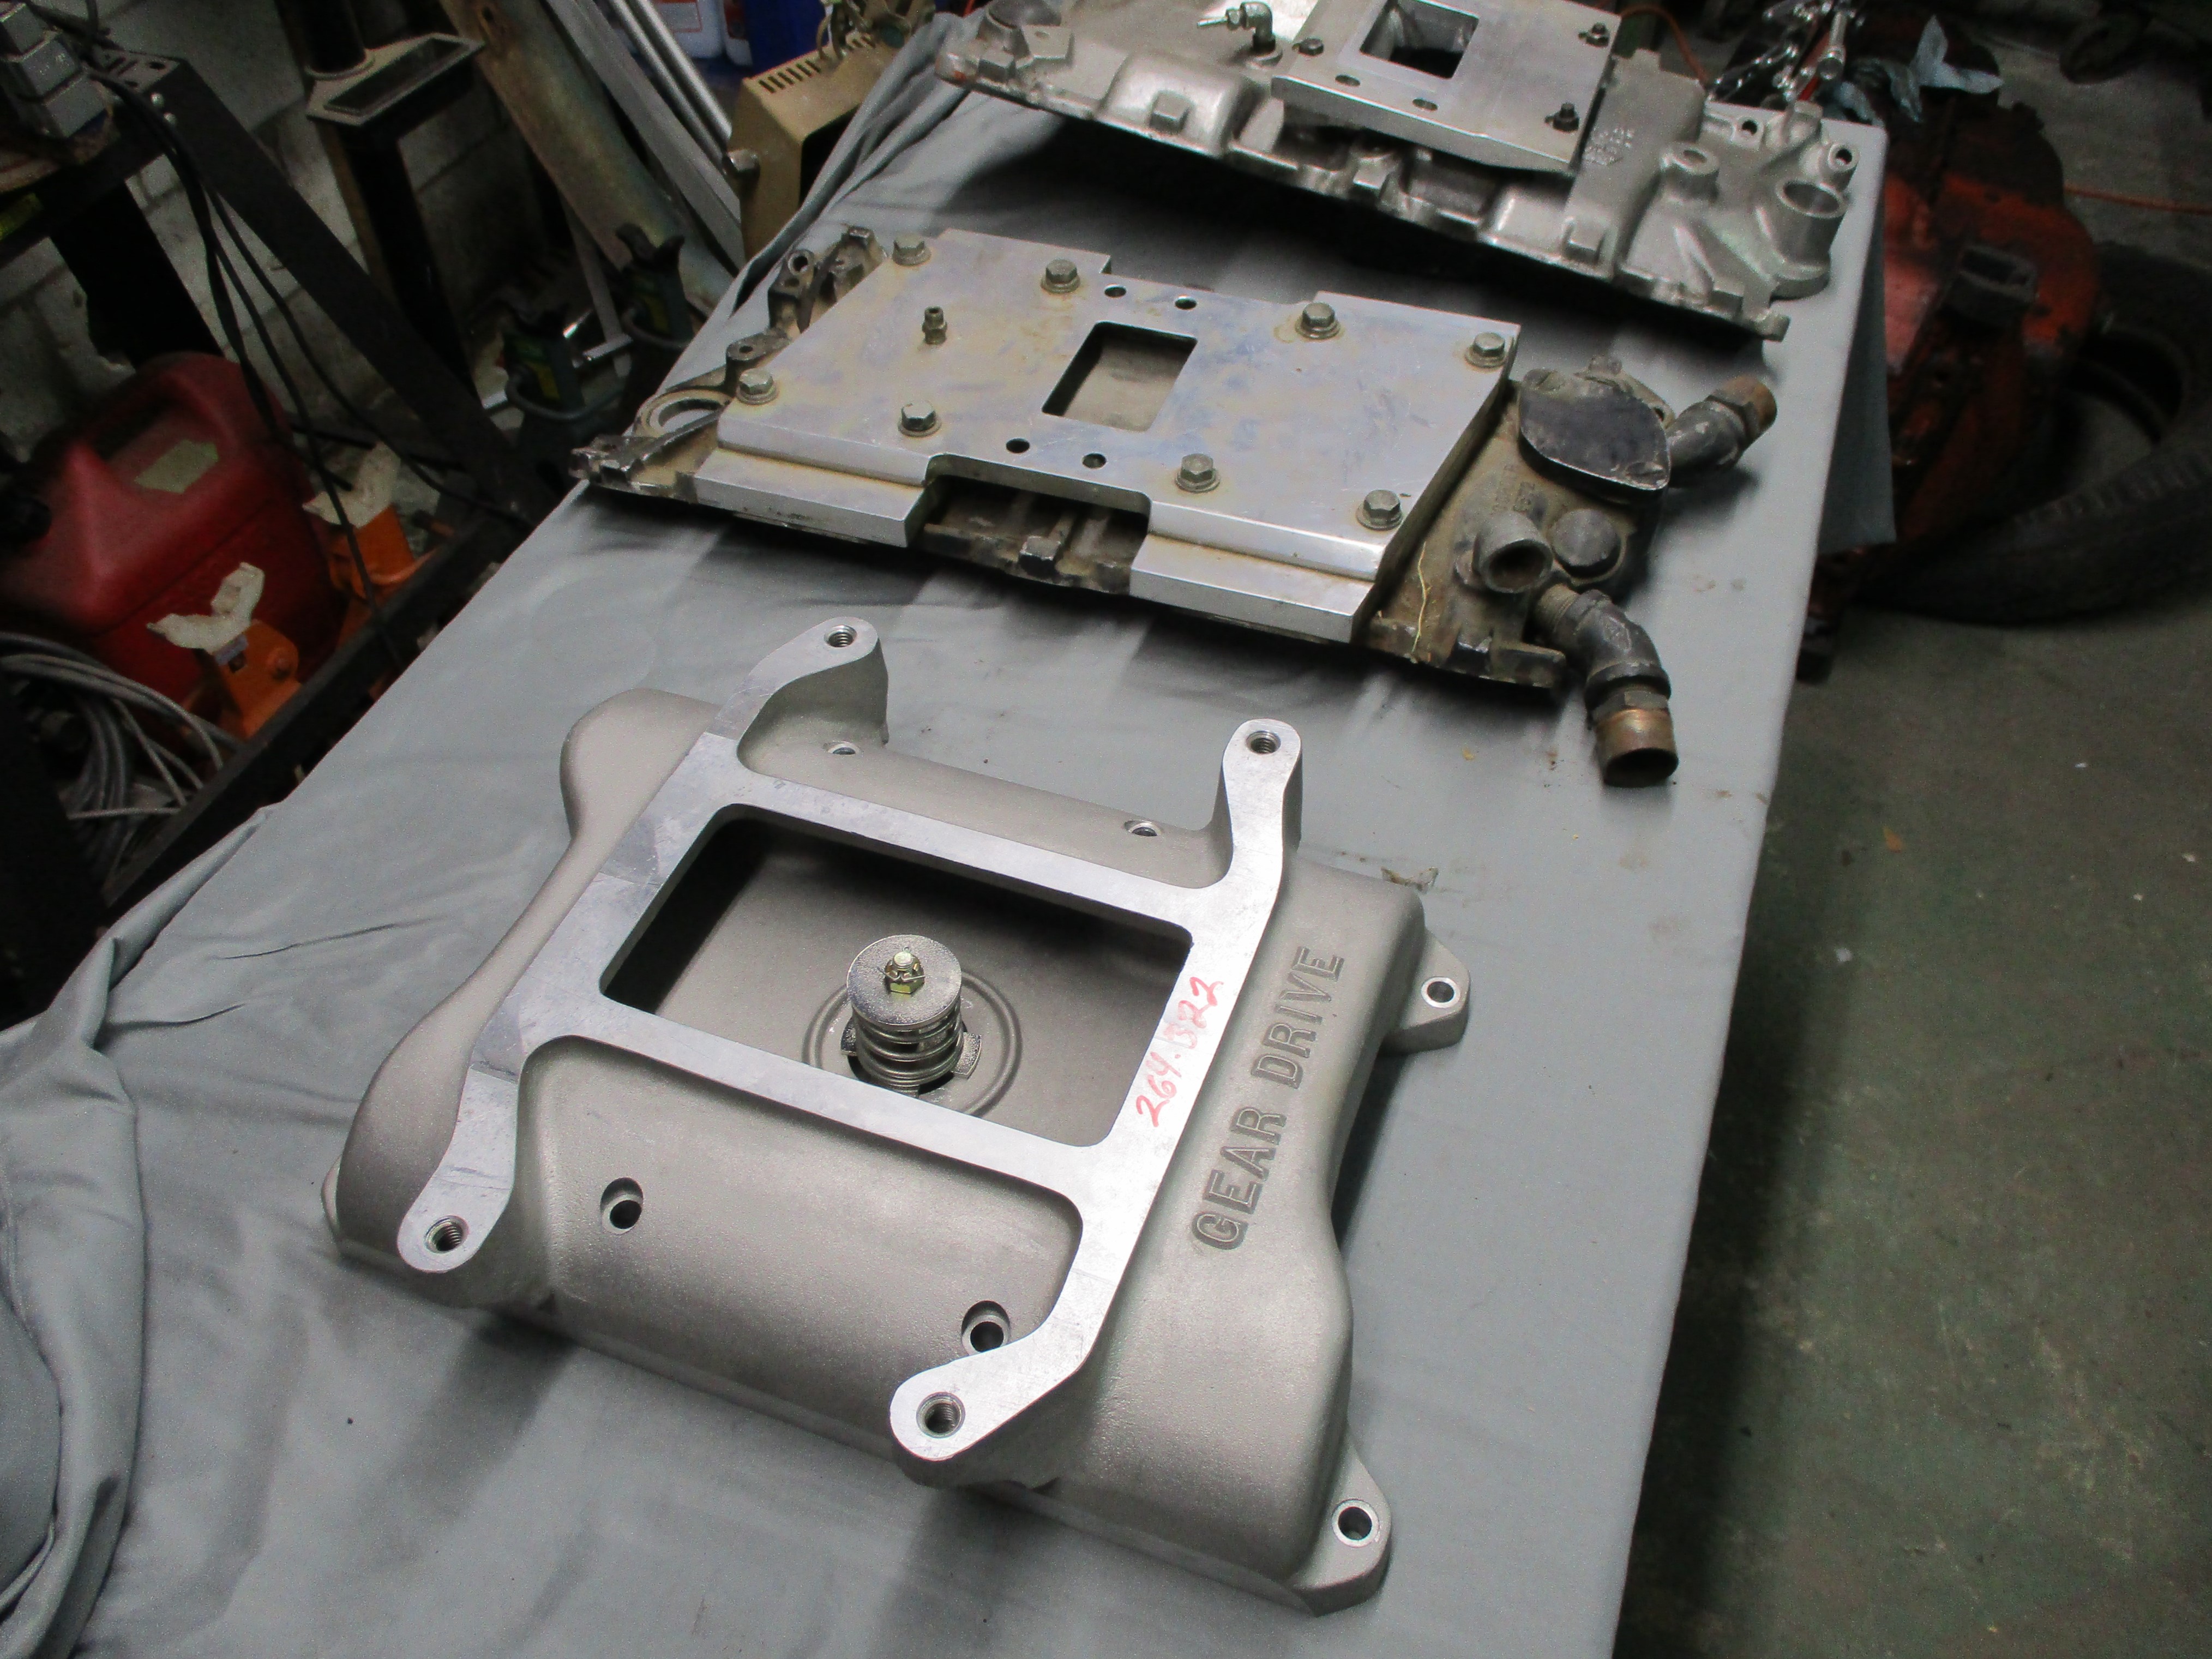
Scored another hard-to-find nailhead part. Fellow who goes by
"Gear-Drive" has cast a hand full of 264-322 nailhead 4-71 blower
manifolds and I managed to snag one. I'm gambling this to be the
easiest path to mounting the Latham supercharger. My two Lathams came
with small block Chevy manifold adapters. I'm guessing I can adapt the
Latham to the blower manifold with some aluminum plate when the time
arrives to mock it up.
September
29th 2020
Scored another hard-to-find nailhead part. Fellow who goes by
"Gear-Drive" has cast a hand full of 264-322 nailhead 4-71 blower
manifolds and I managed to snag one. I'm gambling this to be the
easiest path to mounting the Latham supercharger. My two Lathams came
with small block Chevy manifold adapters. I'm guessing I can adapt the
Latham to the blower manifold with some aluminum plate when the time
arrives to mock it up.
 February
22nd 2021
A body at motion tends to remain at motion. A body at rest remains at
rest and, lazy slug that I am, I am the poster boy for remaining at
rest. I got an e-mail at work on Thursday morning from my landlord
telling me they wanted me present to check for water leaks. I went back
to the shop and while I was waiting, continued to tear down the
nailhead. This may be the catalyst I need to get my ambition back.
February
22nd 2021
A body at motion tends to remain at motion. A body at rest remains at
rest and, lazy slug that I am, I am the poster boy for remaining at
rest. I got an e-mail at work on Thursday morning from my landlord
telling me they wanted me present to check for water leaks. I went back
to the shop and while I was waiting, continued to tear down the
nailhead. This may be the catalyst I need to get my ambition back.
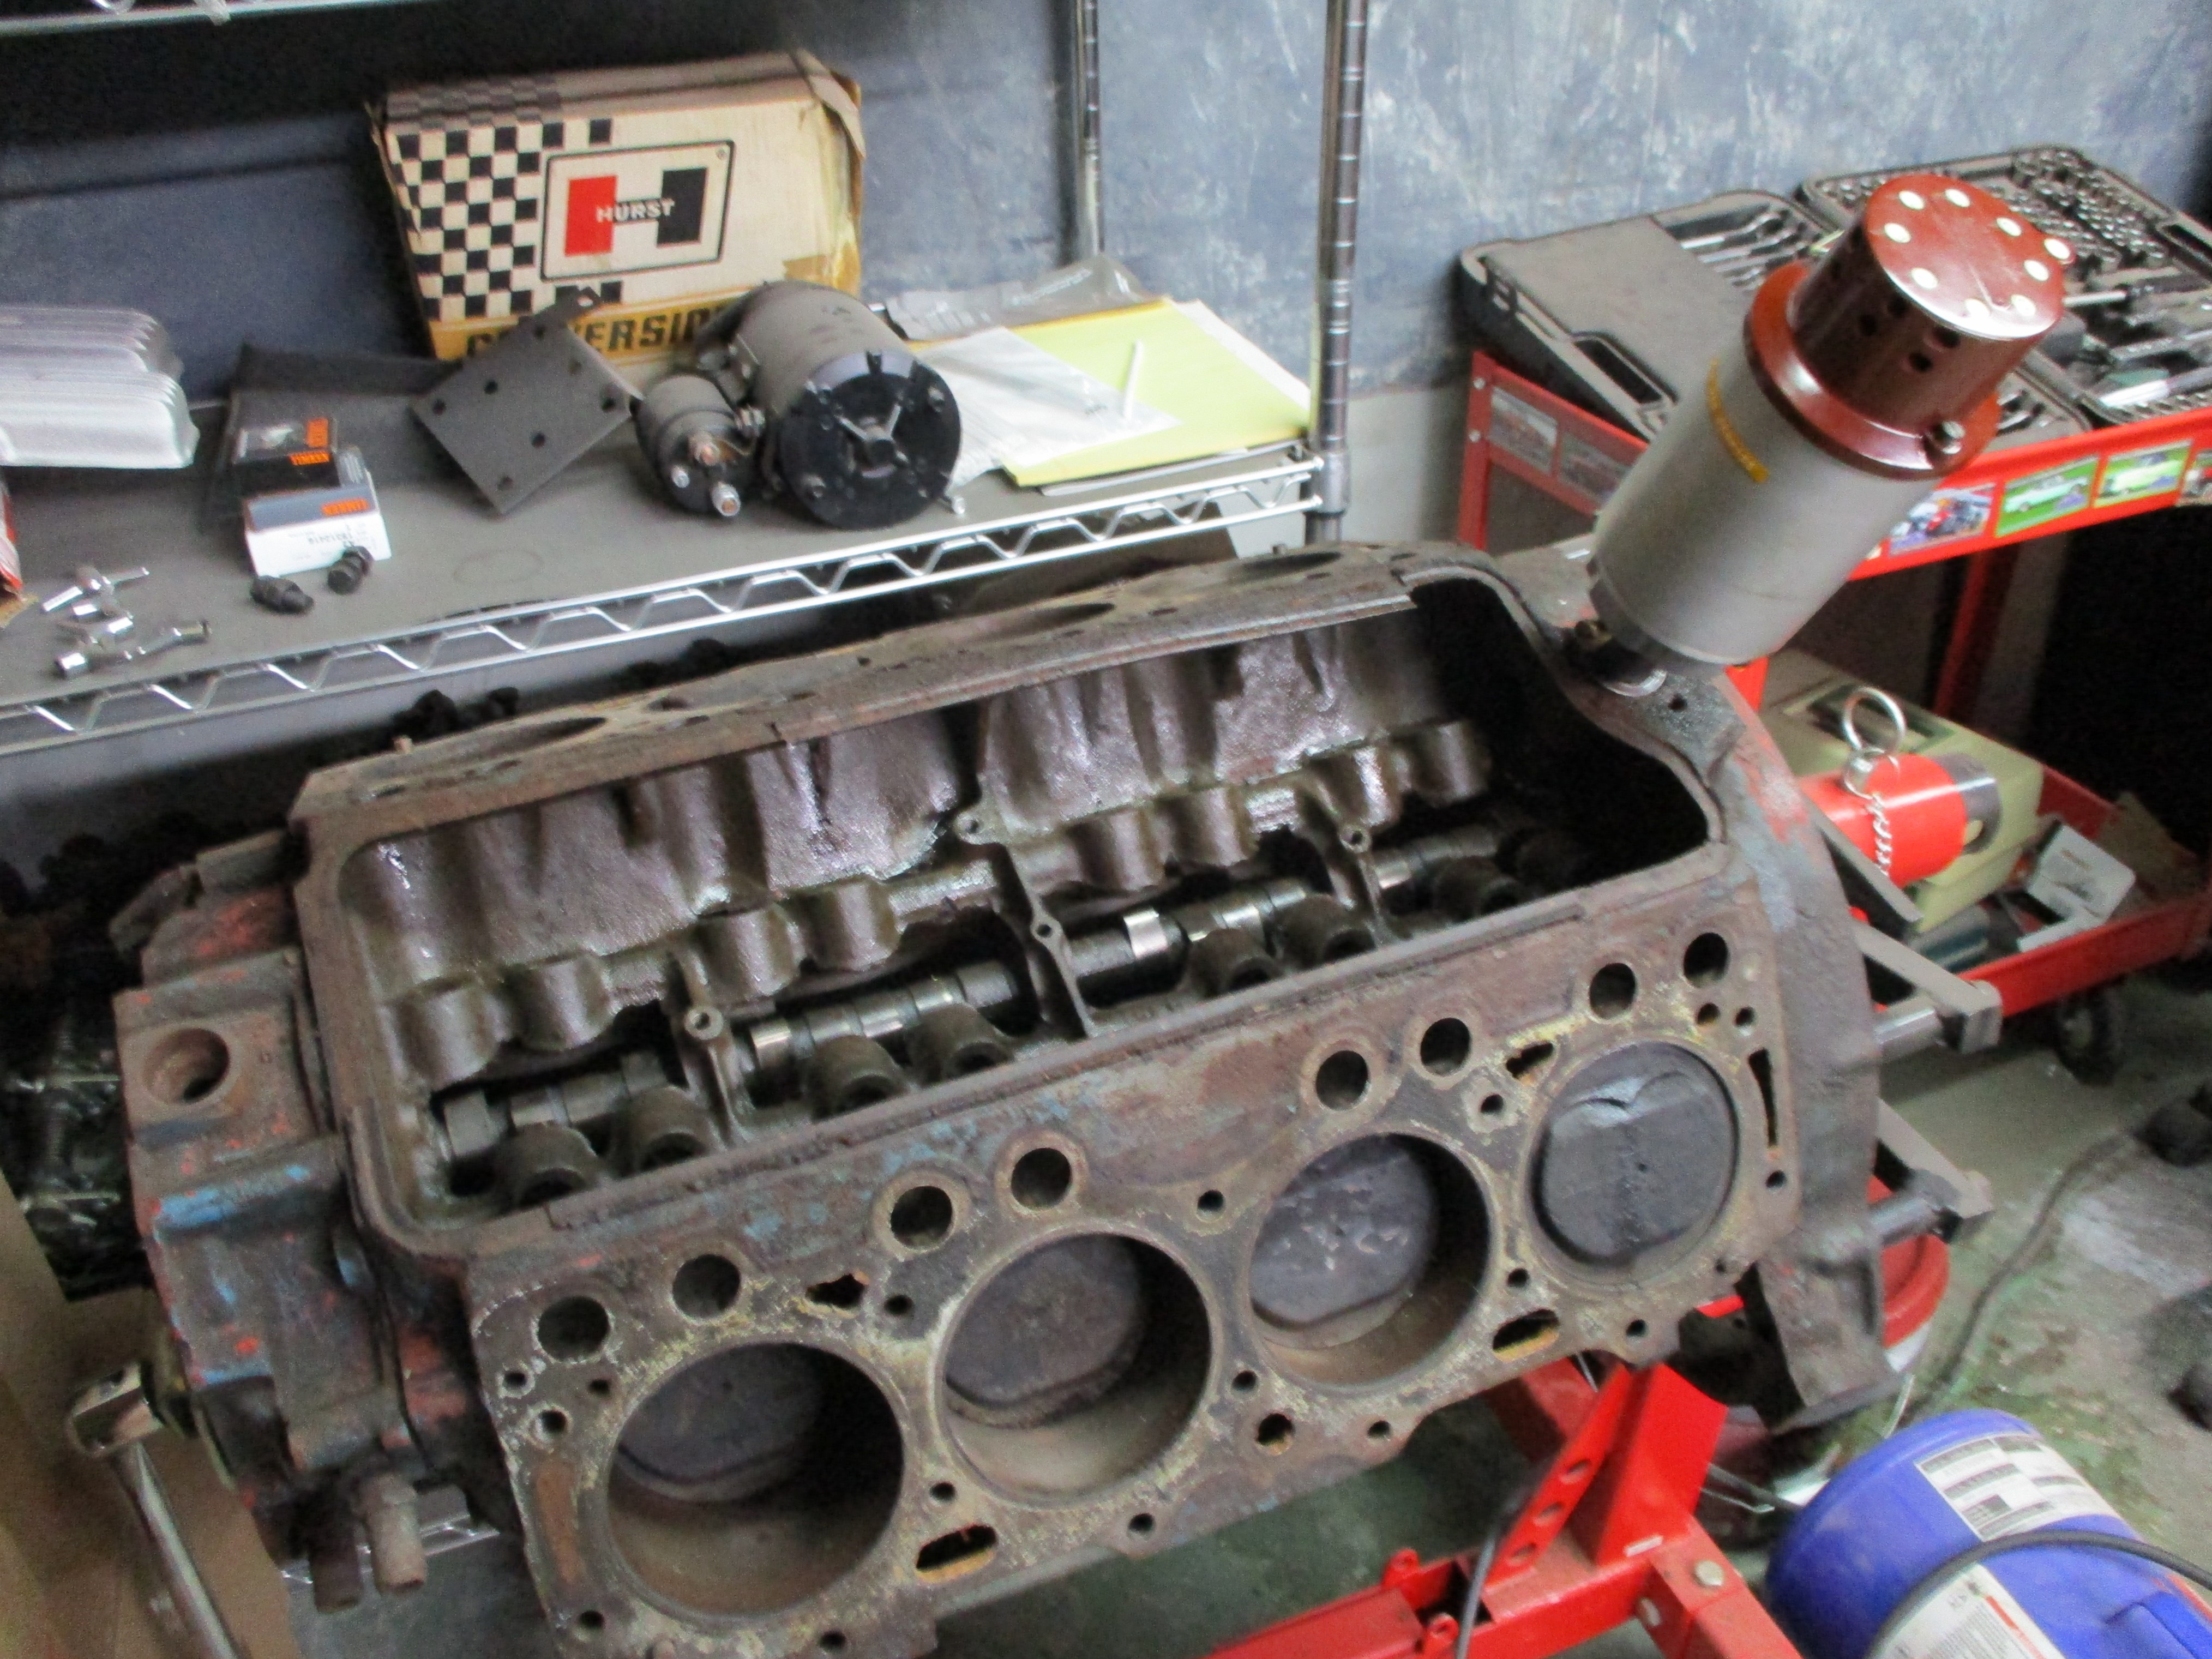
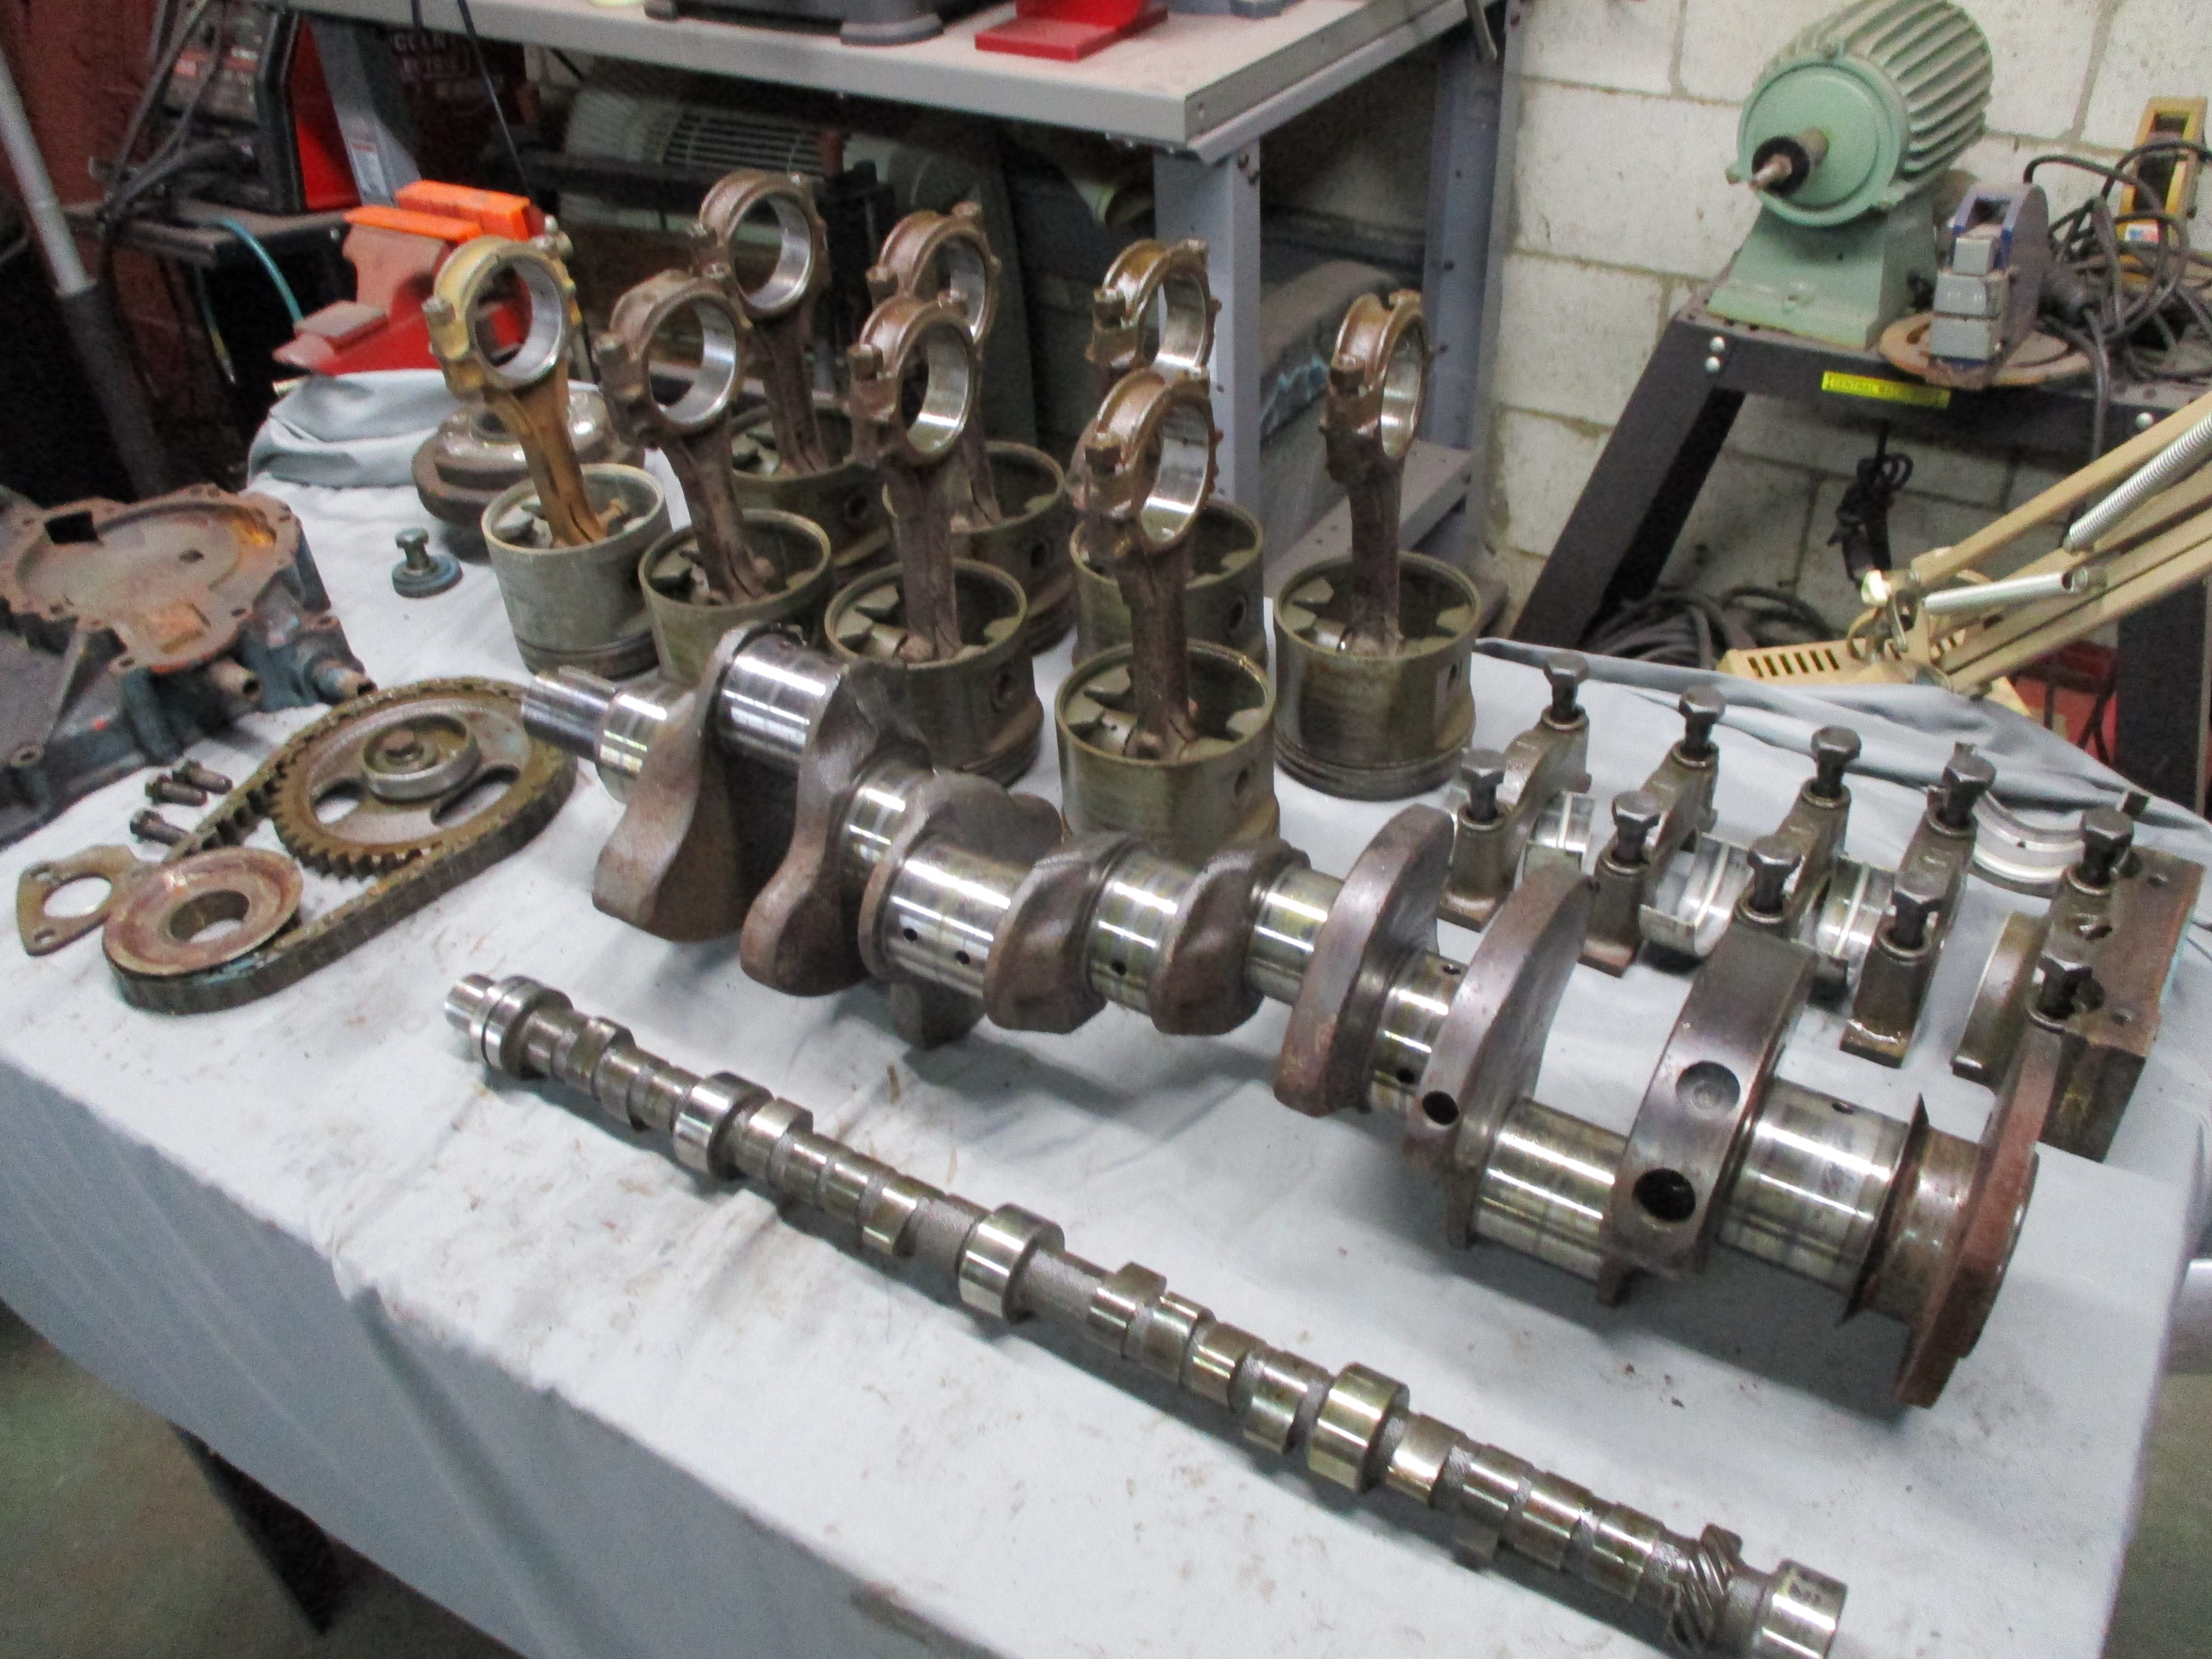
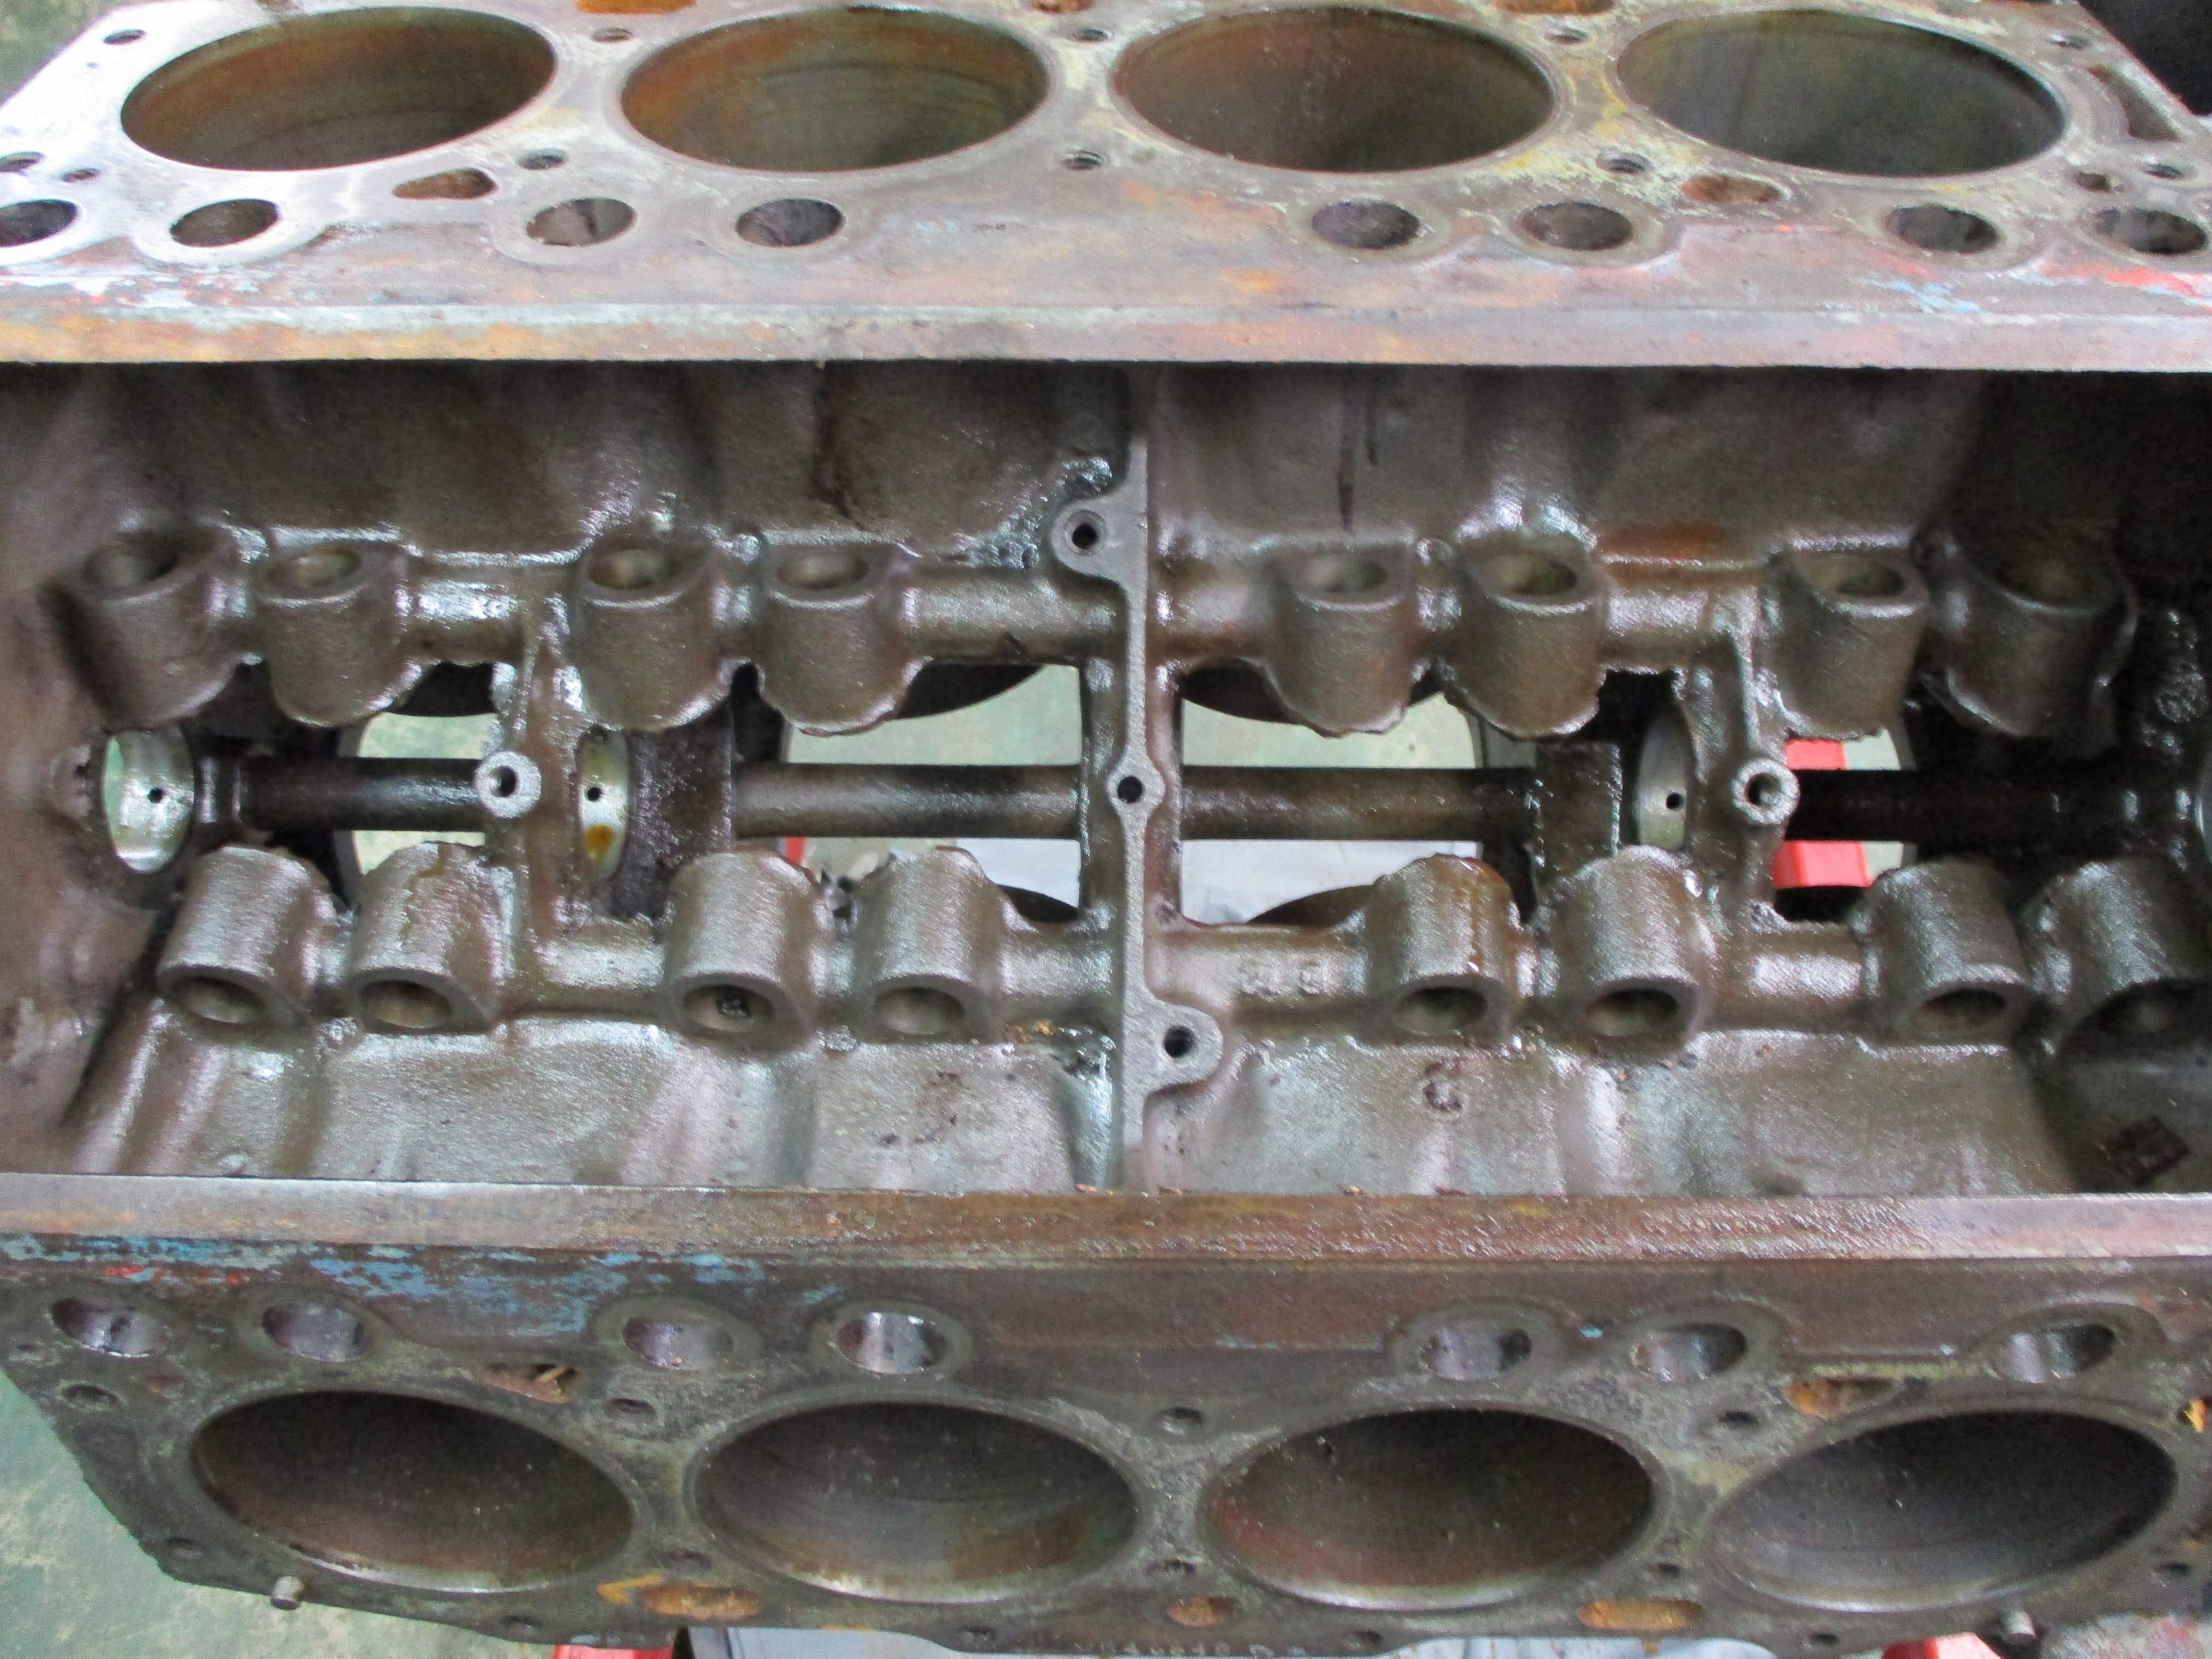
Took out the remaining seven piston assemblies, balancer, timing gear cover and timing gears and chain. Only problems I had was getting the timing gear off the crankshaft. I took this progress as a good omen.
On Saturday, the crankshaft and bearings were removed, along with the camshaft. The only things remaining on the block are the cam bearings, freeze plugs and oil galley plugs.
Also gave the block it's first cleaning with Oileater and
rags. That got ninety percent of the dirt and grease off. Beer of the
day was Payette Brewing Company's Mutton Buster Brown Ale.
 March
6th 2021
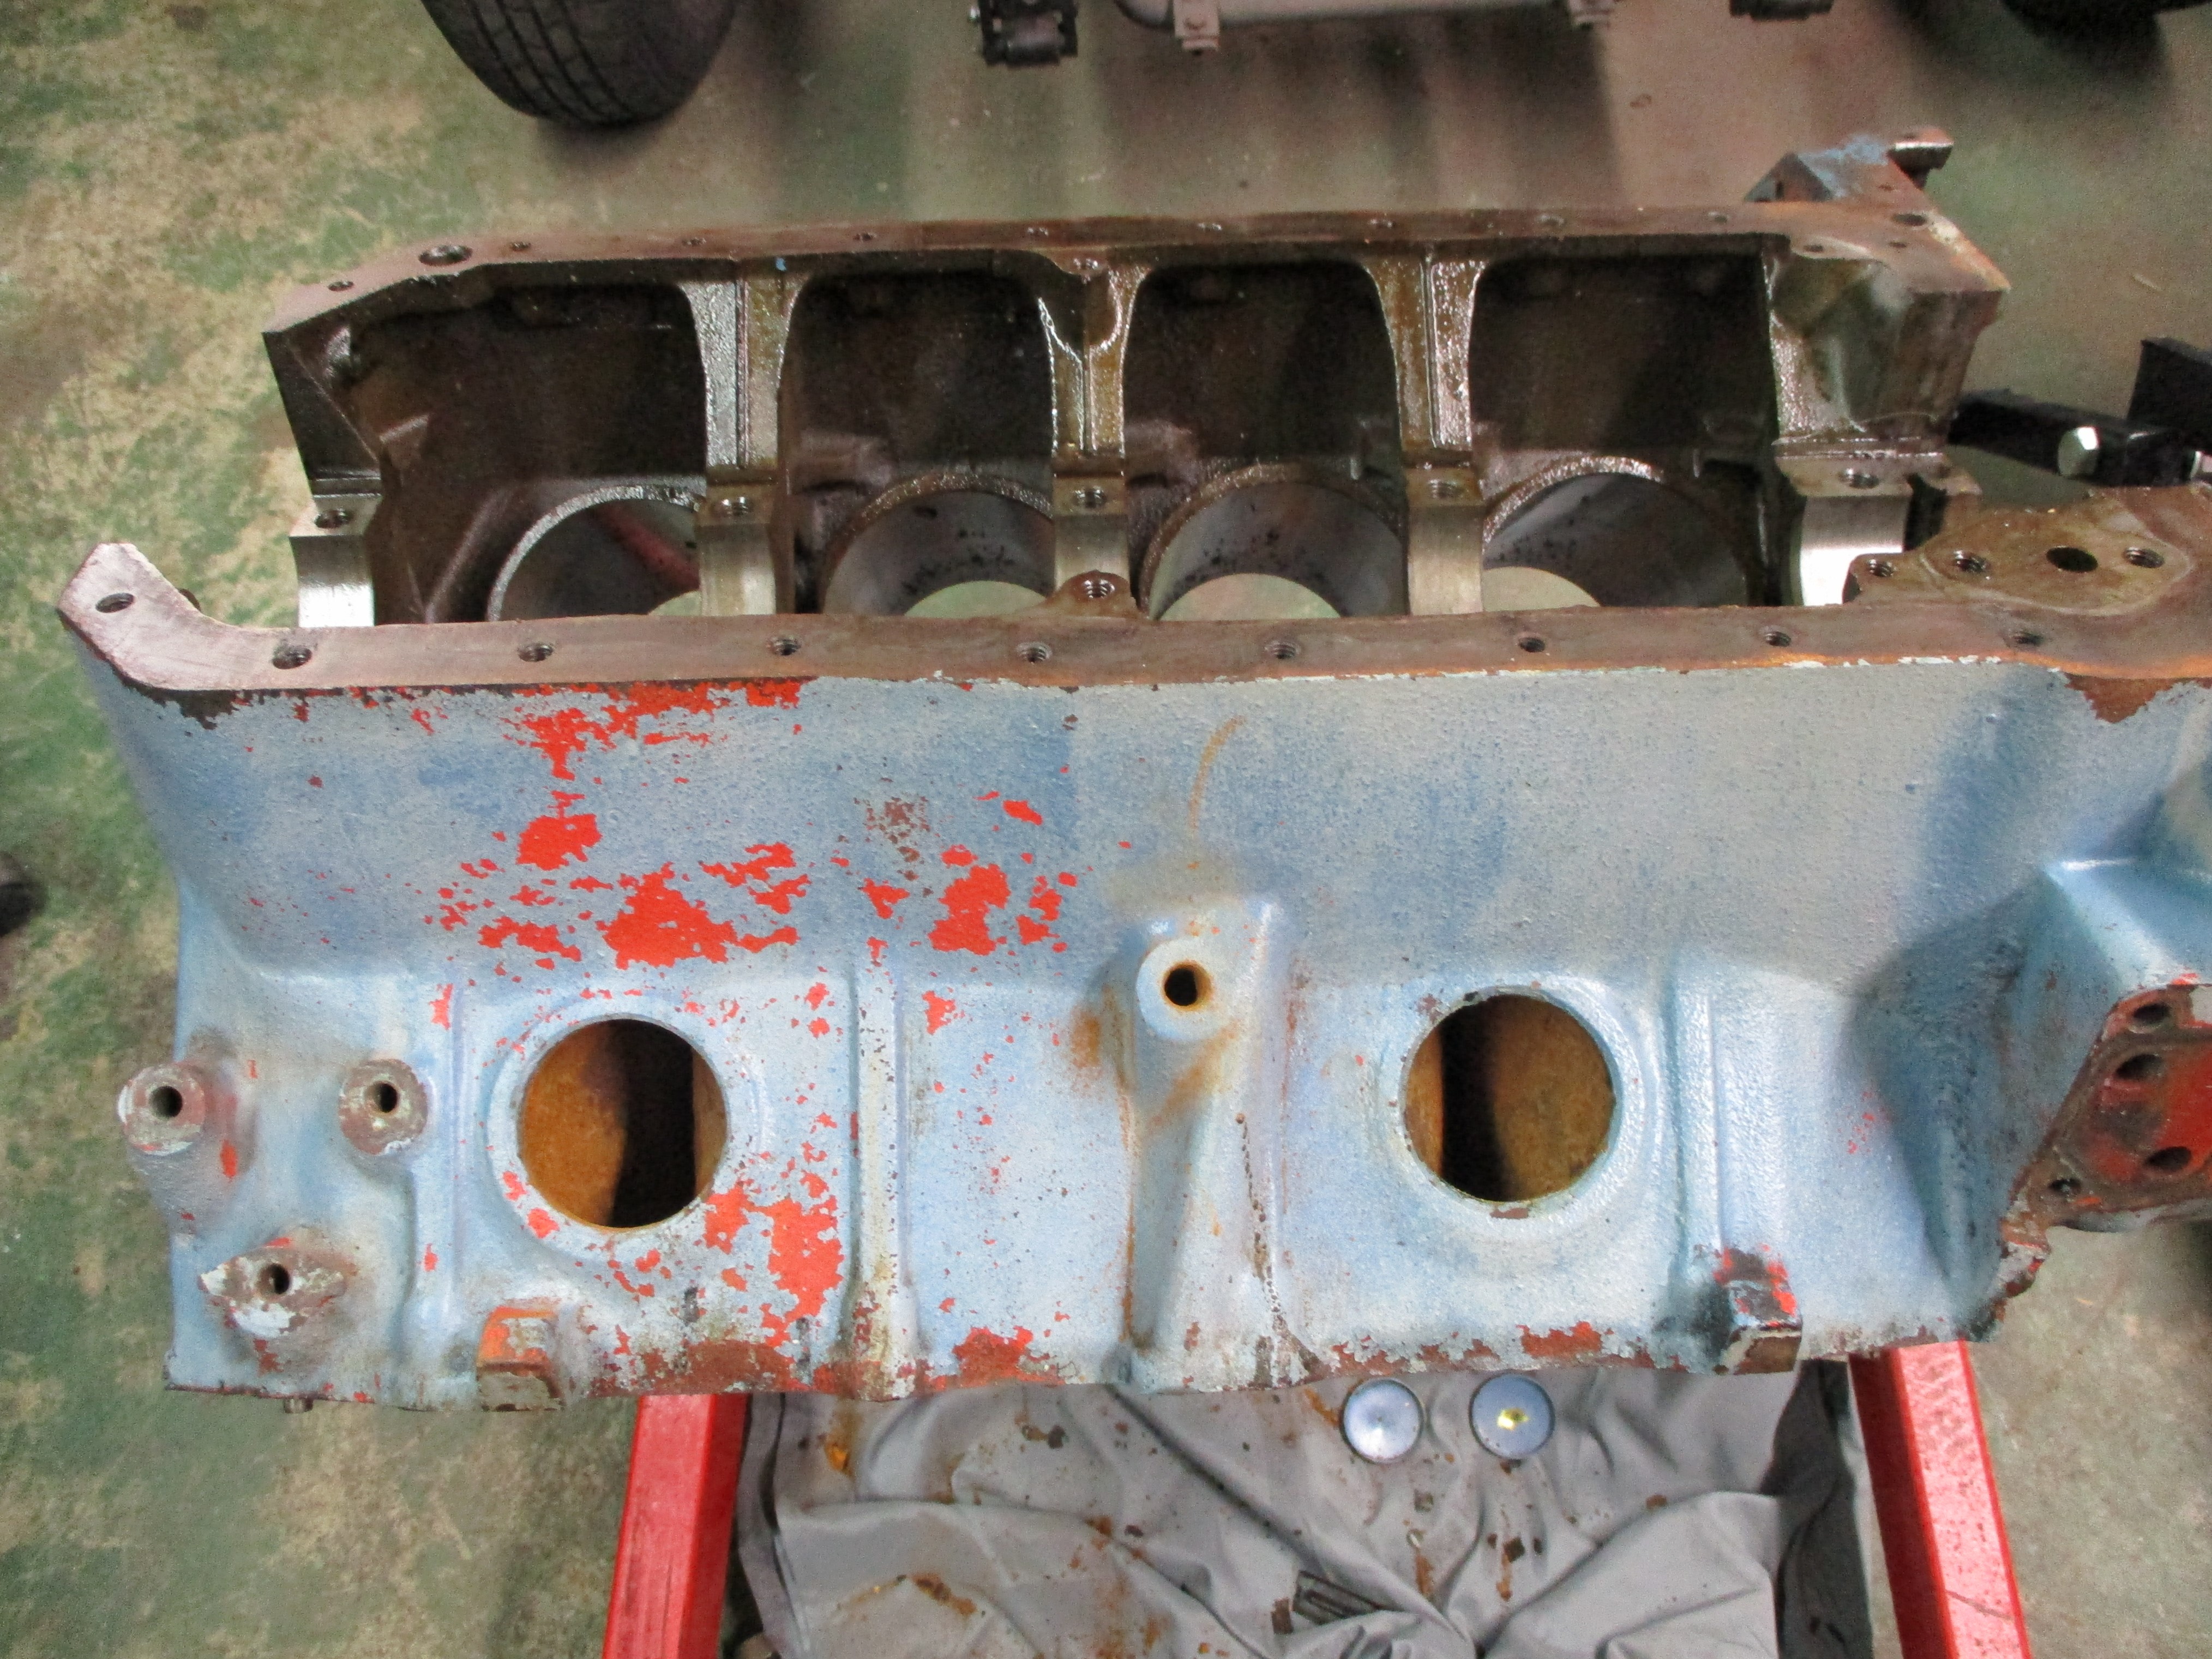
Scraped gasket bits off the block with a razor scrapper. Sent for a
specialized tool to remove the freeze plugs but that was a
waste of money. The removal tool wasn't any easier than a common
chisel. Some days are like that. Removed gobs of loose rust from the
water jacket with a telescoping pocket magnet. Removed the drainage
petcock from the driver side bank and cleaned the rust from the hole
where the passenger side petcock once was, I presume.
March
6th 2021
Scraped gasket bits off the block with a razor scrapper. Sent for a
specialized tool to remove the freeze plugs but that was a
waste of money. The removal tool wasn't any easier than a common
chisel. Some days are like that. Removed gobs of loose rust from the
water jacket with a telescoping pocket magnet. Removed the drainage
petcock from the driver side bank and cleaned the rust from the hole
where the passenger side petcock once was, I presume.
 March
7th 2021
The jagged, sharp casting flash at the bottom of the lifter bores had
never been smoothed on this nailhead block so, I used my newly
rediscovered burrs
with the electric die grinder to take the edges off. Nothing fancy,
just enough to eliminate small bits from breaking off. Background music
was Rolling Stones Hot Rocks Volume II.
March
7th 2021
The jagged, sharp casting flash at the bottom of the lifter bores had
never been smoothed on this nailhead block so, I used my newly
rediscovered burrs
with the electric die grinder to take the edges off. Nothing fancy,
just enough to eliminate small bits from breaking off. Background music
was Rolling Stones Hot Rocks Volume II.
 March
11th 2021
Made the first pass at cleaning the flat machined block surfaces with
scotchbrite "cookies" in the air-powered angle grinder. I know this
method is controversial but I don't have the gumption to do this by
hand and I'm a sucker for shiny metal.
March
11th 2021
Made the first pass at cleaning the flat machined block surfaces with
scotchbrite "cookies" in the air-powered angle grinder. I know this
method is controversial but I don't have the gumption to do this by
hand and I'm a sucker for shiny metal.
After watching Matt on Iron Trap Garage clean sheet metal, I decided to take a pass with the Eastwood SCT Surface Conditioning Tool with the 120 grit drum (the finest grit I currently have) instead of the Scotchbrite cookies as an experiment.
The experiment was a success. Only took ten minutes for one
bank, including a short time out for a gasket scraping. Advantages of
the SCT drum is that it is five inches wide, runs at a slower speed and
is electric. I also ordered a finer grit drum for future ops.
Meanwhile, I'm still struggling with the oil galley plugs. All
I've managed, so far, is to drive two of the little buggers in deeper.
Beer of the day was Nebraska Brewing Company's Cardinal Pale Ale.
 March
15th 2021
Finished the first pass with SCT and angle grinder tools. Went on to
deal with the pesky oil galley plugs that are giving me conniption
fits. Concentrated on the one threaded pipe plug first. I got a 5/16"
pipe plug socket last week and was able to break the plug loose with a
24" breaker bar after heating up the plug with the MAP torch and
quenching with penetrating oil.
March
15th 2021
Finished the first pass with SCT and angle grinder tools. Went on to
deal with the pesky oil galley plugs that are giving me conniption
fits. Concentrated on the one threaded pipe plug first. I got a 5/16"
pipe plug socket last week and was able to break the plug loose with a
24" breaker bar after heating up the plug with the MAP torch and
quenching with penetrating oil.
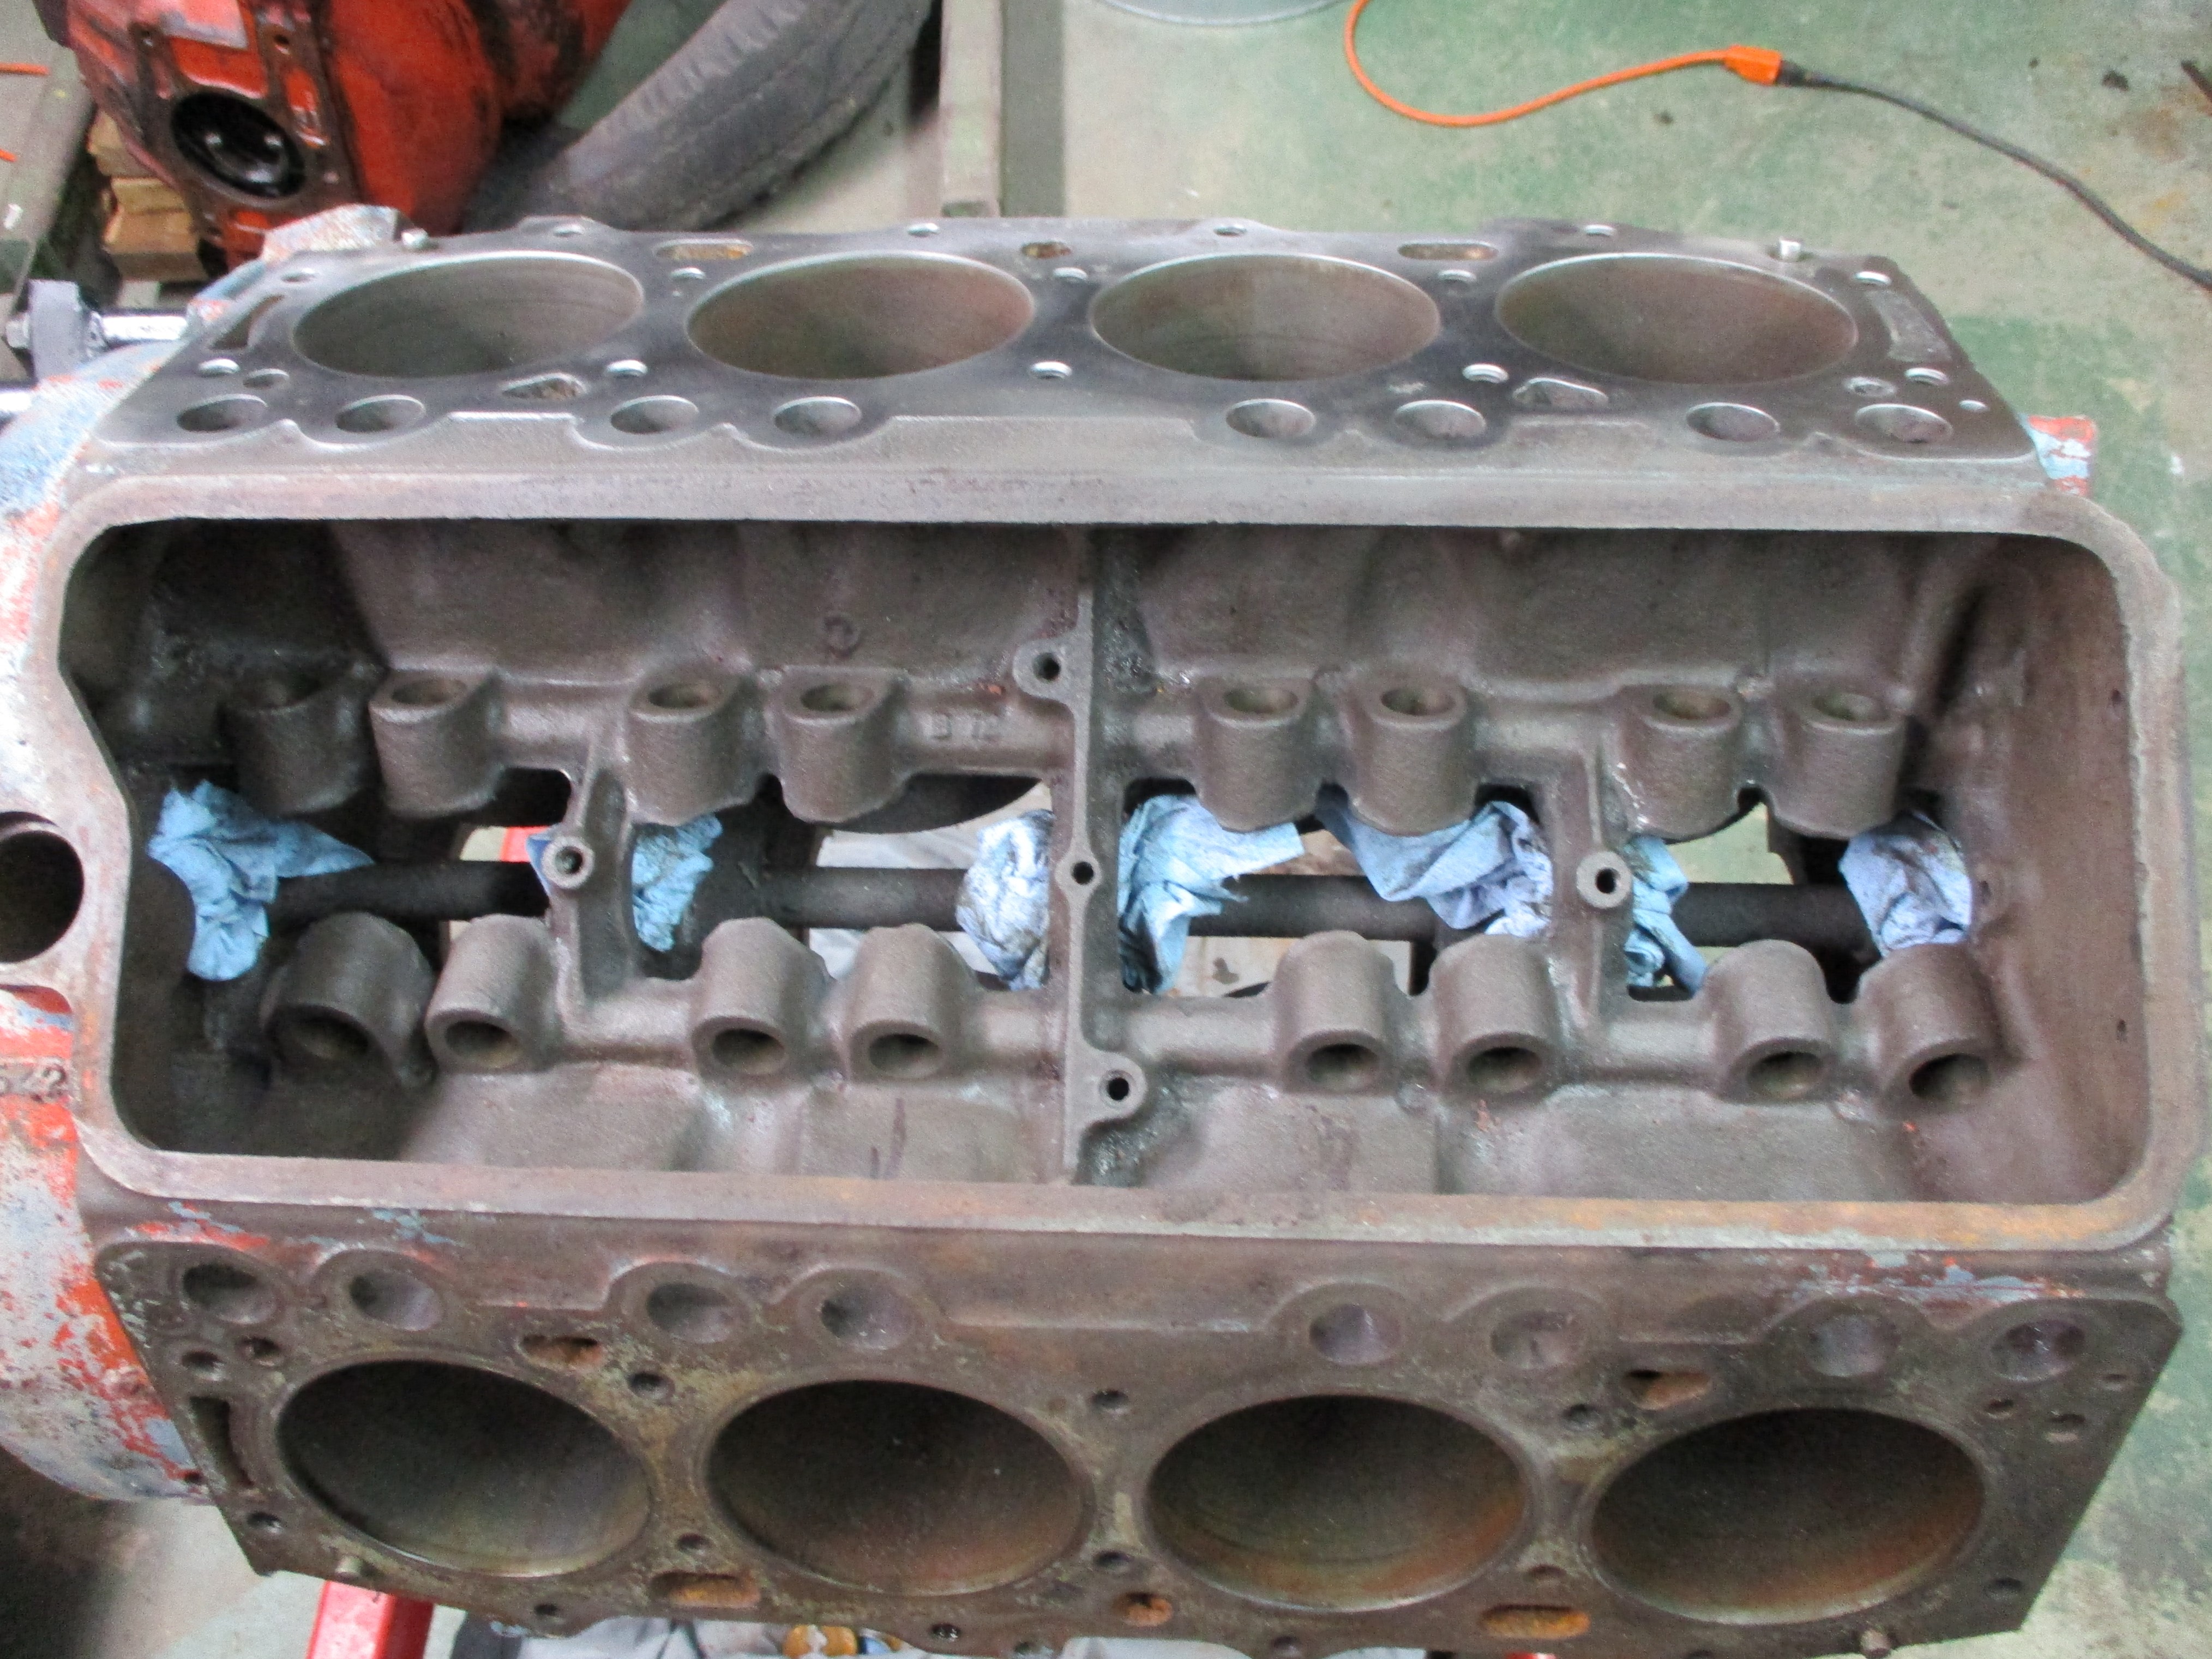
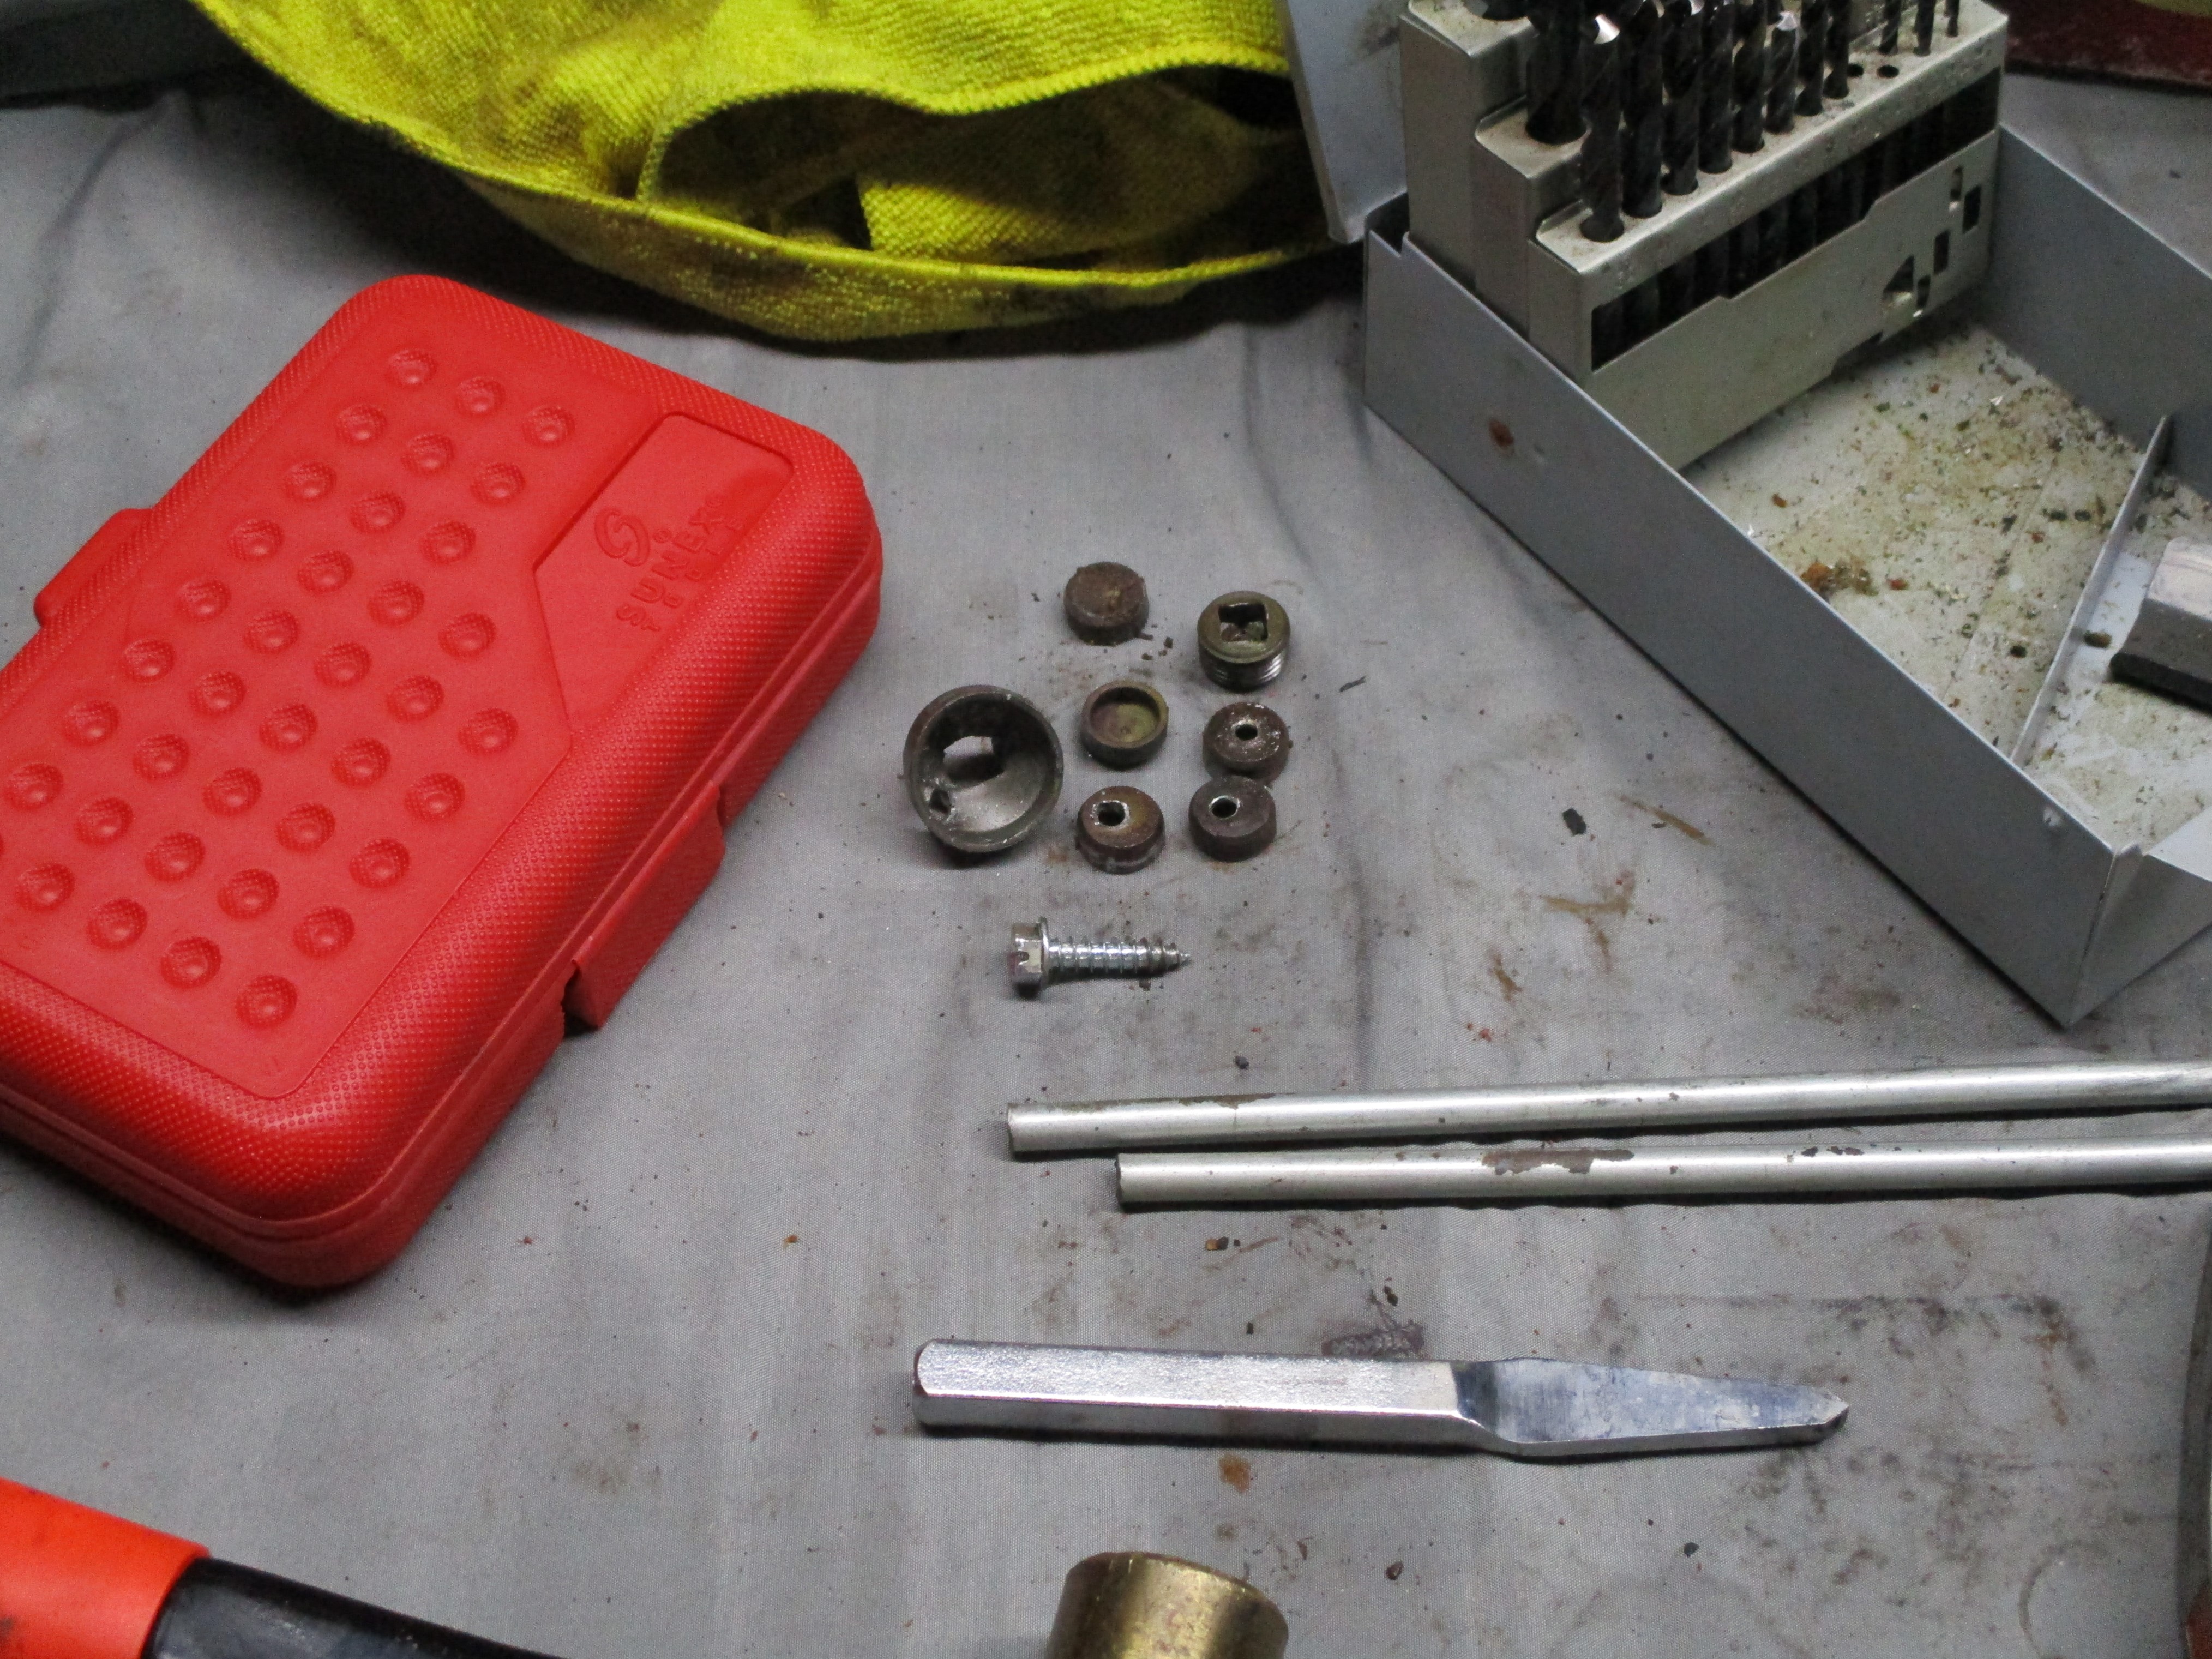
Several of the press in plugs were drilled with a small hole and pulled out with a self-tapping bolt and claw hammer. The press in plugs at the opposite ends of the galleys were tapped out from behind by placing two steel rods in the galleys and tapping from the opposite end. These rods were from my teenage days for locating the '59 Ford transmission I was changing so often.
The last press in plug was a 1" dia plug at the back of the block. Its purpose was to give access to the smaller press in plug at the end of the lifter galley. I pulled and pulled without luck until I realized that I could drive it in and it would fall to the floor. I'm a little slow sometimes.
Professional mechanics
deal with these plugs on a daily basis and think little of it,
but for me, this was an epic struggle. I had to go into Deep
Ponder Mode after each failure and there was a lot of that but, it's
behind me now. Onward. Background music was Steve Miller Band's Brave
New World.
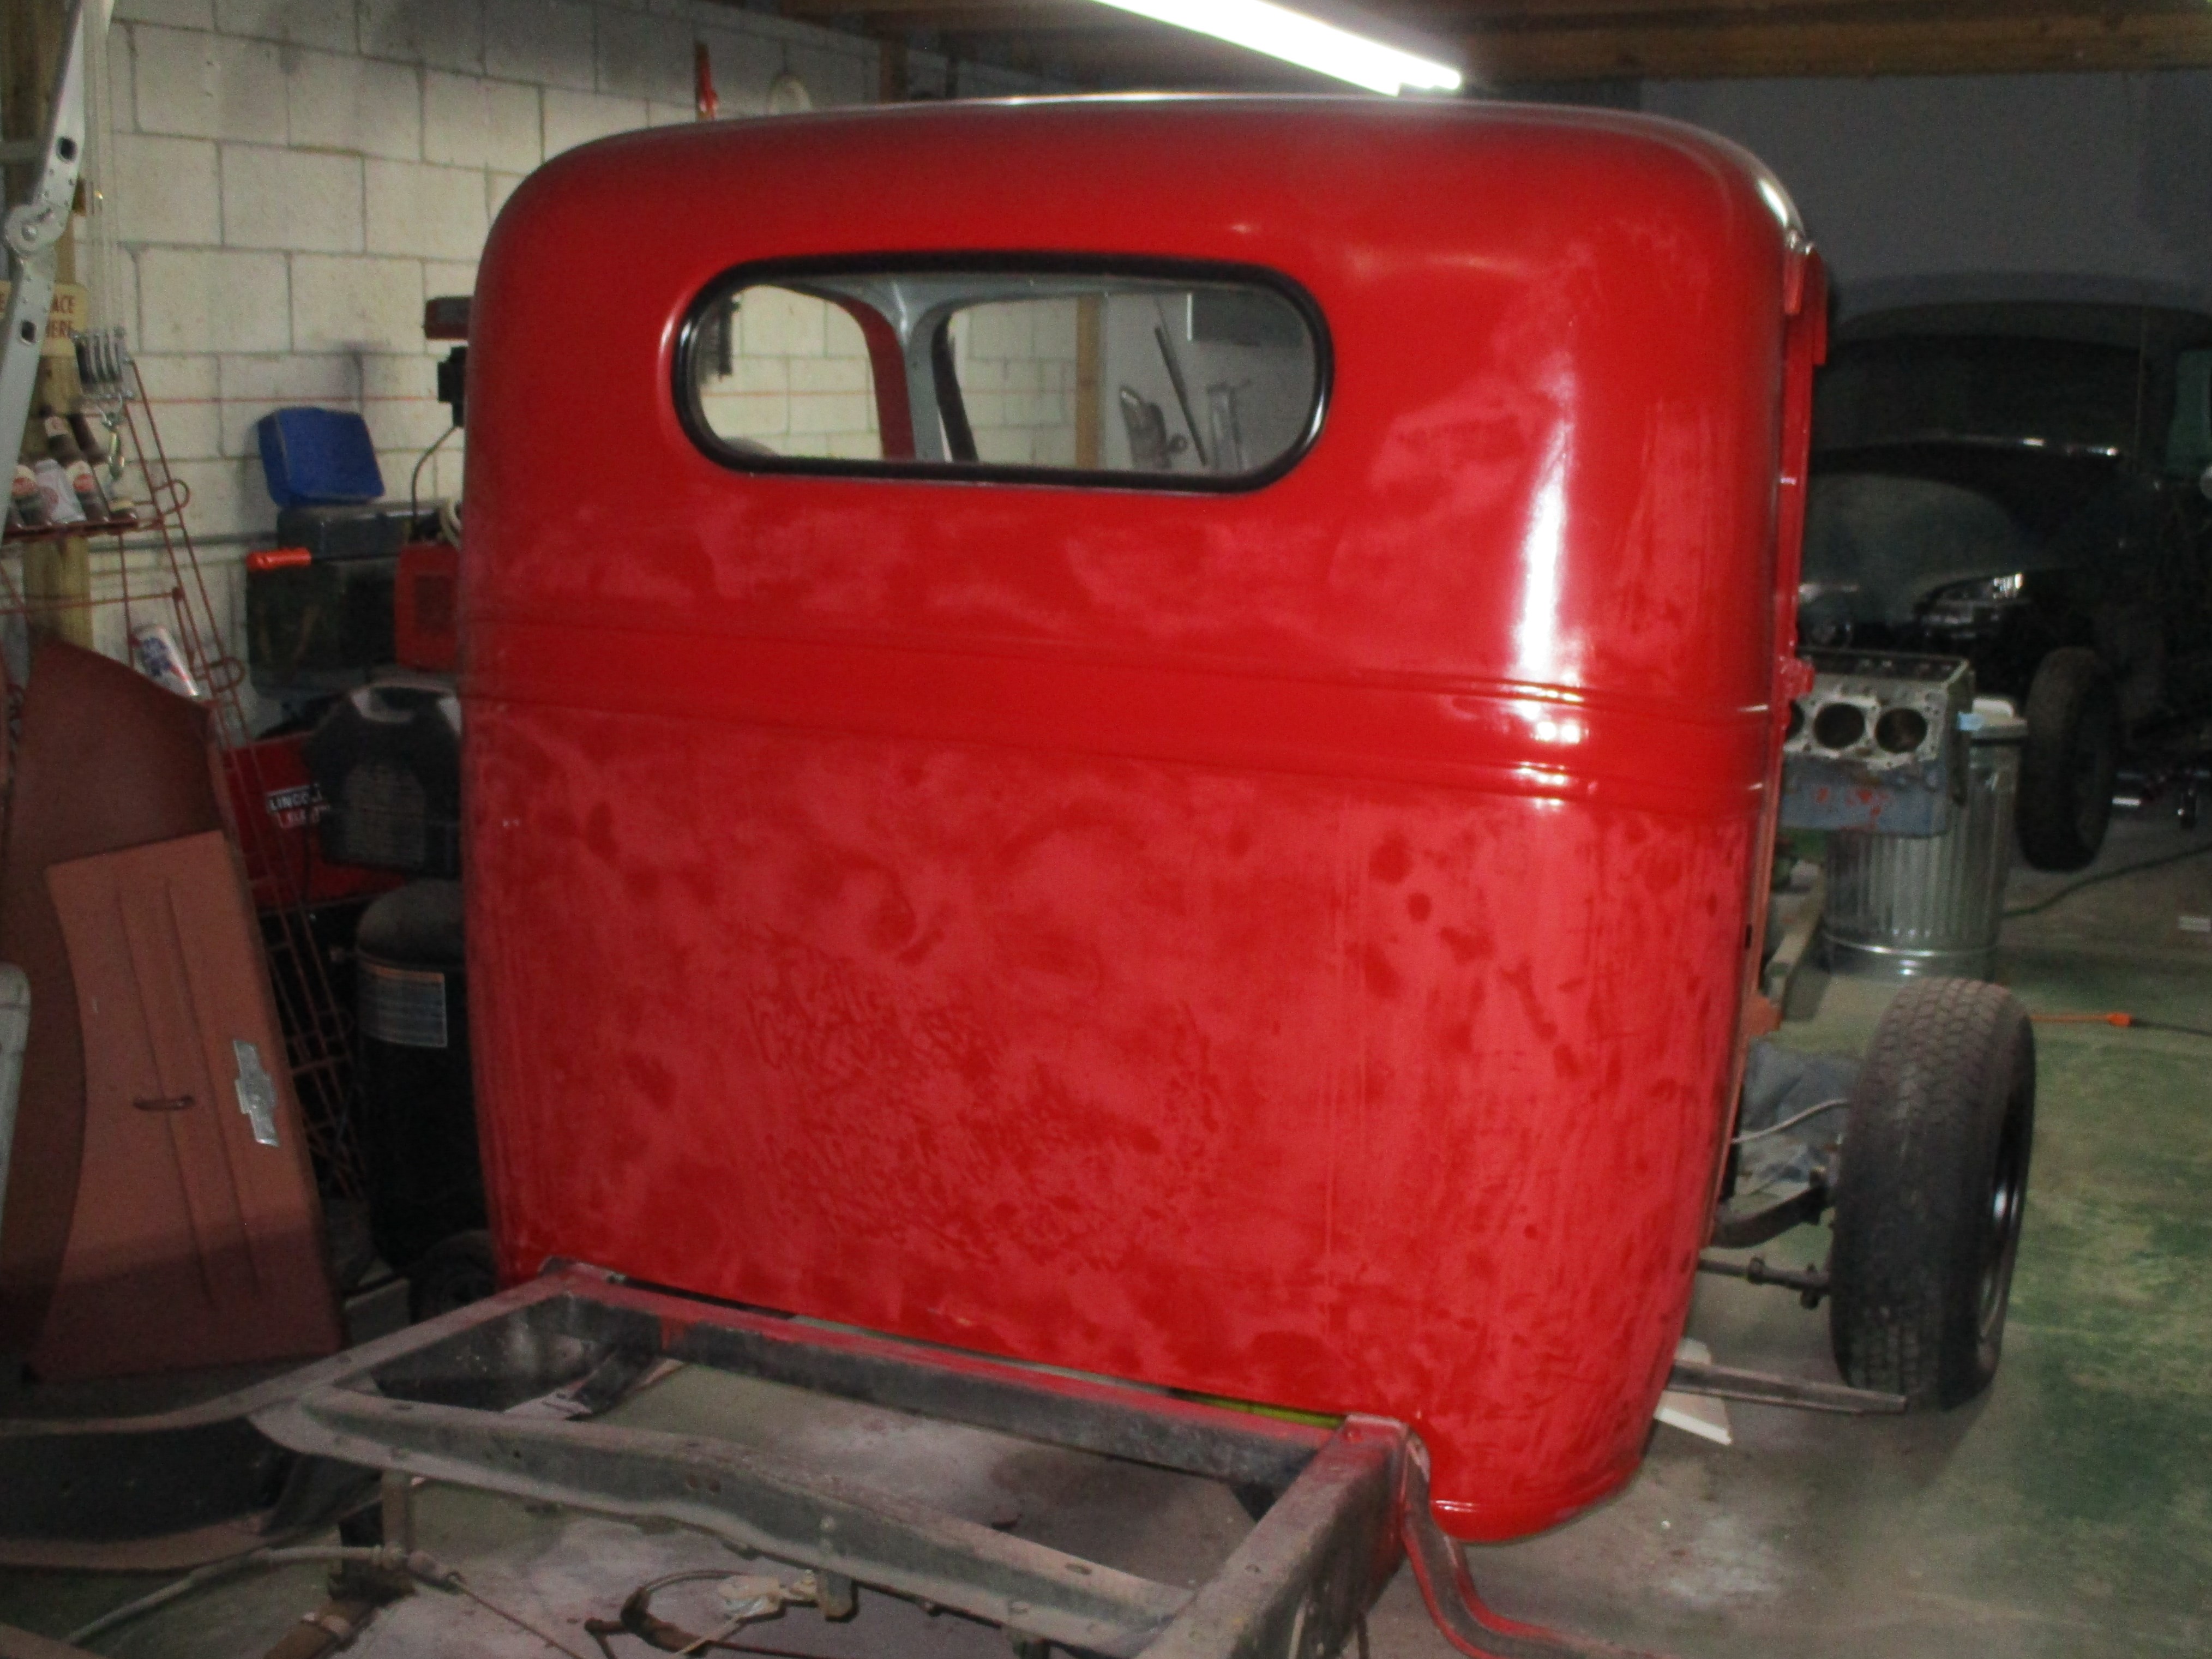 March
17th 2021
Last summer when the wheels fell off and the pilot light of my ambition
went out, I was half way done with painting ops on the back bottom of
the cab. I had finished filler and primer, mineral spirits wipedown and
tack rag and rolled on the first two coats of International Red,
followed by sanding with 240 grit. That's where it stands at this
point. Needs a few more coats before I can move on to the cowl area.
Beer of the day while I contemplated the painting startup was Wooden
Cask Brewing Company's Reformation Scottish Stout.
March
17th 2021
Last summer when the wheels fell off and the pilot light of my ambition
went out, I was half way done with painting ops on the back bottom of
the cab. I had finished filler and primer, mineral spirits wipedown and
tack rag and rolled on the first two coats of International Red,
followed by sanding with 240 grit. That's where it stands at this
point. Needs a few more coats before I can move on to the cowl area.
Beer of the day while I contemplated the painting startup was Wooden
Cask Brewing Company's Reformation Scottish Stout.
| < Back
to Intro |
You can email me at ![]() webmaster@laroke.com
webmaster@laroke.com
Issued Wednesday March 17, 2021
copyright © 2008-2021 Larry R. Kephart all rights reserved
| | LRK Home | | Bio Info | | Krash Khronicles | | LAROKE | |
| | BettyLou | | BillyBob's Garage | | Rat Patrol | | Deerslayer | | Elvira | |
| | Land of the Free and Home of the Brave | |
| | Keppylou's Art | | WWI Soldier's Diary | |