| | LRK Home | | Bio Info | | Krash Khronicles | | LAROKE | |
| | BettyLou | | BillyBob's Garage | | Rat Patrol | | Deerslayer | | Elvira | |
| | Land of the Free and Home of the Brave | |
| | Keppylou's Art | | WWI Soldier's Diary | |
Tinkering with Deerslayer
![]()
DEERSLAYER LINKS including vendor sites for parts and tools as well as sites for old truck and hot rod organizations
![]()
TINKERING WITH DEERSLAYER chronicles the day-by-day maintenance and improvements episodes for Deerslayer, a '37 Chevy farm truck hot rod.
CRUISIN' WITH DEERSLAYER Roadtrips, cruise-in's and truck show stories and tall tales.
TONY'S DUNGEON Tony Pascarella's forum entries at OldGMCtrucks.com regarding Deerslayer, particularly the 302 GMC engine build in his farmhouse basement.
![]()
DEERSLAYER MAINTENANCE Ever changing detailing, oil change, lube, etc. maintenance routines specifically developed for Deerslayer, including required tools, materials and procedures.
PROJECT NAILHEAD Chronicles the rebuild of a 1954 Buick Roadmaster 322 nailhead engine as a future replacement for Deerslayer's Jimmy 302.
43. Down to Bare Bones
 January
16th 2020
Slogging away at the rusted bed bolts. Was under the weather the last
few days. Still spent time out in the shop every day but didn't get as
much done. Scramblin' out from under the truck several times with the
Aztec quickstep put a kink in my operations.
January
16th 2020
Slogging away at the rusted bed bolts. Was under the weather the last
few days. Still spent time out in the shop every day but didn't get as
much done. Scramblin' out from under the truck several times with the
Aztec quickstep put a kink in my operations.
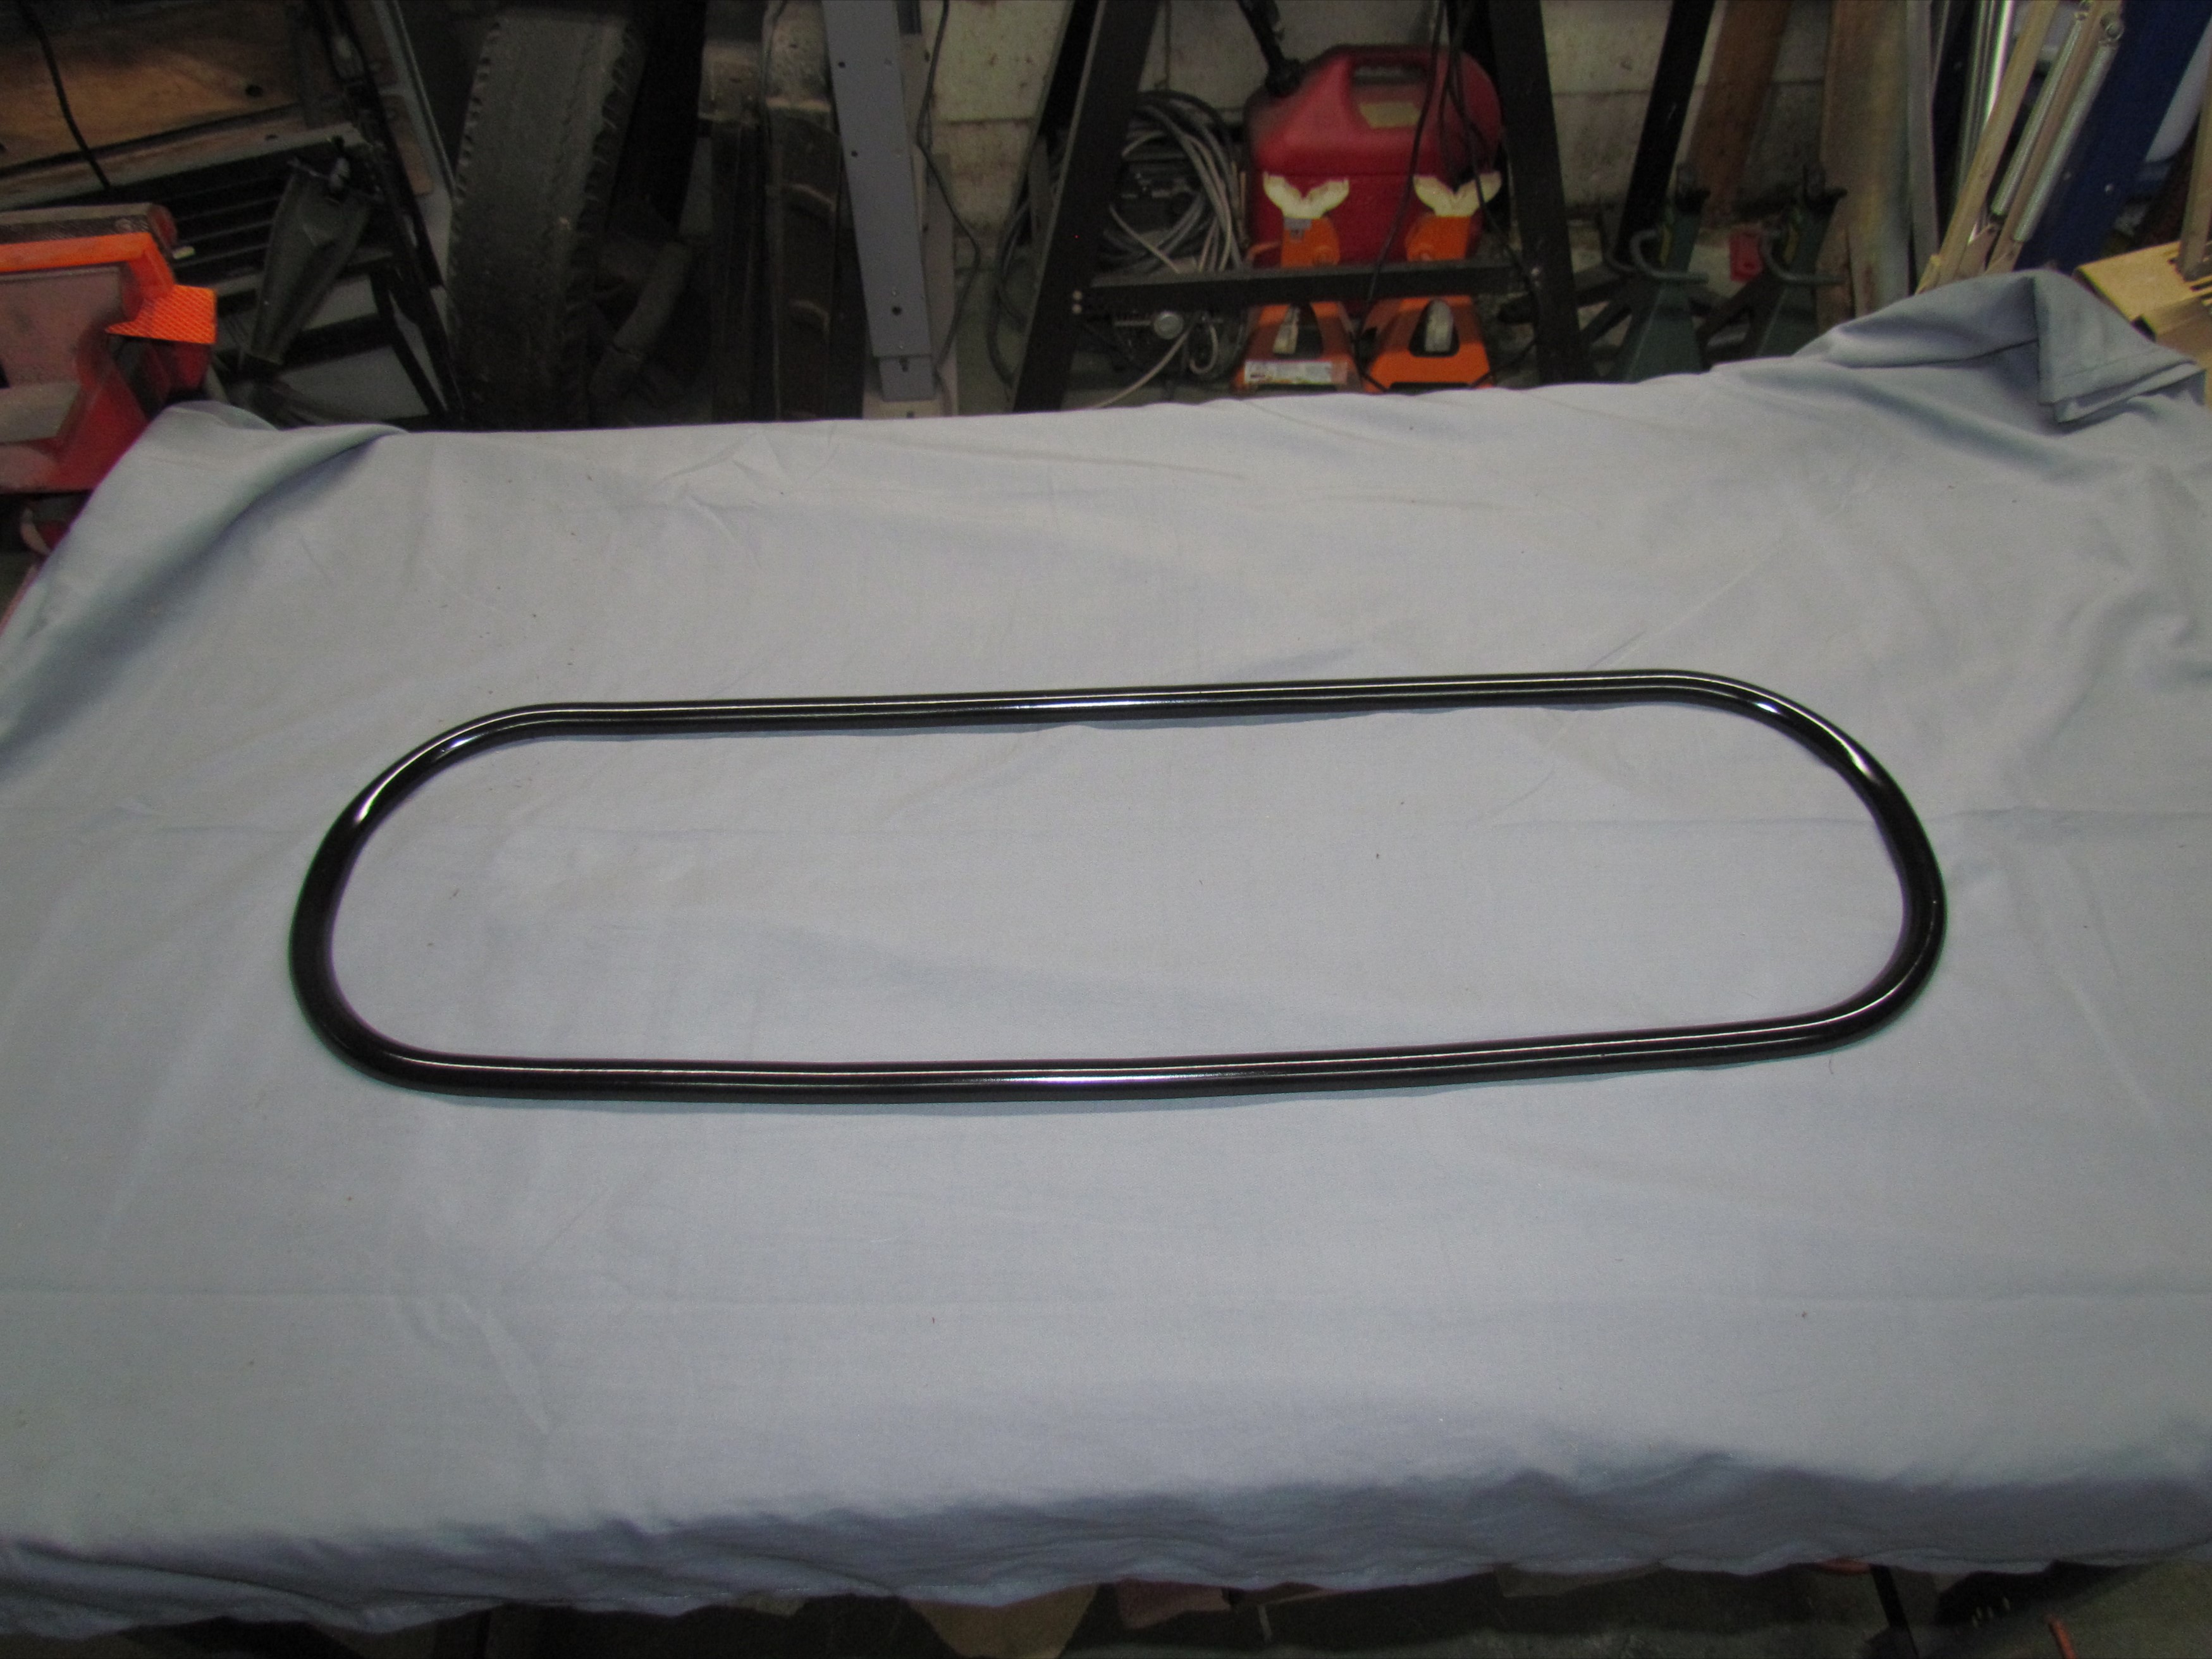
Finally got the bed off but it wasn't pretty. Last two carriage bolts turned in their anchorages. Prepared to grind the heads off when I realized they were both in ends of floating crossmembers and I could lift and lay the bedside down on its side, swing the crossmembers under the remaining board and lift the whole thing off as an assembly. Done! Beer of the day is Clipper City Brewing Company's Heavy Seas Winter Storm Imperial ESB.
 January
17th 2020
Cleaned up the aftermath of the battle of the carriage bolts. Drip
tray, siphon and paint arrived for the windshield job. The drip tray
has a corrugated bottom. That's a bonus. I won't have to fashion
stand-offs for the submerged parts. Still waiting on
Evapo-Rust. In the mean time I'll be removing parts of
the drive train and some other, between the frame rails, items. I was
wrong about the running board supports being bolted. They are riveted.
I must've been having a senior moment. They are sharp on the ends and
I've been collecting bubble wrap to encase them. A person could get a
bad gash and I'm just the man for the job.
January
17th 2020
Cleaned up the aftermath of the battle of the carriage bolts. Drip
tray, siphon and paint arrived for the windshield job. The drip tray
has a corrugated bottom. That's a bonus. I won't have to fashion
stand-offs for the submerged parts. Still waiting on
Evapo-Rust. In the mean time I'll be removing parts of
the drive train and some other, between the frame rails, items. I was
wrong about the running board supports being bolted. They are riveted.
I must've been having a senior moment. They are sharp on the ends and
I've been collecting bubble wrap to encase them. A person could get a
bad gash and I'm just the man for the job.
 January
20th 2020
Evapo-Rust arrived at the Krash Kubicle Friday afternoon. It was set up
at the shop and siphoned into the drip pan. Two hours after being
submerged, all the rust was gone. It took longer to set up and clean up
than than actually clean the metal.
January
20th 2020
Evapo-Rust arrived at the Krash Kubicle Friday afternoon. It was set up
at the shop and siphoned into the drip pan. Two hours after being
submerged, all the rust was gone. It took longer to set up and clean up
than than actually clean the metal.
 I've said
before that there is almost something religious about bare clean metal.
Now, I've got to bone up on setting the windshield in the frame with
glass setting tape. Years ago, I did a similar op with one of
BillyBob's vent windows. I'm hoping the process isn't much different.
I've said
before that there is almost something religious about bare clean metal.
Now, I've got to bone up on setting the windshield in the frame with
glass setting tape. Years ago, I did a similar op with one of
BillyBob's vent windows. I'm hoping the process isn't much different.
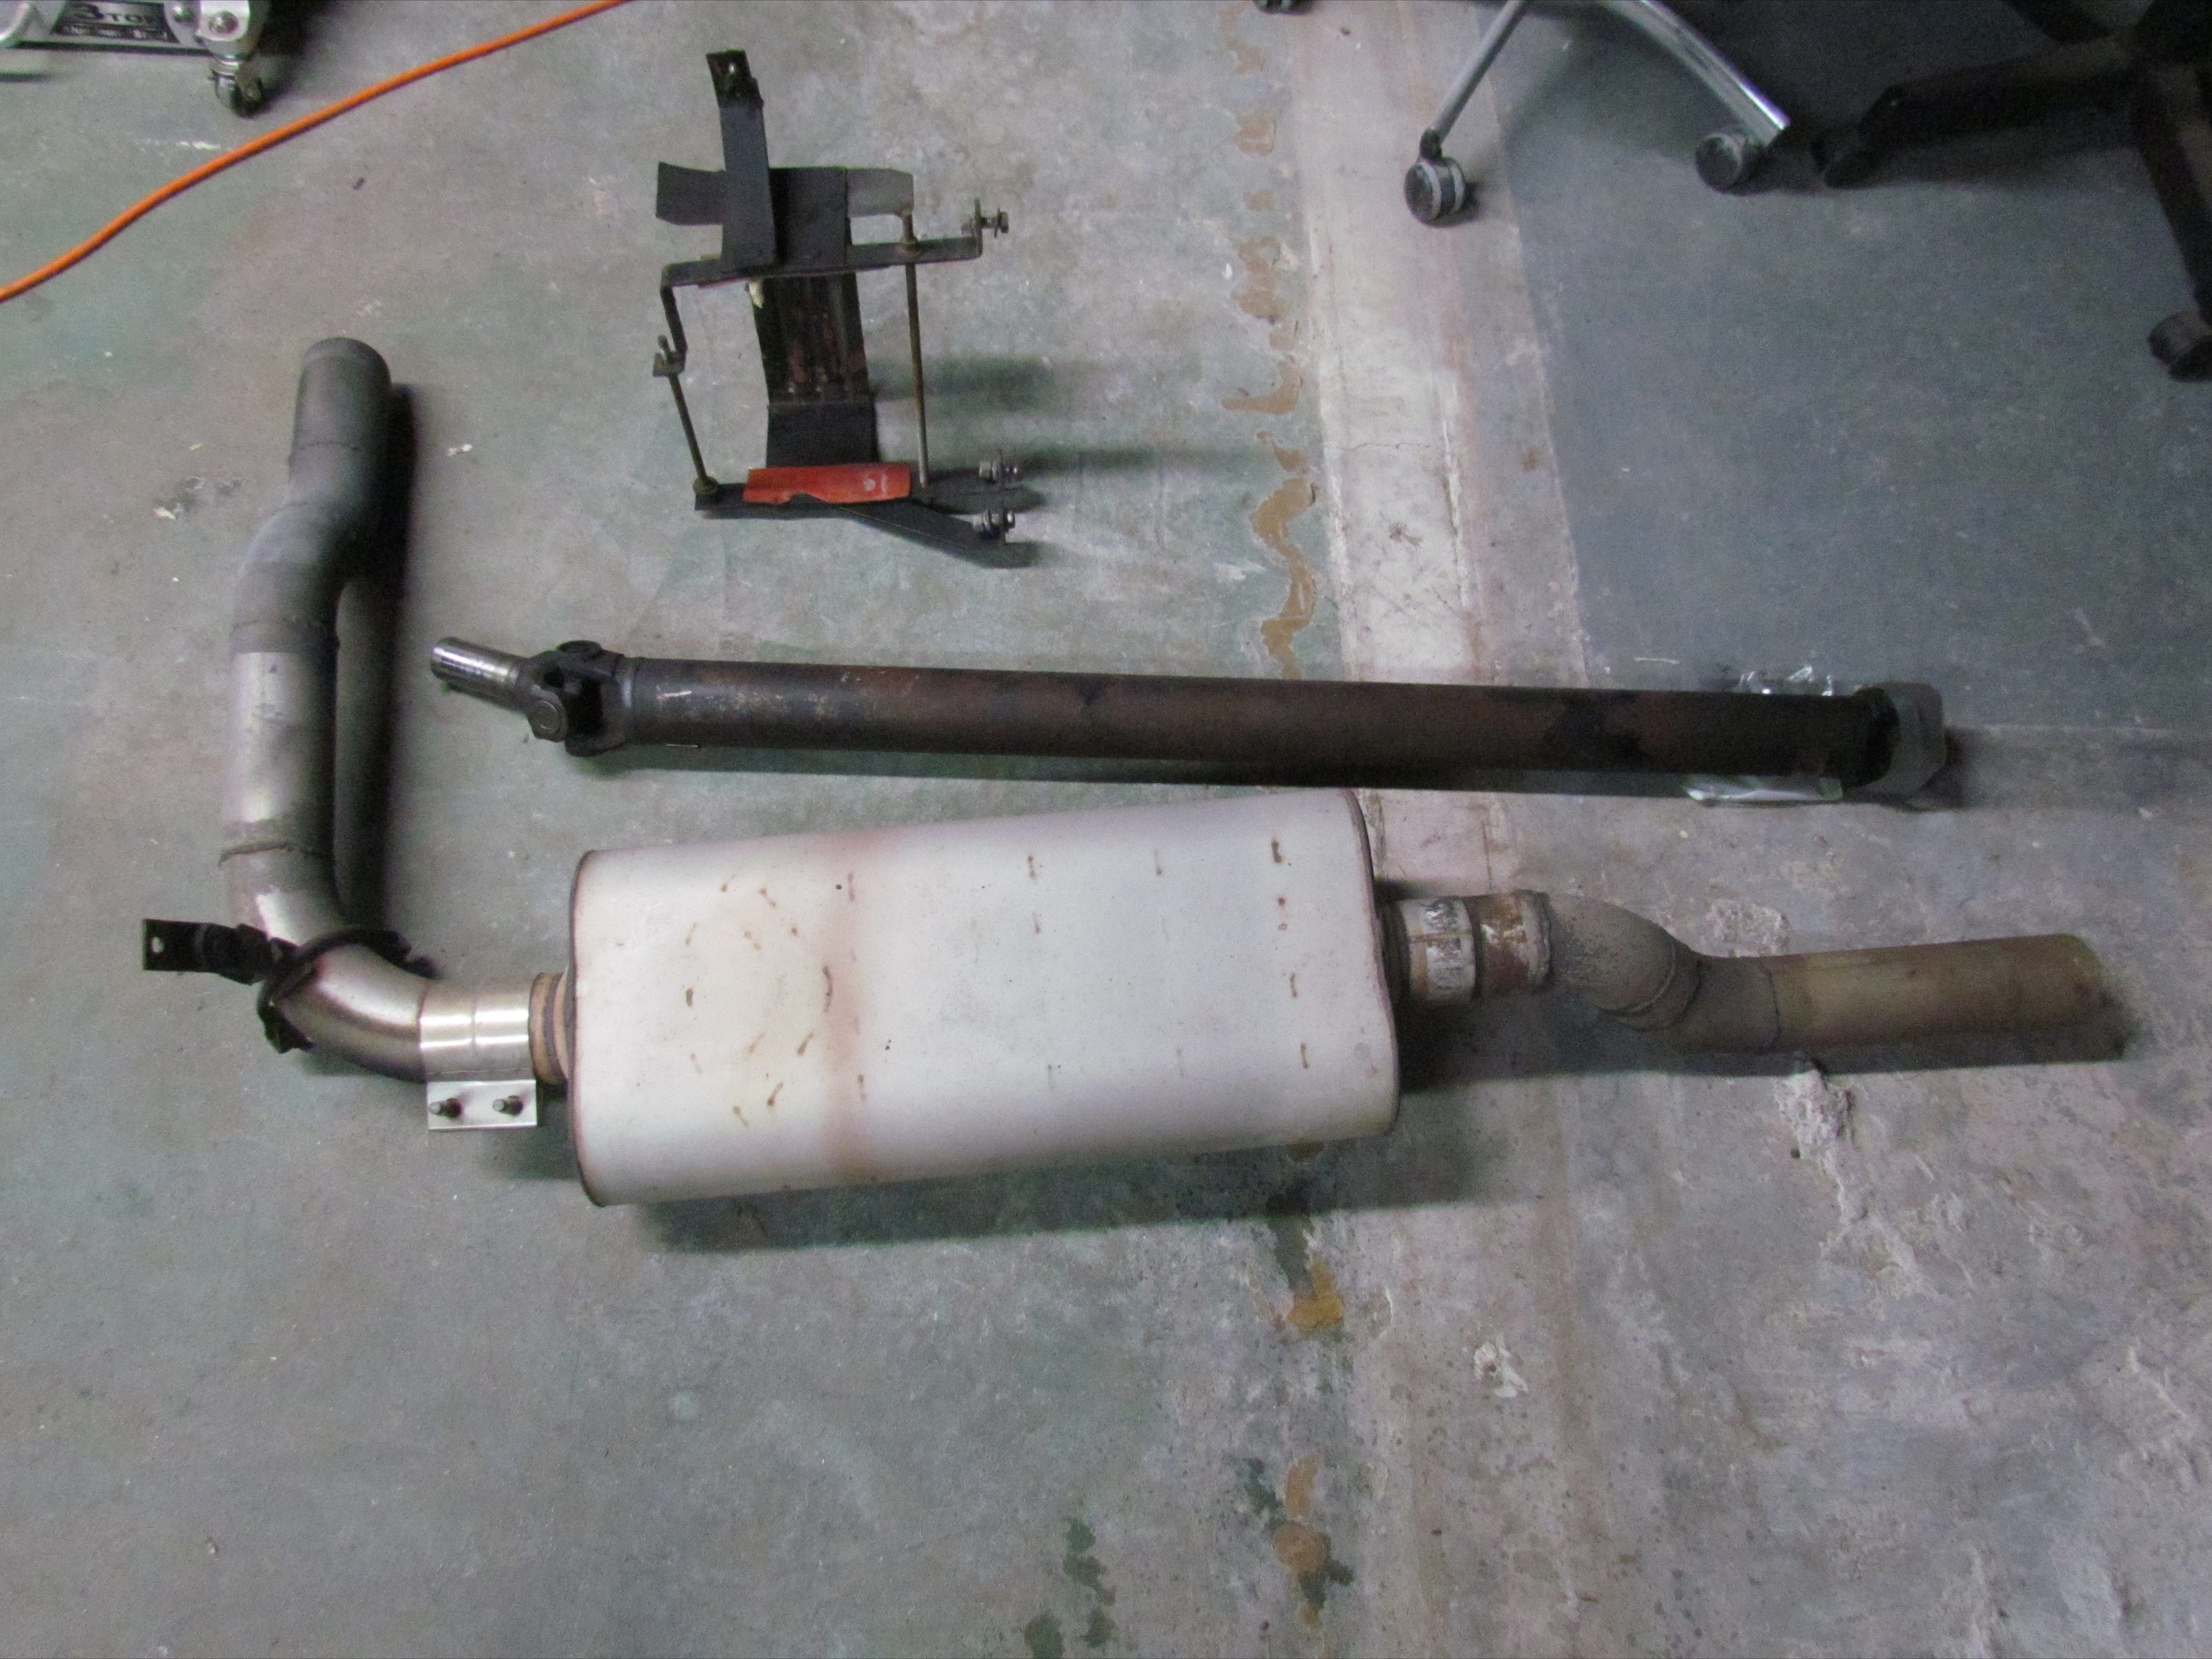 January
21st 2020
Got the remainder of the exhaust system off the truck. This thing has
been in my way a long time. With the bed off, I could finally see the
hanger bolt that was giving me trouble. The entire exhaust system was
rusted together and I cut it in
half at one
point to get the header end off. It was a clean cut and I will be able
to
splice things together again without much trouble. I'm happy because
the combination of the lumpy cam with the Flowmaster muffler makes a
wicked sound that many mistake for a V8.
January
21st 2020
Got the remainder of the exhaust system off the truck. This thing has
been in my way a long time. With the bed off, I could finally see the
hanger bolt that was giving me trouble. The entire exhaust system was
rusted together and I cut it in
half at one
point to get the header end off. It was a clean cut and I will be able
to
splice things together again without much trouble. I'm happy because
the combination of the lumpy cam with the Flowmaster muffler makes a
wicked sound that many mistake for a V8.
Took the drive shaft out next. Soon as it was unbolted, the universal joint got a strip of duct tape around it, keeping the bearing cups in place and preventing the roller bearings from making their escape.
Deerslayer's tranny is scheduled to come out next. Soon
discovered I don't have a wrench that will fit between the battery box
and the drain plug so, I stopped long enuf to take out the battery box.
Beer of the day was Southern Barrel Brewing Company's Helles Lager.
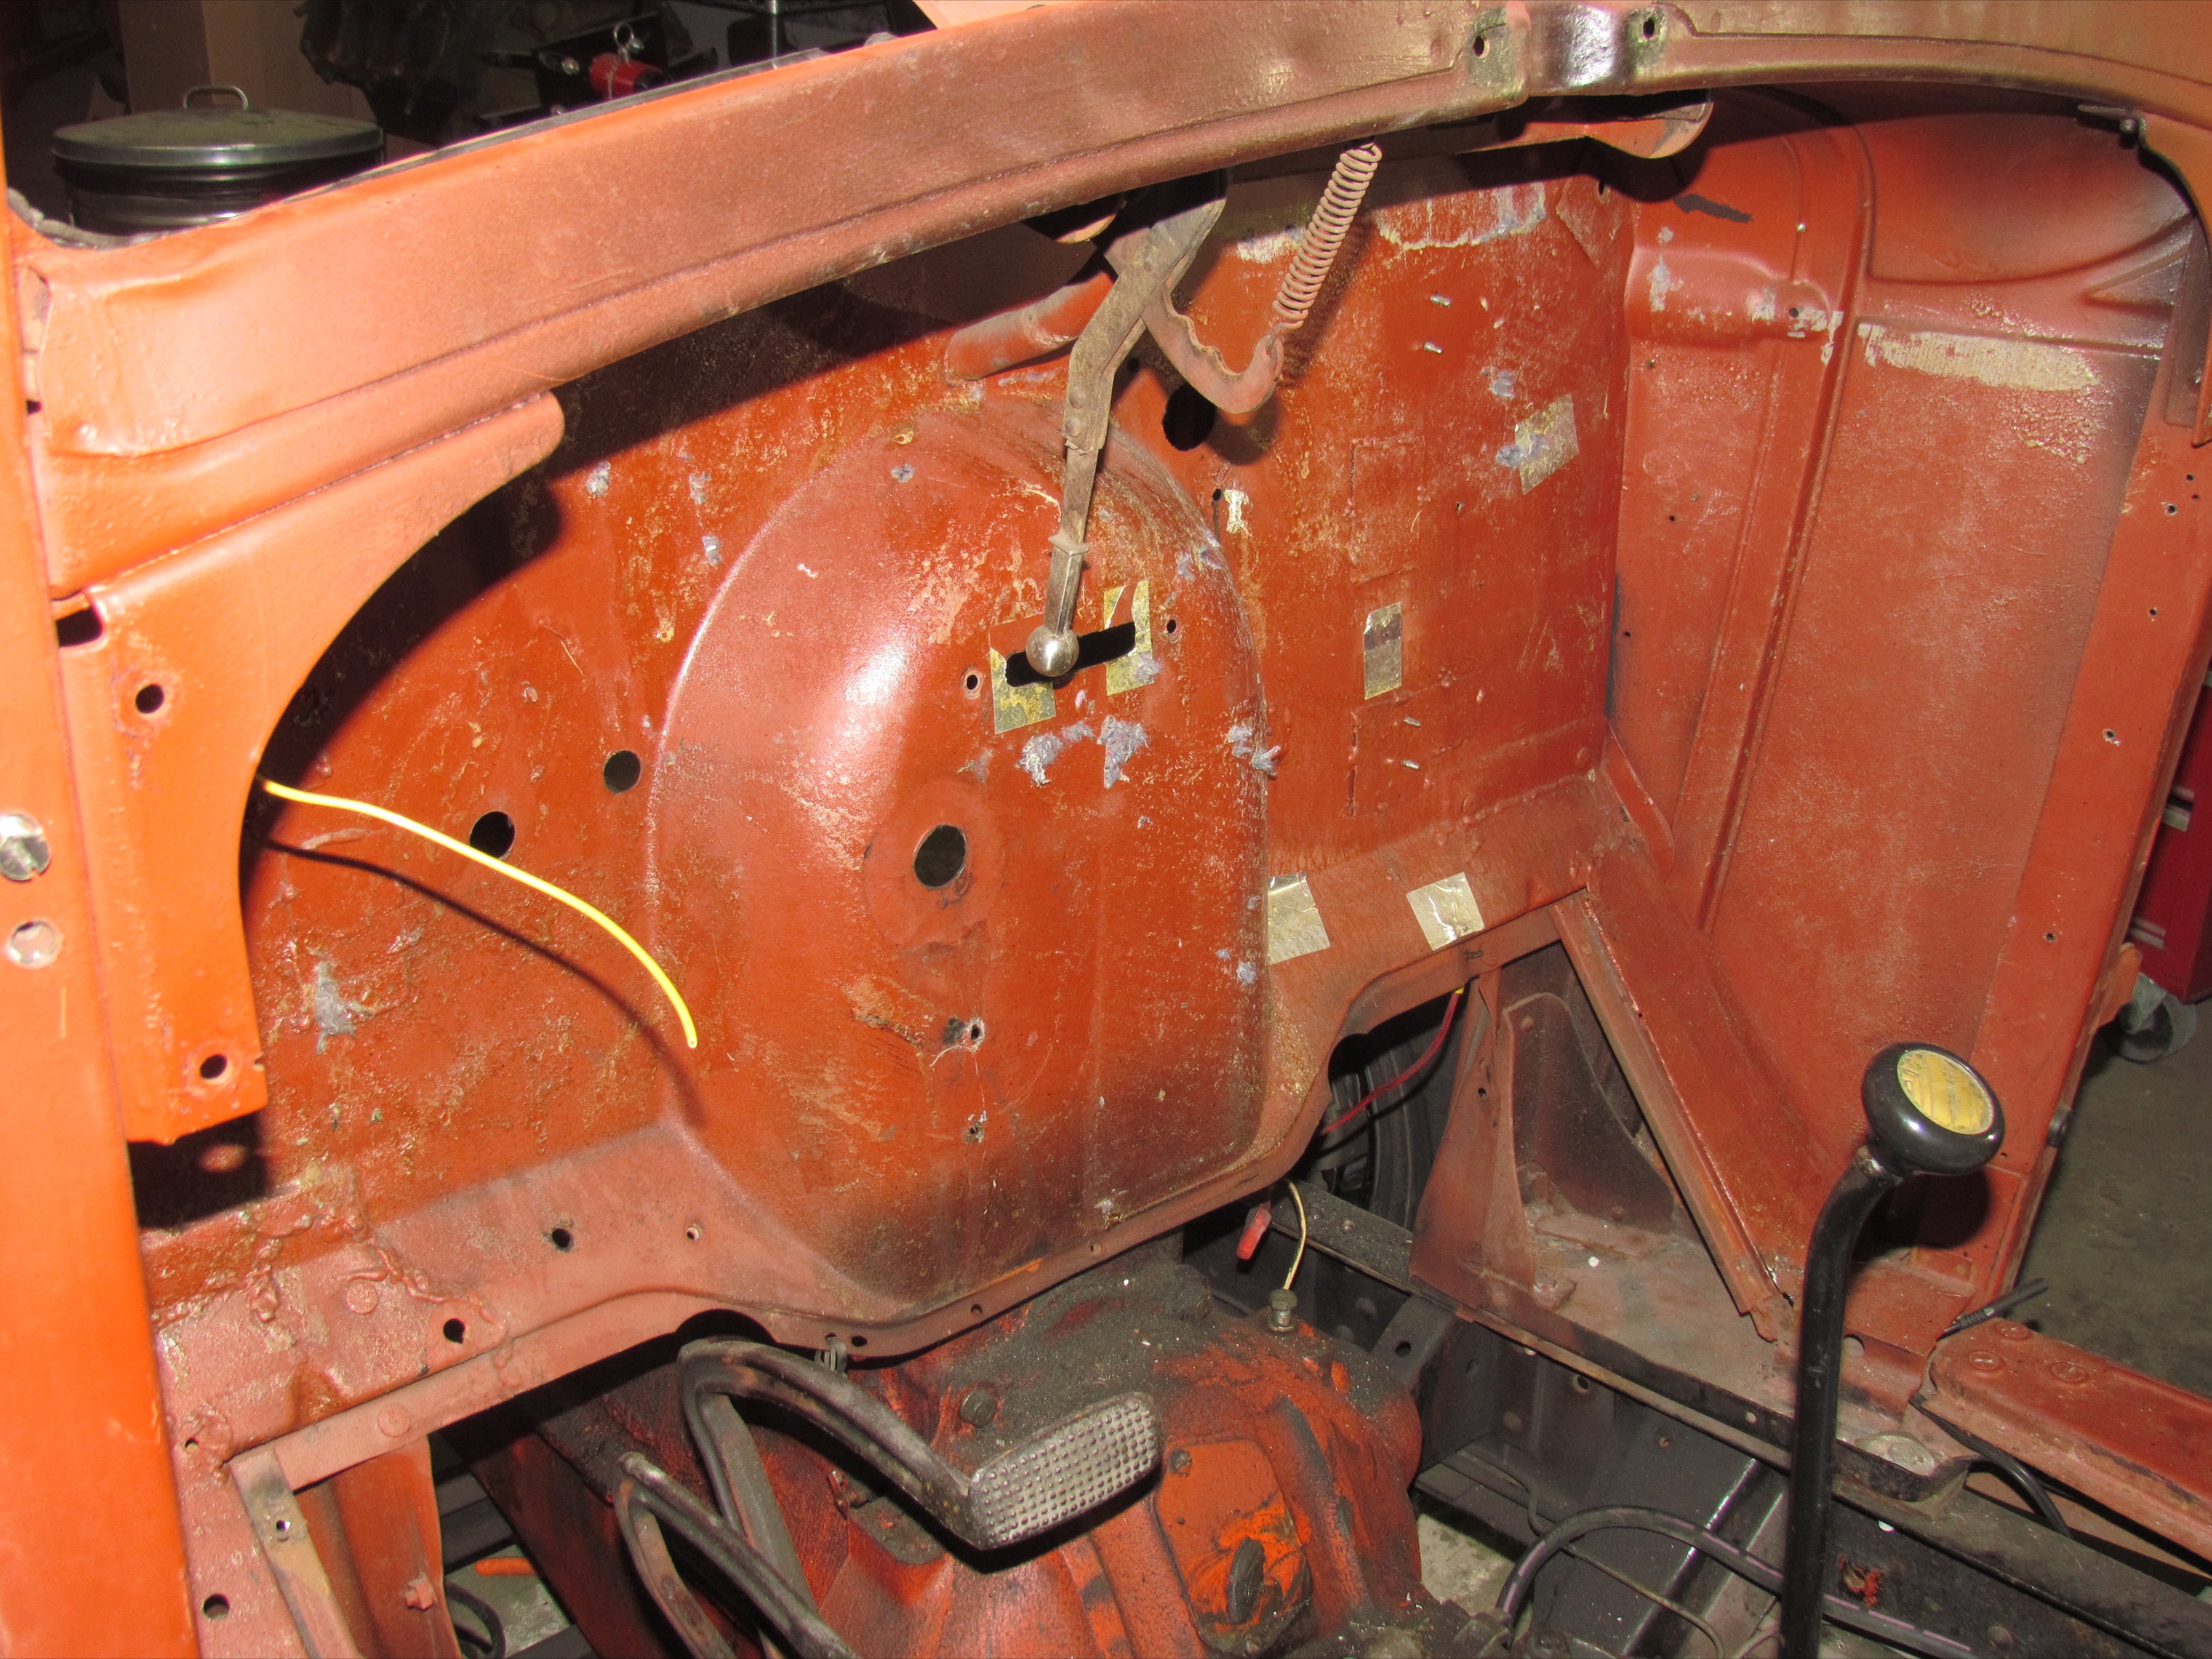
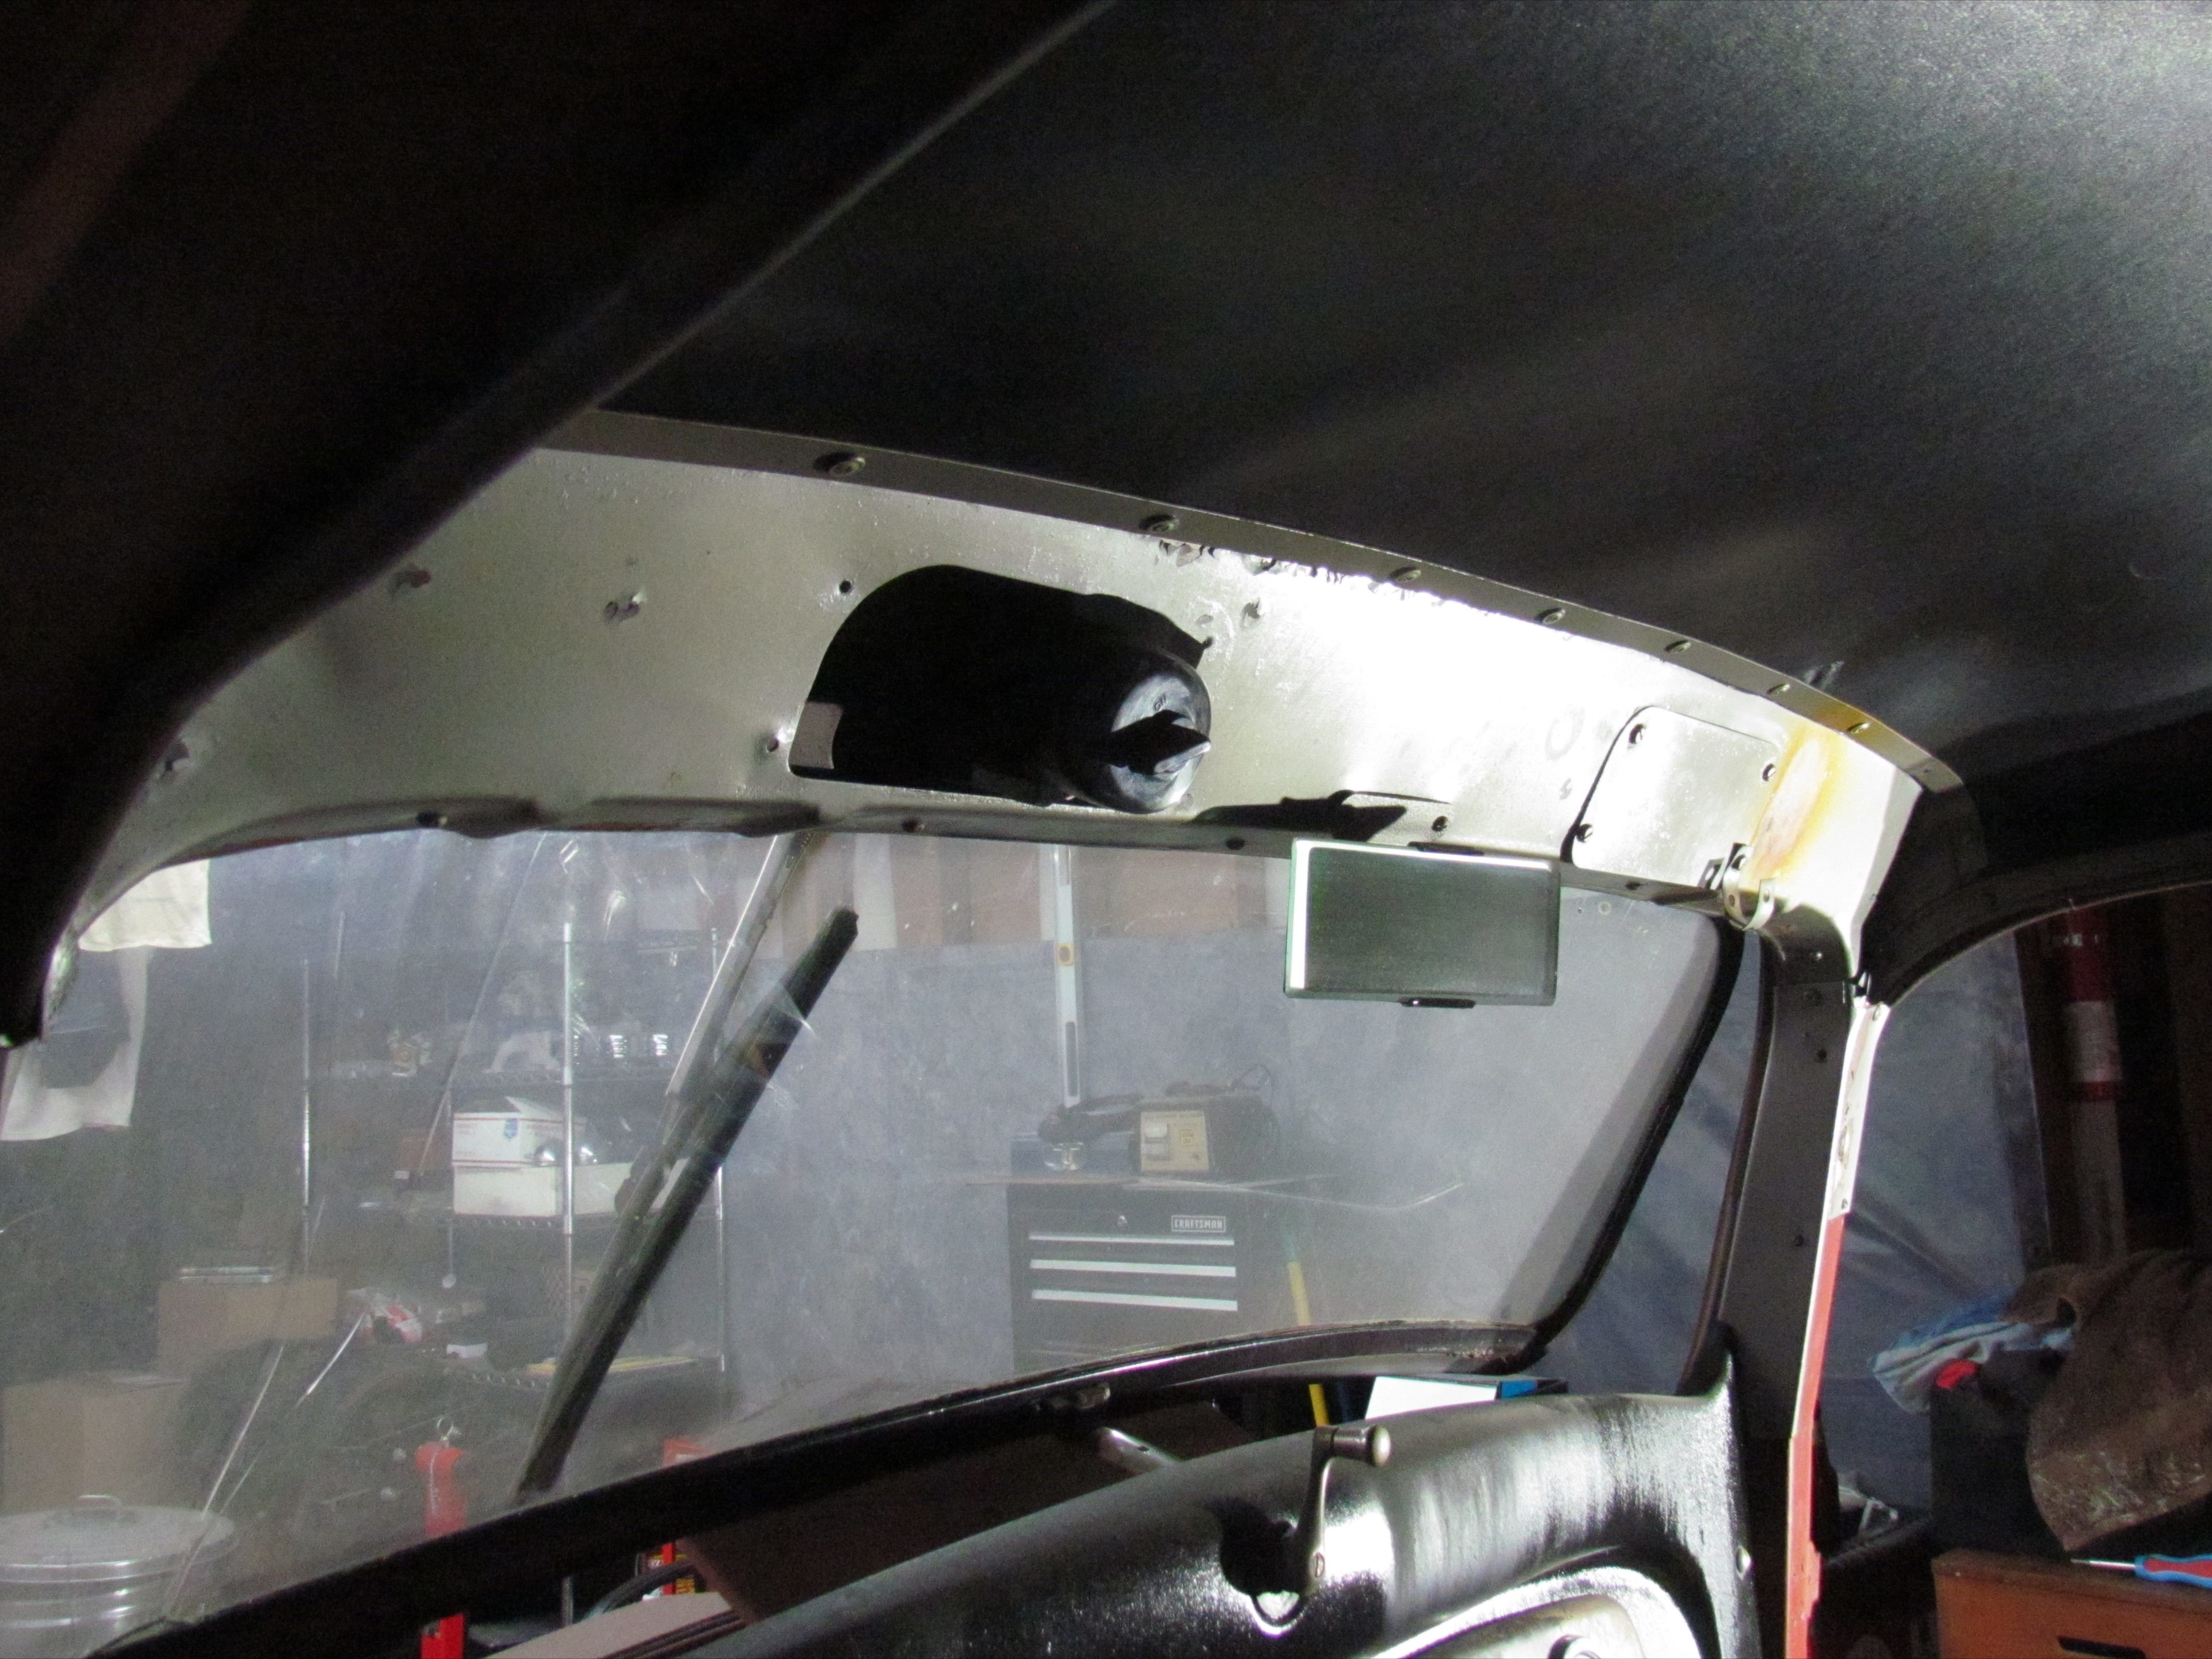 January
22nd 2020 Was tired of rolling around under
the truck and doin' laundry afterwards so I switched to cab disassembly
for a change of pace. The wiper motor and, hinge enclosure above the
windshield has to come off to get at the old windshield hinges.
Headliner trim, a-pillar trim and door header trim pieces have to be
removed for that to happen. Had the items, along with wiper and wiper
motor off by the time I turned the lights out in the shop for the
night.
January
22nd 2020 Was tired of rolling around under
the truck and doin' laundry afterwards so I switched to cab disassembly
for a change of pace. The wiper motor and, hinge enclosure above the
windshield has to come off to get at the old windshield hinges.
Headliner trim, a-pillar trim and door header trim pieces have to be
removed for that to happen. Had the items, along with wiper and wiper
motor off by the time I turned the lights out in the shop for the
night.
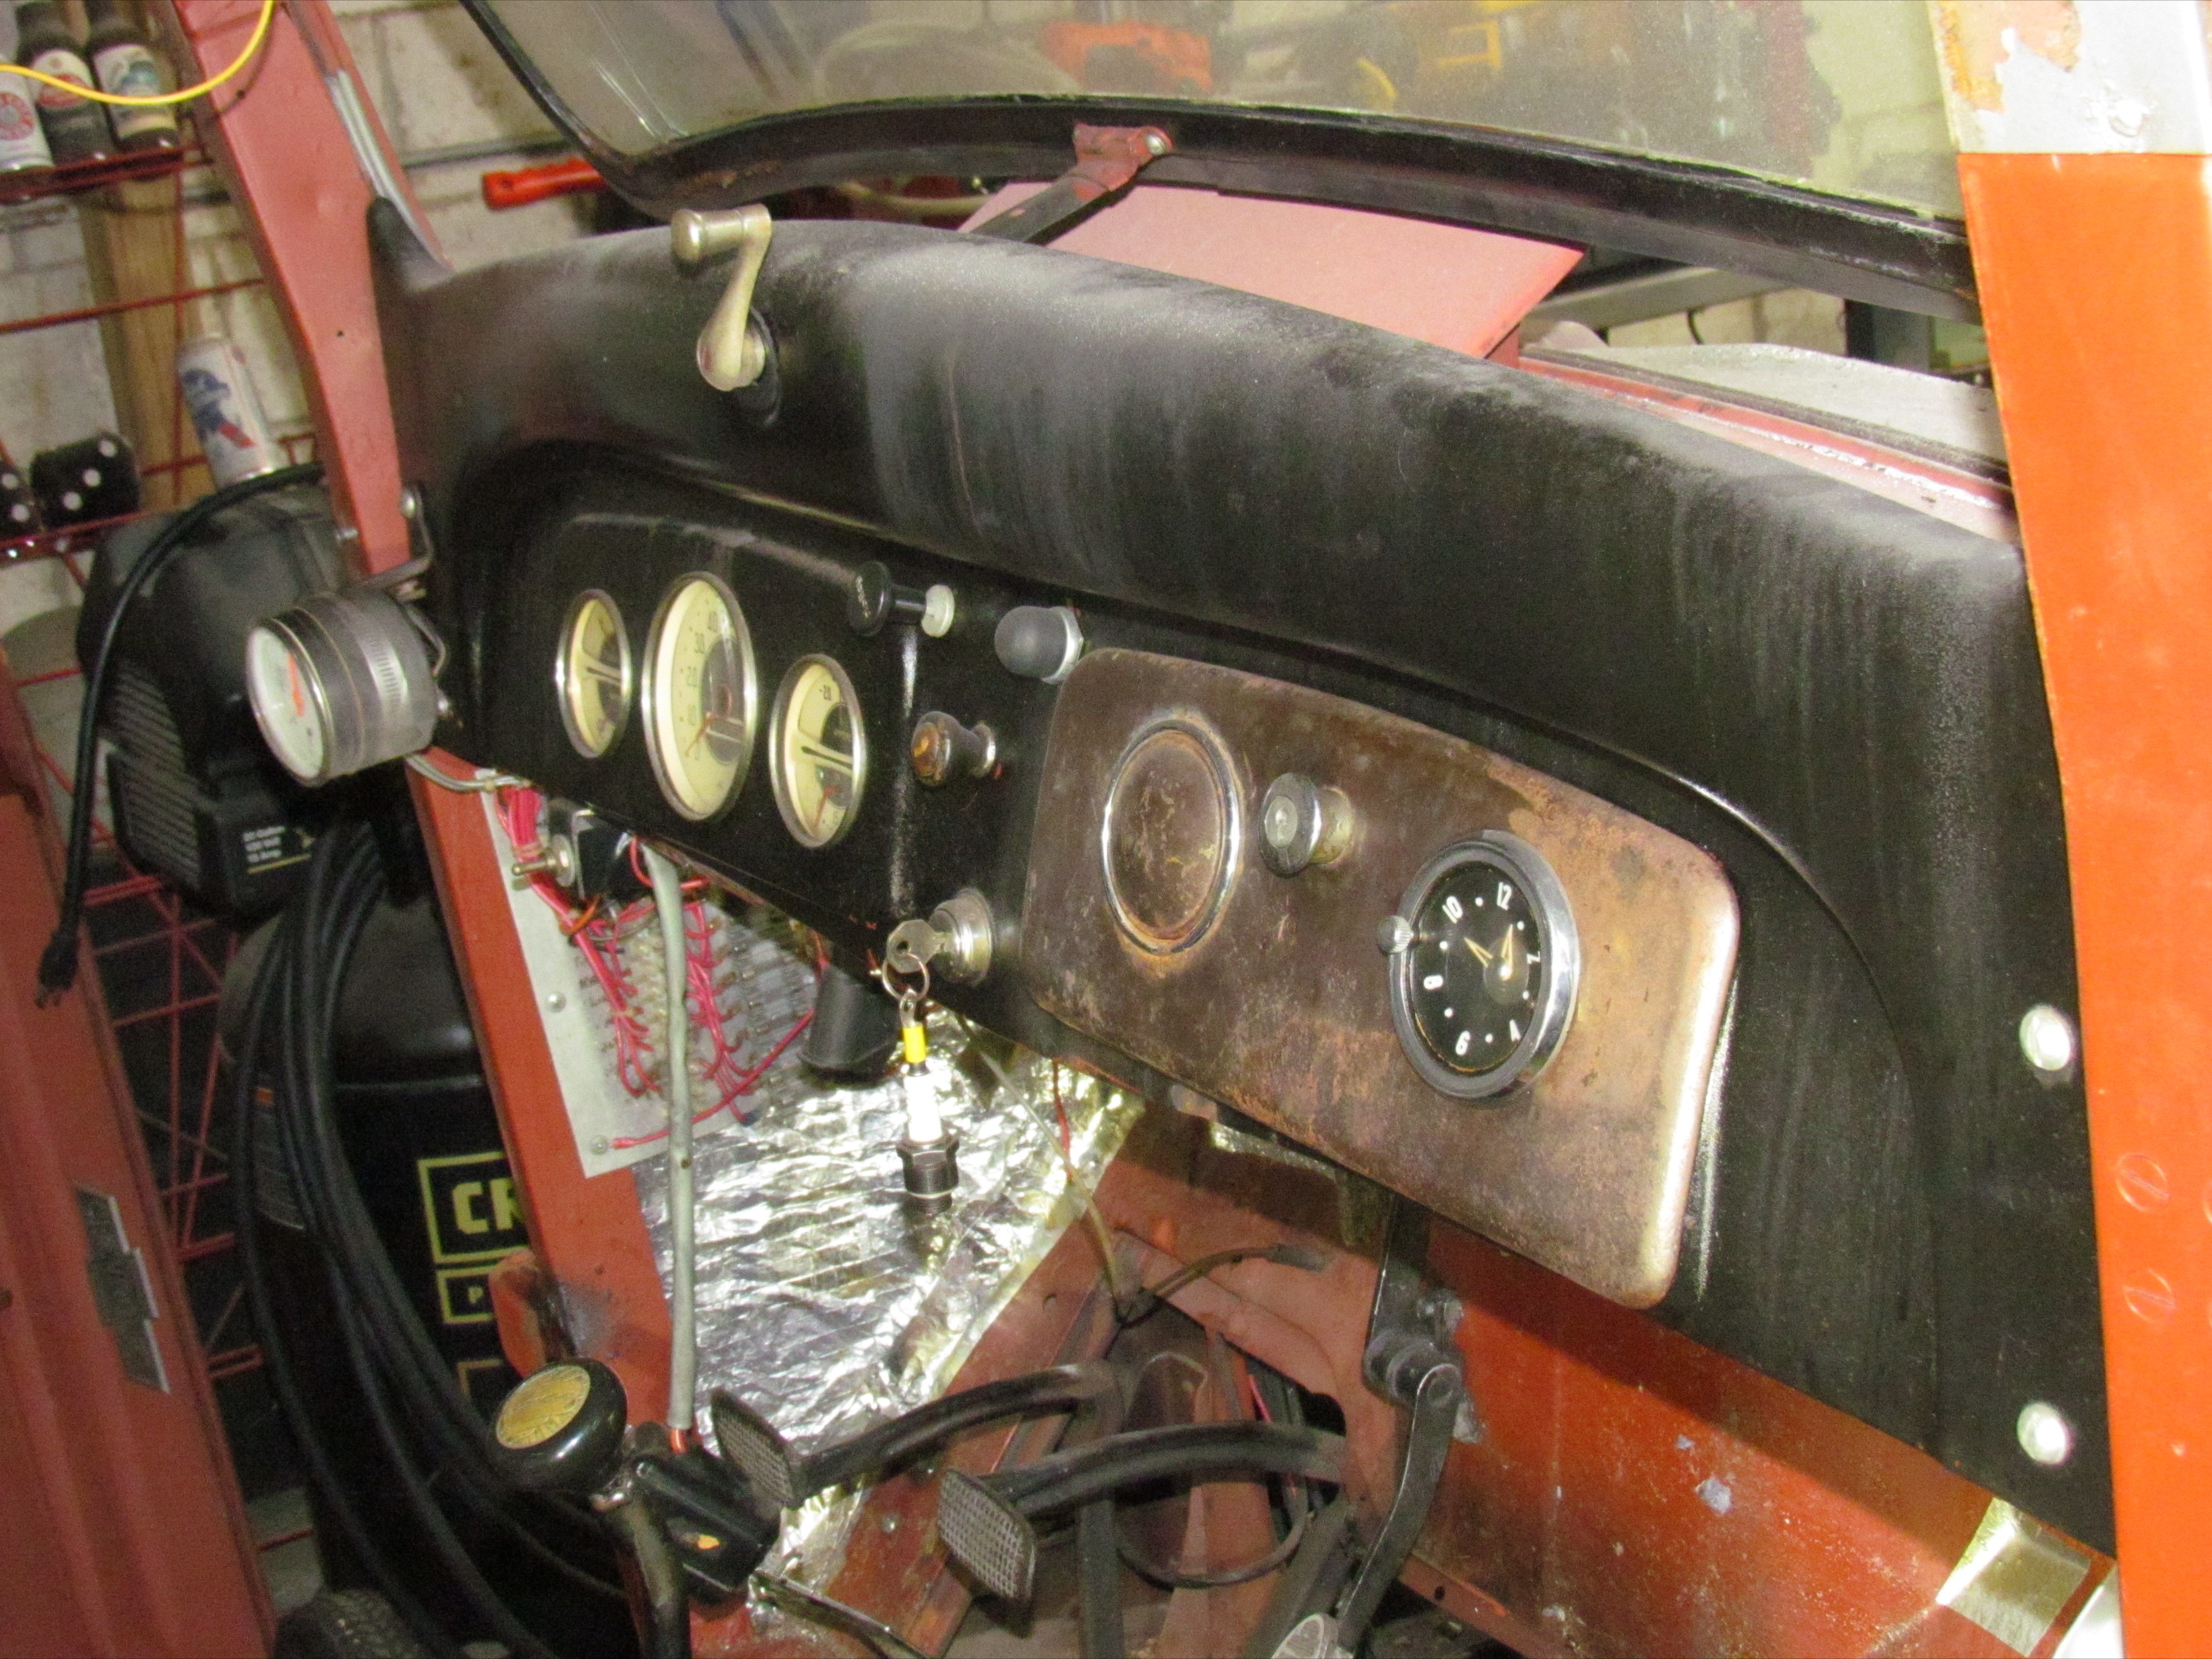 January
23rd 2020
Turned my attention to the dashboard. Looks fairly straightforward. It
should come out after four screws and the windshield crank mechanism
handle are removed. It did, tho' there was some jockeying around,
joggling this way and that, after it was loose. The next thing to
consider is the wiring still attaching it to the cab.
January
23rd 2020
Turned my attention to the dashboard. Looks fairly straightforward. It
should come out after four screws and the windshield crank mechanism
handle are removed. It did, tho' there was some jockeying around,
joggling this way and that, after it was loose. The next thing to
consider is the wiring still attaching it to the cab.
 January
24th 2020 The dashboard wiring needed some
deep ponder mode time to determine the best approach. Let loose the
side cutters of war or try to preserve the existing wiring harness for
comparison when the new wiring harness is installed? Preservation won
out. Beer of the day is Christian Moerlein Brewing Company's Northern
Liberties IPA.
January
24th 2020 The dashboard wiring needed some
deep ponder mode time to determine the best approach. Let loose the
side cutters of war or try to preserve the existing wiring harness for
comparison when the new wiring harness is installed? Preservation won
out. Beer of the day is Christian Moerlein Brewing Company's Northern
Liberties IPA.
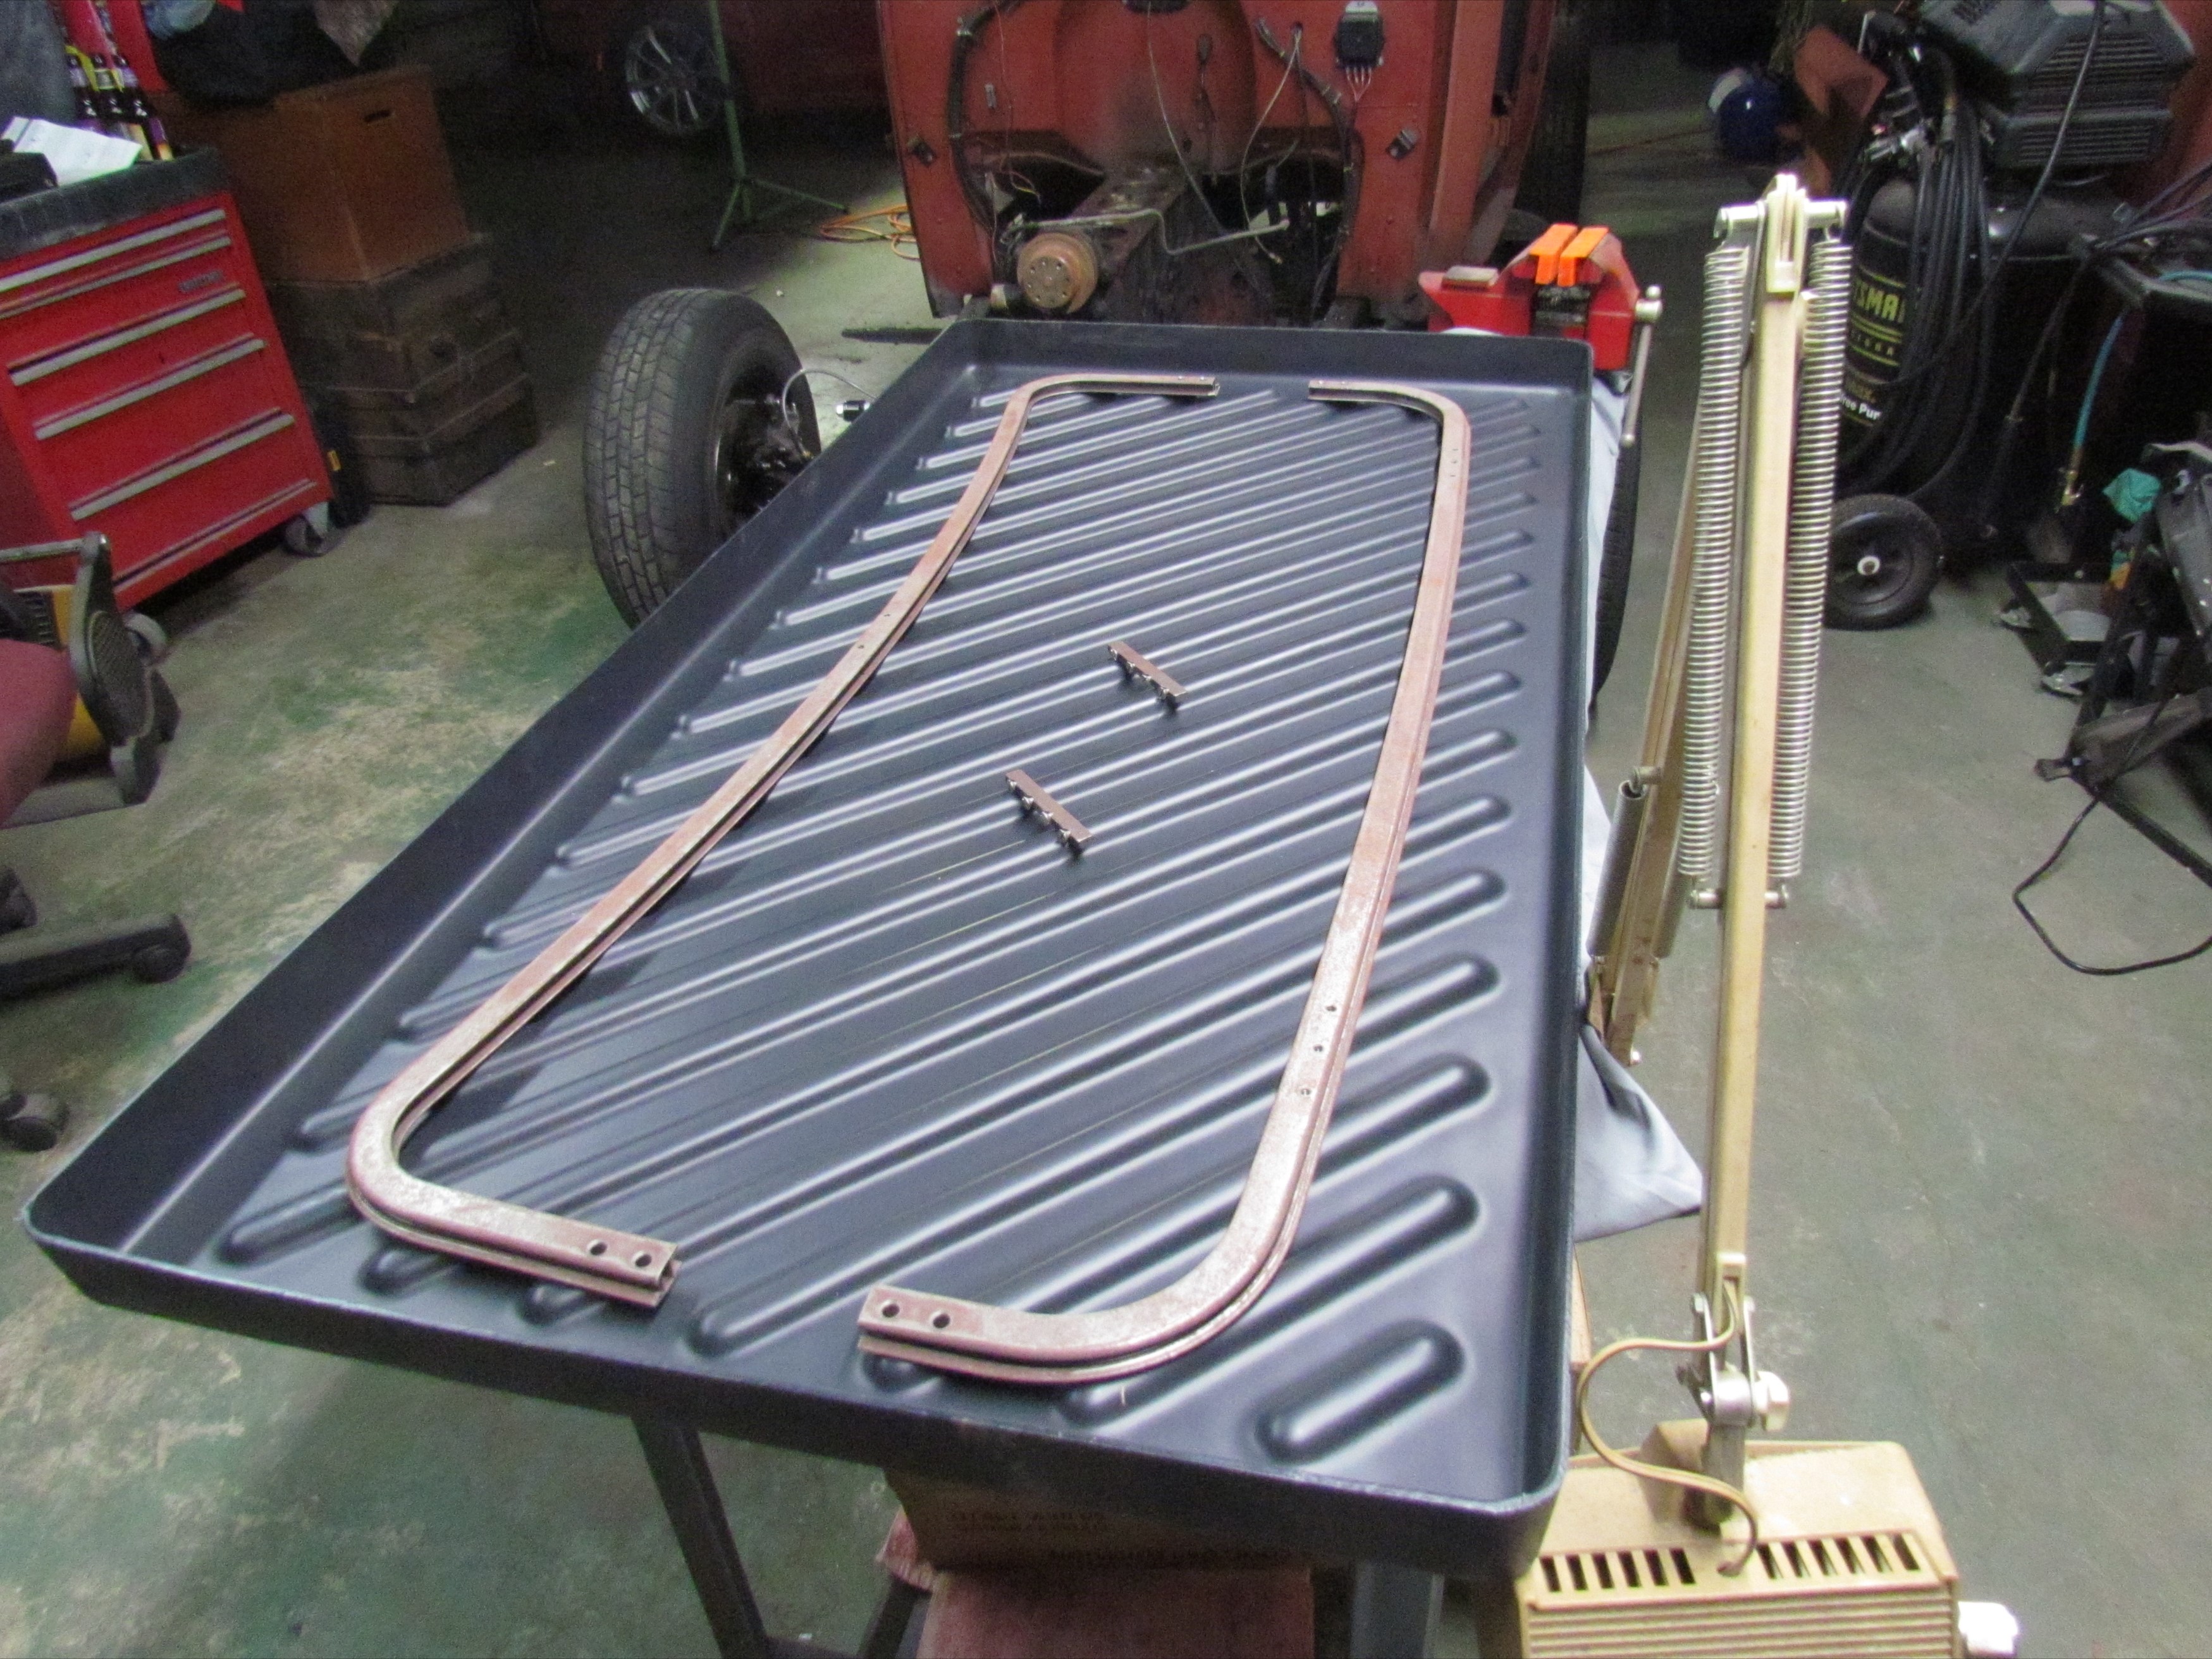
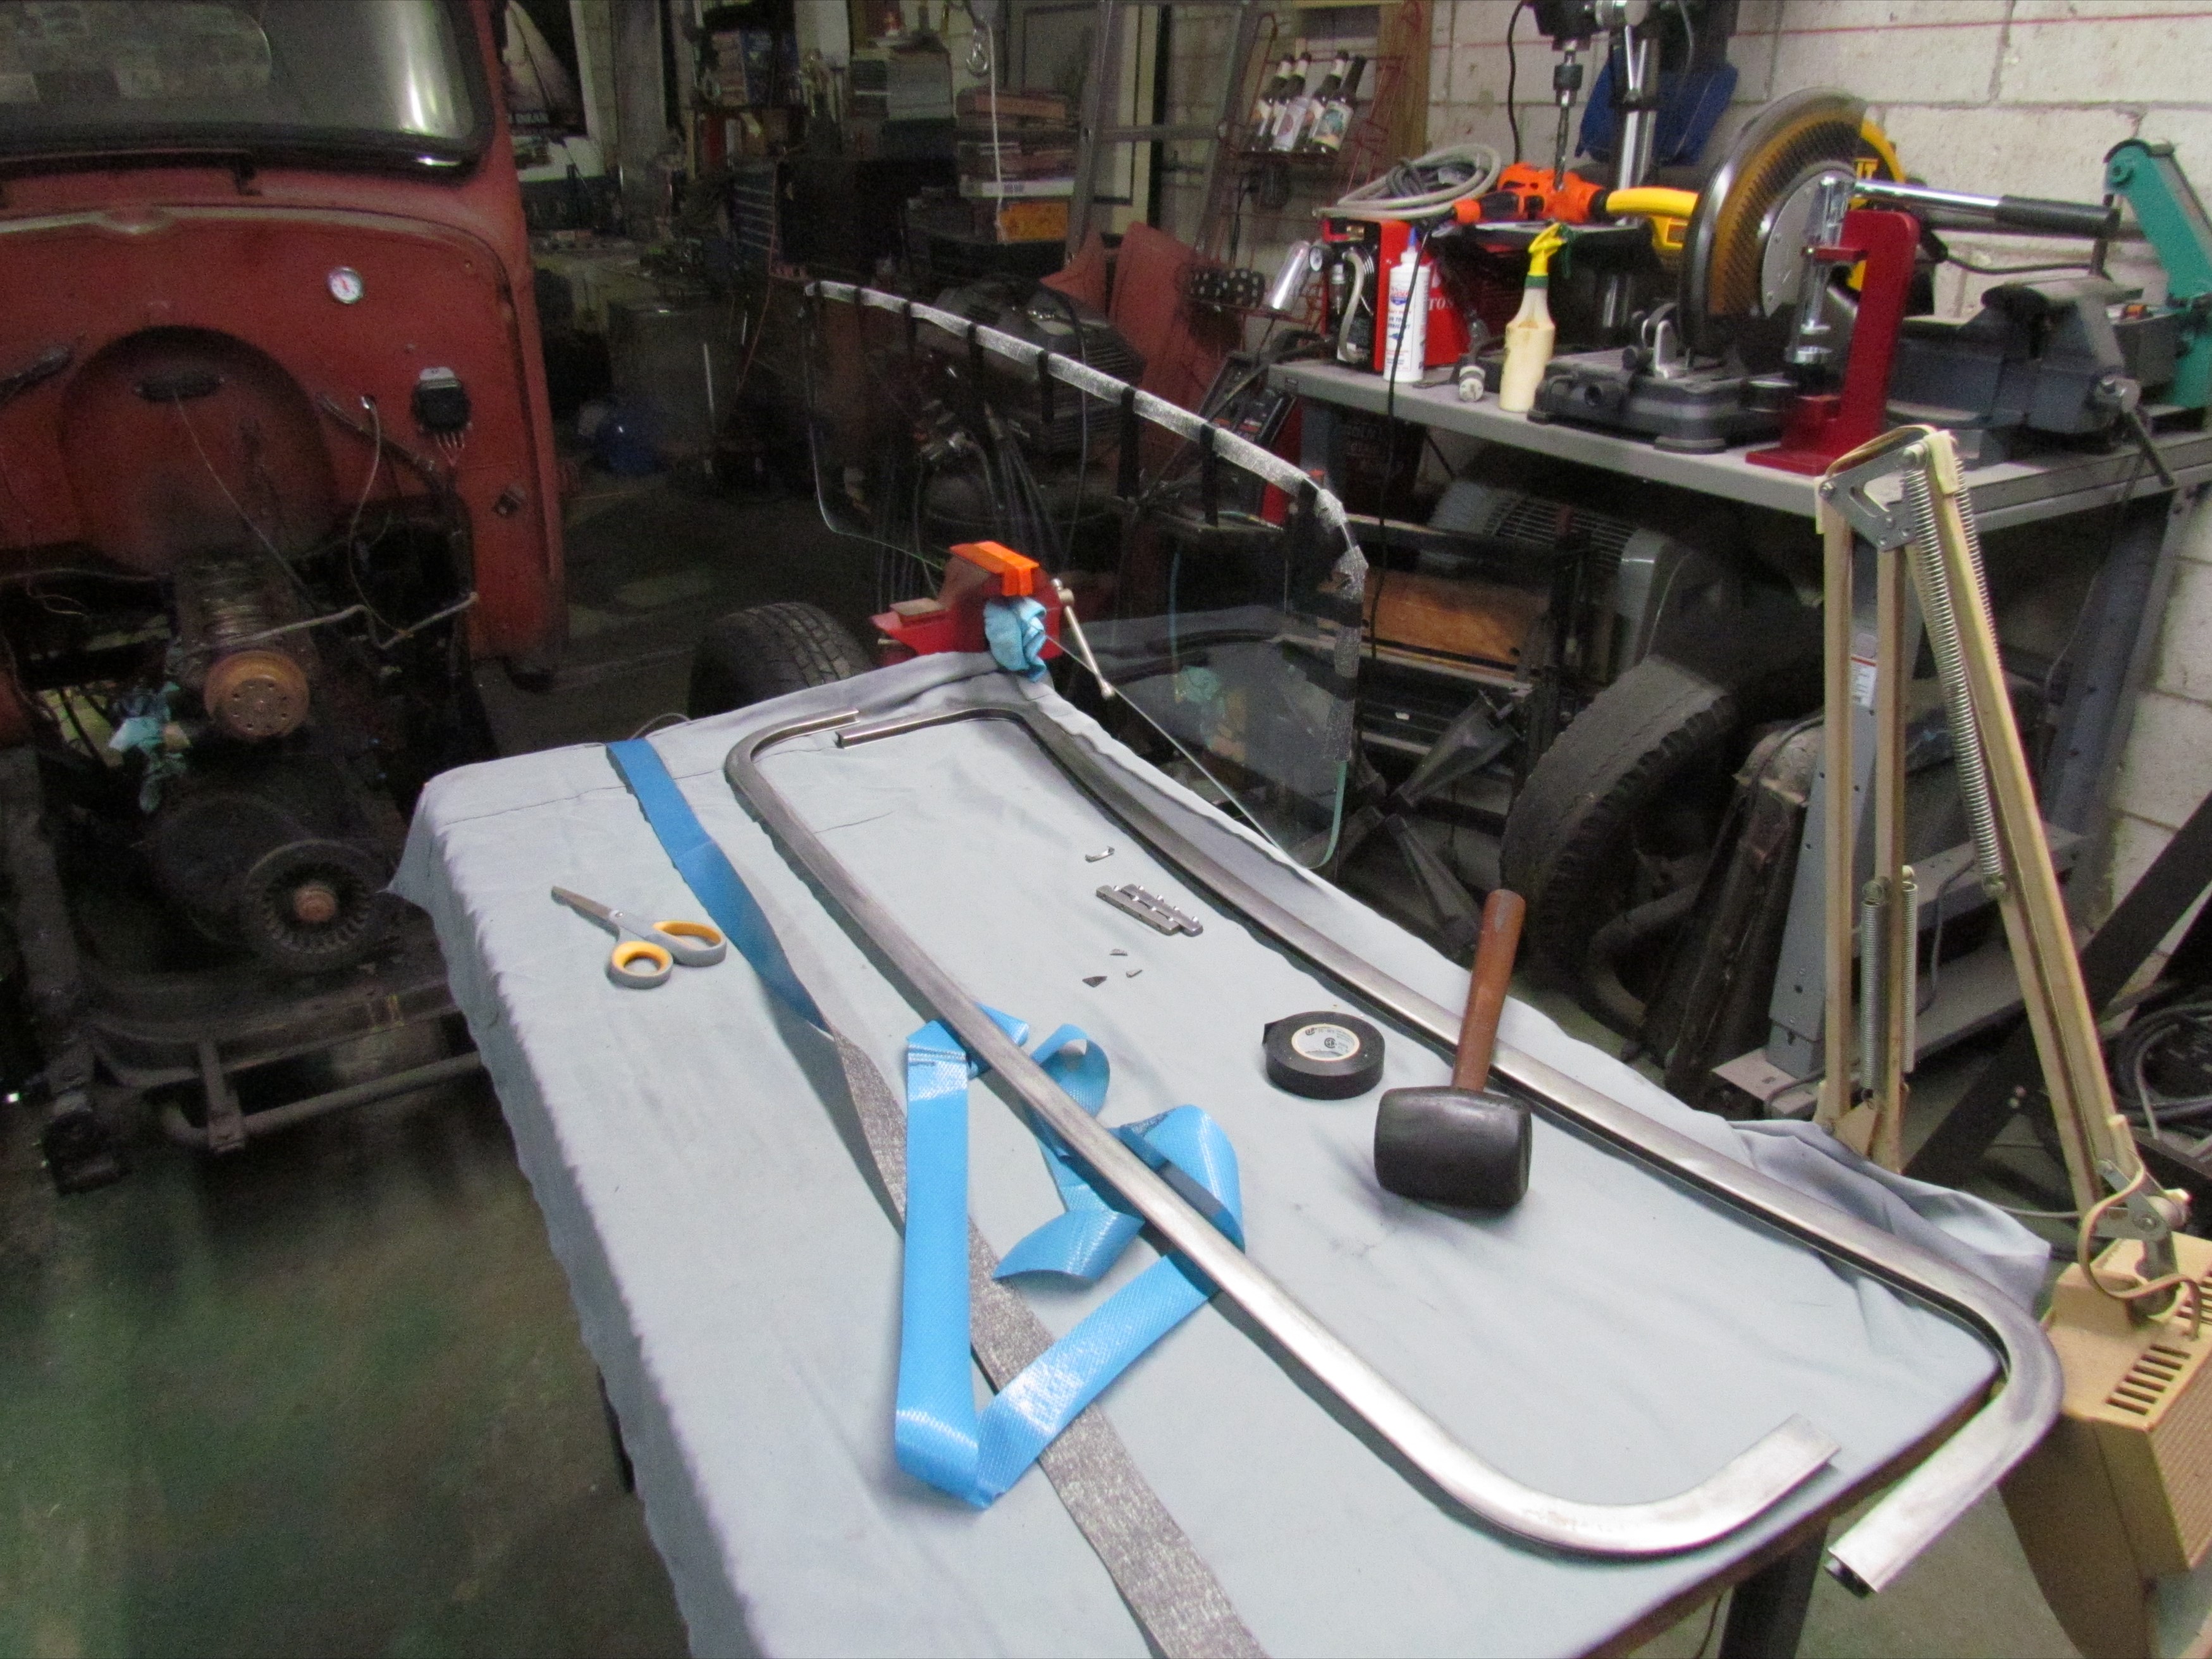 January
27th 2020
A delivery of electrical tape arrived. The windshield project can now
proceed. Cleaned the glass and placed the windshield in my neoprene
padded bench vice. Peeled the protective strip off the glass setting
tape and affixed it to the top edge and sides of the new windshield
glass with the electrical tape.
Notched the corners.
January
27th 2020
A delivery of electrical tape arrived. The windshield project can now
proceed. Cleaned the glass and placed the windshield in my neoprene
padded bench vice. Peeled the protective strip off the glass setting
tape and affixed it to the top edge and sides of the new windshield
glass with the electrical tape.
Notched the corners.
 January
28th 2020 Deerslayer's cardboard headliner is
wrinkled in a few places but otherwise in good shape. I'm leaving it in
place. The five fasteners anchoring it along its centerline,
however, stand out too much for my liking. They are screws and fender
washers and my fall back plan was to paint them to blend in but I
finally happened upon the magic intarweb search term to lead me to my
preferred solution - "Upholstery Buttons". They arrived and were
installed in a matter of minutes. Beer of the day was Spencer Brewery's
Trappist Ale.
January
28th 2020 Deerslayer's cardboard headliner is
wrinkled in a few places but otherwise in good shape. I'm leaving it in
place. The five fasteners anchoring it along its centerline,
however, stand out too much for my liking. They are screws and fender
washers and my fall back plan was to paint them to blend in but I
finally happened upon the magic intarweb search term to lead me to my
preferred solution - "Upholstery Buttons". They arrived and were
installed in a matter of minutes. Beer of the day was Spencer Brewery's
Trappist Ale.
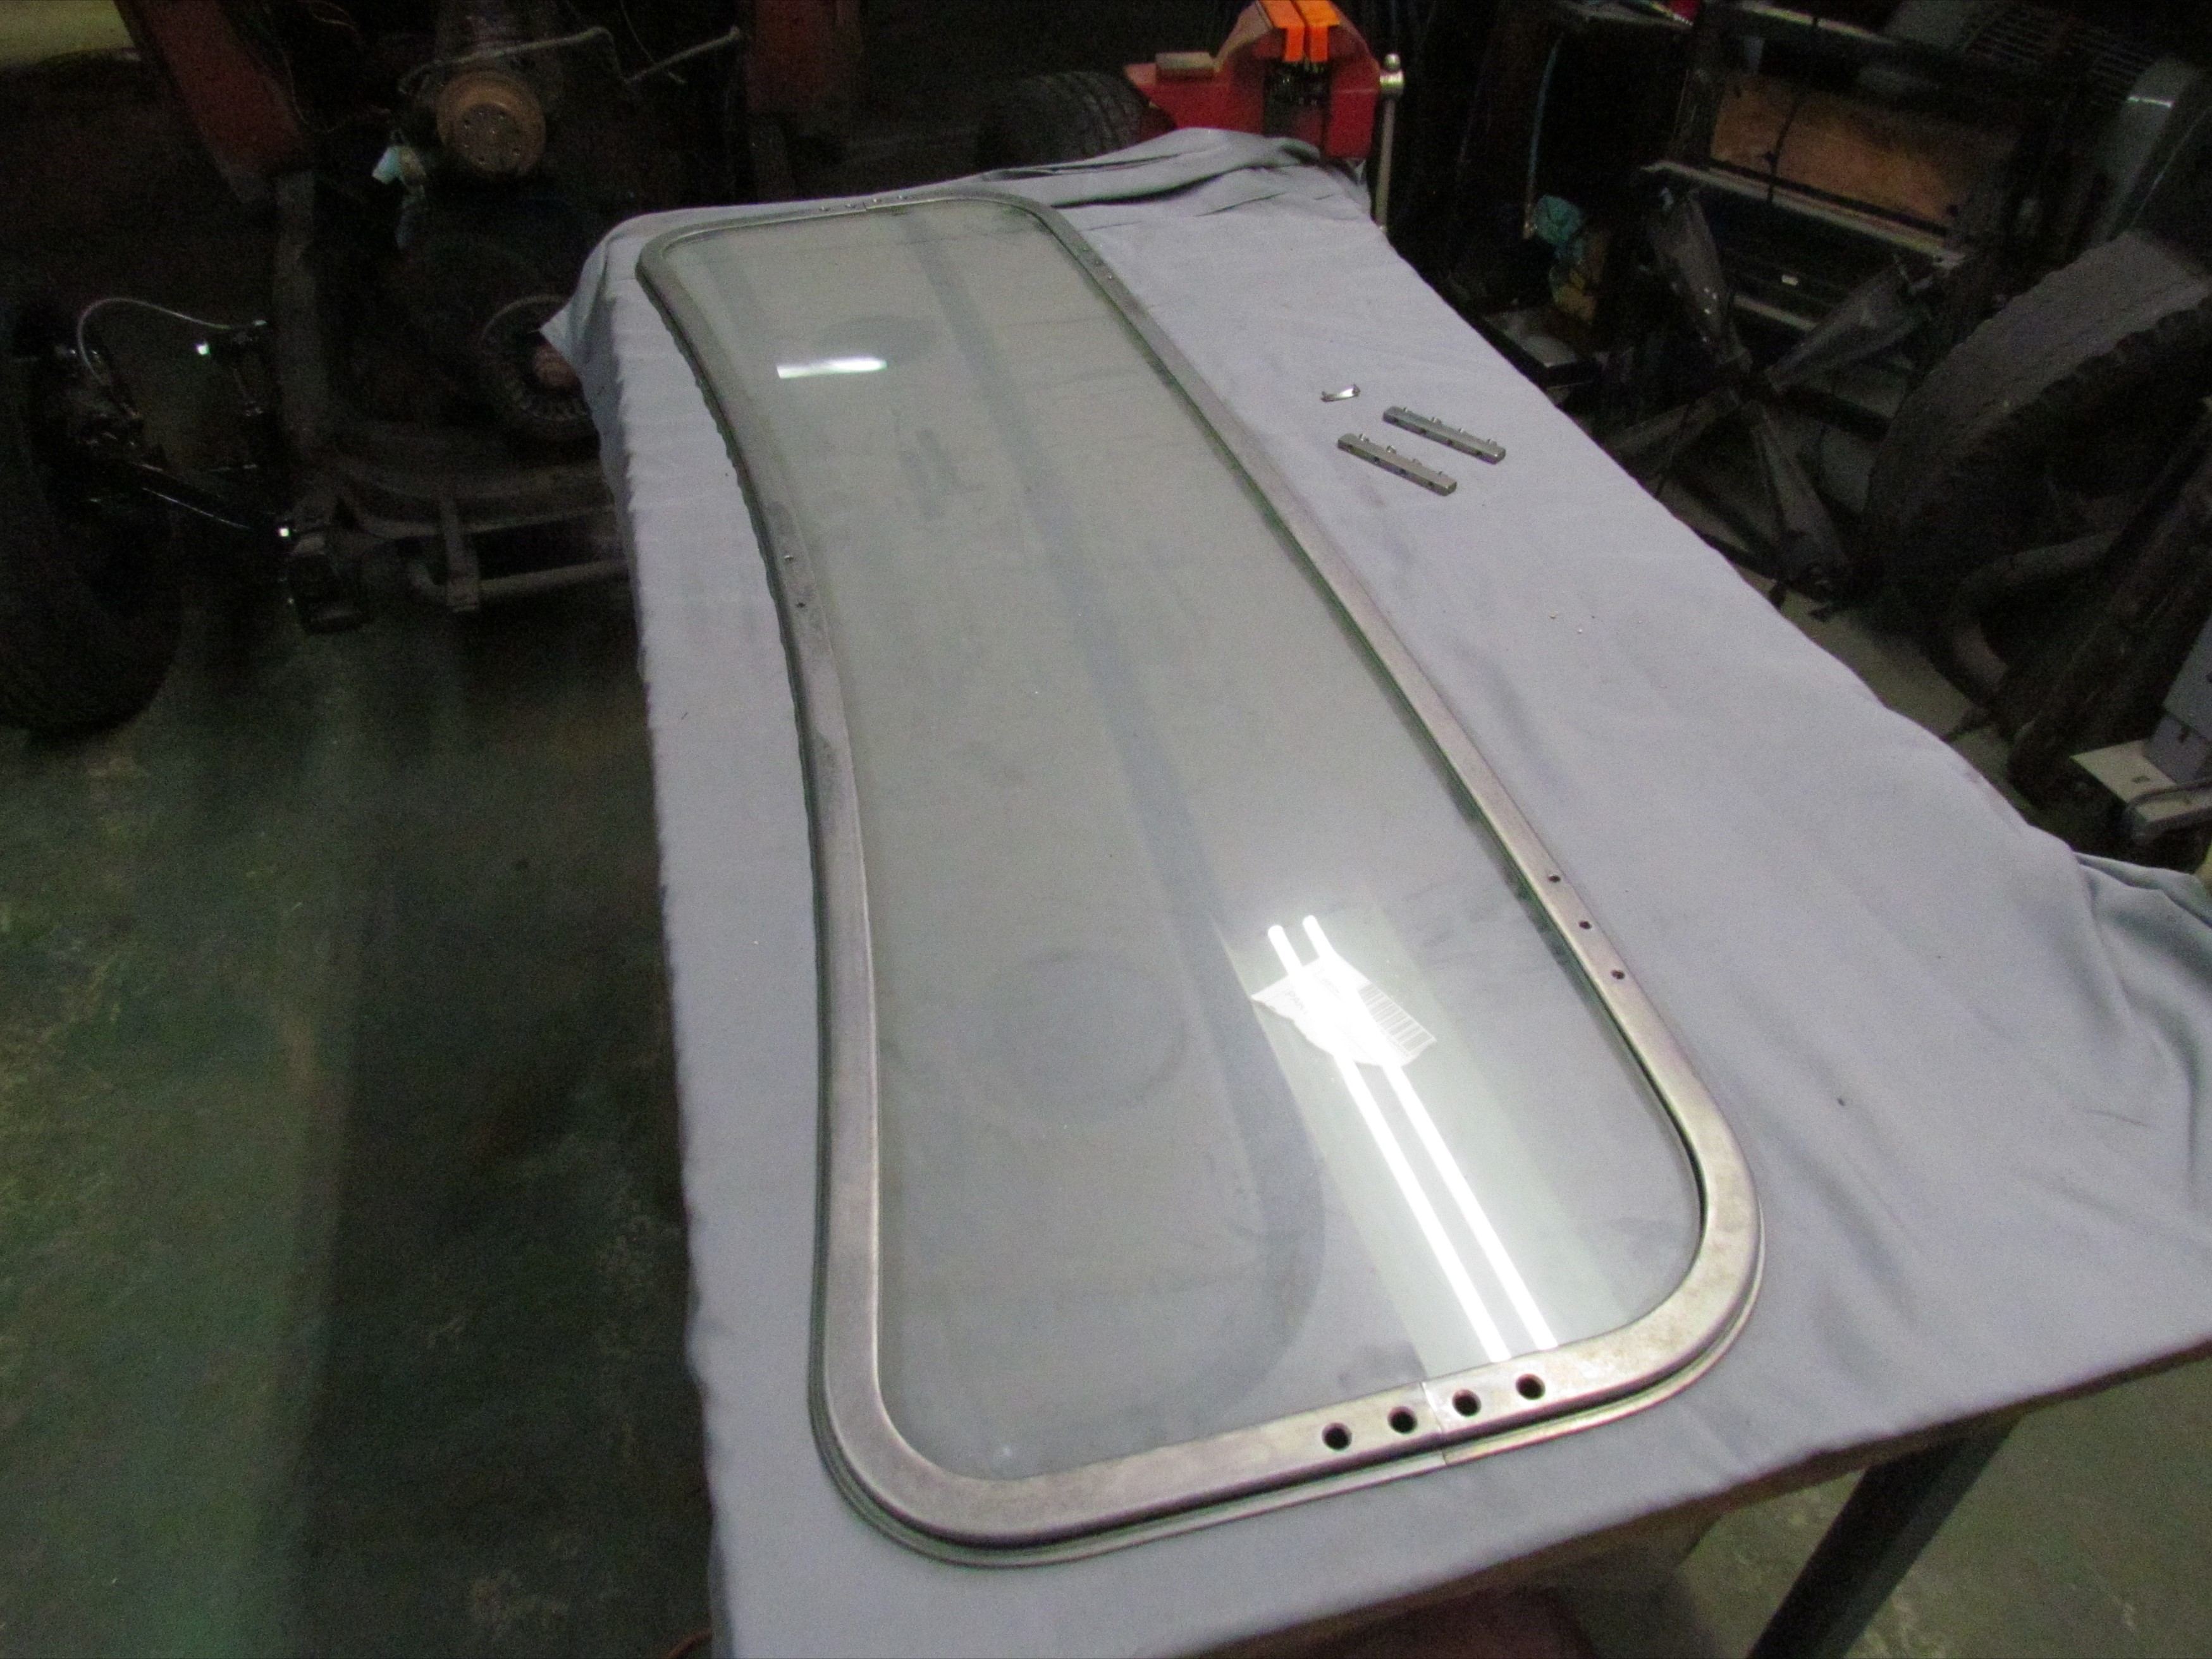
 January
29th 2020
Dawn dish washing soap was used as a lubricant on the setting tape and
the upper windshield frame was urged into position. A rubber mallet
helped to seat the glass in the channel. The assembly was turned upside
down in the vise and the process was repeated for the bottom half.
Finally, a new blade in my utility knife made short work of trimming
the excess glass setting tape and electrical tape remnants.
January
29th 2020
Dawn dish washing soap was used as a lubricant on the setting tape and
the upper windshield frame was urged into position. A rubber mallet
helped to seat the glass in the channel. The assembly was turned upside
down in the vise and the process was repeated for the bottom half.
Finally, a new blade in my utility knife made short work of trimming
the excess glass setting tape and electrical tape remnants.
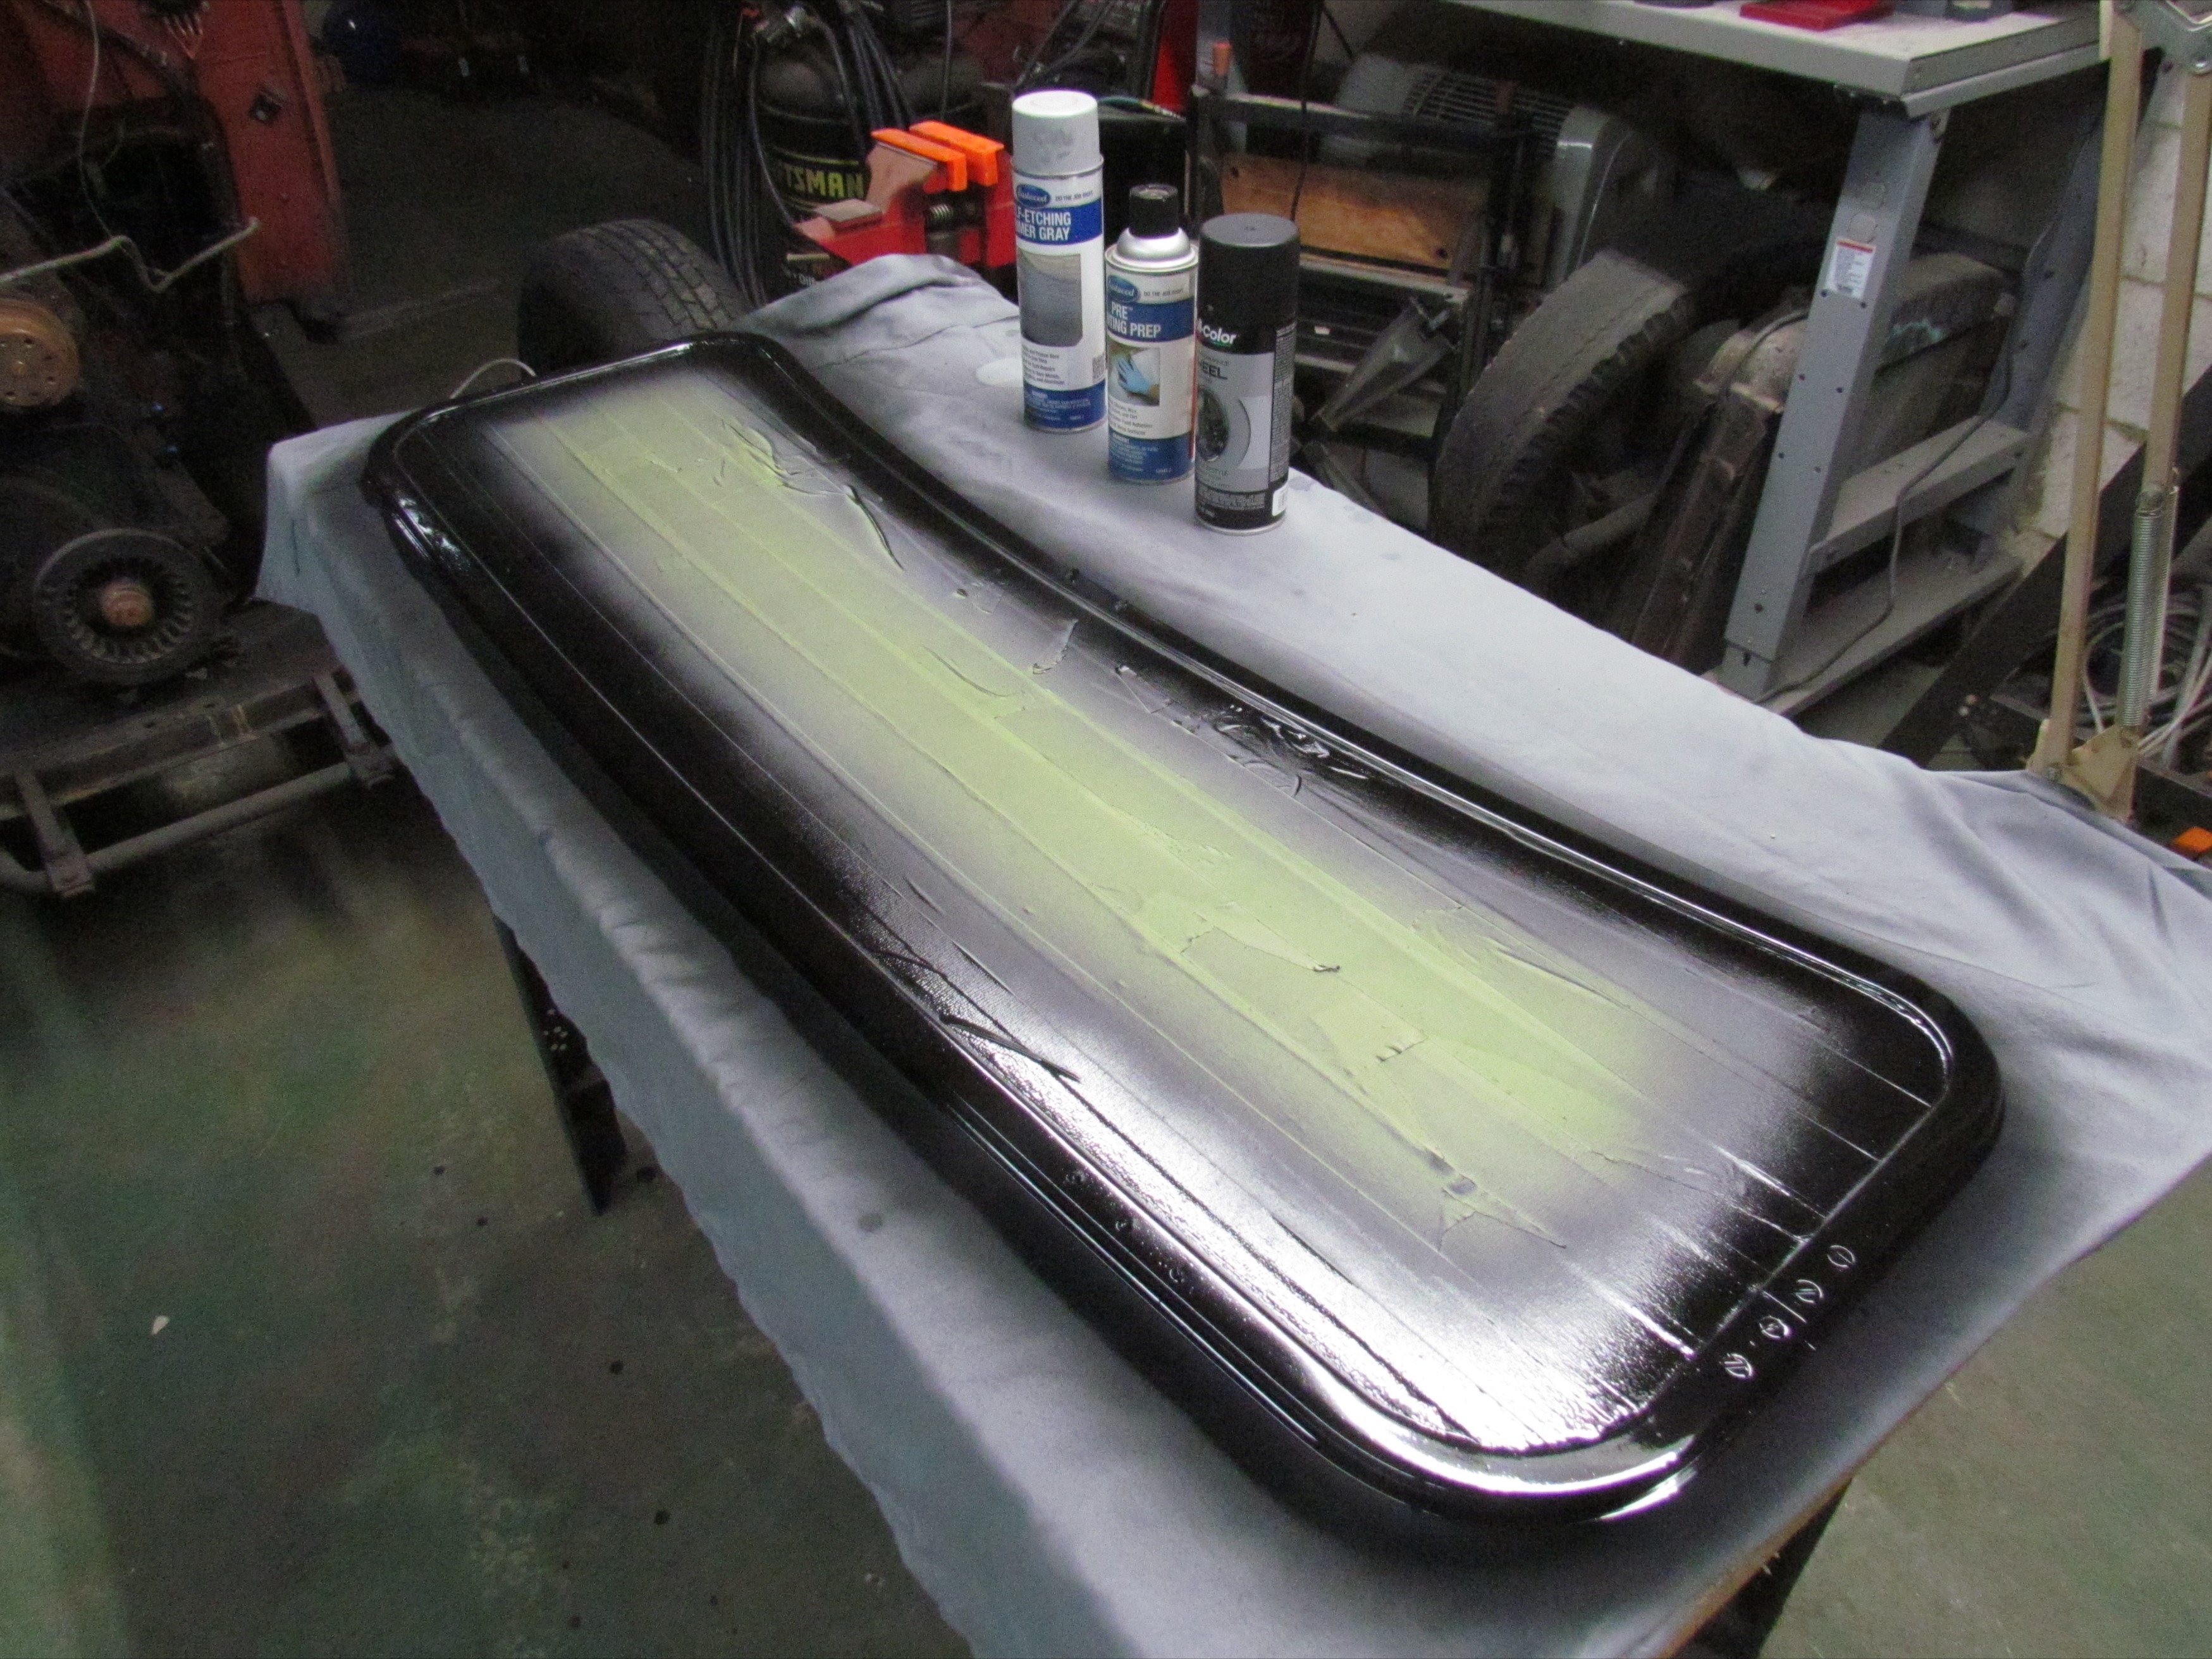
I had forebodings on how the glass setting tape operation was going to go but it turned out to be easier than anticipated. The windshield was then masked for painting. The windshield frame could have been painted before assembly but I have a bad history of marring freshly painted items and I wanted to avoid that fate if I could.
After masking the glass, the frame was PRE-paint prepped and
given two coats of Eastwood's Self-Etching primer. This was followed up
by four coats of Duplicolor's Black Wheel Paint.
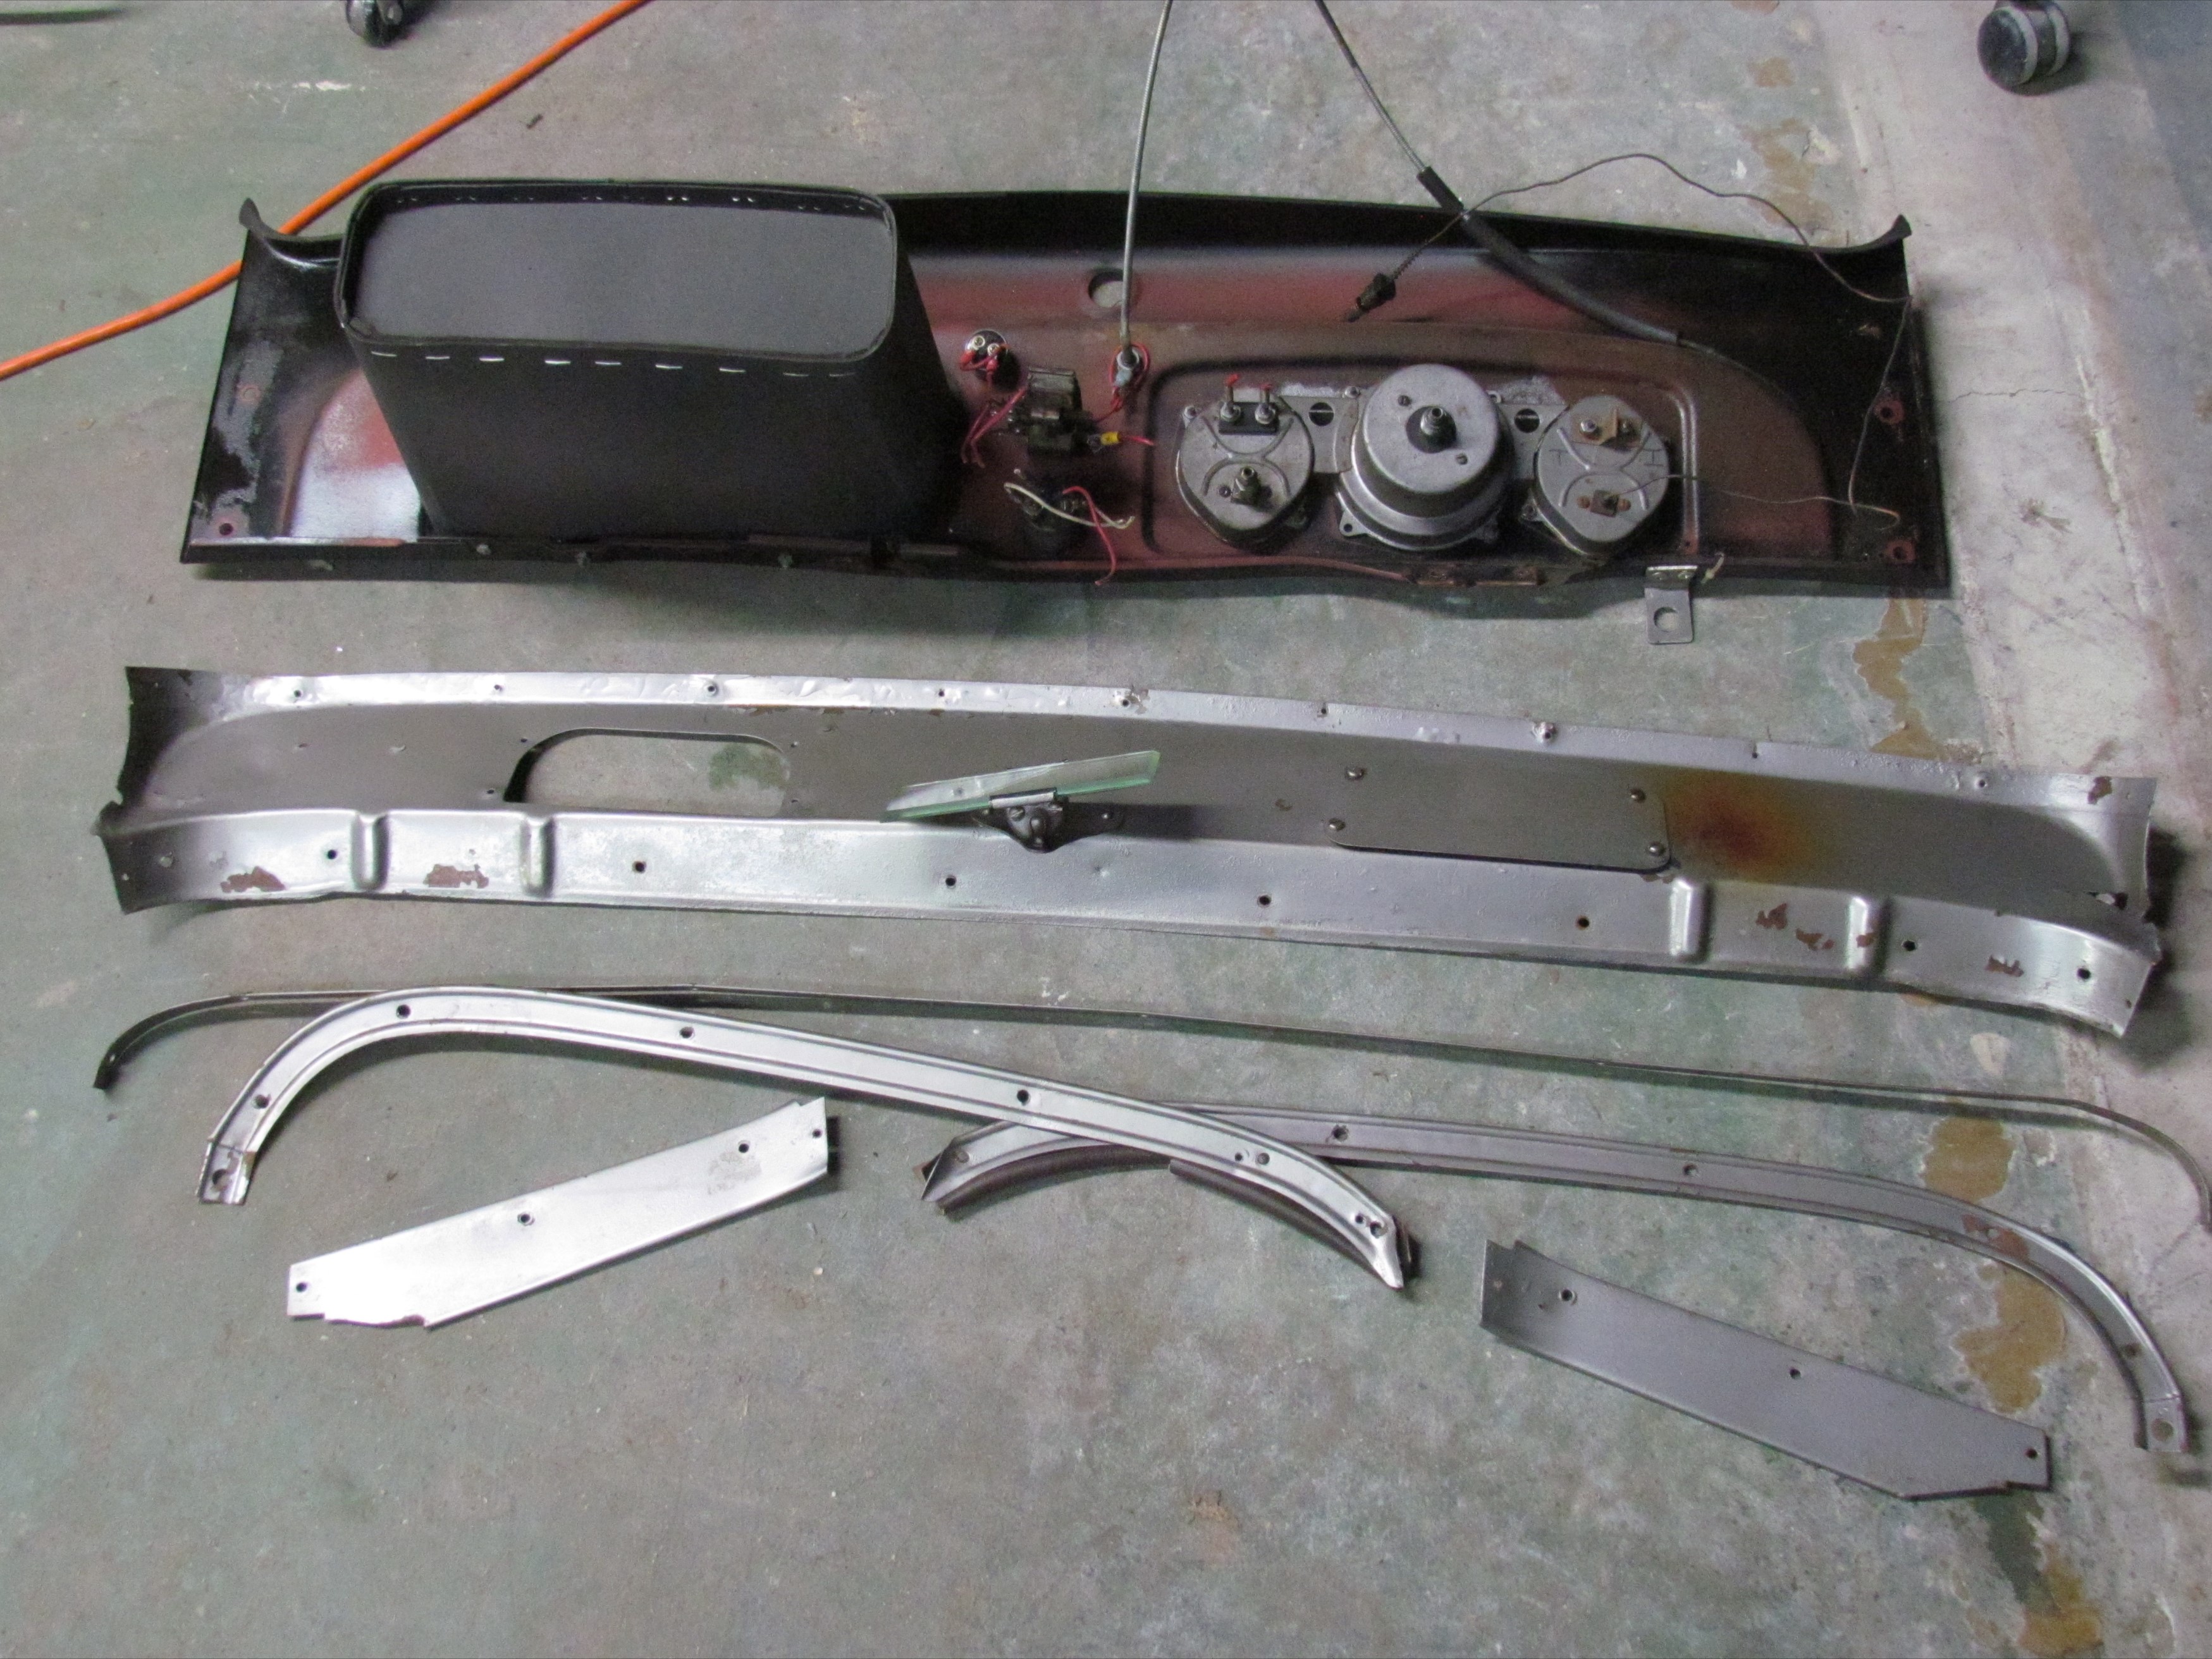 January
30th 2020 Got the dashboard detached from the
wiring. I did have to snip some wires when getting at the connectors
would have required an excess of cursing and contorted body angles. Was
happy to get the water temperature gauge capillary tube out intact.
Beer of the day was Christian Moerlein Brewing Company's Barbarossa
Dark Lager.
January
30th 2020 Got the dashboard detached from the
wiring. I did have to snip some wires when getting at the connectors
would have required an excess of cursing and contorted body angles. Was
happy to get the water temperature gauge capillary tube out intact.
Beer of the day was Christian Moerlein Brewing Company's Barbarossa
Dark Lager.
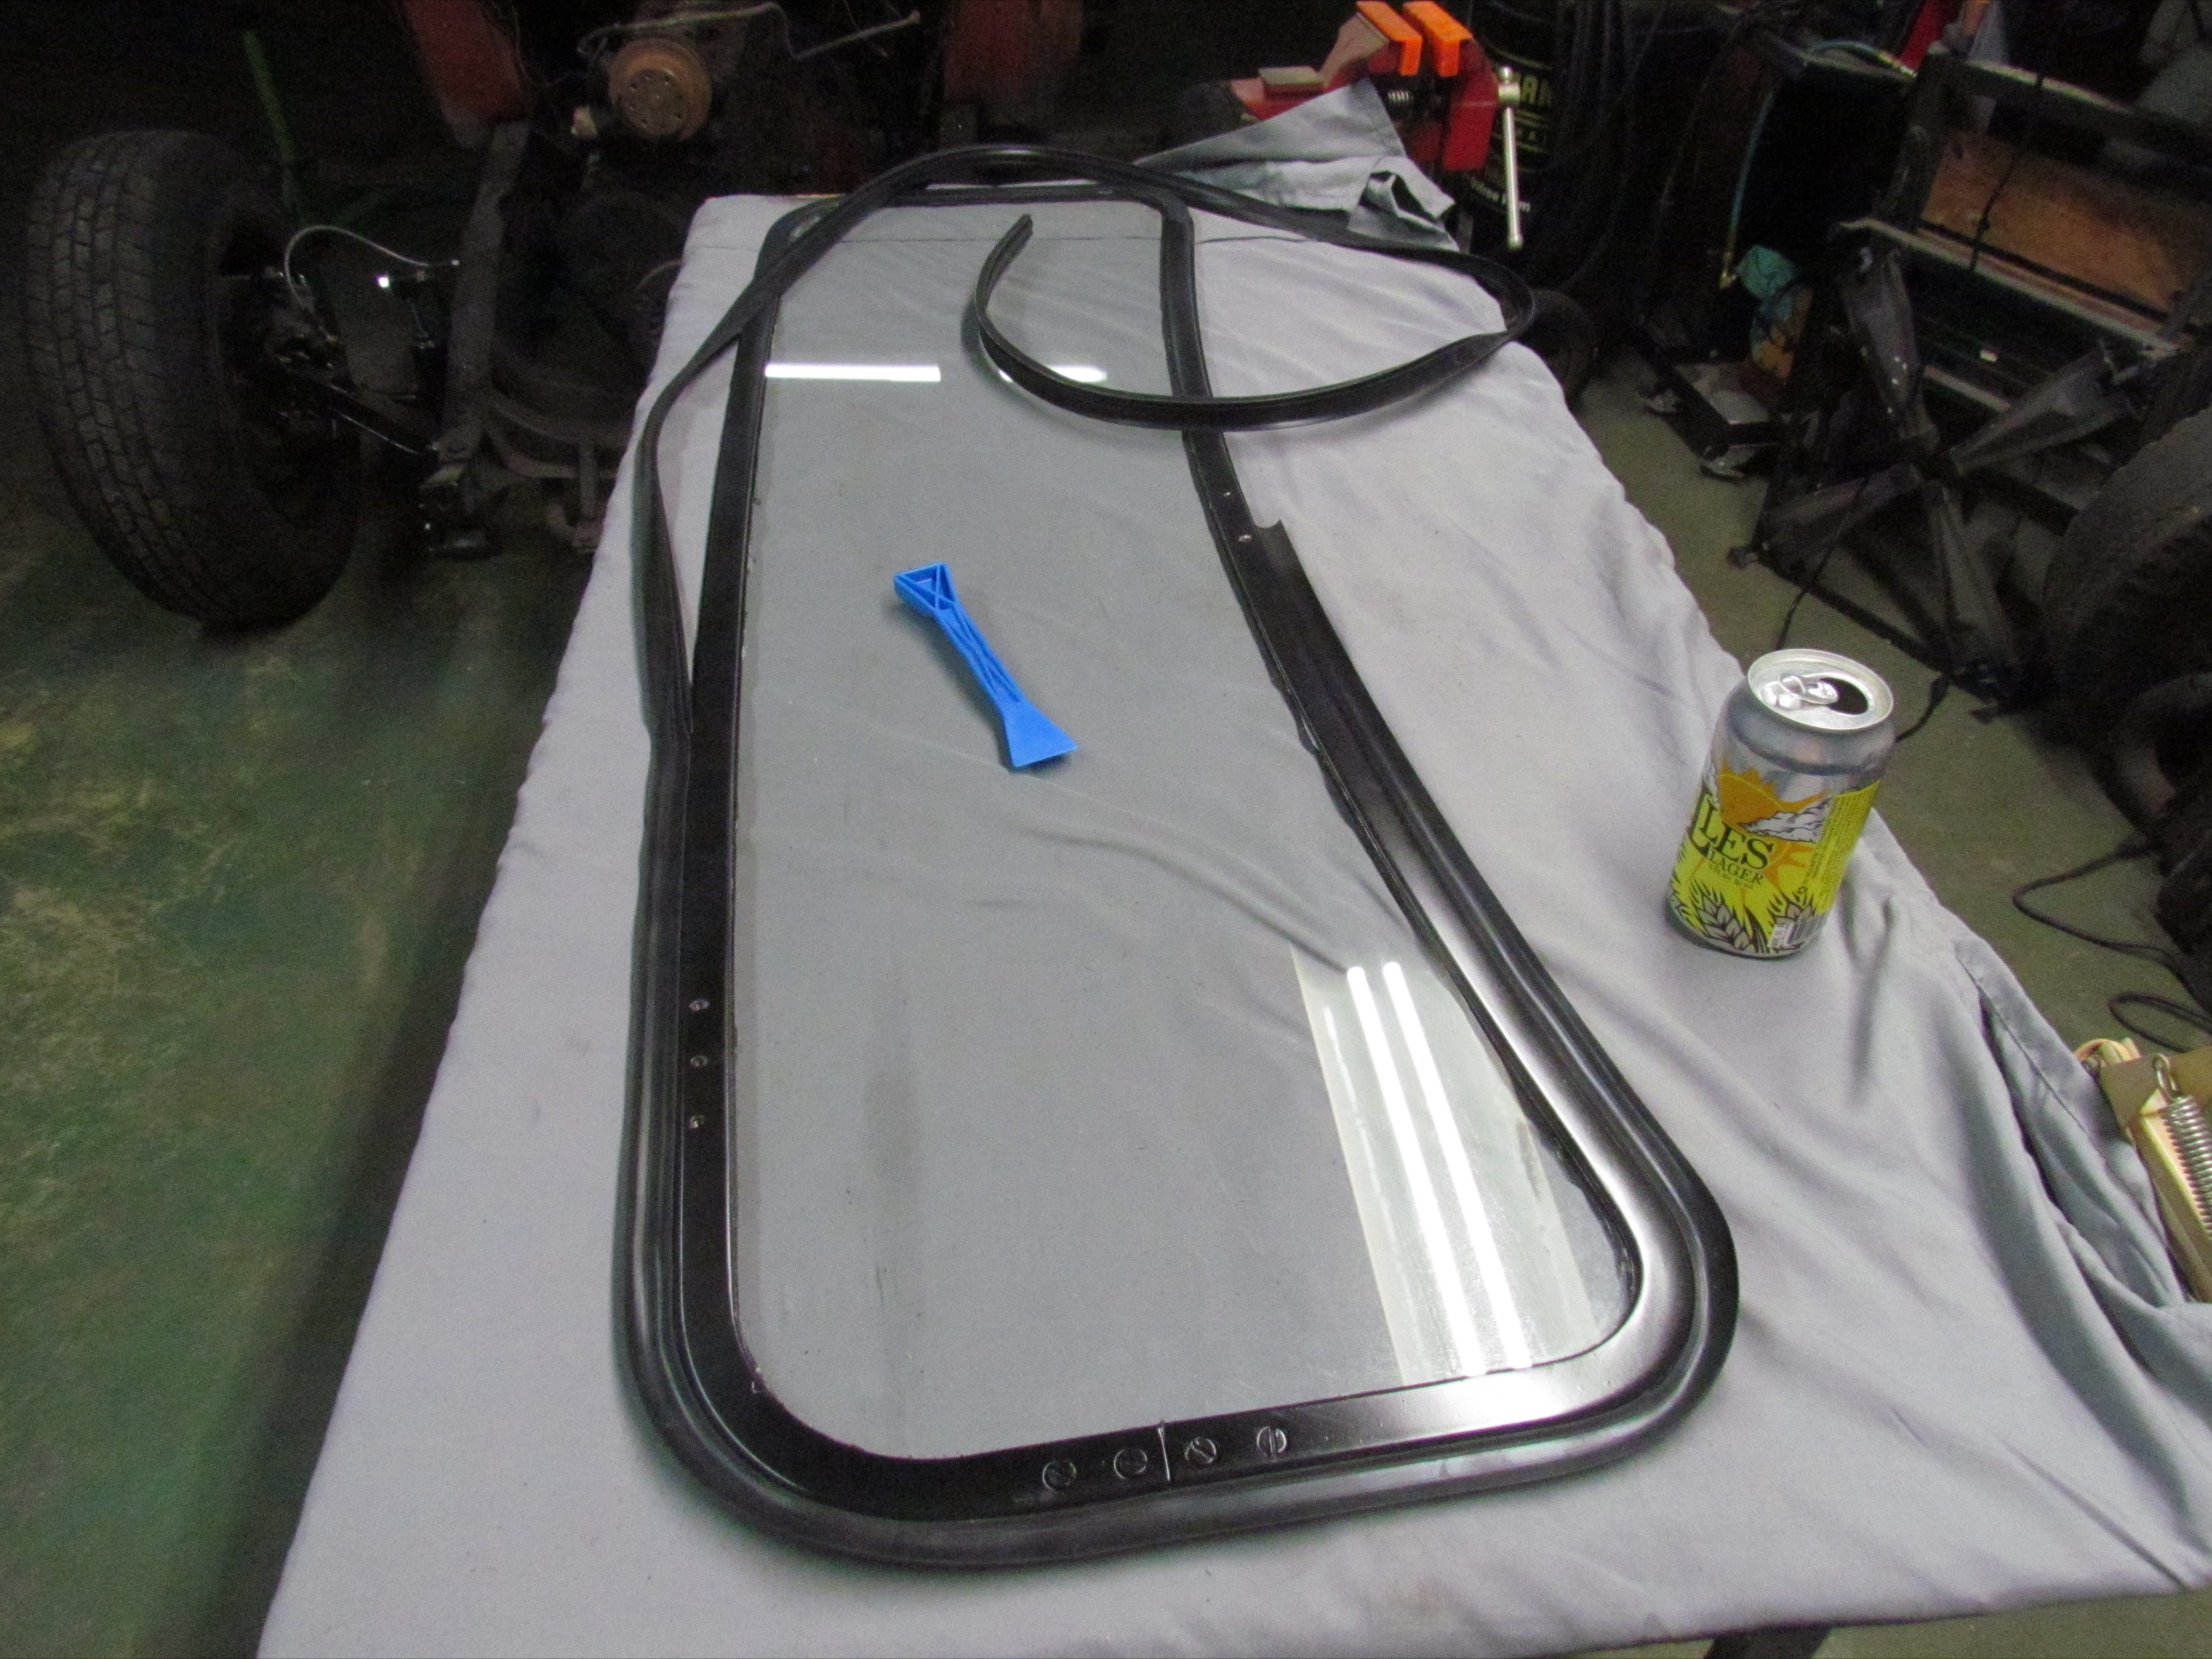 January
31st 2020 The weather seal was pressed into
its channel with the help of a plastic pry tool,
starting at the bottom center of the frame and working around it back
to the point of beginning. It was tedius work and I'll have a bruised
palm for a day or two.
January
31st 2020 The weather seal was pressed into
its channel with the help of a plastic pry tool,
starting at the bottom center of the frame and working around it back
to the point of beginning. It was tedius work and I'll have a bruised
palm for a day or two.
 Some of the
primer got under the masking tape and that still
has to be
cleaned off the glass with lacquer thinner. Smudges and fingerprints
from the hand-to-hand combat with the weather seal also have to be
cleaned, then I can mark finished to this task. Okay, out with the old
windshield and in with the new
windshield
when the cab painting is done. Up on the shelf until then.
Some of the
primer got under the masking tape and that still
has to be
cleaned off the glass with lacquer thinner. Smudges and fingerprints
from the hand-to-hand combat with the weather seal also have to be
cleaned, then I can mark finished to this task. Okay, out with the old
windshield and in with the new
windshield
when the cab painting is done. Up on the shelf until then.
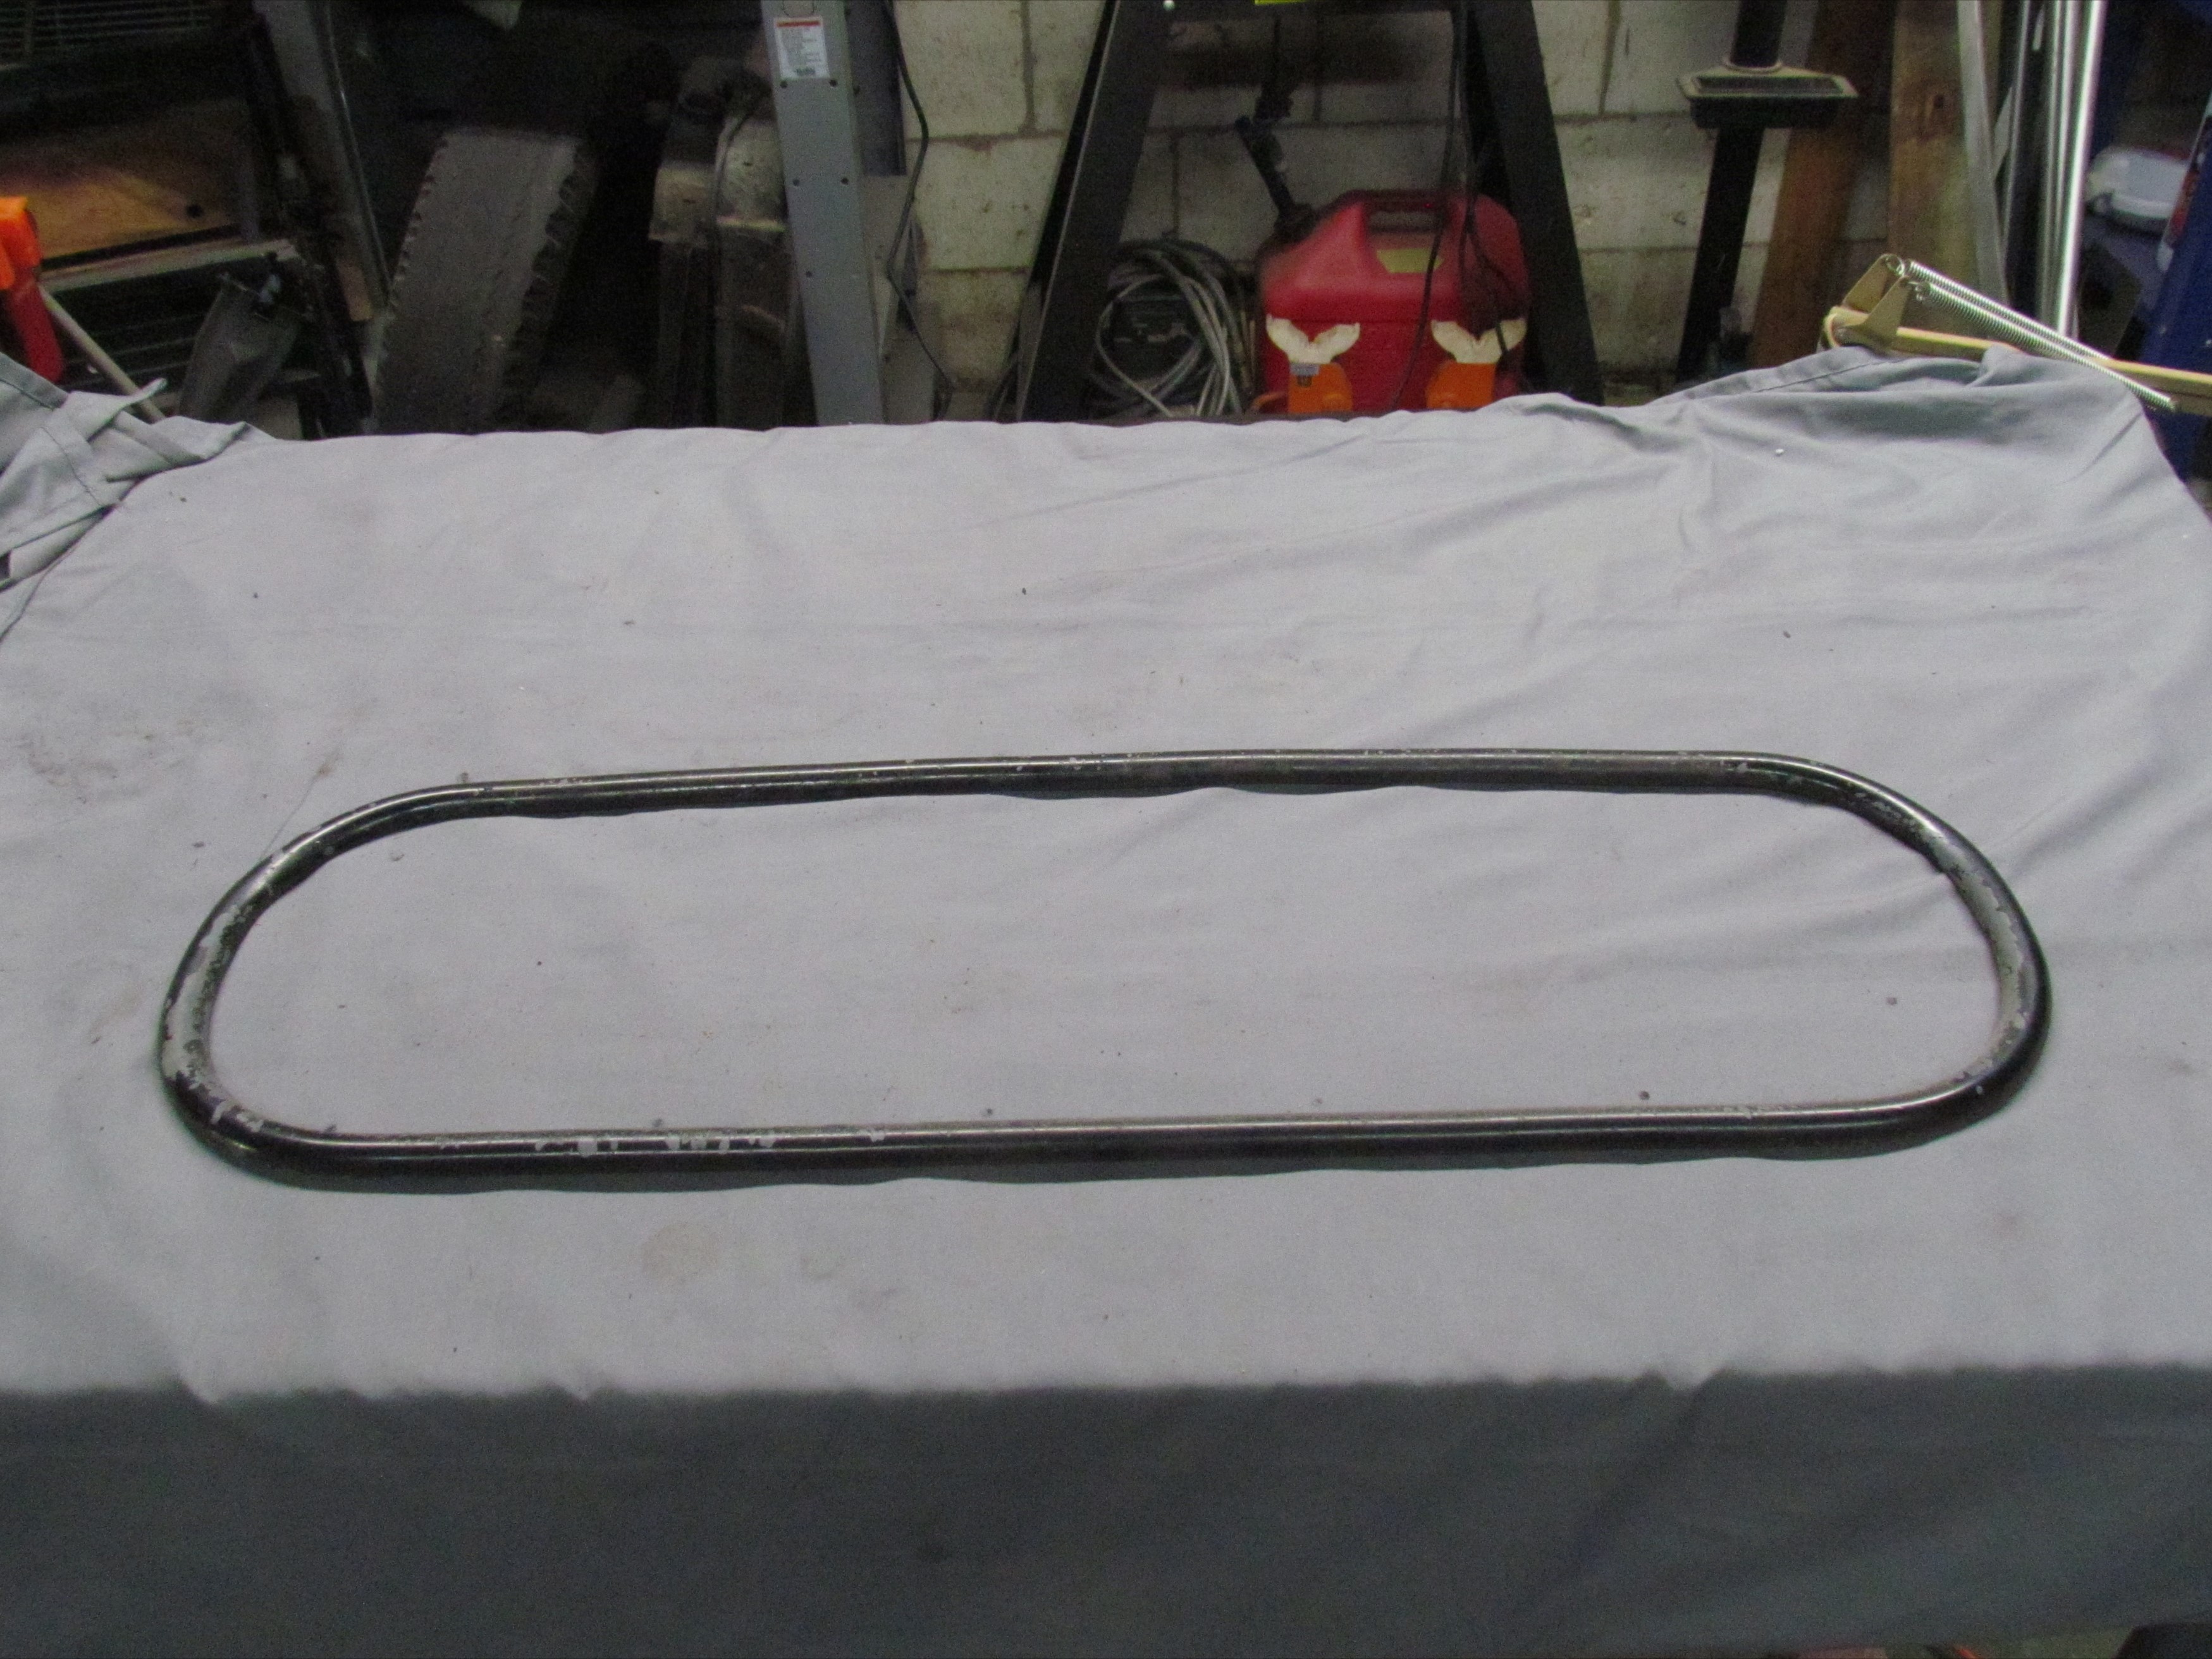 February
3rd 2020 Next small task is the rear cab window.
The trim piece is a cast item, held in place by clutch head screws from
the interior side. For those not familiar with clutch head screws, they
are a fastener anybody working on an old Chevy eventually encounters
and it is usually a whiskey tango foxtrot moment. They are similar to
Torx or Allen head fasteners but instead of a star or hex shape, clutch
head fasteners are bowtie shaped. I purchased clutch head screwdrivers
and bits long ago.
February
3rd 2020 Next small task is the rear cab window.
The trim piece is a cast item, held in place by clutch head screws from
the interior side. For those not familiar with clutch head screws, they
are a fastener anybody working on an old Chevy eventually encounters
and it is usually a whiskey tango foxtrot moment. They are similar to
Torx or Allen head fasteners but instead of a star or hex shape, clutch
head fasteners are bowtie shaped. I purchased clutch head screwdrivers
and bits long ago.
When I got all the fasteners out, the rear window surround
came off the back. The glass was still held in place by the rear window
seal. I gave the window a couple of whacks with a rubber mallet and it
didn't budge. Examined the glass and rubber and found the glass
to be clear and the seal to be intact without sign of cracking or
hardening. I decided to leave the glass and seal in place. Beer of the
day was Spencer Brewery's Premium Pilsner.
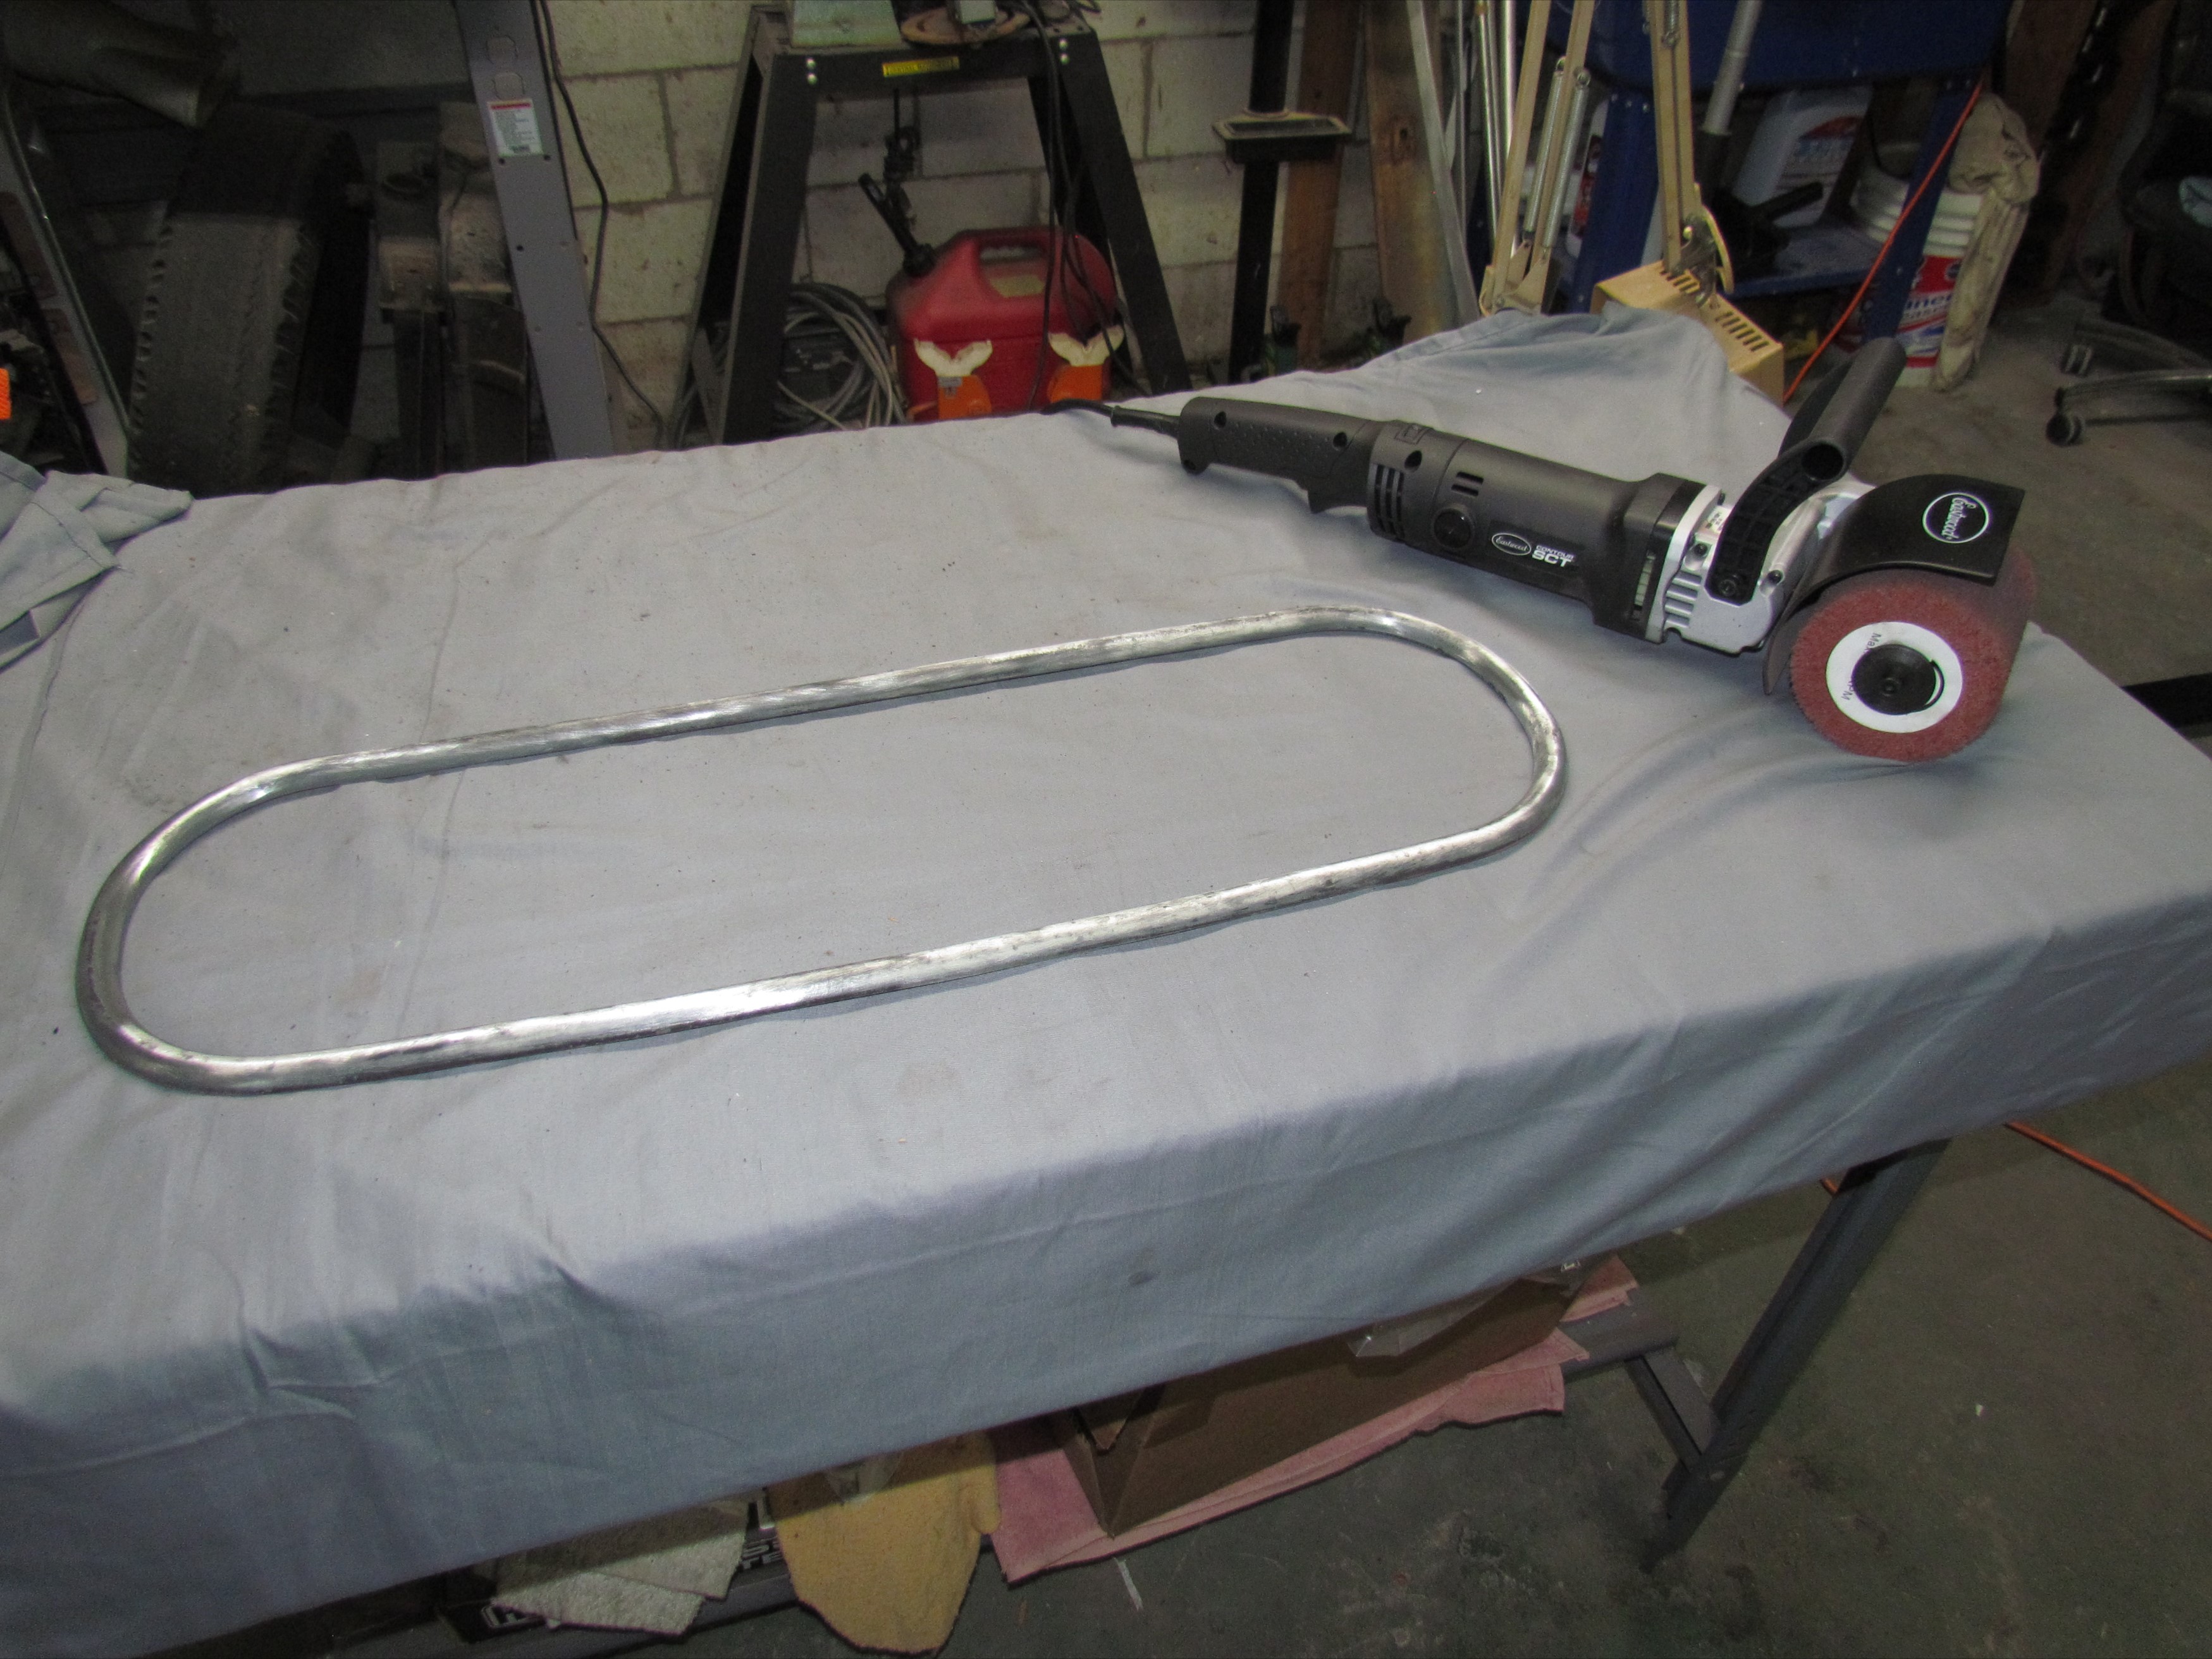 February
4th 2020 A few weeks ago when I saw that the
cab bodywork was creeping up on me, I used it as an excuse to get a
shiny new tool, the Eastwood Contour SCT Surface Conditioning Tool. I
decided to get my feet wet with this gadget by using it to take the
paint off the rear window surround. It did a good job. Took about
fifteen minutes at the lowest speed setting. I think this might be the
beginning of a beautiful friendship.
February
4th 2020 A few weeks ago when I saw that the
cab bodywork was creeping up on me, I used it as an excuse to get a
shiny new tool, the Eastwood Contour SCT Surface Conditioning Tool. I
decided to get my feet wet with this gadget by using it to take the
paint off the rear window surround. It did a good job. Took about
fifteen minutes at the lowest speed setting. I think this might be the
beginning of a beautiful friendship.
 February
5th 2020 Got some more items off the truck. A frame
cross
member that Tony fabricated that does not support the transmission but
has to be removed to get it out. My friend Gato put the cross member in
last time when we replaced the clutch. He also lifted the T5 five speed
above his head, by himself,
to install it at that time so you can imagine how tight those bolts
were.
February
5th 2020 Got some more items off the truck. A frame
cross
member that Tony fabricated that does not support the transmission but
has to be removed to get it out. My friend Gato put the cross member in
last time when we replaced the clutch. He also lifted the T5 five speed
above his head, by himself,
to install it at that time so you can imagine how tight those bolts
were.
The mechanical speedo cable, tach, turn signal director and fire extinguisher and support were also removed.
I managed to keep the wiring harness about 75% intact taking
it out. I gained new admiration for Tony's wiring Kung Fu as I cussed
my way thru the task. Beer of the day was DuClaw Brewing Co's
Everything is Taken Hoppy Lager.
 February
6th 2020 Finished with the rear window
surround. As with the windshield frame, it was PRE paint prepped and
given two coats of Eastwood's self-etching primer followed by four
coats of Duplicolor black wheel paint. It can now join the windshield
on the shelf until the cab is painted.
February
6th 2020 Finished with the rear window
surround. As with the windshield frame, it was PRE paint prepped and
given two coats of Eastwood's self-etching primer followed by four
coats of Duplicolor black wheel paint. It can now join the windshield
on the shelf until the cab is painted.
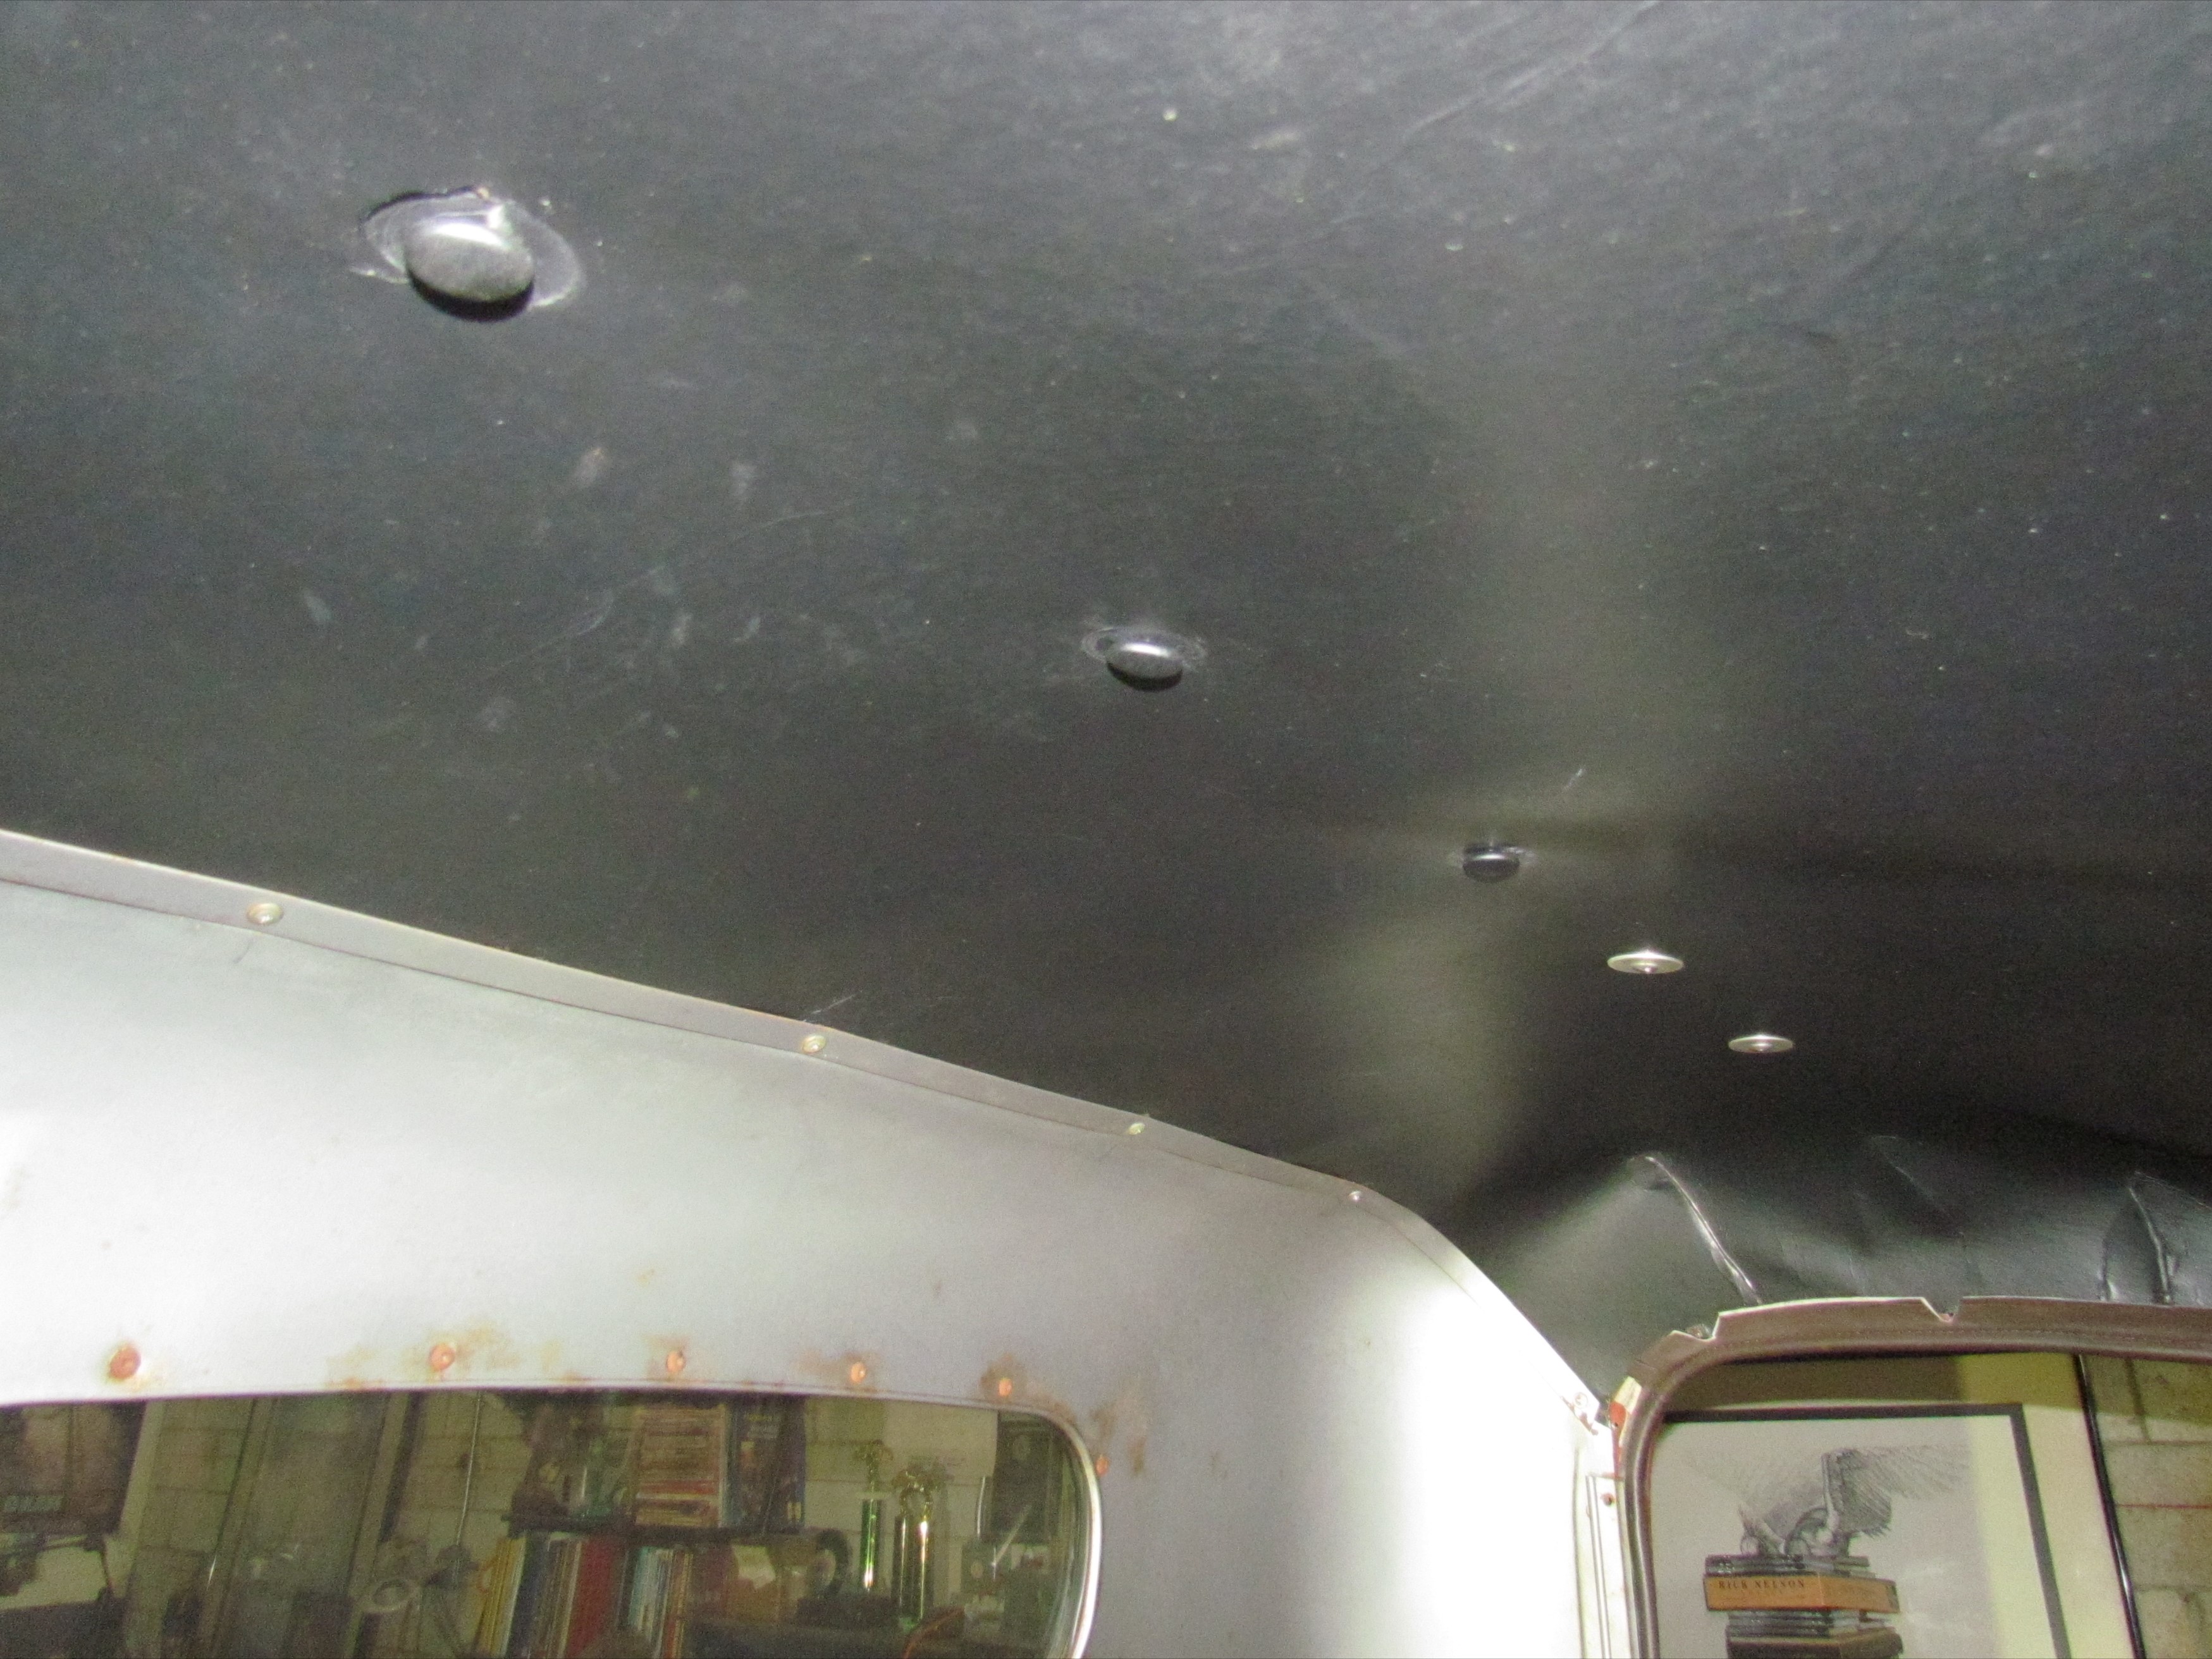
 February
7th 2020 Continued stripping down the cab interior,
removing insulation and various doodads. About the only thing left is
the crotch cooler cowl vent. Need to study that a bit. The headliner
and remaining
interior trim will stay but everything else comes out for painting ops.
Beer of the day was Adirondack Brewery's Iroquois Pale Ale.
February
7th 2020 Continued stripping down the cab interior,
removing insulation and various doodads. About the only thing left is
the crotch cooler cowl vent. Need to study that a bit. The headliner
and remaining
interior trim will stay but everything else comes out for painting ops.
Beer of the day was Adirondack Brewery's Iroquois Pale Ale.
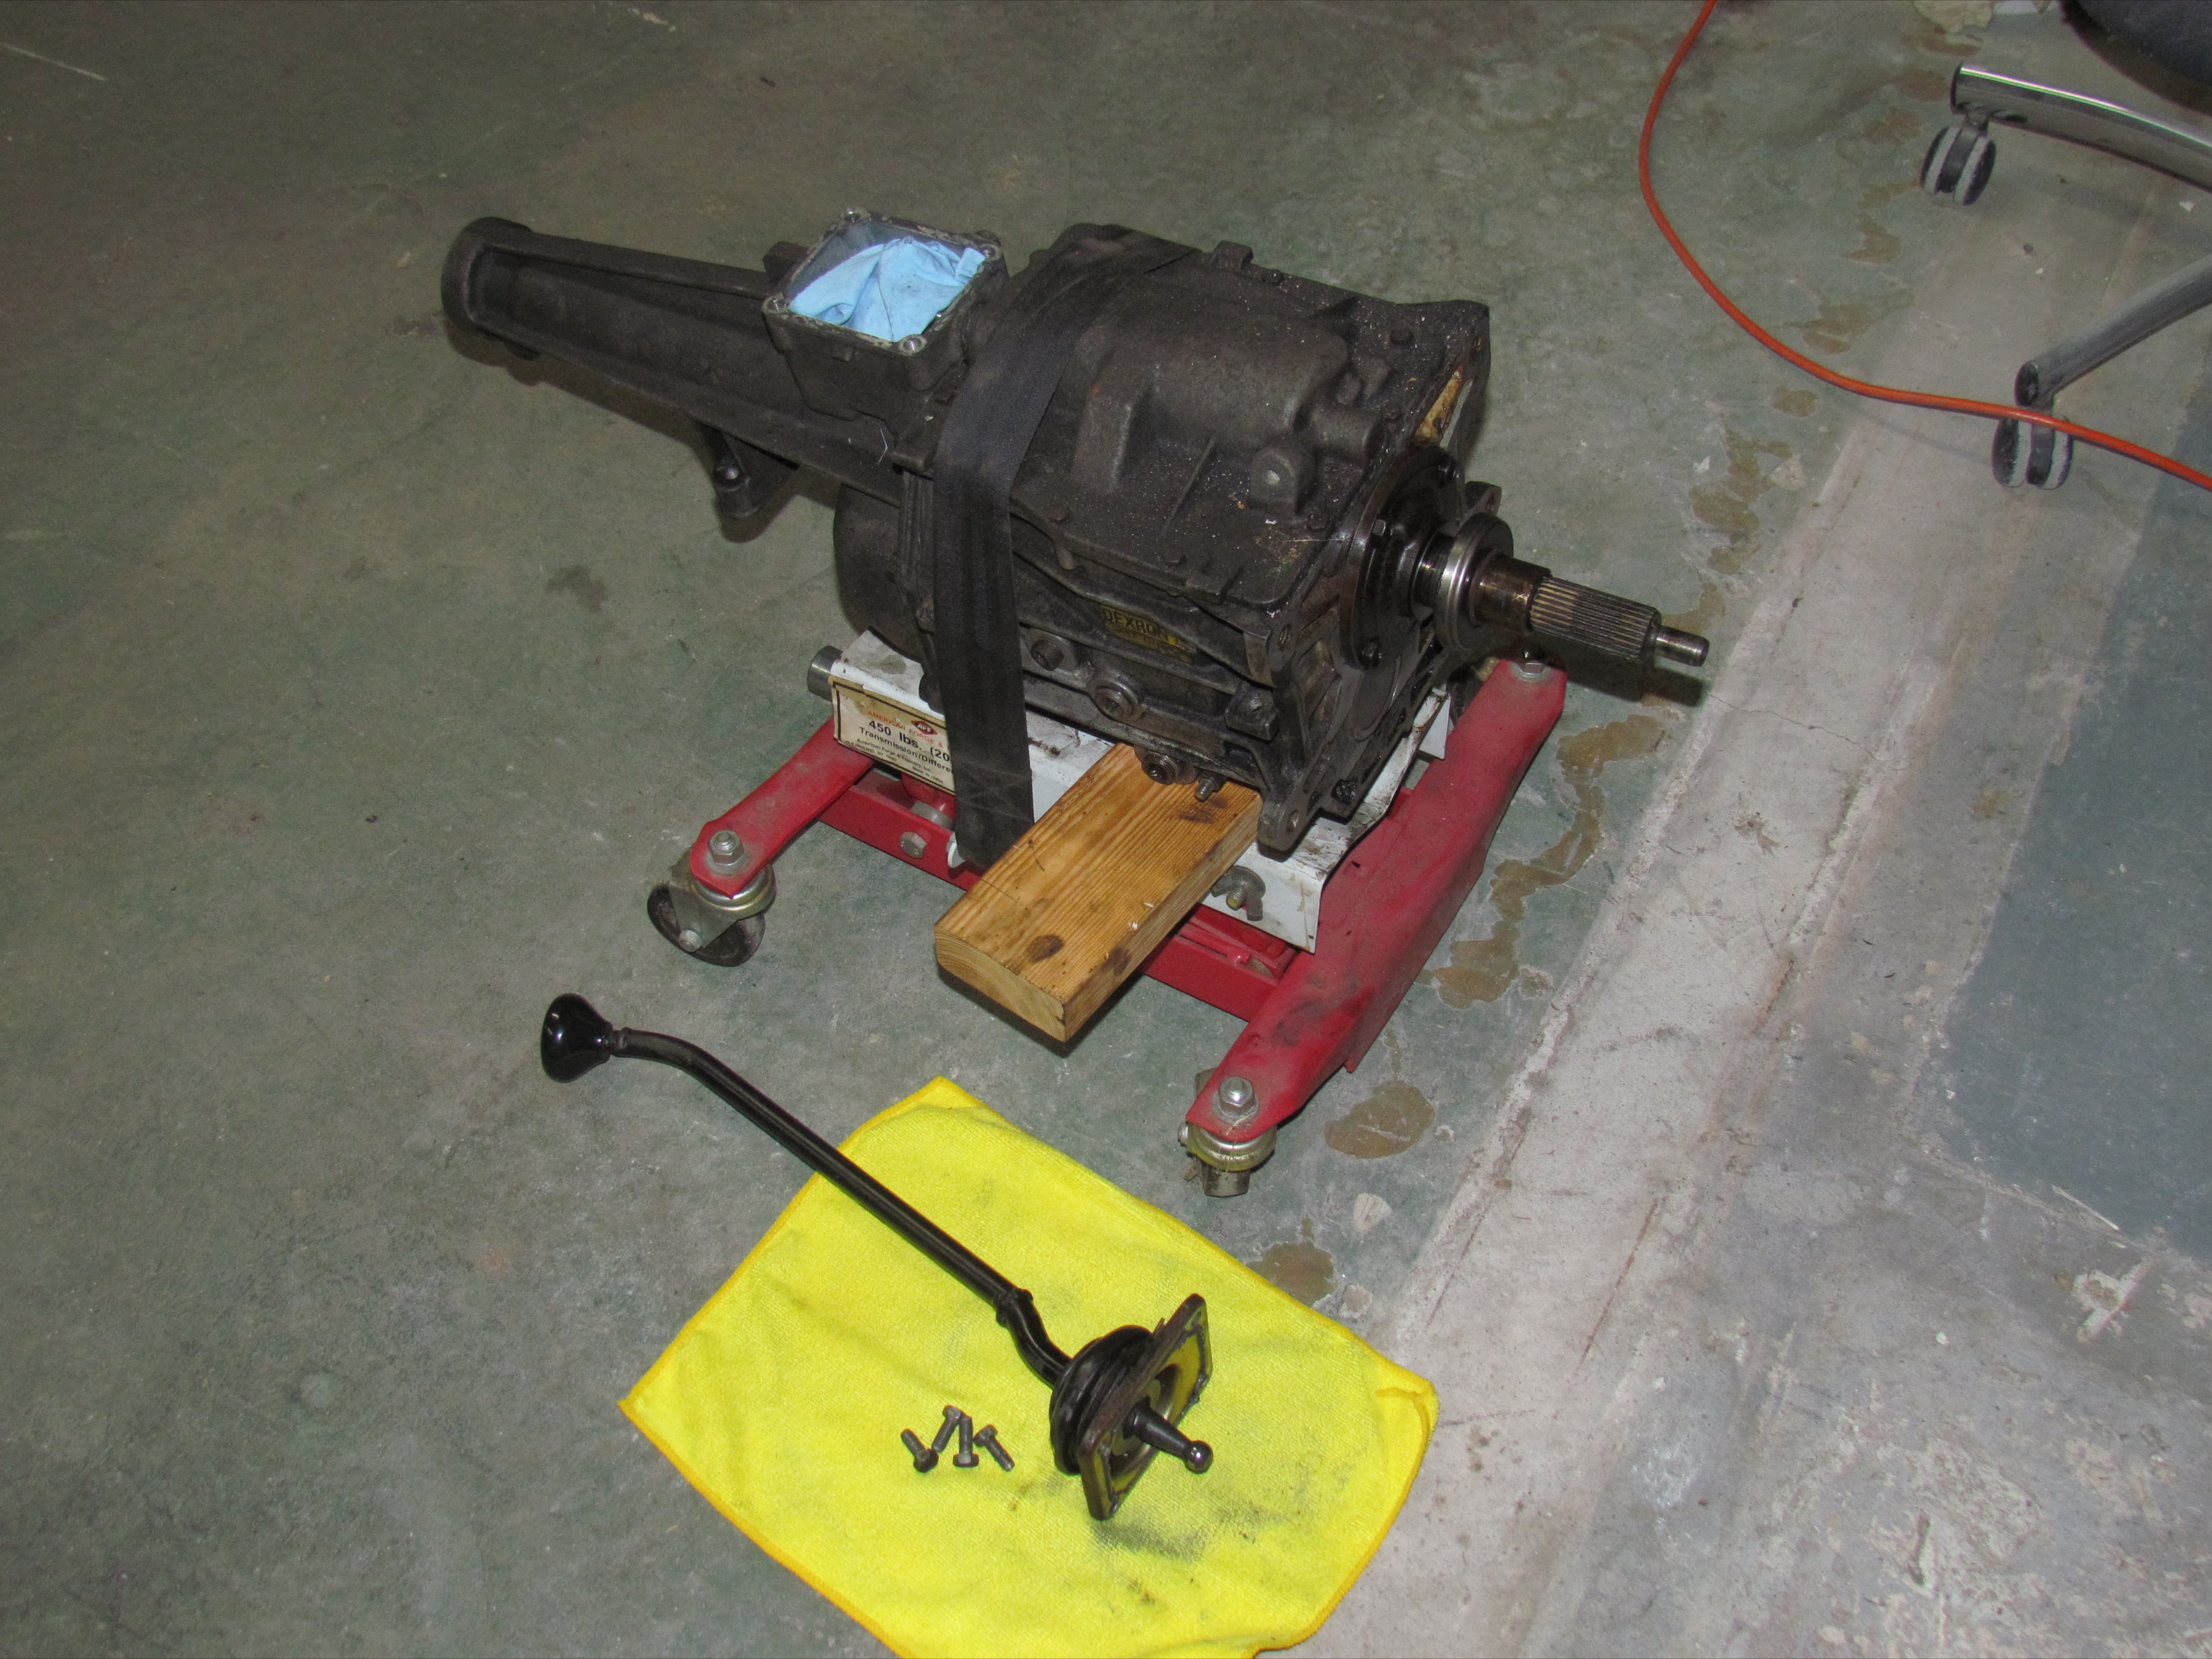 February
10th 2020 Freed up my tranny jack from the gas
tank sitting on it and got the Borg-Warner T5 Transmission out. I try
to schedule the heavy lifting for the weekends 'cause, after twelve
hours in the Krash Kubicle on the weekdays, I usually don't have the
gumption to roll around on the floor and get greasy.
February
10th 2020 Freed up my tranny jack from the gas
tank sitting on it and got the Borg-Warner T5 Transmission out. I try
to schedule the heavy lifting for the weekends 'cause, after twelve
hours in the Krash Kubicle on the weekdays, I usually don't have the
gumption to roll around on the floor and get greasy.
The Jimmy 302 engine block and bellhousing will be the last
major Item to exit the chassis. We are now basically down to bare
bones. Most items now coming off the truck will be cleaned up and put
right back on. We're movin' into a scraping and painting phase. Beer of
the day was Fulton Brewery's Lonely Blonde American Blonde Ale.
| < Back
to Intro |
You can email me at ![]() webmaster@laroke.com
webmaster@laroke.com
Issued Monday February 10, 2020
copyright © 2008-2020 Larry R. Kephart all rights reserved
| | LRK Home | | Bio Info | | Krash Khronicles | | LAROKE | |
| | BettyLou | | BillyBob's Garage | | Rat Patrol | | Deerslayer | | Elvira | |
| | Land of the Free and Home of the Brave | |
| | Keppylou's Art | | WWI Soldier's Diary | |