| | LRK Home | | Bio Info | | Krash Khronicles | | LAROKE | |
| | BettyLou | | BillyBob's Garage | | Rat Patrol | | Deerslayer | | Elvira | |
| | Land of the Free and Home of the Brave | |
| | Keppylou's Art | | WWI Soldier's Diary | |
Tinkering with Deerslayer
![]()
DEERSLAYER LINKS including vendor sites for parts and tools as well as sites for old truck and hot rod organizations
![]()
TINKERING WITH DEERSLAYER chronicles the day-by-day maintenance and improvements episodes for Deerslayer, a '37 Chevy farm truck hot rod.
CRUISIN' WITH DEERSLAYER Roadtrips, cruise-in's and truck show stories and tall tales.
TONY'S DUNGEON Tony Pascarella's forum entries at OldGMCtrucks.com regarding Deerslayer, particularly the 302 GMC engine build in his farmhouse basement.
![]()
DEERSLAYER MAINTENANCE Ever changing detailing, oil change, lube, etc. maintenance routines specifically developed for Deerslayer, including required tools, materials and procedures.
PROJECT NAILHEAD Chronicles the rebuild of a 1954 Buick Roadmaster 322 nailhead engine as a future replacement for Deerslayer's Jimmy 302.
42. On a roll
 December
13th 2019
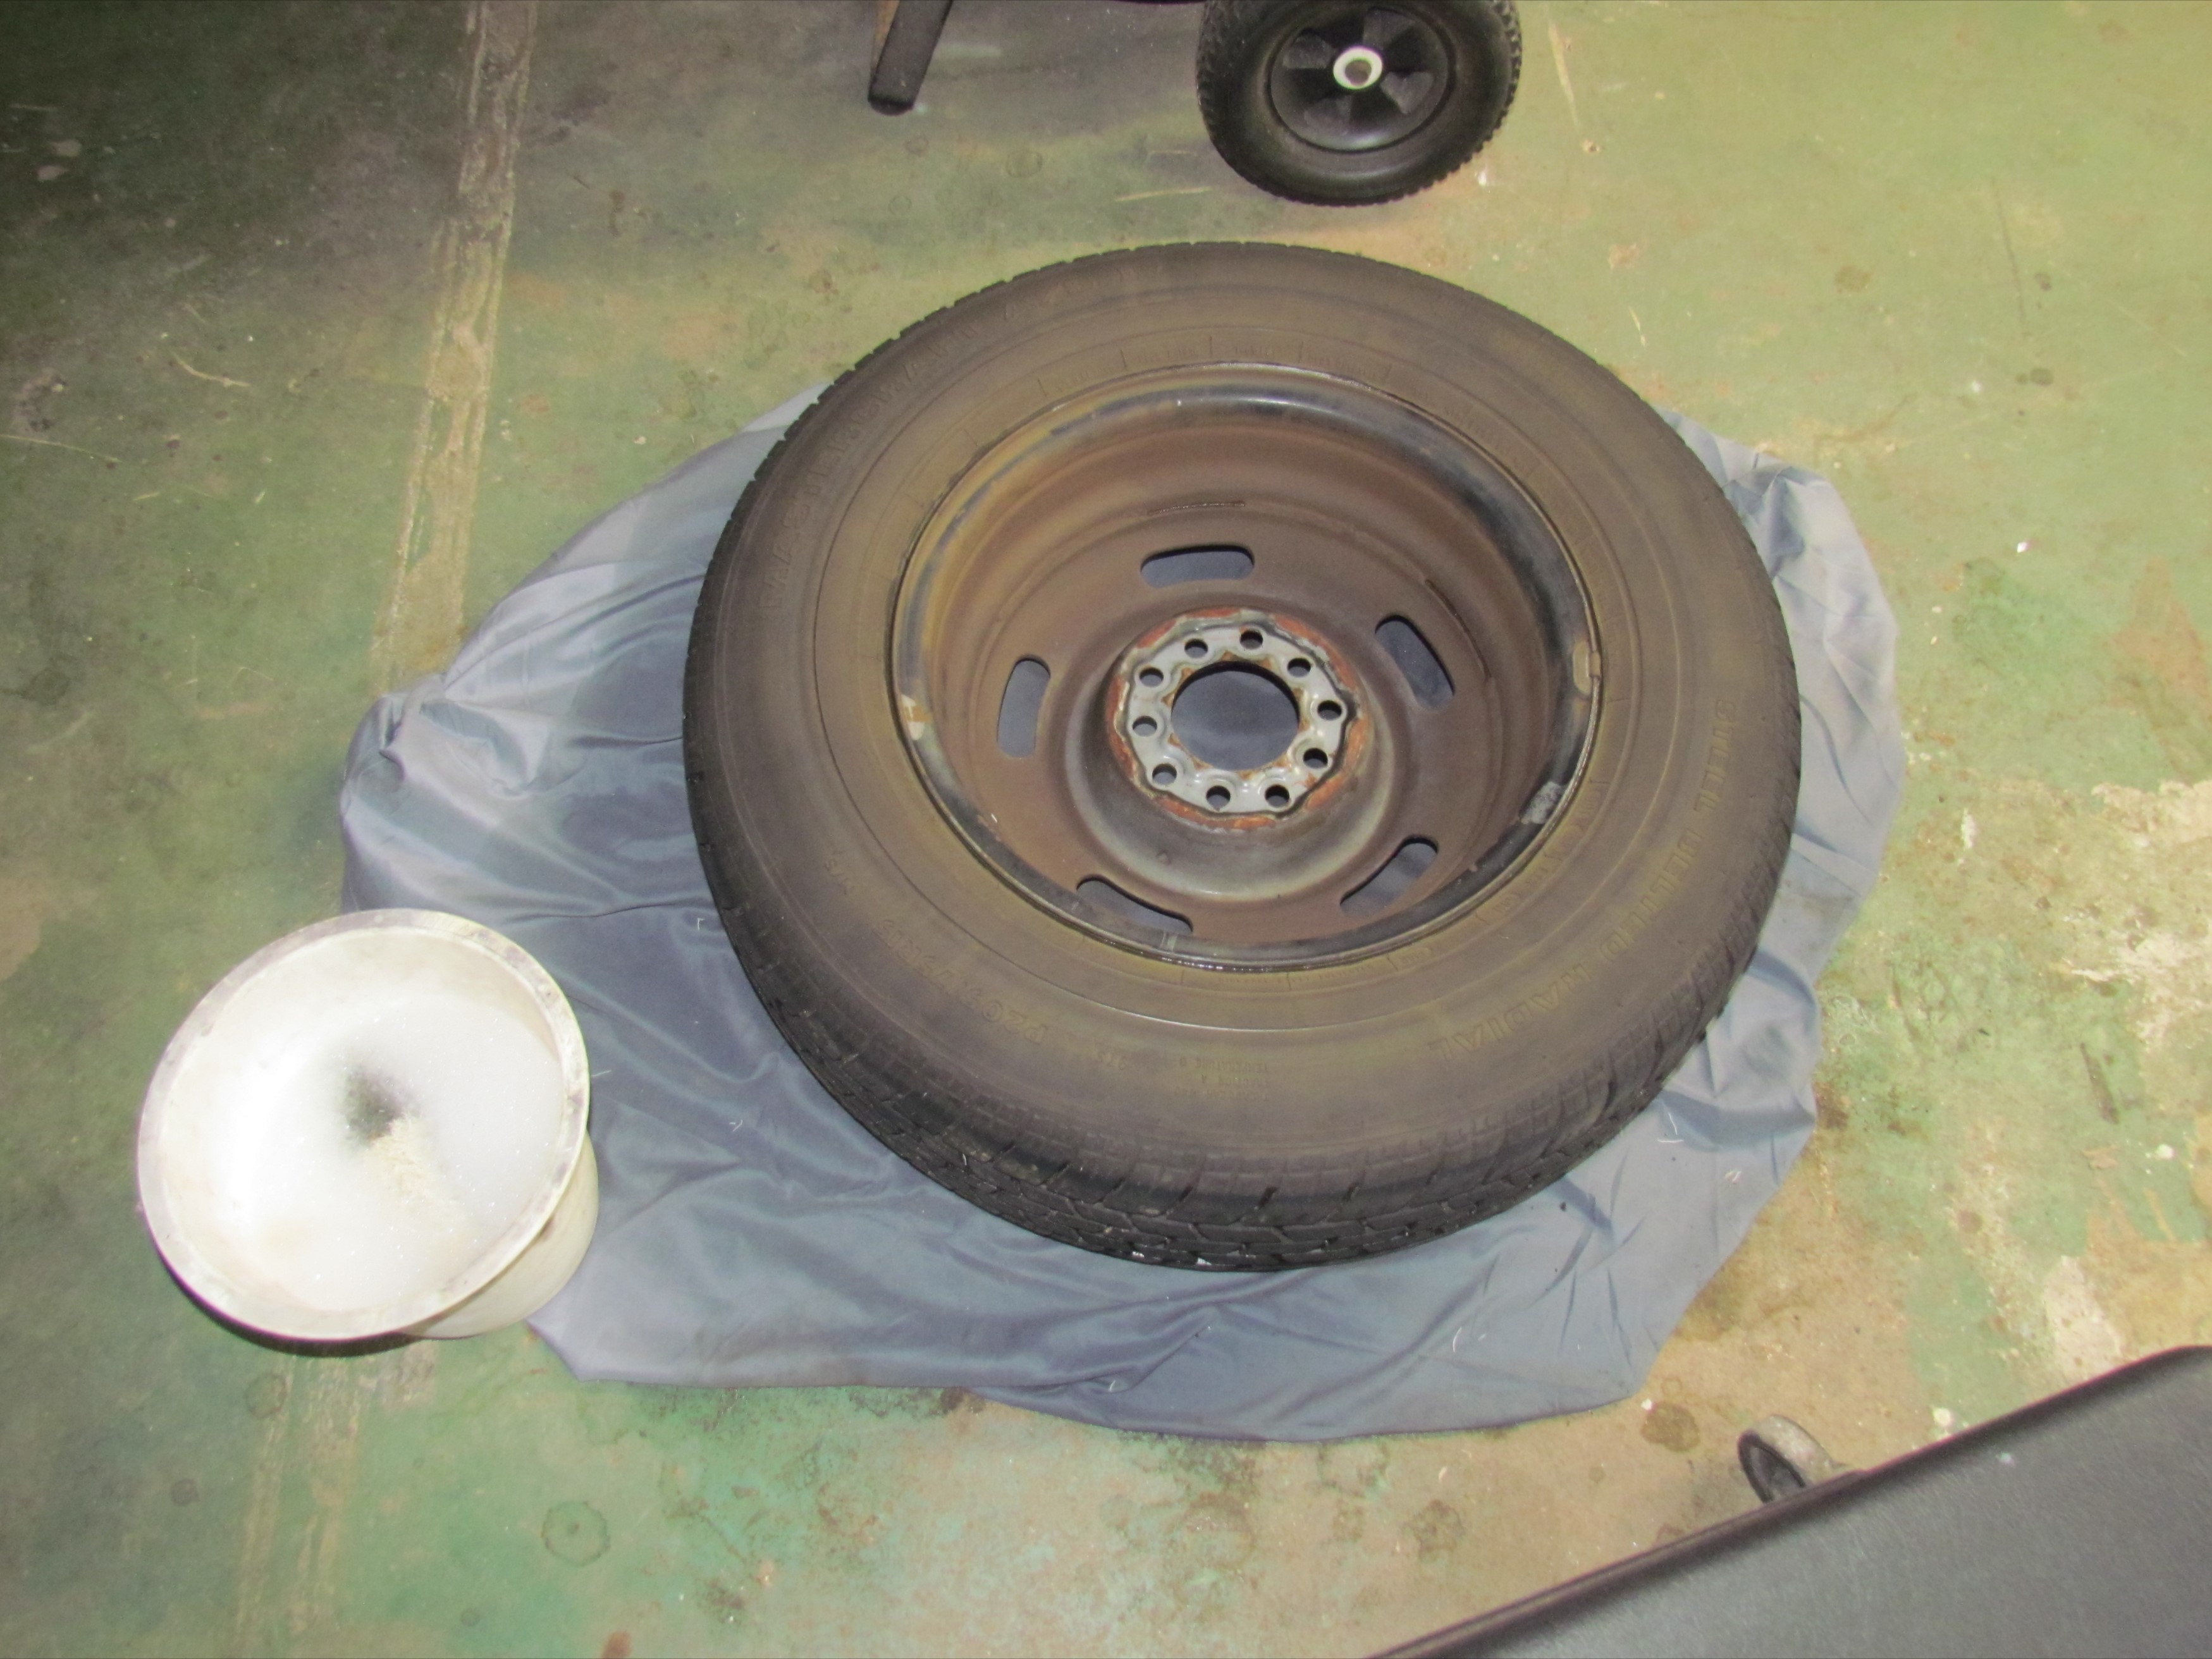
Next task is to clean and paint Deerslayer's front wheels. There is
method to my madness. The wheels will be put back on the truck soon to
reposition it with the Go-Jack wheel dollies and I want to give the
paint around the lugs some time to cure and harden.
December
13th 2019
Next task is to clean and paint Deerslayer's front wheels. There is
method to my madness. The wheels will be put back on the truck soon to
reposition it with the Go-Jack wheel dollies and I want to give the
paint around the lugs some time to cure and harden.
Cleaned and organized the tools and parts left over in the
aftermath of the disk brake and head work ops, then set to work washing
the backside of the first wheel with a Dawn dish washing soap and water
solution, the only thing I had on hand. Beer of the day was Sumerian
Brewing Company's Holy Water Citra IPA.
 December
17th 2019
Made a pass with wire cup and wheel in air-powered angle grinder
followed by several cycles of cleaning with Oil Eater degreaser. I was
surprised to find it as effective on this dry brake grime as it is on
greasy surfaces.
December
17th 2019
Made a pass with wire cup and wheel in air-powered angle grinder
followed by several cycles of cleaning with Oil Eater degreaser. I was
surprised to find it as effective on this dry brake grime as it is on
greasy surfaces.
After the Oil Eater cleaning, the rusty areas were
treated with a course grit foam sanding block and the whole
surface to be painted was gone over with a Scotchbrite pad.
Went and hunted up my Wheel Masks, a tool I'd gotten from
Eastwood in the last century. These simple sheet metal bands are the
best thing since sliced bread as far as wheel painting is concerned. I
need all the help I can get. My tape masking Kung Fu is not strong. PRE
Paint Prepped the wheel and gave required areas two coats of
Eastwood's
Self-etching Primer, followed up by four coats of Dupli-Color Black
High Performance Wheel Paint over the entire wheel side.
 December
18th 2019
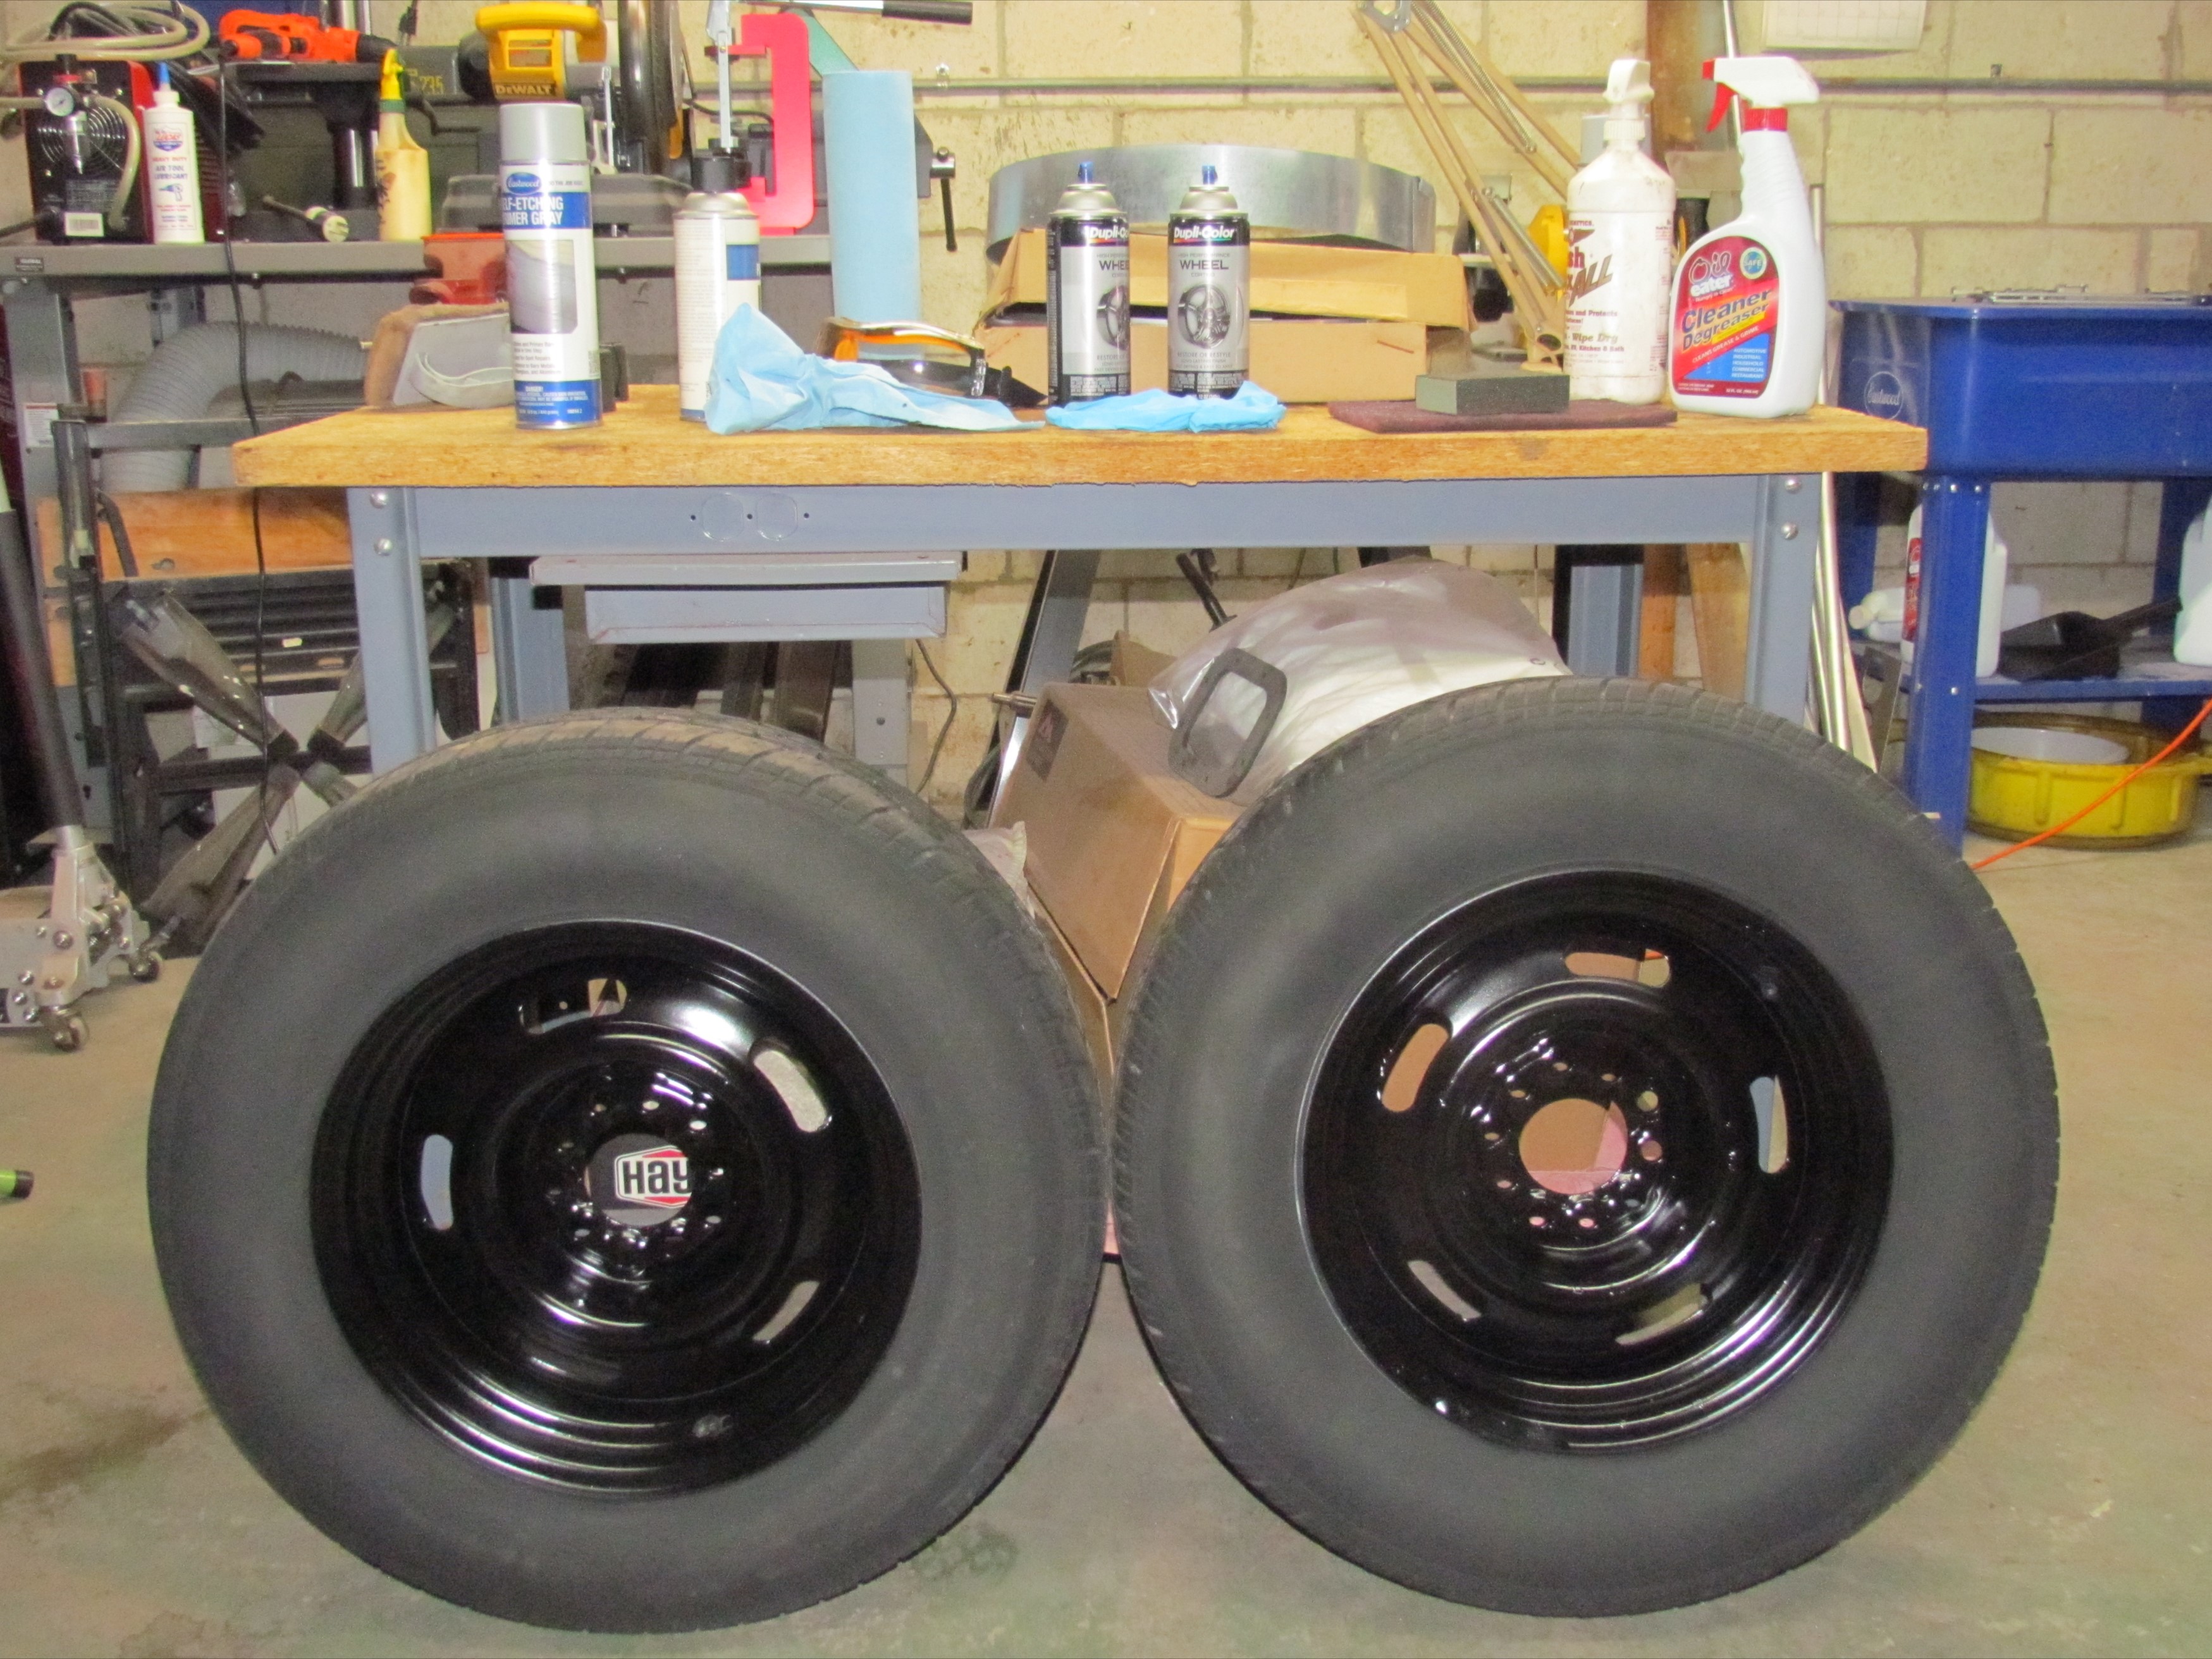
After the first side of the first wheel was painted, I adjusted my
procedure. The wire cup and wheel step was eliminated. I couldn't get
to the nooks and crannies and as much paint was being removed as dirt,
necessitating more primer. If I had known beforehand how well the Oil
Eater was going to do, the air-powered angle grinder would have never
come out of the drawer for this operation. Deerslayer's front wheels
are done for now and can be put off to the side for the paint to
harden. Beer of the day is RJ
Rockers Brewing Company's Son of a Peach Wheat Ale. As a rule, wheat
ales do not agree with me but this one tastes, well . . . just peachy.
December
18th 2019
After the first side of the first wheel was painted, I adjusted my
procedure. The wire cup and wheel step was eliminated. I couldn't get
to the nooks and crannies and as much paint was being removed as dirt,
necessitating more primer. If I had known beforehand how well the Oil
Eater was going to do, the air-powered angle grinder would have never
come out of the drawer for this operation. Deerslayer's front wheels
are done for now and can be put off to the side for the paint to
harden. Beer of the day is RJ
Rockers Brewing Company's Son of a Peach Wheat Ale. As a rule, wheat
ales do not agree with me but this one tastes, well . . . just peachy.
 December
19th 2019
Organized, put away the wheel painting materials and cleared the
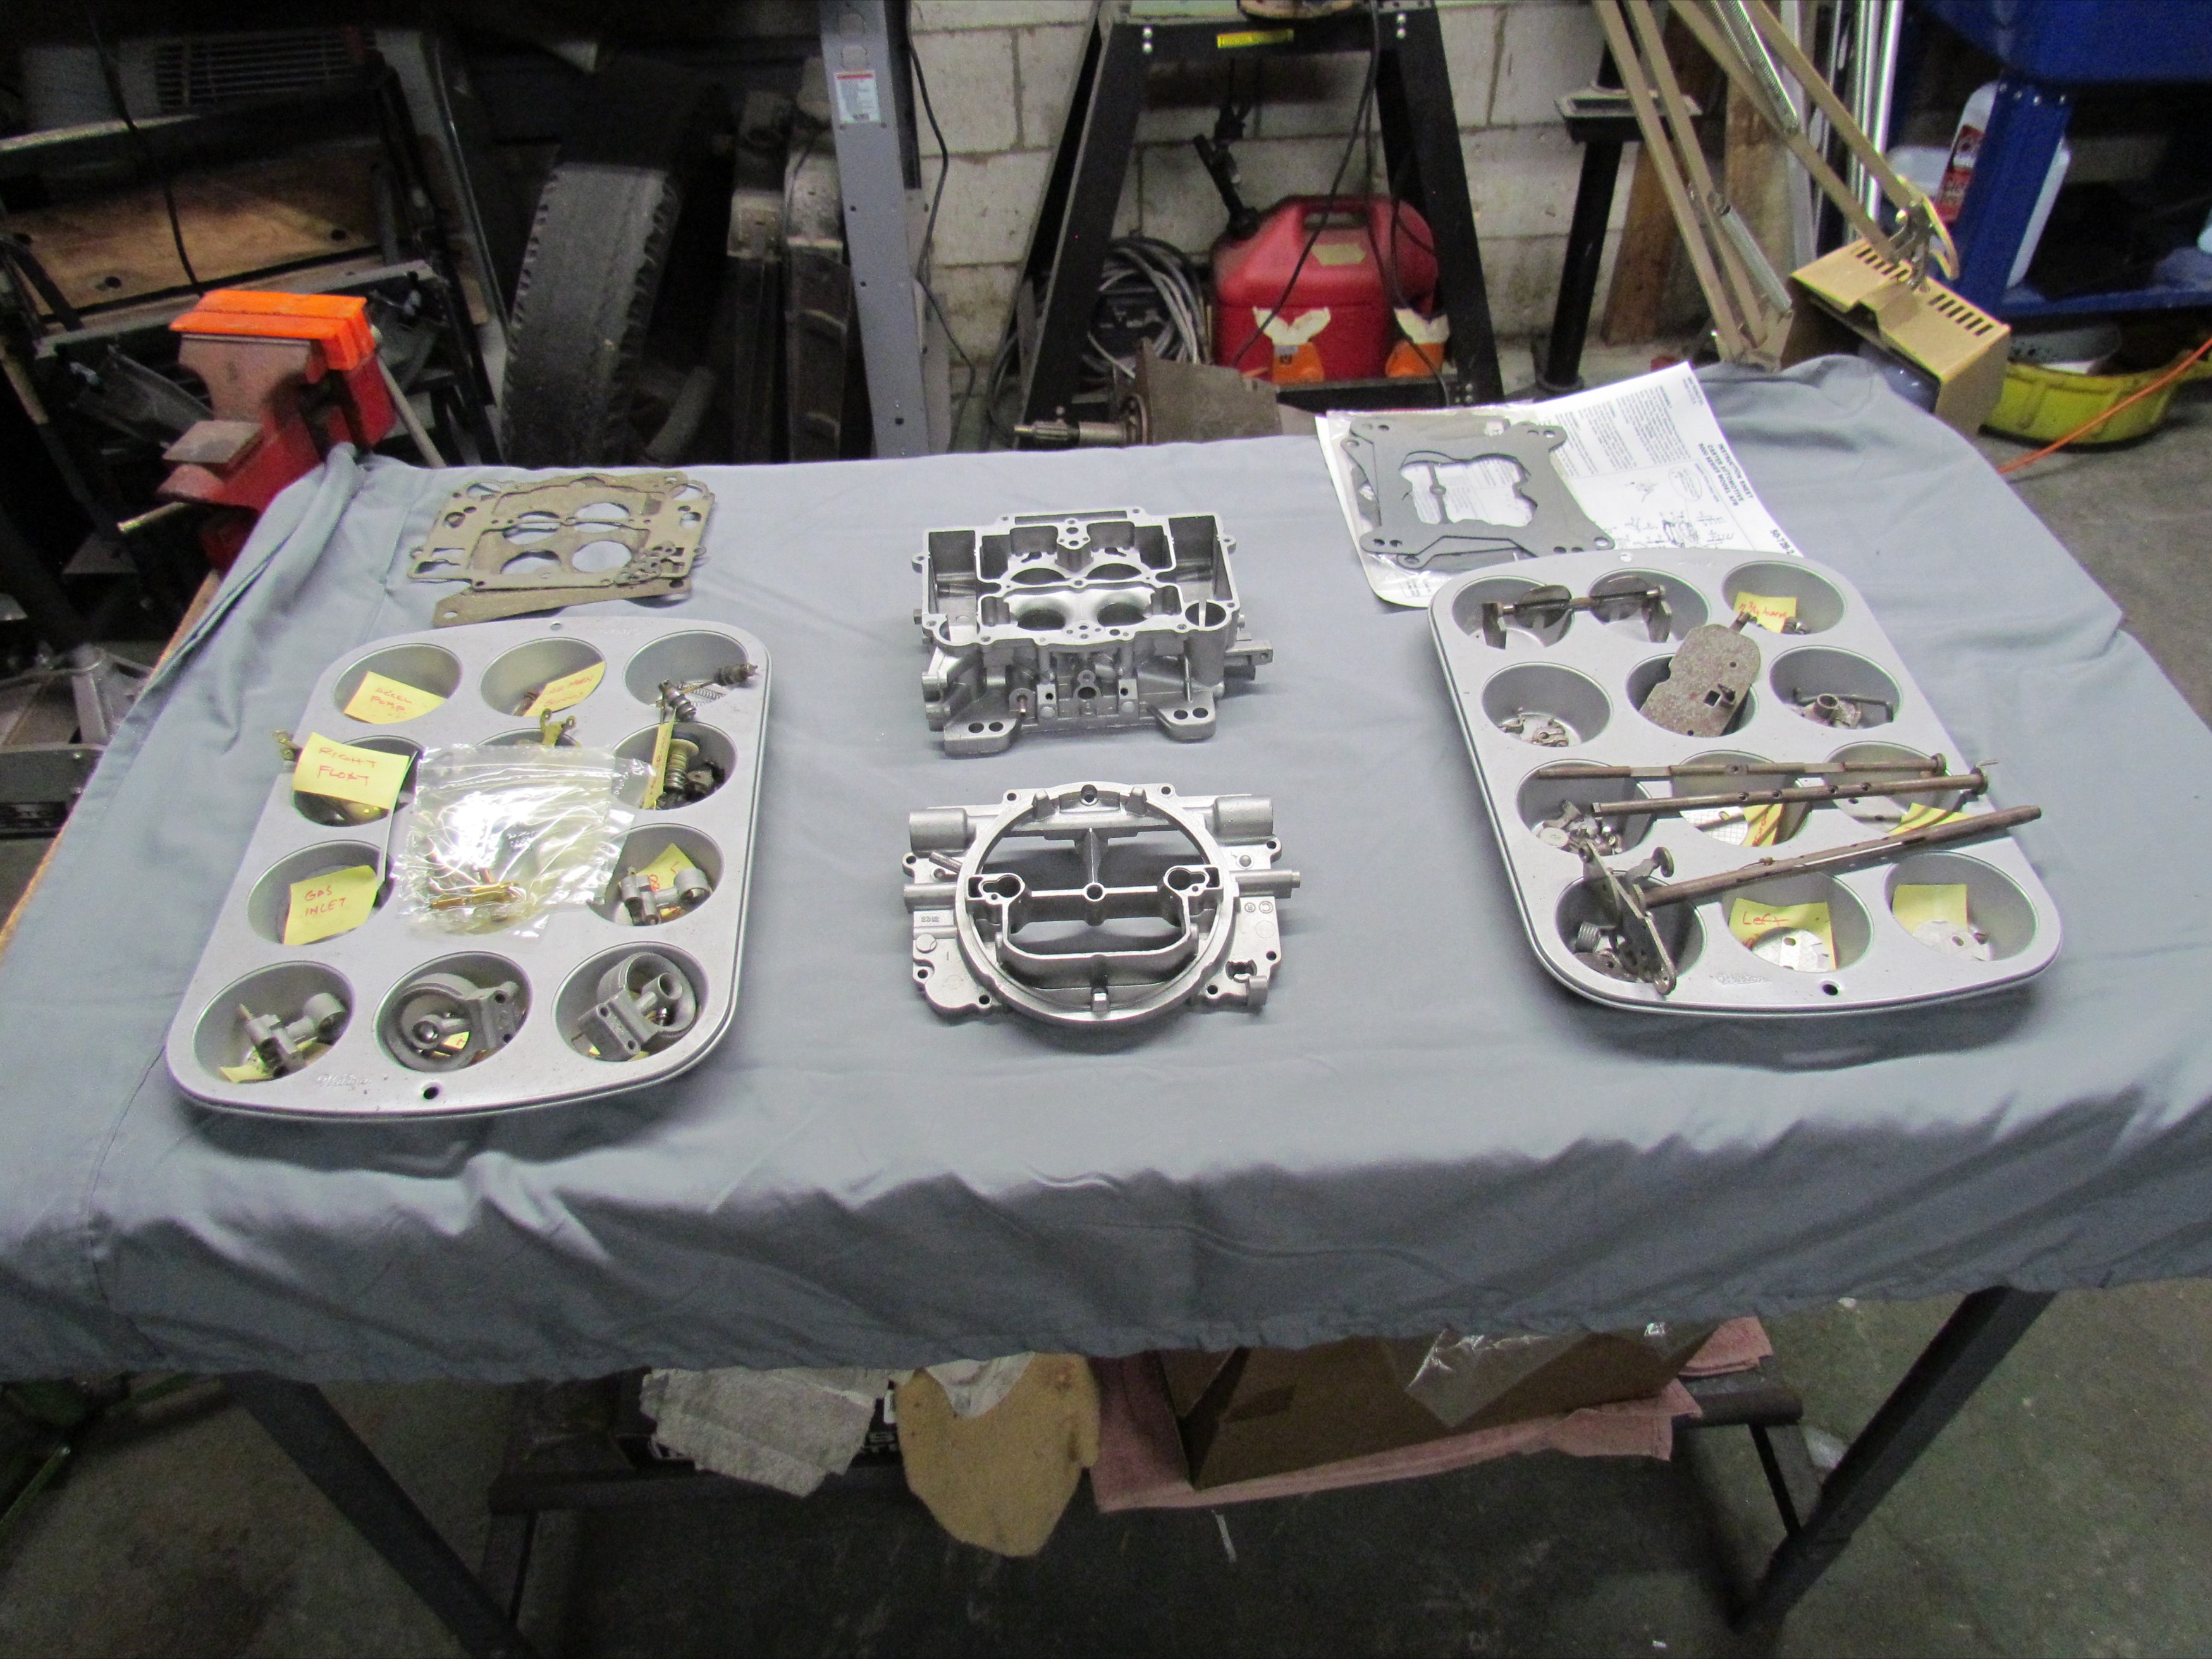
deck for the next planned task. Deerslayer's 400 CFM Carter AFB
Carburetor has been in pieces for 3-1/2 years. Long past time to get it
back together.
December
19th 2019
Organized, put away the wheel painting materials and cleared the
deck for the next planned task. Deerslayer's 400 CFM Carter AFB
Carburetor has been in pieces for 3-1/2 years. Long past time to get it
back together.
When I took this thing apart, the parts were organized in
muffin tins with post-it note labels. Hopefully, this will cut down my
confusion during reassembly. Most of the ferrous parts have developed
surface rust over the years. They will have to spend some time in the
Evapo-Rust basket.
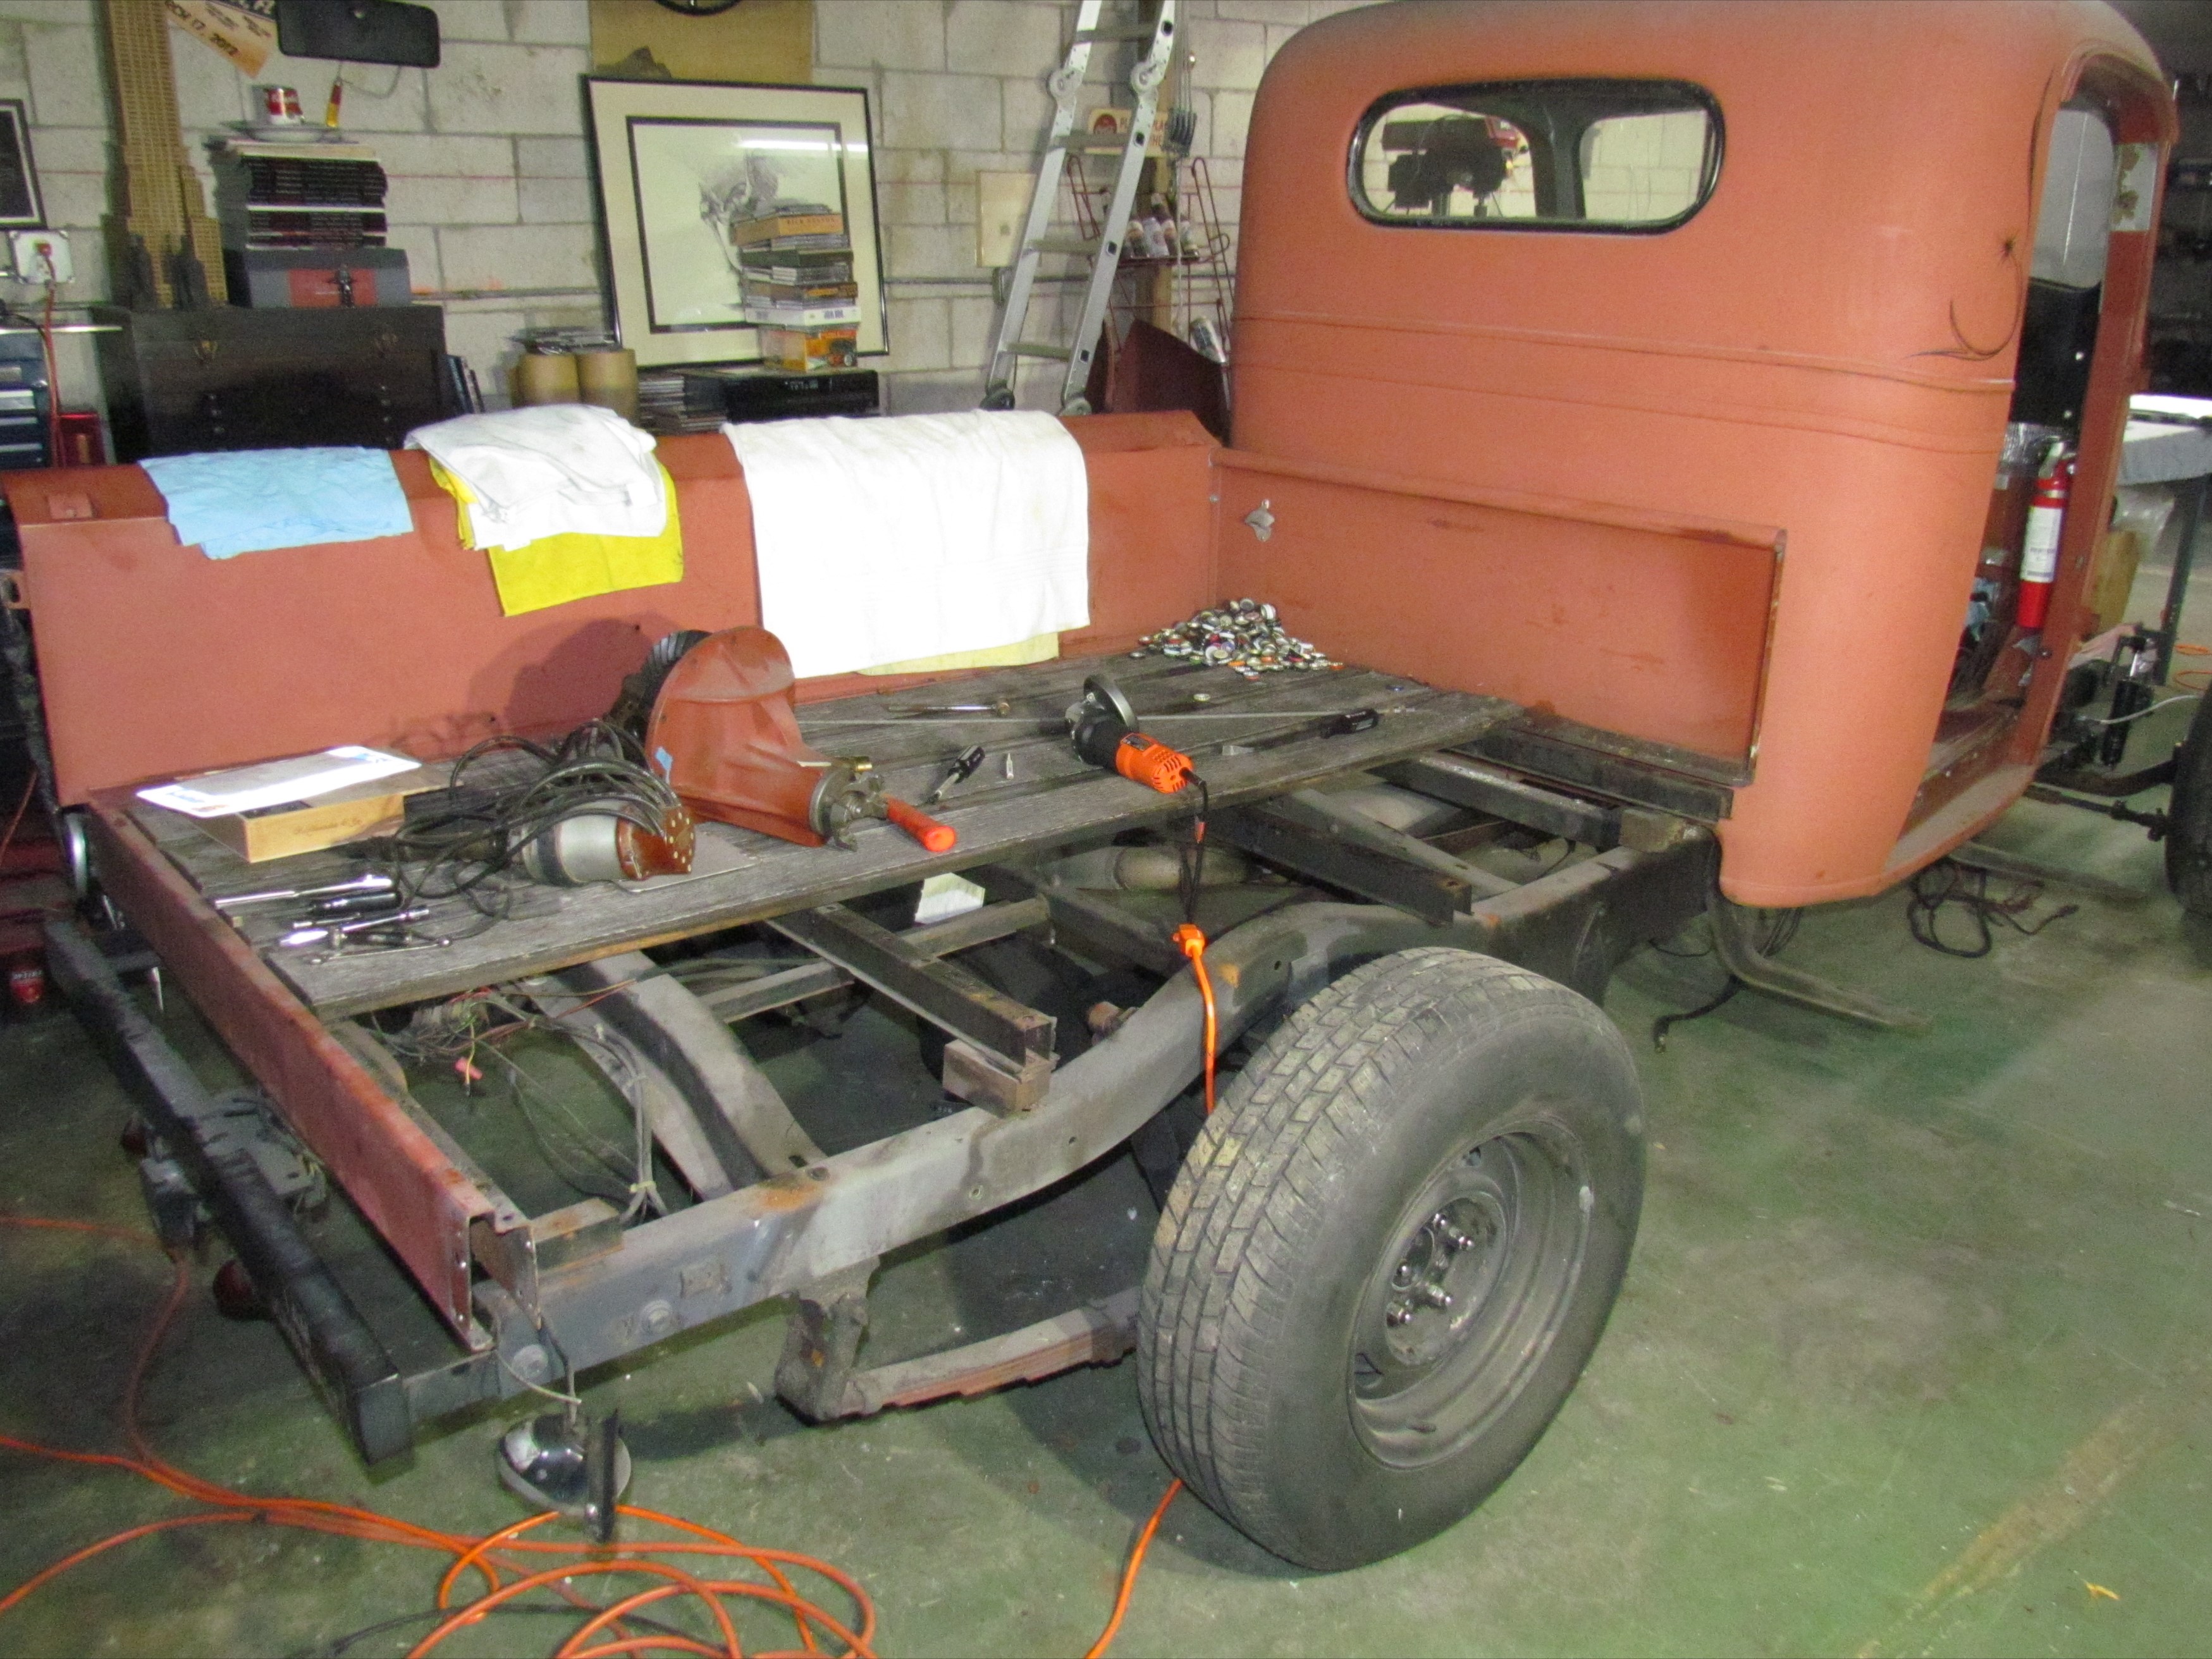
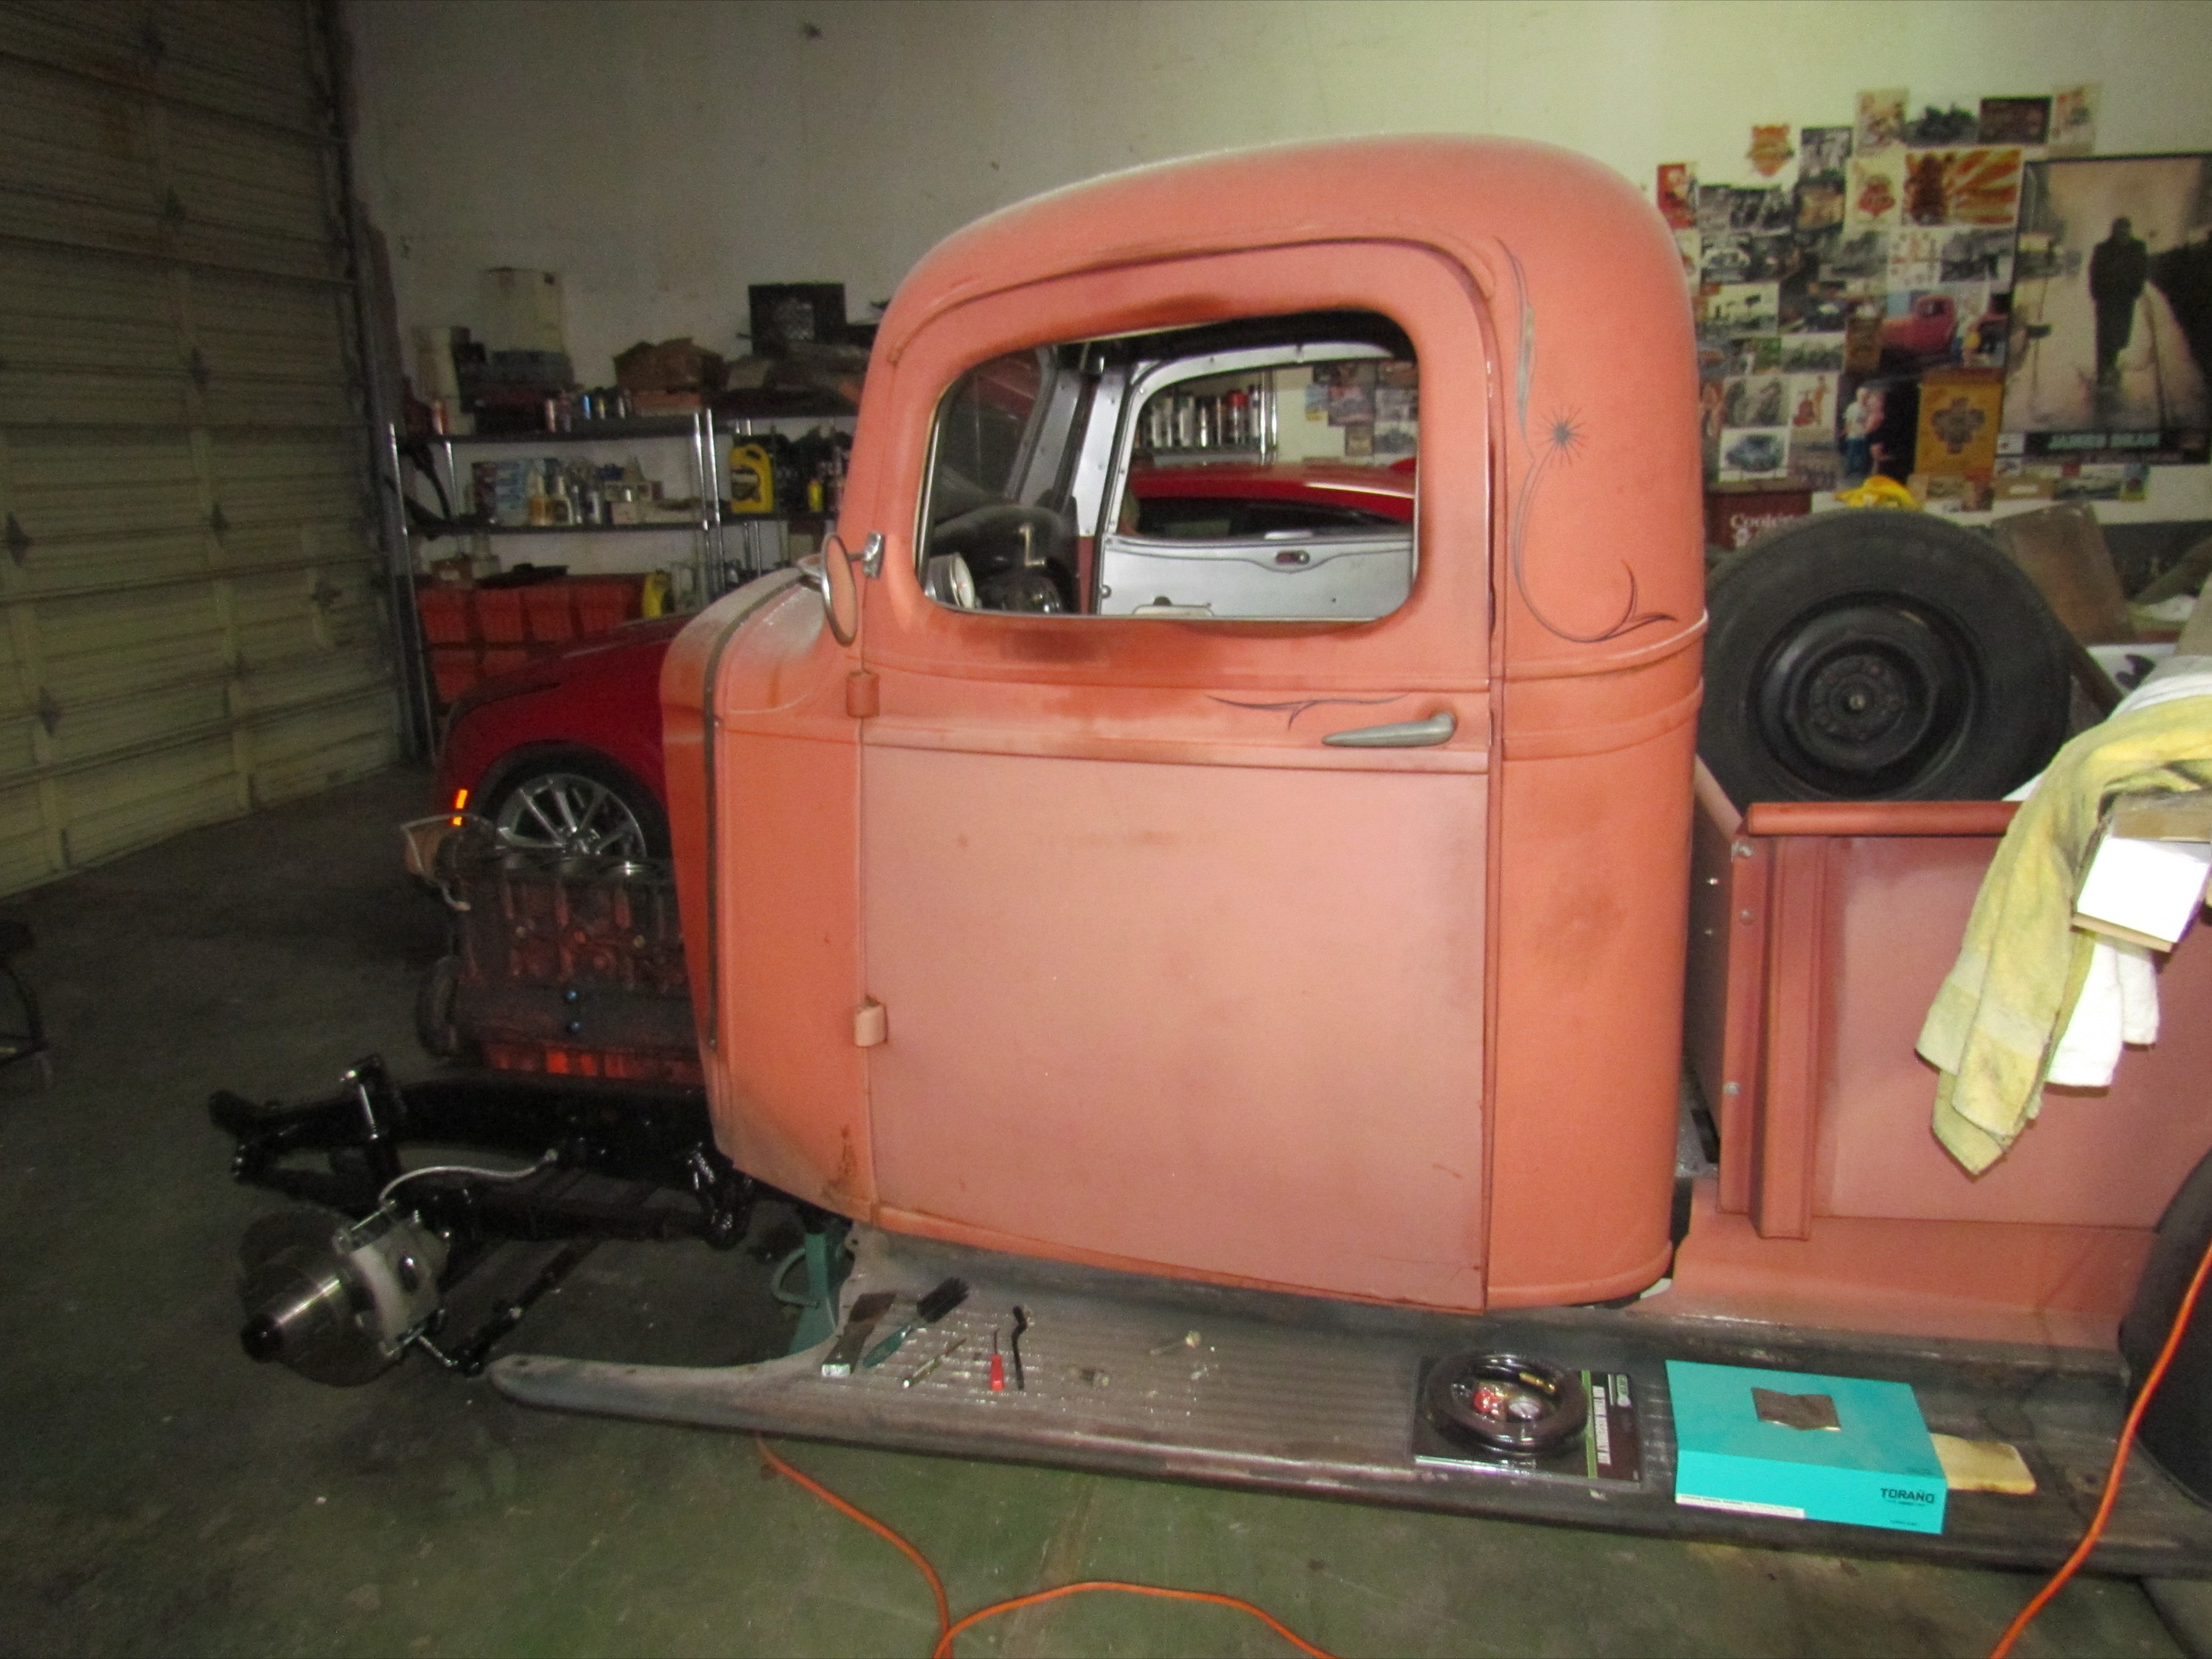 December
20th 2019
It's time to strip down and remove Deerslayer's cab for the next phase
of the work while I'm scratching my head over the carburetor.
Dropped the front end down on the jack stands to level out the truck.
Now
I can jockey the door lift into position to take off the doors. Some of
the door hinge screws want to stay where they are. Now, I'm trying
different methods of extraction, with limited success. Beer of the day
is River Horse Brewing Company's Oatmeal Milk Stout.
December
20th 2019
It's time to strip down and remove Deerslayer's cab for the next phase
of the work while I'm scratching my head over the carburetor.
Dropped the front end down on the jack stands to level out the truck.
Now
I can jockey the door lift into position to take off the doors. Some of
the door hinge screws want to stay where they are. Now, I'm trying
different methods of extraction, with limited success. Beer of the day
is River Horse Brewing Company's Oatmeal Milk Stout.
 December
23rd 2019
All the hinge leaf screws were small but stubborn. I was successful at
getting the driver side upper hinge cab side screws out with manual
impact driver but none of the others would bust loose. I also tried MAP
gas, Kroil penetrating oil and air-powered impact wrench, all to no
avail. I got the driver side lower hinge leaf door side screws loose
but they had hex nuts inside the door and I had to take off the inner
door panel to get at those. I finally got the door off with the upper
hinge still on the door and the lower hinge still on the cab.
December
23rd 2019
All the hinge leaf screws were small but stubborn. I was successful at
getting the driver side upper hinge cab side screws out with manual
impact driver but none of the others would bust loose. I also tried MAP
gas, Kroil penetrating oil and air-powered impact wrench, all to no
avail. I got the driver side lower hinge leaf door side screws loose
but they had hex nuts inside the door and I had to take off the inner
door panel to get at those. I finally got the door off with the upper
hinge still on the door and the lower hinge still on the cab.
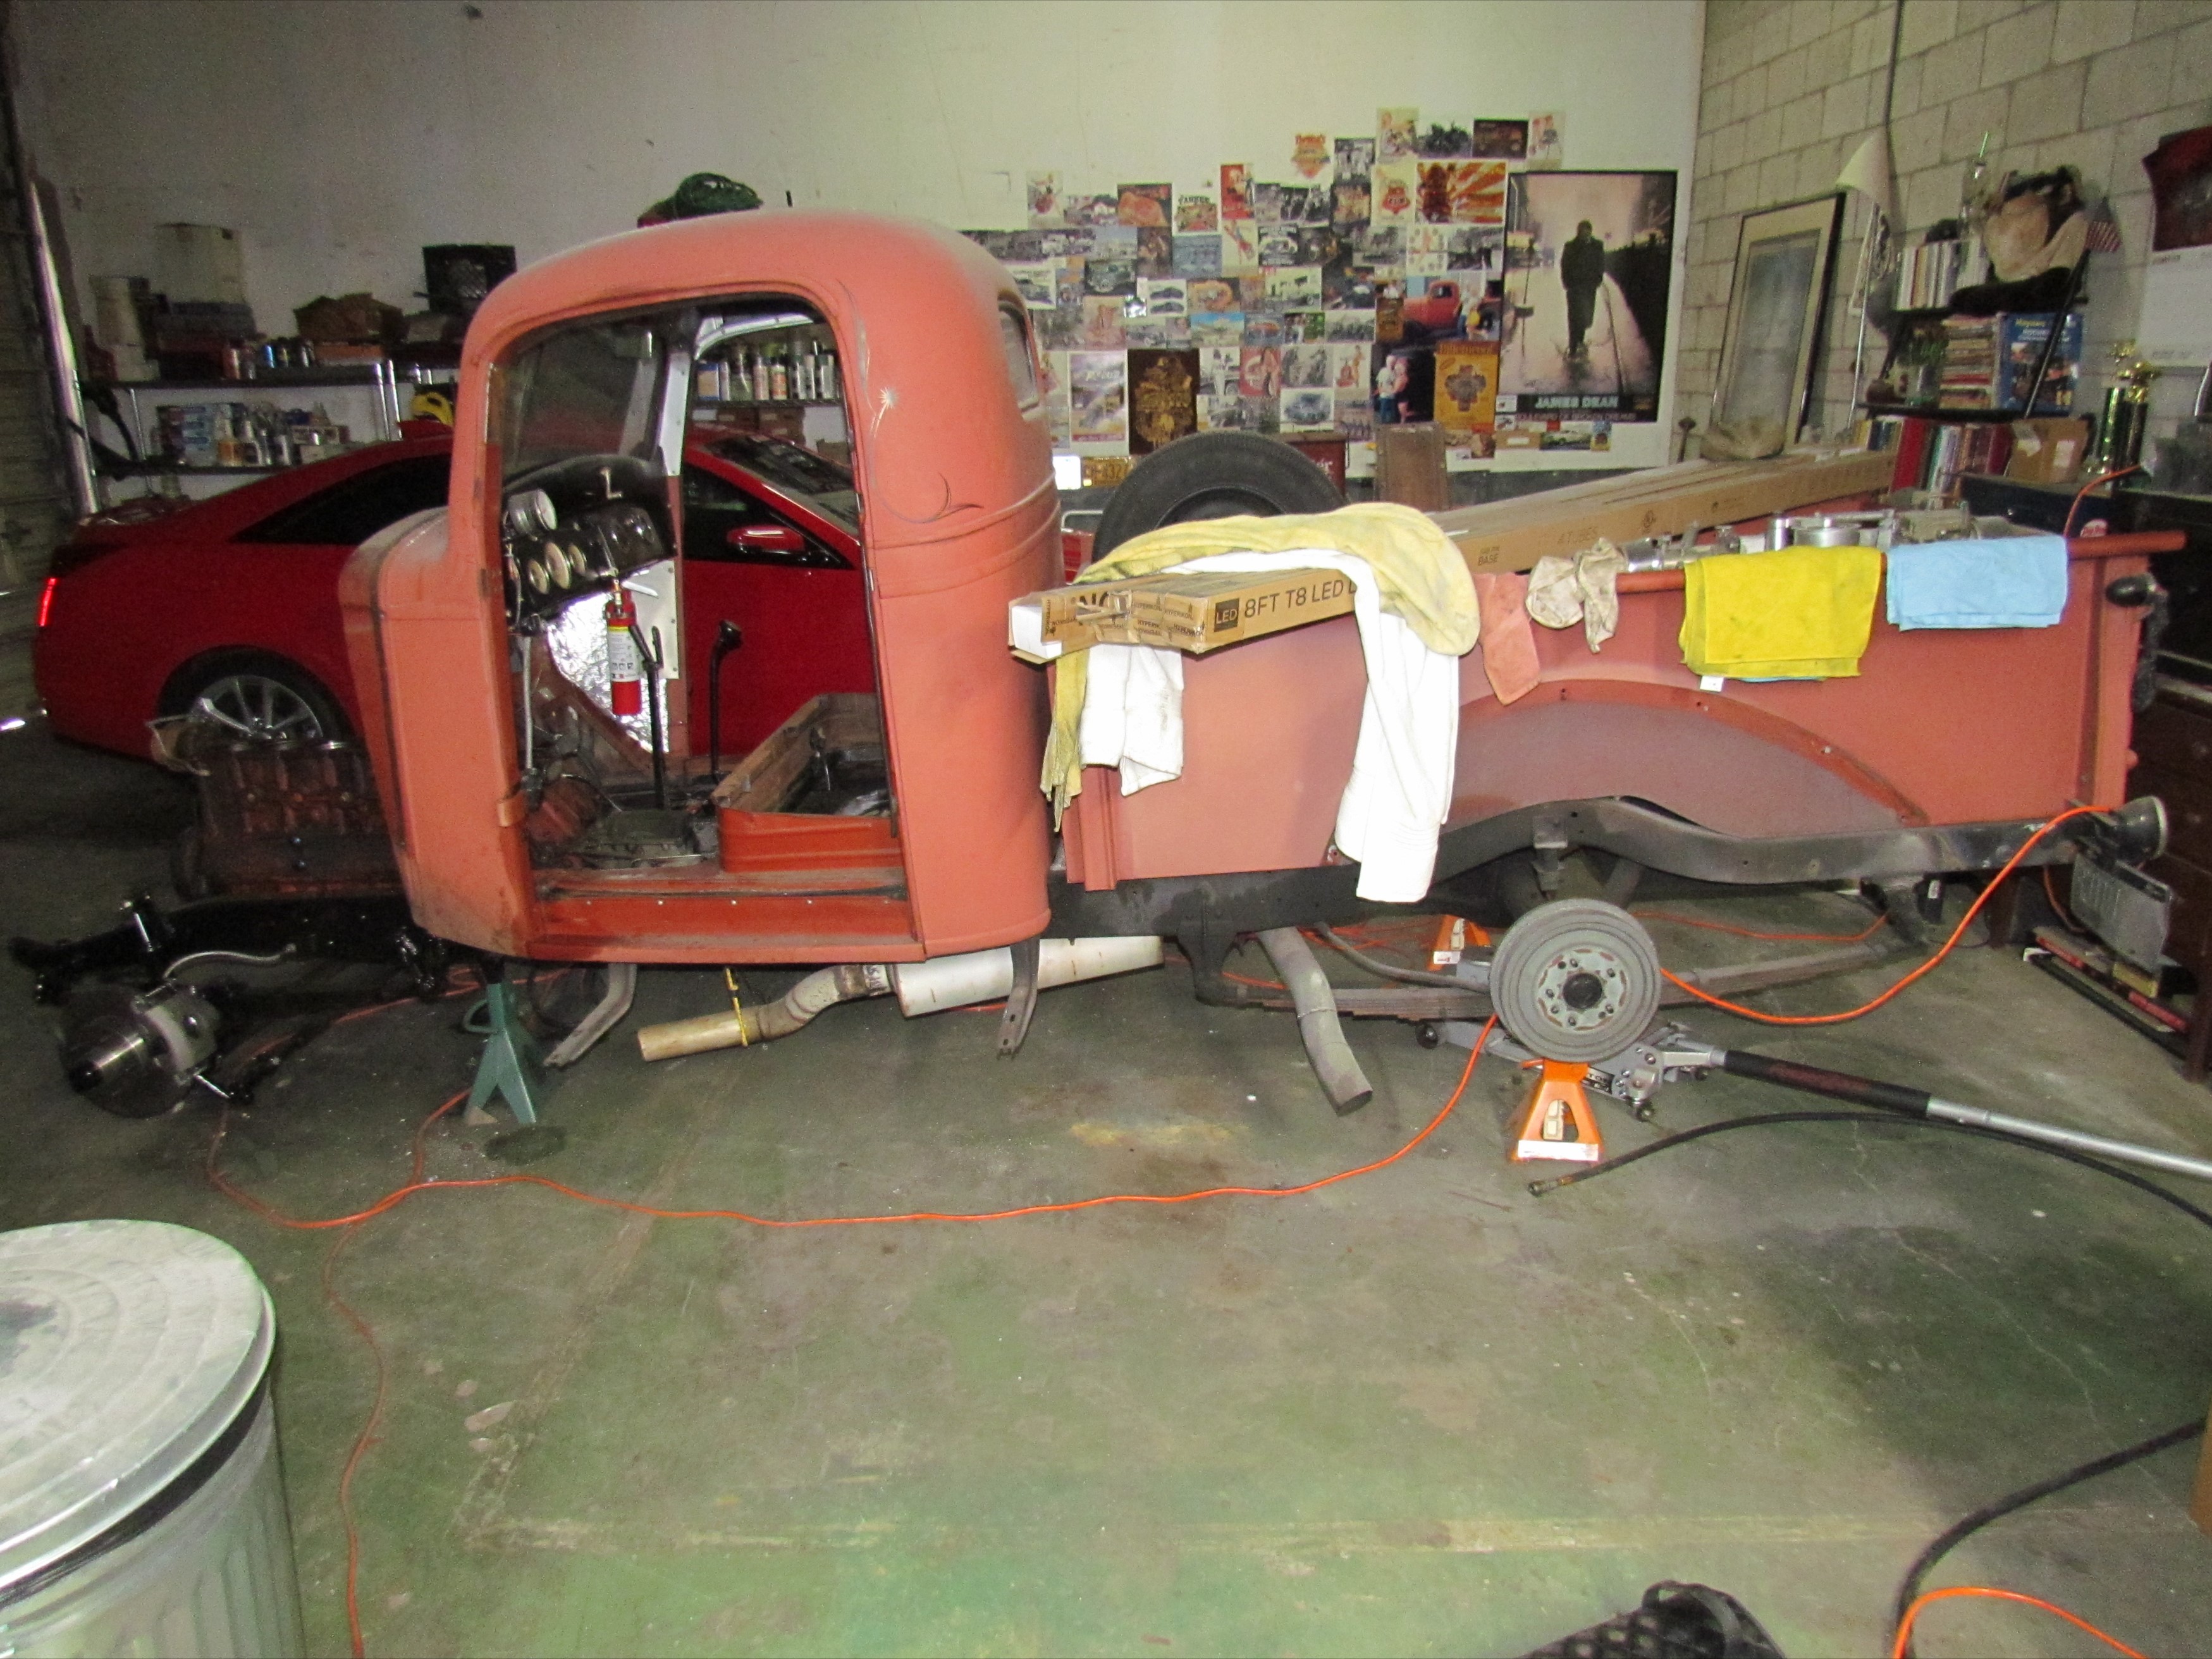
Went to the passenger side door and found more of the same despair. Then, palm slap to the forehead! I'm overthinking things again. I was doing things here the way I did when I took BillyBob's doors off but Billybob has concealed hinges. Deerslayer's doors have exterior hinges. All I have to do is drive the hinge pins out with a punch! I did and the passenger side door was off in five minutes instead of the hours long ordeal of the driver side door.
Damnation! Some days the bear gets you and some days, you iz the bear. Beer of the day was Southern Barrel Brewing Company's Damn Yankee IPA.
 December
24th 2019
While I was pondering the problems of clutch and brake pedal, and other
obstructions blocking cab removal, I went to work on items that were
relatively easy. The rear fenders gave me some trouble in the form of a
few rusted bolts I had to grind off. Otherwise, the fenders and running
boards came away easier than I expected. The running board supports are
bolted in place, not riveted like BillyBob, so those "shin killers"
will be removed too.
December
24th 2019
While I was pondering the problems of clutch and brake pedal, and other
obstructions blocking cab removal, I went to work on items that were
relatively easy. The rear fenders gave me some trouble in the form of a
few rusted bolts I had to grind off. Otherwise, the fenders and running
boards came away easier than I expected. The running board supports are
bolted in place, not riveted like BillyBob, so those "shin killers"
will be removed too.
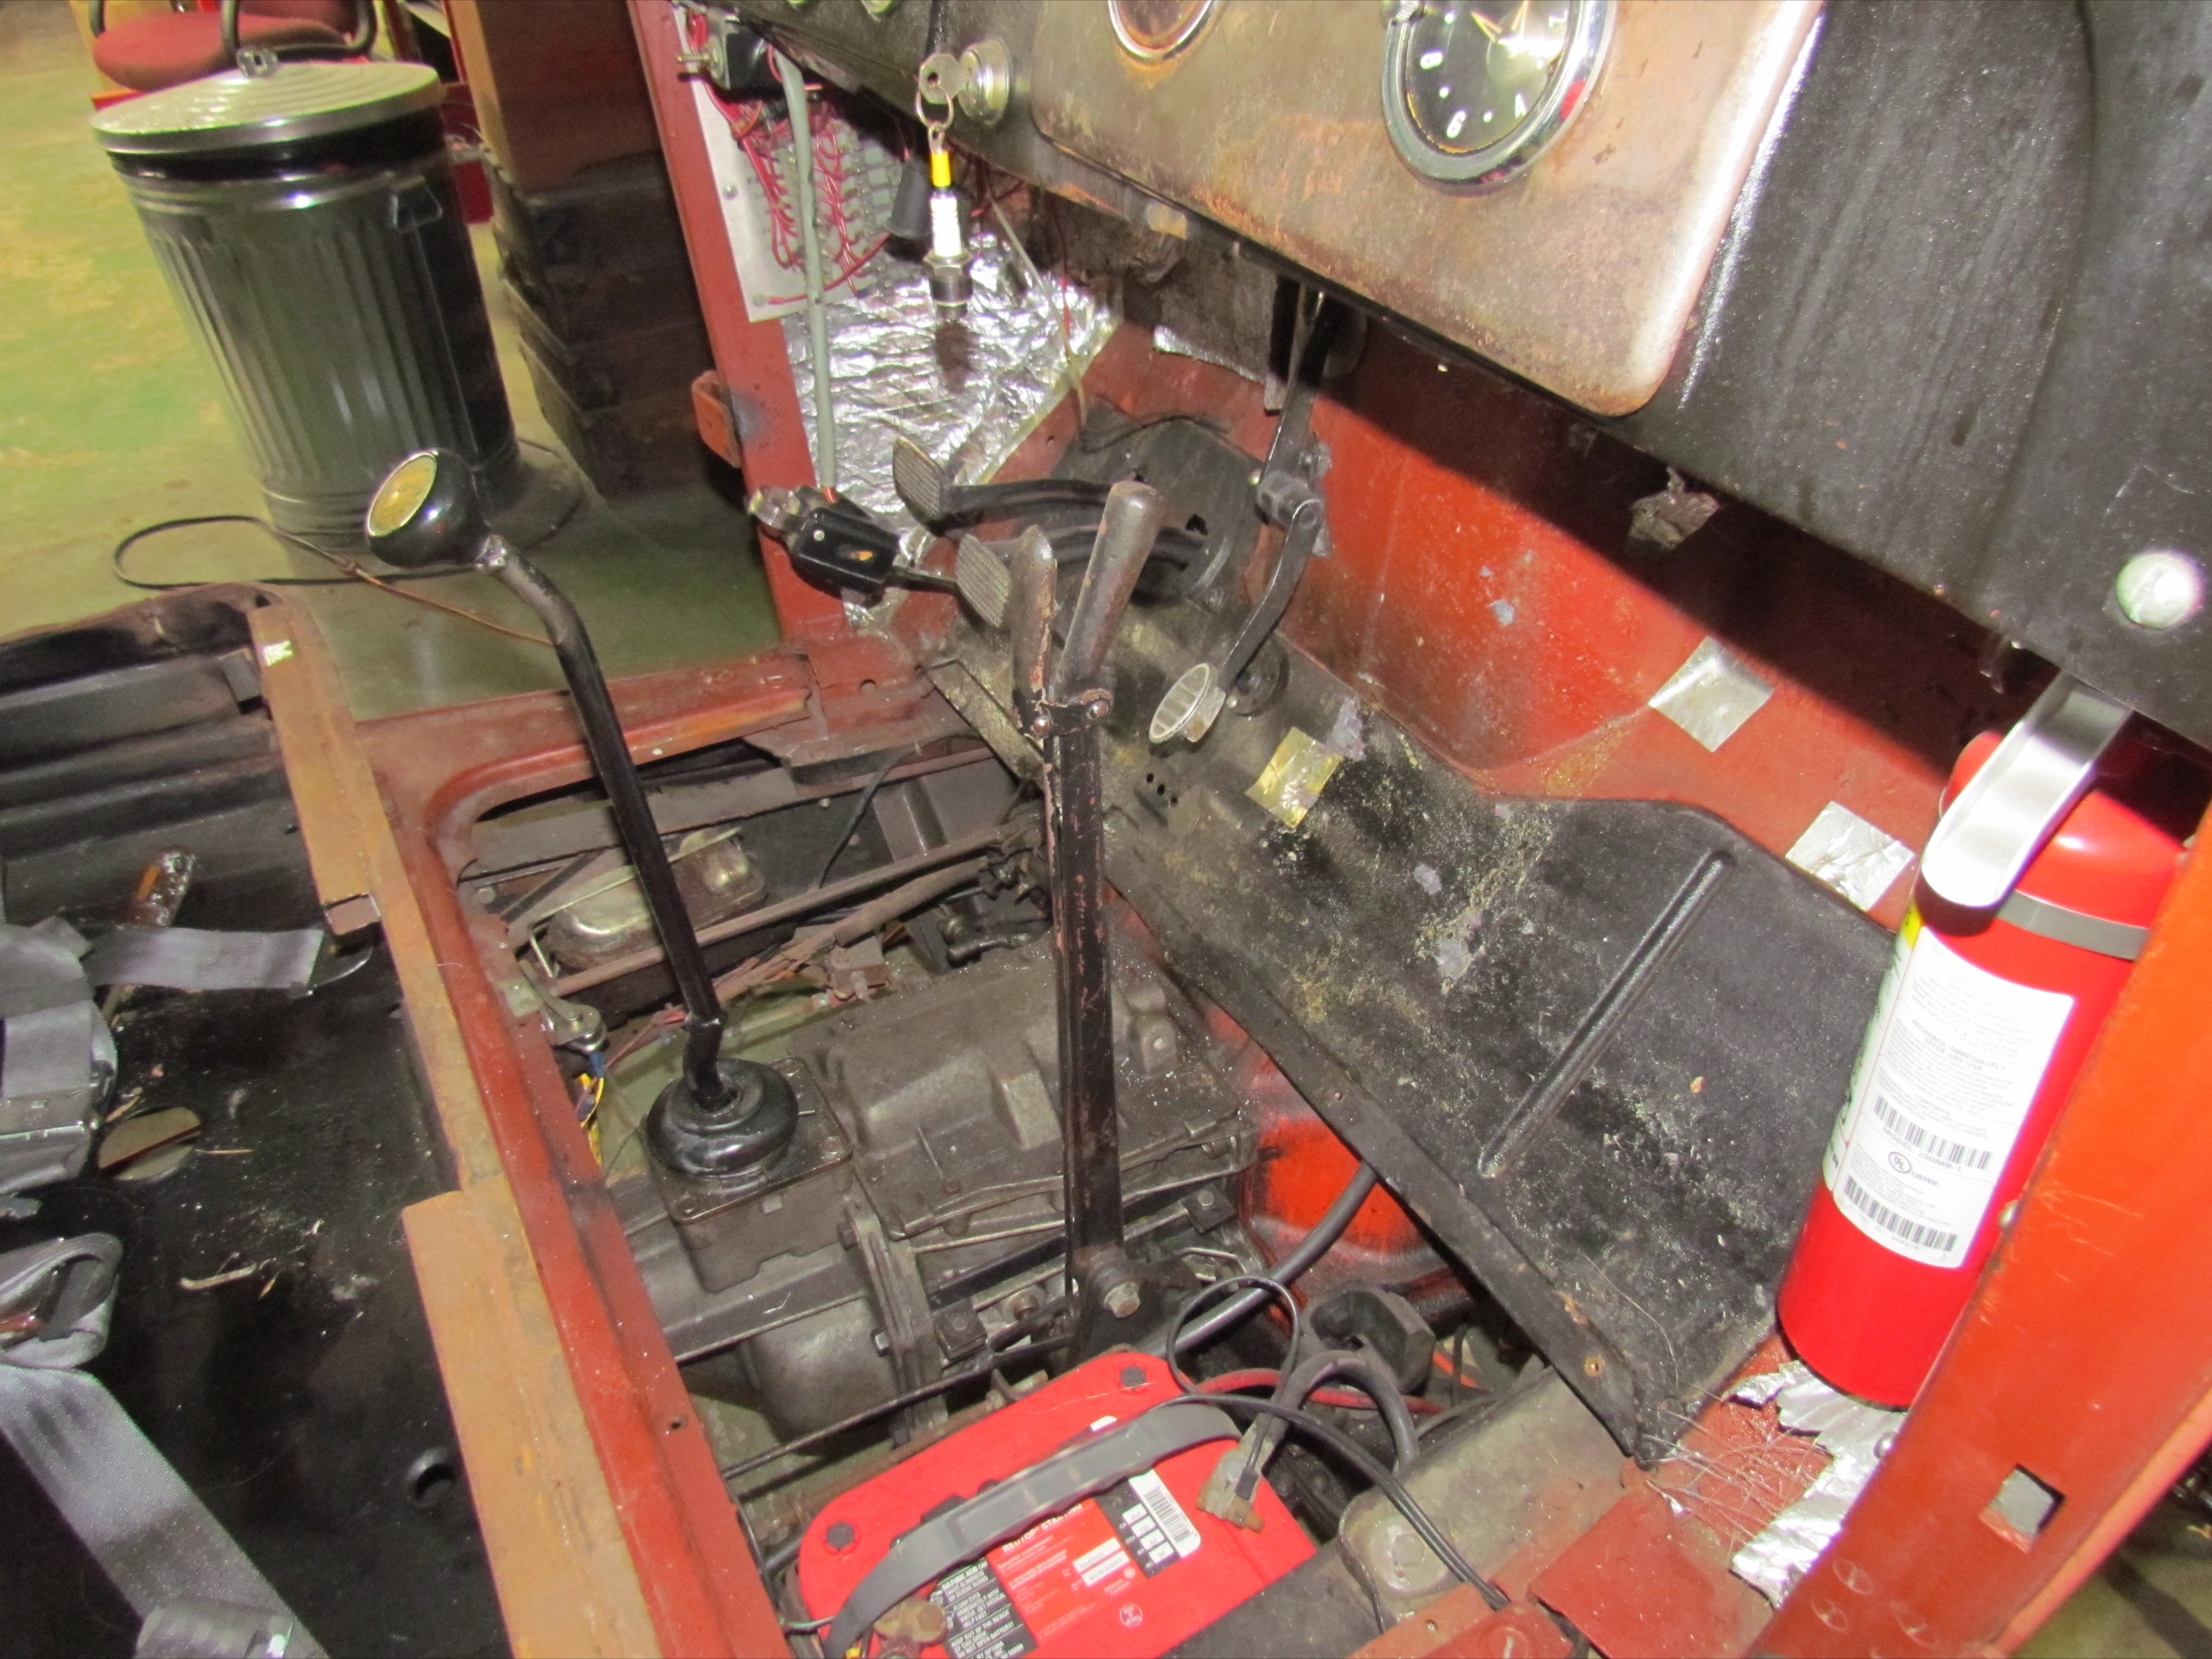 December
26th 2019
Started striping the glued on insulation and other easy items from the
cab interior. That's when I discovered or, rather re-discovered (since
I had applied the insulation years ago), that the firewall kick plate,
including the area of the clutch and brake pedals, was a bolt in item.
The area surrounding the pedal shafts splits into two pieces. The
pedals
would not restrict the cab lift operation after all. Beer of the day is
RJ Rockers Brewing Company's Bell Ringer Double Pale Ale. I've been
punched by this brew before.
December
26th 2019
Started striping the glued on insulation and other easy items from the
cab interior. That's when I discovered or, rather re-discovered (since
I had applied the insulation years ago), that the firewall kick plate,
including the area of the clutch and brake pedals, was a bolt in item.
The area surrounding the pedal shafts splits into two pieces. The
pedals
would not restrict the cab lift operation after all. Beer of the day is
RJ Rockers Brewing Company's Bell Ringer Double Pale Ale. I've been
punched by this brew before.
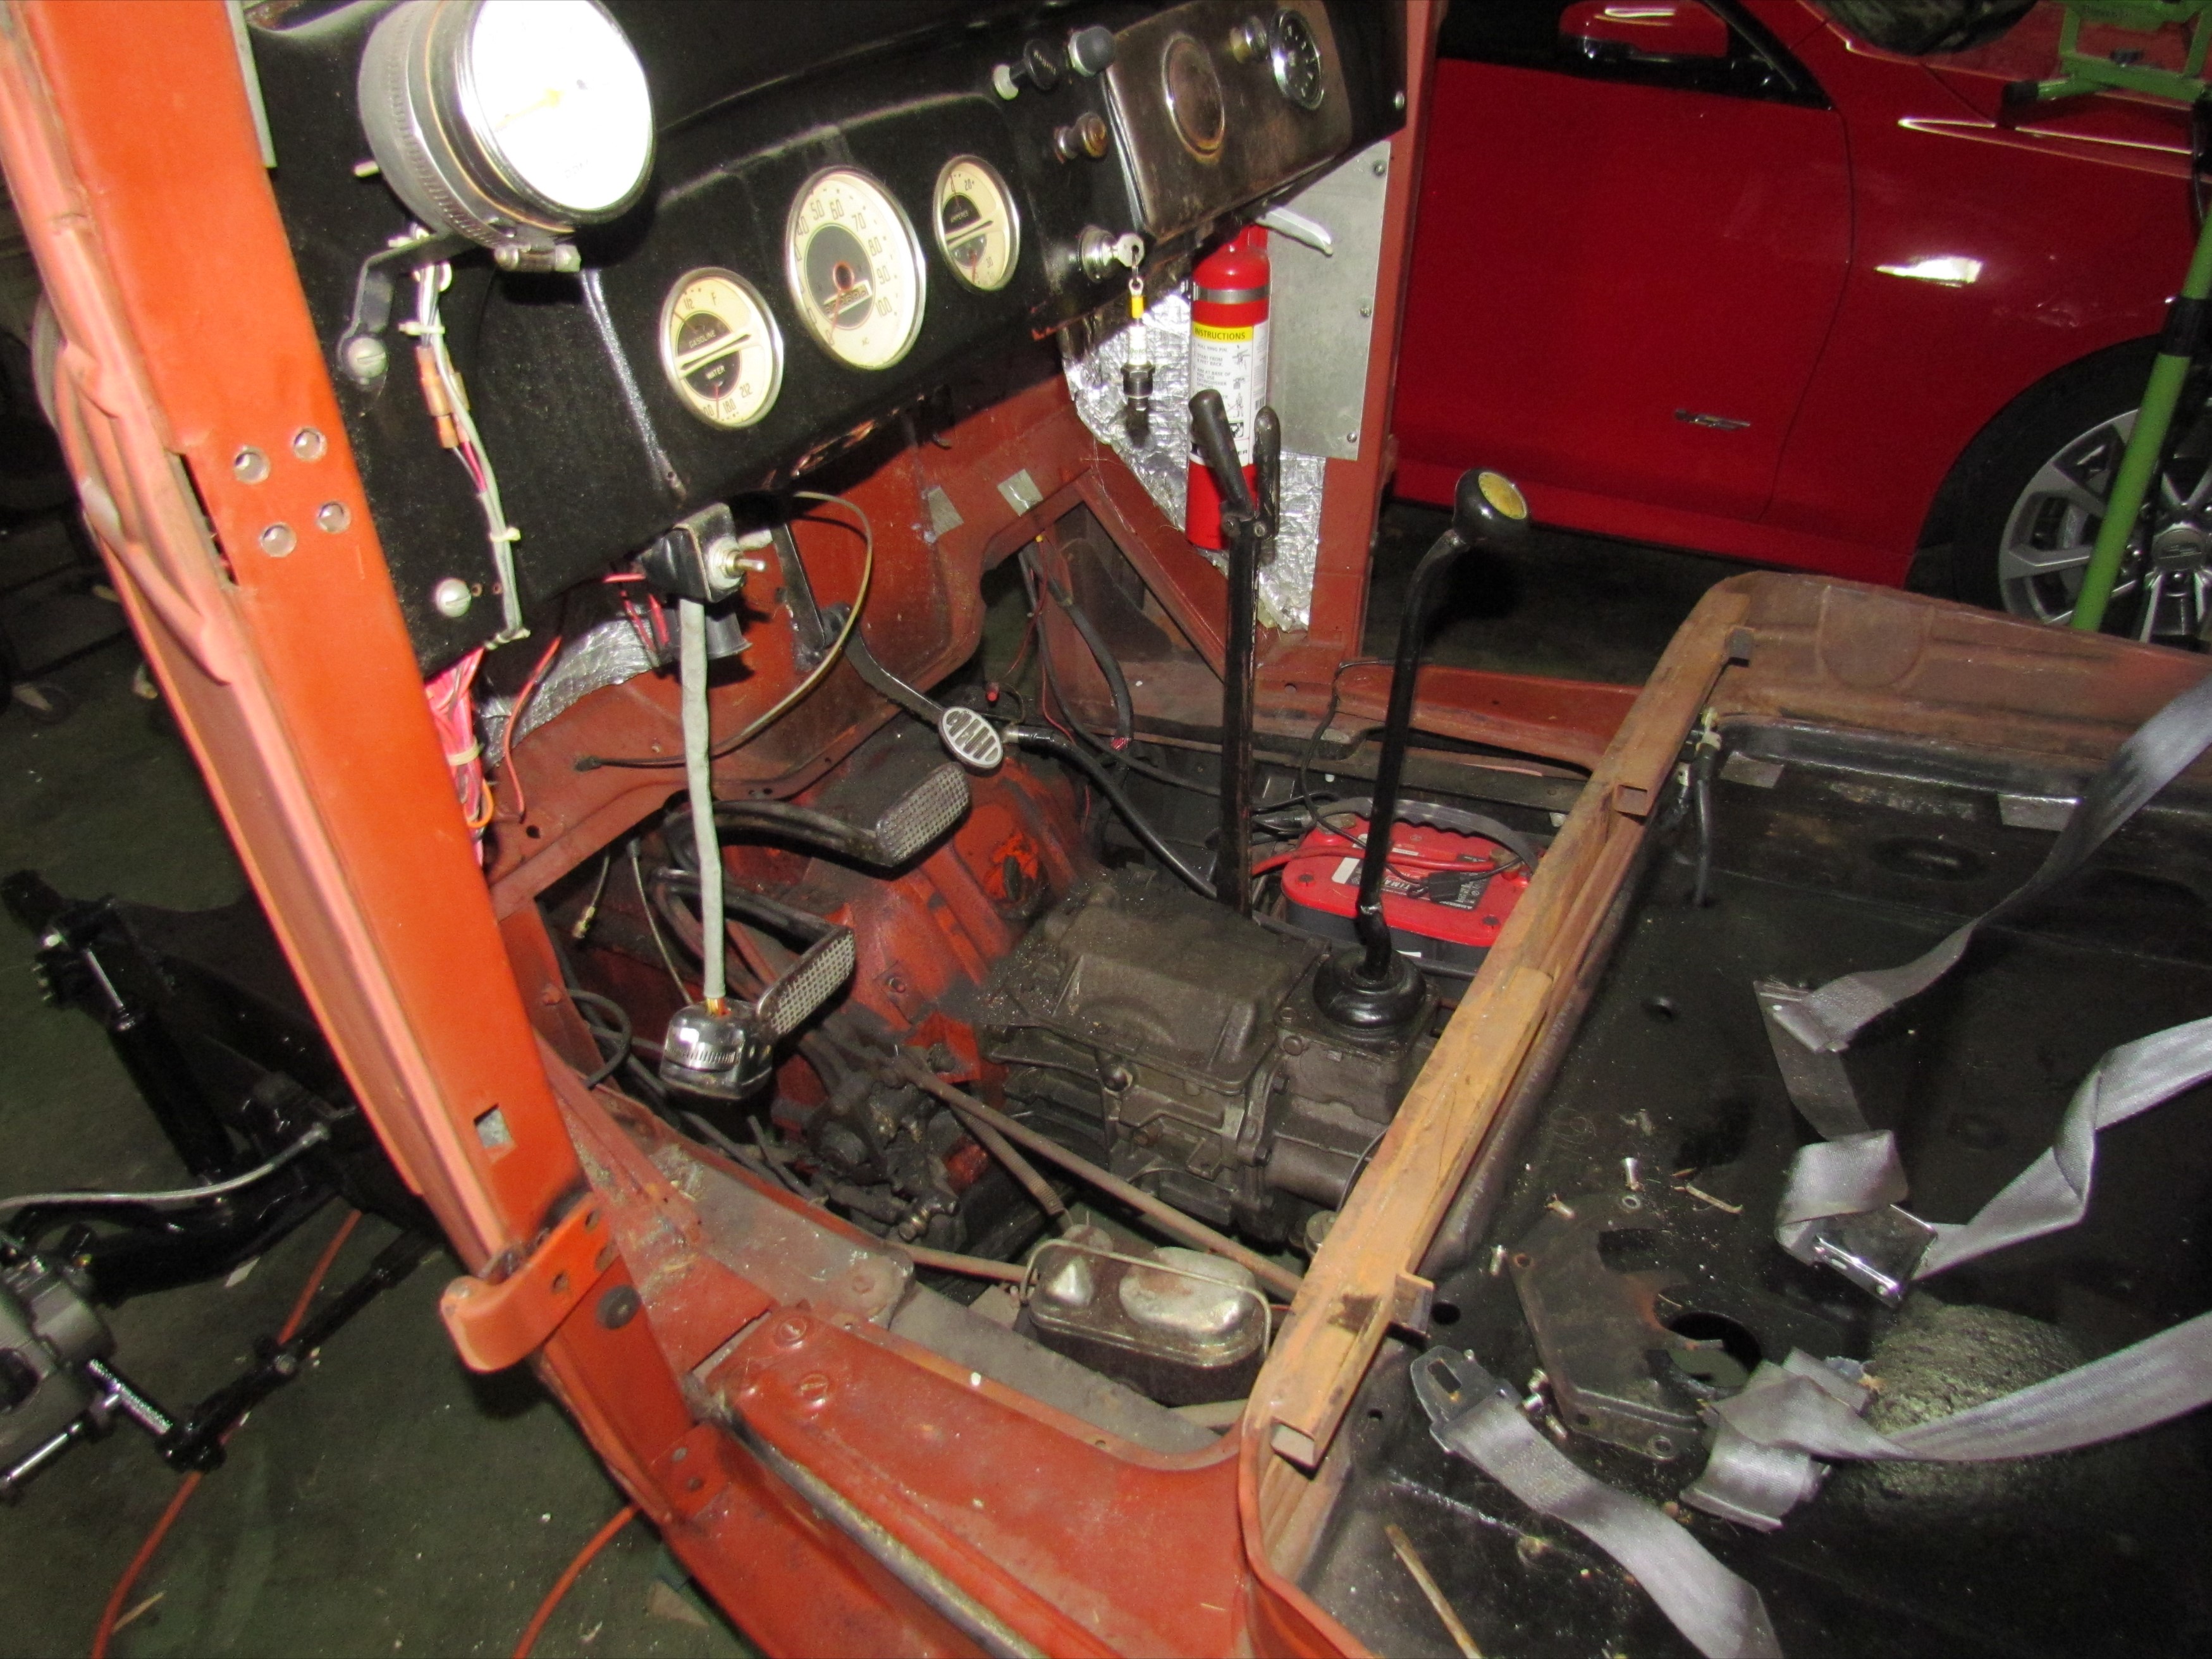 December
27th 2019
I unscrewed the firewall kick plate sheet metal and went into Deep
Ponder Mode. This was a game changer. The reasons for lifting the cab
have largely vanished and the diminishing returns threshold crossed. I
have all the access I need from above except directly
under the seat base and that is a "quiet" area. Not much has to be
done on my back there except clean and paint the frame rails and cab
floor. Yogi Berra said "When you
come to a fork in the road, take it." I moved on to the task of
preparing the bed for removal.
December
27th 2019
I unscrewed the firewall kick plate sheet metal and went into Deep
Ponder Mode. This was a game changer. The reasons for lifting the cab
have largely vanished and the diminishing returns threshold crossed. I
have all the access I need from above except directly
under the seat base and that is a "quiet" area. Not much has to be
done on my back there except clean and paint the frame rails and cab
floor. Yogi Berra said "When you
come to a fork in the road, take it." I moved on to the task of
preparing the bed for removal.
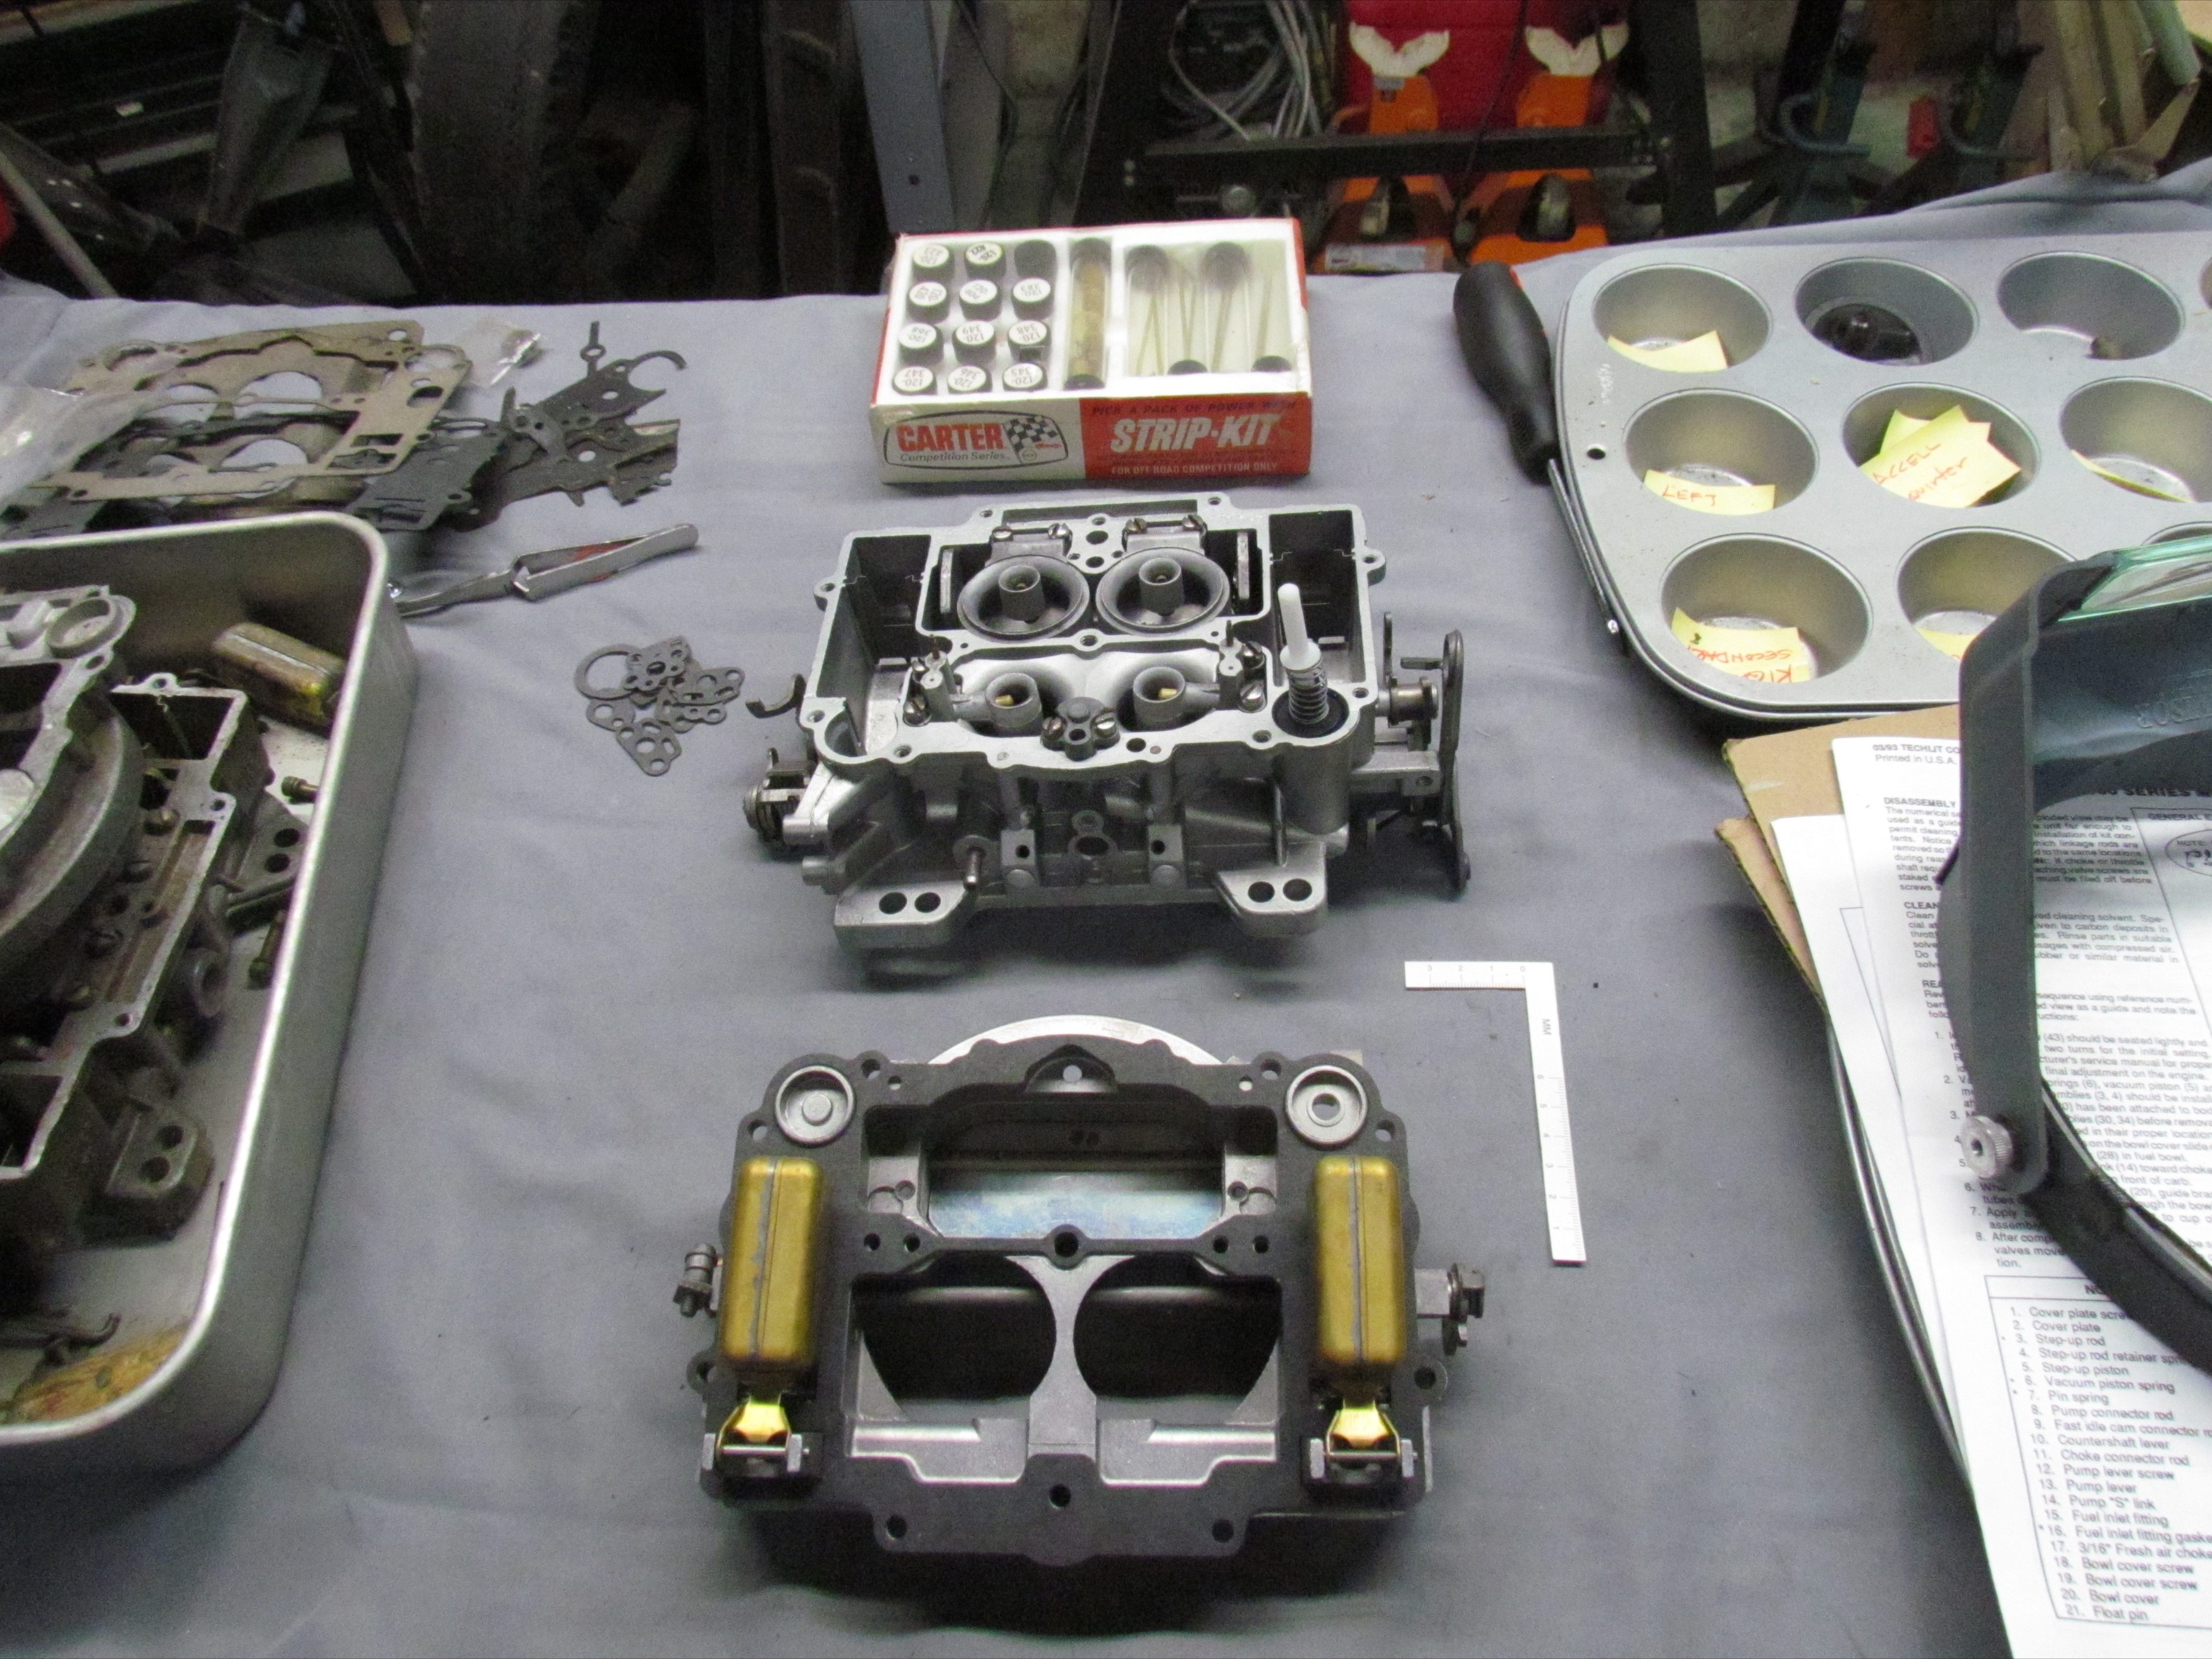
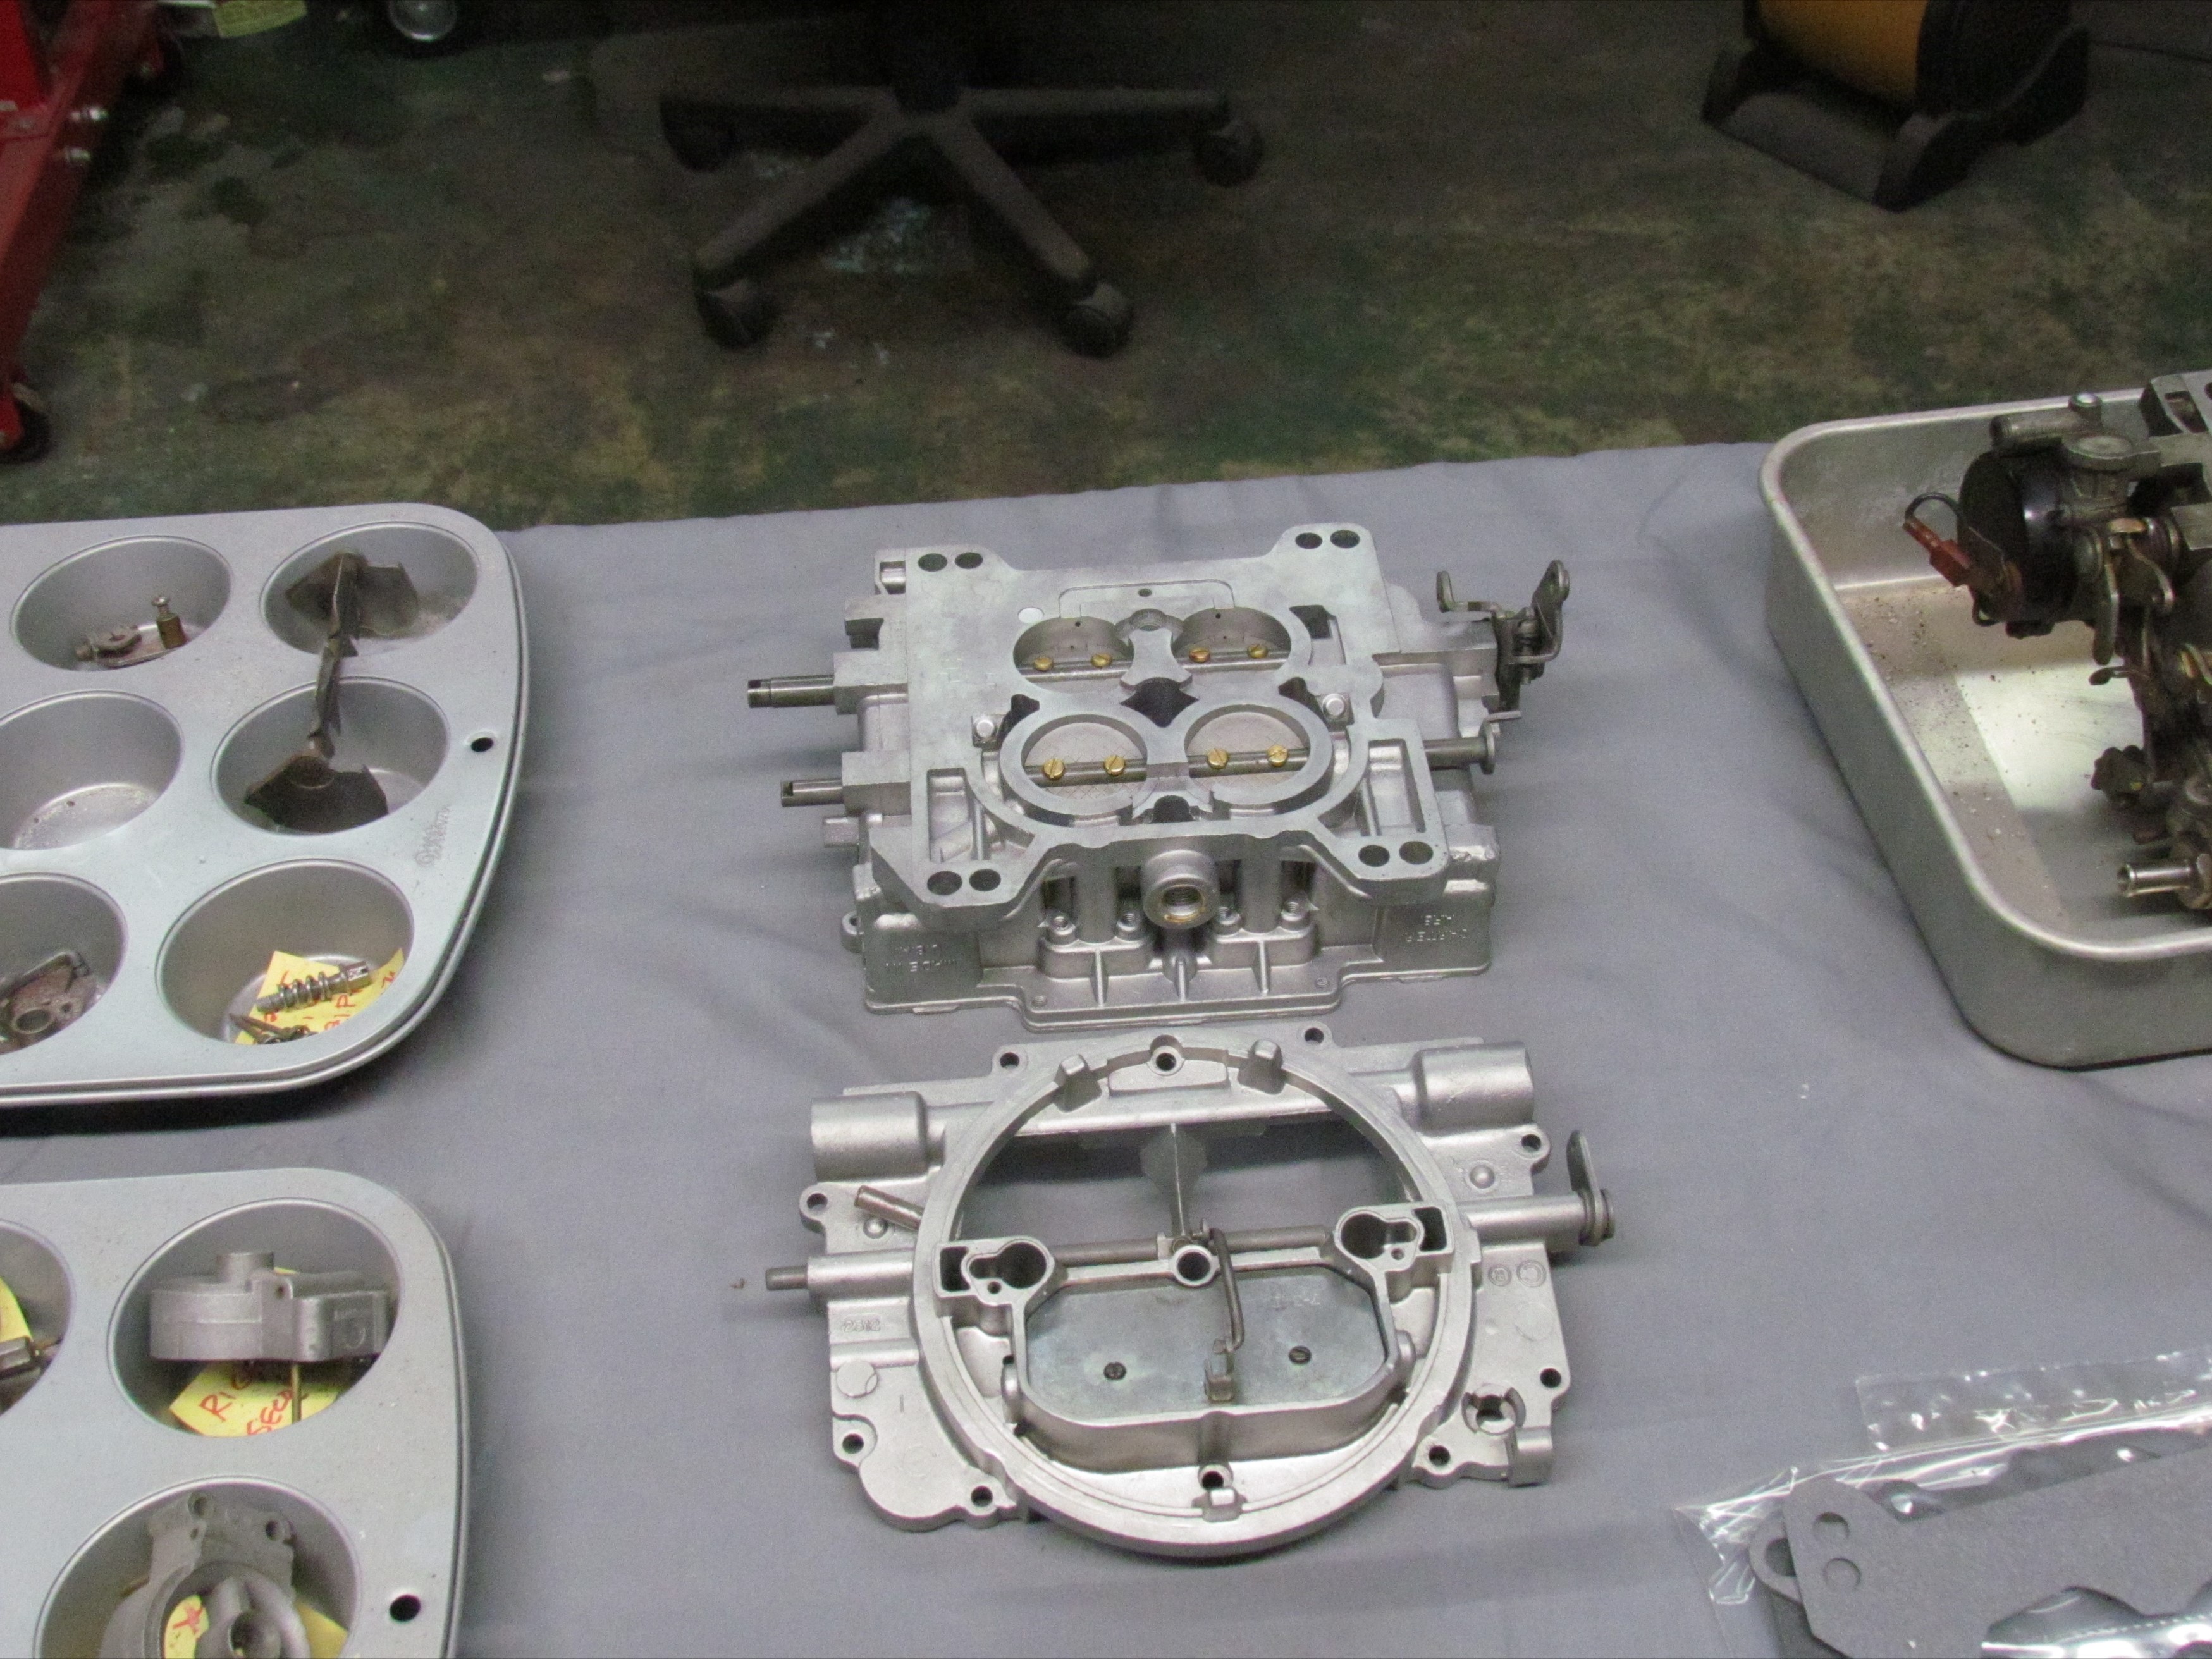 December
30th 2019
Back to the Carter AFB. This thing has been apart so long, a
recap is in order. Originally I tore it down for a standard rebuild. I
got an ultrasonic cleaner to brighten it up. The first cleaner was
faulty and it had to be replaced. The second cleaner worked but I ended
up with main castings of different shades of gray. I was unhappy. My
friend, Johan Amy, suggested vapor blasting. I read up on it and
agreed. I tore down the AFB to the basic castings and that's where
things went South. I twisted off screws and buggered my repair
attempts. John Carey's machining skills and Johan Amy's vapor blasting
saved my bacon. Ironically, Johan told me I did not have to break the
AFB
down that far for the process. And that's where we are right now.
December
30th 2019
Back to the Carter AFB. This thing has been apart so long, a
recap is in order. Originally I tore it down for a standard rebuild. I
got an ultrasonic cleaner to brighten it up. The first cleaner was
faulty and it had to be replaced. The second cleaner worked but I ended
up with main castings of different shades of gray. I was unhappy. My
friend, Johan Amy, suggested vapor blasting. I read up on it and
agreed. I tore down the AFB to the basic castings and that's where
things went South. I twisted off screws and buggered my repair
attempts. John Carey's machining skills and Johan Amy's vapor blasting
saved my bacon. Ironically, Johan told me I did not have to break the
AFB
down that far for the process. And that's where we are right now.
De-rusted primary and secondary throttle shafts and installed them, using my spare carb as a guide. New screws were used with threadlocker blue on the throttle plates in lieu of staking them. I could foresee getting myself into real trouble doing that as I've never done it before. I've already screwed up the throttle shafts enuf.
Choke plate and shafts were next. Bit of a setback here. Noticed one of the very small screws was shorter. Pulled the shaft out of the Evapo-Rust and found the other end of the screw still in it. I must have noticed this at the time I broke it but forgot the traumatic experience.
Okay, cannibalize the spare carb's choke shaft and clean it
with Oil Eater. Done, assemble . . . Whiskey, Tango, Foxtrot! Shafts
are ever so slightly different and screw holes are off. Salvage the
choke plate from the spare carb as well and clean it. Attempt assembly
a second time and it goes together this time. On to the next challenge.
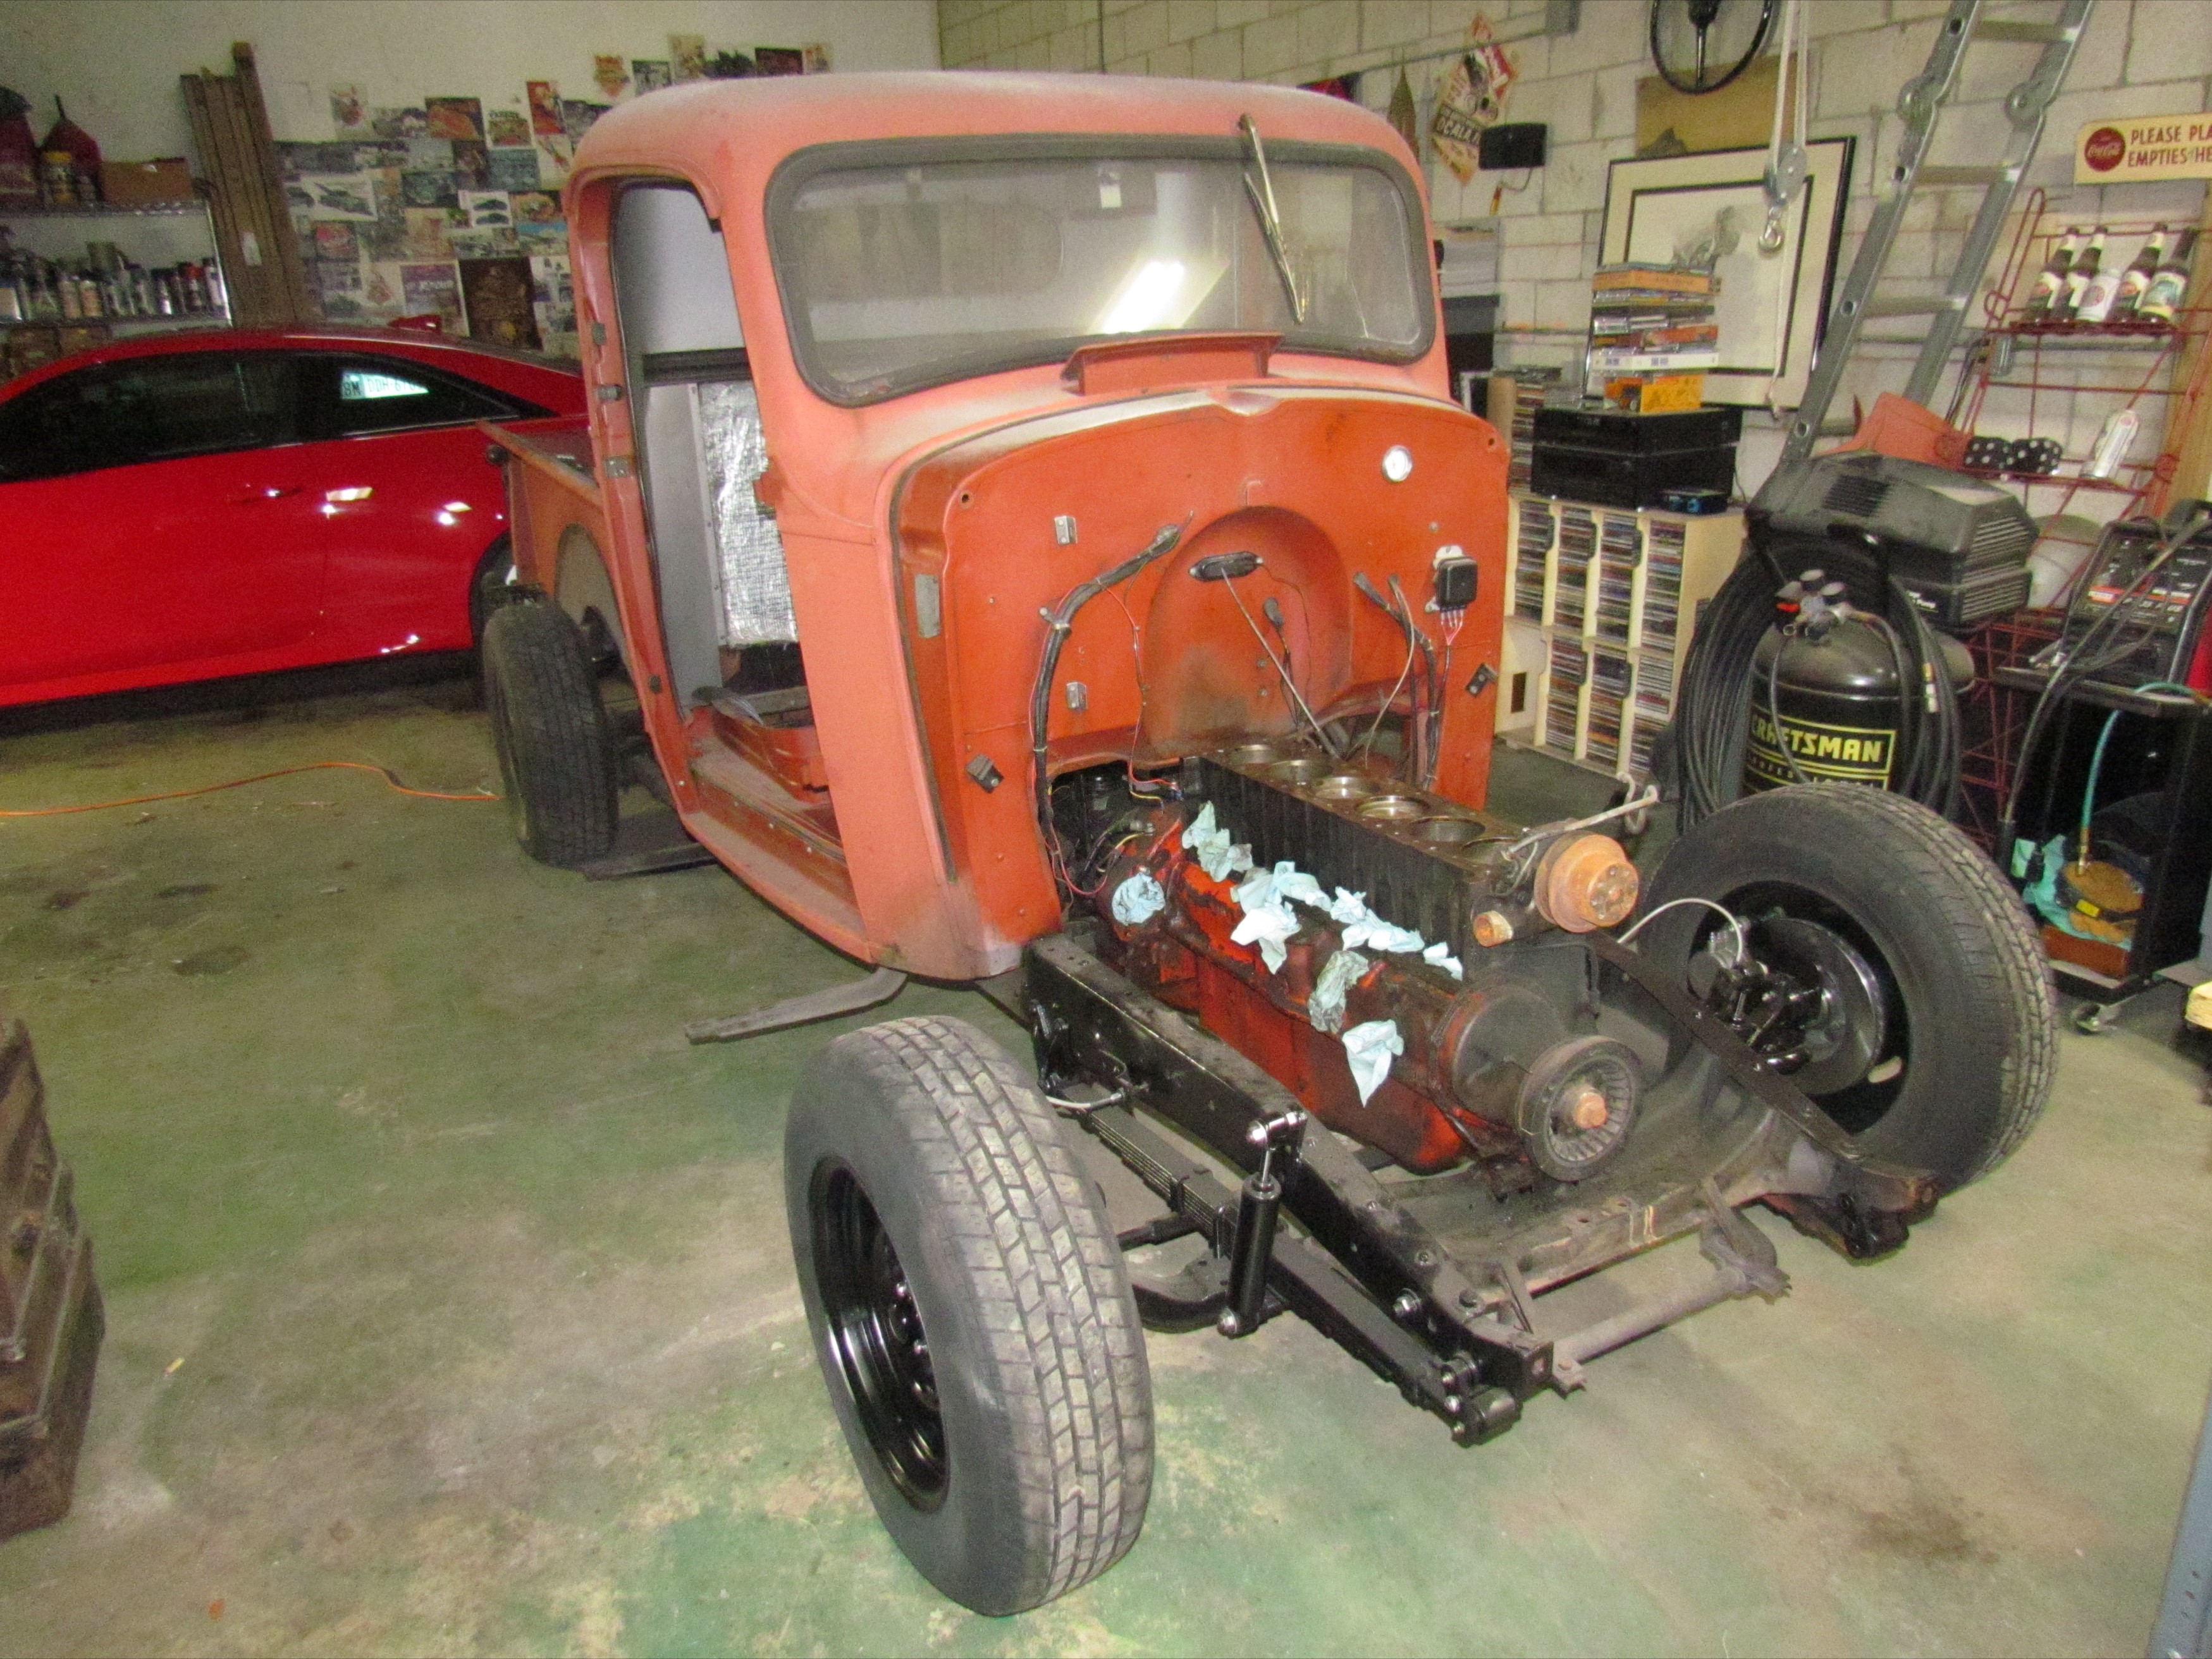 December
31st 2019
Put the wheels back on and lowered the Deerslayer. Dragged the Go-Jaks
over and positioned them. Pushed and dragged the truck around until it
was perpendicular to its previous position with the engine bay
poking into the operating theater under the loft. Disengaged the
Go-Jaks and stored them under BillyBob. Started clearing out
Deerslayer's bed. Thirsty work and it wore me out. Beer of the day is
Red River Brewing Company's Penalty Bock Lager.
December
31st 2019
Put the wheels back on and lowered the Deerslayer. Dragged the Go-Jaks
over and positioned them. Pushed and dragged the truck around until it
was perpendicular to its previous position with the engine bay
poking into the operating theater under the loft. Disengaged the
Go-Jaks and stored them under BillyBob. Started clearing out
Deerslayer's bed. Thirsty work and it wore me out. Beer of the day is
Red River Brewing Company's Penalty Bock Lager.
 January
2nd 2020
Emptied Deerslayer's bed slowly as I organized the parts so I wouldn't
loose track of them. Removed the tailgate and puzzled over the
logistics of moving the heaviest items, the two Latham superchargers.
The Positraction rear end chunk was lighter but still heavy from this
geezer's perspective.
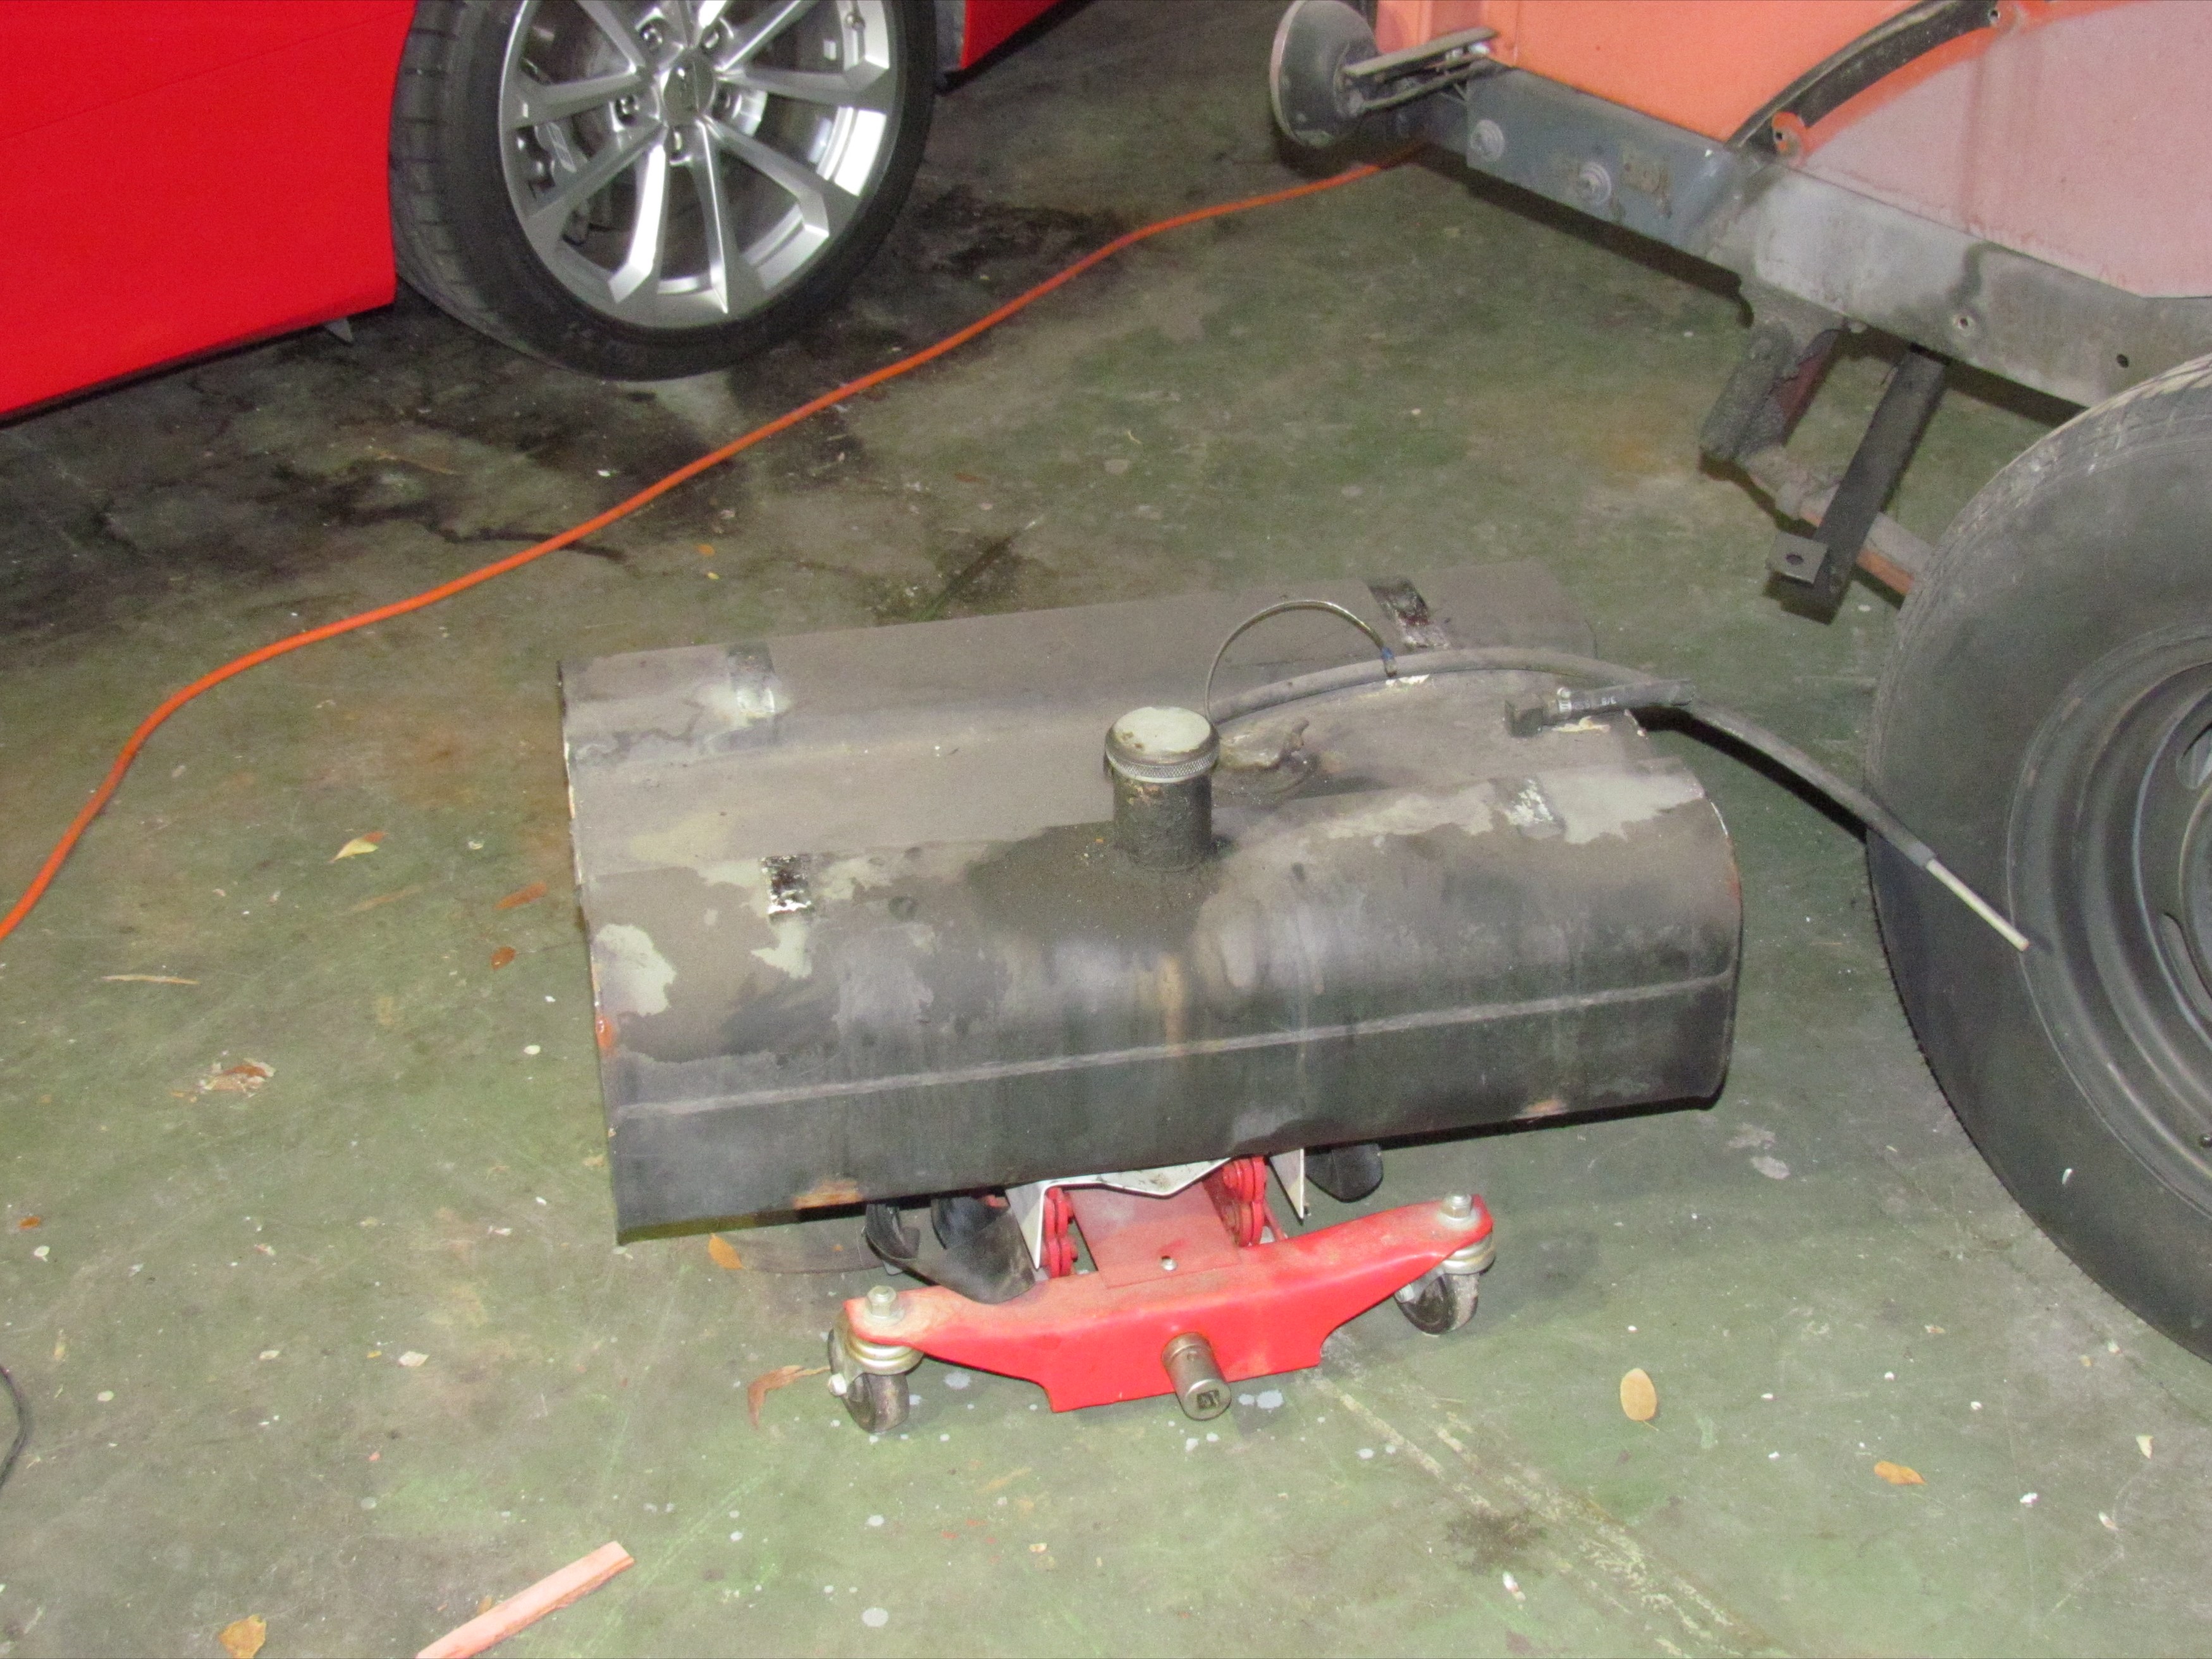
January
2nd 2020
Emptied Deerslayer's bed slowly as I organized the parts so I wouldn't
loose track of them. Removed the tailgate and puzzled over the
logistics of moving the heaviest items, the two Latham superchargers.
The Positraction rear end chunk was lighter but still heavy from this
geezer's perspective.
I was hoping I could dismantle the bed from the top down. I knew it was wishful thinking. Like all old pickup beds, the bed boards are held in place by bed strips attached by a grid of carriage bolts and fender washers. The hex nuts are all accessed from the underside.
First thing I discovered was that a few of the carriage bolts were above the gas tank. It would have to come out. It's still full of corn squezzin's stuff that used to be ethanol gas. It's heavy. Positioned my transmission jack under it for support and took off the tank strap hex nuts inboard, next to the axle, because, as Murphy would have it, they weren't halfway up the threaded rod as the more accessible outboard strap anchors were. Dirty work. Cut the fuel line with shears and rolled the tank out.
Deerslayer's builder, Tony, had connected the sender with
blade terminals so I didn't have to cut the wires. He also
fashioned a vent line that resided in the rear, right-side, stake
pocket.
Pretty neat.
 January
3rd 2020
The Carter AFB is a touch different from the ones being rebuilt in the
videos I've been studying and I've been coping with that best I can.
When it came time to reinstall the jets, the primaries were located as
in the video but the secondaries were not at the bottom of the fuel
bowls where they are in the video and I removed them so long ago I
couldn't remember where they came from. Eventually located them at the
bottom of deep wells under the secondary venturi mounts.
January
3rd 2020
The Carter AFB is a touch different from the ones being rebuilt in the
videos I've been studying and I've been coping with that best I can.
When it came time to reinstall the jets, the primaries were located as
in the video but the secondaries were not at the bottom of the fuel
bowls where they are in the video and I removed them so long ago I
couldn't remember where they came from. Eventually located them at the
bottom of deep wells under the secondary venturi mounts.
I had to go into Deep Ponder Mode to figure a way to re-install them there. Hit upon an idea to use a thin pipe cleaner by putting the jet on the end of the pipe cleaner and using the pipe cleaner to get the jet started in the threads where a long screwdriver could finish the job. It worked well.
Accelerator pump jet housing, check weight, primary and secondary venturis and their assorted gaskets were next. These items were gritty and dirty and I couldn't remember why at first. Slowly dawned on me that I had not figured out the best way to clean these small parts and keep them organized at the same time when my activity ground to a halt. I did, however, get a fresh gallon of Chem-Dip before that happened and it beckoned now.
Started cleaning parts with a thirty minute bath as I needed them. Got the pump jet housing and venturis in place. Many parts will interchange and you can get things wrong and I did, occasionally, so my efforts had to be repeated a couple of times.
 January
6th 2020
Started taking the bed strip carriage bolts out. The first half-dozen
went easy then, having been lulled into a good mood, Murphy hit me
with two in a row that just turned in their
anchorages. I
had to get out the electric angle grinder and grind the carriage bolt
heads off those. Progress continued to be be spotty.
January
6th 2020
Started taking the bed strip carriage bolts out. The first half-dozen
went easy then, having been lulled into a good mood, Murphy hit me
with two in a row that just turned in their
anchorages. I
had to get out the electric angle grinder and grind the carriage bolt
heads off those. Progress continued to be be spotty.
Eventually found all the fasteners holding the passenger bed
side on and got it off. Beer of the day was Clipper City Brewing
Company's Heavy Seas
Loose Cannon Hops IPA.
 January
7th 2020
I couldn't find the new accelerator pump in pile of rebuilding parts so
I took time out to completely clean up the other workbench where I tore
the
Carter AFB apart. Found the new pump, along with an unopened "Carter
Strip Kit"
from the sixties containing a variety of jets and metering rods for the
drag strip. I don't have the knowledge to make use of the strip kit so
it stays sealed.
January
7th 2020
I couldn't find the new accelerator pump in pile of rebuilding parts so
I took time out to completely clean up the other workbench where I tore
the
Carter AFB apart. Found the new pump, along with an unopened "Carter
Strip Kit"
from the sixties containing a variety of jets and metering rods for the
drag strip. I don't have the knowledge to make use of the strip kit so
it stays sealed.
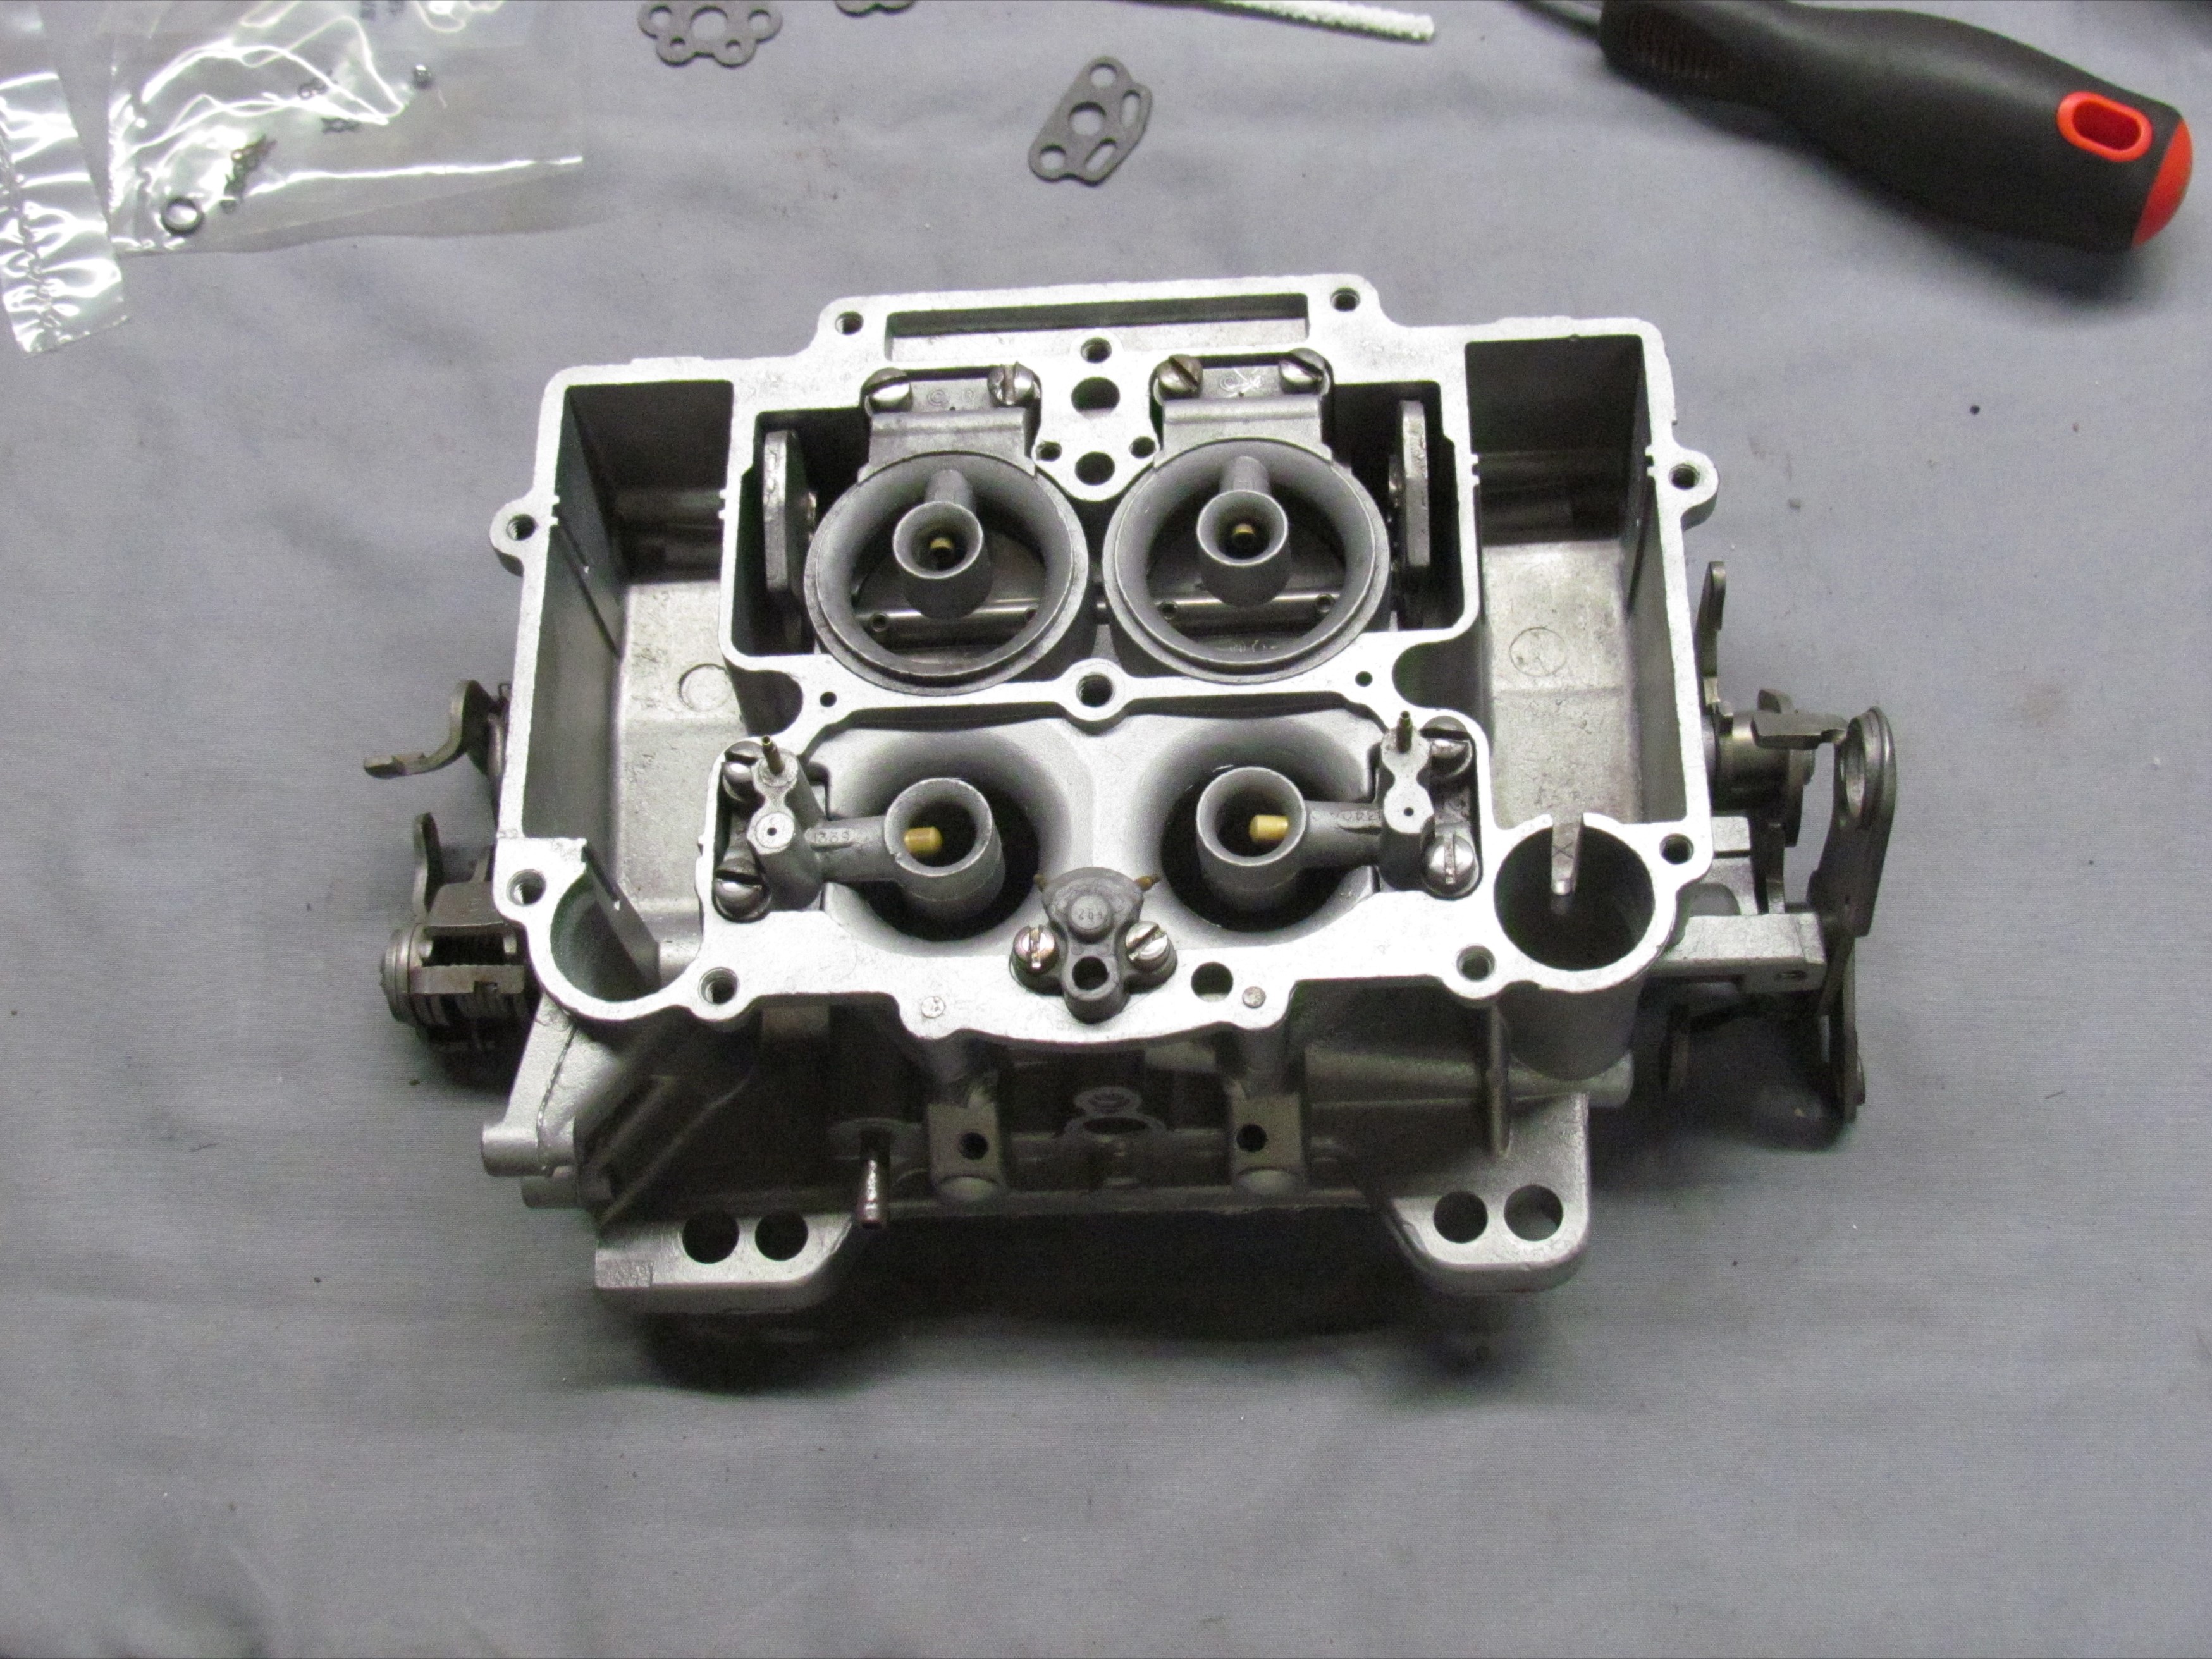
Installed the new float seats and needles, then checked the new main gaskets against the old gasket to determine the correct one. Had two sheet metal items left over in the muffin tins that are not mentioned in any of the videos. I put them in the Evapo-Rust basket and tore down the spare AFB a little further to find out what they were. Turned out to be fuel bowl baffles.
The spare AFB had better floats so I submerged those floats
under water for a day to check if they had leaks.
I then set the floats and adjusted them. Placed the new accelerator
pump
and spring and it was time to screw the top casting back unto the
bottom.
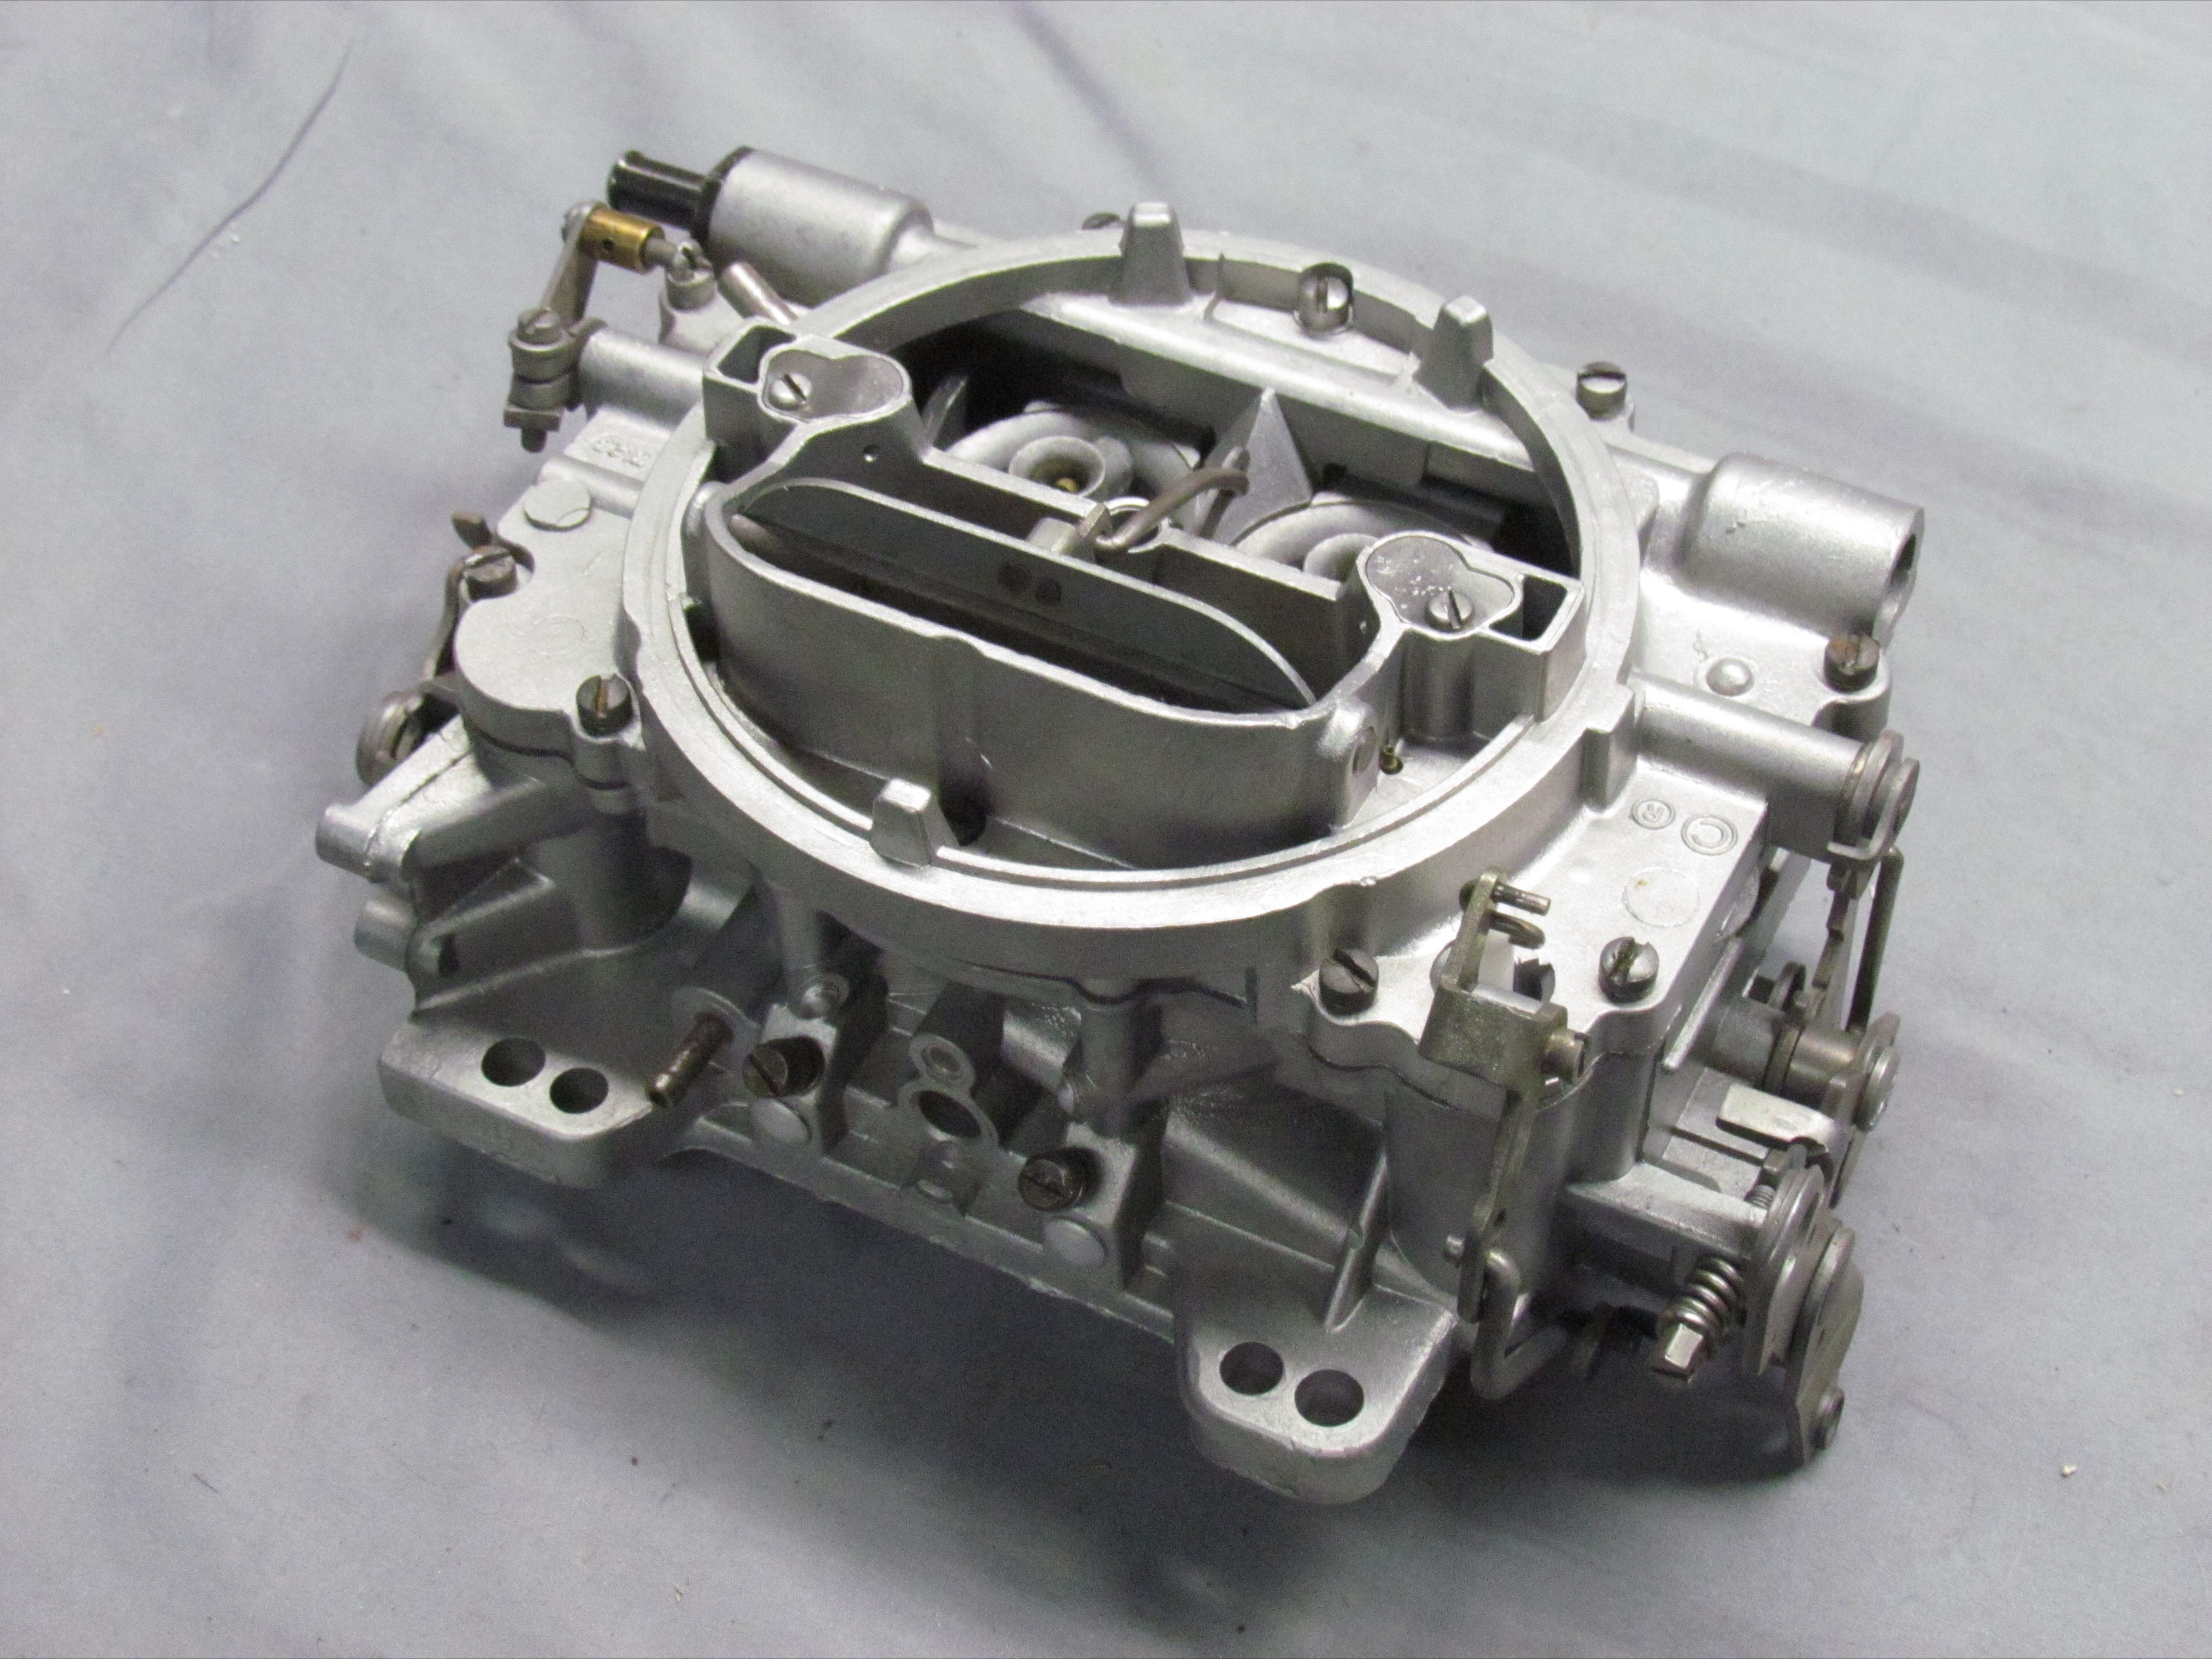 January
8th 2020
Put the AFB top and bottom together. Installed the accelerator pump
linkage and choke linkage, installed the metering rods and springs,
installed the idle mix screws, idle speed screw and fuel inlet. Found
some old photos I
took before disassembly and saw I had the manual choke linkage bass
ackwards so I fixed that.
January
8th 2020
Put the AFB top and bottom together. Installed the accelerator pump
linkage and choke linkage, installed the metering rods and springs,
installed the idle mix screws, idle speed screw and fuel inlet. Found
some old photos I
took before disassembly and saw I had the manual choke linkage bass
ackwards so I fixed that.
Purty shure I got it
right now but the proof is in the pudding. We won't know until the
engine
is reassembled. Time to Seran wrap this baby and put it on the shelf
until then. Beer of the day is Sumerian Brewing Company's Lucidity
Czech Style Pilsner.
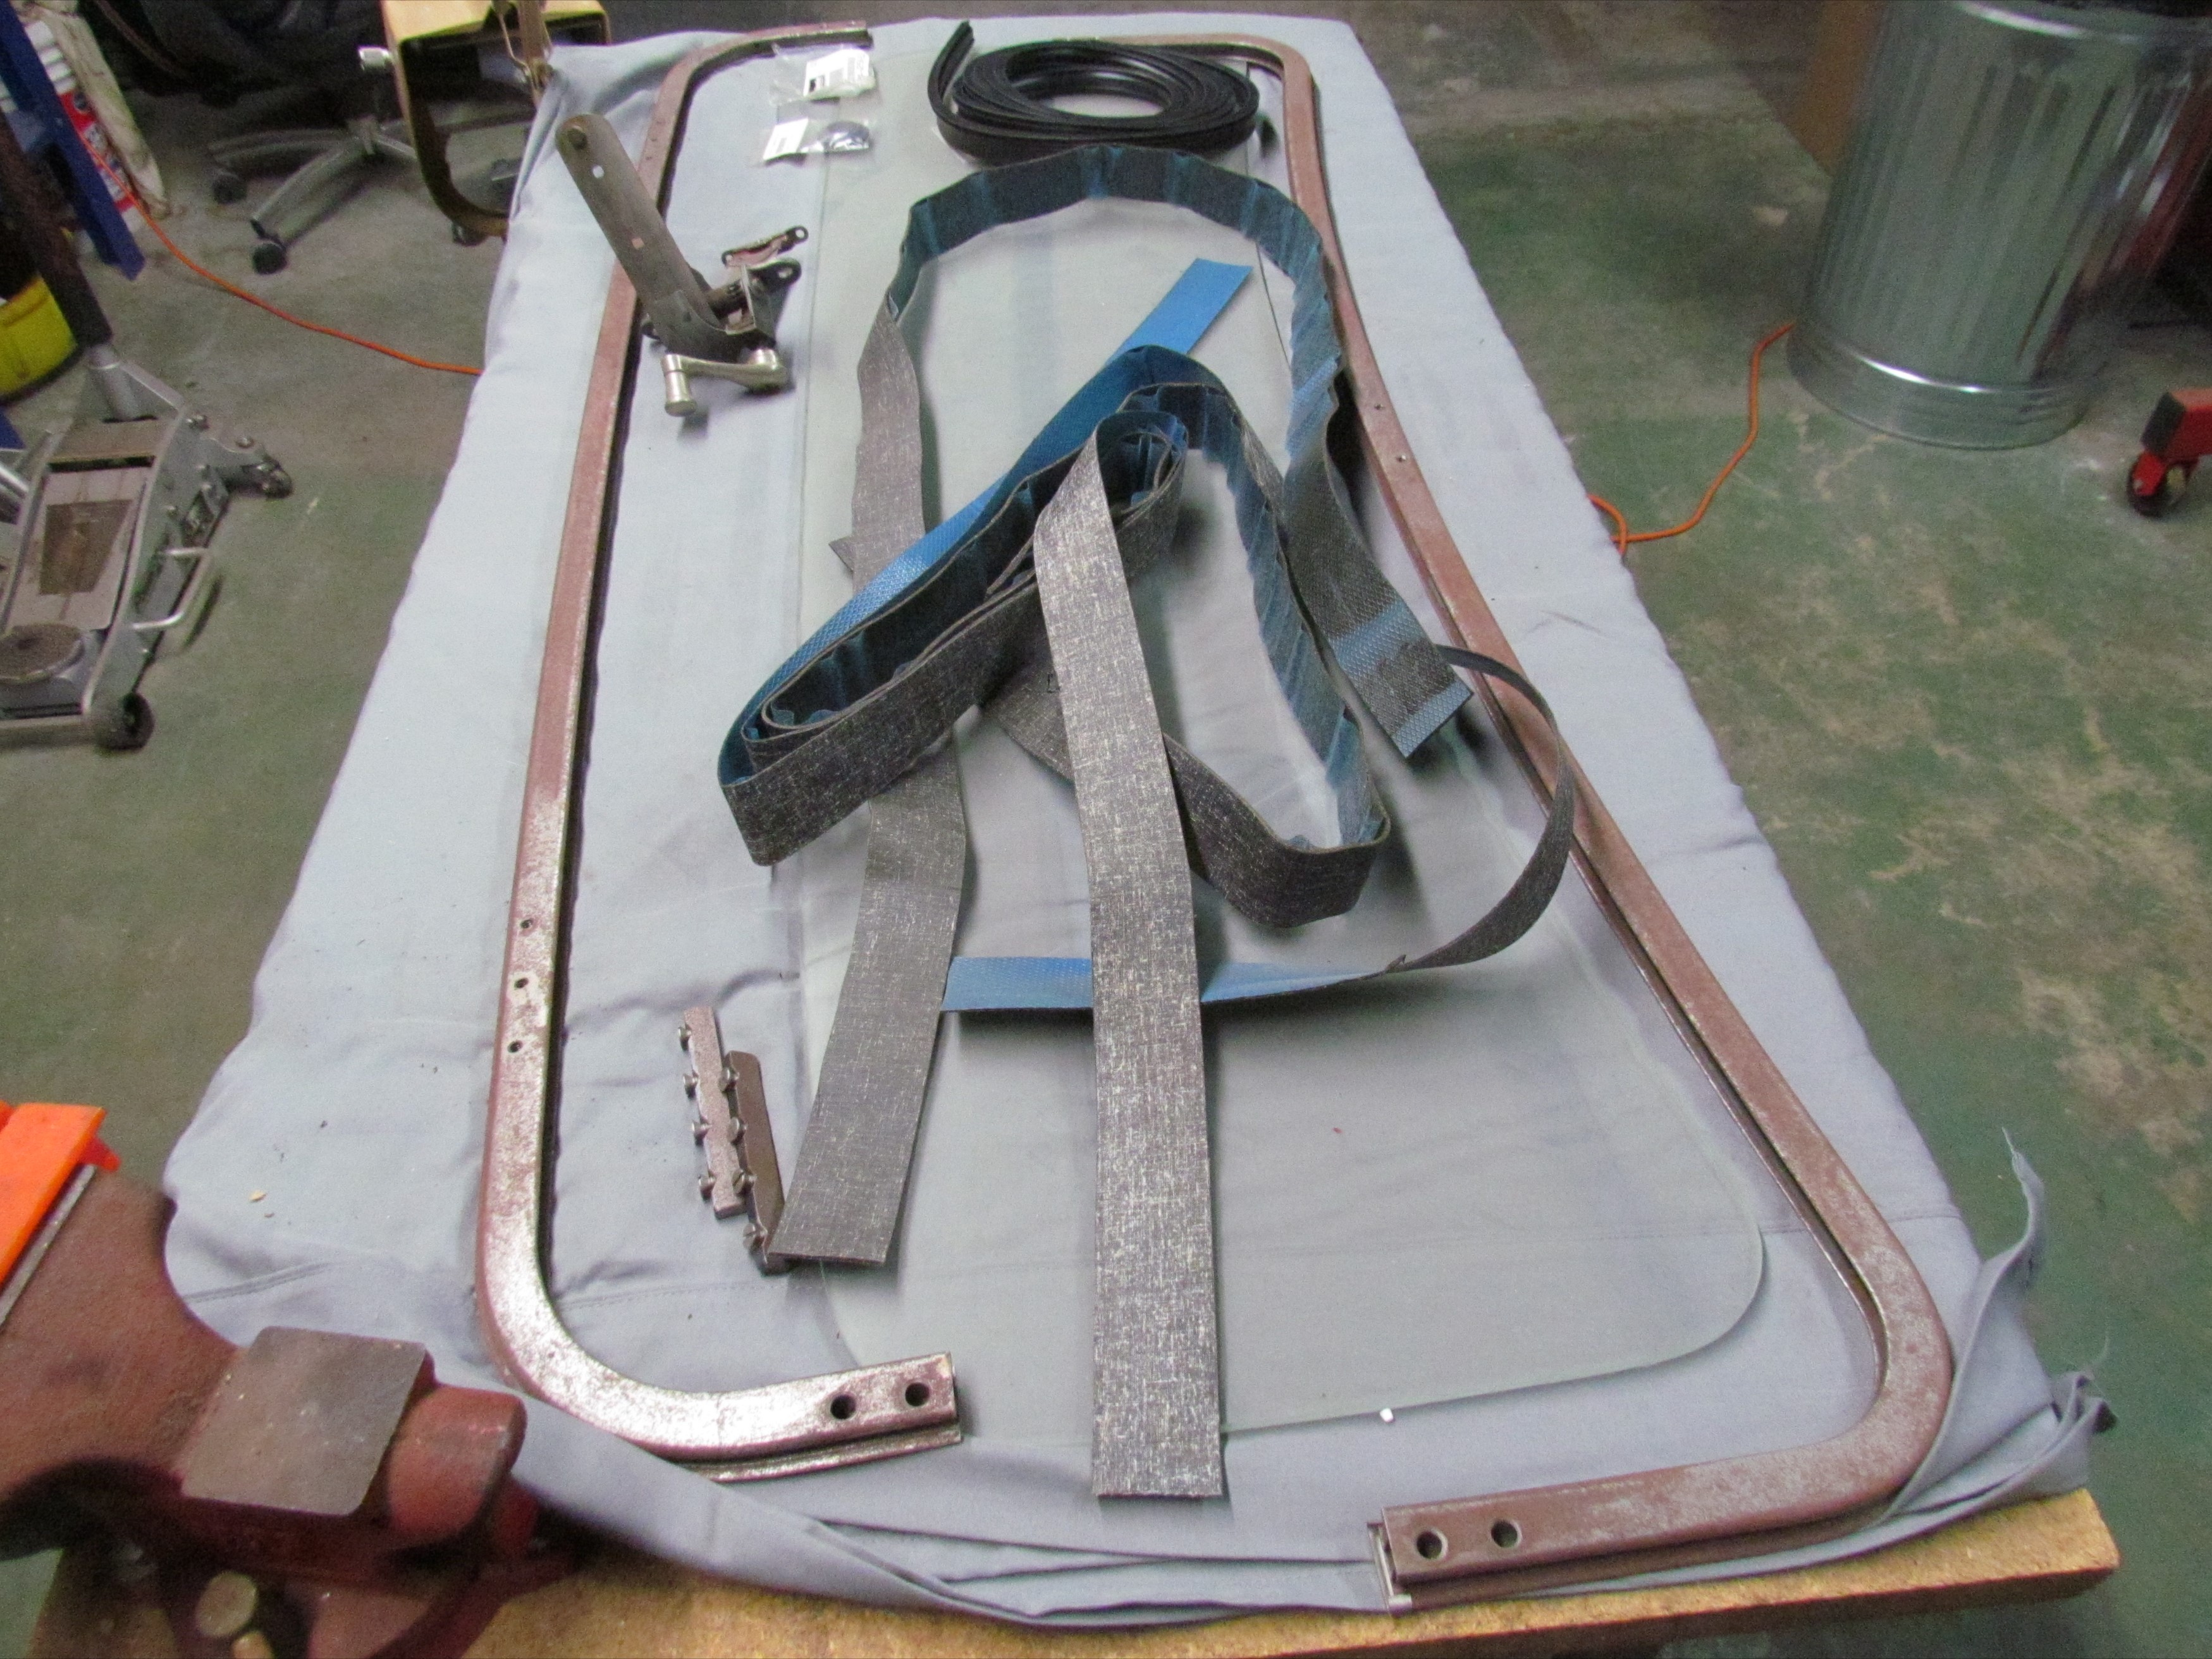 January
9th 2020 With the carb off the work bench,
it's time to blow the dust off another half finished task, Deerslayer's
new windshield. I quit working on this just short of six years ago. The
repop windshield frame was bare metal then. Got on the intarweb and
ordered a heavy duty 24 x 48 x 2 inch deep plastic drip pan and five
more gallons of Evapo-Rust to submerge the rusty window frame parts.
January
9th 2020 With the carb off the work bench,
it's time to blow the dust off another half finished task, Deerslayer's
new windshield. I quit working on this just short of six years ago. The
repop windshield frame was bare metal then. Got on the intarweb and
ordered a heavy duty 24 x 48 x 2 inch deep plastic drip pan and five
more gallons of Evapo-Rust to submerge the rusty window frame parts.
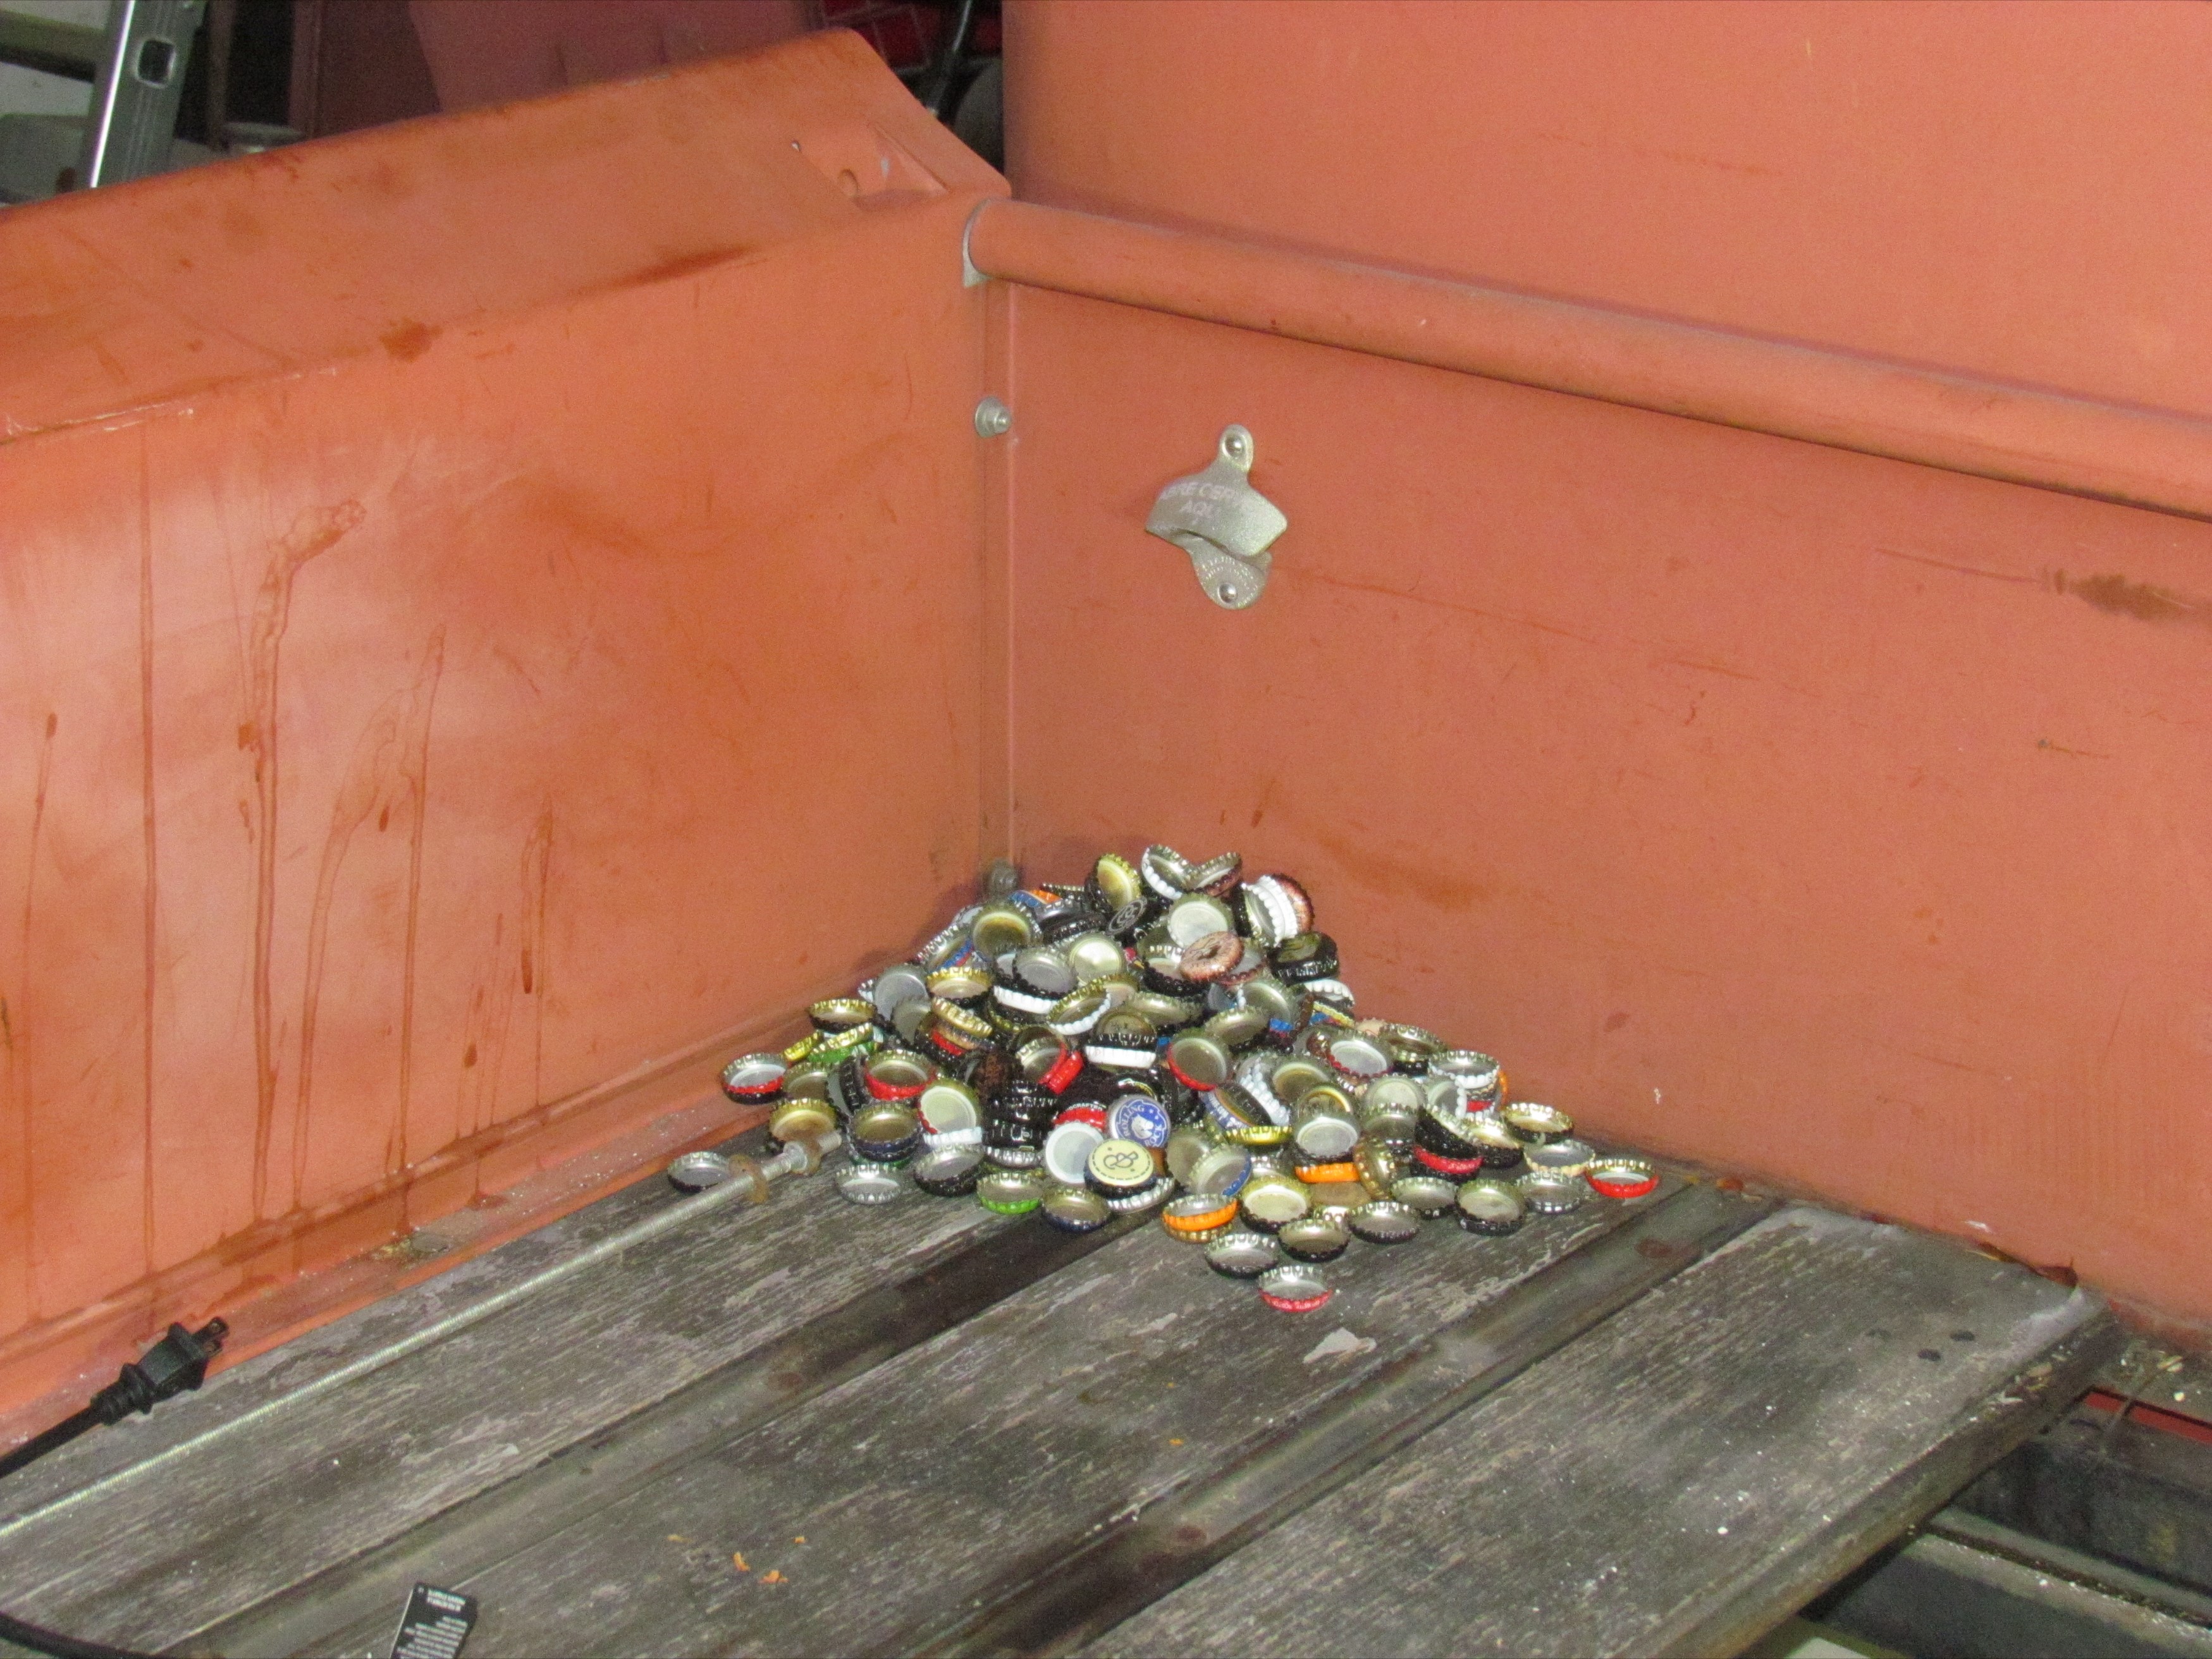 January
10th 2020 Originally, my plans called for
refinishing the bed boards that Tony had made locally from oak but
several of them are too far gone to
save. Edges are crumbling and, at eye level, the bed undulates like sea
swells. I will go with paint on pine this time. I've had it with
varnishes and stains. This section is in better shape than most of the
bed. Maybe the moisture from my bottle cap collection helped. Beer of
the day is Sudwerk Brewing Company's Rye of the Lager.
January
10th 2020 Originally, my plans called for
refinishing the bed boards that Tony had made locally from oak but
several of them are too far gone to
save. Edges are crumbling and, at eye level, the bed undulates like sea
swells. I will go with paint on pine this time. I've had it with
varnishes and stains. This section is in better shape than most of the
bed. Maybe the moisture from my bottle cap collection helped. Beer of
the day is Sudwerk Brewing Company's Rye of the Lager.
| < Back
to Intro |
You can email me at ![]() webmaster@laroke.com
webmaster@laroke.com
Issued Friday January 10, 2020
copyright © 2008-2020 Larry R. Kephart all rights reserved
| | LRK Home | | Bio Info | | Krash Khronicles | | LAROKE | |
| | BettyLou | | BillyBob's Garage | | Rat Patrol | | Deerslayer | | Elvira | |
| | Land of the Free and Home of the Brave | |
| | Keppylou's Art | | WWI Soldier's Diary | |