| | LRK Home | | Bio Info | | Krash Khronicles | | LAROKE | |
| | BettyLou | | BillyBob's Garage | | Rat Patrol | | Deerslayer | | Elvira | |
| | Land of the Free and Home of the Brave | |
| | Keppylou's Art | | WWI Soldier's Diary | |
BillyBob Work-in-Progress Log
![]()
TRUCK LINKS including vendor sites for old parts, custom parts, and tools as well as sites for classic car and truck organizations
STORE Operating in association with Amazon.com, books, recordings and tools can be purchased.
PLANNING for the restoration including project schedule and cost estimates.
![]()
WORK-IN-PROGRESS is the restoration of parts of BillyBob that I can accomplish without a garage.
PRE-RESTORATION includes log entries of minor repairs and and adventures between time of purchase and the time when I started restoration, a piece at a time.
JR'S KORNER JR's Korner is the history of BillyBob before I got him authored by my brother, Wm. C. Kephart.
![]()
BILLYBOB MAINTENANCE Ever changing detailing, oil change, lube, etc. maintenance routines specifically developed for BillyBob, including required tools, materials and procedures.
20. And More Frame Work
 June
9th 2002 Weather was
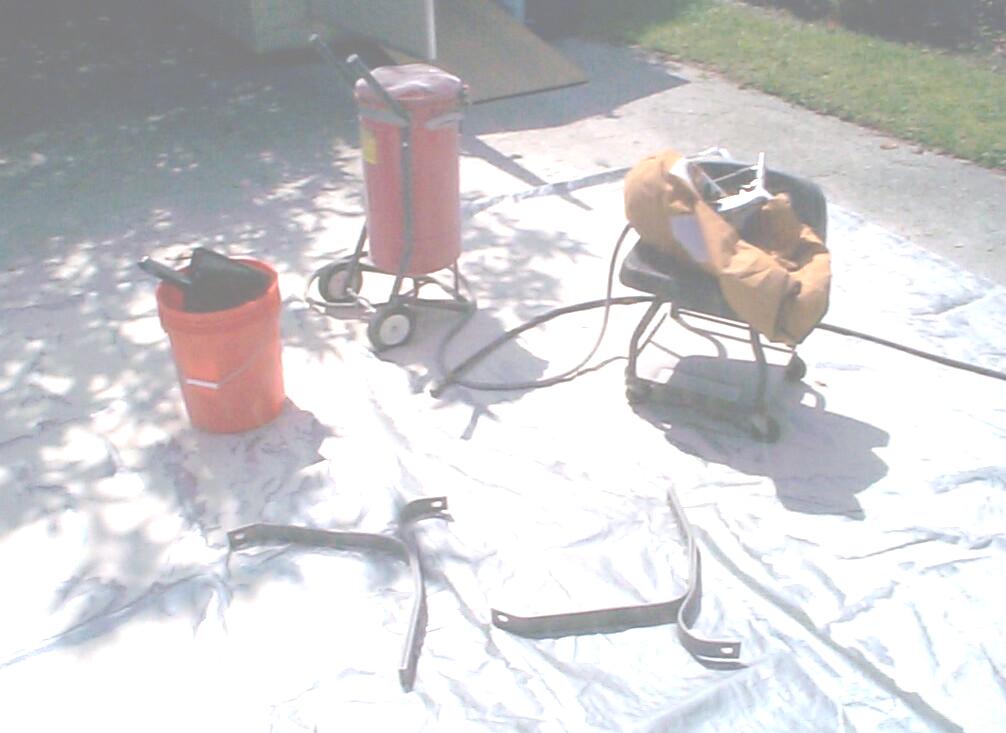
supposed to be bad this morning but I decided to gamble and drag out
the sand blasting equipment. Unfolded the tarp part way to cover only
10' x 15' instead of the full 20' x 30'. This was easier to manage.
Secured metal insect screen to the top of the siphon blaster with duct
tape, a bungee cord and some blood. Blasted the other front bumper
bracket and managed to cut an hour off my previous time of four hours.
The weather co-operated this time with no rain and low wind. Cleanup
was easier too. My next improvement will be a better blaster gun.
June
9th 2002 Weather was
supposed to be bad this morning but I decided to gamble and drag out
the sand blasting equipment. Unfolded the tarp part way to cover only
10' x 15' instead of the full 20' x 30'. This was easier to manage.
Secured metal insect screen to the top of the siphon blaster with duct
tape, a bungee cord and some blood. Blasted the other front bumper
bracket and managed to cut an hour off my previous time of four hours.
The weather co-operated this time with no rain and low wind. Cleanup
was easier too. My next improvement will be a better blaster gun.
 June
16th 2002 Yesterday was
a rainout. Today is iffy. Pulled out the equipment anyway. Blasted the
rust off the front bumper brackets that had built-up during the week.
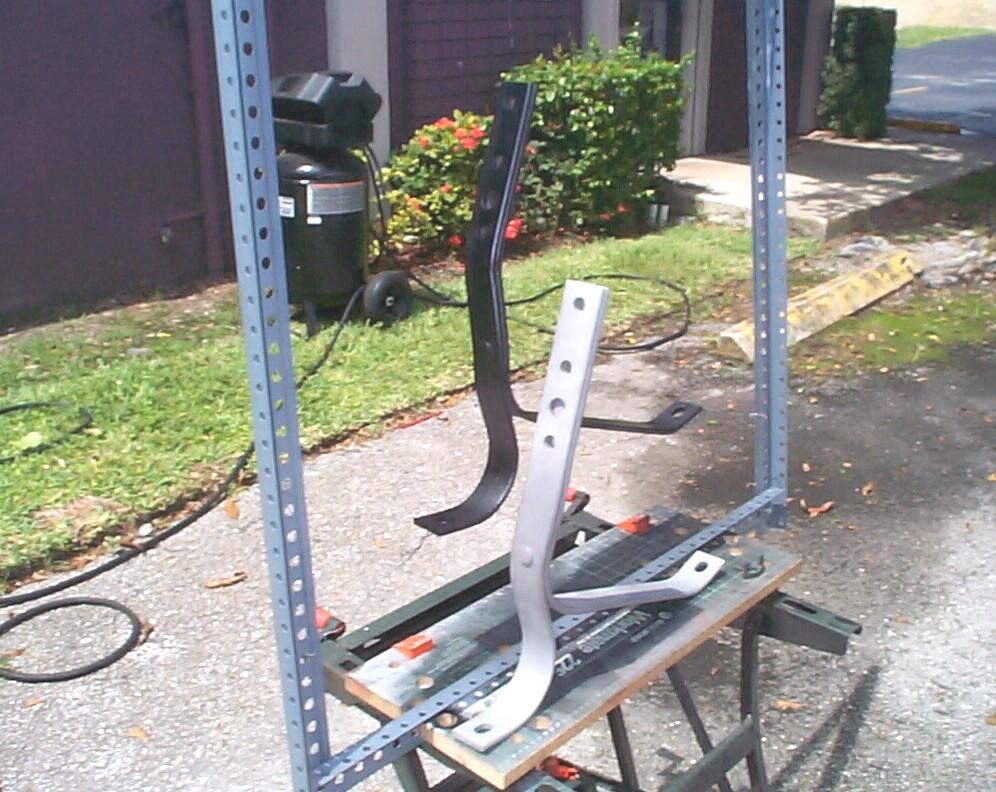
Setup the powdercoating kit and coated and cured the bumper brackets,
one at a time. Wired each bracket into the supporting frame and donned
latex gloves to treat first with compressed air, then with PRE Paint
Prep. They were coated with "Satin Black" and the whole job went easier
this time which was my second attempt at powdercoating. Got light rain
near the end of curing the first bracket. I had to abort the operation
and hustle the infared lamp inside 'til the foul weather passed. Ended
up with a dull spot on the bottom of one bracket where I don't think I
got enuf coverage with powder.
June
16th 2002 Yesterday was
a rainout. Today is iffy. Pulled out the equipment anyway. Blasted the
rust off the front bumper brackets that had built-up during the week.
Setup the powdercoating kit and coated and cured the bumper brackets,
one at a time. Wired each bracket into the supporting frame and donned
latex gloves to treat first with compressed air, then with PRE Paint
Prep. They were coated with "Satin Black" and the whole job went easier
this time which was my second attempt at powdercoating. Got light rain
near the end of curing the first bracket. I had to abort the operation
and hustle the infared lamp inside 'til the foul weather passed. Ended
up with a dull spot on the bottom of one bracket where I don't think I
got enuf coverage with powder.
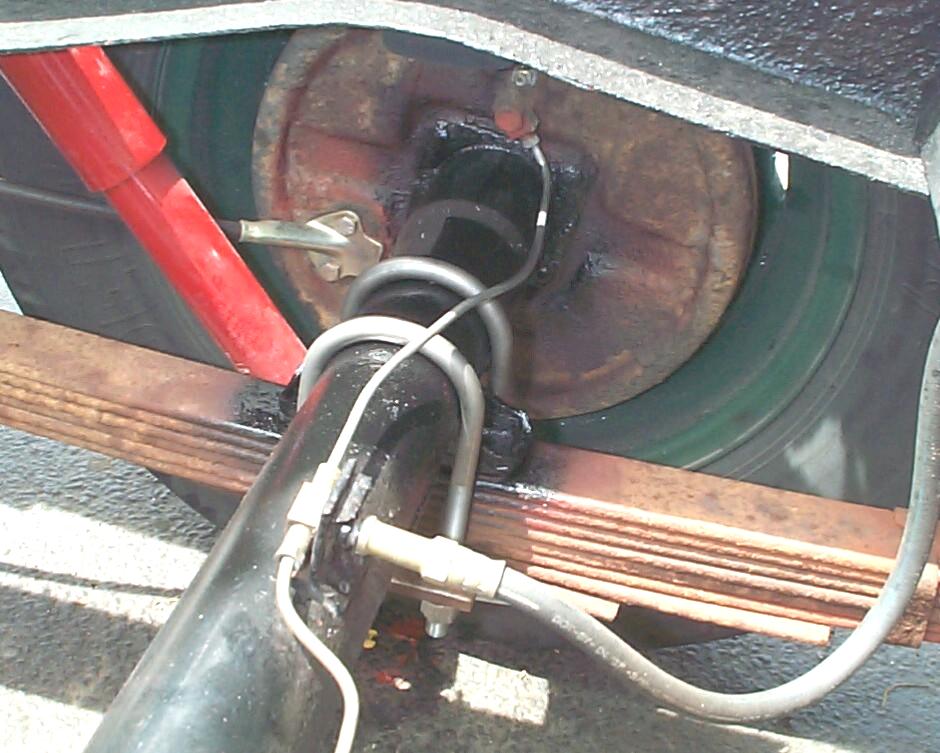
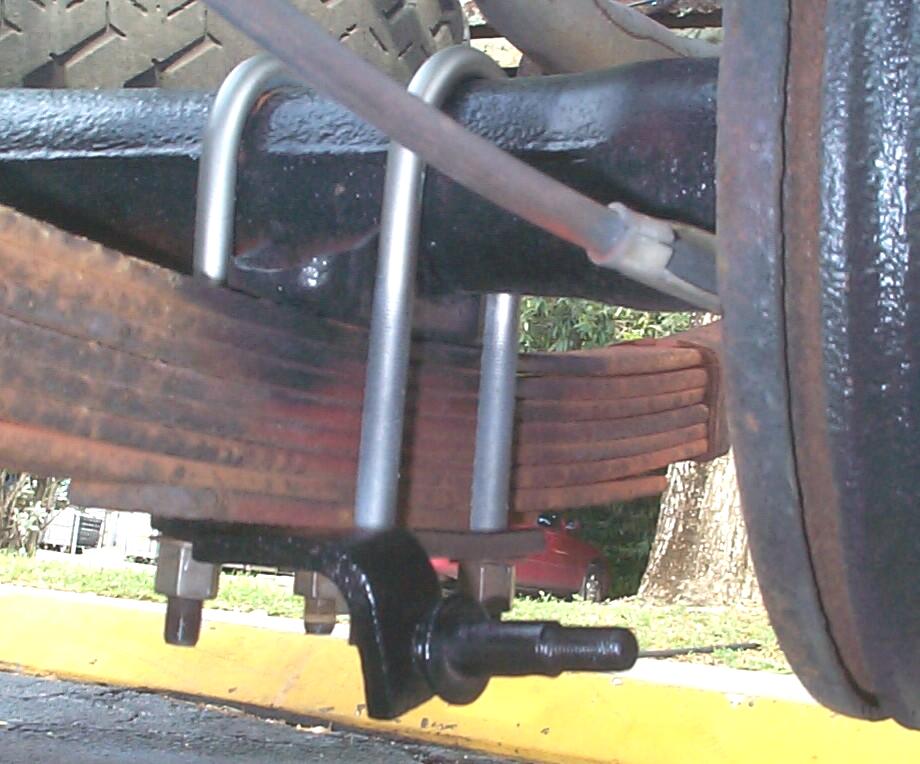
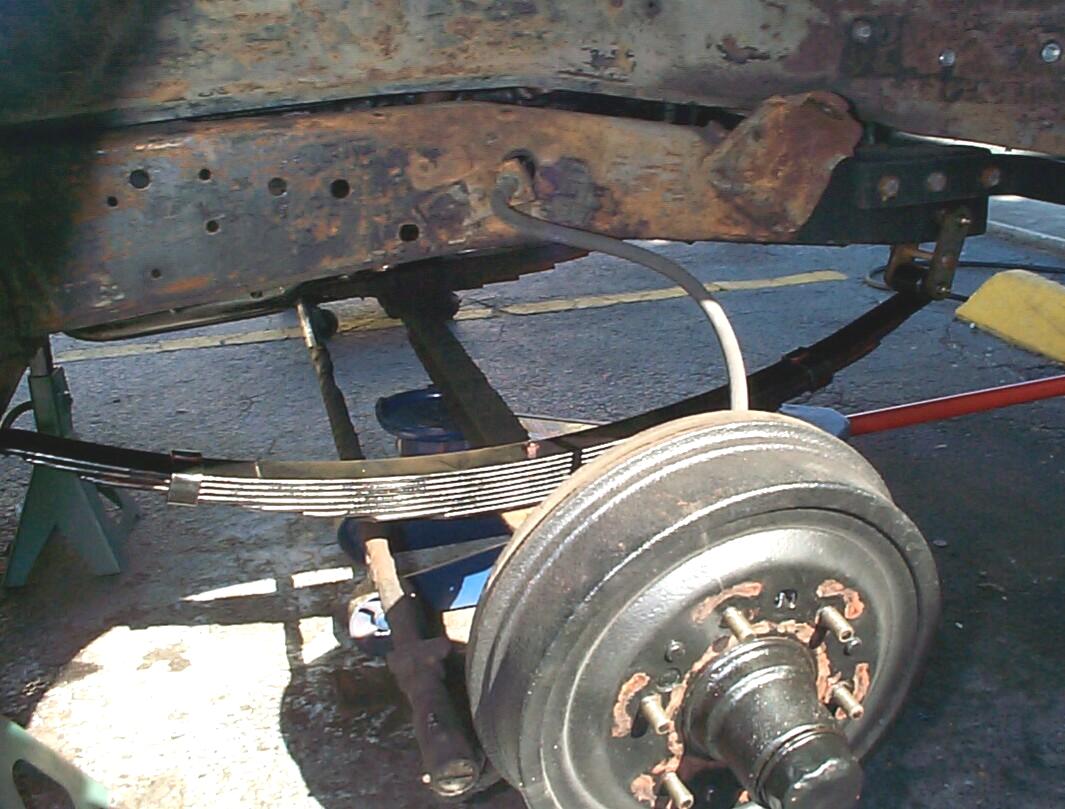
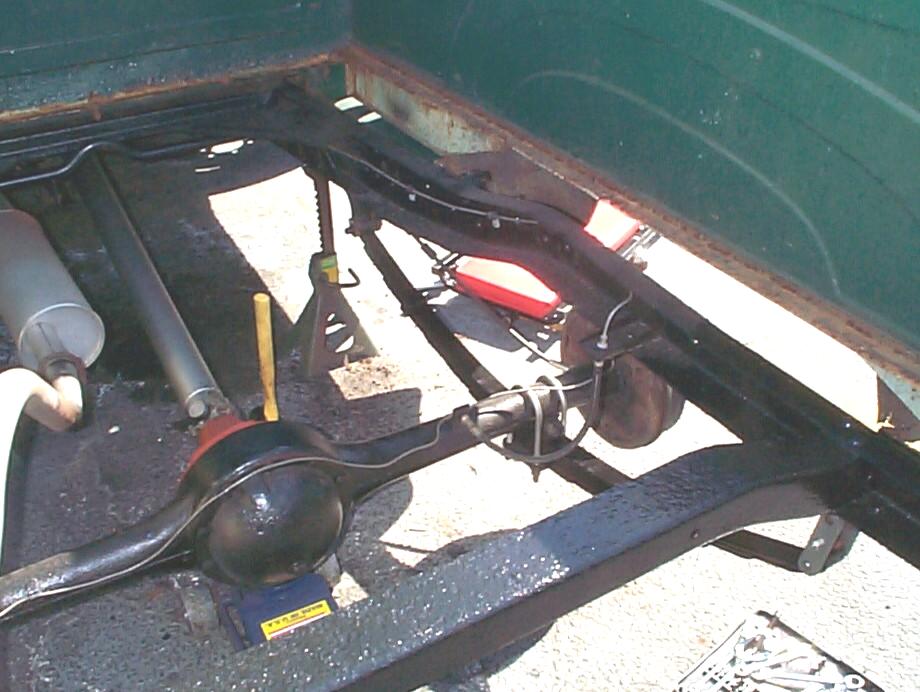
August 10th 2002 Workin' at the back of the frame today. Weather is 'posed to be good 'til this afternoon. Going to replace the rear axle U-bolts. This is somewhat risky 'cause, if things go south, I'll be stuck without transportation as the Boss's Mercedes Panzerwagon is in the shop for electrical problems. Jacked up Billybob and placed the jackstands just forward of the front spring mounts for the rear springs. Removed the wheels and rear shocks. Started working on the rusted U-bolts. Tried the easy solutions first - Penetrating oil, impact wrench and breaker bar. No joy, so I went straight to the 3" air cut-off wheel. That did the job and put me at the point of no return.
 Cleaned
the axle ends and spring saddles first with Eastwood's
Under Gone Undercoating/Heavy Residue Remover (part #31130Z), then with
wire brush and putty knife. Followed up with wire brush cup in the air
powered angle grinder. Continued with a couple of applications of
Eastwood's Under Gone Industrial Cleaner/Degreaser (#31131Z), PRE Paint
Prep (#1679Z) and Rust Encapsulator (#16040Z). While the Rust
Encapsulator dried, I did a check fit of the U-bolts to the plate . . .
The U-bolts fit in the plate holes. Whew! A real relief.
Cleaned
the axle ends and spring saddles first with Eastwood's
Under Gone Undercoating/Heavy Residue Remover (part #31130Z), then with
wire brush and putty knife. Followed up with wire brush cup in the air
powered angle grinder. Continued with a couple of applications of
Eastwood's Under Gone Industrial Cleaner/Degreaser (#31131Z), PRE Paint
Prep (#1679Z) and Rust Encapsulator (#16040Z). While the Rust
Encapsulator dried, I did a check fit of the U-bolts to the plate . . .
The U-bolts fit in the plate holes. Whew! A real relief.
 After
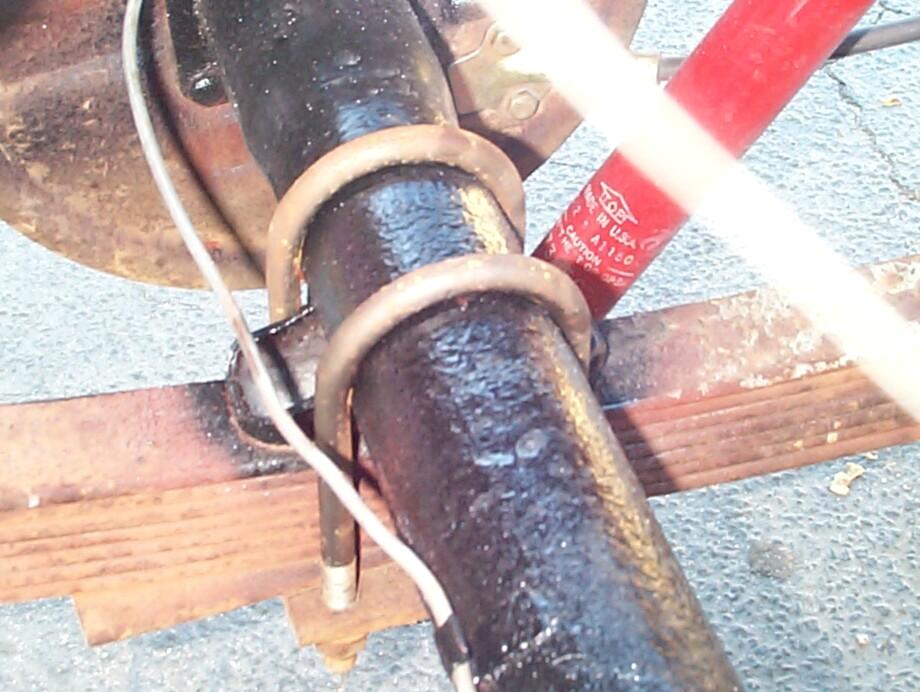
an hour the axle ends were painted with Eastwood's rattlecan Chassis
Black. Overspray was wiped off brake lines with lacquer thinner.
Another hour and I was ready for the new U-bolts which I had
powdercoated with Satin Clear a couple of months ago. Everything went
together easy. I applied threadlocker blue to the hex nuts and torqued
the U-bolts to about seventy footpounds as I couldn't find the specs.
I'll keep lookin' and re-torque them after they settle in a bit.
Replaced the shocks and wheels and put BillyBob back on the ground.
That's about it for today but I'm a little bit closer to ordering those
new springs. Time for a burger and a cigar.
After
an hour the axle ends were painted with Eastwood's rattlecan Chassis
Black. Overspray was wiped off brake lines with lacquer thinner.
Another hour and I was ready for the new U-bolts which I had
powdercoated with Satin Clear a couple of months ago. Everything went
together easy. I applied threadlocker blue to the hex nuts and torqued
the U-bolts to about seventy footpounds as I couldn't find the specs.
I'll keep lookin' and re-torque them after they settle in a bit.
Replaced the shocks and wheels and put BillyBob back on the ground.
That's about it for today but I'm a little bit closer to ordering those
new springs. Time for a burger and a cigar.
 October
5th 2002 Well, I've
read that powder coating is idiot-proof, so I must be a mo-ron! The
U-bolts have surface rust all over them so my first attempt at powder
coating is a failure. We'll try something else. Good weather today.
Tropical Storm Isidore and Hurricane Lili have just gotten done
tag-teamin' the area west of the Big Easy and the seas are relatively
calm for the time being. Put BillyBob on jackstands again and removed
the rear wheels and shocks.
October
5th 2002 Well, I've
read that powder coating is idiot-proof, so I must be a mo-ron! The
U-bolts have surface rust all over them so my first attempt at powder
coating is a failure. We'll try something else. Good weather today.
Tropical Storm Isidore and Hurricane Lili have just gotten done
tag-teamin' the area west of the Big Easy and the seas are relatively
calm for the time being. Put BillyBob on jackstands again and removed
the rear wheels and shocks.
Got the U-bolts off with the impact wrench. Tossed the hex nuts and washers in the tumbler for a cleaning session. Wire-brushed and PRE Paint Prepped the U-Bolts, then immersed them in Eastwoods OxiSolve anti-rust treatment. After the OxiSolve, The U-bolts were cleaned with PRE Paint Prep again and given a coat of Plasti-Cote Anti-Rust Primer. When that was dry, the U-bolts were finished up with a couple of coats of Eastwood's Detail Gray acrylic lacquer.
The plates that the U-bolts attach to were blasted with aluminium oxide media in the cheap Harbor Freight blast cabinet. Then, they were treated with PRE and then preheated with the powder coat infared heat lamp to outgas the parts before coating . . . Yeah, even tho' I've been humbled by my first powder coating experience, I'm gonna take another whack at it. Coated the parts with Low Gloss Black powder I ordered from the Columbia Coatings website a few weeks ago. Cured each plate for 25 minutes after the powder flashed, and then let them cool down.
 It's
late in the afternoon. Time to start reassembly. Wanted to tin-zinc
plate the hex nuts and washers but that will have to wait until next
time. Found a couple of bare spots in the nooks and cranies that the
powder didn't reach - touched them up with Eastwood's Chassis Black.
Got everything back together by 5:30 PM an' I'm a bit worn through.
We'll just have to wait and see if this U-bolt finish solution fairs
any better than the last one. It's the same paint I used on the drive
shaft and that's holding up well. Next time I get around to this end of
BillyBob it will be time to attack the spare tire assembly.
It's
late in the afternoon. Time to start reassembly. Wanted to tin-zinc
plate the hex nuts and washers but that will have to wait until next
time. Found a couple of bare spots in the nooks and cranies that the
powder didn't reach - touched them up with Eastwood's Chassis Black.
Got everything back together by 5:30 PM an' I'm a bit worn through.
We'll just have to wait and see if this U-bolt finish solution fairs
any better than the last one. It's the same paint I used on the drive
shaft and that's holding up well. Next time I get around to this end of
BillyBob it will be time to attack the spare tire assembly.
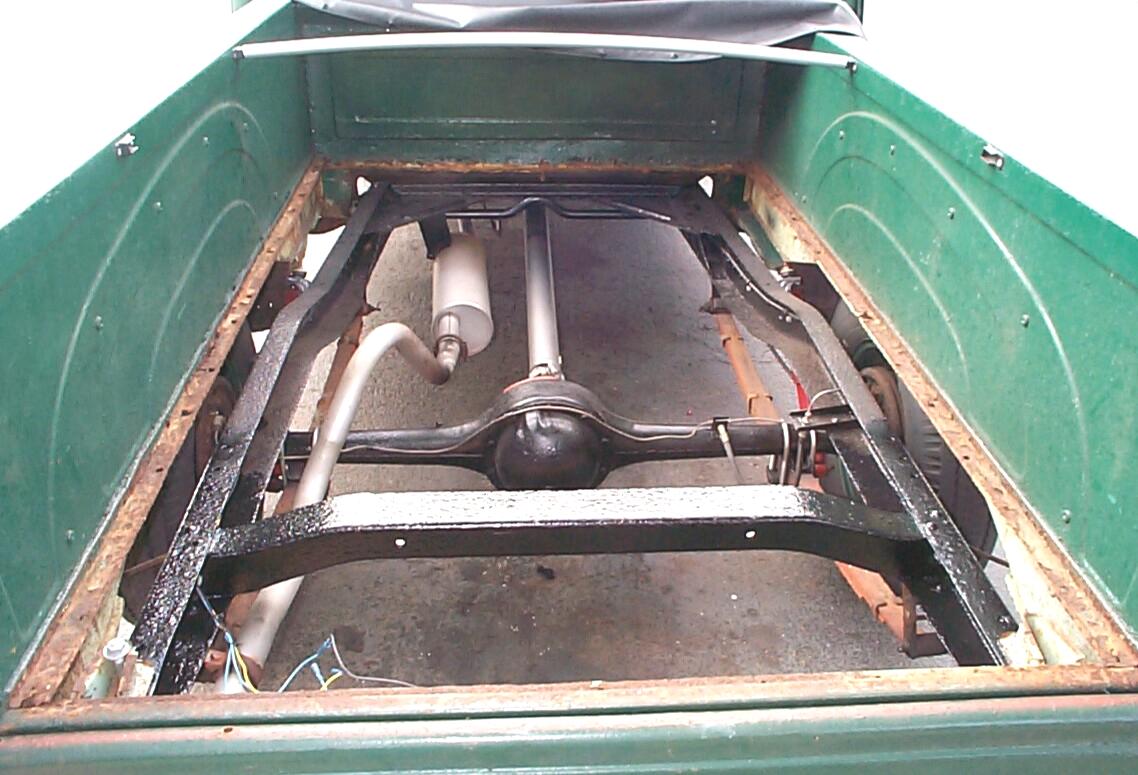
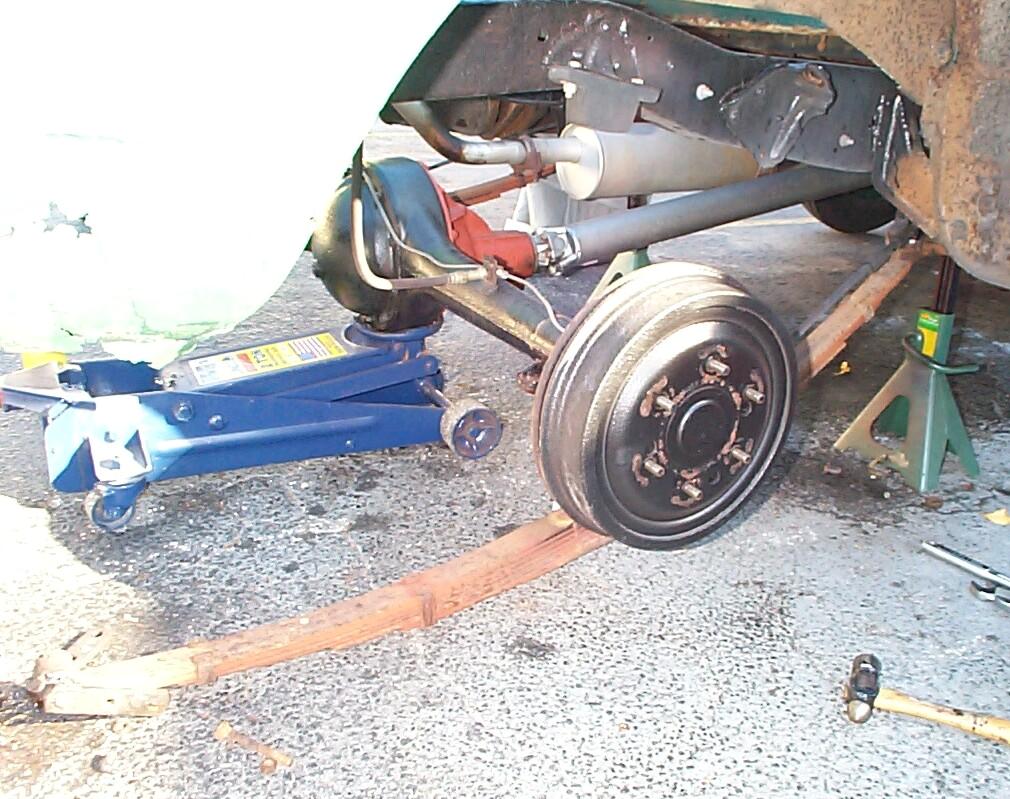
November 9th 2002 Beautiful day for work here in the shadetree garage. Last week I was in Norfolk, Virginia for the USS Abner Read Reunion. My uncle Dutch served on that ship and went down with it in the Battle of Leyte Gulf. It was great getting first hand history of war in the pacific from the survivors. One of them, Harry M. Huyck, died about a month before the reunion but he sent my family a letter shortly before his death. These quiet veterans (they become uncomfortable if you even think about calling them heros) always treat me well, like I belong at their gatherings, even tho' I wasn't even born yet at the time of their trama and have never served in the military. The memorial service this year was held on the USS Wisconsin . . . Very solemn and moving.
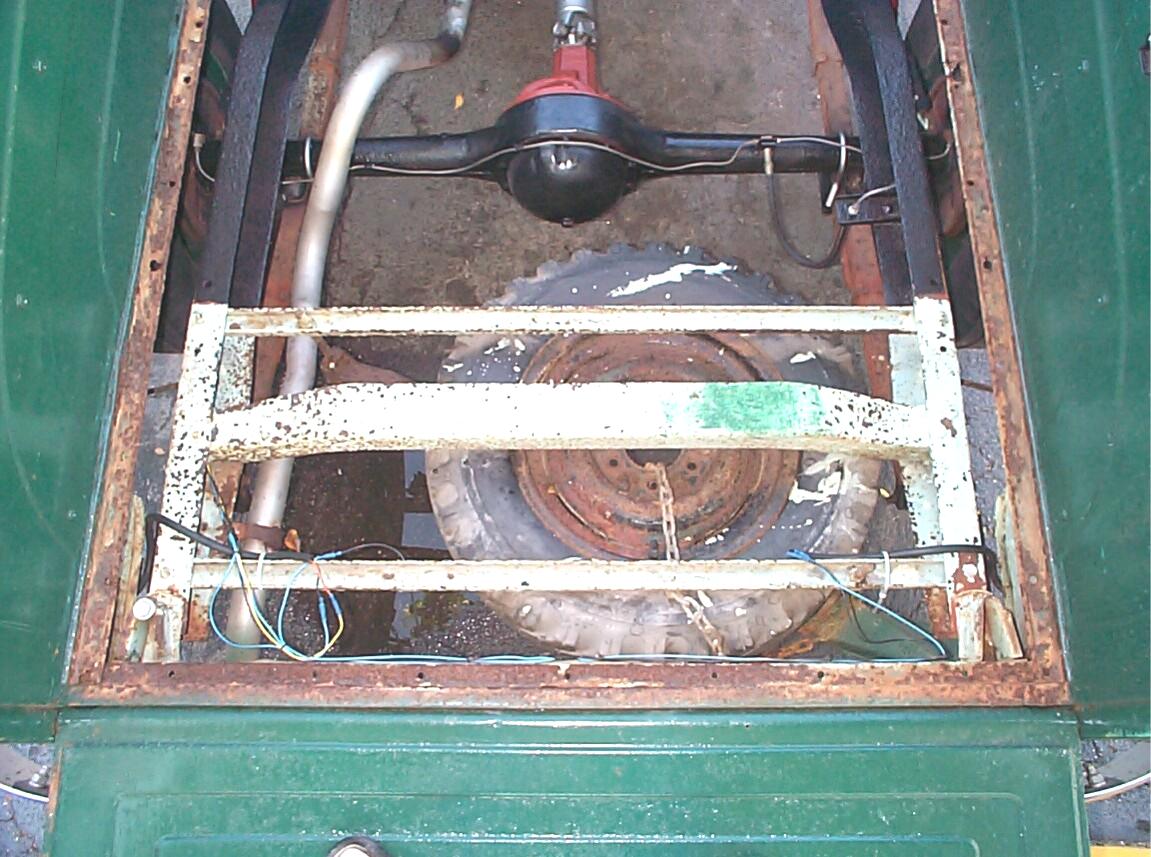 Time
to remove the spare tire and carrier. This thing has been here a long
time. Some previous owner before JR painted the frame light green and
this tire has that green paint on it. I'll bet it's been in there since
the Nixon administration and it's still holding air! I'm gonna have to
cut the carrier bolts and chain holding the tire in place.
Time
to remove the spare tire and carrier. This thing has been here a long
time. Some previous owner before JR painted the frame light green and
this tire has that green paint on it. I'll bet it's been in there since
the Nixon administration and it's still holding air! I'm gonna have to
cut the carrier bolts and chain holding the tire in place.
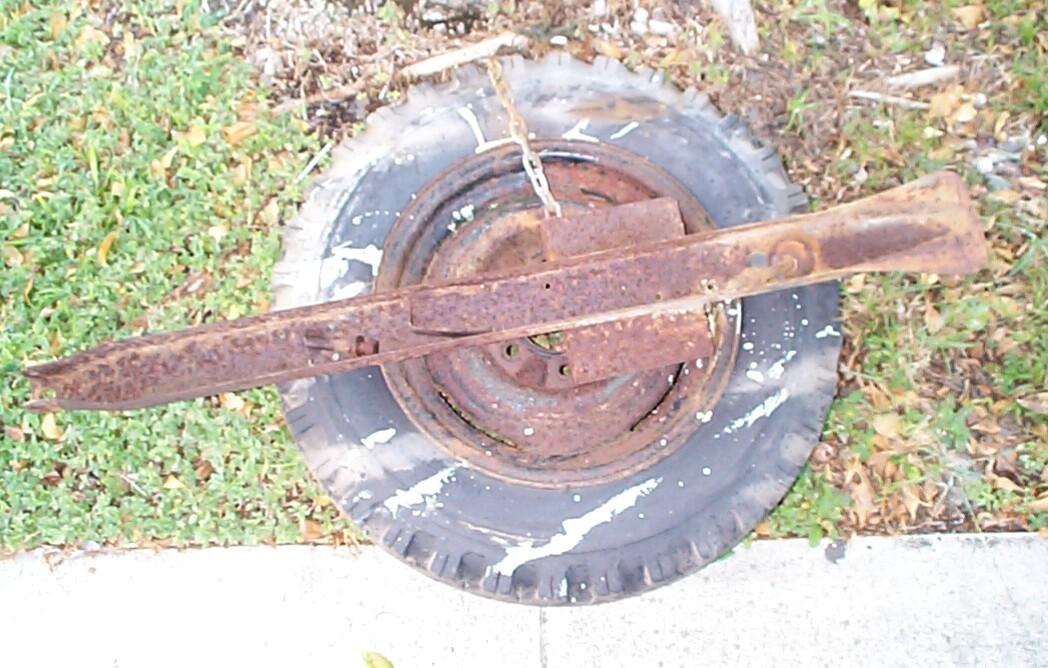 Cut
the carrier threaded rods with a 3" air powered cutoff wheel. These
things are anchored to frame crossmembers with hex head nuts and flat
washers on both sides of the crossmember. At least I think they were
hex heads once - very corroded now. It's gonna take some effort to get
them off. The spare tire and carrier are gonna take a lotta elbow
grease too. I removed the forward most crossmember - These are minor
Channel shaped crossmembers used only to support the tire carrier so
they are bolted into place with 3/8" - 24 x 1-3/4" hex bolts, not
riveted like the major frame elements.
Cut
the carrier threaded rods with a 3" air powered cutoff wheel. These
things are anchored to frame crossmembers with hex head nuts and flat
washers on both sides of the crossmember. At least I think they were
hex heads once - very corroded now. It's gonna take some effort to get
them off. The spare tire and carrier are gonna take a lotta elbow
grease too. I removed the forward most crossmember - These are minor
Channel shaped crossmembers used only to support the tire carrier so
they are bolted into place with 3/8" - 24 x 1-3/4" hex bolts, not
riveted like the major frame elements.
November 16th 2002 I'm being punished for being lazy last week when the weather was good. We're right on the edge of a cold front and under constant threat of cloudbursts. I've got the doppler radar for the area from the Internet running on my computer "Buc Nekid" inside. It may give me a few minutes warning unless a cell forms right over me. Am only draggin' out tools as needed 'an I've decided to work with BillyBob on the ground when it would be easier to remove both rear wheels.
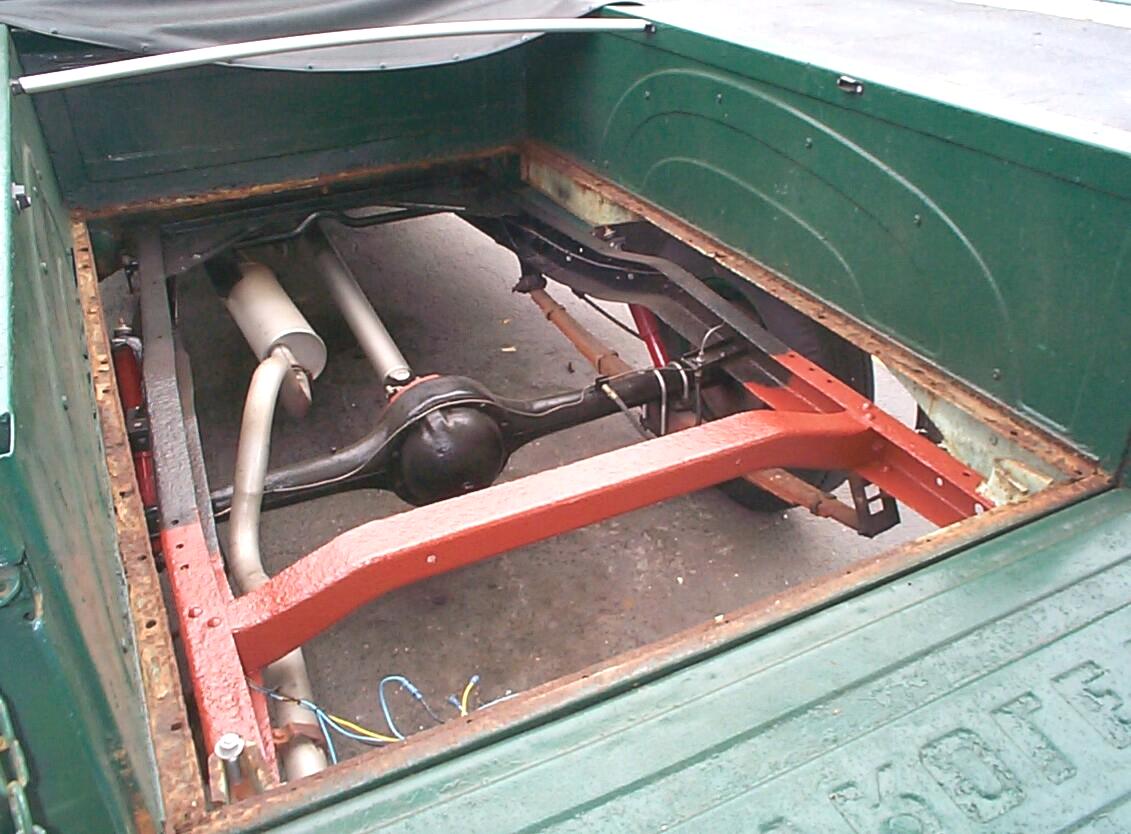 Started
out by removing the rear bumper and brackets with hand tools. Used the
air powered 3" cut off wheel and a chisel to get the at the bolt heads
attaching the rear tire carrier cross member. With the cross member
loose, I disconnected the tail light wiring bullet connectors to get
the wiring out of the way and ran into one frozen bullet connector . .
. had to stop long enuf to replace it with a new connector. Continued
by cleaning the rear frame with a wire brush cup in an air powered
angle grinder. I always wear a respirator, goggles and gloves when I do
this to keep collateral damage to my old skin down to a minimum. Felt a
few sprinkles from the sky . . . OH GREAT! We've just had a tornado
watch issued. By early afternoon, I had PRE Paint Prepped the rear of
the frame and brush painted a coat of Eastwood's Rust Encapsulator.
With a wary eye to the Northwest where the advancing cold front is
rolling in, I started to clean up. Left the bumper and brackets off for
the time being.
Started
out by removing the rear bumper and brackets with hand tools. Used the
air powered 3" cut off wheel and a chisel to get the at the bolt heads
attaching the rear tire carrier cross member. With the cross member
loose, I disconnected the tail light wiring bullet connectors to get
the wiring out of the way and ran into one frozen bullet connector . .
. had to stop long enuf to replace it with a new connector. Continued
by cleaning the rear frame with a wire brush cup in an air powered
angle grinder. I always wear a respirator, goggles and gloves when I do
this to keep collateral damage to my old skin down to a minimum. Felt a
few sprinkles from the sky . . . OH GREAT! We've just had a tornado
watch issued. By early afternoon, I had PRE Paint Prepped the rear of
the frame and brush painted a coat of Eastwood's Rust Encapsulator.
With a wary eye to the Northwest where the advancing cold front is
rolling in, I started to clean up. Left the bumper and brackets off for
the time being.
November 22nd 2002 Thirty-nine years ago today, I remember sitting in a junior high school classroom (middle school nowadays) listening to radio reports over the PA system with my classmates and teacher. President Kennedy had been shot and regular classes had come to a screaming halt.
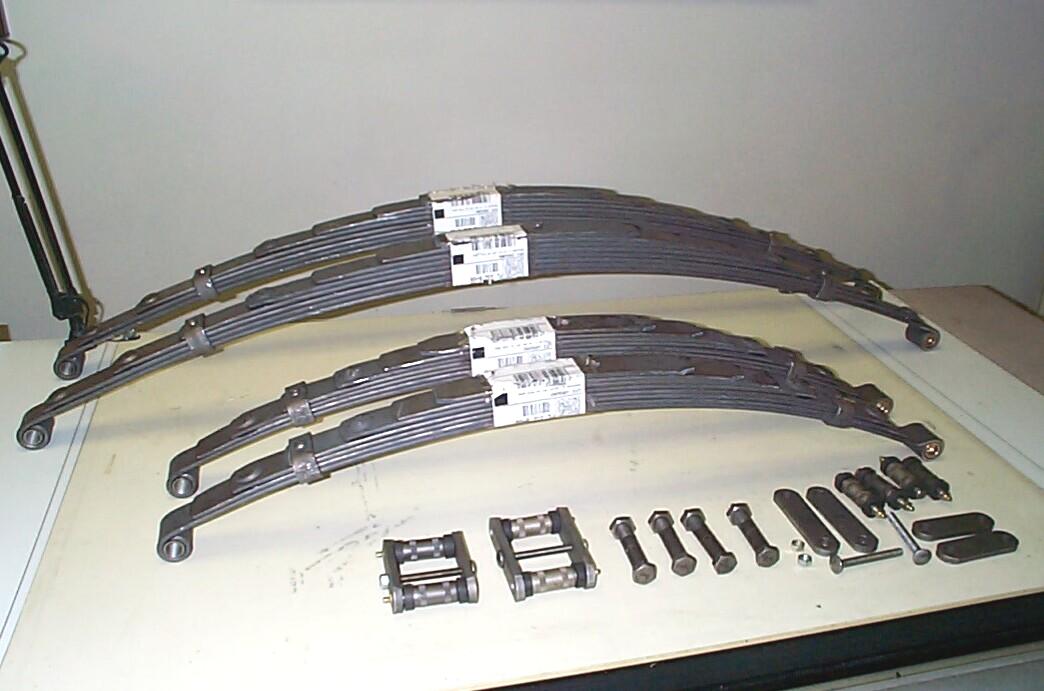 The
UPS man arrived this afternoon with new springs for BillyBob from Eaton
Detroit Spring, Inc. I ordered stock springs from the website
a few weeks ago. A feller from Eaton called me up a couple of days
later and, after a few questions, helped me decide that the "rod ride"
springs would be more suitable for my uses. I don't plan on a lot of
hauling but I do plan on traveling some in BillyBob someday so the
softer ride might be welcome. He gave me the rod springs for the same
price as stock springs. Also ordered all the installation fittings
'cept the U-bolts which I already have. These things are not painted
but all the bushings are already pressed into the spring eyes - That's
a big plus in my book. I will only have to deal with the frame bushings
now. Eaton springs aren't cheap but this is one area where I didn't
want to skimp any.
The
UPS man arrived this afternoon with new springs for BillyBob from Eaton
Detroit Spring, Inc. I ordered stock springs from the website
a few weeks ago. A feller from Eaton called me up a couple of days
later and, after a few questions, helped me decide that the "rod ride"
springs would be more suitable for my uses. I don't plan on a lot of
hauling but I do plan on traveling some in BillyBob someday so the
softer ride might be welcome. He gave me the rod springs for the same
price as stock springs. Also ordered all the installation fittings
'cept the U-bolts which I already have. These things are not painted
but all the bushings are already pressed into the spring eyes - That's
a big plus in my book. I will only have to deal with the frame bushings
now. Eaton springs aren't cheap but this is one area where I didn't
want to skimp any.
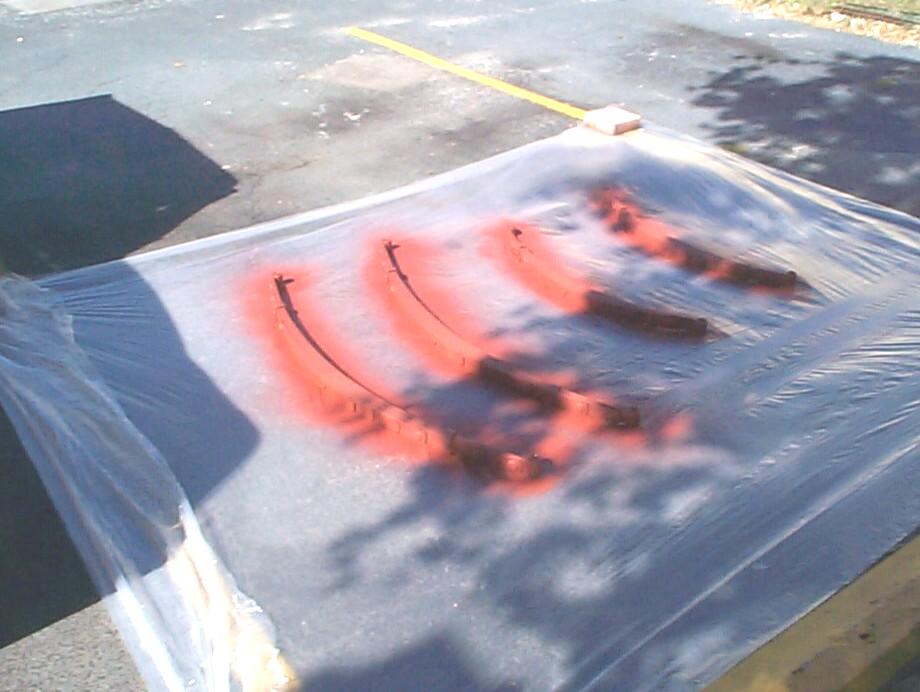 November
23rd 2002 Chilly today
for South Florida. Spent some time trying to get the mailing labels and
adhesive off the new springs with utility knife, scraper and wire
brush. PRE Paint Prepped the springs, spread out a plastic drop cloth,
put plugs in the bushing openings, and applied a coat of Rust
Encapsulator. There's no rust on these springs but I haven't had
trouble with anything I've applied Rust Encapsulator to 'cept where it
has come in contact with brake fluid. I've developed a general rule of
thumb to use it as a primer for chassis parts.
November
23rd 2002 Chilly today
for South Florida. Spent some time trying to get the mailing labels and
adhesive off the new springs with utility knife, scraper and wire
brush. PRE Paint Prepped the springs, spread out a plastic drop cloth,
put plugs in the bushing openings, and applied a coat of Rust
Encapsulator. There's no rust on these springs but I haven't had
trouble with anything I've applied Rust Encapsulator to 'cept where it
has come in contact with brake fluid. I've developed a general rule of
thumb to use it as a primer for chassis parts.
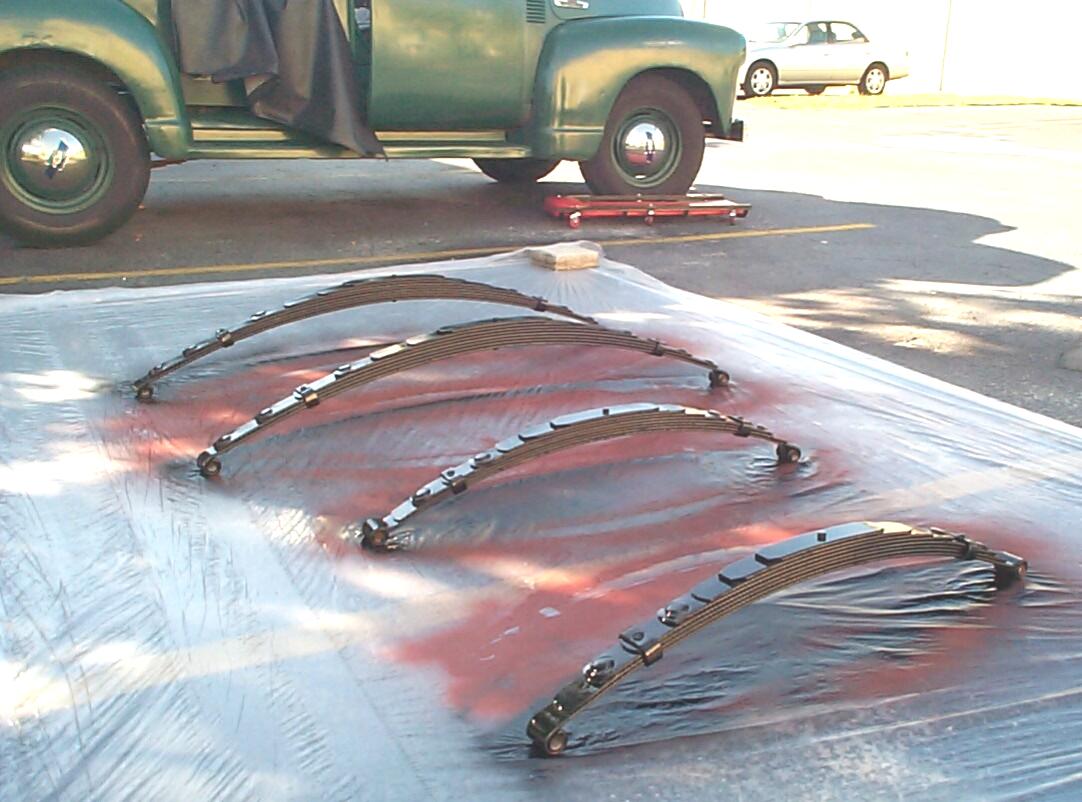 November
24th 2002 Not as cold
this morning as yesterday. Started out with some scheduled BillyBob
maintenance checks. After it warmed up a bit, I setup the drop cloth
again and painted the new springs with rattlecan chassis black.
Everything's been going well this weekend. None of the paint cans have
clogged up and the wind isn't too bad. No rain. I'm wondering where
Murphy is.
November
24th 2002 Not as cold
this morning as yesterday. Started out with some scheduled BillyBob
maintenance checks. After it warmed up a bit, I setup the drop cloth
again and painted the new springs with rattlecan chassis black.
Everything's been going well this weekend. None of the paint cans have
clogged up and the wind isn't too bad. No rain. I'm wondering where
Murphy is.
 Last
week, I wuz rained out before I got the rear of the chassis painted. I
had left the bumper and brackets off in anticipation of completing the
work this weekend. With the quarterly maintenance out of the way and
the springs painted and drying, the rear of the frame was PRE Paint
Prepped. Brush applied a coat of Chassis Black over the Rust
Encapsulator. Some time back, I painted over Rust Encapsulator 'bout an
hour after the Rust Encapsulator was applied. I thought I hadn't waited
long enuf 'cause I was getting bleed thru from the Rust Encapsulator.
Well, I was wrong, 'cause I'm having the same problem today and the
Rust Encapsulator has been on the frame for over a week. It's not bad.
Nothing that another coat of Chassis Black wouldn't cure. If it bothers
me enuf, I'll get the paint brush out again.
Last
week, I wuz rained out before I got the rear of the chassis painted. I
had left the bumper and brackets off in anticipation of completing the
work this weekend. With the quarterly maintenance out of the way and
the springs painted and drying, the rear of the frame was PRE Paint
Prepped. Brush applied a coat of Chassis Black over the Rust
Encapsulator. Some time back, I painted over Rust Encapsulator 'bout an
hour after the Rust Encapsulator was applied. I thought I hadn't waited
long enuf 'cause I was getting bleed thru from the Rust Encapsulator.
Well, I was wrong, 'cause I'm having the same problem today and the
Rust Encapsulator has been on the frame for over a week. It's not bad.
Nothing that another coat of Chassis Black wouldn't cure. If it bothers
me enuf, I'll get the paint brush out again.
 November
28th 2002 Thanksgiving
day and once more into the breach. I've got four days to install the
new springs along with some other jobs logged elsewhere. Started out by
taking existing height measurements between running board and ground at
all four "corners". Left front is 12-3/8". Right front is 12-7/8". Left
Rear is 14" and right rear equals 14-1/4". I'm hoping the measurements
will not be much different when the new springs are in place as I like
BillyBob's current stance.
November
28th 2002 Thanksgiving
day and once more into the breach. I've got four days to install the
new springs along with some other jobs logged elsewhere. Started out by
taking existing height measurements between running board and ground at
all four "corners". Left front is 12-3/8". Right front is 12-7/8". Left
Rear is 14" and right rear equals 14-1/4". I'm hoping the measurements
will not be much different when the new springs are in place as I like
BillyBob's current stance.
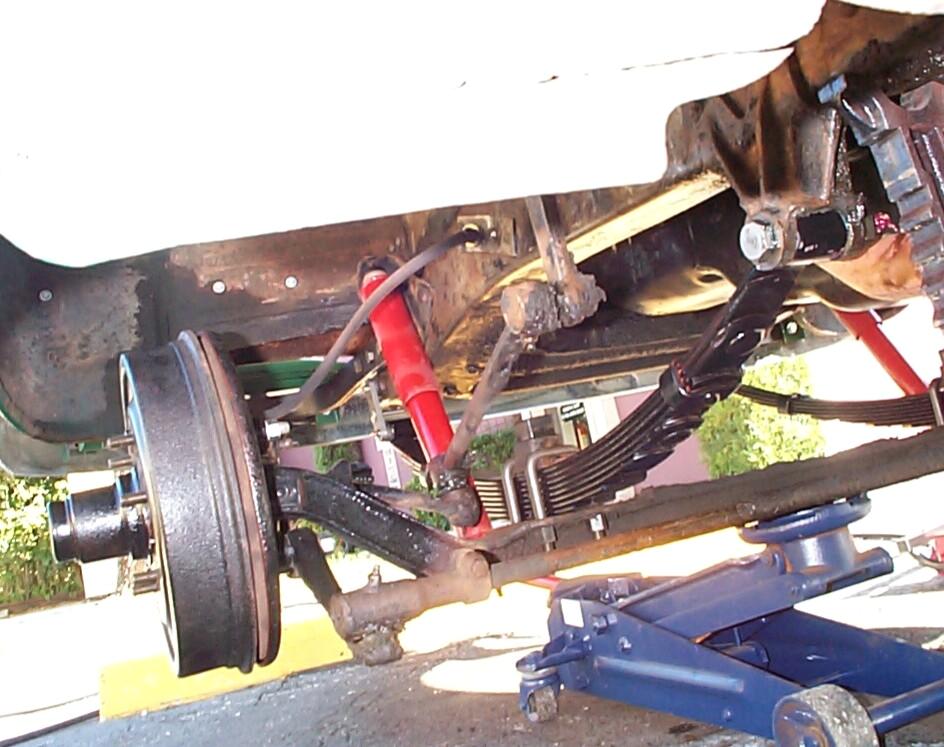
November 29th 2002 Frost on the pumpkin today. We don't have pumpkins in South Florida an' it's not really that cold but it feels like it. Spoiled, I guess. Put BillyBob's front end up on jackstands under the frame right behind the front spring mounts. Removed the front wheels and shocks, then went inside to warm up and search for the new front axle U-bolts and spring bumpers I purchased some time back from Chevy Duty. That took awhile. I remembered where the U-bolts were, and I remembered where I put the bumpers when I first got them but, I didn't remember moving the bumpers to another box of rubber parts. I had out-organized myself.
 Started
with the passenger side front spring (the broken one). Supporting the
front axle with the floor jack, I started on the U-Bolts with the
impact wrench and a 3/4" deep socket. This hadn't worked on the rear
U-Bolts but they were rusted. The front U-bolts are caked with grease.
The impact wrench worked this time. Started cleaning up the bumper
mount and shock bracket a bit. Not gonna attempt to refurbish these
parts now. That's too much work for the timeline I have available. The
goal for these four days is to get the springs in place and the
niceties can wait.
Started
with the passenger side front spring (the broken one). Supporting the
front axle with the floor jack, I started on the U-Bolts with the
impact wrench and a 3/4" deep socket. This hadn't worked on the rear
U-Bolts but they were rusted. The front U-bolts are caked with grease.
The impact wrench worked this time. Started cleaning up the bumper
mount and shock bracket a bit. Not gonna attempt to refurbish these
parts now. That's too much work for the timeline I have available. The
goal for these four days is to get the springs in place and the
niceties can wait.
 Didn't
have enuf room to use the impact wrench on the spring bolt but it
wasn't necessary. It came out fairly easily. I did manage to bang one
of my fingers and now I've got a purple badge of stupidity welling up
under a fingernail. The spring eye of the new spring was a smigeon too
big for the bracket opening so, I tried the other front spring thinking
maybe there were left and right springs. It was too big too. I haven't
used my Chicago 4" angle grinder much but today I'm glad I had the
foresight to buy it. Got the spring eye ground down enuf to fit and
installed the spring eye bolt and front shackle. Couldn't install the
U-bolts yet as the alignment peg on the spring is 'bout a half inch
from the mating hole on the front axle. Pondered the possibility of
left and right springs again until I convinced myself they were the
same and the mis-alignment is due to the old spring still attached to
the other side and that it will disappear when I get both springs in
place. Time to break loose the U-Bolts on the other side.
Didn't
have enuf room to use the impact wrench on the spring bolt but it
wasn't necessary. It came out fairly easily. I did manage to bang one
of my fingers and now I've got a purple badge of stupidity welling up
under a fingernail. The spring eye of the new spring was a smigeon too
big for the bracket opening so, I tried the other front spring thinking
maybe there were left and right springs. It was too big too. I haven't
used my Chicago 4" angle grinder much but today I'm glad I had the
foresight to buy it. Got the spring eye ground down enuf to fit and
installed the spring eye bolt and front shackle. Couldn't install the
U-bolts yet as the alignment peg on the spring is 'bout a half inch
from the mating hole on the front axle. Pondered the possibility of
left and right springs again until I convinced myself they were the
same and the mis-alignment is due to the old spring still attached to
the other side and that it will disappear when I get both springs in
place. Time to break loose the U-Bolts on the other side.
U-bolts on the driver side also came out easy. The spring eye bolt on this side was a little tougher . . . That's because the exhaust pipe was in the way so, naturally, in accord with Murphy, it was a bit frozen. Not too bad tho' and I had the old spring out in short order. In the interest of doing a thorough job, I managed to whack my bad finger again, this time with a ball peen hammer trying to break the shackle loose!
 Spring
eye had to be ground down on this side too. The axle came back into
alignment with both new springs in place. A small lizard has taken up
position on top of the axle and doesn't seem inclined to move off it. I
don't know if he's the guy from Geico, but I've already got insurance
so he's wasting his time. Got everything buttoned up and lubed. Had to
put an angled zerk fitting on the driver's side spring bolt, again,
because of the obtrusive exhaust pipe. The rubber axle bumpers are
wedge shaped and are pressed up thru the U'Bolt saddle. Well, the new
ones didn't want to fit very well and, even after snugging up the
U-bolts, left a little sandwich of rubber pinched between the spring
and the saddle. When dragging off the old springs, I noticed loose leaf
shaped wedges about five inches long. These things are caster shims and
I put them off to the side for now (took note that the old springs had
the thick part of the wedge facing rearward on the passenger side and
forward on the driver side??). I may not need them with the new
springs. I'll test drive BillyBob for a week and revisit the U-bolts,
rubber bumper excess, and caster shims next week if BillyBob is
unstable.
Spring
eye had to be ground down on this side too. The axle came back into
alignment with both new springs in place. A small lizard has taken up
position on top of the axle and doesn't seem inclined to move off it. I
don't know if he's the guy from Geico, but I've already got insurance
so he's wasting his time. Got everything buttoned up and lubed. Had to
put an angled zerk fitting on the driver's side spring bolt, again,
because of the obtrusive exhaust pipe. The rubber axle bumpers are
wedge shaped and are pressed up thru the U'Bolt saddle. Well, the new
ones didn't want to fit very well and, even after snugging up the
U-bolts, left a little sandwich of rubber pinched between the spring
and the saddle. When dragging off the old springs, I noticed loose leaf
shaped wedges about five inches long. These things are caster shims and
I put them off to the side for now (took note that the old springs had
the thick part of the wedge facing rearward on the passenger side and
forward on the driver side??). I may not need them with the new
springs. I'll test drive BillyBob for a week and revisit the U-bolts,
rubber bumper excess, and caster shims next week if BillyBob is
unstable.
November 30th 2002 Only slightly warmer this morning than yesterday. I'd rather suffer a little cold than rain so I'm not complaining. Reminds me a little of my second year at Penn State. Students had to park their cars in big lots surrounding the campus which was about a half mile from my dorm. My '59 Ferd developed a teeth-rattling vibration on the way back to campus from home in November. I let it sit in the parking lot 'til winter break when I came back with the tools to change the tie rod ends. I remember laying on my back under the Ferd on that windswept parking lot with snowdrifts piling up around the Ferd since it was the only car left in the lot. The temperature was in the teens while I struggled to break loose the old tie rod ends. When finished, I somehow managed to get the Ferd started for a test drive across the lot. ~!@#$%^ The vibration was still there! Turned out the be a bent drive shaft at the transmission because I had reversed the rear spring shackles to jack up the the Ferd and make it look cool (if that's possible) and didn't know about shimming the rear axle to correct the pinion angle. I didn't ask Dad about the implications of reversing the shackles 'cause I knew he would'uv given me a ration of s**t for doin' such a fool thing. That Ferd was his nemesis.
 Started
around seven following the same methods as yesterday and had the
passenger side rear spring off by nine-thirty. There is much better
access in the back but this is offset by more rust. The spring eye bolt
was frozen. Using a method recently suggested to me by fellow ole
trucker VW Nate for stud removal, I repeatedly heated up the bolt with
a torch and quenched it with penetrating oil. A washer was used as a
heat sink to keep the spring eye bracket cooler than the bolt in this
process. Two iterations of this procedure and some help from the impact
wrench did the trick. The shackle was pretty rusted too. Had a hard
time getting one shackle side off the upper shackle pin. I couldn't
bang away at it much with a hammer 'cause the pin was a little loose in
the bushing and I didn't want to cause any further damage to the pin
and bushing. After a couple of heat and quench repetitions, I managed
to get it apart with a small gear puller that didn't stress the
bushing. The bushing is worn enuf that a new shackle pin will not fit,
only the old pin. It's not worn thru to the bracket, however, so I have
time to work on it in the weeks ahead.
Started
around seven following the same methods as yesterday and had the
passenger side rear spring off by nine-thirty. There is much better
access in the back but this is offset by more rust. The spring eye bolt
was frozen. Using a method recently suggested to me by fellow ole
trucker VW Nate for stud removal, I repeatedly heated up the bolt with
a torch and quenched it with penetrating oil. A washer was used as a
heat sink to keep the spring eye bracket cooler than the bolt in this
process. Two iterations of this procedure and some help from the impact
wrench did the trick. The shackle was pretty rusted too. Had a hard
time getting one shackle side off the upper shackle pin. I couldn't
bang away at it much with a hammer 'cause the pin was a little loose in
the bushing and I didn't want to cause any further damage to the pin
and bushing. After a couple of heat and quench repetitions, I managed
to get it apart with a small gear puller that didn't stress the
bushing. The bushing is worn enuf that a new shackle pin will not fit,
only the old pin. It's not worn thru to the bracket, however, so I have
time to work on it in the weeks ahead.
 The
spring eye had to be ground to fit just like the front springs . . . A
little more tedjus' this time to fit and grind, fit and grind, because
this thing is long and heavy. The new shackle went together on the old
pin easily and the U-Bolts were no problem since they're fairly new and
the alignment is less critical than the front was. It's eleven now and
I'm farther ahead than I was yesterday at this time. Unless Murphy
really messes with me, I won't end up in a hurry sundown situation
again.
The
spring eye had to be ground to fit just like the front springs . . . A
little more tedjus' this time to fit and grind, fit and grind, because
this thing is long and heavy. The new shackle went together on the old
pin easily and the U-Bolts were no problem since they're fairly new and
the alignment is less critical than the front was. It's eleven now and
I'm farther ahead than I was yesterday at this time. Unless Murphy
really messes with me, I won't end up in a hurry sundown situation
again.
Had the same problems on the driver side with the spring eye and the old shackle. The shackle bushing is worn out on this side too. Had the exact same problem getting the shackle apart, this time complicated by the tail pipe being in the way of the gear puller. I used a pickle fork this time even tho' it put a little pressure on the shackle pin and bushing. There wasn't any other way I could see to do it with the tools I had at hand. I was lucky. The pickle fork tightened the assembly up enuf so that a tap on the shackle side bar with a hammer popped it off. When it comes time to press in a new bushing, the tail pipe is going to have to move out of the way, so I better get some new hanger fittings.
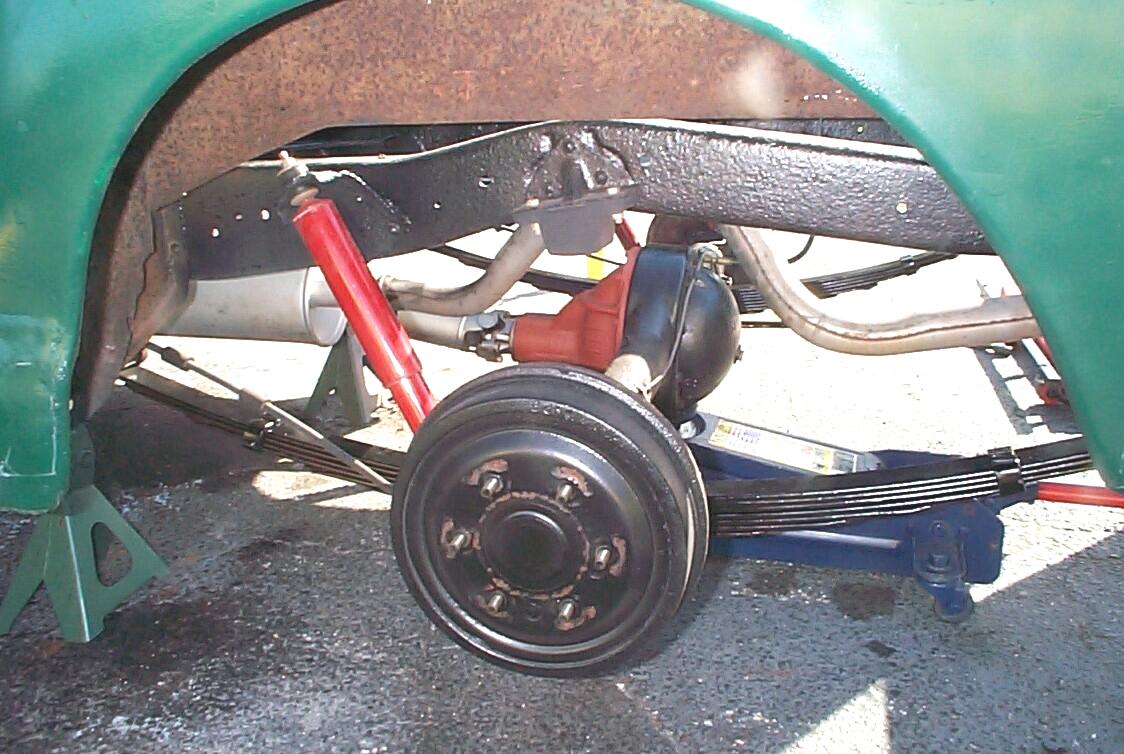 The
last spring had to have the spring eye ground down just like the
others. After that was done, the shackle and U-bolts went together
pretty quick. Finished up by installing the six new zerk fittings and
greasing the spring eyes and shackles. Put the shocks back on and the
wheels. Took BillyBob off the jackstands and checked the height
measurements again. Left front is 14-1/4". Right front is 14-1/4". Left
Rear is 16" and right rear equals 16". Gained about an 1-1/2" in the
front and almost two inches in the rear. The stance is pretty much the
same and I'm happy. The rear end should drop down some when I get the
spare tire and bed floor in. Well, it's two forty-five and I've still
got good afternoon light to finish the other job I've got going.
The
last spring had to have the spring eye ground down just like the
others. After that was done, the shackle and U-bolts went together
pretty quick. Finished up by installing the six new zerk fittings and
greasing the spring eyes and shackles. Put the shocks back on and the
wheels. Took BillyBob off the jackstands and checked the height
measurements again. Left front is 14-1/4". Right front is 14-1/4". Left
Rear is 16" and right rear equals 16". Gained about an 1-1/2" in the
front and almost two inches in the rear. The stance is pretty much the
same and I'm happy. The rear end should drop down some when I get the
spare tire and bed floor in. Well, it's two forty-five and I've still
got good afternoon light to finish the other job I've got going.
 December
1st 2002 It's
Thanksgiving aftermath cleanup day. I've got both my big jobs finished.
There's enuf carnage in this episode to post it to the website, so I'll
do that before cleaning up the pile of tools I've got scattered
throughout the Krash Lab. Gotta put the rear bumper back on BillyBob
too. I also did a Stage I repair job on the cab floor during these past
four days to keep it from turning into a Fred Flintstone car with my
feet hangin' out the bottom and I've got more engine bay, brake,
electrical, door and interior work to report on down the road. It was a
good Thanksgiving for me. Even though skinnin' knuckles by yourself on
a holiday isn't everyone's cup of tea, I felt my Dad's spirit with me
in every little victory I achieved. I'm thankful for that. I hope
everyone who reads these log entries had as good a Thanksgiving as I
did.
December
1st 2002 It's
Thanksgiving aftermath cleanup day. I've got both my big jobs finished.
There's enuf carnage in this episode to post it to the website, so I'll
do that before cleaning up the pile of tools I've got scattered
throughout the Krash Lab. Gotta put the rear bumper back on BillyBob
too. I also did a Stage I repair job on the cab floor during these past
four days to keep it from turning into a Fred Flintstone car with my
feet hangin' out the bottom and I've got more engine bay, brake,
electrical, door and interior work to report on down the road. It was a
good Thanksgiving for me. Even though skinnin' knuckles by yourself on
a holiday isn't everyone's cup of tea, I felt my Dad's spirit with me
in every little victory I achieved. I'm thankful for that. I hope
everyone who reads these log entries had as good a Thanksgiving as I
did.
| < Back
to Intro |
You can email me at ![]() webmaster@laroke.com
webmaster@laroke.com
Issued Sunday December 1, 2002
Updated Thursday February 8, 2018
copyright © 1996-2018 Larry Robert Kephart all rights reserved
| | LRK Home | | Bio Info | | Krash Khronicles | | LAROKE | |
| | BettyLou | | BillyBob's Garage | | Rat Patrol | | Deerslayer | | Elvira | |
| | Land of the Free and Home of the Brave | |
| | Keppylou's Art | | WWI Soldier's Diary | |