| | LRK Home | | Bio Info | | Krash Khronicles | | LAROKE | |
| | BettyLou | | BillyBob's Garage | | Rat Patrol | | Deerslayer | | Elvira | |
| | Land of the Free and Home of the Brave | |
| | Keppylou's Art | | WWI Soldier's Diary | |
BillyBob Work-in-Progress Log
![]()
TRUCK LINKS including vendor sites for old parts, custom parts, and tools as well as sites for classic car and truck organizations
STORE Operating in association with Amazon.com, books, recordings and tools can be purchased.
PLANNING for the restoration including project schedule and cost estimates.
![]()
WORK-IN-PROGRESS is the restoration of parts of BillyBob that I can accomplish without a garage.
PRE-RESTORATION includes log entries of minor repairs and and adventures between time of purchase and the time when I started restoration, a piece at a time.
JR'S KORNER JR's Korner is the history of BillyBob before I got him authored by my brother, Wm. C. Kephart.
7. Nervous breakdown: Taillights,
Parking Lights, Turn Signals
Page 2
 March
4th 2001 The festival
is still goin' on and I've got a flu bug so I'm movin' slow today.
Working on the AutoCAD wiring diagram to get ready for the new
turn-signal wiring installation. A fused wire from the flasher will run
to "a positive power source" to power the turn-signals. I want to run
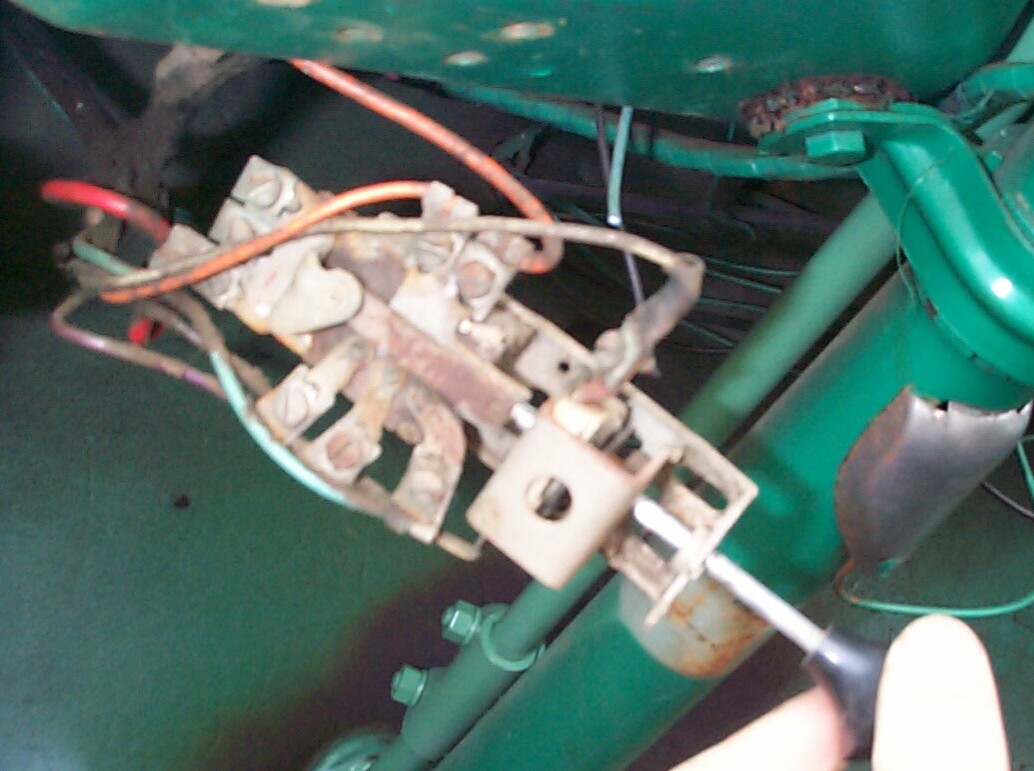
this to one of the unused battery terminals on the light switch. The
light switch was disconnected from its dashboard mounting and pulled
down to have a look and get familiarized with it. There is a trick to
disconnecting the light switch which I learned of from postings to the
ole trucks maillist. You have to pull the knob and its shaft out first
and this is the tricky part. Oh yeah, make shure the battery is
disconnected too. Pull the knob out as far as it will go (without
force) to the headlight on position. Then feel around behind the
dashboard to find the shaft release button on the righthand side of the
switch 'bout two-thirds of the way back. Fiddle around working this
button until it releases the knob shaft. Now you can unscrew the
ferrule and remove the switch.
March
4th 2001 The festival
is still goin' on and I've got a flu bug so I'm movin' slow today.
Working on the AutoCAD wiring diagram to get ready for the new
turn-signal wiring installation. A fused wire from the flasher will run
to "a positive power source" to power the turn-signals. I want to run
this to one of the unused battery terminals on the light switch. The
light switch was disconnected from its dashboard mounting and pulled
down to have a look and get familiarized with it. There is a trick to
disconnecting the light switch which I learned of from postings to the
ole trucks maillist. You have to pull the knob and its shaft out first
and this is the tricky part. Oh yeah, make shure the battery is
disconnected too. Pull the knob out as far as it will go (without
force) to the headlight on position. Then feel around behind the
dashboard to find the shaft release button on the righthand side of the
switch 'bout two-thirds of the way back. Fiddle around working this
button until it releases the knob shaft. Now you can unscrew the
ferrule and remove the switch.
 March
10th 2001 Some much
needed rain was forecast but, so far, it's a beautiful morning here in
downtown Boca Raton. Time to concentrate on the parking lights and
front turn signals. A previous owner added amber bullet turn signal
lights in the lower grille opening. I want to reduce the clutter and
combine the turn-signals with the parking lights.
March
10th 2001 Some much
needed rain was forecast but, so far, it's a beautiful morning here in
downtown Boca Raton. Time to concentrate on the parking lights and
front turn signals. A previous owner added amber bullet turn signal
lights in the lower grille opening. I want to reduce the clutter and
combine the turn-signals with the parking lights.
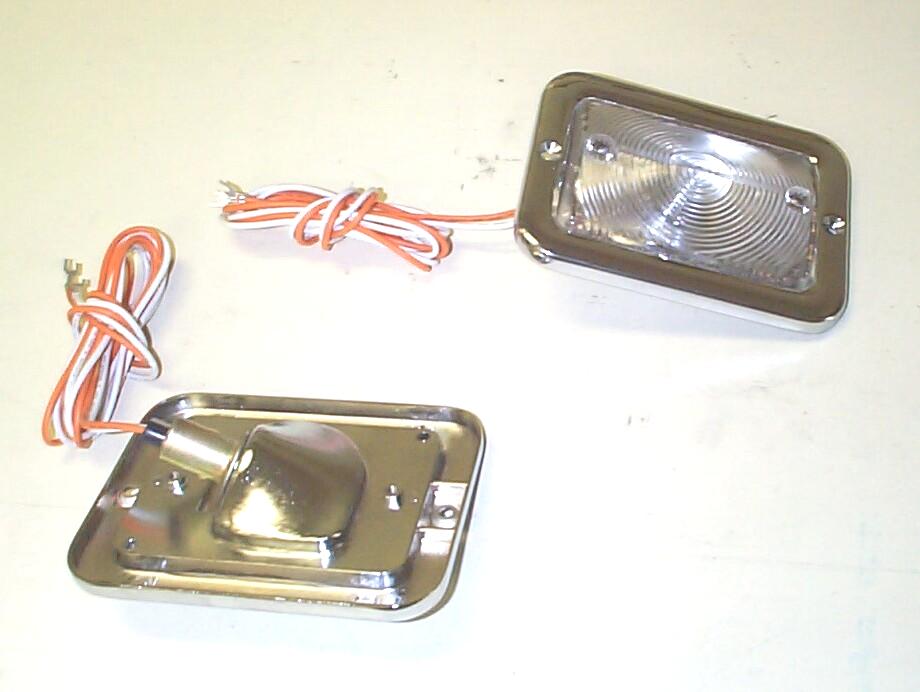 This
is a popular conversion and many vendors offer bulb sockets or whole
parking lamp assemblies with the bulb sockets, lenses, wire stubs and
gaskets. I went this route since BillyBob's original assemblies are
fairly corroded. I ordered these units from the Chevy-Duty website last
Sunday and they arrived at the Krash Lab yesterday in time to install
this weekend. The upper radiator baffle was removed to get at the
parking lamp wiring. The new lights have enough wire lead to reach the
inner fender mounted terminal blocks for the parking light circuit. It
was a simple screwdriver operation once I determined which wire went to
the "dim" filament of the bulb (turned out to be orange - exact
opposite of the taillight wire color scheme). The open terminal
connectors on the "white" turn signal lead wires were cut off and the
leads were crimped to the existing turn signal wires as a temporary
solution. I did not shorten the wires any so I will have full
flexibility when the main wiring harness is installed somewhere down
the road. The extra wire was secured with ties.
This
is a popular conversion and many vendors offer bulb sockets or whole
parking lamp assemblies with the bulb sockets, lenses, wire stubs and
gaskets. I went this route since BillyBob's original assemblies are
fairly corroded. I ordered these units from the Chevy-Duty website last
Sunday and they arrived at the Krash Lab yesterday in time to install
this weekend. The upper radiator baffle was removed to get at the
parking lamp wiring. The new lights have enough wire lead to reach the
inner fender mounted terminal blocks for the parking light circuit. It
was a simple screwdriver operation once I determined which wire went to
the "dim" filament of the bulb (turned out to be orange - exact
opposite of the taillight wire color scheme). The open terminal
connectors on the "white" turn signal lead wires were cut off and the
leads were crimped to the existing turn signal wires as a temporary
solution. I did not shorten the wires any so I will have full
flexibility when the main wiring harness is installed somewhere down
the road. The extra wire was secured with ties.
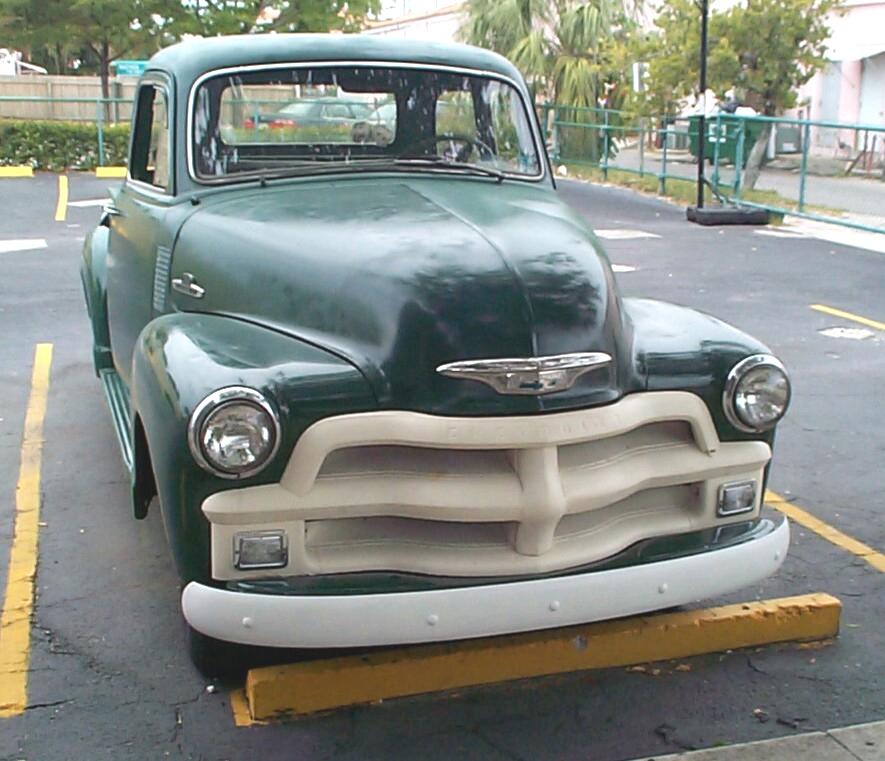 Here's
BillyBob's front end with the new lights in place. By the time the new
parking light/turn signals were installed, the sky had turned uneasy.
I'm caught up on a point of indecision. It's only 11:30 AM. Should I
attempt to install the new turn signal switch, wiring and flasher or
should I quit while I'm ahead? As I wrote this log entry it started
raining and the decision may have been made for me. Oh well, rain delay
is always a good time to update the AutoCAD wiring
diagram.
Here's
BillyBob's front end with the new lights in place. By the time the new
parking light/turn signals were installed, the sky had turned uneasy.
I'm caught up on a point of indecision. It's only 11:30 AM. Should I
attempt to install the new turn signal switch, wiring and flasher or
should I quit while I'm ahead? As I wrote this log entry it started
raining and the decision may have been made for me. Oh well, rain delay
is always a good time to update the AutoCAD wiring
diagram.
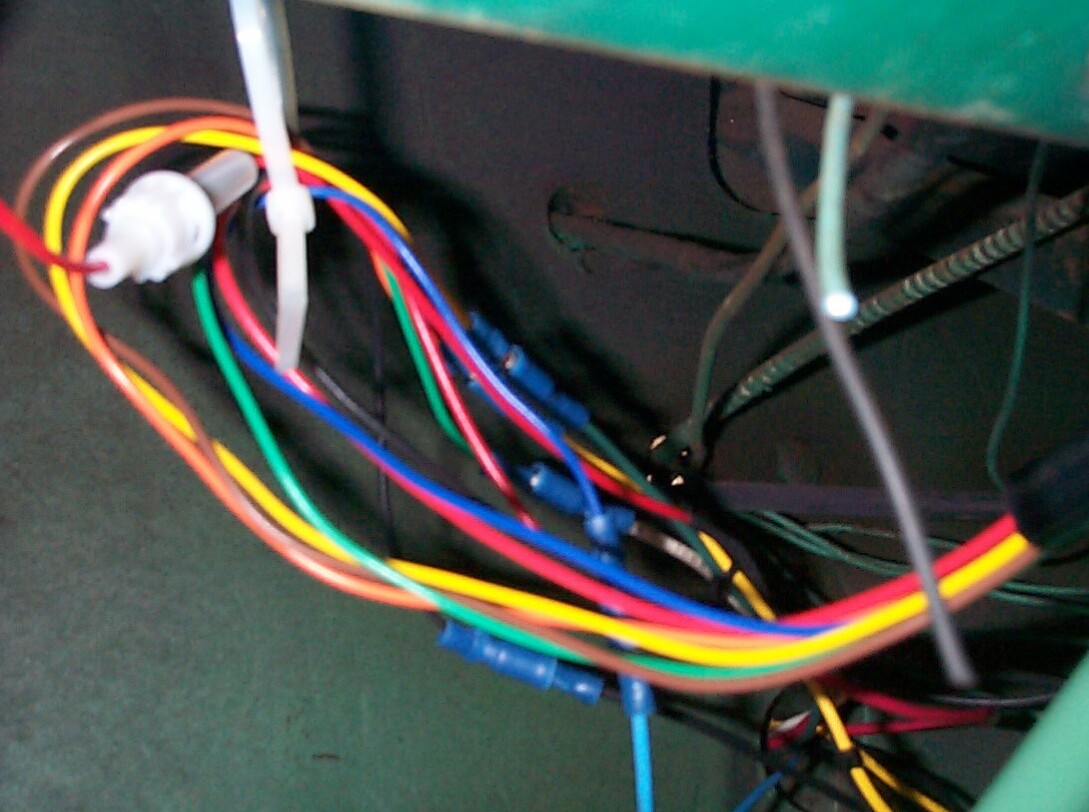
March 11th 2001 When the rain started to let up yesterday, I decided "Damn the torpedos, full speed ahead!" The turn signal kit's "power" wire (with an inline 15 amp fuse) was too short to reach between the light switch and the positive terminal of the firewall mounted flasher, so I soldered a short length of 14 ga red wire to the 16 ga red wire (all the wiring leads of the turn signal kit appear to be 16 ga) and sealed the connection with heat shrink tubing insulation. An open terminal connector was crimped to the light switch end and a blade receptacle connector crimped to the flasher end.
Next, temporary 14 ga wires for the rear turn signals (black and yellow) were fabricated to reach between the connectors under the cab and the turn signal director leads under the dashboard. The same was then done for the front turn signals (white and green). These wires were provided with crimped bullet connectors on both ends and secured in place on BillyBob. They are temporary and will be replaced by the main wiring harness when I finally muster the guts to string it.
OOPS! I'm running out of bullet connectors and won't have enough. Two choices: Put Billybob back together enough to drive him to Discount Auto Parts or use the Boss's Panzerwagon to chase parts. I don't have a horse blanket to keep grease off the big sedan's interior and, besides, pride and pioneer spirit urge me to take BillyBob, which is what I opt for.
 14
ga black and blue wires were made to connect the turn signal director
to the "L" and negative terminals, respectively, of the flasher. Bullet
connectors were crimped to the director ends and blade receptacle
connectors crimped to the flasher ends. The last wire to be fabricated
was a 14 ga red wire to connect the director to the brake switch. I
left the old brake switch in place. A 14-16 ga bullet receptacle
connector fits the brake switch terminals perfectly.
14
ga black and blue wires were made to connect the turn signal director
to the "L" and negative terminals, respectively, of the flasher. Bullet
connectors were crimped to the director ends and blade receptacle
connectors crimped to the flasher ends. The last wire to be fabricated
was a 14 ga red wire to connect the director to the brake switch. I
left the old brake switch in place. A 14-16 ga bullet receptacle
connector fits the brake switch terminals perfectly.
 BillyBob
and I had reached the point of no return. I cut the bundle of dirty,
frayed wires to the old turn signal director at the firewall and
removed them along with the director. The old wires had been threaded
thru the same firewall hole with the main harness. I ran the new wiring
thru the hole provided for the windshield wiper vacuum hose. A previous
owner had left this hole vacant but it still had its grommet in place.
When I install the main harness, it will be freed up again for its
original purpose. The new director was clamped to the steering column.
This was the only place I experienced problems. I couldn't get the
clamp mechanism started correctly and the "screw" kept binding and
chewing up the clamp. I never did get it as tight as I wanted and the
phillips head screw head was pretty mutilated by the time I was
finished.
BillyBob
and I had reached the point of no return. I cut the bundle of dirty,
frayed wires to the old turn signal director at the firewall and
removed them along with the director. The old wires had been threaded
thru the same firewall hole with the main harness. I ran the new wiring
thru the hole provided for the windshield wiper vacuum hose. A previous
owner had left this hole vacant but it still had its grommet in place.
When I install the main harness, it will be freed up again for its
original purpose. The new director was clamped to the steering column.
This was the only place I experienced problems. I couldn't get the
clamp mechanism started correctly and the "screw" kept binding and
chewing up the clamp. I never did get it as tight as I wanted and the
phillips head screw head was pretty mutilated by the time I was
finished.
 Finally,
I crossed myself (I'm not Catholic but it couldn't hurt) and
re-connected the battery . . . No sign of smoke . . . No odd smells . .
. Good! Checked the parking lights, taillights, turn signals, four way
flashers and everything works. Backed BillyBob up to the front entrance
and checked the brake lights reflection in the front doors. Success!
The only thing that is not working is the indicator lights in the turn
signal director itself. From reading posts at the Stovebolt.com forums,
I know this is not an uncommon problem. I will investigate some of the
solutions offered there in the coming weeks. Update the autoCAD wiring diagram
and that's it. Whew!! It is getting late and I'm feeling good. Time to
hoist an imaginary Iron City beer with Dad.
Finally,
I crossed myself (I'm not Catholic but it couldn't hurt) and
re-connected the battery . . . No sign of smoke . . . No odd smells . .
. Good! Checked the parking lights, taillights, turn signals, four way
flashers and everything works. Backed BillyBob up to the front entrance
and checked the brake lights reflection in the front doors. Success!
The only thing that is not working is the indicator lights in the turn
signal director itself. From reading posts at the Stovebolt.com forums,
I know this is not an uncommon problem. I will investigate some of the
solutions offered there in the coming weeks. Update the autoCAD wiring diagram
and that's it. Whew!! It is getting late and I'm feeling good. Time to
hoist an imaginary Iron City beer with Dad.
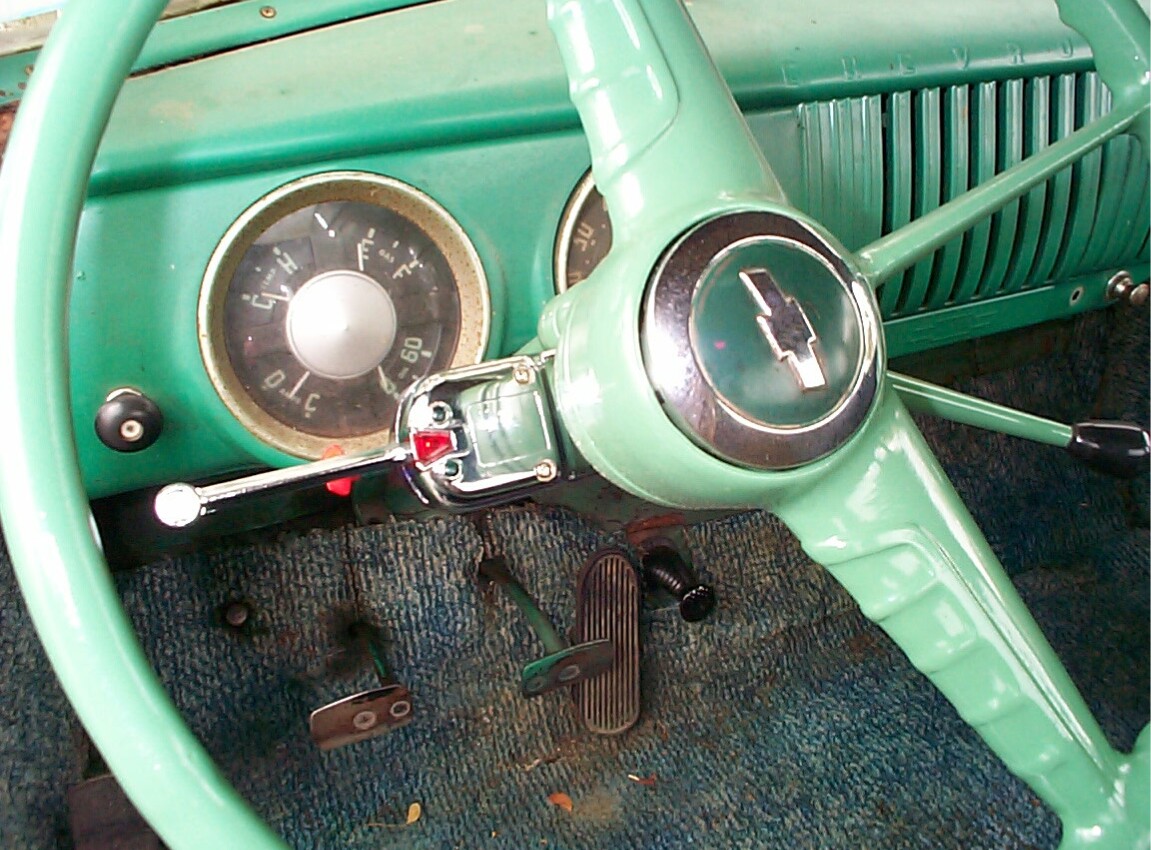
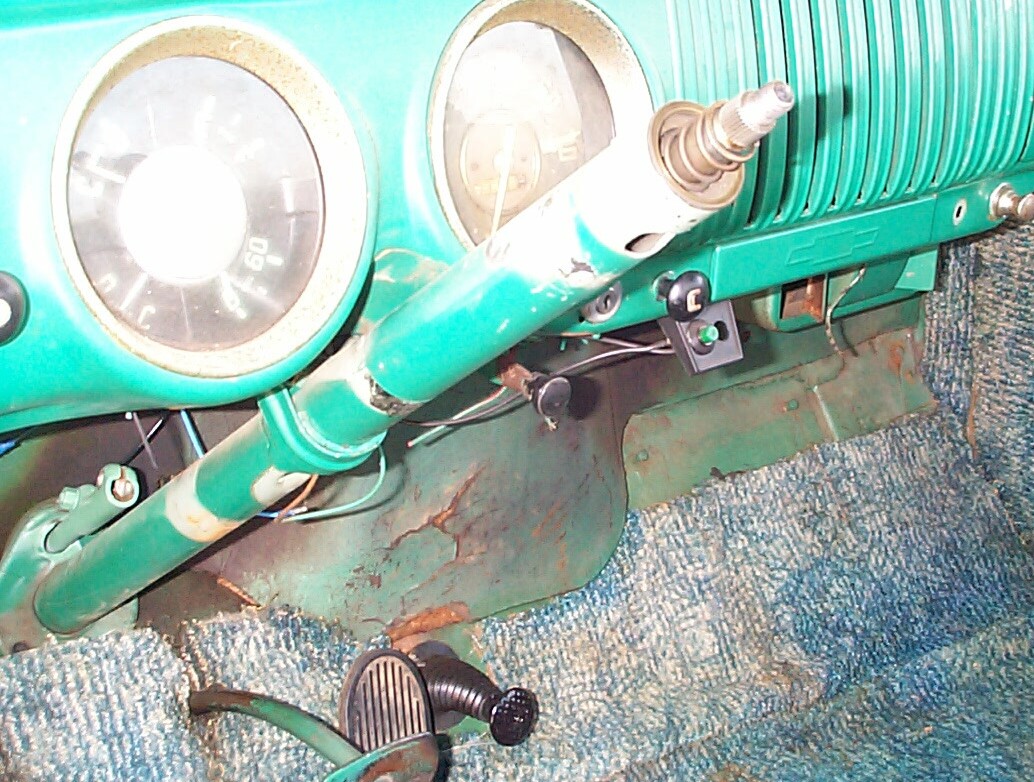
March 17th 2001 Started today with the starter. Starting BillyBob is somewhat of an art since I "fixed" it a few months back. Sometimes the starter spins without engaging and last week, I had to pull on the foot button to disengage it. I think part of the problem, at least, is the new starter return spring from American Classic Truck Parts. I noticed, on installation, that it was longer and weaker than the spring it was replacing (prettier too). Today I put the old ugly, shorter, stiffer spring back on . . . BillyBob started with confidence. Time will tell if this solves the problem.
 Decided
it would be a good time to paint the steering column to match the
steering wheel and shift linkage now that the old turn signal director
was gone. The steering wheel, shift linkage and new turn signal
director were removed. The bullet connectors on the turn-signal
director wiring make this a lot easier than if they were hard-wired.
Rough spots were lightly sanded and the whole column was gone over with
a 3M Automotive Paint & Body Scuff Pad. Eastwood's PRE Paint
Prep (catalog #10041Z) was applied and wiped off. Adjacent dashboard
and kick panel areas were masked off and screw holes were plugged. A
coat of Rustoleum "Grass Green" was applied.
Decided
it would be a good time to paint the steering column to match the
steering wheel and shift linkage now that the old turn signal director
was gone. The steering wheel, shift linkage and new turn signal
director were removed. The bullet connectors on the turn-signal
director wiring make this a lot easier than if they were hard-wired.
Rough spots were lightly sanded and the whole column was gone over with
a 3M Automotive Paint & Body Scuff Pad. Eastwood's PRE Paint
Prep (catalog #10041Z) was applied and wiped off. Adjacent dashboard
and kick panel areas were masked off and screw holes were plugged. A
coat of Rustoleum "Grass Green" was applied.
 I
also wanted to do some cleanup work on the new turn signal director
while the paint dried. I was lucky and the old phillips head screw
clamping mechanism from the old director was interchangable (not exact
but close enuf) with the new director allowing me to rectify the chewed
up phillips head condition I caused last week. I wanted to isolate the
clamp from the steering column with a strip of rubber too. I thought
about cutting a section out of a bicycle inner tube for this purpose.
Poking around in a mom and pop hardware store I found a better
solution. I found a vacuum cleaner drive belt about two inches in
diameter and exactly the same width as the clamp and approximately
1/16" thick. A small section will have to be cut out but, otherwise,
it's perfect. This belt was in a plain ziplock bag with the designation
"B9" hand printed on it. I wouldn't be surprised if it was the same one
JR was searching for when he was on a mission for Mom in the A-Team Mission Accomplished
caper.
I
also wanted to do some cleanup work on the new turn signal director
while the paint dried. I was lucky and the old phillips head screw
clamping mechanism from the old director was interchangable (not exact
but close enuf) with the new director allowing me to rectify the chewed
up phillips head condition I caused last week. I wanted to isolate the
clamp from the steering column with a strip of rubber too. I thought
about cutting a section out of a bicycle inner tube for this purpose.
Poking around in a mom and pop hardware store I found a better
solution. I found a vacuum cleaner drive belt about two inches in
diameter and exactly the same width as the clamp and approximately
1/16" thick. A small section will have to be cut out but, otherwise,
it's perfect. This belt was in a plain ziplock bag with the designation
"B9" hand printed on it. I wouldn't be surprised if it was the same one
JR was searching for when he was on a mission for Mom in the A-Team Mission Accomplished
caper.
 Early
afternoon, the masking was removed and the shift linkage re-installed.
One of the two phillips head screws that hold the linkage "knuckle" to
the steering column was loose again when I removed it earlier so, some
Threadlocker compound was applied to the screw threads when
re-installing this time. The vacuum cleaner belt was cut to size and
the turn signal director clamp snugged up. With the rubber belt under
the clamp, there is less clearance between the clamp, steering wheel
hub, and shift lever. It took a few tries before the director was
positioned where it wouldn't rub the steering wheel hub or the shift
lever. I tightened it up this time without mutilitating the clamp screw
head.
Early
afternoon, the masking was removed and the shift linkage re-installed.
One of the two phillips head screws that hold the linkage "knuckle" to
the steering column was loose again when I removed it earlier so, some
Threadlocker compound was applied to the screw threads when
re-installing this time. The vacuum cleaner belt was cut to size and
the turn signal director clamp snugged up. With the rubber belt under
the clamp, there is less clearance between the clamp, steering wheel
hub, and shift lever. It took a few tries before the director was
positioned where it wouldn't rub the steering wheel hub or the shift
lever. I tightened it up this time without mutilitating the clamp screw
head.
At this point, I suffered a series of stupid attacks. I alligator clipped a wire between the turn signal director switch case and the black (hot) wire to the flasher working toward a solution to the indicator light problem that was suggested on one of the message threads of the Stovebolt.com electrical forum (1st stupid attack). This action burnt up the flasher I thought, so I saddled up and went to Discount Auto Parts for another flasher (2nd stupid attack). On the way back, I realized I hadn't checked the 15A in-line fuse between the headlamp switch and the flasher (3rd stupid attack). Shure Nuff! The fuse was blown and it had protected me from stupid attack number one. I didn't have any 15A fuses so I went to the local NAPA store which is closer than Discount Auto Parts. Also, I wouldn't have to show up at the Discount Auto Parts counter where the checkout guy would be able to put two and two together and figure out I was having stupid attacks. A new fuse fixed the problem, but I still don't have indicator lights.
"I'd rather be lucky than smart" is a saying my boss is fond of. Since I already had another new heavy duty flasher from my run to Discount Auto Parts, I thought I'd give it a try. This one is a number 550 and the one I've been using is a 569. A newer message thread on the Stovebolt.com electrical forum indicates the indicator light problem has to do with the newer flashers having different circuitry than the turn signal director was designed for. Guess what! With the new 550 flasher, everything works including the indicator lights. I've made some progress today. I'm going home happy.
| < Back
to Intro |
You can email me at ![]() webmaster@laroke.com
webmaster@laroke.com
Issued Sunday March 18, 2001
Updated Tuesday May 9, 2017
copyright © 1996-2017 Larry Robert Kephart all rights reserved
| | LRK Home | | Bio Info | | Krash Khronicles | | LAROKE | |
| | BettyLou | | BillyBob's Garage | | Rat Patrol | | Deerslayer | | Elvira | |
| | Land of the Free and Home of the Brave | |
| | Keppylou's Art | | WWI Soldier's Diary | |