| | LRK Home | | Bio Info | | Krash Khronicles | | LAROKE | |
| | BettyLou | | BillyBob's Garage | | Rat Patrol | | Deerslayer | | Elvira | |
| | Land of the Free and Home of the Brave | |
| | Keppylou's Art | | WWI Soldier's Diary | |
BillyBob Work-in-Progress Log
![]()
TRUCK LINKS including vendor sites for old parts, custom parts, and tools as well as sites for classic car and truck organizations
STORE Operating in association with Amazon.com, books, recordings and tools can be purchased.
PLANNING for the restoration including project schedule and cost estimates.
![]()
WORK-IN-PROGRESS is the restoration of parts of BillyBob that I can accomplish without a garage.
PRE-RESTORATION includes log entries of minor repairs and and adventures between time of purchase and the time when I started restoration, a piece at a time.
JR'S KORNER JR's Korner is the history of BillyBob before I got him authored by my brother, Wm. C. Kephart.
6. Nervous Breakdown: Research,
Battery, Starter
Page 1
June 19th 2000 On the day I finished the Wheels Refurb mini-project I ordered a wiring harness (catalog #EL171C) and turn-signal kit from Jim Carter's Antique Truck Parts at their Website. I made a mistake and ordered the 6-volt turn-signal kit (#EL1316), so I went online again a few hours later and ordered the 12-volt kit (#EL13112). I made mention of my mistake in the new order, and whoever filled my order at Jim Carter's made sure I got the right stuff by amending the original order. The order arrived yesterday and tho' the turn-signal is the correct 12-volt kit, it is missing the switch and flasher, so I will have to get on the phone after all.
I'm gonna have to pull the steering wheel, I think, to get at the horn wiring, and it would also help me with my shift lever repairs with the wheel out of the way, so I ordered The Eastwood Company's Steering Wheel Restoration Kit (catalog #52061) since that job has to be done sooner or later and the kit includes a wheel puller. I also ordered a 6-to-12 volt conversion video (# 25064)from Eastwood.
The Jim Carter catalog description for the wiring harness made mention of "detailed installation instructions" . . . Well, maybe for a fella experienced in automotive electrics, but not for me. The single page left me scratching my head with apprehension.
 I'm
gathering every bit of info about this job I can 'cause we fear what we
don't know and I know next to nuttin' about electricity. I learned
about high-voltage as a young twenty-somethin' when I told my brother, JR, to
start the 290 CI V8 engine of my 1969 AMC Javelin SST while I hovered
over the engine compartment. To support myself I had one hand braced on
the inner fender, the other on the coil! Eureka!
the power of electricity was amply demonstrated. Hoo-boy,
that smarts! More recently, here in South Florida, I
passed a burning classic on the side of the highway. The fire had
consumed everything by the time I saw it - it was a smokin' black hulk.
It had been, only a few hours before, a running Aston-Martin DB5 (like
007's car in Goldfinger). I shook my head as I slowed down to pass.
Ignition by Lucas, Lord of Darkness, I lamented.
I'm
gathering every bit of info about this job I can 'cause we fear what we
don't know and I know next to nuttin' about electricity. I learned
about high-voltage as a young twenty-somethin' when I told my brother, JR, to
start the 290 CI V8 engine of my 1969 AMC Javelin SST while I hovered
over the engine compartment. To support myself I had one hand braced on
the inner fender, the other on the coil! Eureka!
the power of electricity was amply demonstrated. Hoo-boy,
that smarts! More recently, here in South Florida, I
passed a burning classic on the side of the highway. The fire had
consumed everything by the time I saw it - it was a smokin' black hulk.
It had been, only a few hours before, a running Aston-Martin DB5 (like
007's car in Goldfinger). I shook my head as I slowed down to pass.
Ignition by Lucas, Lord of Darkness, I lamented.
Everytime I think about my lack of skill in this area, I mentally kick myself in the butt. You see, my Dad's hobby (and eventually his work) was electronics. When I was a kid, he was president of the local HAM radio club and had his first class radio license. He would have been thrilled to school me in this arcane knowledge, if only I had expressed the least bit of interest. I was, however, interested in daydreamin' about girls beyond my reach. I'm still daydreaming of those same girls whose faces are now obscured by a rosy fog of a memory. Anyway, I inherited Dad's multi-meter and oscilliscope when he passed on and I don't have a clue on how to use them!
 June
24th 2000 A previous
owner before JR
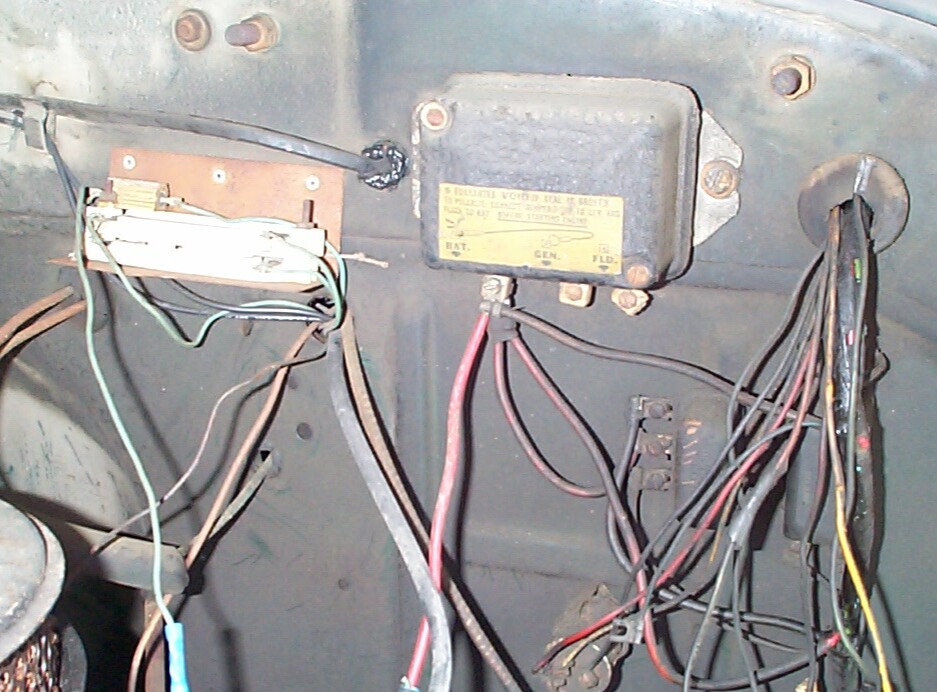
had already converted BillyBob to 12-volt some time back. The info for
new wiring harness doesn't state that it's for a "one-wire alternator"
conversion but that seems to be the case. From my limited research I
believe "one-wire" alternators have a built-in voltage regulator and
there is therefore no need for an external voltage regulator. Why then
is BillyBob's original 6-volt voltage regulator still in place with
wires still running to its "bat" terminal? The white ceramic gismo to
the left is a 12-volt to 6-volt voltage reducer for the gauges? the
heater motor? both? - I don't know yet. Behind the rat's nest of wiring
below and to the right of the voltage regulator is the original horn
relay and fuse block, I think. The round device at the bottom of the
pic might be the flasher for the after-market turn signals.
June
24th 2000 A previous
owner before JR
had already converted BillyBob to 12-volt some time back. The info for
new wiring harness doesn't state that it's for a "one-wire alternator"
conversion but that seems to be the case. From my limited research I
believe "one-wire" alternators have a built-in voltage regulator and
there is therefore no need for an external voltage regulator. Why then
is BillyBob's original 6-volt voltage regulator still in place with
wires still running to its "bat" terminal? The white ceramic gismo to
the left is a 12-volt to 6-volt voltage reducer for the gauges? the
heater motor? both? - I don't know yet. Behind the rat's nest of wiring
below and to the right of the voltage regulator is the original horn
relay and fuse block, I think. The round device at the bottom of the
pic might be the flasher for the after-market turn signals.
 And
what is this on the driver side inner fender? Is it a 12-volt voltage
regulator? Last Thursday happened to be JR's 48th
birthday. I called him Wednesday nite and wished him a happy one. After
waiting a polite five nano-seconds more, I launched into an
interrogation on the nature of BillyBob's wiring.
And
what is this on the driver side inner fender? Is it a 12-volt voltage
regulator? Last Thursday happened to be JR's 48th
birthday. I called him Wednesday nite and wished him a happy one. After
waiting a polite five nano-seconds more, I launched into an
interrogation on the nature of BillyBob's wiring.
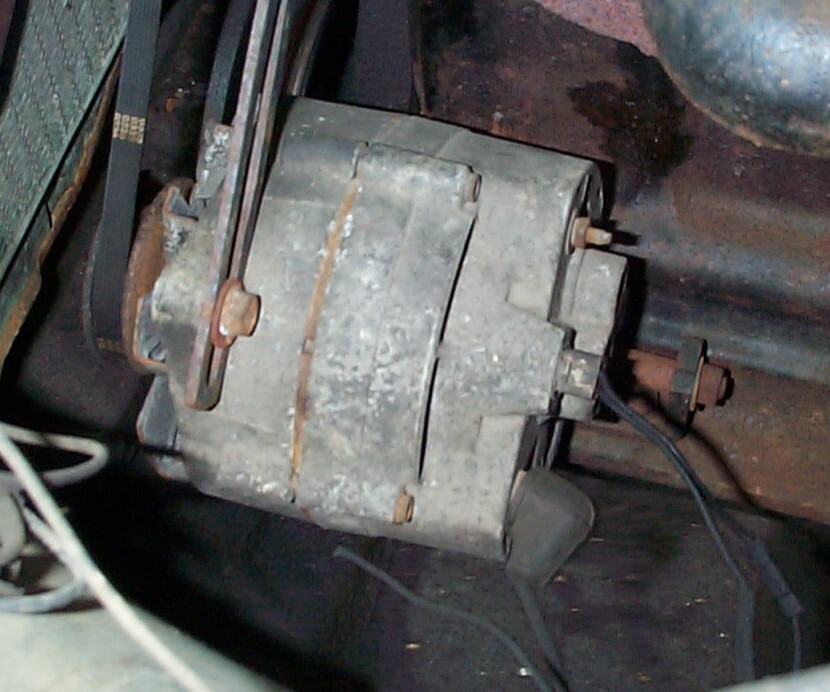 JR
said BillyBob's alternator was an earlier model than the one-wire jobs
and it didn't have the internal regulator. We talked about the voltage
reducers and he suggested the possibllity of replacing the existing
gauges with converted 12-volt gauges to simplify things somewhat. JR
said I would have to modify my new wiring harness, but it was fairly
simple to do and that he thought a 1972 Chevy Pickup wiring diagram was
pretty close to what I needed. Easy for him to say - He's an
electronics engineer. JR offered that it was, in fact, a lot easier
than tearing into his mid-eighties Jag V-12 wiring which even he was
afraid of. I had to agree.
JR
said BillyBob's alternator was an earlier model than the one-wire jobs
and it didn't have the internal regulator. We talked about the voltage
reducers and he suggested the possibllity of replacing the existing
gauges with converted 12-volt gauges to simplify things somewhat. JR
said I would have to modify my new wiring harness, but it was fairly
simple to do and that he thought a 1972 Chevy Pickup wiring diagram was
pretty close to what I needed. Easy for him to say - He's an
electronics engineer. JR offered that it was, in fact, a lot easier
than tearing into his mid-eighties Jag V-12 wiring which even he was
afraid of. I had to agree.
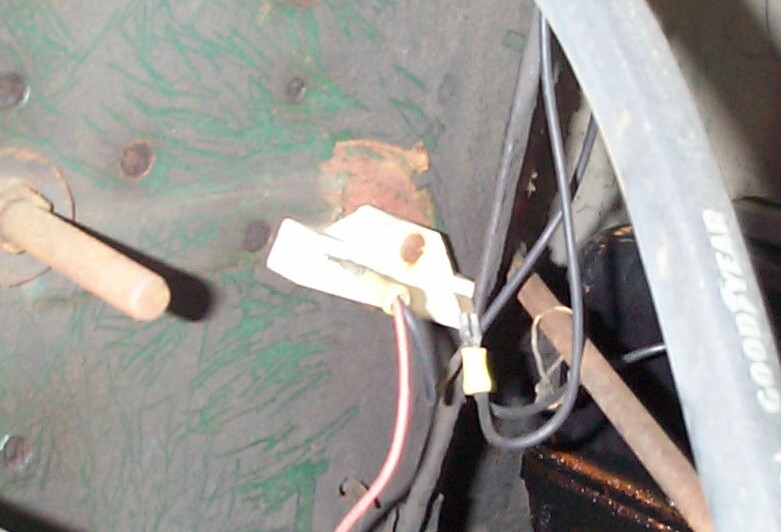 If
I'm right, it looks as if BillyBob is still running his 6-volt coil
which is wired thru this other
If
I'm right, it looks as if BillyBob is still running his 6-volt coil
which is wired thru this other voltage reducer,
OOPs, "Ballast Resistor" I think (I'm clueless as to the difference at
this point in my education), on the passenger side of the firewall. If
so, I'll be changing that too. Well, it's back to the books for more
research. I'm also in the process of gathering more parts for the time
being.
 June
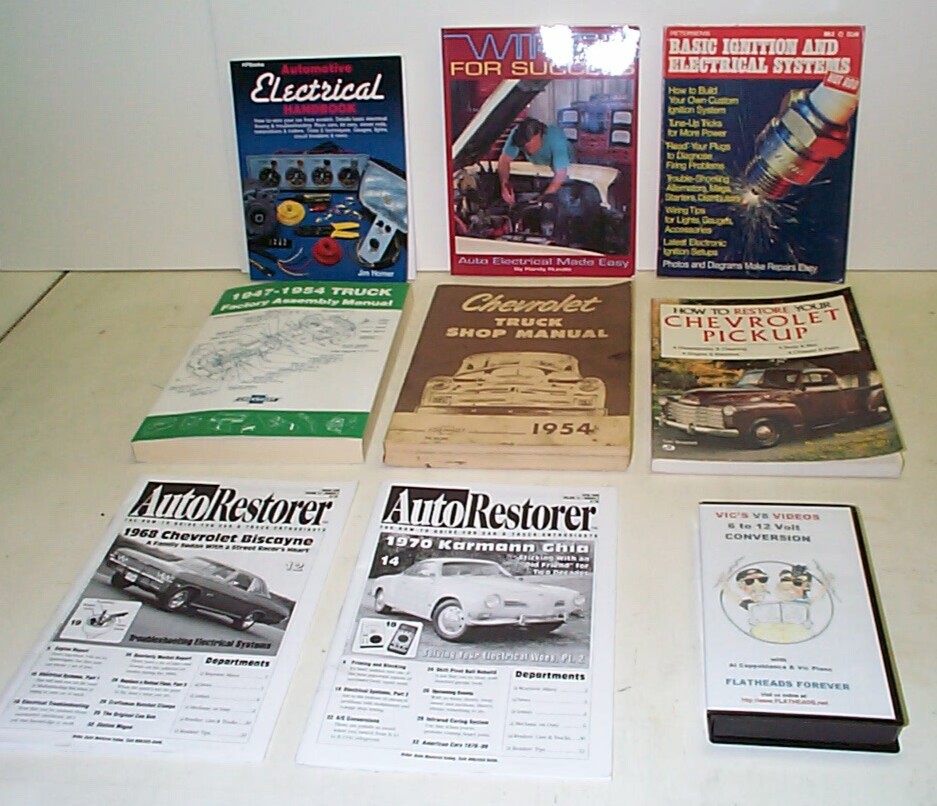
25th 2000 Gathered my
first batch of research materials an' went at it. Starting at the top
left corner in the pic is the "Automotive Electrical Handbook" By Jim
Horner. I've just started to read this, but I know already I'm gonna go
cover-to-cover. It's great for the "abstract theory challenged" people
like me - easy to understand for the layman. Next to it is "Wired for
Success" By Randy Rundle. It's next on my list for a complete read.
Next is Petersen's "Basic Ignition and Electrical Systems".
Out-of-print now, this is one of a series of Hot Rod tech volumes from
the late sixties, early seventies. Dated, but still useful info. The
second row consists of the "Factory Assembly Manual", "Shop Manual" and
"How to Restore Your Chevrolet Pickup" By Tom Brownell. I use these
extensively for reference. The first two items of the bottom row are
"Auto Restorer Magazine Volume 12 Numbers 3 and 4. Several electrical
how-to's and troubleshooting articles between these two issues. The
last item is "Vic's V8 Videos 6 to 12 volt Conversion" Video. I got
this from Eastwood and it applies to Ford Flatheads but some info is
applicable to other makes. I wouldn't buy this again (unless I had a
flathead), but it was interesting and campy with corny jokes throughout.
June
25th 2000 Gathered my
first batch of research materials an' went at it. Starting at the top
left corner in the pic is the "Automotive Electrical Handbook" By Jim
Horner. I've just started to read this, but I know already I'm gonna go
cover-to-cover. It's great for the "abstract theory challenged" people
like me - easy to understand for the layman. Next to it is "Wired for
Success" By Randy Rundle. It's next on my list for a complete read.
Next is Petersen's "Basic Ignition and Electrical Systems".
Out-of-print now, this is one of a series of Hot Rod tech volumes from
the late sixties, early seventies. Dated, but still useful info. The
second row consists of the "Factory Assembly Manual", "Shop Manual" and
"How to Restore Your Chevrolet Pickup" By Tom Brownell. I use these
extensively for reference. The first two items of the bottom row are
"Auto Restorer Magazine Volume 12 Numbers 3 and 4. Several electrical
how-to's and troubleshooting articles between these two issues. The
last item is "Vic's V8 Videos 6 to 12 volt Conversion" Video. I got
this from Eastwood and it applies to Ford Flatheads but some info is
applicable to other makes. I wouldn't buy this again (unless I had a
flathead), but it was interesting and campy with corny jokes throughout.
July 1st 2000 Rain is threatening so I'm not doin' much this Independence Day weekend. I'm contenting myself to remove some parts from the dashboard area that are not needed in the hope I'll have a little more elbow room when I start messin' with the wiring of the instruments down the road. First, I removed the non-functioning throttle cable and knob. This operation involves a 9/16" wrench in a confined area - takes a while. It would be even harder if BillyBob had a radio to get in the way. Also removed an aftermarket bracket from the steering column that looks like it was designed to hold a flashlight.
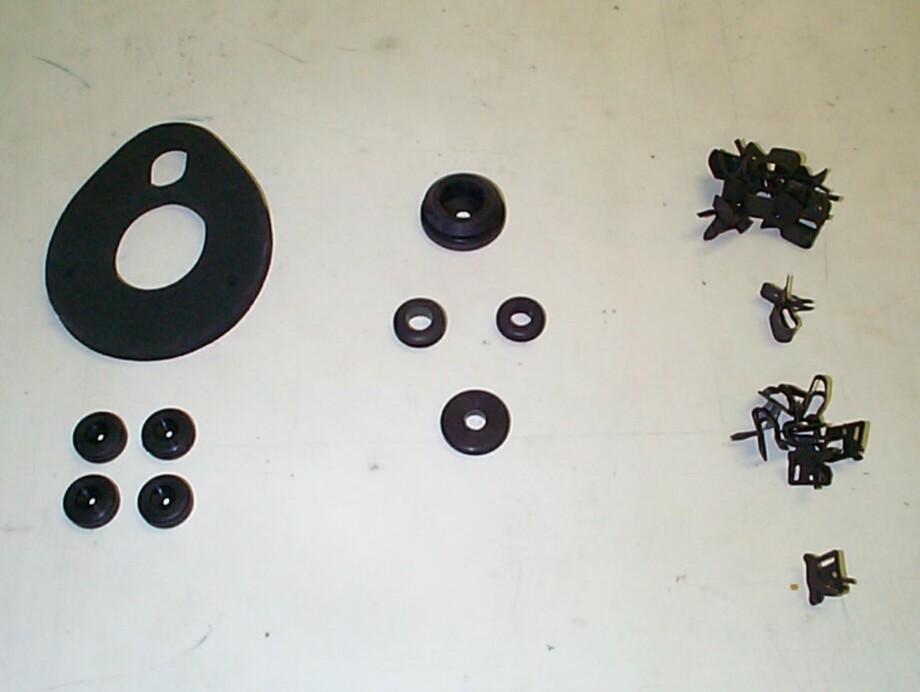 I've
decided to give the firewall and inner fenders a "Stage I" cleaning and
painting when I remove the old wiring, so I've started purchasing new
rubber parts and wiring clips. So far Chevy Duty has sent me (catalog
#37-821) 4 Inner Fender Wire Grommets, (#40-211) Steering Column to
Floor Sponge Seal, (#42-105) Main Harness Firewall Grommet, (#42-315)
Starter Wire Grommet, (#42-425) Vacuum Hose Grommet, (#42-525)
Speedometer Cable Grommet, (#52-905) 10 Wiring Harness Clips - Sheet
Metal, and (#52-925) 10 Wiring Harness Clips - Frame.
I've
decided to give the firewall and inner fenders a "Stage I" cleaning and
painting when I remove the old wiring, so I've started purchasing new
rubber parts and wiring clips. So far Chevy Duty has sent me (catalog
#37-821) 4 Inner Fender Wire Grommets, (#40-211) Steering Column to
Floor Sponge Seal, (#42-105) Main Harness Firewall Grommet, (#42-315)
Starter Wire Grommet, (#42-425) Vacuum Hose Grommet, (#42-525)
Speedometer Cable Grommet, (#52-905) 10 Wiring Harness Clips - Sheet
Metal, and (#52-925) 10 Wiring Harness Clips - Frame.
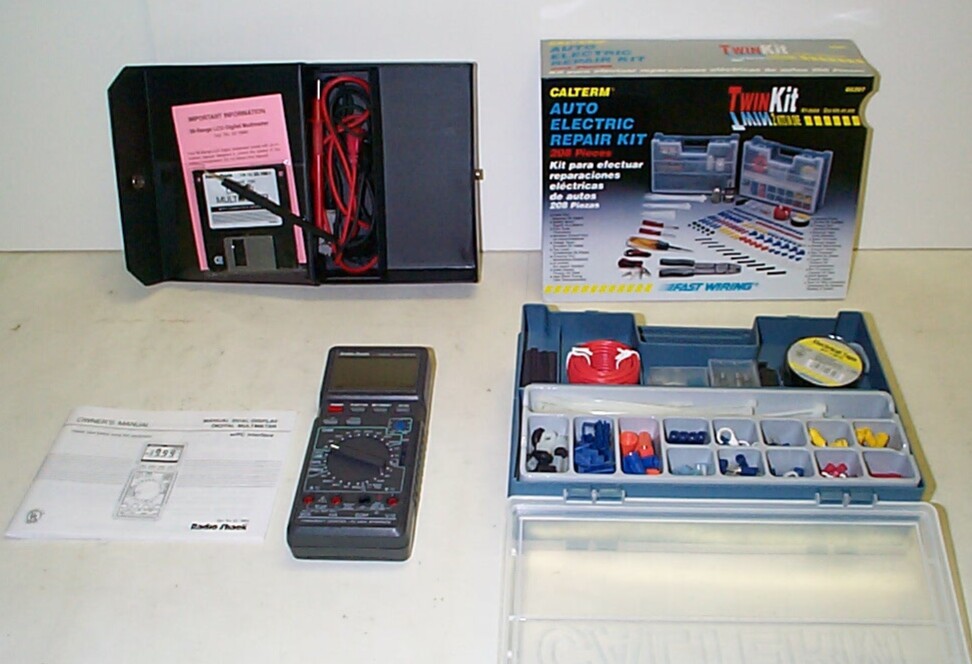 July
14th 2000 Still
gathering parts and tools. i've learned enuf basics to begin to
understand the existing rat's nest of wiring (a little) as well as
start to plan it's replacement. An impulse buy at the Discount Auto
Parts store a couple of weeks ago resulted in a Calterm Auto Eectric
Repair Kit (#05207) with all kinda goodies which this project will put
to good use. The time has come to blow the dust off the Radio Shack
Digital Multimeter I picked up last year for my computer consulting
business and put it to use checking out the Jim Carter wiring harness.
July
14th 2000 Still
gathering parts and tools. i've learned enuf basics to begin to
understand the existing rat's nest of wiring (a little) as well as
start to plan it's replacement. An impulse buy at the Discount Auto
Parts store a couple of weeks ago resulted in a Calterm Auto Eectric
Repair Kit (#05207) with all kinda goodies which this project will put
to good use. The time has come to blow the dust off the Radio Shack
Digital Multimeter I picked up last year for my computer consulting
business and put it to use checking out the Jim Carter wiring harness.
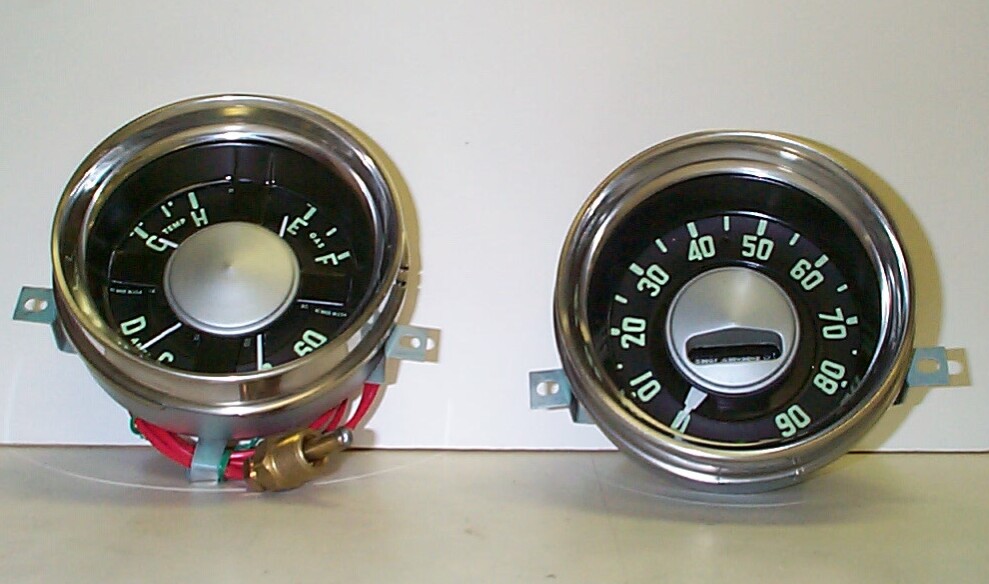 The
day after my conversation with JR, I ordered a rebuilt gauge cluster
with 12-volt conversion (catalog #GCL54C-12) and rebuilt speedometer
cluster (#SP182) from the American Classic Truck Parts website.
This came close to $630 including shipping and core charges of $150.
They arrived today and based on appearance alone, I am tickled pink!
They are beautiful. They don't look rebuilt, they look new. The water
temperature gauge connection may present some problems since the
fitting for the engine end of the capillary tube appears to be bigger
than the existing fitting on BillyBob.
The
day after my conversation with JR, I ordered a rebuilt gauge cluster
with 12-volt conversion (catalog #GCL54C-12) and rebuilt speedometer
cluster (#SP182) from the American Classic Truck Parts website.
This came close to $630 including shipping and core charges of $150.
They arrived today and based on appearance alone, I am tickled pink!
They are beautiful. They don't look rebuilt, they look new. The water
temperature gauge connection may present some problems since the
fitting for the engine end of the capillary tube appears to be bigger
than the existing fitting on BillyBob.
 July
23rd 2000 During the
week, a backordered four-hole firewall grommet (catalog #42-215)
arrived from Chevy-Duty. I was also tipped off
to a sale at the Brothers Truck Parts Website by
one of the fellas at The Stovebolt Page Bulletin Board.
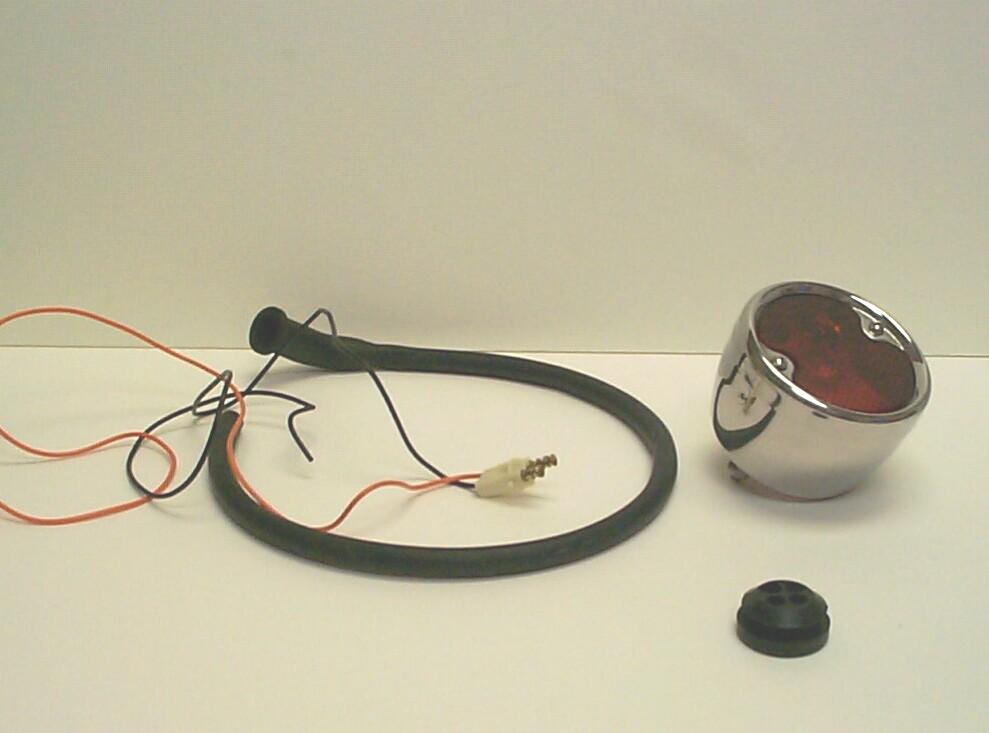
I rushed over there and ordered a pair of 54-55 Taillamps (#TLC550P)
along with some other parts. They arrived on Friday.
July
23rd 2000 During the
week, a backordered four-hole firewall grommet (catalog #42-215)
arrived from Chevy-Duty. I was also tipped off
to a sale at the Brothers Truck Parts Website by
one of the fellas at The Stovebolt Page Bulletin Board.
I rushed over there and ordered a pair of 54-55 Taillamps (#TLC550P)
along with some other parts. They arrived on Friday.
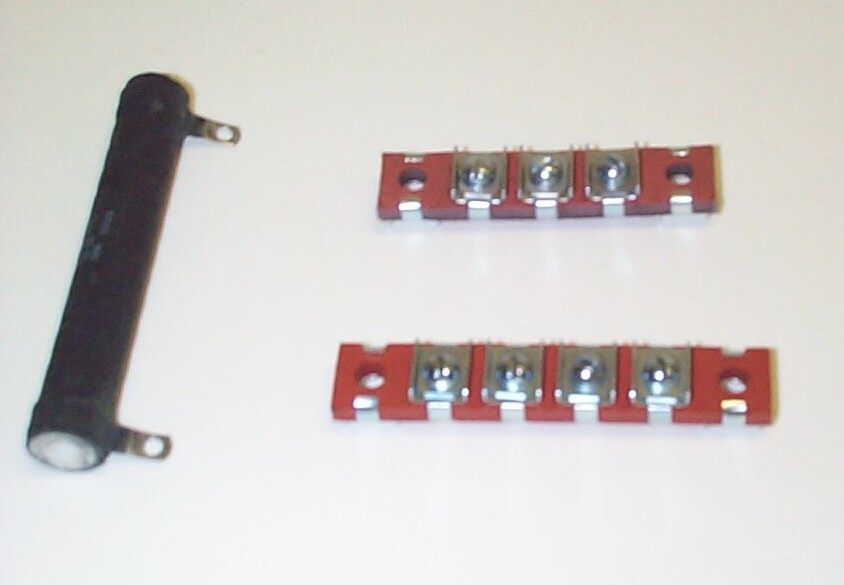 November
22nd 2000 A few months
back I ordered a pair of the terminal blocks that mount on the inner
fender wells in the engine bay for the headlight and horn wiring. I'm
not sure that these are needed with the new wiring harness, but I
wanted to use them to keep the look a little more original. I ordered
them from Jim Carter's along with some other items. The terminal blocks
were backordered and some time later, Jim Carter's sent me a postcard
to the effect that they didn't expect the terminal blocks anytime soon,
so they were canceling the order rather than make me wait. I went to
American Classic Truck Parts where I got the gauges and ordered the
terminal blocks (#EL173) along with a Heavy Duty Voltage Reducer
(#EL135) for the Heater Motor which I will use if I don't get a 12-volt
replacement motor for the heater. These items arrived today at the
Krash Lab. Later on, Tim Lloyd posted a message to the
Oletrucks mail list that the Heavy Duty Voltage Reducer for the heater
motor sold by Chevy-Duty does not hold up. I don't know if it is the
same one I purchased from American Classic or not.
November
22nd 2000 A few months
back I ordered a pair of the terminal blocks that mount on the inner
fender wells in the engine bay for the headlight and horn wiring. I'm
not sure that these are needed with the new wiring harness, but I
wanted to use them to keep the look a little more original. I ordered
them from Jim Carter's along with some other items. The terminal blocks
were backordered and some time later, Jim Carter's sent me a postcard
to the effect that they didn't expect the terminal blocks anytime soon,
so they were canceling the order rather than make me wait. I went to
American Classic Truck Parts where I got the gauges and ordered the
terminal blocks (#EL173) along with a Heavy Duty Voltage Reducer
(#EL135) for the Heater Motor which I will use if I don't get a 12-volt
replacement motor for the heater. These items arrived today at the
Krash Lab. Later on, Tim Lloyd posted a message to the
Oletrucks mail list that the Heavy Duty Voltage Reducer for the heater
motor sold by Chevy-Duty does not hold up. I don't know if it is the
same one I purchased from American Classic or not.
| < Back to Intro |
You can email me at ![]() webmaster@laroke.com
webmaster@laroke.com
Issued Tuesday February 6, 2001
Updated Tuesday May 2, 2017
copyright © 1996-2017 Larry Robert Kephart all rights reserved
| | LRK Home | | Bio Info | | Krash Khronicles | | LAROKE | |
| | BettyLou | | BillyBob's Garage | | Rat Patrol | | Deerslayer | | Elvira | |
| | Land of the Free and Home of the Brave | |
| | Keppylou's Art | | WWI Soldier's Diary | |