| | LRK Home | | Bio Info | | Krash Khronicles | | LAROKE | |
| | BettyLou | | BillyBob's Garage | | Rat Patrol | | Deerslayer | | Elvira | |
| | Land of the Free and Home of the Brave | |
| | Keppylou's Art | | WWI Soldier's Diary | |
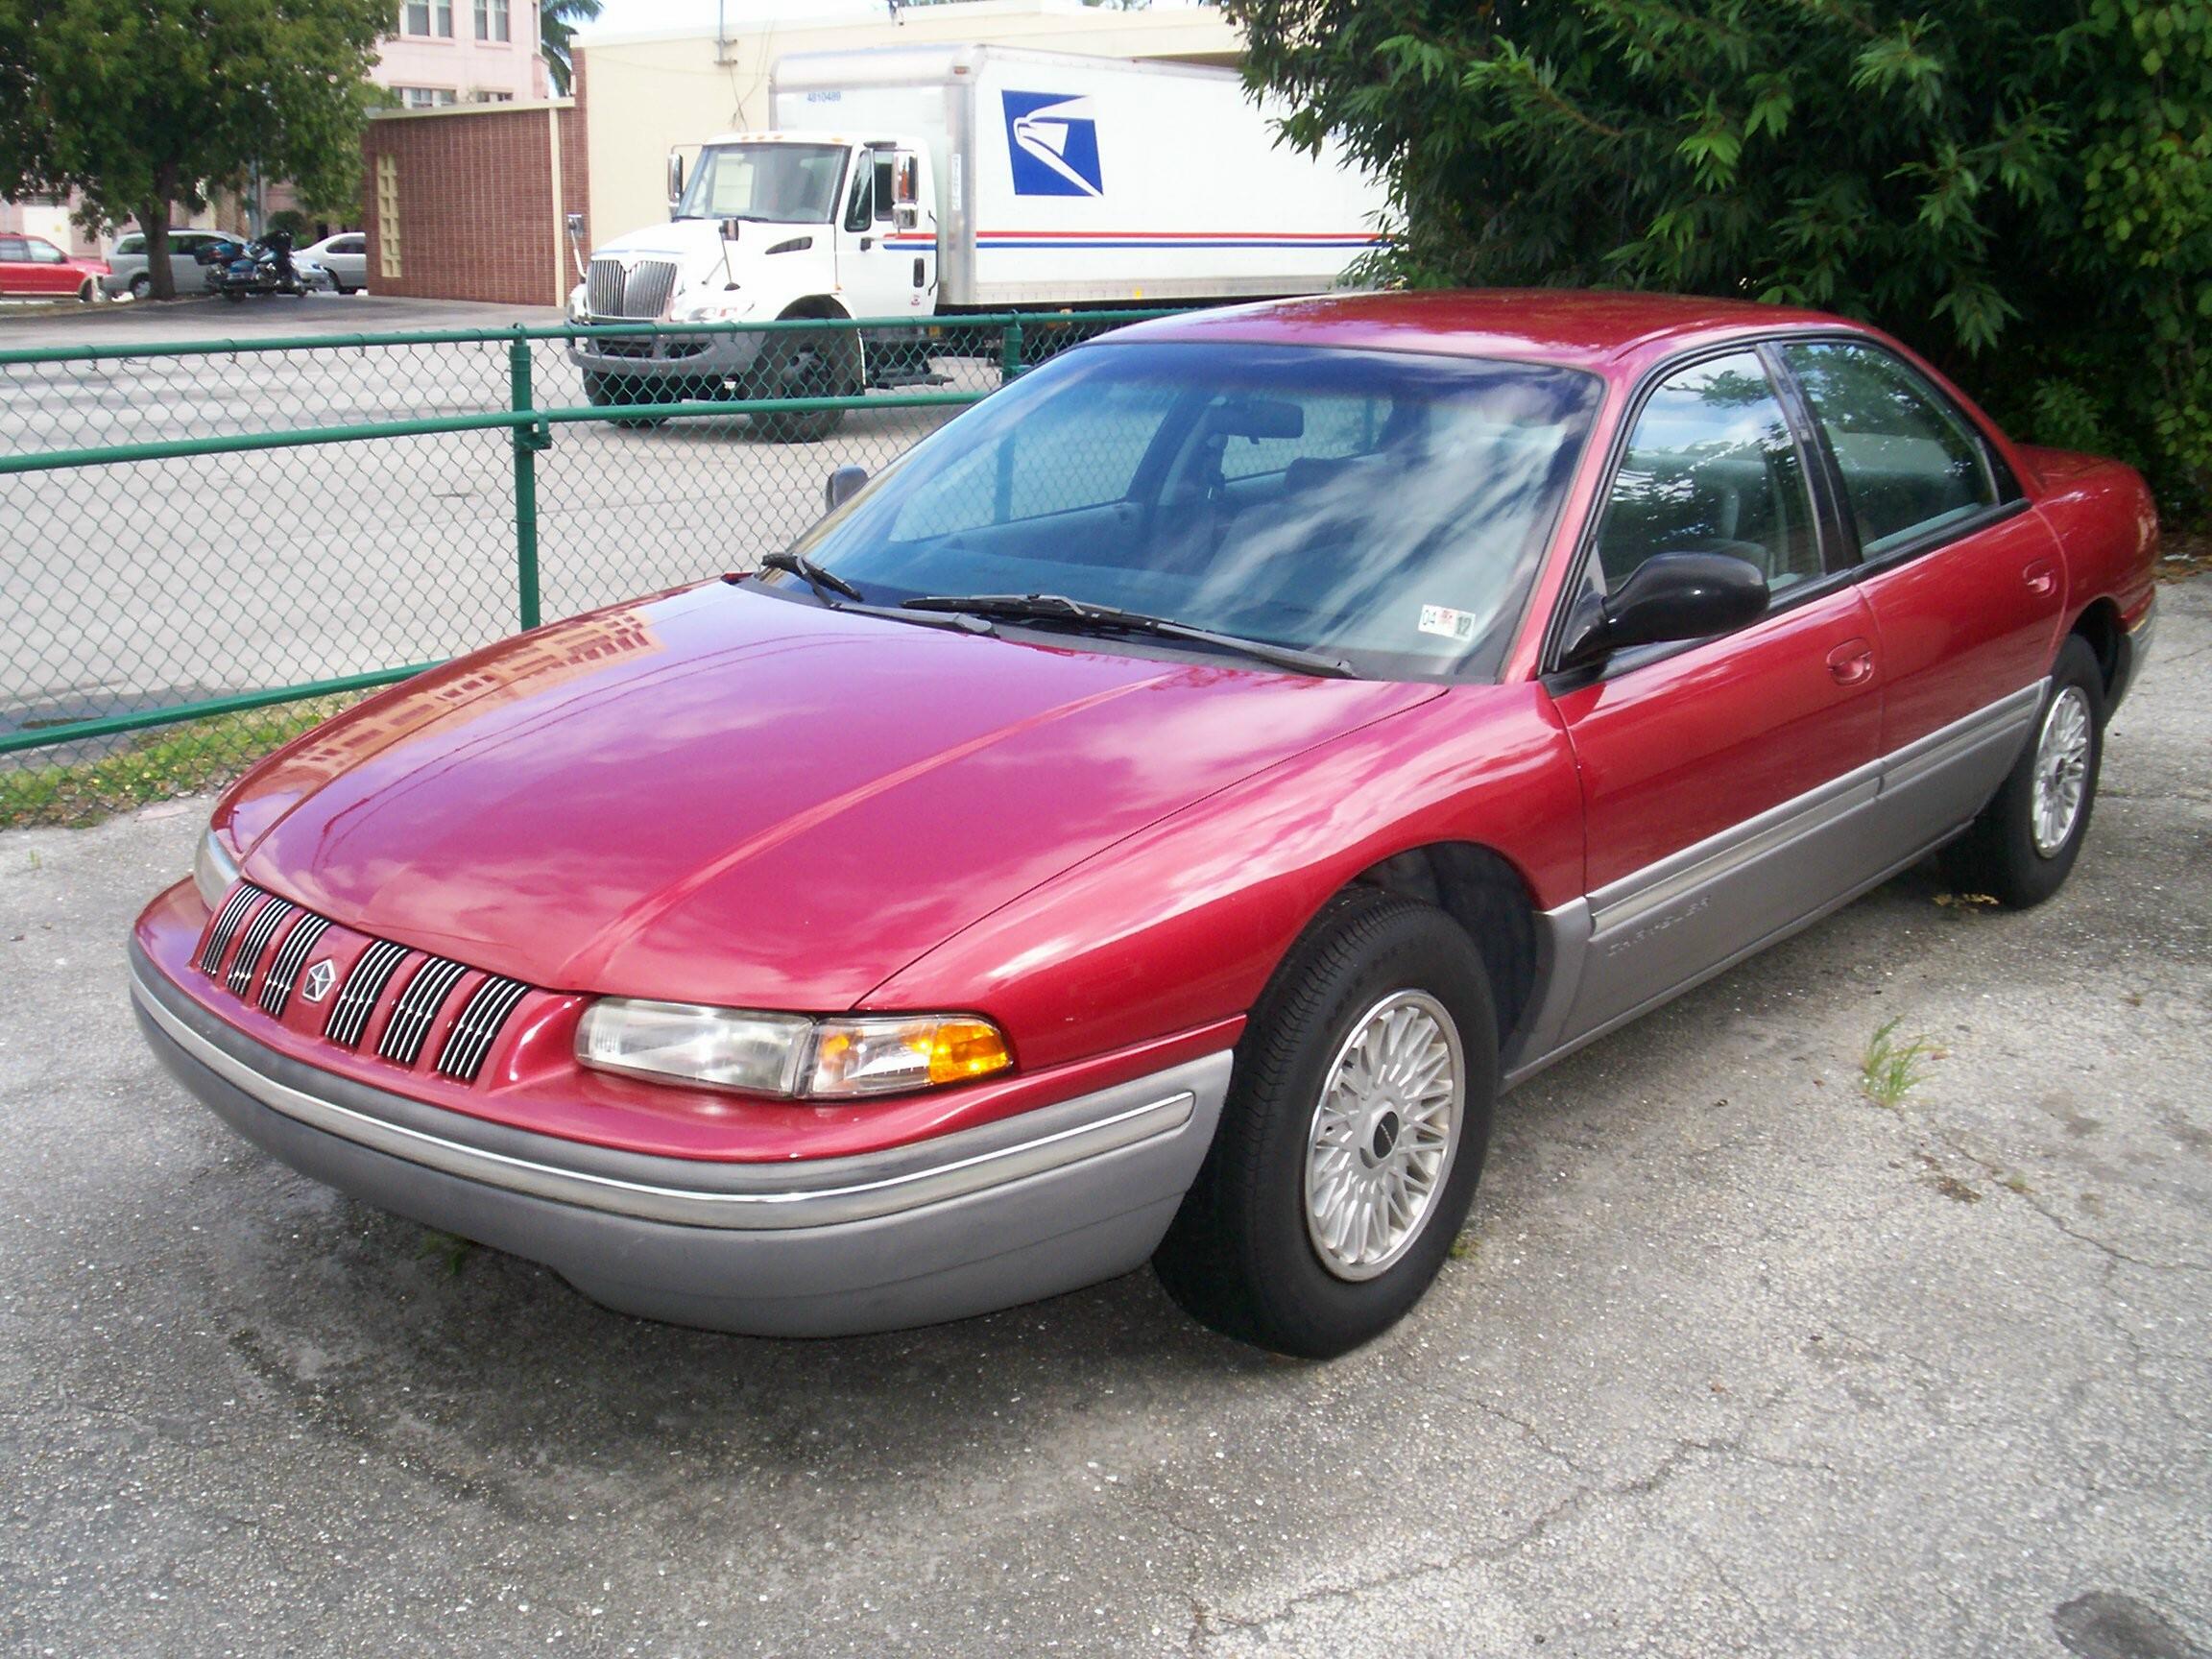
BettyLou's Restoration Log
![]()
BETTYLOU LINKS including vendor sites for parts and tools as well as sites for MoPar organizations
![]()
RESTORATION LOG includes log entries of repairs and restoration between the time of arrival in Florida and the present.
![]()
BETTYLOU MAINTENANCE Ever changing detailing, oil change, lube, etc. maintenance routines developed for BettyLou based on the BillyBob routines, including required tools, materials and procedures.
2. Little Things
Rust Apocalypse
 April
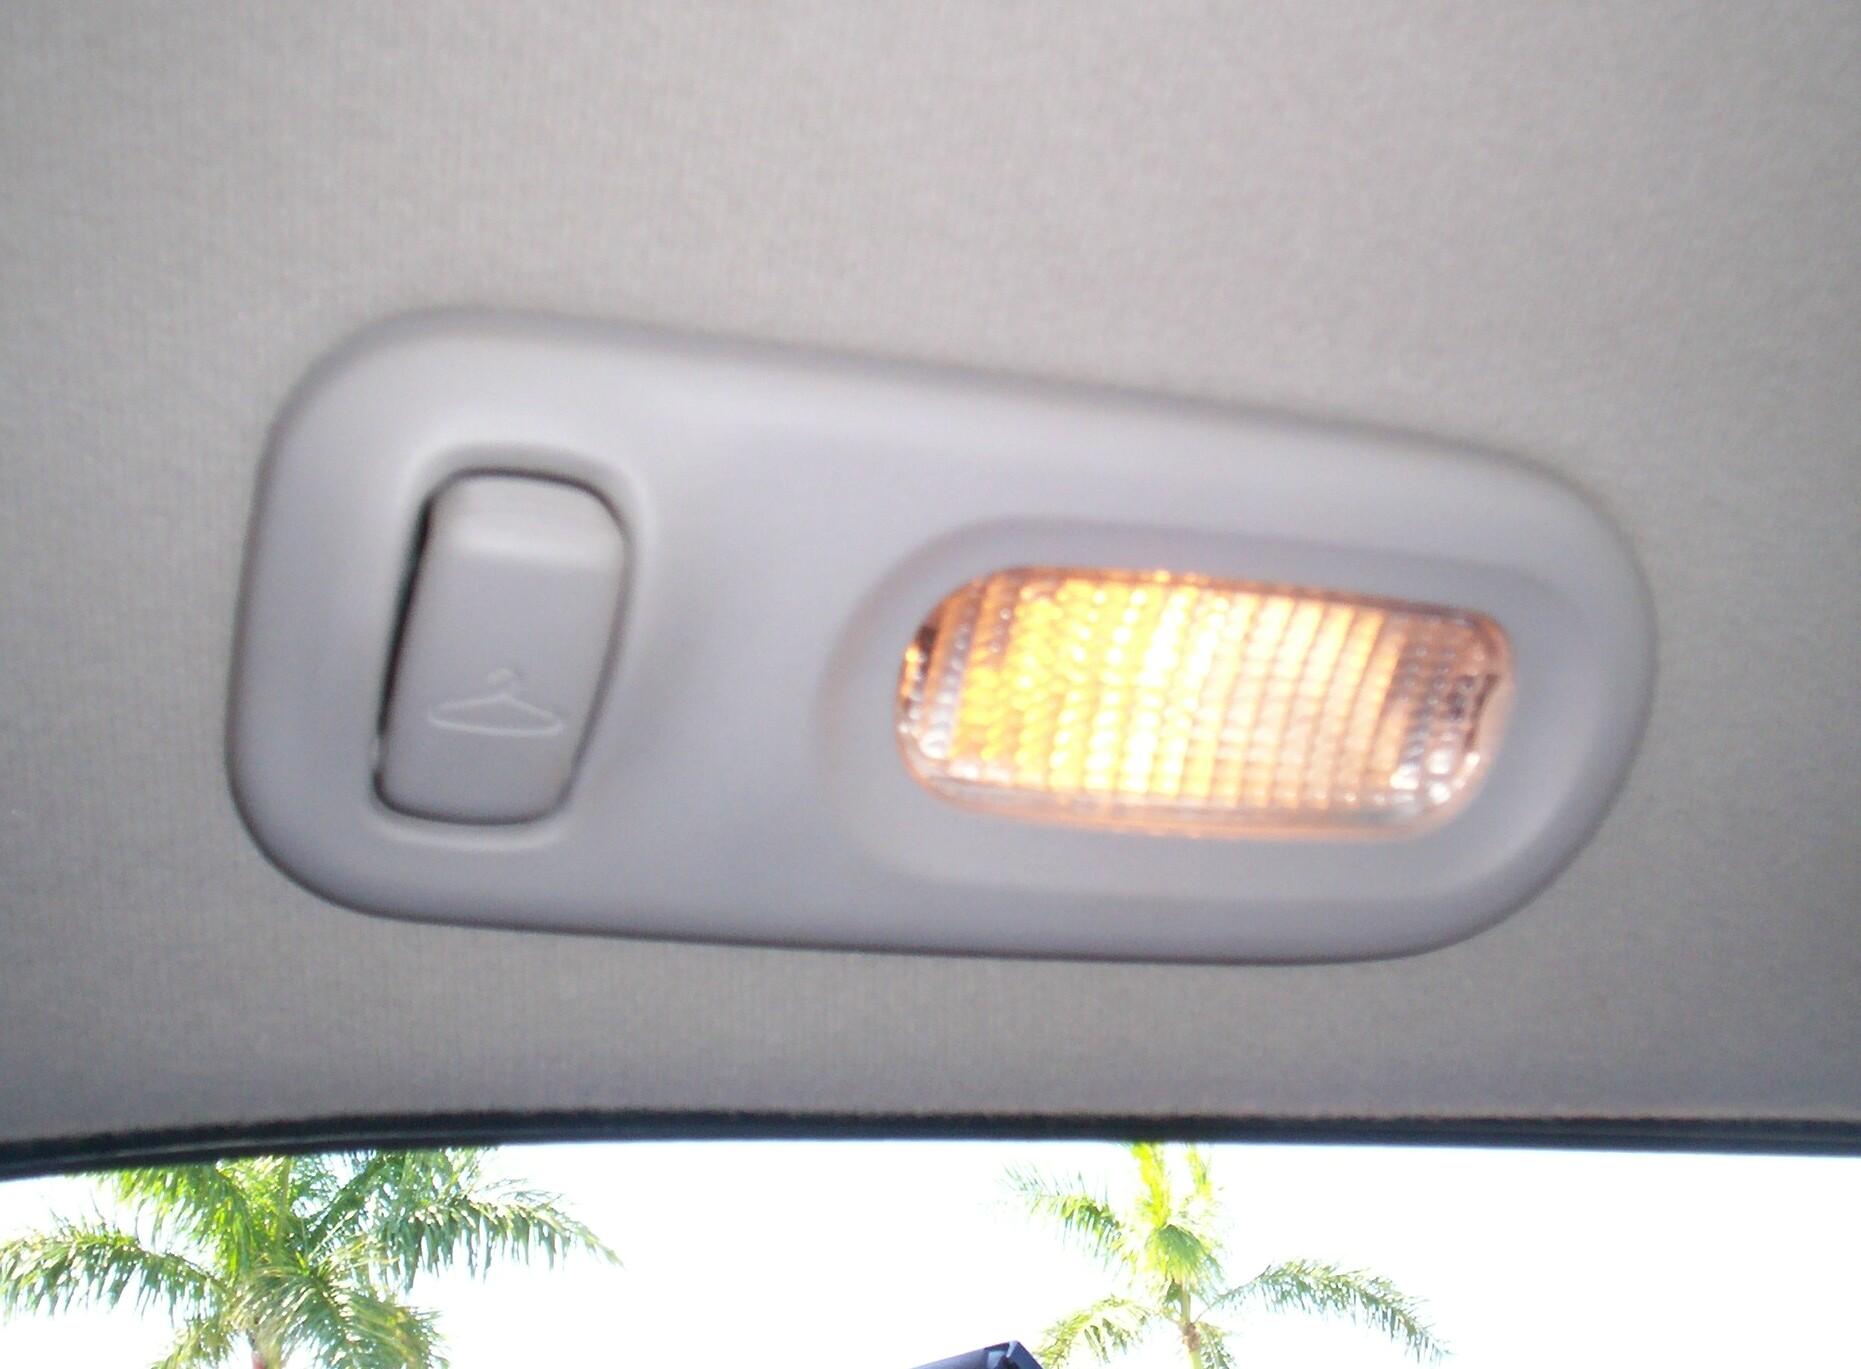
5th 2007 Last weekend
while I was doin' some lite tinkering with the vehicles while waiting
to go to the Barrett-Jackson auction with my boss, I noticed something
hanging down from the headliner in the backseat. It was the driver
side, rear seat, courtesy light coathook assembly. Further
investigation revealed that this thing was secured by a single phillips
head screw and that the plastic had fractured and shattered around the
screw. ARRRUUUGH! I'm old-fashioned on
this issue. I prefer metal in lieu of plastic in cars in most cases
where either one can be used.
April
5th 2007 Last weekend
while I was doin' some lite tinkering with the vehicles while waiting
to go to the Barrett-Jackson auction with my boss, I noticed something
hanging down from the headliner in the backseat. It was the driver
side, rear seat, courtesy light coathook assembly. Further
investigation revealed that this thing was secured by a single phillips
head screw and that the plastic had fractured and shattered around the
screw. ARRRUUUGH! I'm old-fashioned on
this issue. I prefer metal in lieu of plastic in cars in most cases
where either one can be used.
My first impulse was to order a new courtesy light assembly from Chrysler Direct online but my search for part #V58724-R came up empty. Pondered on the broken assembly awhile and determined the easy fix would be a flat washer big enuf to bridge the distance between the screw head and the new edge of the fractured plastic. The more professional and long term solution would be to learn how to repair the plastic. I'm still thinkin' about it.
April 7th 2007 Continued routine detailing by cleaning and waxing the plastic front and rear pans and side rocker panels. All these items are low on the car and a pain in the knees for us older guys. Got the front pan done then noticed substantial road tar buildup on the side rockers and rear pan. Decided to suspend this operation until next week when I can get some tar remover.
Went back to the courtesy light problem. Decided on the simple washer solution for the time being. Purchases for the June roadtrip to Pennsylvania in BillyBob and for the two new classics I am charged with looking after (Henry and Frankie) have me too over budget for any big new tool purchases (plastic welding tech) at this time.
 Besides,
the fact that I found a suitable washer in the debris on top of my file
cabinet was an omen. So, with the washer, a thin screwdriver, deft
finger movements and a choice word, I got the courtesy light back in
place. A good static zap getting back out of the car elicited a squawk
and another choice word. Rubbing around on the seat while fooling with
the light had charged me up. Good thing, really. It saves wear-n-tear
on the parrot. When I go to pet Wingnut with a static charge, the arc
will often jump between my finger tip and his stubby little wormlike
tongue. His eyes bulge and it puts him in a bad mood.
Besides,
the fact that I found a suitable washer in the debris on top of my file
cabinet was an omen. So, with the washer, a thin screwdriver, deft
finger movements and a choice word, I got the courtesy light back in
place. A good static zap getting back out of the car elicited a squawk
and another choice word. Rubbing around on the seat while fooling with
the light had charged me up. Good thing, really. It saves wear-n-tear
on the parrot. When I go to pet Wingnut with a static charge, the arc
will often jump between my finger tip and his stubby little wormlike
tongue. His eyes bulge and it puts him in a bad mood.
April 28th 2007 Parked BettyLou in the shade of the Krash Lab and tried to get the road tar and stains off of her gray plastic bottom panels with Turtle Wax Tar and Bug Remover. Wuz only partially successful. It got some of the stains off OK but couldn't make a dent in the blemishes on the passenger side that looks like it they might be the result of driving on a freshly asphalted road sometime in BettyLou's distant past. The search for solutions continues. Finished detailing BettyLou's interior plastics after that.
May 6th 2007 Did monthly maintenance on BettyLou and BillyBob today and then I cleaned out BettyLou's trunk. There are still things in here from when I brought the car down from Pennsylvania and it's a mini time capsule. Mom's handicap permit sign, a car blanket and her seat bolster, a "North Fork Country Club" umbrella, and a Red Cross first aid kit that I can transfer over to BillyBob for roadtrips. Also found my name tag for my last high school reunion. Made me a bit melancholy but the items triggered good family memories too.
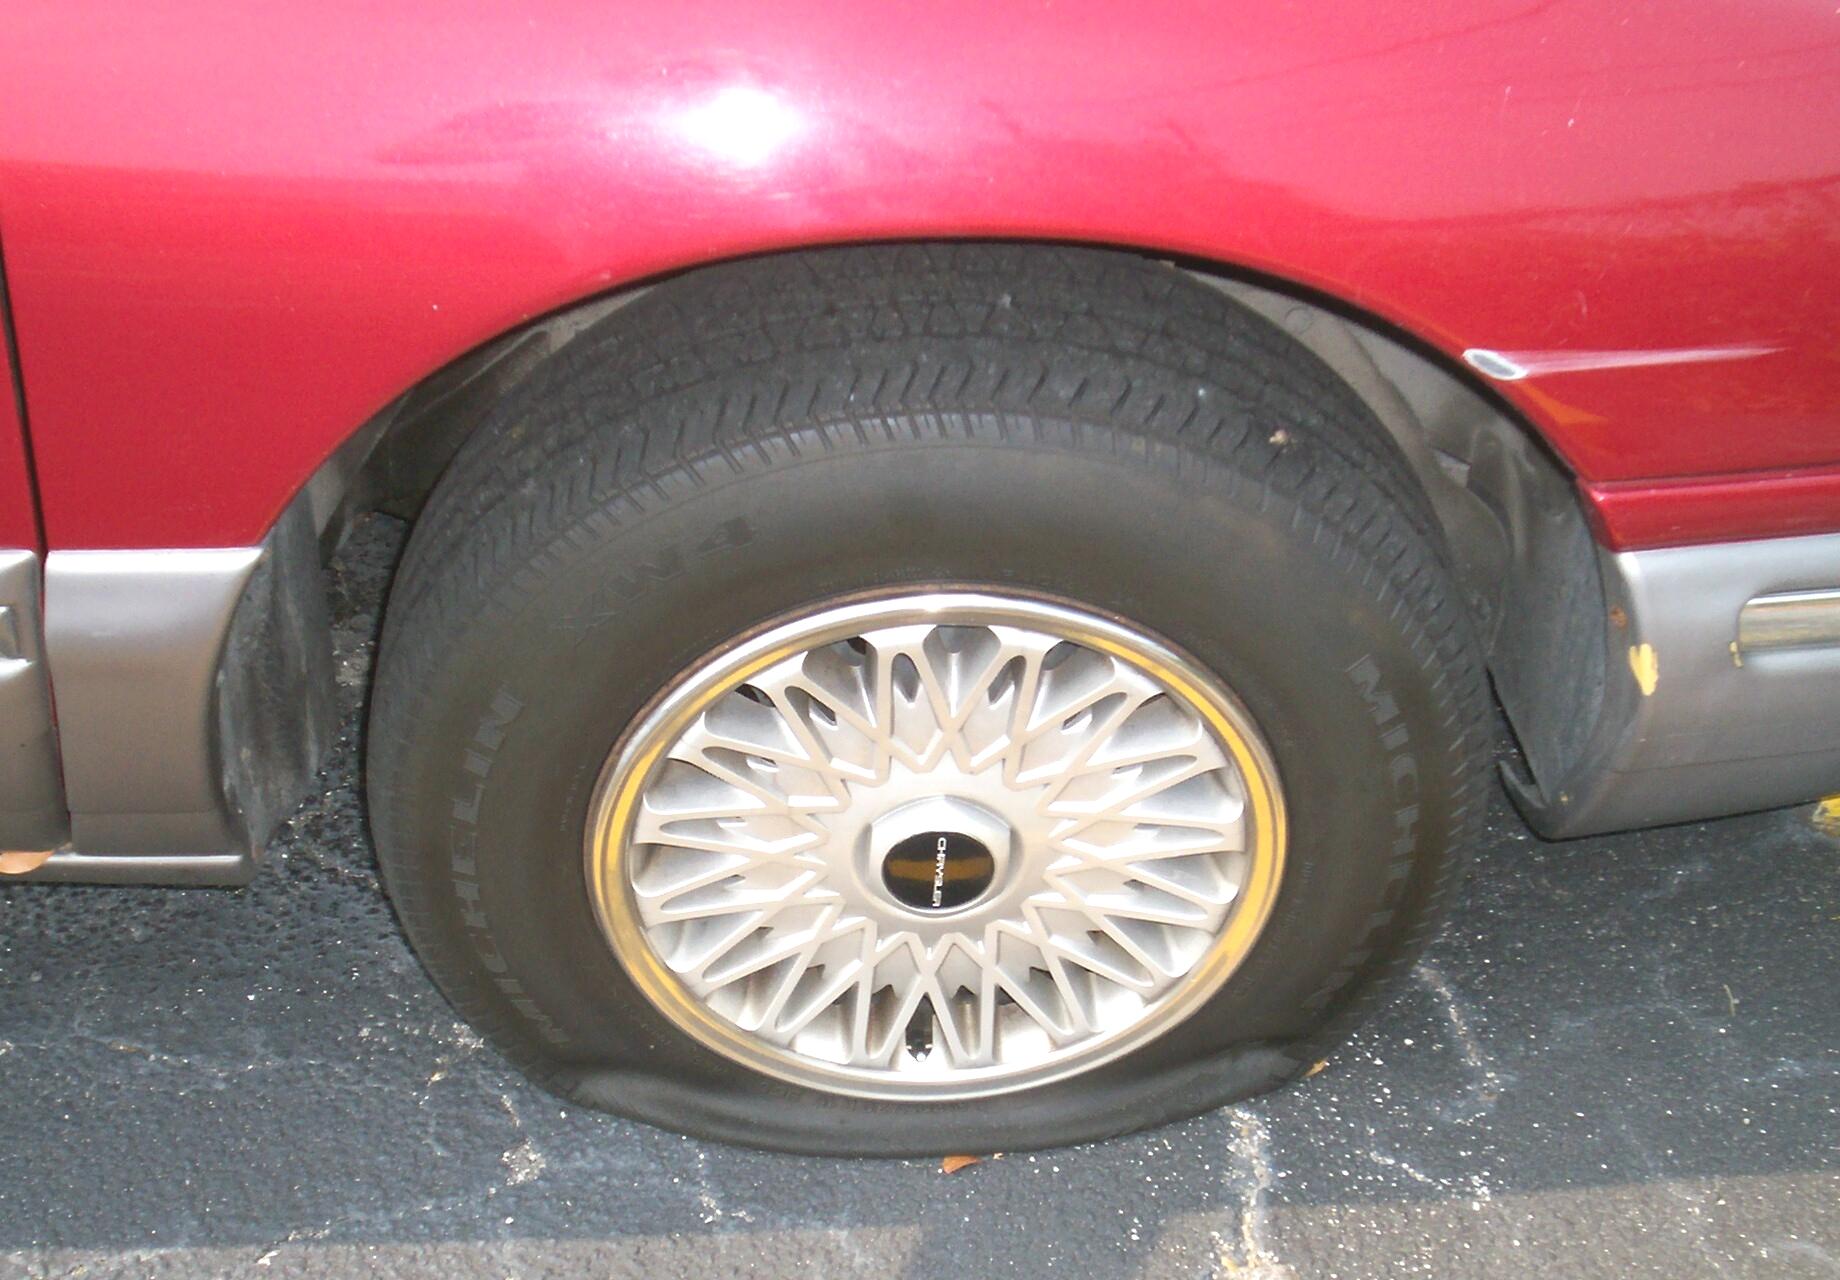 May
7th 2007 I came to the
Krash Lab this morning to find BettyLou's right front tire completely
flat. Damnation! I think I have had more flat tires in the last five
years with BillyBob, Renegade and BettyLou than with all my previous
cars! I felt around the tire but couldn't feel anything protruding from
it. Renegade is intact so I don't think it was vandalism. I'll just
have to wait until the weekend to investigate further.
May
7th 2007 I came to the
Krash Lab this morning to find BettyLou's right front tire completely
flat. Damnation! I think I have had more flat tires in the last five
years with BillyBob, Renegade and BettyLou than with all my previous
cars! I felt around the tire but couldn't feel anything protruding from
it. Renegade is intact so I don't think it was vandalism. I'll just
have to wait until the weekend to investigate further.
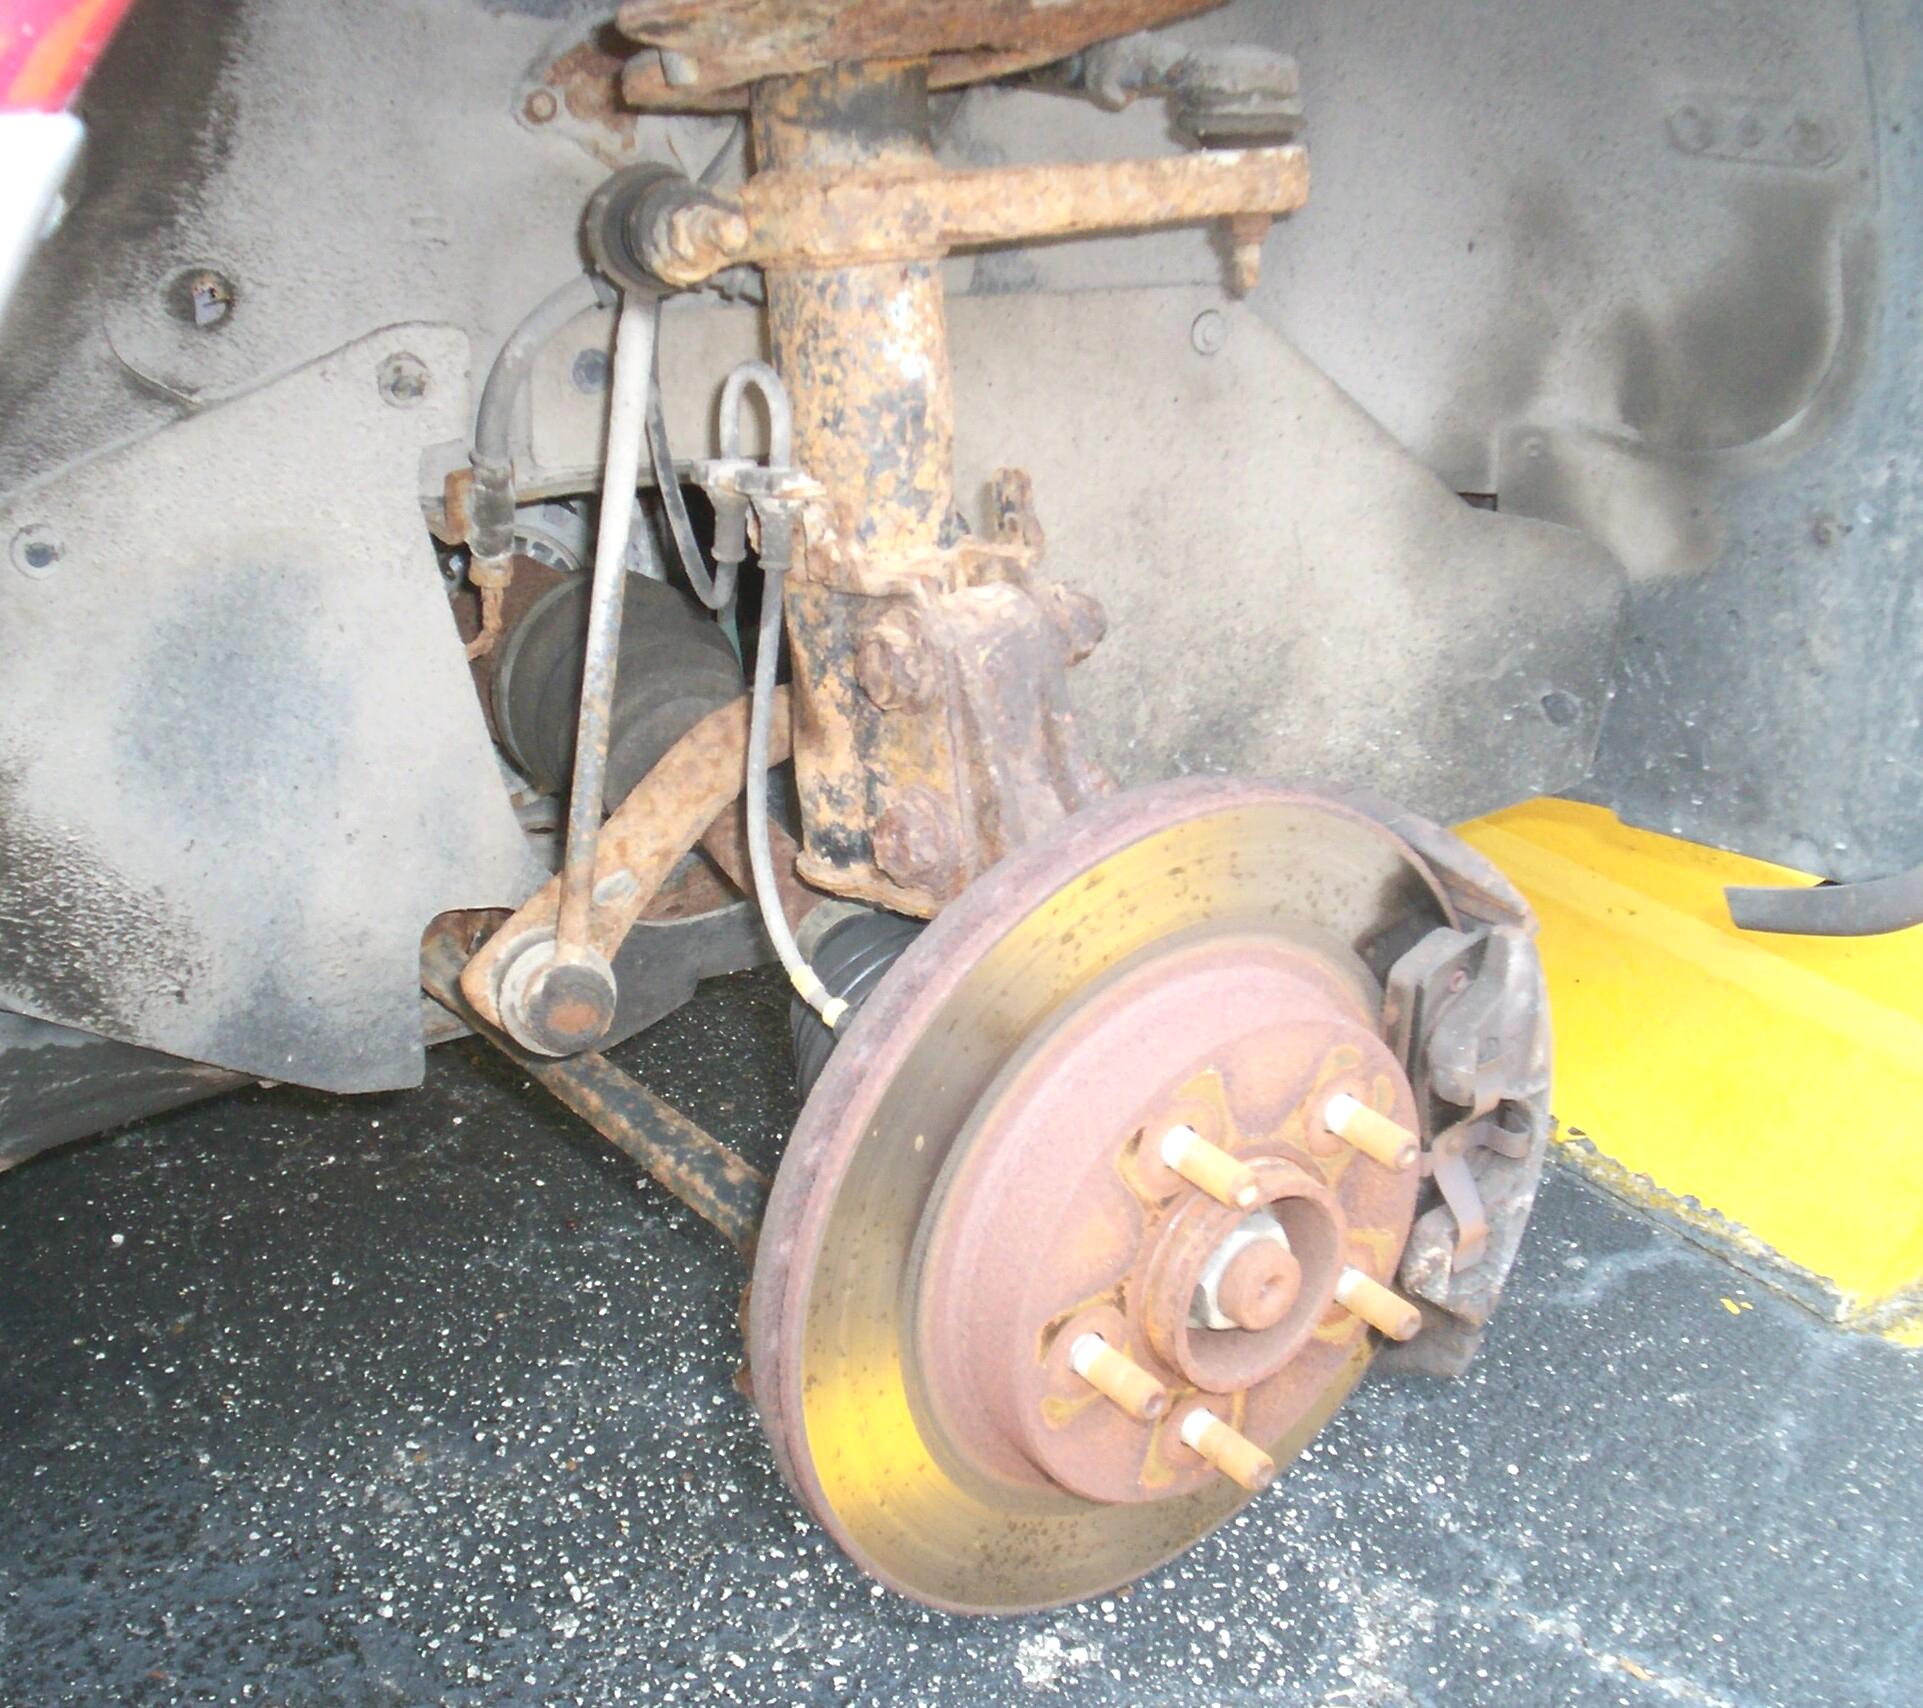 May
12th 2007 Got the floor
jack out and removed the wheel with the flat tire after some work on
BillyBob this morning. Man, I dislike these plastic wheel covers. They
are hard to get off without damage. This is the first time I've had a
look at the front suspension. Lottsa corrosion here but not as bad as
the rear suspension so my decision to redo the rear suspension and
brakes first holds. There was no air at all in the tire but I couldn't
see any punctures so I suspected valve problems since I had put air in
this tire last sunday during monthly maintenance. Unscrewed the plastic
cap/filler gizmo and found the metal stem and valve corroded. I'll bet
this thing got stuck open last week. Used a little bit of penetrating
oil on it and unscrewed the valve core and reseated it. Filled the tire
up to forty psi and listened for hissing . . . No detectable sound from
the tire. Waited a couple of hours and checked again. Still holding at
forty psi. Dropped the pressure down to thirty-five psi, put the wheel
back on the car and put BettyLou back on the ground.
May
12th 2007 Got the floor
jack out and removed the wheel with the flat tire after some work on
BillyBob this morning. Man, I dislike these plastic wheel covers. They
are hard to get off without damage. This is the first time I've had a
look at the front suspension. Lottsa corrosion here but not as bad as
the rear suspension so my decision to redo the rear suspension and
brakes first holds. There was no air at all in the tire but I couldn't
see any punctures so I suspected valve problems since I had put air in
this tire last sunday during monthly maintenance. Unscrewed the plastic
cap/filler gizmo and found the metal stem and valve corroded. I'll bet
this thing got stuck open last week. Used a little bit of penetrating
oil on it and unscrewed the valve core and reseated it. Filled the tire
up to forty psi and listened for hissing . . . No detectable sound from
the tire. Waited a couple of hours and checked again. Still holding at
forty psi. Dropped the pressure down to thirty-five psi, put the wheel
back on the car and put BettyLou back on the ground.
September 28th 2007 Waited too long to attend to chassis work on BettyLou. Wuz taking her home last night on her weekly run to get the juices flowin' when I had a brake system meltdown. Left the Krash Lab and got about a block away. I was coming up on a stoplight that was turning yellow. Applied the brakes, then a pop and a puff and the car stopped slowing down and my brake pedal was on the floor. Like a carrier pilot who snaps his tailhook cable, I hit the gas to get thru the intersection. Afterwards, I got turned around and back to the office. There were still some brakes but they were minimal. That means that both BettyLou and Renegade are currently out of commission. BillyBob is my only running vehicle and I have my work cut out for me.
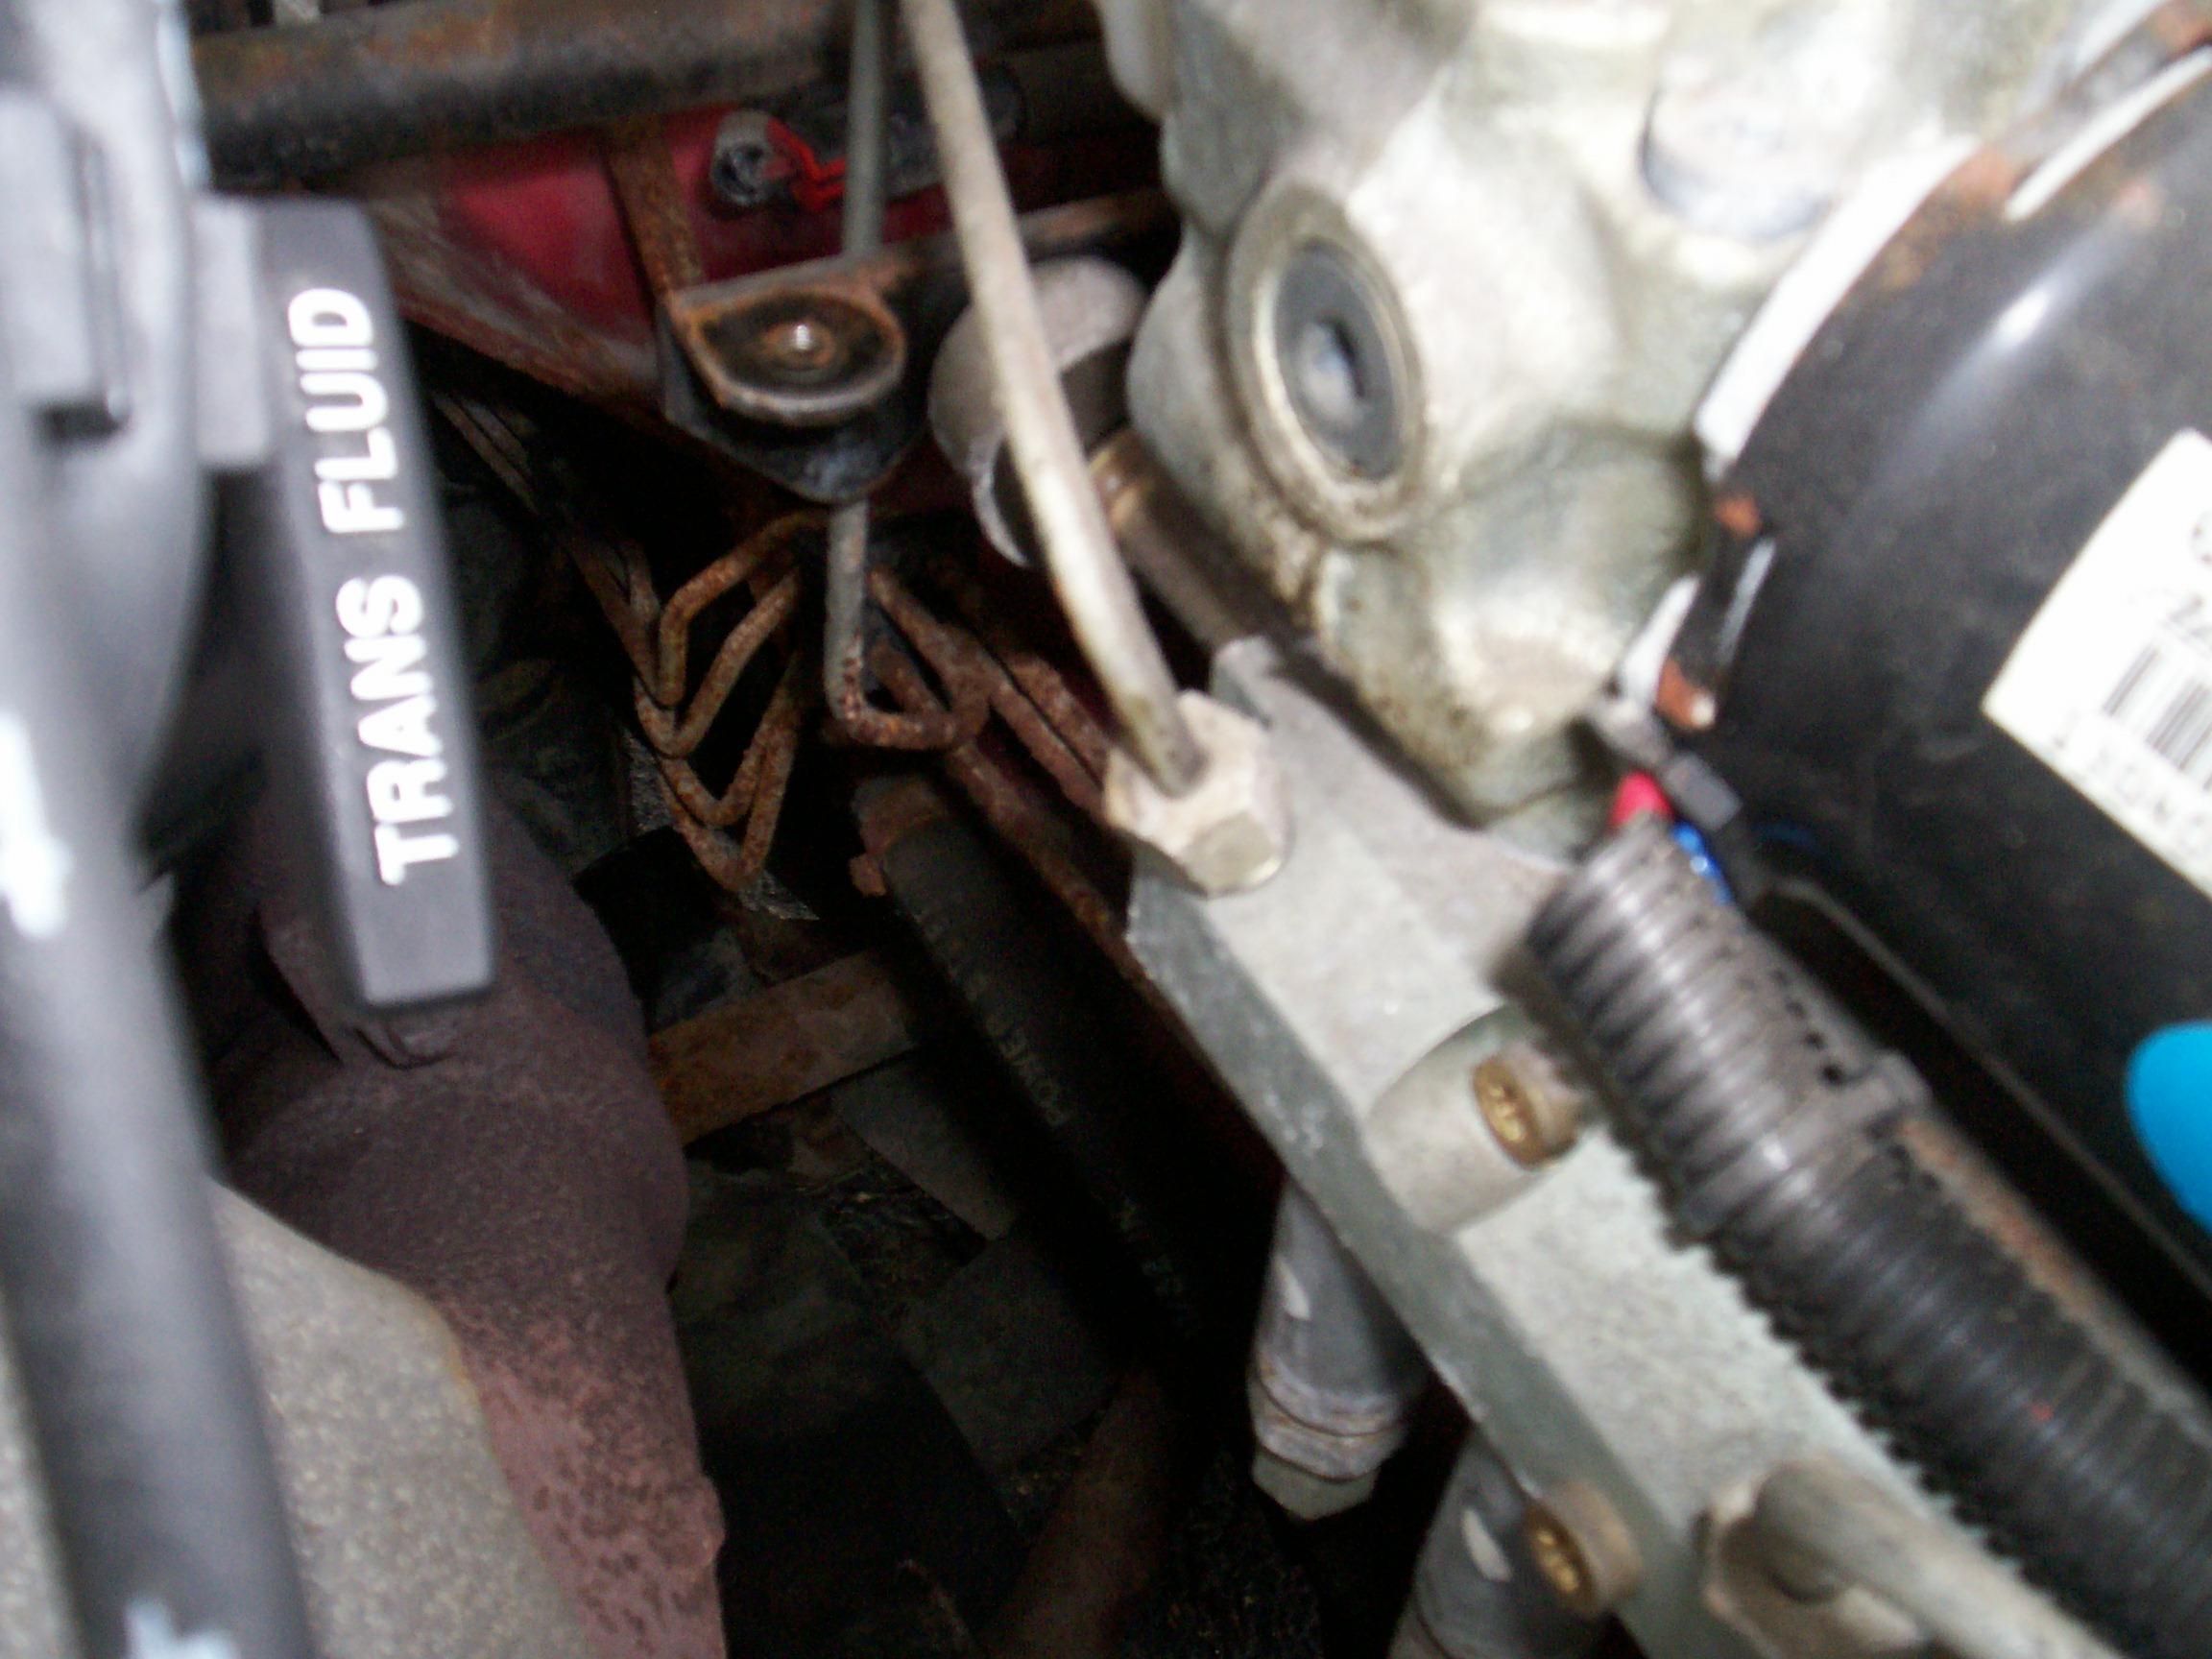 October
20th 2007 I know next
to nuttin' about modern braking systems so I started out with the
simple things. Brake line failure being the problem, I wanted to get a
feel for the routing. I took the heat shield off the hydraulic control
unit to look at the lines leading to and from it. The lines to each
wheel look pretty good where they connect to the HCU but corrosion is
heavy lower on the frame rail where they were exposed to road salts. I
spent a half hour searching for preformed brake lines on the intarweb
but didn't find anything.
October
20th 2007 I know next
to nuttin' about modern braking systems so I started out with the
simple things. Brake line failure being the problem, I wanted to get a
feel for the routing. I took the heat shield off the hydraulic control
unit to look at the lines leading to and from it. The lines to each
wheel look pretty good where they connect to the HCU but corrosion is
heavy lower on the frame rail where they were exposed to road salts. I
spent a half hour searching for preformed brake lines on the intarweb
but didn't find anything.
After I familarized myself a bit with the HCU, I put the heat shield back on. The heat shield was showing signs of rust on its bottom edges so, it was cleaned, wire-brushed, PRE Paint Prepped and given a coat of Eastwood's Self-etching primer on the bare spots, followed by a coat of Eastwood's Underhood Black before being bolted back into place.
 October
22nd 2007 Reviewing the
ABS brake system info in the Chilton manual. They reference the DRB
scan tool several times. I've never worked on 'puter cars before unless
the Jeep counts. I have never worked with a scanner. Went on the
Intarweb for some research. Damnation! The DRB III scanner is available
in basic form for close to 4K and over eight thousand with all the
bells and whistles. Sounds like a dealer conspiracy. JR would know. I
found the allpar website and
joined up. Some further research there sent over to Amazon.com to order
up a Innova Equus 3140 Can OBD II and I scan tool. I hope it works on
BettyLou. Time will tell. I also ordered new front brake hoses for
BettyLou online at RockAuto.
October
22nd 2007 Reviewing the
ABS brake system info in the Chilton manual. They reference the DRB
scan tool several times. I've never worked on 'puter cars before unless
the Jeep counts. I have never worked with a scanner. Went on the
Intarweb for some research. Damnation! The DRB III scanner is available
in basic form for close to 4K and over eight thousand with all the
bells and whistles. Sounds like a dealer conspiracy. JR would know. I
found the allpar website and
joined up. Some further research there sent over to Amazon.com to order
up a Innova Equus 3140 Can OBD II and I scan tool. I hope it works on
BettyLou. Time will tell. I also ordered new front brake hoses for
BettyLou online at RockAuto.
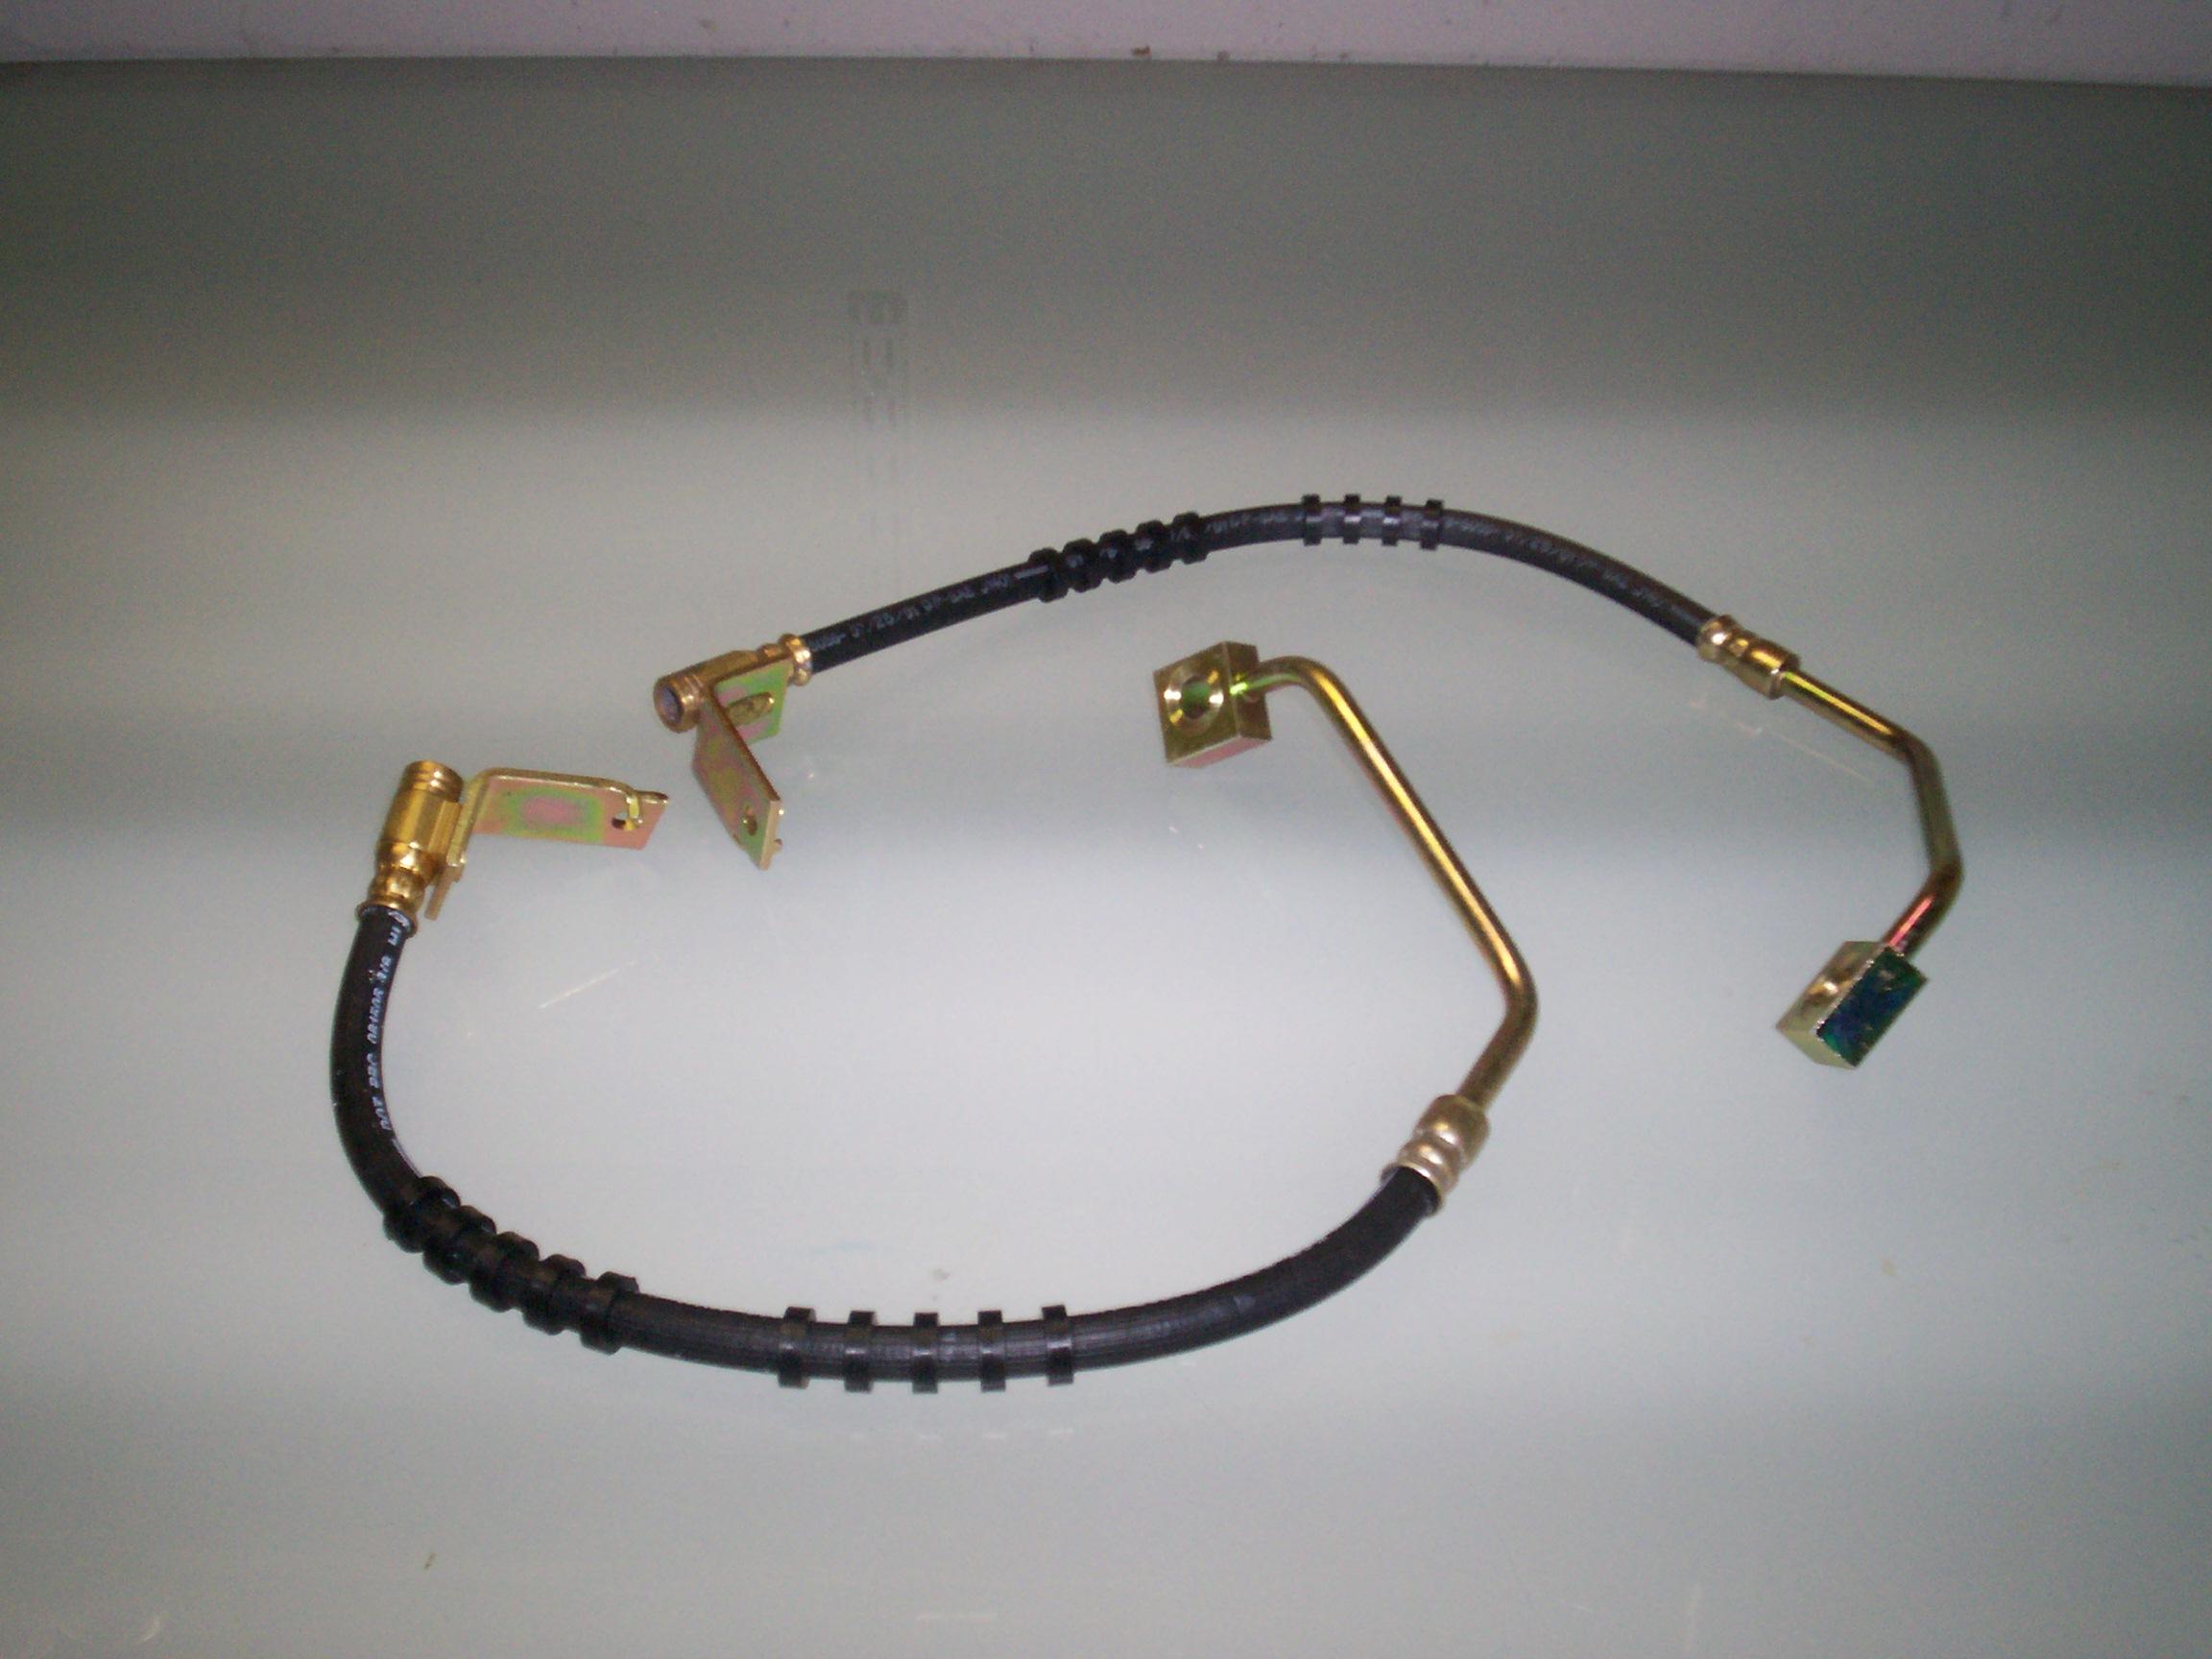 November
3rd 2007 Hurricane Noel
has scraped by us and headed up the coast. It is a cool and sunny
morning. BettyLou's new front brake hoses had arrived earlier in the
week and I had the silly idea in my head that I might have BettyLou
back on the road by the end of the day. I put BettyLou's front end up
on jackstands and removed the passenger side wheel. This is where I
thought the blowout had occured but I couldn't find signs of leakage.
November
3rd 2007 Hurricane Noel
has scraped by us and headed up the coast. It is a cool and sunny
morning. BettyLou's new front brake hoses had arrived earlier in the
week and I had the silly idea in my head that I might have BettyLou
back on the road by the end of the day. I put BettyLou's front end up
on jackstands and removed the passenger side wheel. This is where I
thought the blowout had occured but I couldn't find signs of leakage.
Filled the master cylinder reservoir back up with DOT 3 and turned on the engine. Stomped the brake pedal a couple of times and started looking underneath to see where the brake fluid was going. The first puddle I spied was towards the back of the car, underneath the passenger side, forward of the rear wheel. Whiskey Tango Foxtrot. I was certain that the leak was up front. I stuck my finger in the fluid and sniffed. It was not DOT 3. It was gasoline. Damnation! I've got two systems going south on me at the same time!
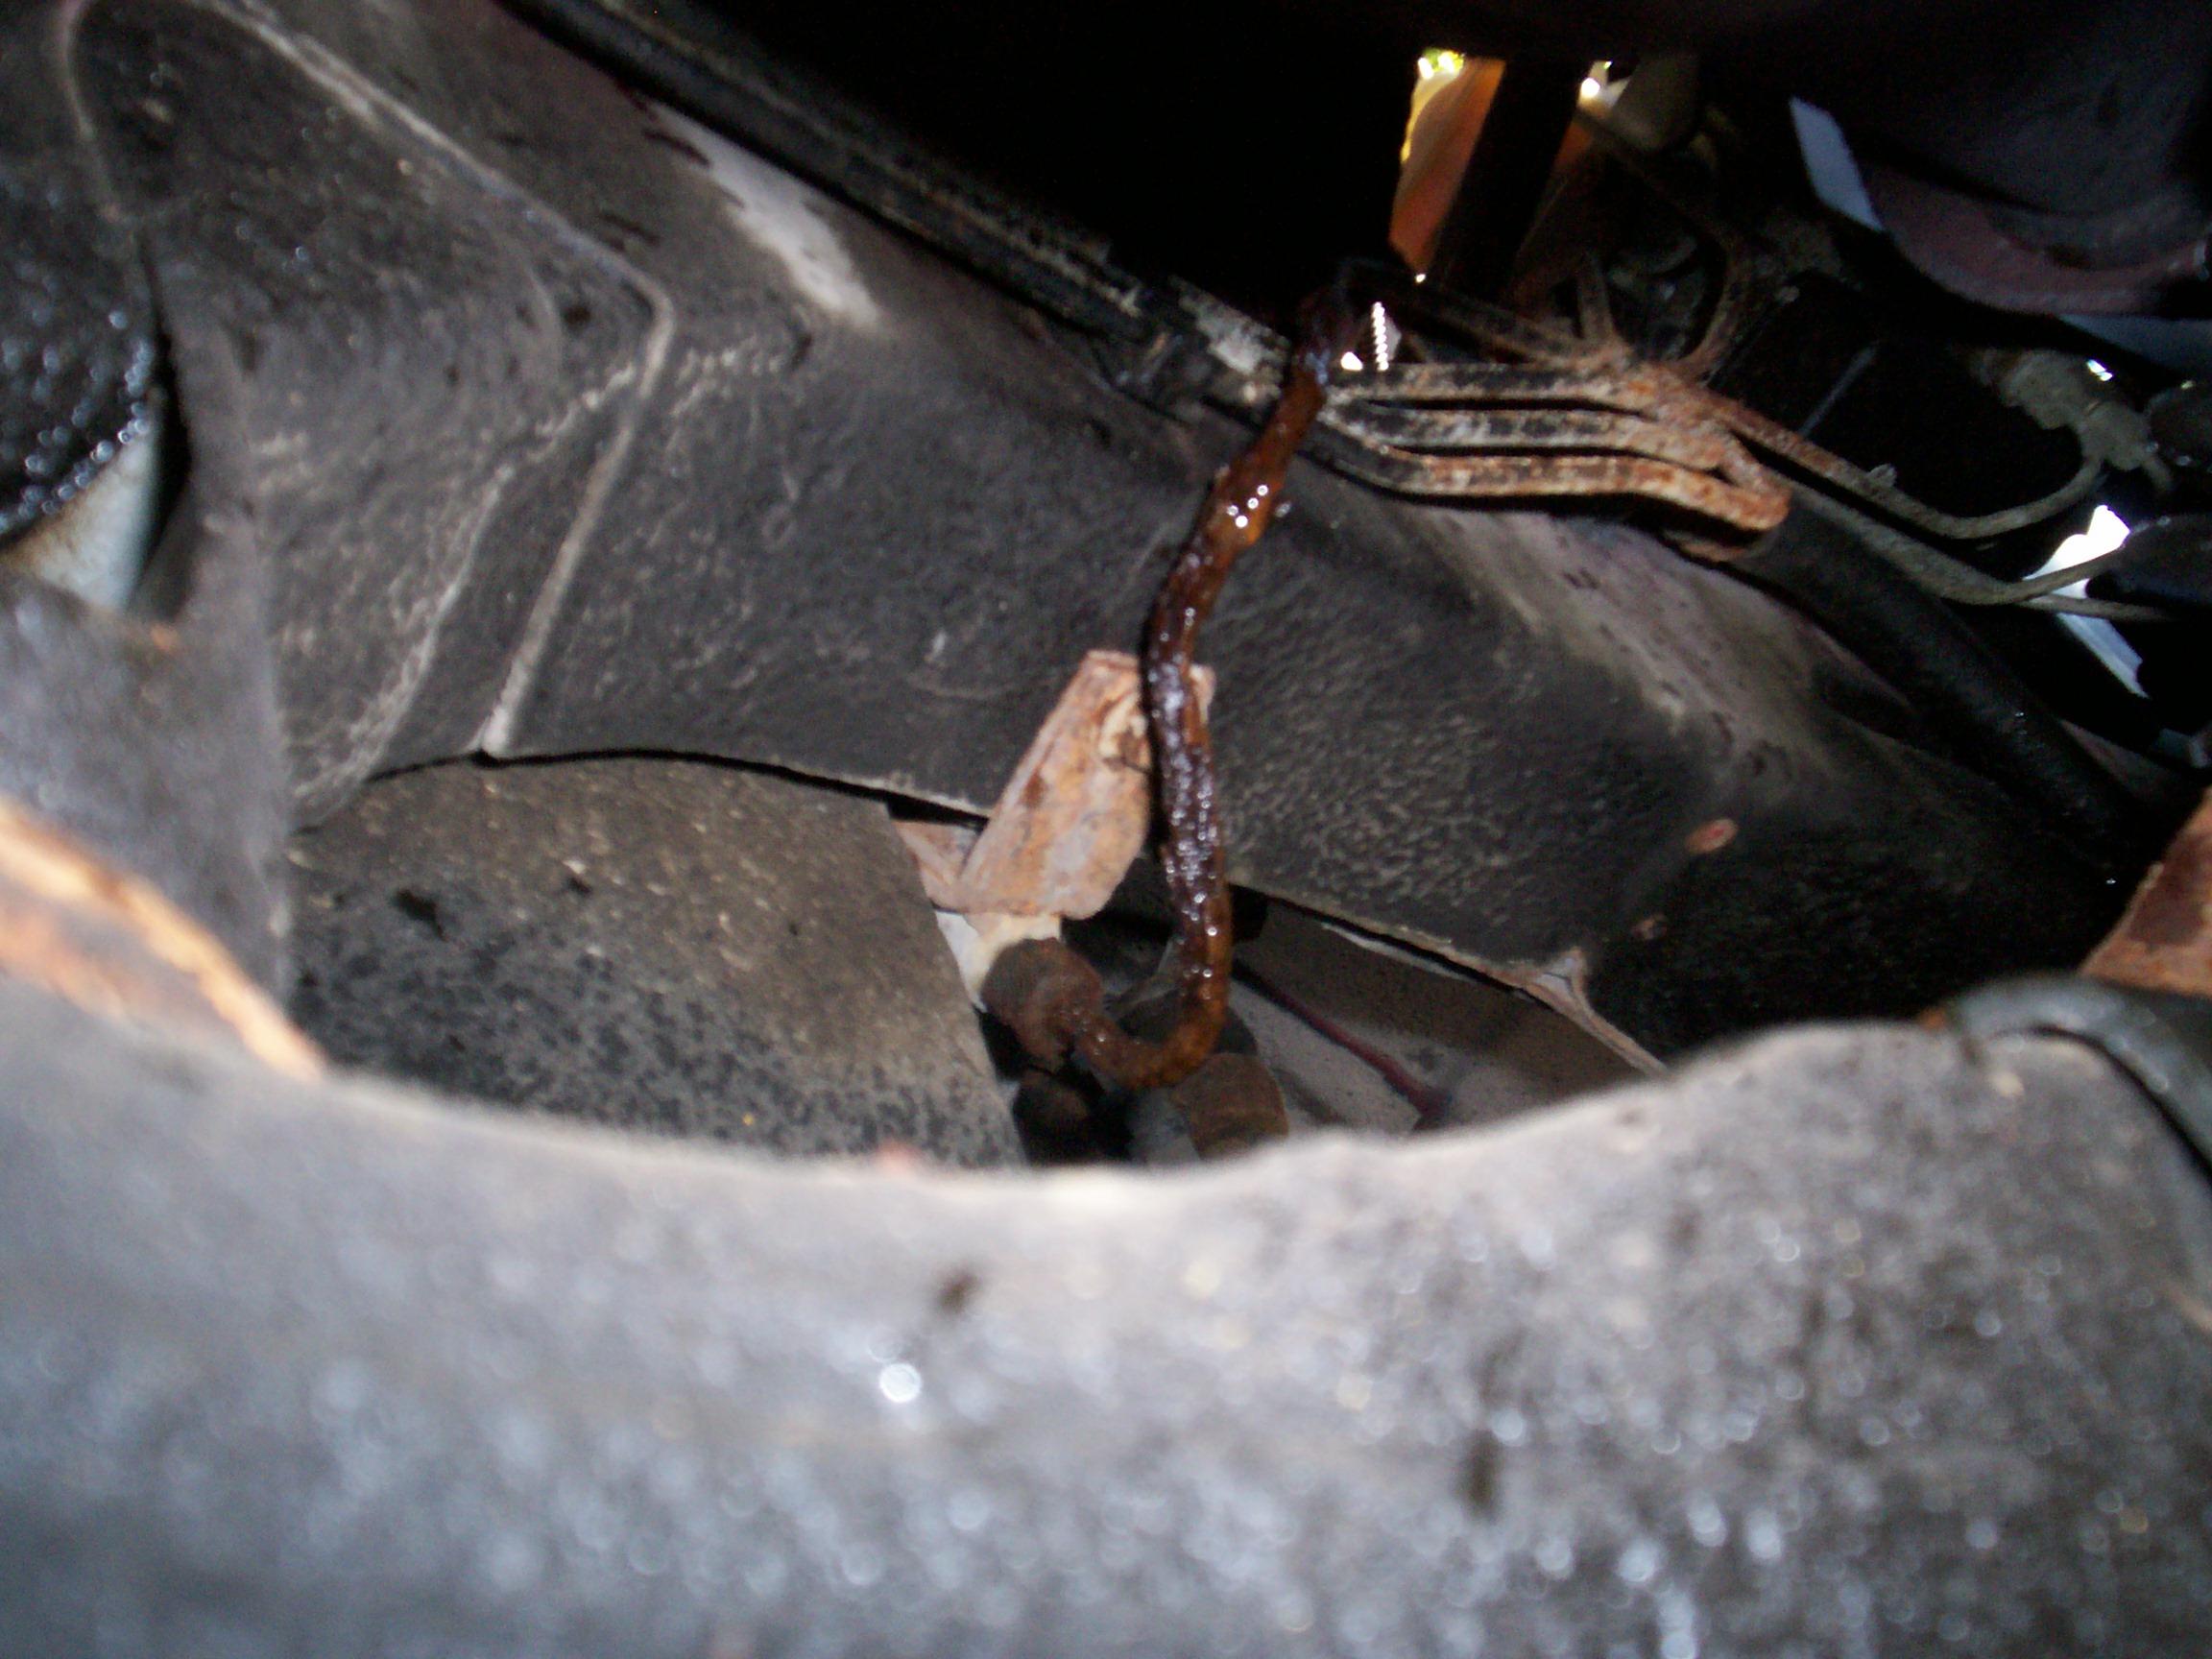 Then
I saw the brake fluid leak. It was up by the driver side front wheel.
It turned out to be the steel brake line, not the hose. AARRRUUUGH!
I spent an hour trying to get that line off. At a little over a foot
long, it's the shortest of all the brake lines but still hard to get
out. The others are rusted just as bad as the one that blew out. I need
to replace them all but I can't even see them where they disappear
behind the engine. Man alive! can you even replace these lines without
taking out the engine? Since it looks like I'll have to bend my own
lines anyway, can I get away with rerouting them in more accessible
places along the frame rail?
Then
I saw the brake fluid leak. It was up by the driver side front wheel.
It turned out to be the steel brake line, not the hose. AARRRUUUGH!
I spent an hour trying to get that line off. At a little over a foot
long, it's the shortest of all the brake lines but still hard to get
out. The others are rusted just as bad as the one that blew out. I need
to replace them all but I can't even see them where they disappear
behind the engine. Man alive! can you even replace these lines without
taking out the engine? Since it looks like I'll have to bend my own
lines anyway, can I get away with rerouting them in more accessible
places along the frame rail?
November 17th 2007 A couple of weeks ago I ordered a "Shop Manual, 1993 Chrysler Concorde, Dodge Intrepid, Eagle Vision Reprint" from Bishko Automobile Literature. It is much more helpful than the Chilton or Haynes manuals for some things. In it I found the part number for the proper SnapOn Tools "bubble" flaring kit (TFM-428) for BettyLou's brake lines. Yeah, I'm gonna roll my own. All three manuals repeat the "preformed lines" mantra, but I've convinced myself that they aren't readily available, if at all. You can get straight lengths with connectors at each end that you can then bend to fit but that's not much easier than flaring your own. I searched the net for a week and I went to my favorite FLAPS parts counter. I waited 'til the "old guy" was free to talk to about it. No joy. I think I would rather give up a testicle than visit a dealership so that was out.
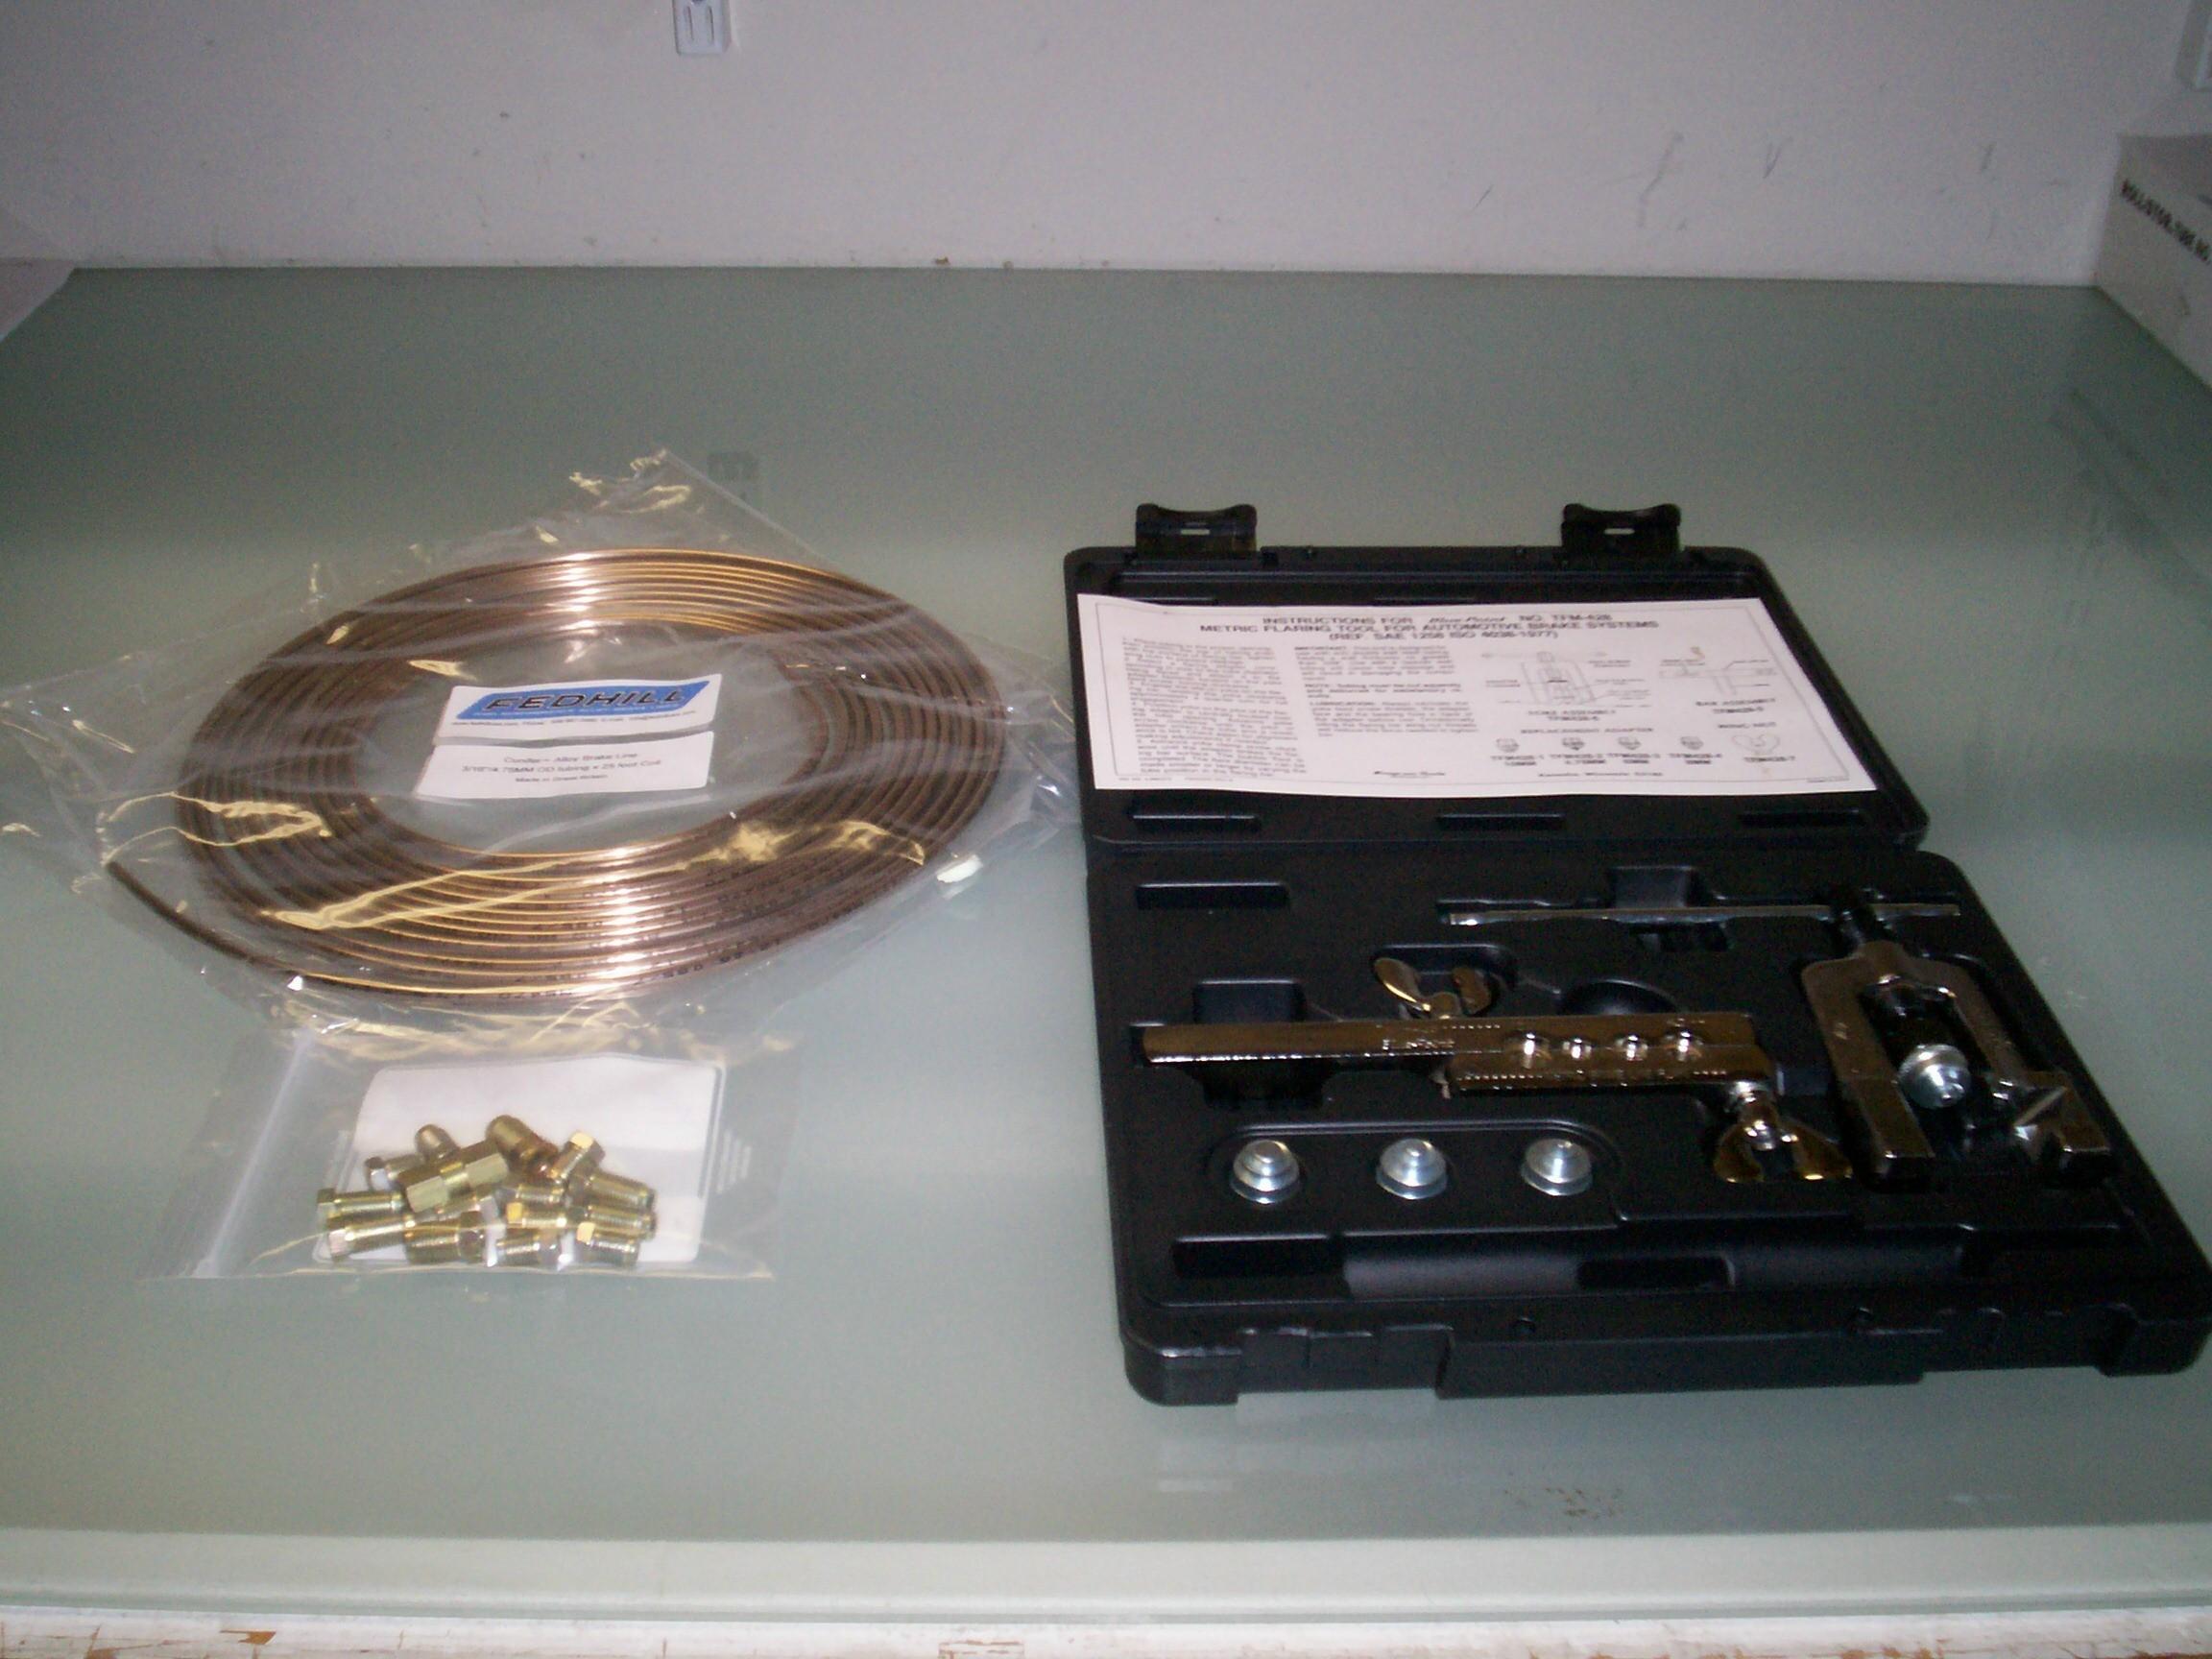 During
my Intarweb research, I came across "Cunifer" brake line.
I decided to give it a go. Ordered two 25' rolls of 3/16" 4.75 OD
cunifer line and a metric common nut assortment for 3/16" line from Federal Hill Trading Company.
This will get me started. I received both packages from SnapOn and
Fedhill from the friendly UPS man on the same day last week.
During
my Intarweb research, I came across "Cunifer" brake line.
I decided to give it a go. Ordered two 25' rolls of 3/16" 4.75 OD
cunifer line and a metric common nut assortment for 3/16" line from Federal Hill Trading Company.
This will get me started. I received both packages from SnapOn and
Fedhill from the friendly UPS man on the same day last week.
November 29th 2008 Well it's been over a year since I've worked on BettyLou and she is still sitting patiently out back of the Krash Lab. It's the third day of the four day Thanksgiving weekend and I've devoted one day to each vehicle. I've picked up "Deerslayer", a thirty-seven Chevy farmtruck hotrod, as my daily driver so, now I have four vehicles to take care of. Worked on Deerslayer on Thanksgiving and Renegade yesterday. Today is BettyLou's turn.
 I've
decided I want to get the fuel lines fixed first so I can run the
engine again. Then I can work on the brake lines. I looked all over the
engine bay with a flashlight but I couldn't see where the fuel lines
connect into the fuel rails. Got out all three of my manuals and
commenced to studyin'.
I've
decided I want to get the fuel lines fixed first so I can run the
engine again. Then I can work on the brake lines. I looked all over the
engine bay with a flashlight but I couldn't see where the fuel lines
connect into the fuel rails. Got out all three of my manuals and
commenced to studyin'.
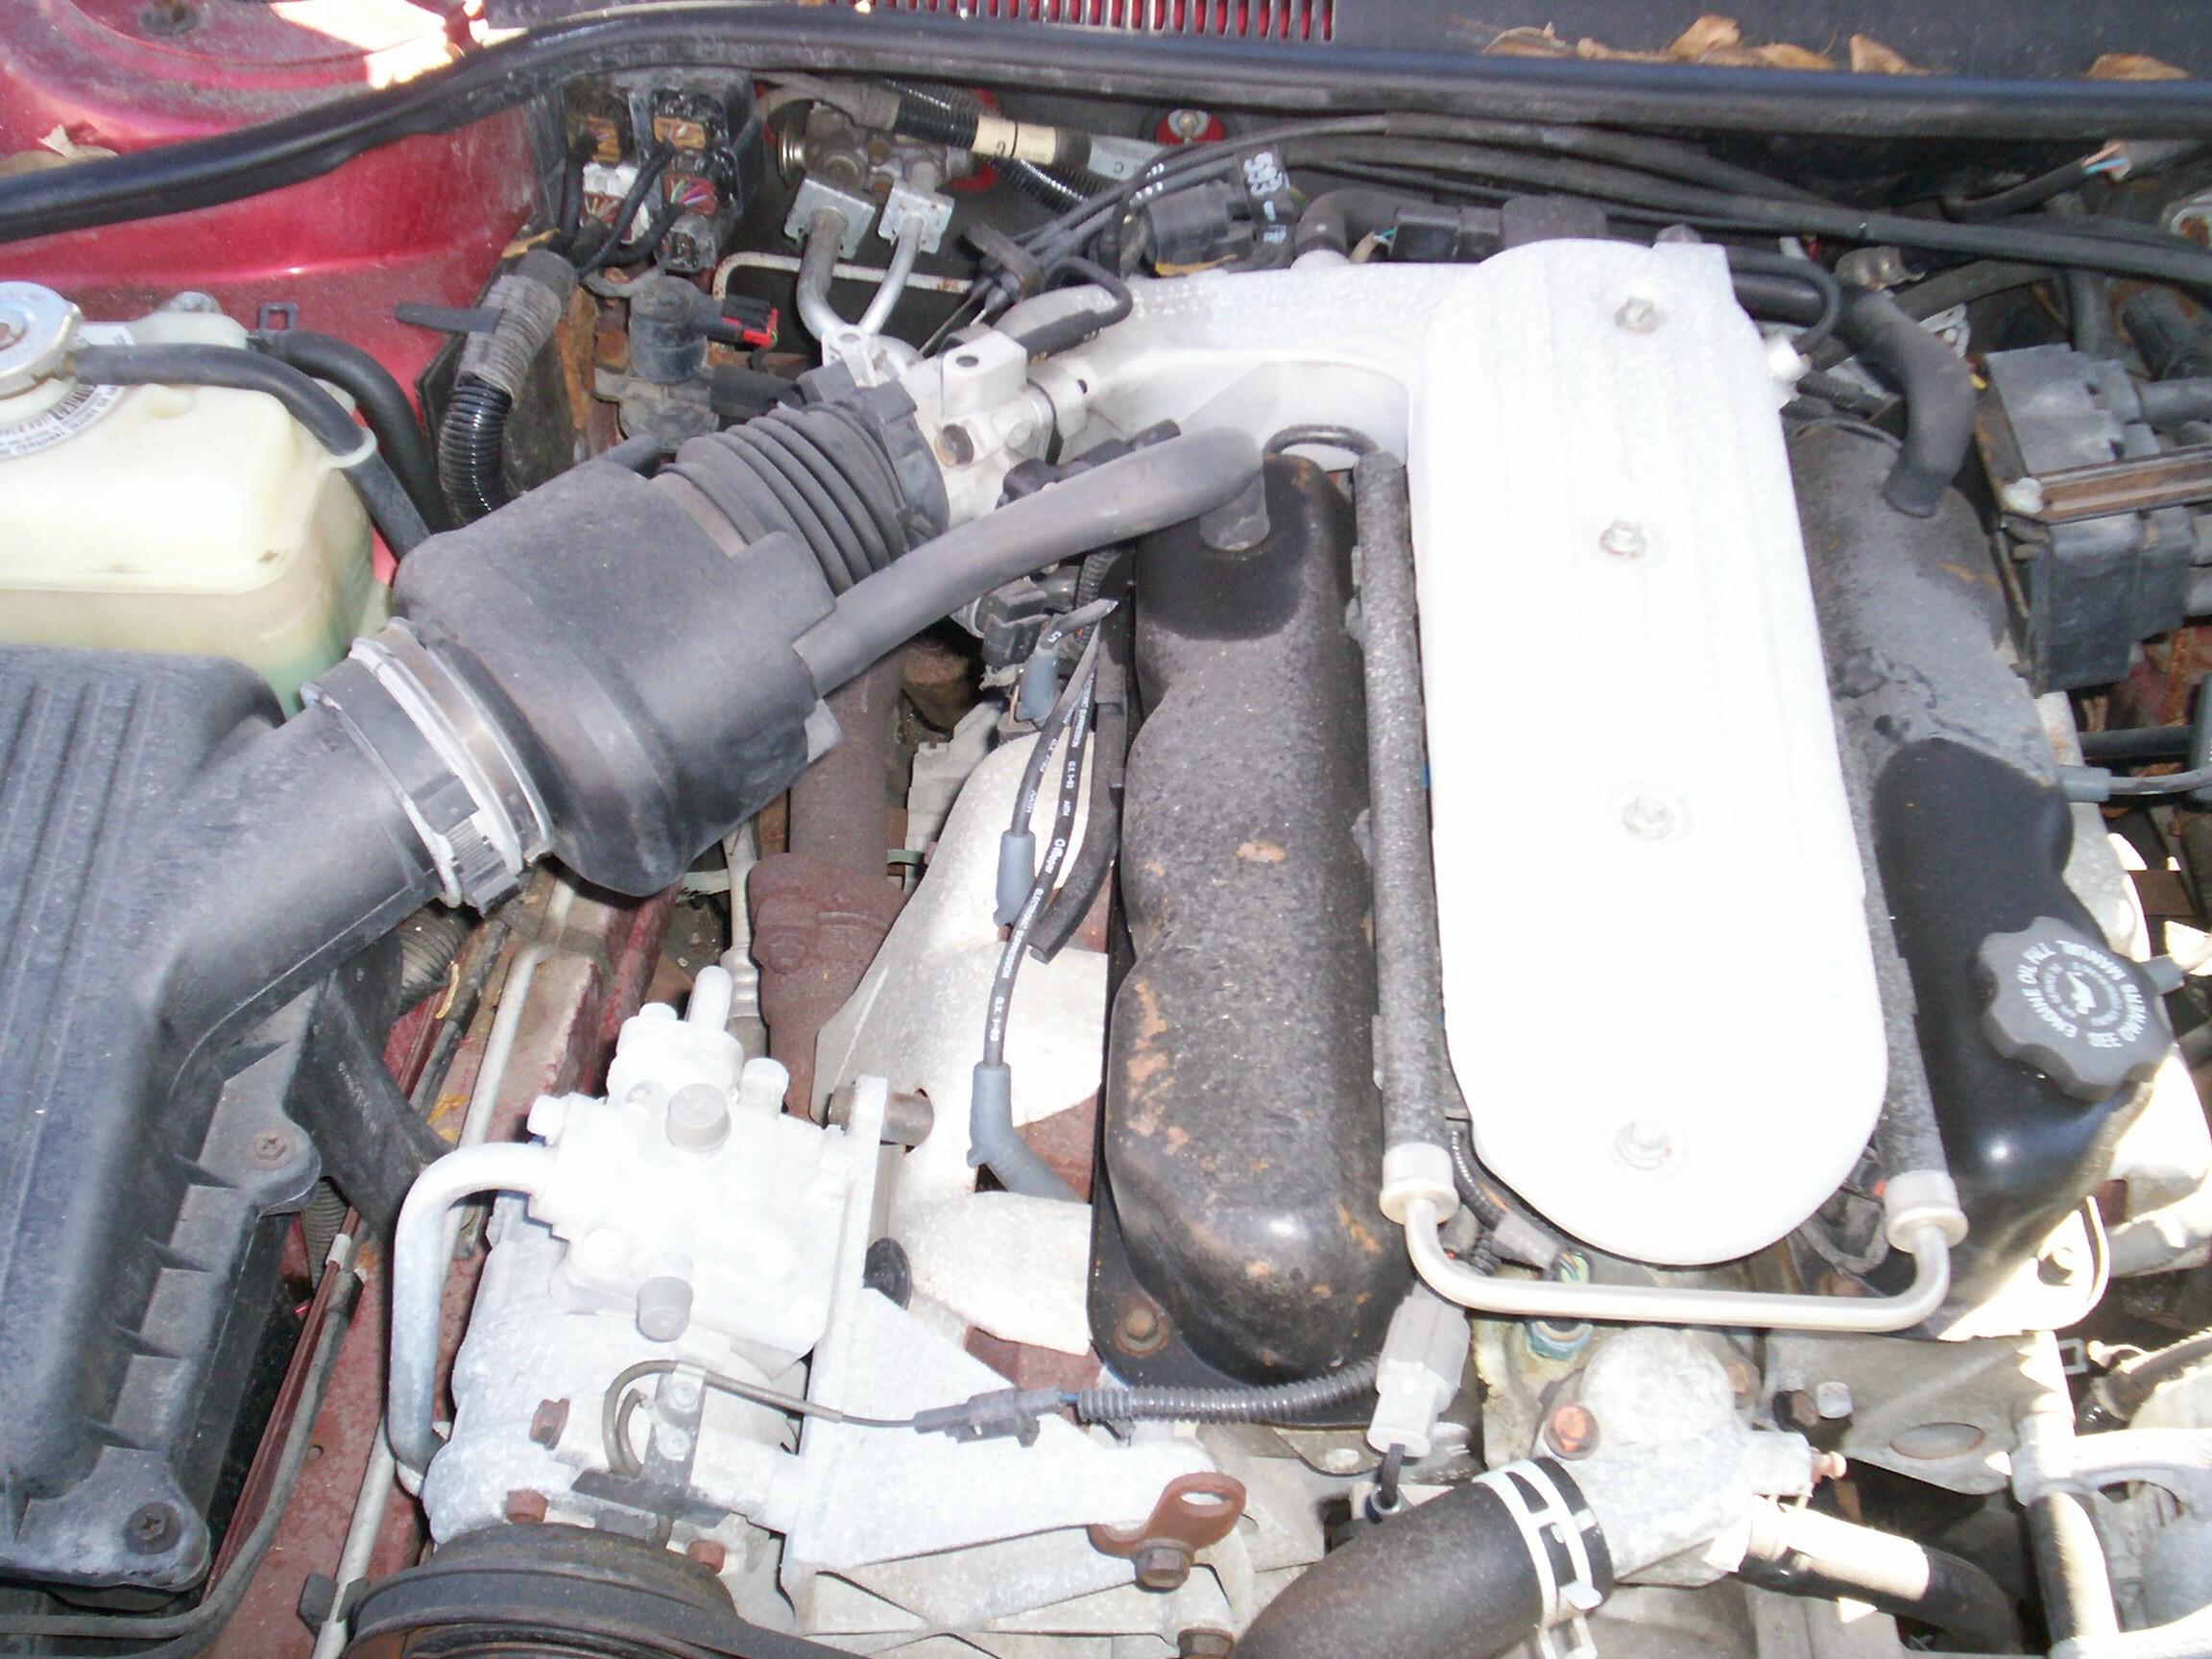
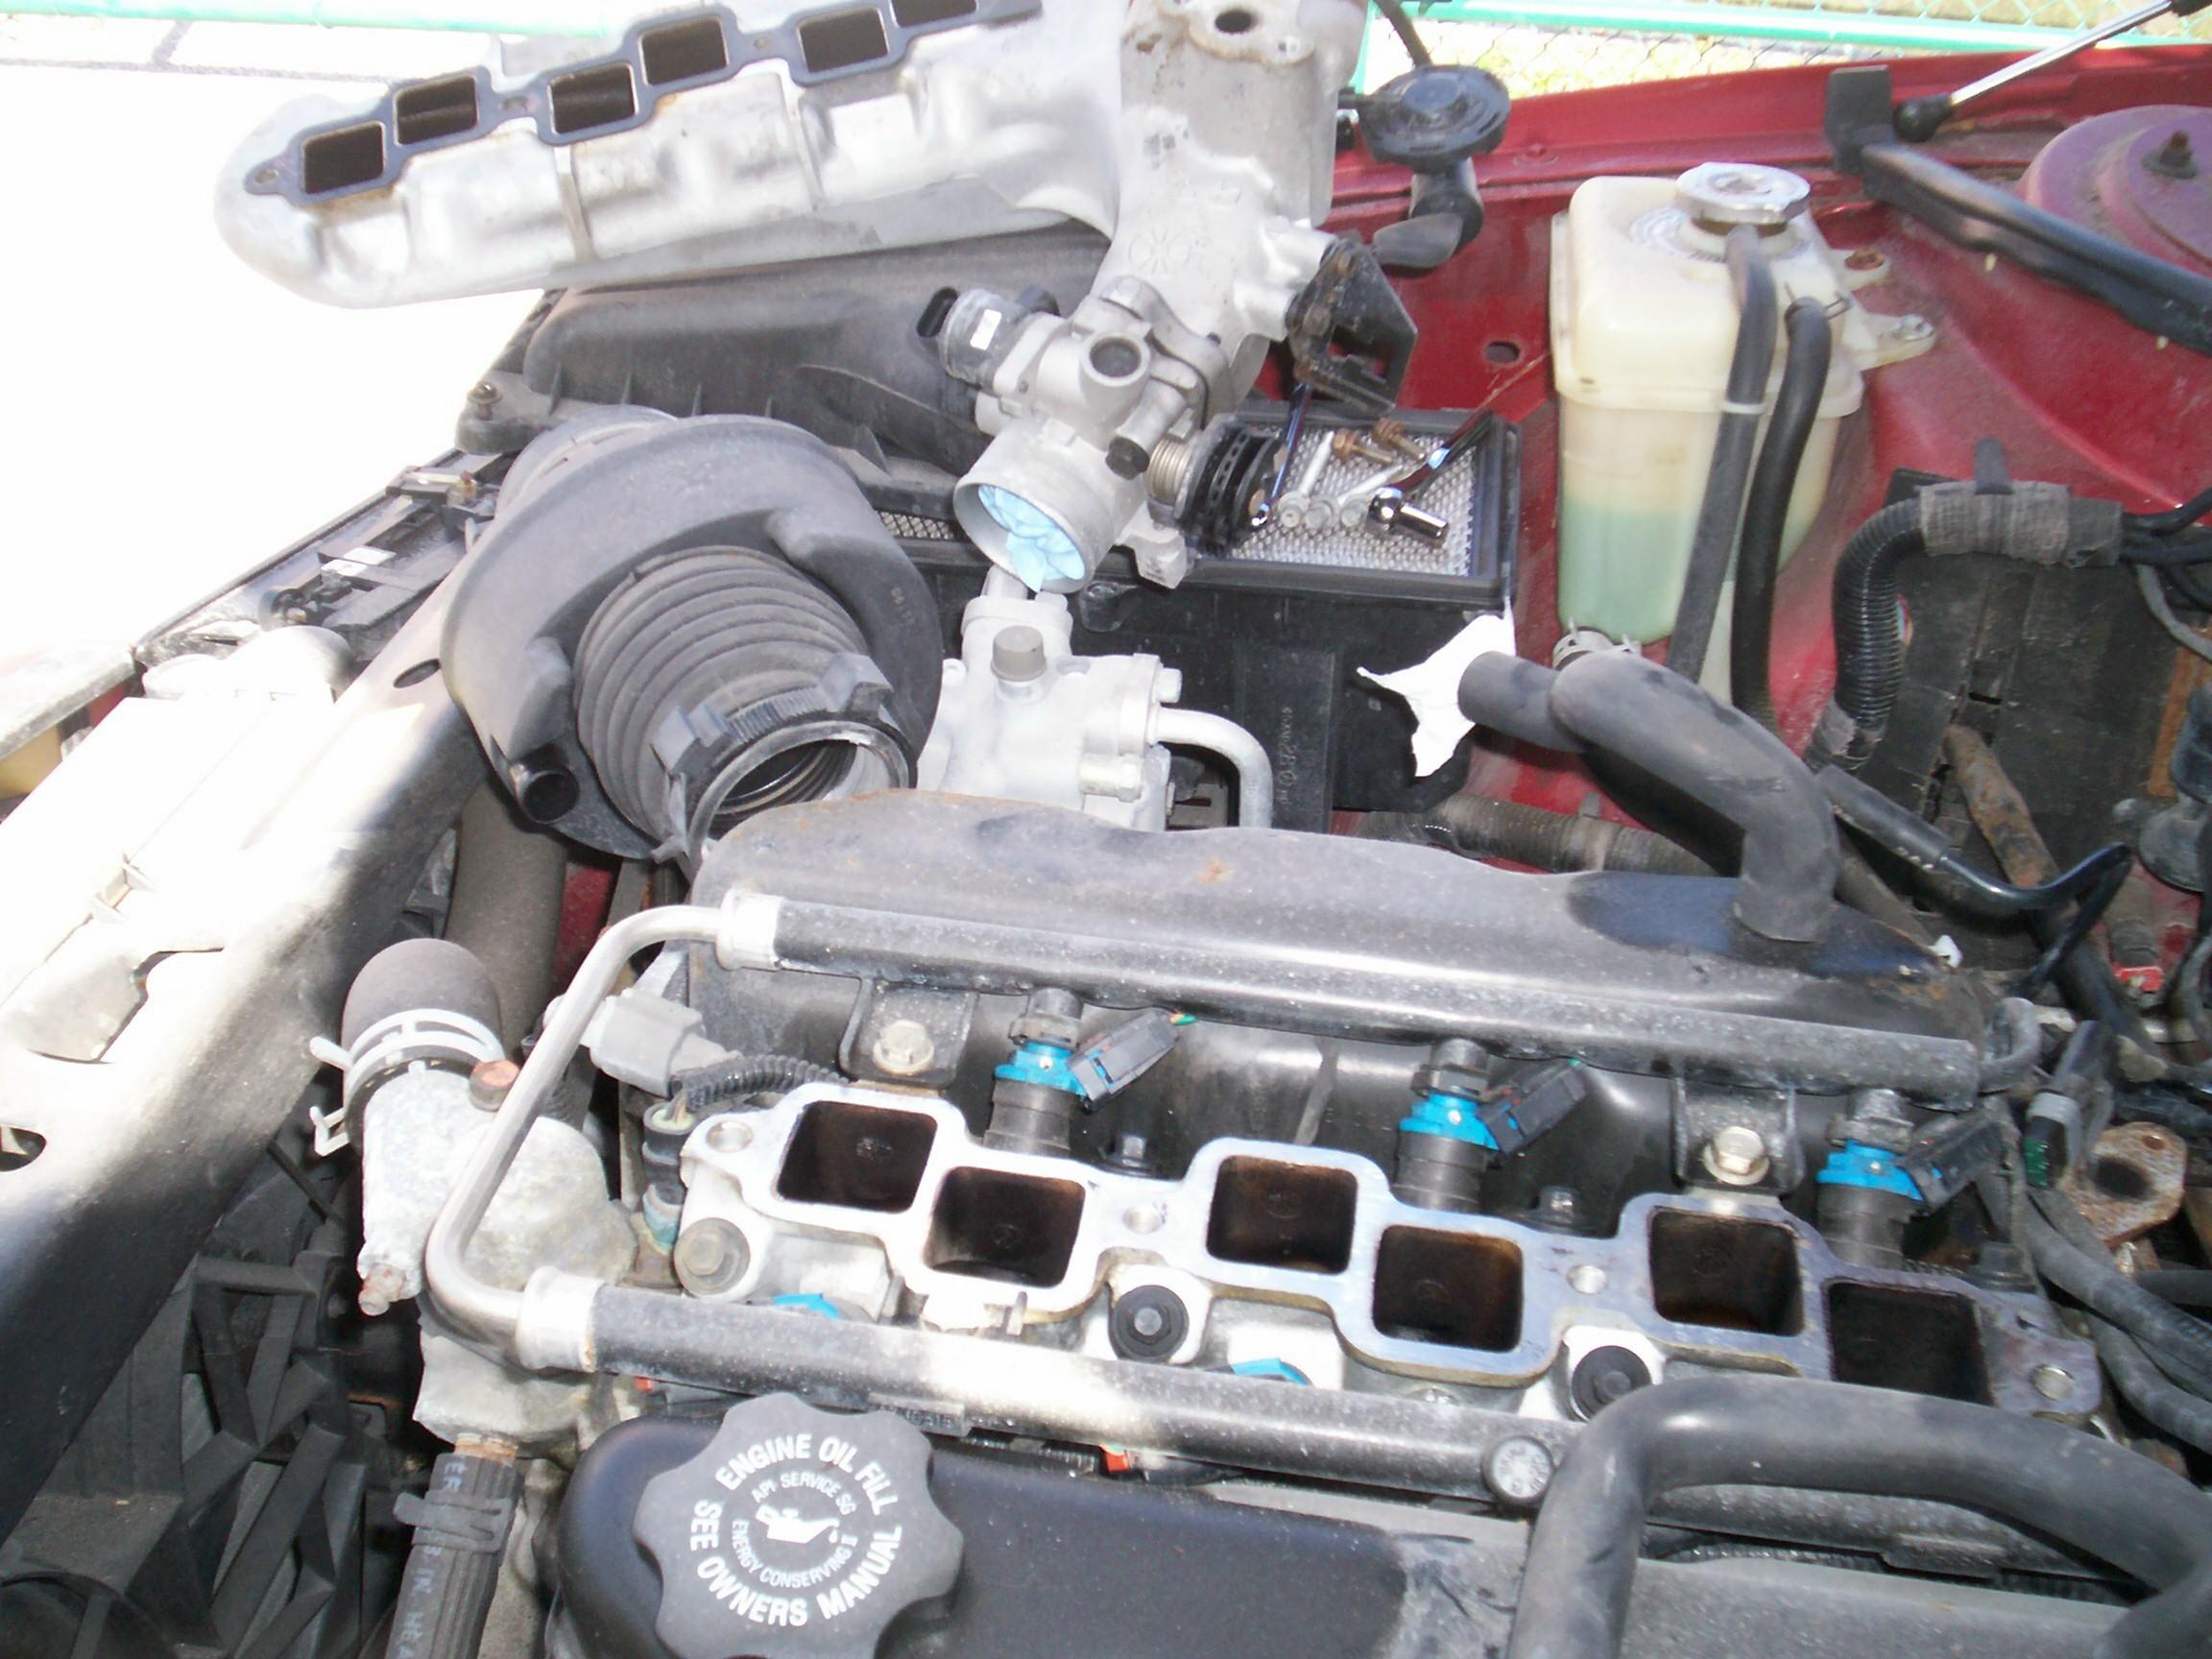
 Finally
figured that I would have to get the intake manifold plenum off to see
where the fuel line connection is. Started by disconnecting the battery
and releasing the fuel system pressure even tho' the battery has been
dead for a long time and there shouldn't be any pressure in the fuel
system being that the car has been sitting here for a year now and the
fuel line is being replaced because it leaks. Next, the the air cleaner
top and air plenum were removed after I figured how to work the plastic
hose clamp. I'm old school and lost at sea trying to get even the most
basic things done on a new car. Yeah, that's right. A fifteen year old
car is a new tech vehicle to me.
Finally
figured that I would have to get the intake manifold plenum off to see
where the fuel line connection is. Started by disconnecting the battery
and releasing the fuel system pressure even tho' the battery has been
dead for a long time and there shouldn't be any pressure in the fuel
system being that the car has been sitting here for a year now and the
fuel line is being replaced because it leaks. Next, the the air cleaner
top and air plenum were removed after I figured how to work the plastic
hose clamp. I'm old school and lost at sea trying to get even the most
basic things done on a new car. Yeah, that's right. A fifteen year old
car is a new tech vehicle to me.
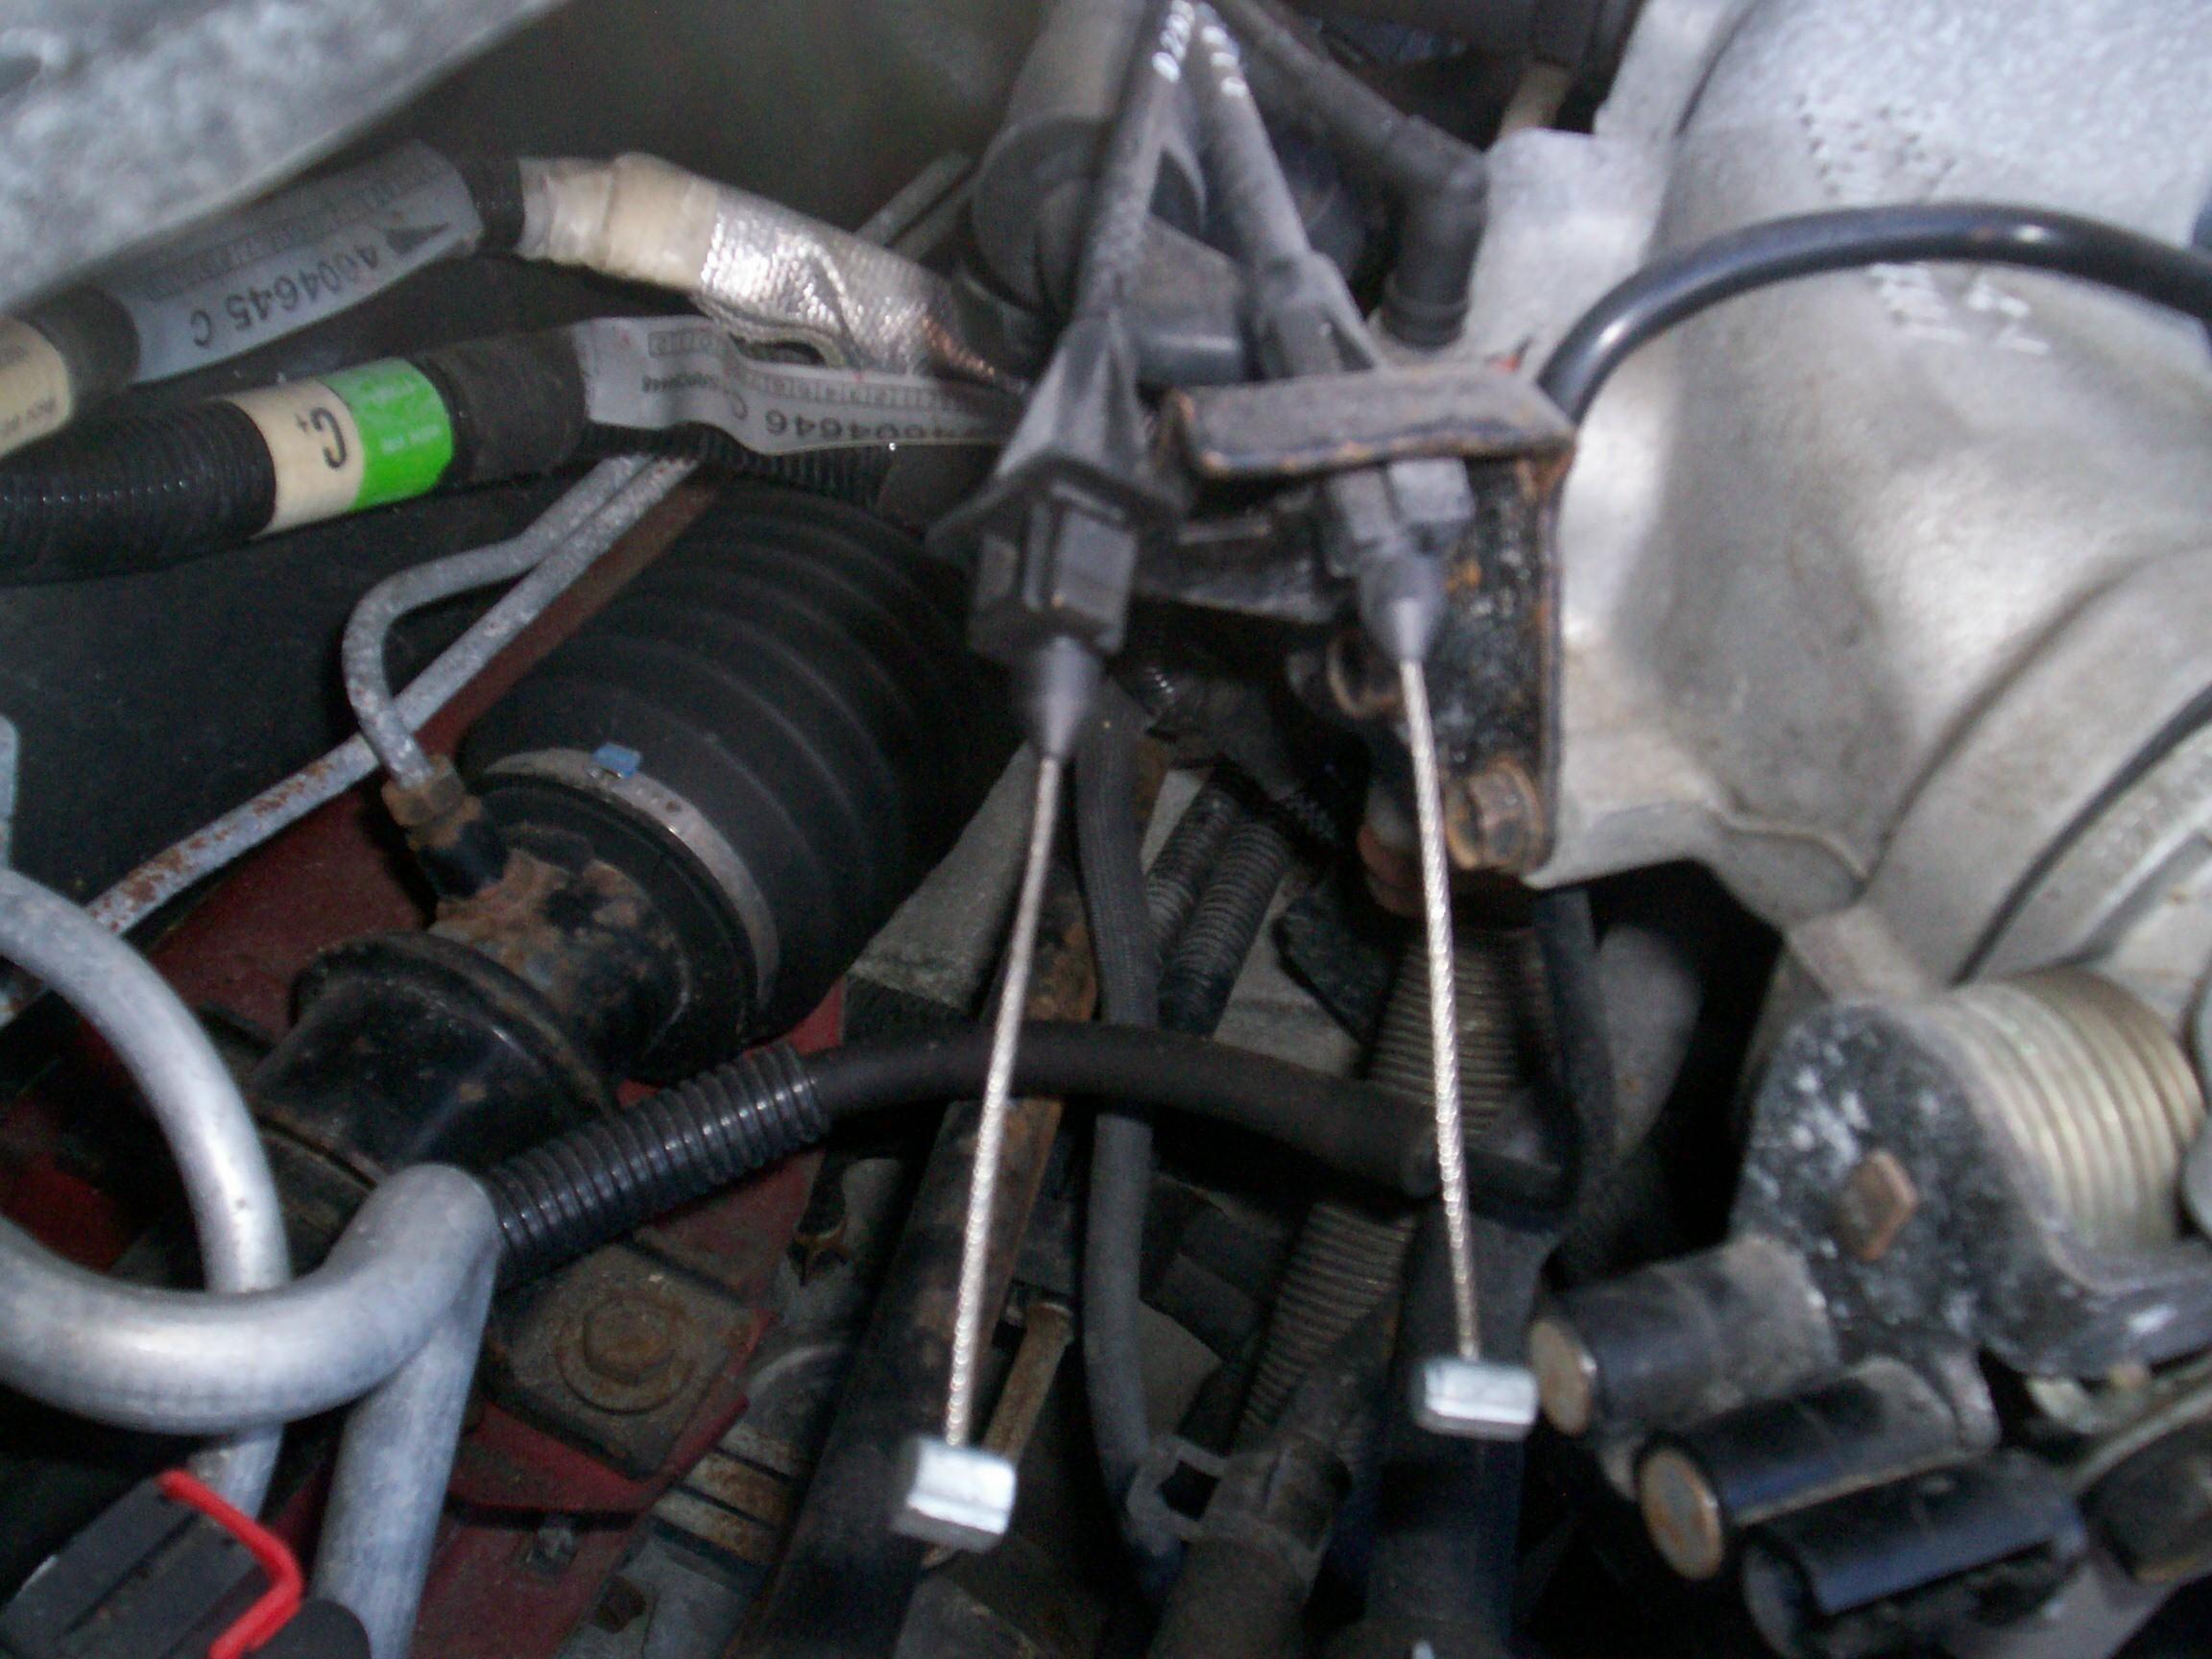 Now
it was time to puzzle over the throttle and cruise control cables. The
manuals and some observation allowed me to figure how to get them
disconnected from the throttle body and backed out of the mounting
bracket. A hand full of hoses and electrical connectors were removed
next and the plenum was unbolted from the intake manifold.
Now
it was time to puzzle over the throttle and cruise control cables. The
manuals and some observation allowed me to figure how to get them
disconnected from the throttle body and backed out of the mounting
bracket. A hand full of hoses and electrical connectors were removed
next and the plenum was unbolted from the intake manifold.
 Tried
to lift off the intake manifold plenum and throttle body assembly.
Something was still hooked up and blocking progress. Turned out to be a
heat tube from the exhaust manifold held unto the bottom back of the
plenum with two capscrews and a flange. Hard to get at with a wrench. I
got the bolts out but I'm not looking forward to getting these bolts
started during reassembly.
Tried
to lift off the intake manifold plenum and throttle body assembly.
Something was still hooked up and blocking progress. Turned out to be a
heat tube from the exhaust manifold held unto the bottom back of the
plenum with two capscrews and a flange. Hard to get at with a wrench. I
got the bolts out but I'm not looking forward to getting these bolts
started during reassembly.
 I
can now see the fuel lines where they attach to the fuel rails with
"quick disconnect" fittings. My first runnup against a "quick
disconnect" was Renegade's hydraulic clutch line. I came away from that
experience beaten like a rented mule. Time fer some study. I put tape
on the manifold and hose openings. I will have to get new hoses as
several were dryrotted and fell apart when I tried to remove them.
I
can now see the fuel lines where they attach to the fuel rails with
"quick disconnect" fittings. My first runnup against a "quick
disconnect" was Renegade's hydraulic clutch line. I came away from that
experience beaten like a rented mule. Time fer some study. I put tape
on the manifold and hose openings. I will have to get new hoses as
several were dryrotted and fell apart when I tried to remove them.
November 30th 2008 When I was up at the warehouse, exchanging Renegade for BillyBob this morning, I picked up my universal disconnect tool kit from otctools.com. There is actually an illustration in the Chilton manual using a Chrysler disconnect tool on the fuel rail fittings. I picked the closest tool I could find in my kit and went at it. Got one fitting disconnected but no joy with the other. There are too many obstructions and I can't get the tool or my hand in there. The fuel rails are going to have to come off to get access. That's a job fer 'nother day. There's a storm front rolling in from the west and it promises to be foul weather here in the shadetree garage before long.
 December
27th 2008 It's a good
weather day here in the shadetree garage. 'Bout a month back, I
purchased a new product to clean and protect the Deerslayer's flat
primer surface. Wash
Wax All by Aero Cosmetics. I was so pleased with this stuff
that I'm using it on all the vehicles. Easy to use - spray on, agitate,
wipe off, and it works on most any surface. Cleans and leaves a UV
protective coating. The stronger degreaser version dresses wheels and
tires nicely. I'm hooked. I gave BettyLou her first treatment with this
stuff this morning. Not much else was accomplished. Beer of the day is
Lancaster Brewing Company's Milk Stout.
December
27th 2008 It's a good
weather day here in the shadetree garage. 'Bout a month back, I
purchased a new product to clean and protect the Deerslayer's flat
primer surface. Wash
Wax All by Aero Cosmetics. I was so pleased with this stuff
that I'm using it on all the vehicles. Easy to use - spray on, agitate,
wipe off, and it works on most any surface. Cleans and leaves a UV
protective coating. The stronger degreaser version dresses wheels and
tires nicely. I'm hooked. I gave BettyLou her first treatment with this
stuff this morning. Not much else was accomplished. Beer of the day is
Lancaster Brewing Company's Milk Stout.
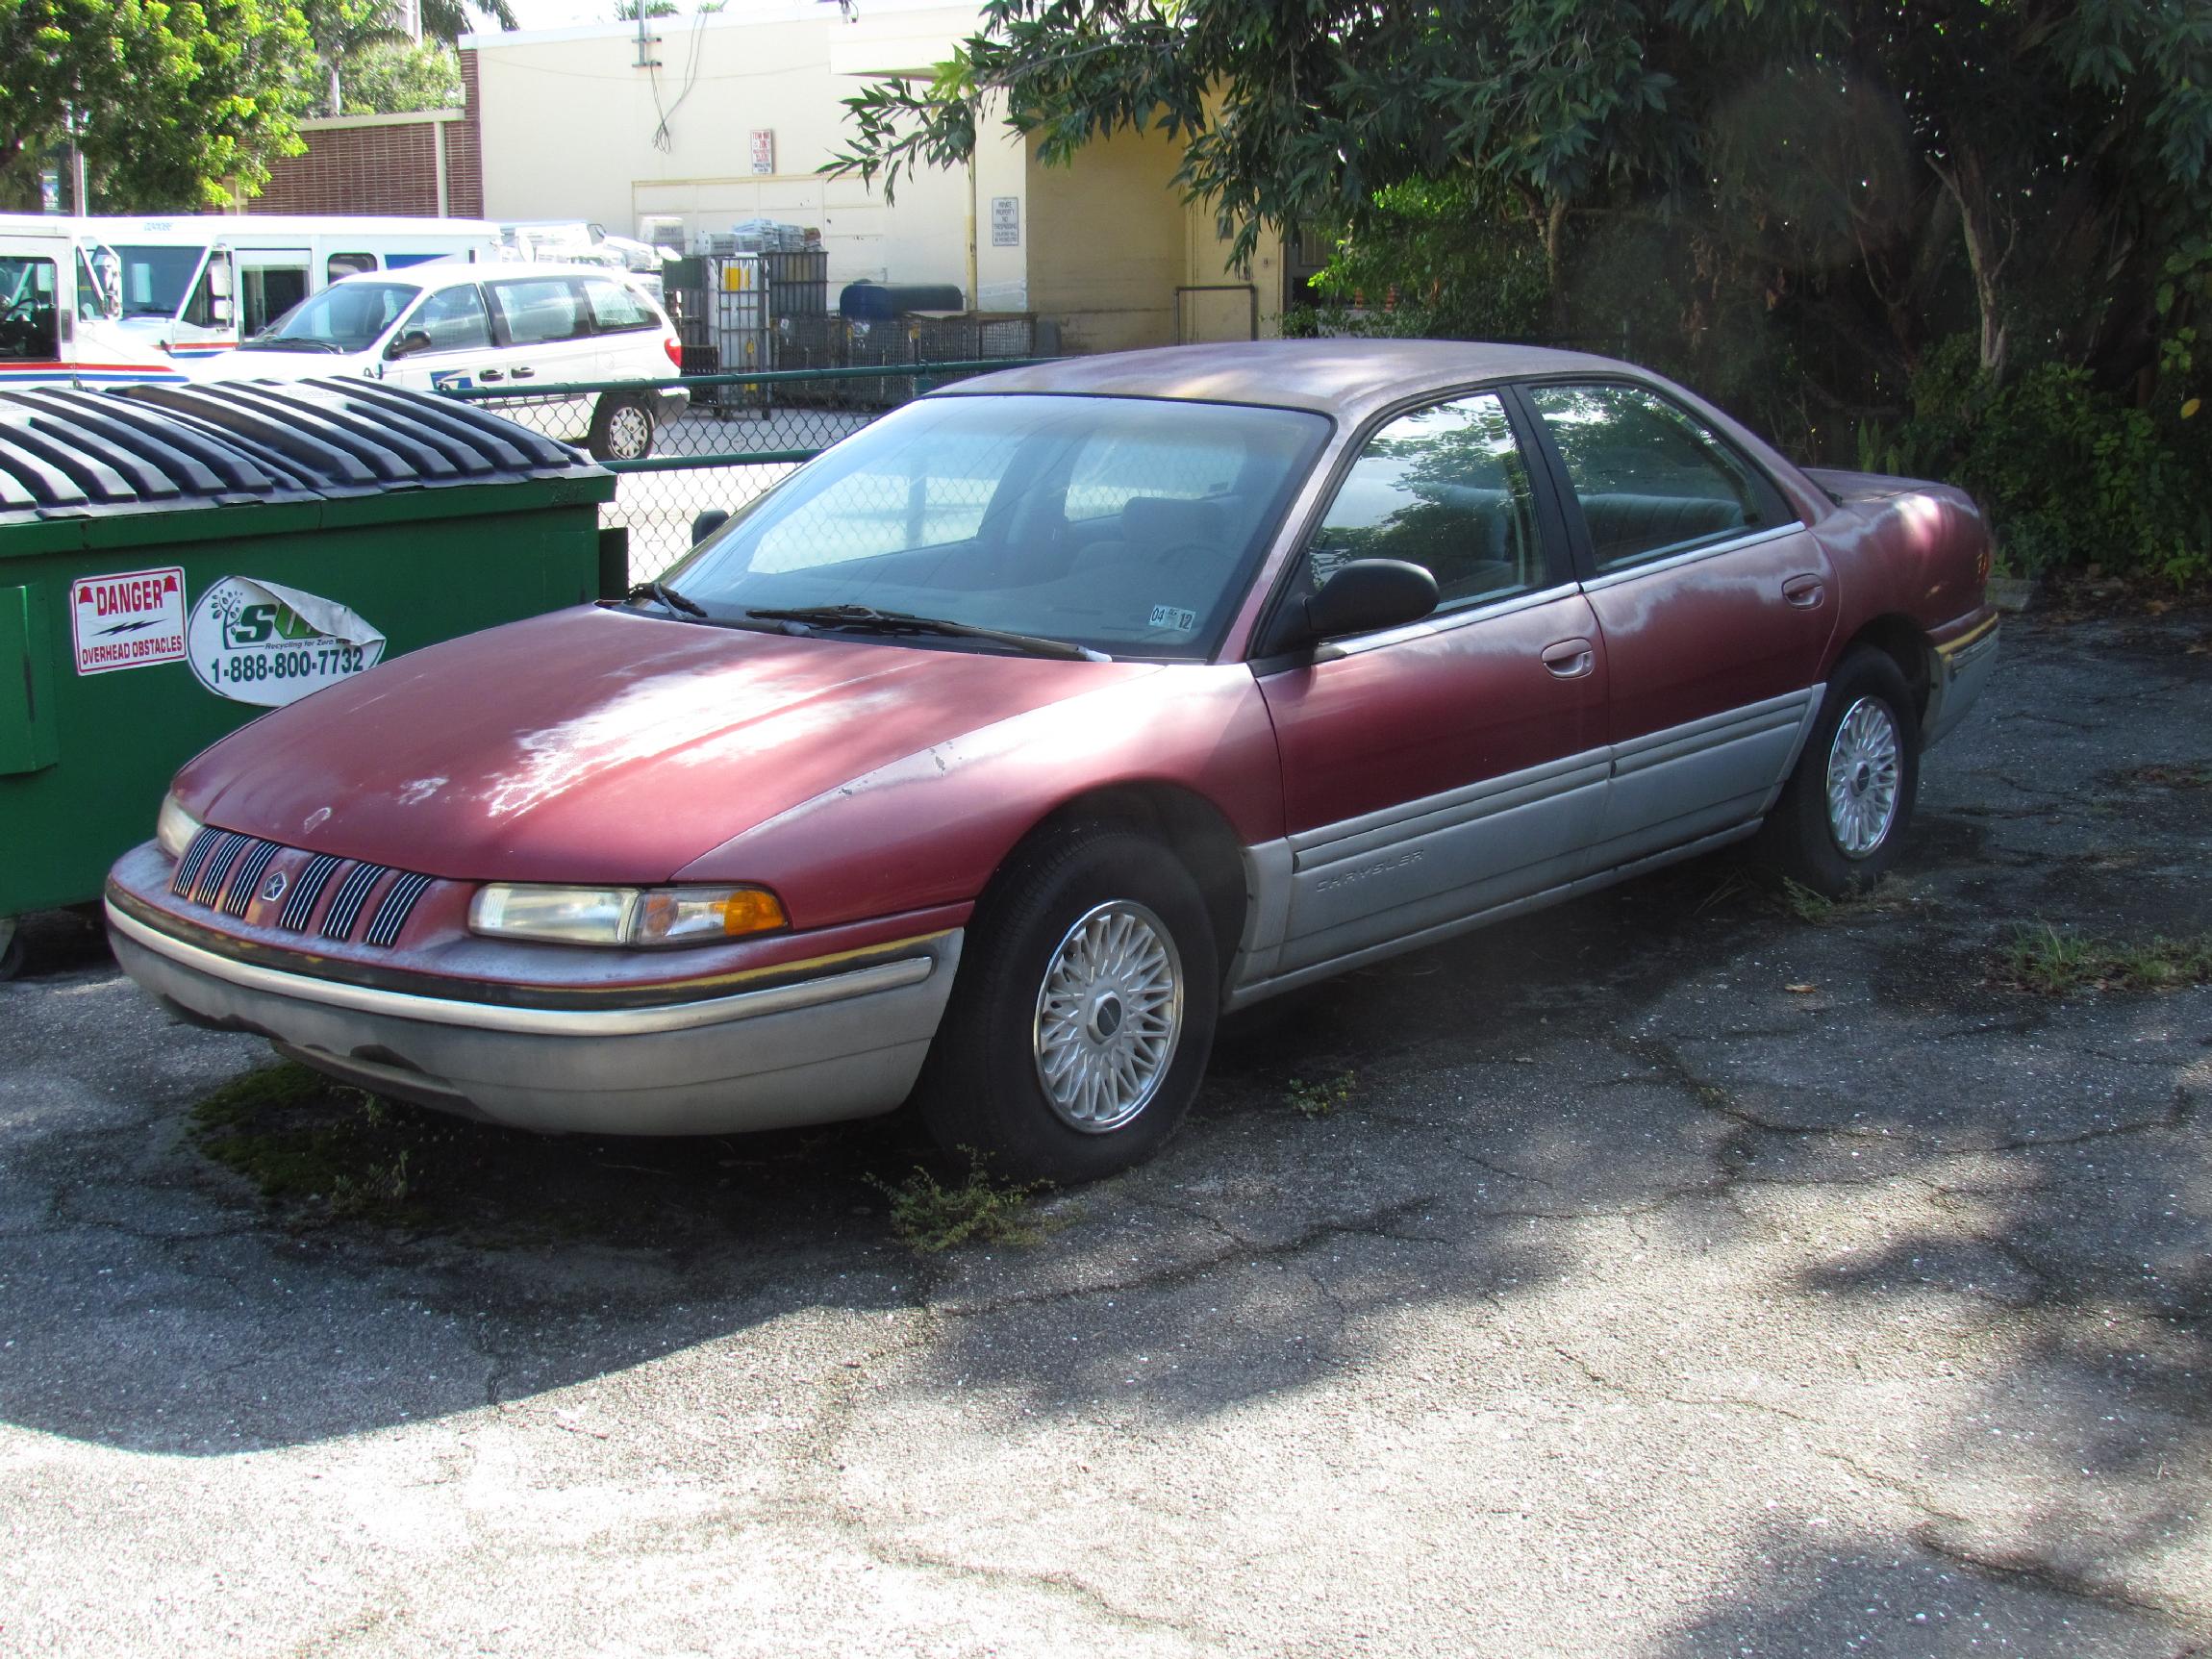
January 12th 2011 Time is marchin' on and I'm doin' some website housecleaning here at the BillyBob garage. Haven't done any work on BettyLou in the last two years. She sits, forlorn and patient, behind the Krash Lab. Weeds are trying to grow up under her through the asphalt. Some skateboard punks have put some dents in her by walking on her hood and roof. Like Rodney Dangerfield, she gets no respect. I have not renewed registration or insurance on BettyLou this year due to obamanomics putting a big pinch on me. At some point, she will be trailered to the new BillyBob Shop but that may be a year or more in the future. There's no room there for her right now. This log entry has been awaiting posting for a long time and I decided to get it out there so we can start out fresh when I can afford to direct my attention to BettyLou again.
 Update:
August
7th 2016
At the beginning of the Obama years, all four of my vehicles were
running. Now, near the end, none of them are running and my '93
Chrysler Concorde was the first to break down with rusted out fuel and
brake lines. At first I planned to repair her but funds dried up to the
point I couldn't even keep my trucks on the road. Things are slightly
better now and I'm working on the other rides but BettyLou is a
casualty. Our office is soon moving to make way for new construction
and I have to get BettyLou ready to be flat bedded away. to the
scrapyard.
Update:
August
7th 2016
At the beginning of the Obama years, all four of my vehicles were
running. Now, near the end, none of them are running and my '93
Chrysler Concorde was the first to break down with rusted out fuel and
brake lines. At first I planned to repair her but funds dried up to the
point I couldn't even keep my trucks on the road. Things are slightly
better now and I'm working on the other rides but BettyLou is a
casualty. Our office is soon moving to make way for new construction
and I have to get BettyLou ready to be flat bedded away. to the
scrapyard.
 Update:
November
22nd 2016 The time has
come to say goodbye to BettyLou. She is the last to leave the old
office "Krash Lab" site. The shade tree I used to work under on
weekends has already been ripped out and demolition starts
today on the three buildings on the site, including our old
office.
Update:
November
22nd 2016 The time has
come to say goodbye to BettyLou. She is the last to leave the old
office "Krash Lab" site. The shade tree I used to work under on
weekends has already been ripped out and demolition starts
today on the three buildings on the site, including our old
office.
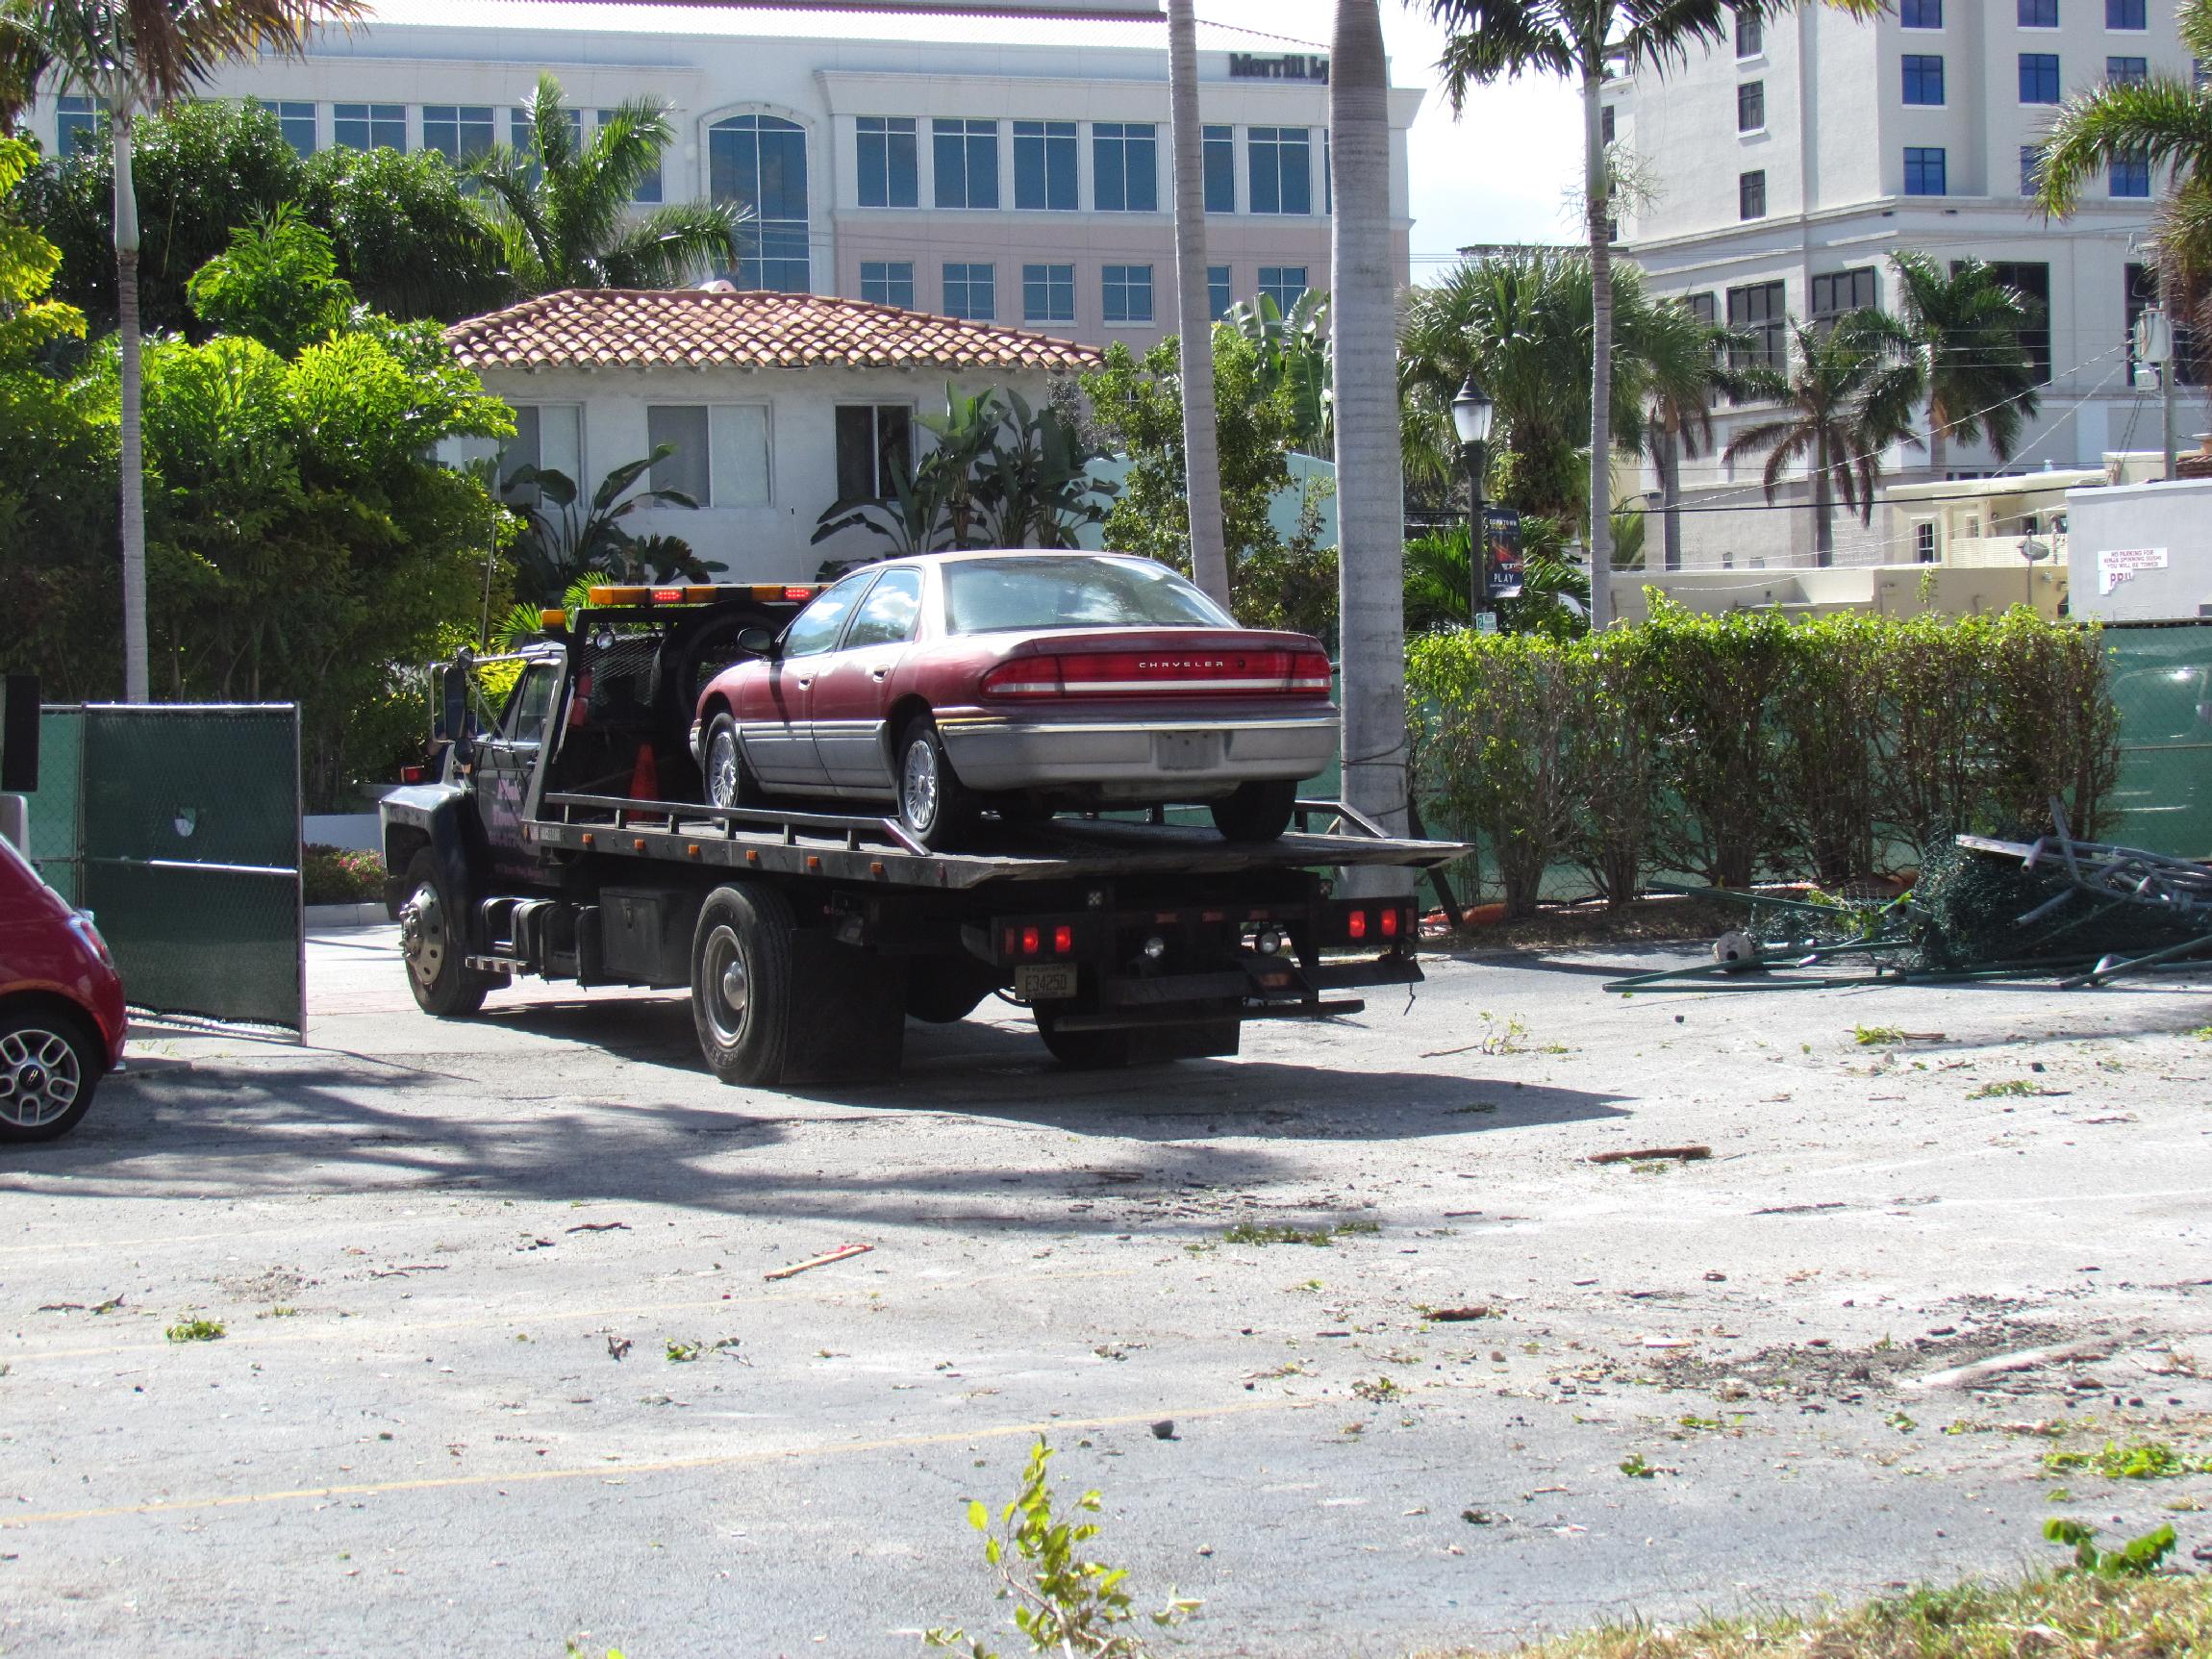 The
'93 Chrysler Concorde was my parents' last car. Dad drove it little
before he bacame too sick and Mom drove for the ten years she lived
after Dad was gone. It only had nineteen thousand miles on it but the
bottom was rusted out. The good news is that I'm now down to three
non-running vehicles instead of four. This
puts the lights out in the BettyLou section of the BillyBob Shop for
the last time.
The
'93 Chrysler Concorde was my parents' last car. Dad drove it little
before he bacame too sick and Mom drove for the ten years she lived
after Dad was gone. It only had nineteen thousand miles on it but the
bottom was rusted out. The good news is that I'm now down to three
non-running vehicles instead of four. This
puts the lights out in the BettyLou section of the BillyBob Shop for
the last time.
| < Back
to Intro |
You can email me at ![]() webmaster@laroke.com
webmaster@laroke.com
Issued Saturday January 15, 2011
Updated Wednesday April 25, 2018
copyright © 1996-2018 Larry Robert Kephart all rights reserved
| | LRK Home | | Bio Info | | Krash Khronicles | | LAROKE | |
| | BettyLou | | BillyBob's Garage | | Rat Patrol | | Deerslayer | | Elvira | |
| | Land of the Free and Home of the Brave | |
| | Keppylou's Art | | WWI Soldier's Diary | |